A little diagram explaining what i’m using to get a secure mqtt owntracks setup. (reinstall)
Mobile connects with certificates and password to my server in DMZ using port 8883 (no sockets activated at the moment)
Mqtt server in DMZ connects via a bridge to my internal mqtt server. (Both Mosquitto)
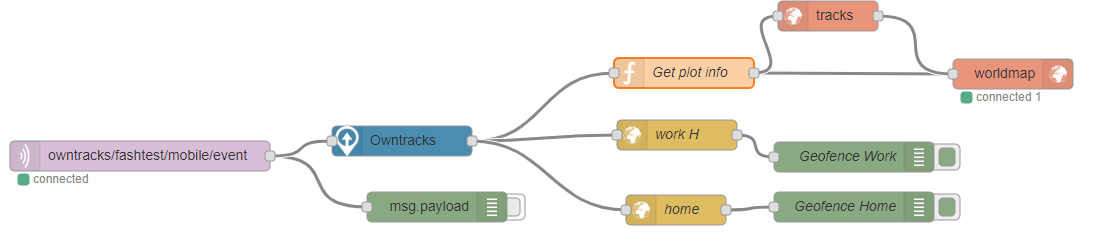
Node-red using a worldmap plugin displays the current position of my mobile. Coordinates are stored in a InfluxDB and geolocation is being used to activate/de-activate other node-red nodes.
./generate-CA.sh # creates ca.crt and server.{key,crt}
./generate-CA.sh mqttserver # creates server certs
./generate-CA.sh client workstation # creates client certs
./generate-CA.sh client mobile # creates mobile cert
NOTE: My workstation client is MQTT-explorer, no need to change anything For owntracks on your mobile you need a P12 certicate, thats a combined cert+key certificate.
TLS mosquitto example, change where needed. (this is a multi setup, portforward ONLY 8883 to this instance) 1883 is only for internal bridge communication.
# Place your local configuration in /etc/mosquitto/conf.d/
#
# A full description of the configuration file is at
# /usr/share/doc/mosquitto/examples/mosquitto.conf.example
pid_file /var/run/mosquitto.pid
persistence true
persistence_location /var/lib/mosquitto/
# Plain MQTT protocol
listener 1883
# End of plain MQTT configuration
# MQTT over TLS/SSL
listener 8883
cafile /etc/mosquitto/certs/ca.crt
certfile /etc/mosquitto/certs/server.crt
keyfile /etc/mosquitto/certs/server.key
allow_anonymous false
password_file /etc/mosquitto/passwords
# End of MQTT over TLS/SLL configuration
listener 9001
protocol websockets
# End of plain Websockets configuration
# WebSockets over TLS/SSL
listener 9883
protocol websockets
cafile /etc/mosquitto/certs/ca.crt
certfile /etc/mosquitto/certs/server.crt
keyfile /etc/mosquitto/certs/server.key
log_dest file /var/log/mosquitto/mosquitto.log
#include_dir /etc/mosquitto/conf.d
connection bridge-01
address INTERNALIP:1883
topic owntracks/# both 0
Plain internal ‘open’ mosquitto setup only needs bridge config
connection bridge-01
address TLSMOSQUITTOINSTANCE-IP:1883
topic # in 2
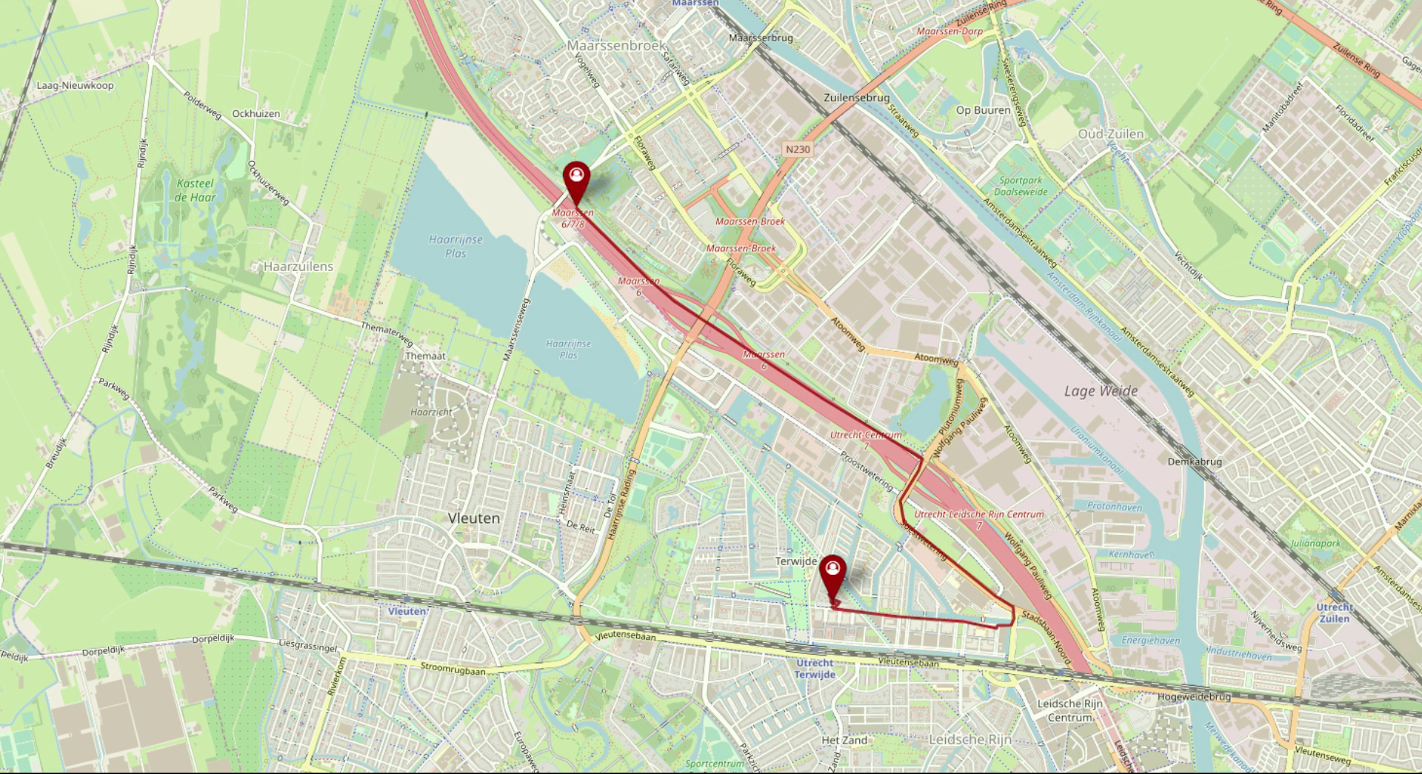
Node-red Flow
Nov 2019 example of a track in nodered (A2 to our old home)
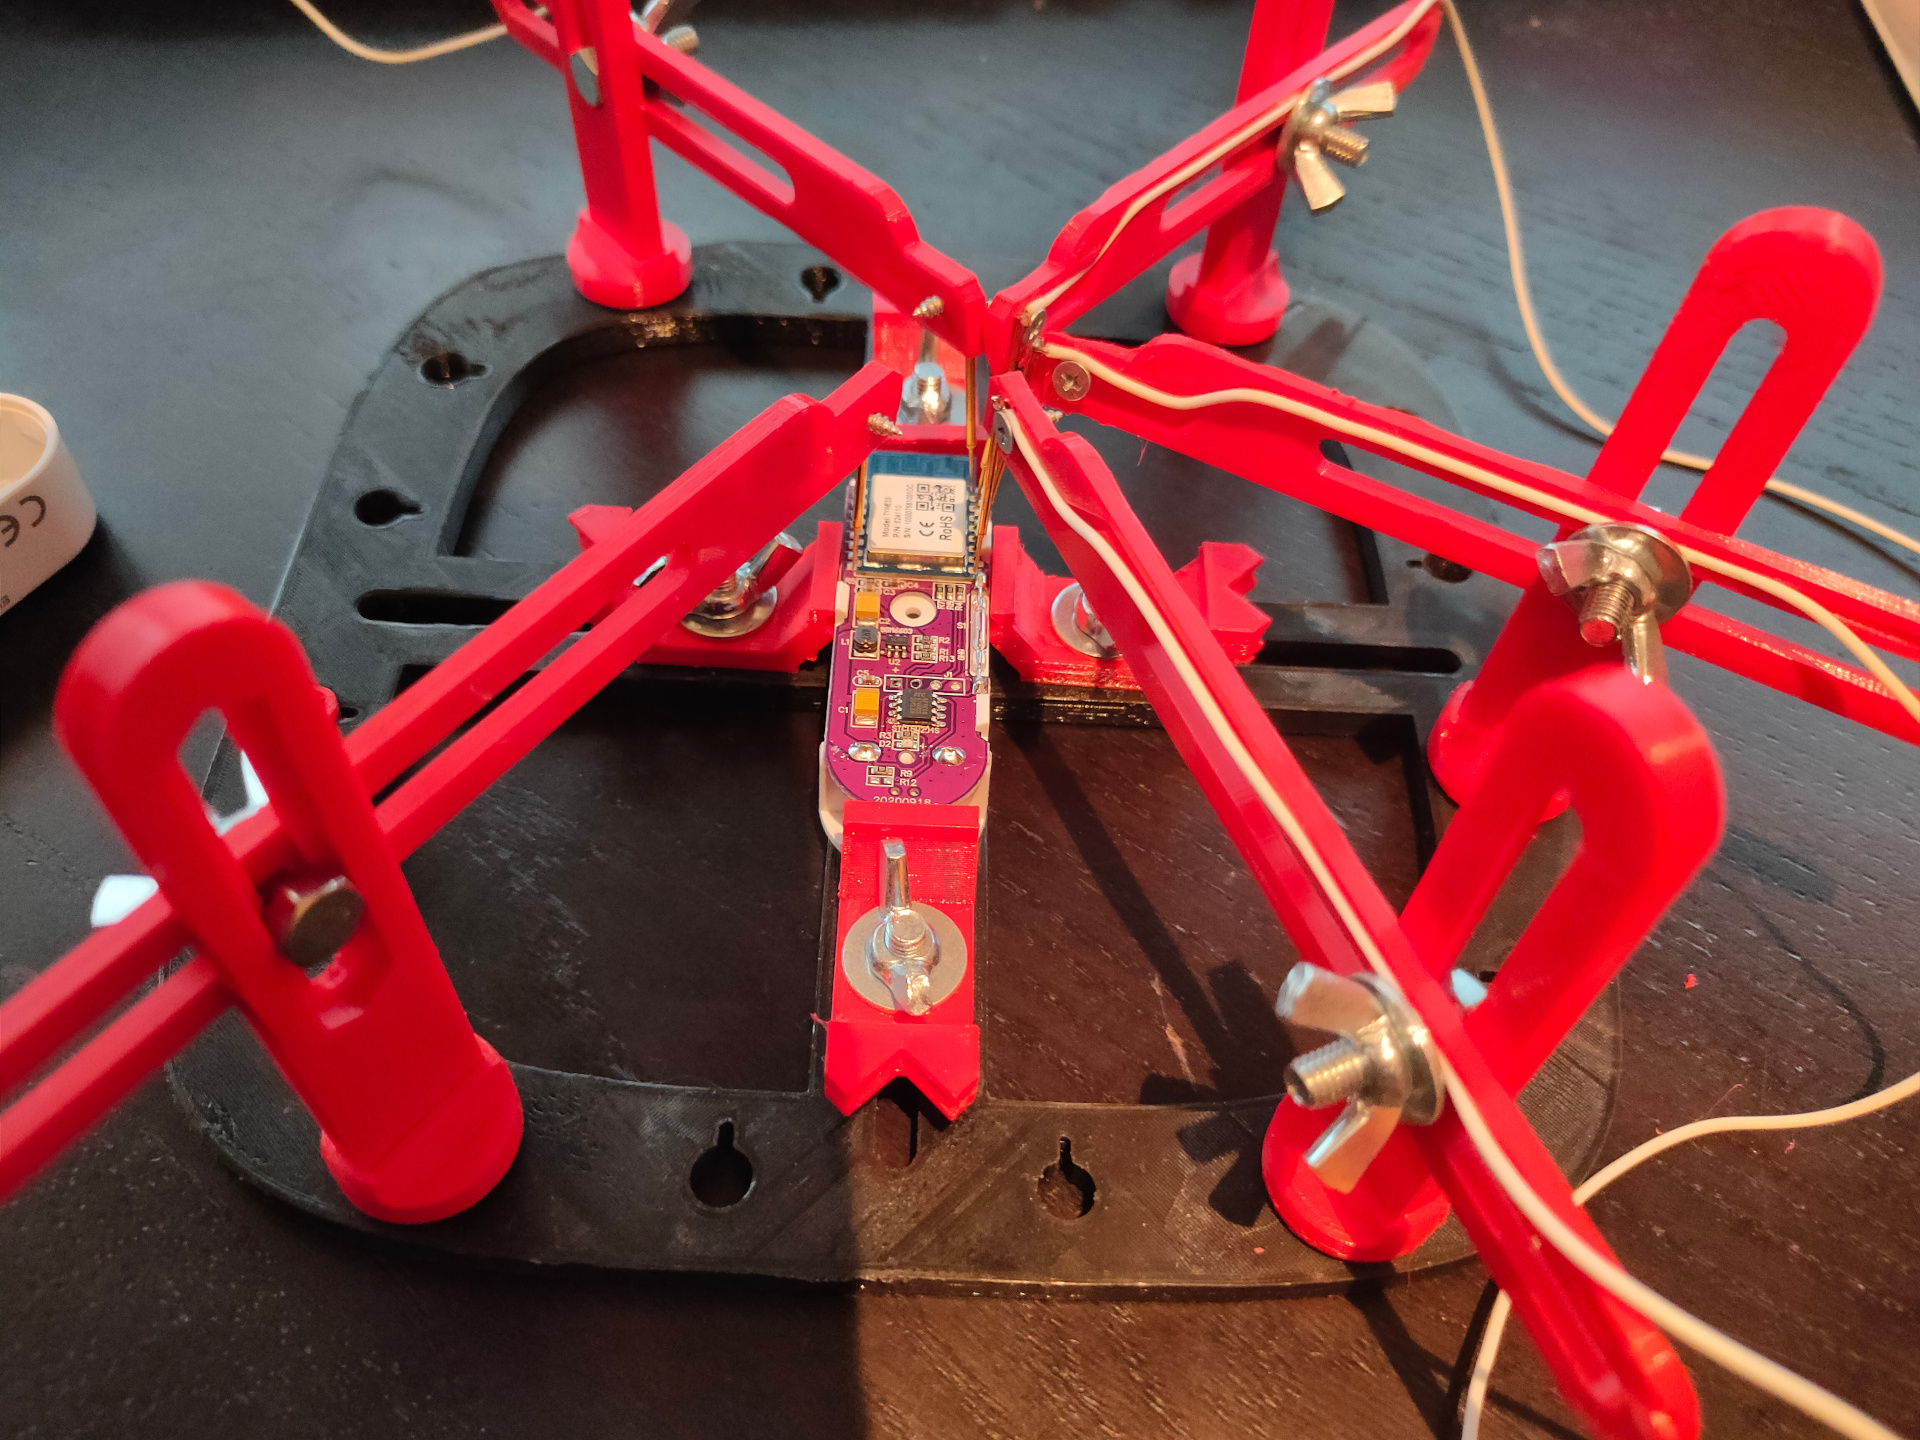
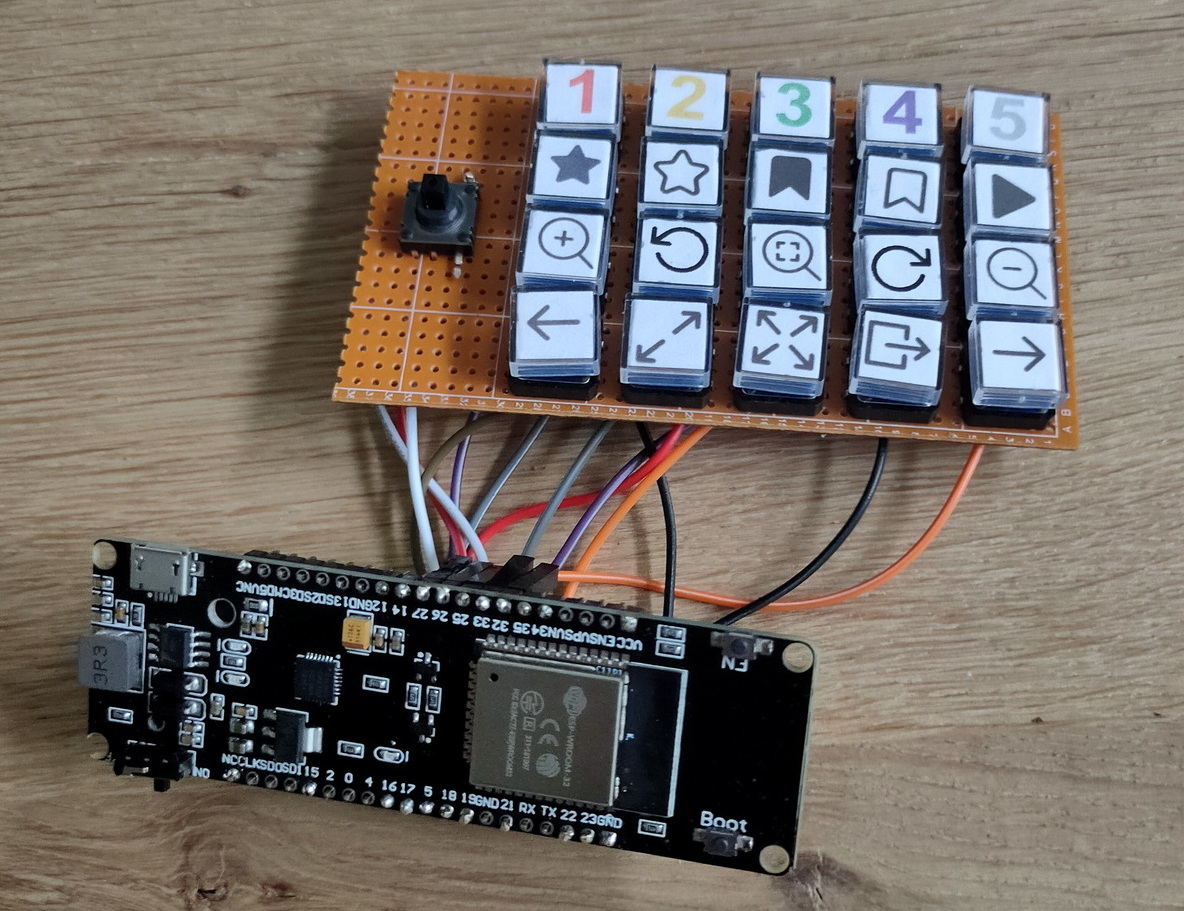
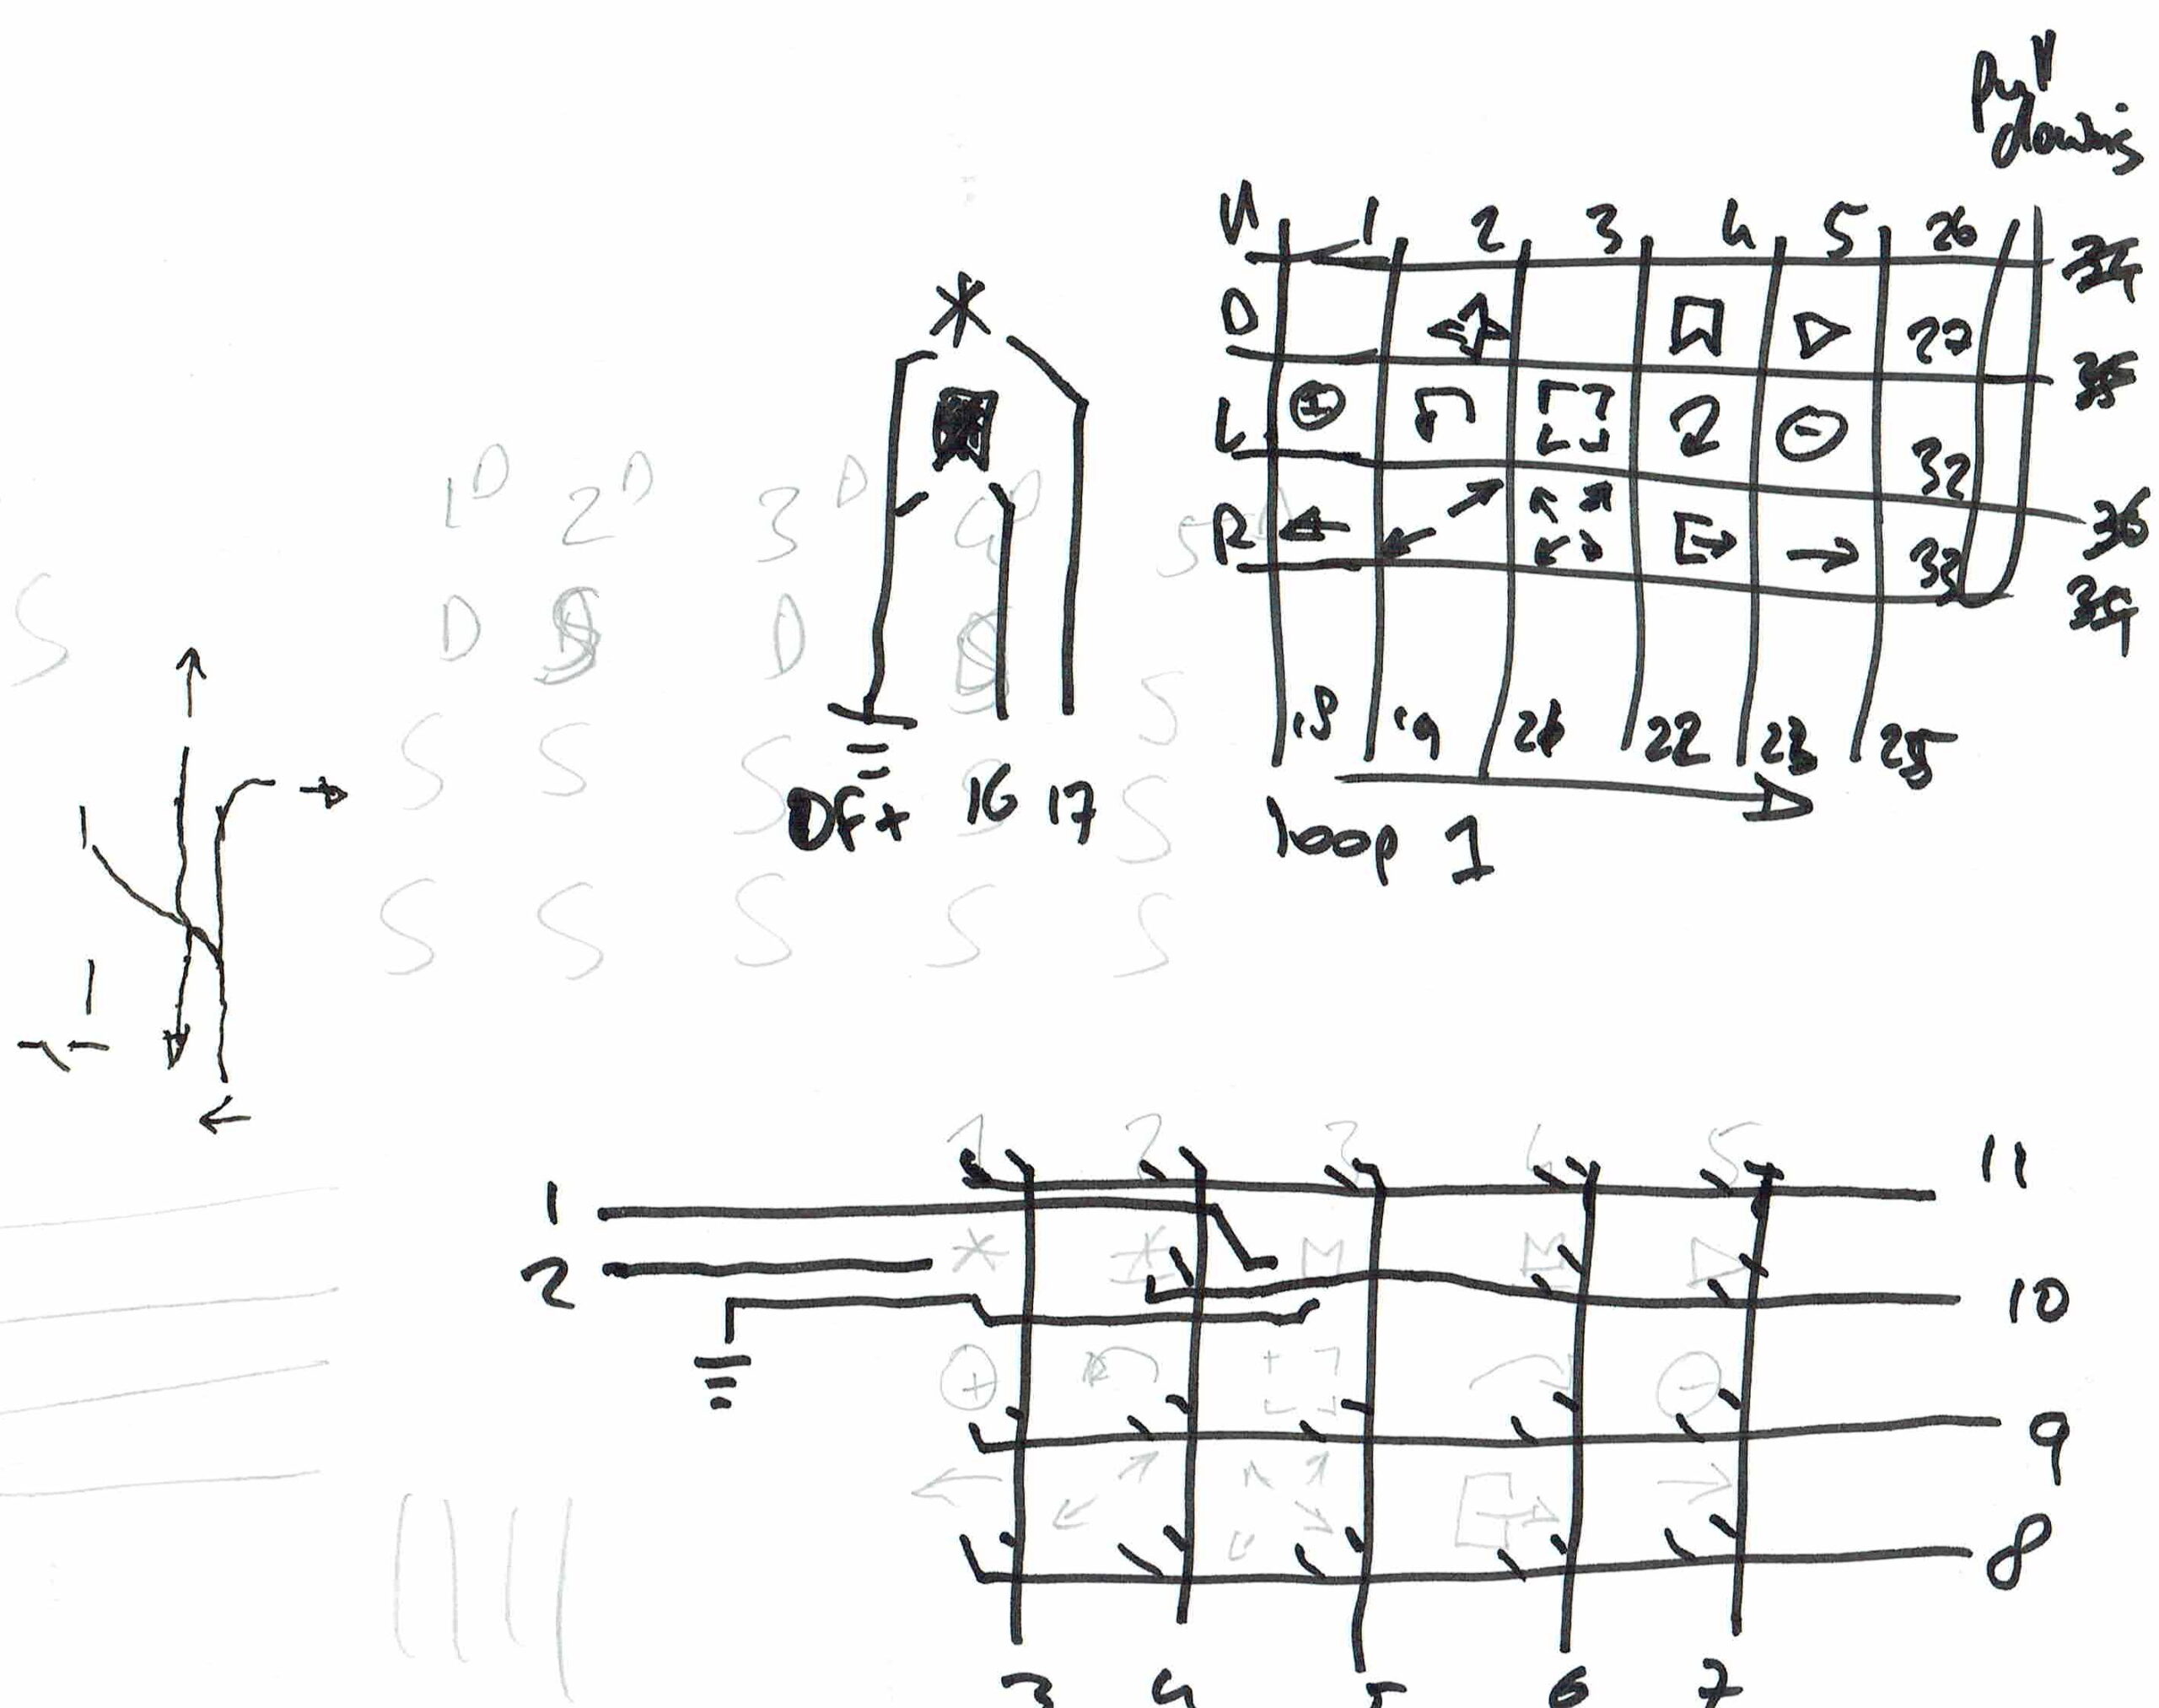
Put the box flat on the table to switch off. When you put it on one side, it will controll your lights brightness. 20,40,60,80 and 100%, just by rotating and putting it down on its sides.
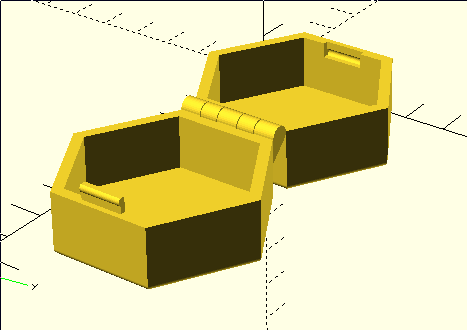
3D printed case
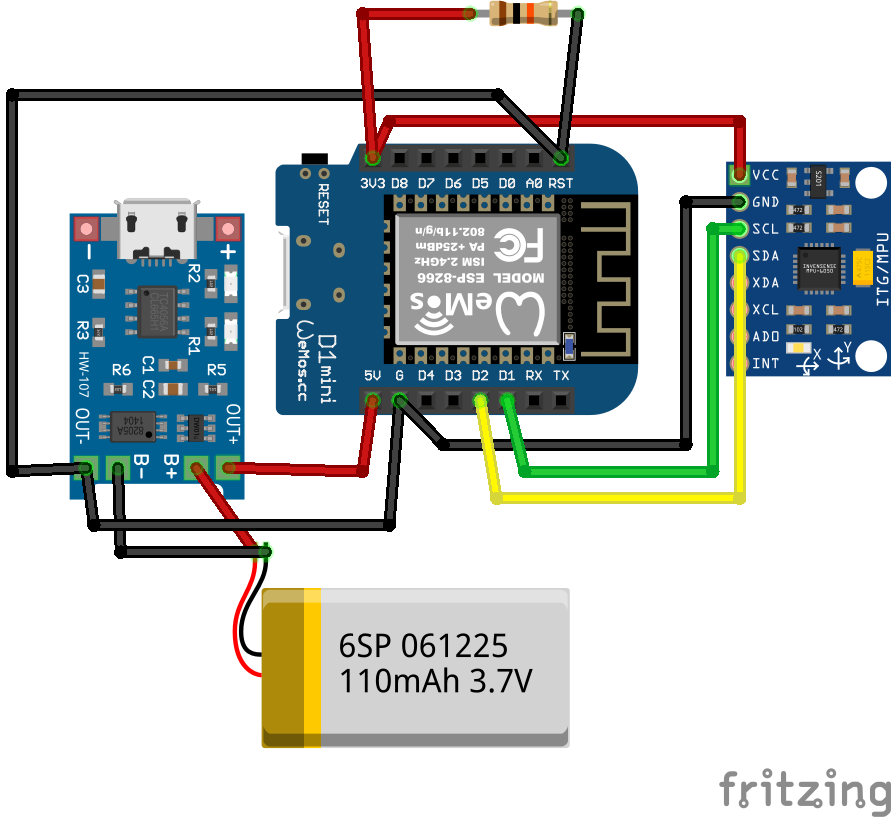
Schematics (without the wireless charging part)
Wireless part
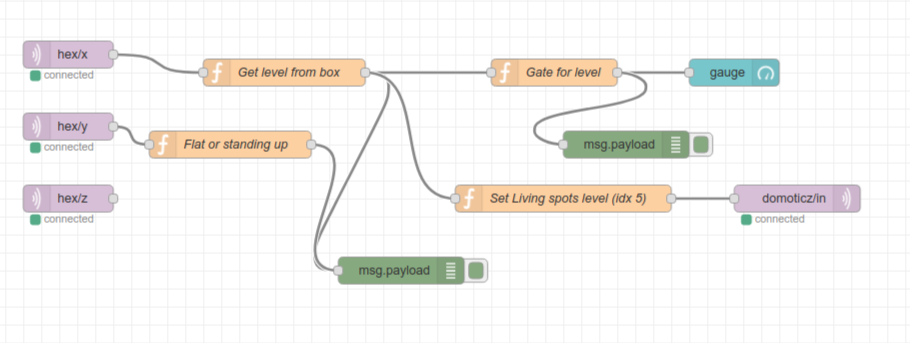
Node-Red Controll part (source below)
Nice to have’s : Arduino-sleep mode, wakeup with a movement sensor.
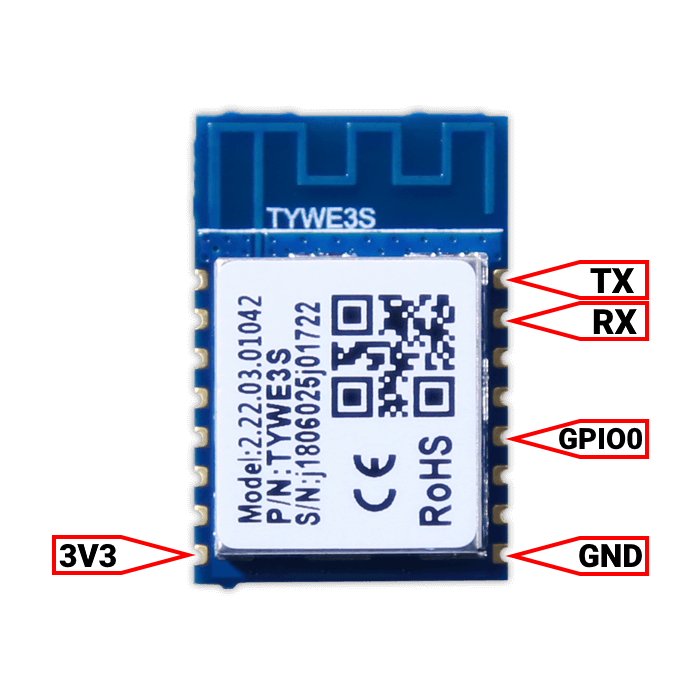
Arduino Code
#include <Wire.h>
//#include <SPI.h>
#include <PubSubClient.h>
//#include <string.h>
//#include <stdio.h>
#include <ESP8266WiFi.h>

// Wifi settings
const char* ssid = "xxxxxx";
const char* password = "xxxxxxxxxx";
const char* mqtt_server = "10.1.0.17";

// I2C address of the MPU-6050 - 0x68 or 0x69 if AD0 is pulled HIGH
const int MPU = 0x68;
int16_t AcX, AcY, AcZ, GyX, GyY, GyZ;
float gForceX, gForceY, gForceZ, rotX, rotY, rotZ;

// Wifi MAC address
byte mac[]= {  0xDE, 0xED, 0xBA, 0xFE, 0xFE, 0xED };

WiFiClient espClient;
IPAddress ip;
PubSubClient mqttClient(espClient);

// IP address of your MQTT server
const char* server = "10.1.0.17";
//const char* outTopic = "test/";
//const char* server = "iot.eclipse.org";

void dataReceiver(){
  Wire.beginTransmission(MPU);
  Wire.write(0x3B);  // starting with register 0x3B (ACCEL_XOUT_H)
  Wire.endTransmission(false);
  Wire.requestFrom(MPU,14,true);  // request a total of 14 registers
  AcX = Wire.read()<<8|Wire.read();  // 0x3B (ACCEL_XOUT_H) & 0x3C (ACCEL_XOUT_L)
  AcY = Wire.read()<<8|Wire.read();  // 0x3D (ACCEL_YOUT_H) & 0x3E (ACCEL_YOUT_L)
  AcZ = Wire.read()<<8|Wire.read();  // 0x3F (ACCEL_ZOUT_H) & 0x40 (ACCEL_ZOUT_L)
  GyX = Wire.read()<<8|Wire.read();  // 0x43 (GYRO_XOUT_H) & 0x44 (GYRO_XOUT_L)
  GyY = Wire.read()<<8|Wire.read();  // 0x45 (GYRO_YOUT_H) & 0x46 (GYRO_YOUT_L)
  GyZ = Wire.read()<<8|Wire.read();  // 0x47 (GYRO_ZOUT_H) & 0x48 (GYRO_ZOUT_L)
  processData();
}

void processData(){
  gForceX = AcX / 16384.0;
  gForceY = AcY / 16384.0;
  gForceZ = AcZ / 16384.0;

  rotX = GyX / 131.0;
  rotY = GyY / 131.0;
  rotZ = GyZ / 131.0;
}

void debugFunction(int16_t AcX, int16_t AcY, int16_t AcZ, int16_t GyX, int16_t GyY, int16_t GyZ){
  // Print the MPU values to the serial monitor
  Serial.print("Accelerometer: ");
  Serial.print("X="); Serial.print(gForceX);
  Serial.print("|Y="); Serial.print(gForceY);
  Serial.print("|Z="); Serial.println(gForceZ);
  Serial.print("Gyroscope:");
  Serial.print("X="); Serial.print(rotX);
  Serial.print("|Y="); Serial.print(rotY);
  Serial.print("|Z="); Serial.println(rotZ);
}

void reconnect() {
  // Loop until we're reconnected
  while (!mqttClient.connected()) {
    Serial.print("Attempting MQTT connection...");
    // Attempt to connect
    if (mqttClient.connect("arduinoClient")){
      Serial.println("connected");
    }
    else {
      Serial.print("failed, rc=");
      Serial.print(mqttClient.state());
      Serial.println(" try again in 5 seconds");
//      Wait 5 seconds before retrying
      delay(1000);
    }
  }
}

void setup(){
  Serial.begin(9600);

    setup_wifi();

  Wire.begin(0,2);
  Wire.beginTransmission(MPU);
  Wire.write(0x6B);  // PWR_MGMT_1 register
  Wire.write(0);     // set to zero (wakes up the MPU-6050)
  Wire.endTransmission(true);

  mqttClient.setServer(server, 1883);

//  Ethernet.begin(mac);
//  ip = Ethernet.localIP();

  Serial.println(ip);
  Serial.println(server);
  //delay(1500);
}

char* init(float val){

  char buff[100];

  for (int i = 0; i < 100; i++) {
      dtostrf(val, 4, 2, buff);  //4 is mininum width, 6 is precision
  }
   return buff;

}

void setup_wifi() {

  delay(10);
  // We start by connecting to a WiFi network
  Serial.println();
  Serial.print("Connecting to ");
  Serial.println(ssid);

  WiFi.begin(ssid, password);

  while (WiFi.status() != WL_CONNECTED) {
    delay(500);
    Serial.print(".");
  }

  Serial.println("");
  Serial.println("WiFi connected");
  Serial.println("IP address: ");
  Serial.println(WiFi.localIP());
}

void dataAcc(){

  char mpu6050X[100]= "";
  strcat(mpu6050X,init(gForceX));

  char mpu6050Y[100]= "";
  strcat(mpu6050Y,init(gForceY));

  char mpu6050Z[100]= "";
  strcat(mpu6050Z,init(gForceZ));

  // accelerometer - "topic, mpu6050"
  mqttClient.publish("AcX/", mpu6050X);
  mqttClient.publish("AcY/", mpu6050Y);
  mqttClient.publish("AcZ/", mpu6050Z);
//  mqttClient.publish(outTopic, "text to send via mqtt");
}


void dataGy(){

  char mpu6050X[100]= "";
  strcat(mpu6050X,init(rotX));

  char mpu6050Y[100]= "";
  strcat(mpu6050Y,init(rotY));

  char mpu6050Z[100]= "";
  strcat(mpu6050Z,init(rotZ));

  // gyroscope - "topic, mpu6050"
  mqttClient.publish("GyX/", mpu6050X);
  mqttClient.publish("GyY/", mpu6050Y);
  mqttClient.publish("GyZ/", mpu6050Z);
//  mqttClient.publish(outTopic, "text to send via mqtt");
}

void loop(){
  dataReceiver();
  debugFunction(AcX,AcY,AcZ,GyX,GyY,GyZ);

  if (!mqttClient.connected()) {
    reconnect();
  }

  mqttClient.loop();

  dataAcc();
  dataGy();

  delay(2000);
}
I don’t like cloud enabled devices, except if it is my own cloud!
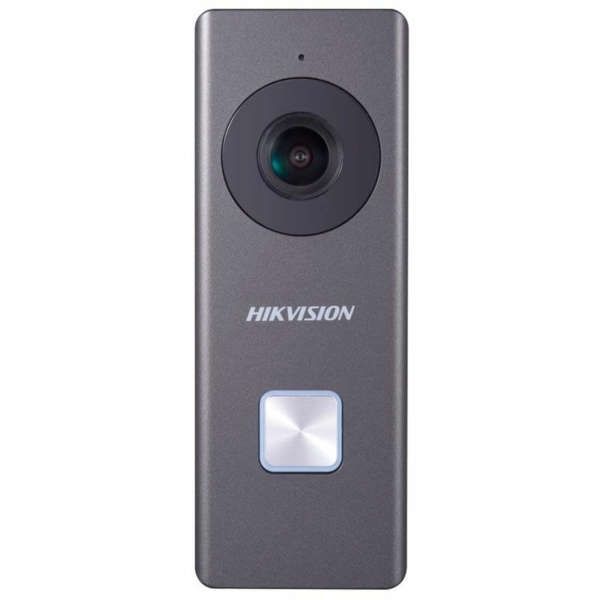
I bought a Hikvision doorcam, when i researched the diverse doorcams where was a hikvision which could use a existing doorchime.
When i got mine in, it did not have this feature. Damn what to do!
Where where several solutions i could think off:
Use as is .. a no-go for me
Offload SSL on a proxy and try to reverse engineer the https communication
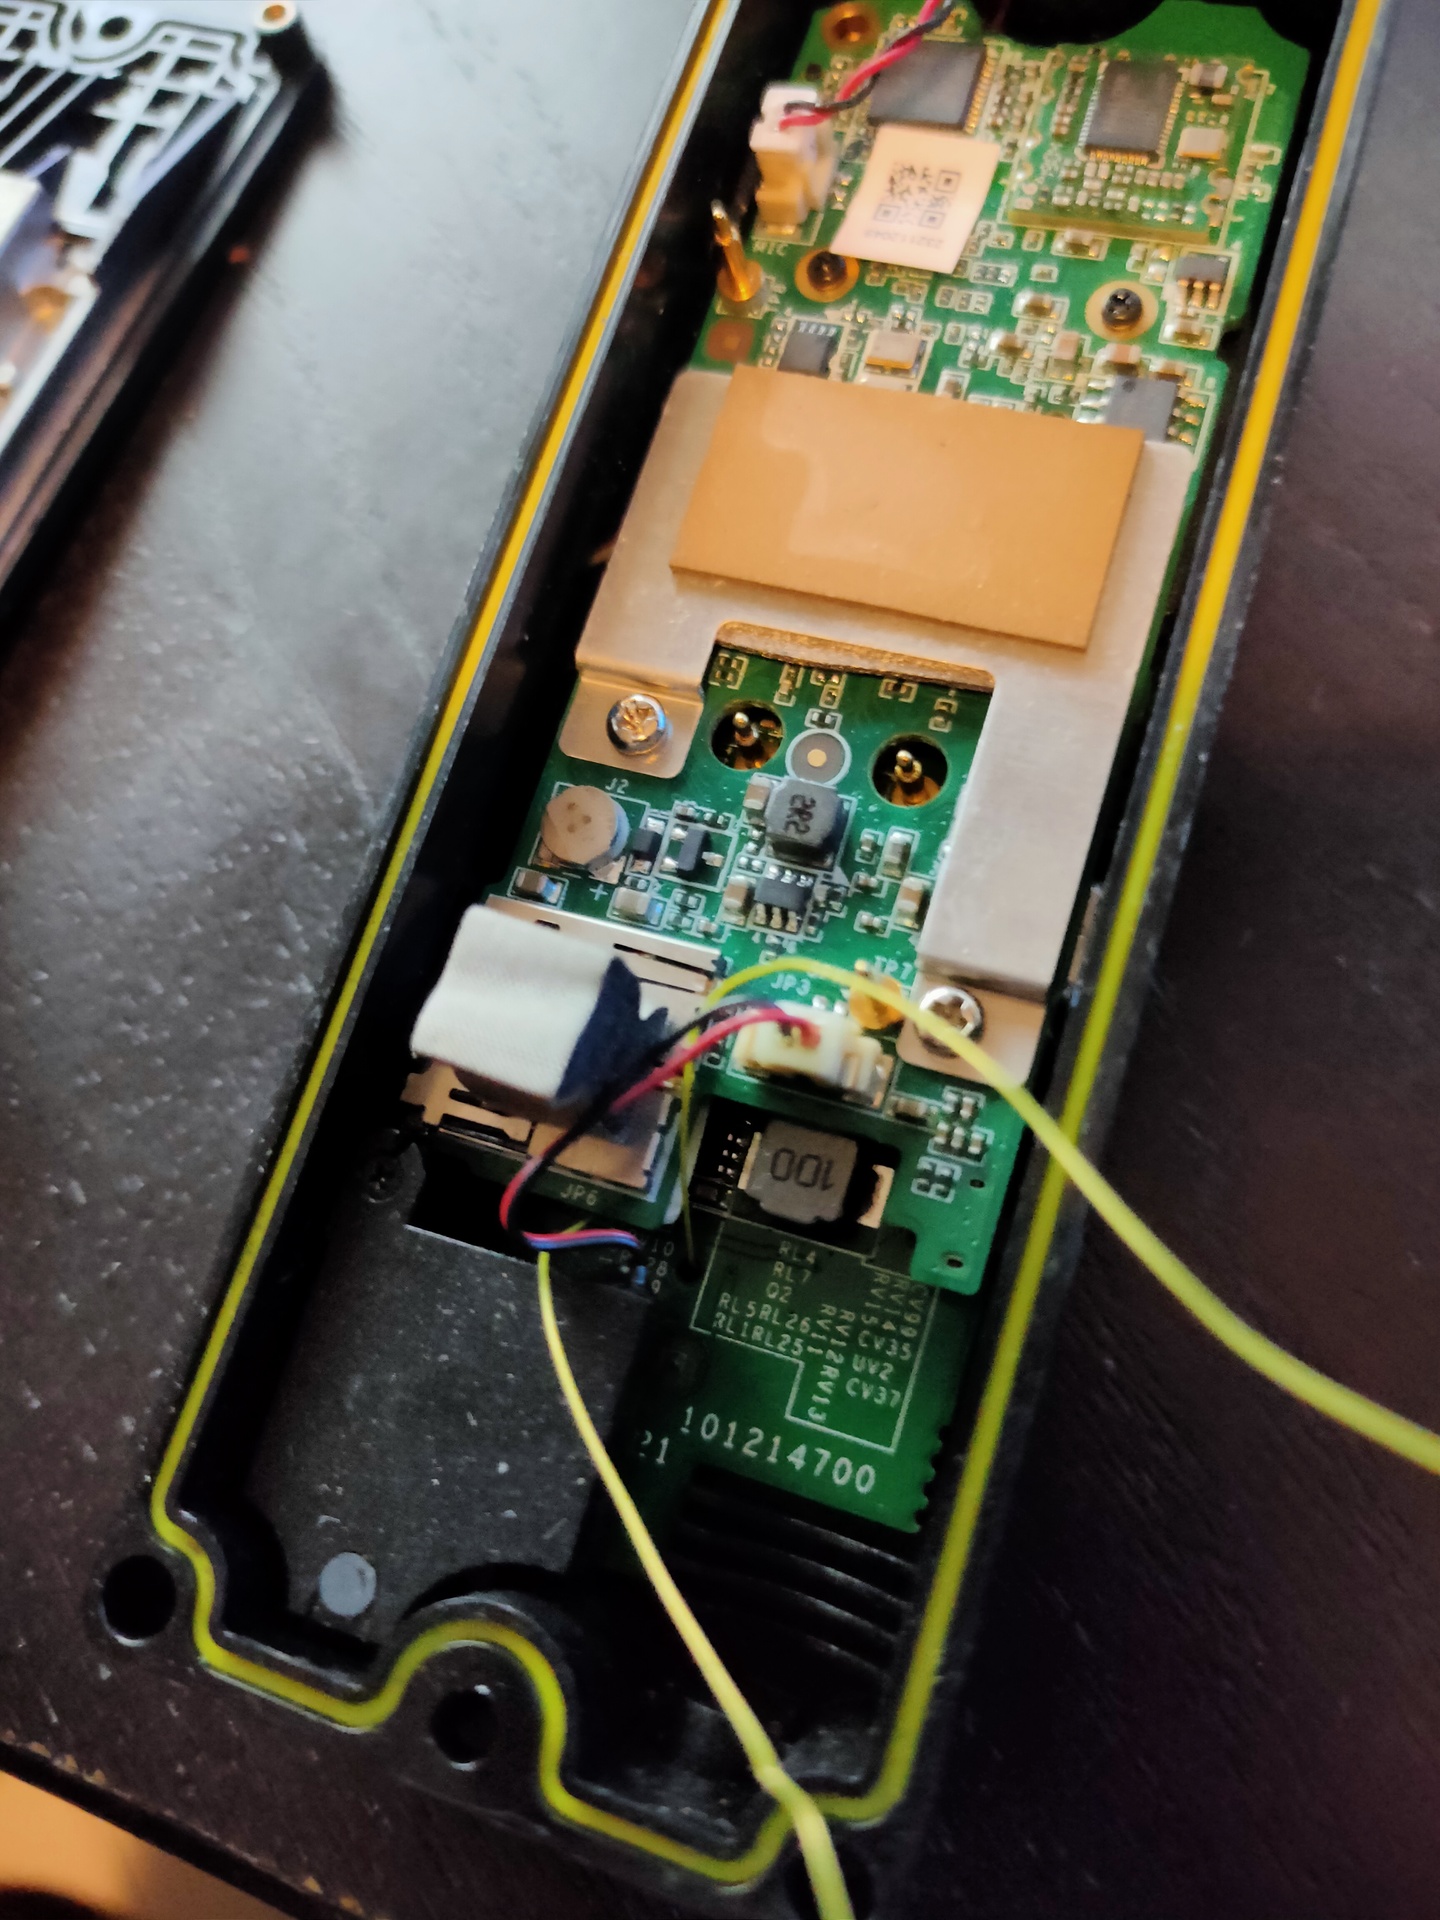
Or a hardware solution
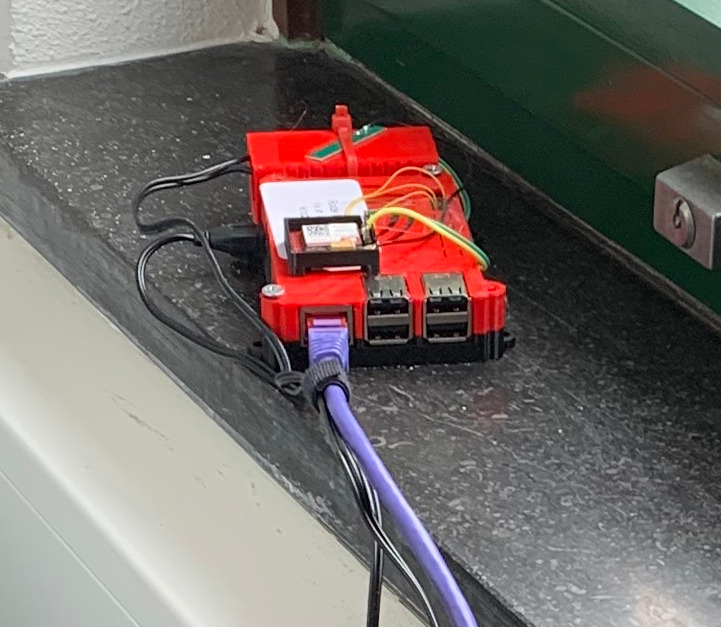
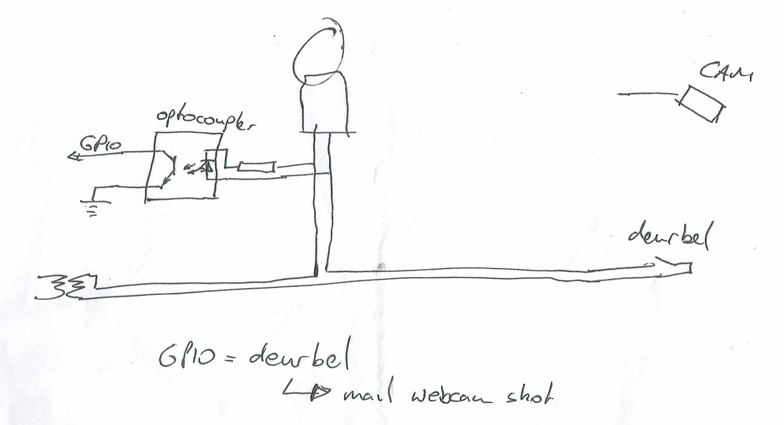
I looked at the electronics and tried to find out how things where connected and where things where you could make use of. I soldered some wires to a little print where the pushbutton was located. Now i could read the button press, video was easily captured by using a RTSP port.
For my home automation i’m using Home Assistant and Domoticz. All 433Mhz Temperature/Humidity are connected to a RFXcom device on two domoticx instances. (Master slave construction)
I’ve made a php script and a bash script to draw all sensors on a floorplan in realtime.
There is also a cron running which takes a snapshot of the generated image every 5 minutes. These images are being converted to MP4 and animated GIF to have a timelapse with all temperatures displayed on a floorplan.
An obfuscated view of the floorplan
The circles are where sensors are placed. Colors are from blue till red, representing the heat. In the center is the measured temperature value.
The (shortened) PHP script: (index.php)
<?php
header('Content-type: image/png');
// This is the floorplan empty ..
$png_image = imagecreatefrompng('plattegrondenmerge.png');
$white = ImageColorAllocate($png_image, 0, 0, 0);

$max = 40;
$min = -10;

// living
// getstate is a bash script (see below which gets the values from domoticz using curl)
// 840 is the domoticz idx
$temp840 = shell_exec('./getstate 840');
// A gray circle will be drawn if the temperature age is > 500 seconds
$age = shell_exec('./new.sh 18 840 500 >/dev/null || echo gray');
// location of circle
$start_x = 950;
$start_y = 760;
$line = $temp840 + 10;
// get x-th line from colors
$colorfromlist = shell_exec("tail --lines=$line ./colors2 | head -1");
if(strpos($age, "gray") !== false){
 $colorfromlist = "128,128,128";
};
$colors = explode(",", $colorfromlist);
$color = imagecolorallocatealpha($png_image, $colors[0], $colors[1], $colors[2], 50);
// draw circle
imagefilledellipse ($png_image, $start_x, $start_y, 175, 175, $color);
$start_x = $start_x - 70;
$start_y = $start_y + 15;
// add text
imagettftext($png_image, 24, 0, $start_x, $start_y, $white, './verdana.ttf', $temp840);

// winecellar
$temp840 = shell_exec('./getstate 839');
$age = shell_exec('./new.sh 18 839 700 >/dev/null || echo gray');
$start_x = 560;
$start_y = 840;
$line = $temp840 + 10;
$colorfromlist = shell_exec("tail --lines=$line ./colors2 | head -1");
if(strpos($age, "gray") !== false){
 $colorfromlist = "128,128,128";
};
$colors = explode(",", $colorfromlist);
$color = imagecolorallocatealpha($png_image, $colors[0], $colors[1], $colors[2], 50);
imagefilledellipse ($png_image, $start_x, $start_y, 175, 175, $color);
$start_x = $start_x - 70;
$start_y = $start_y + 15;
imagettftext($png_image, 24, 0, $start_x, $start_y, $white, './verdana.ttf', $temp840);

// ETC ETC

imagesavealpha($png_image, TRUE);

  imagepng($png_image);
  imagedestroy($png_image);
?>
getstate bash script (gets the temperature from domoticz instance1 given an idx)