Tag Archives: homeassistant

Smoke detector (ShellySmoke) notification Home Assistant with friendly-names

Quick ‘n simple post, so I won’t forget.

Multiple triggers in one Automation, use friendly_name to distinguish entities that triggered the notification.

Message send example “Smoke detected ShellySmokeKitchen”

alias: Smoke detected
description: ""
triggers:
  - type: smoke
    device_id: bbd0c2ebb949b38a28c6ecca67fb4ebe
    entity_id: 888d20ea2075873284708125491695b5
    domain: binary_sensor
    trigger: device
  - type: smoke
    device_id: 31bda70d60fc815681fe951469e11a0a
    entity_id: 3a9538b025f7d263b5e145d6f4dda859
    domain: binary_sensor
    trigger: device
  - type: smoke
    device_id: 1a33c981b1dfca13202b5efe0237fea1
    entity_id: 6bf59d8de54a7bdef0bab7daf483221f
    domain: binary_sensor
    trigger: device
  - type: smoke
    device_id: 0496d720c844a5648d8b3789b8f4d093
    entity_id: e635593a29dc9af3977224b54bf19140
    domain: binary_sensor
    trigger: device
conditions: []
actions:
  - action: notify.pushover
    metadata: {}
    data:
      message: Smoke detected  "{{ state_attr(trigger.entity_id, 'friendly_name') }}"
      data:
        priority: 2
        sound: siren
        expire: 300
        retry: 30
mode: single

Using Reolink IPcams for motion detection automations in Home Assistant

I’ve been testing automations using an IPCam instead of a PIR.

If dark, person detected on Reolink camera -> turn on light.

CODE

alias: Motion detect garden
description: ""
triggers:
  - type: motion
    device_id: 3459783a628a0065fd5540af988f0b60
    entity_id: 4f4193f01ceb5c5ec21a2e5bf3f6c9e3
    domain: binary_sensor
    trigger: device
    for:
      hours: 0
      minutes: 0
      seconds: 2
conditions:
  - condition: sun
    before: sunrise
    after: sunset
  - condition: device
    type: is_off
    device_id: 2189b12c73679451fa1af406b0b492d1
    entity_id: 4bb88f1b2f7bd1d6701cc924ecbb3cb1
    domain: switch
    for:
      hours: 0
      minutes: 0
      seconds: 5
actions:
  - action: switch.turn_on
    metadata: {}
    data: {}
    target:
      device_id: 2189b12c73679451fa1af406b0b492d1
  - type: toggle
    device_id: 348056095d7d3217280b235cf0969dc6
    entity_id: 7c02a433ce73b03df62d2187a97ad9b0
    domain: light
  - action: light.toggle
    metadata: {}
    target:
      entity_id: light.shellyrgbw2_2c4013_channel_4
    data: {}
  - delay:
      hours: 0
      minutes: 0
      seconds: 5
      milliseconds: 0
  - action: light.toggle
    metadata: {}
    target:
      entity_id: light.shellyrgbw2_2c4013_channel_4
    data: {}
  - delay:
      hours: 0
      minutes: 5
      seconds: 0
      milliseconds: 0
  - action: switch.turn_off
    metadata: {}
    target:
      device_id: 2189b12c73679451fa1af406b0b492d1
    data: {}
  - type: toggle
    device_id: 348056095d7d3217280b235cf0969dc6
    entity_id: 7c02a433ce73b03df62d2187a97ad9b0
    domain: light
mode: single

New afvalwijzer using Home Assistant

New version of :

New schematic using ESPHOME and has reset button (pressing the lid).
(Resets the LED when you’ve put the trash at the street curb.)

Above, a simplified version. I’m using 4 ws2812 leds now.

ESPHOME code:

esphome:
  name: afvalwemos
  friendly_name: AfvalWemos
  on_boot:
    priority: 800
    then:
    - delay: 1s
    - light.turn_off: main_leds

esp8266:
  board: d1_mini

# Enable logging
logger:

# Enable Home Assistant API
api:
  encryption:
    key: "bT76oR8vOxxxxxxxxxxxxxxxxxxxxxxxxQbyjY6M="

ota:
  - platform: esphome
    password: "c1dbxxxxxxxxxxxxxxxxxxxxxxxxxx36e75"

wifi:
  ssid: !secret wifi_ssid
  password: !secret wifi_password

  # Enable fallback hotspot (captive portal) in case wifi connection fails
  ap:
    ssid: "Afvalwemos Fallback Hotspot"
    password: "vVxxxxxxxxxxxxxxaw"

captive_portal:

# LED strip definition
light:
  - platform: neopixelbus
    type: RGB
    variant: WS2812
    pin: D5
    num_leds: 4
    name: "All LEDs"
    id: main_leds
    restore_mode: ALWAYS_OFF   # ensures all LEDs start off


  # Individual LED partitions
  - platform: partition
    name: "LED 1"
    segments:
      - id: main_leds
        from: 0
        to: 0

  - platform: partition
    name: "LED 2"
    segments:
      - id: main_leds
        from: 1
        to: 1

  - platform: partition
    name: "LED 3"
    segments:
      - id: main_leds
        from: 2
        to: 2

  - platform: partition
    name: "LED 4"
    segments:
      - id: main_leds
        from: 3
        to: 3


# Physical button on D6 to turn off all LEDs
binary_sensor:
  - platform: gpio
    pin:
      number: D6
      mode: INPUT_PULLUP
      inverted: True
    name: "All Off Button"
    on_press:
      - logger.log: "Button pressed — turning all LEDs OFF"
      - light.turn_off: main_leds

Home Assistant automation:

alias: Afvalwijzer Plastic
description: Afvalwijzer leds
triggers:
  - at: "18:00:00"
    trigger: time
conditions:
  - condition: template
    value_template: >
      {% set raw = states('sensor.gad_pmd') %} {% if raw not in ['unknown',
      'unavailable', 'none', ''] %}
        {% set clean = raw.replace('Tomorrow, ', '').replace('Today, ', '').strip() %}
        {% set parts = clean.split(', ') %}
        {% set date_part = parts[-1] if parts|length > 1 else clean %}
        {% set pmd_date = strptime(date_part, '%d-%m-%Y').date() %}
        {% set tomorrow = (now().date() + timedelta(days=1)) %}
        {{ pmd_date == tomorrow }}
      {% else %}
        false
      {% endif %}
actions:
  - action: light.turn_on
    target:
      entity_id: light.afvalwemos_led_3
    data:
      rgb_color:
        - 236
        - 199
        - 14
mode: single

5 sensor Flame detector

December is coming, time for candles.

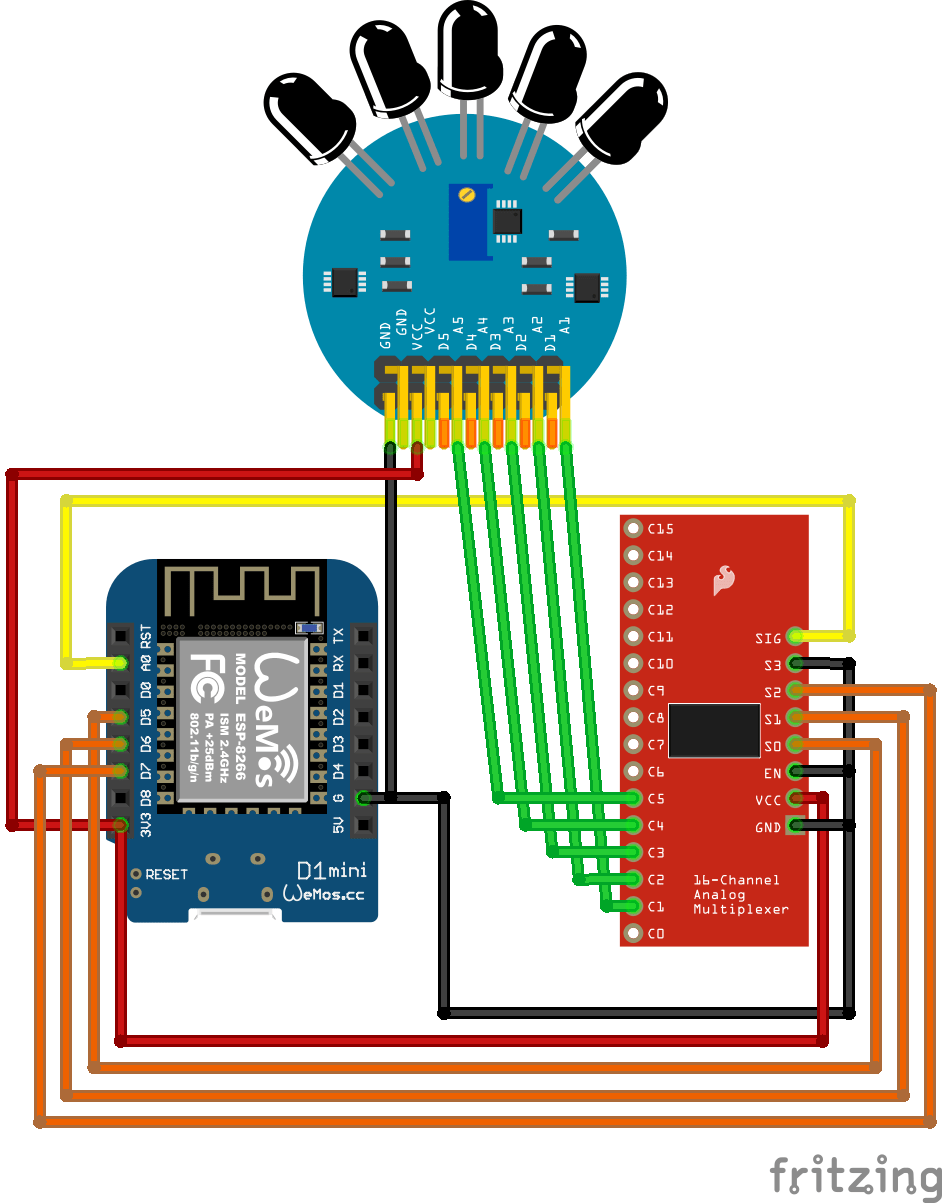
The plan is to make a flame sensor, with in combination with my presence sensor will alert me when we leave the room and candles are on, give us a notification.

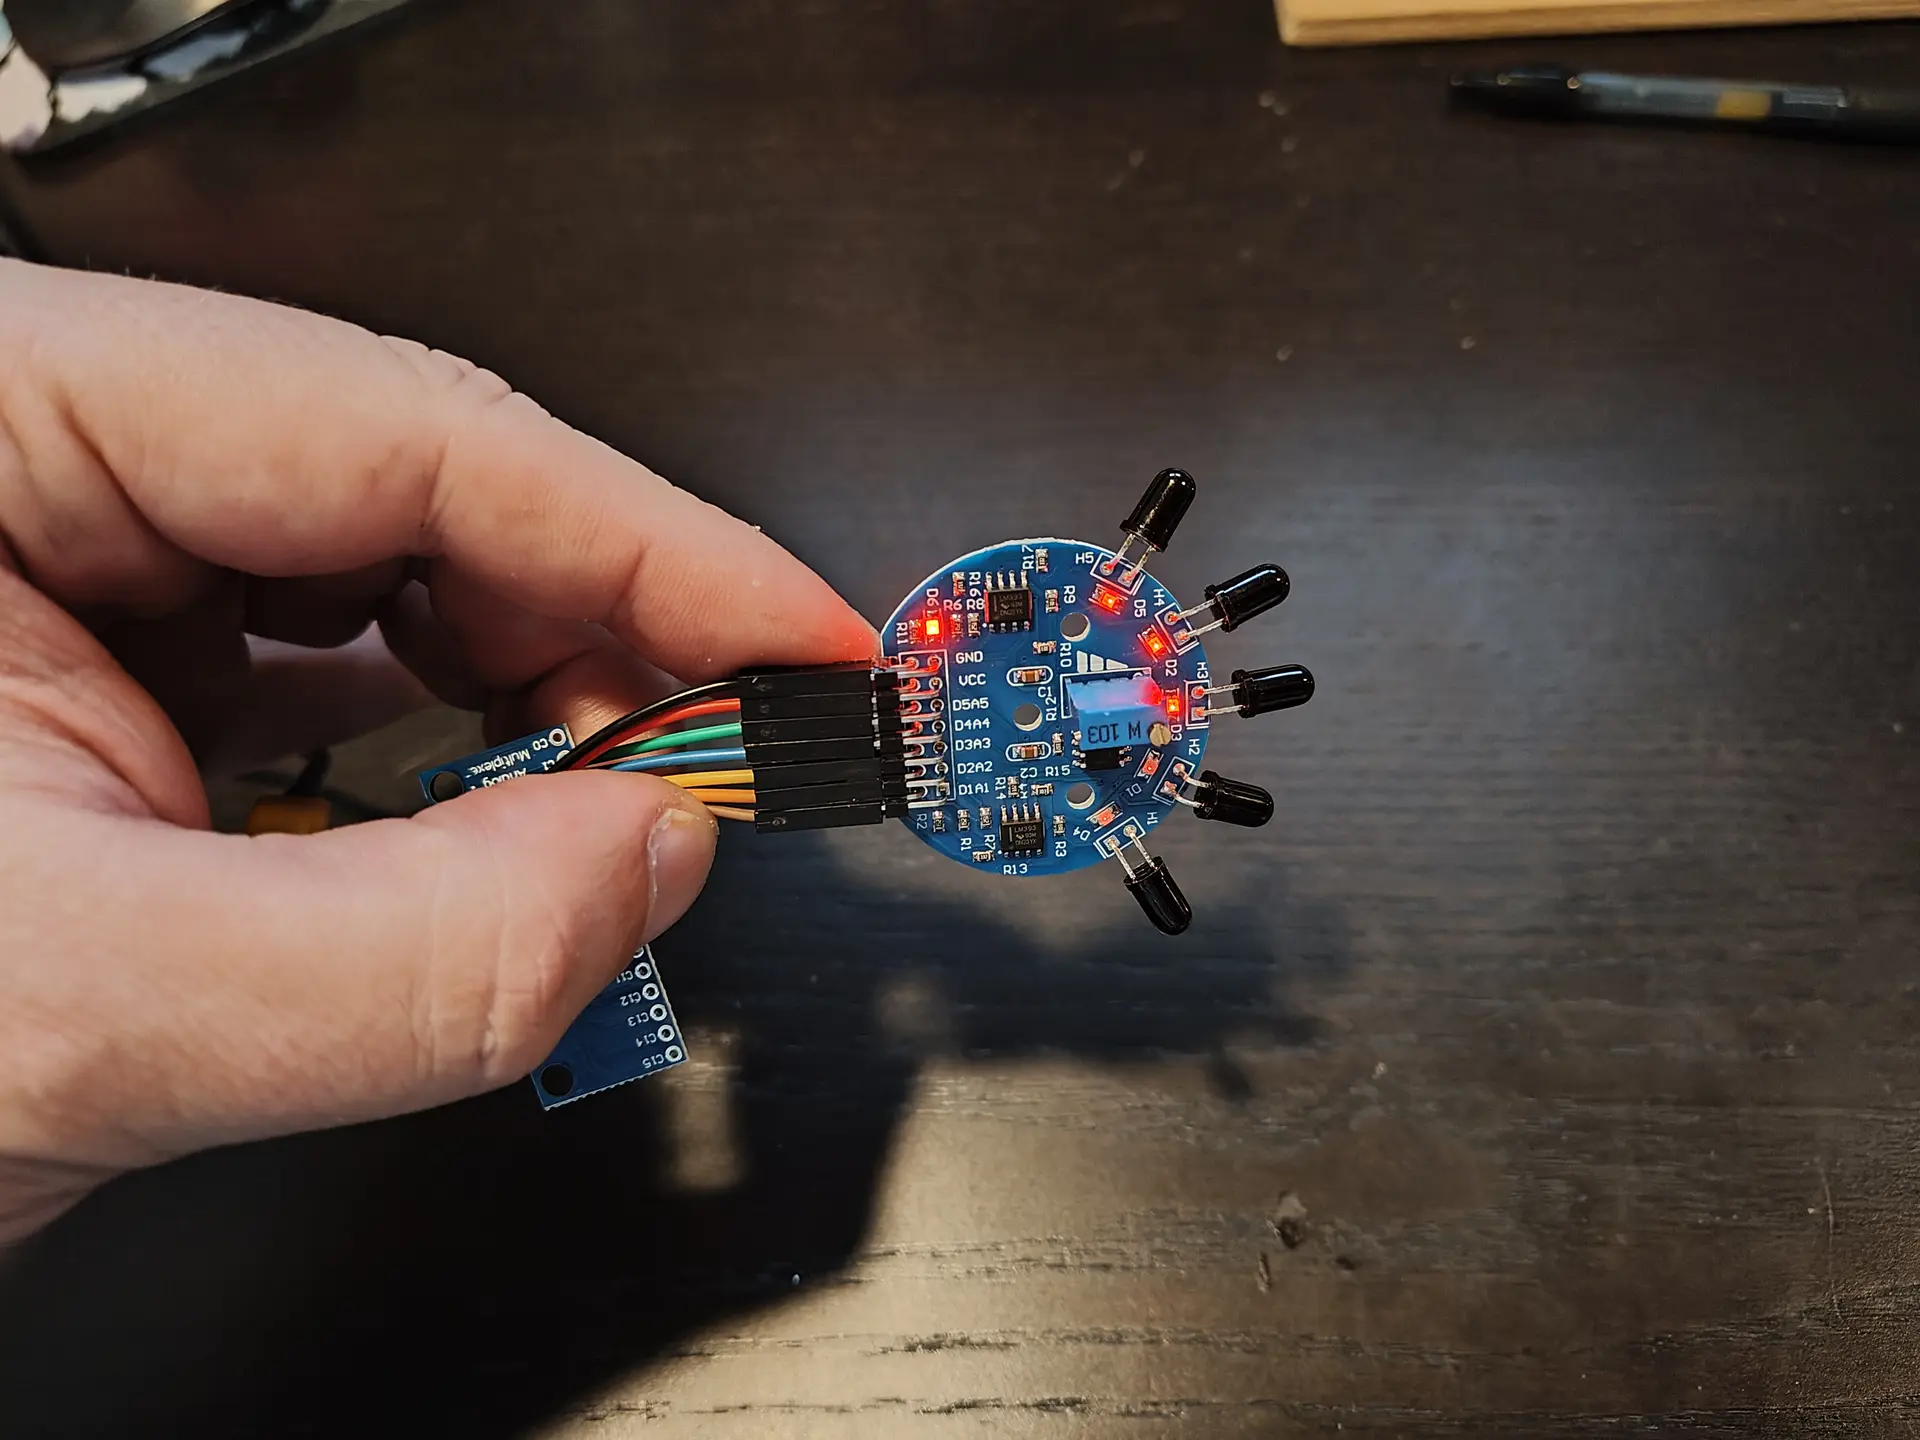
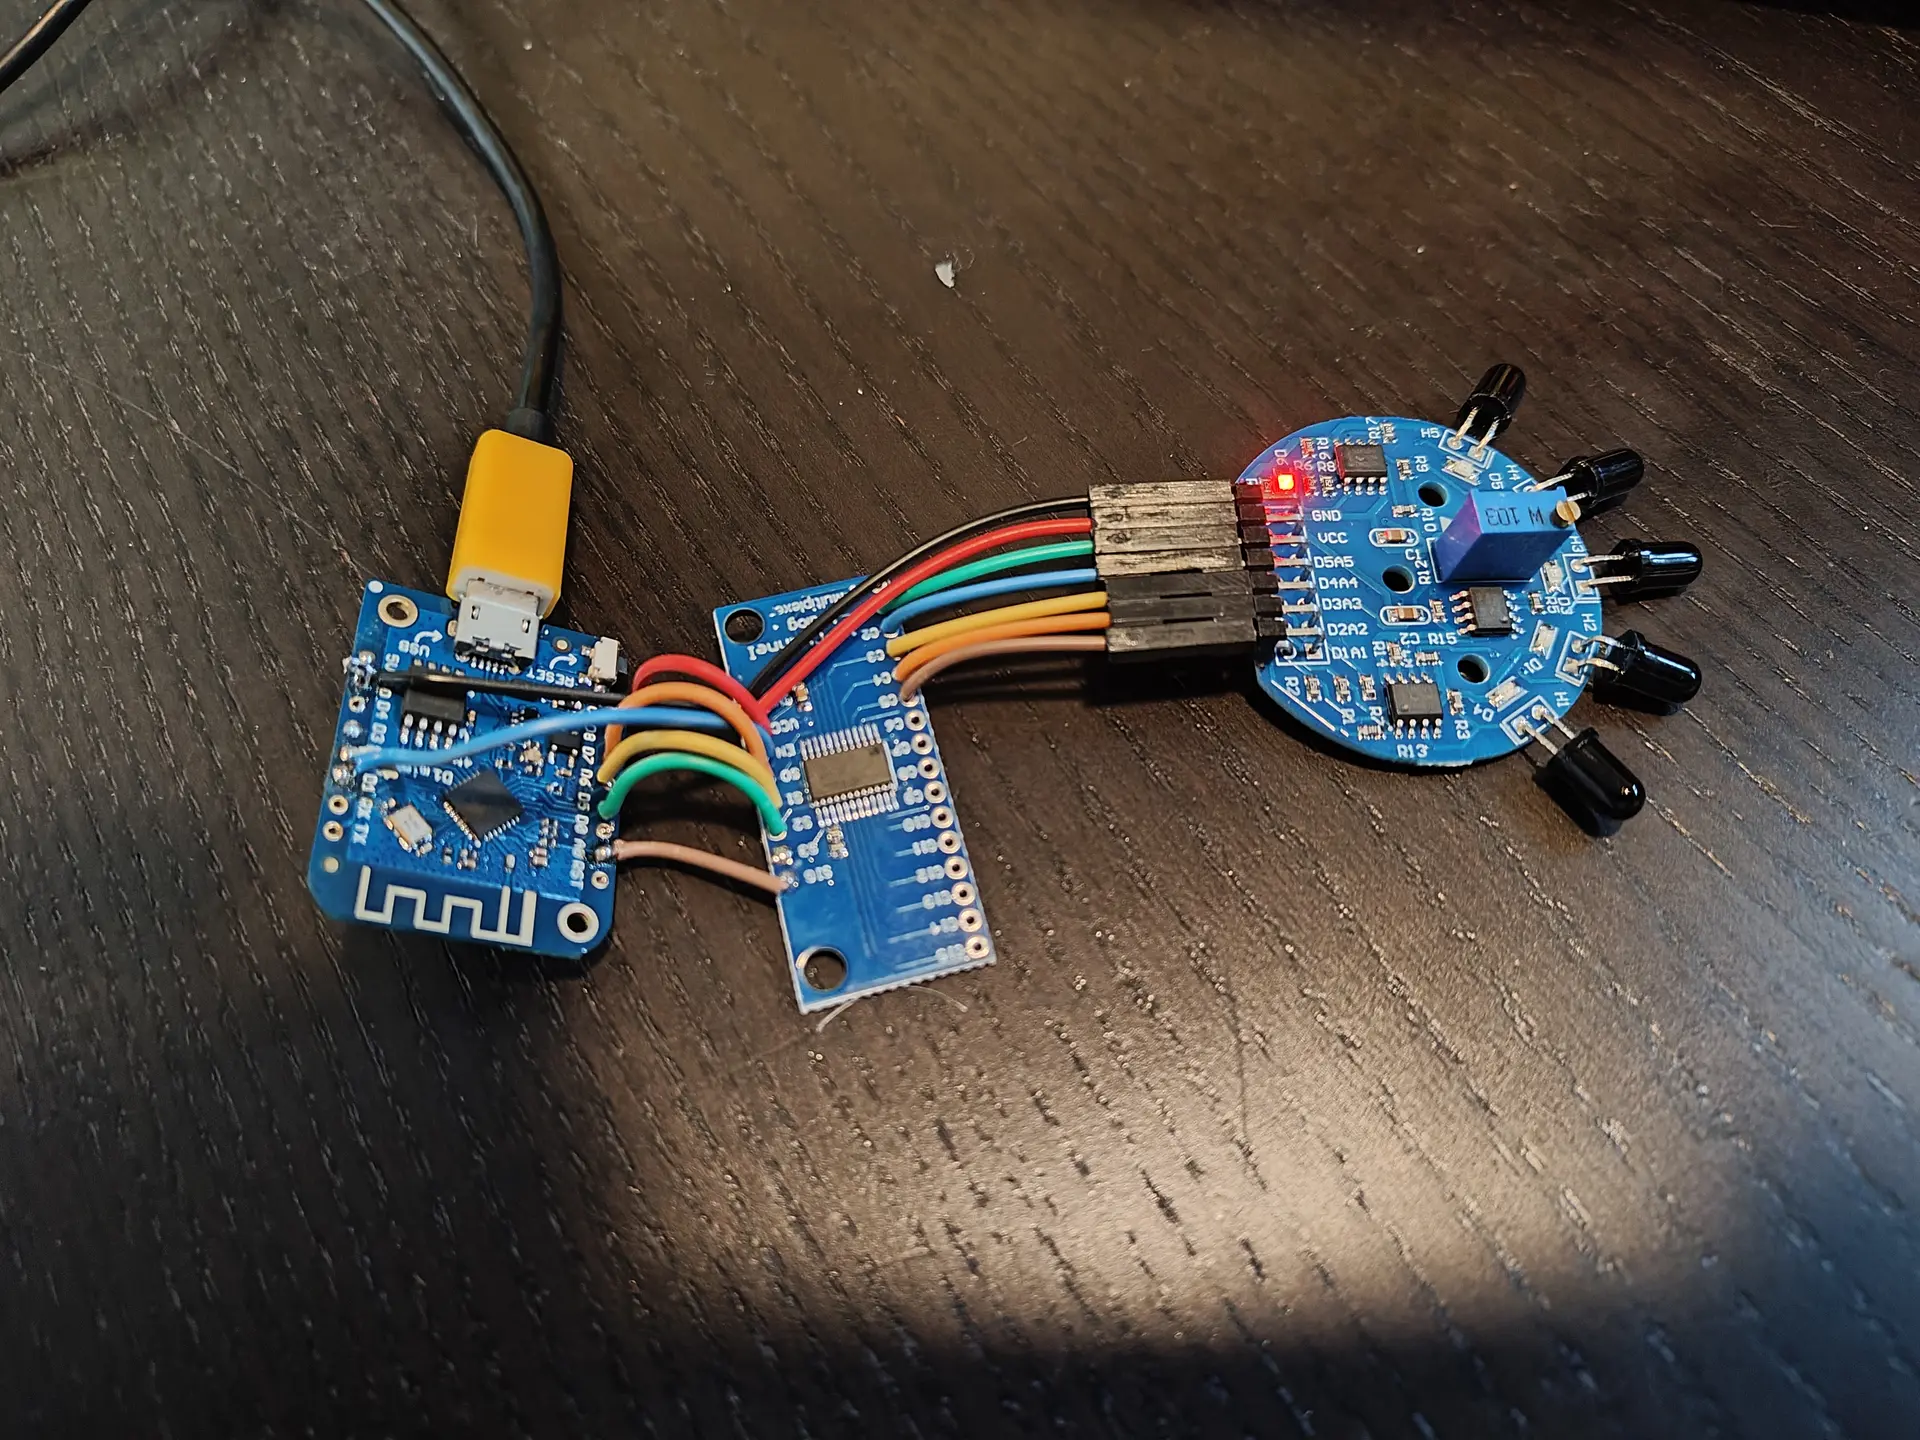
Above is the schematic. A Wemos mini (left over from another project), an analog multiplexer and a cheap 5 times flame detector.
There is a potentiometer on this board to change the sensitivity.

Search “Infrared Ir Flame Sensor Detector Fire Detection Module 5 Channel” on Aliexpress. These are 1 euro.

Presence sensor:

Here is some Arduino code.

#define MUX_A D5
#define MUX_B D6
#define MUX_C D7
#define ENABLE D1

#define ANALOG_INPUT A0


void setup() {
    Serial.begin(9600);

  //Define output pins for Mux
  pinMode(MUX_A, OUTPUT);
  pinMode(MUX_B, OUTPUT);     
  pinMode(MUX_C, OUTPUT);     
  pinMode(ENABLE, OUTPUT);     
  digitalWrite(ENABLE, LOW); // No need to switch, can be permanenty low
  
}

void changeMux(int c, int b, int a) {
  digitalWrite(MUX_A, a);
  digitalWrite(MUX_B, b);
  digitalWrite(MUX_C, c);
}

void loop() {
  float value;
  
  
  changeMux(LOW, LOW, HIGH);
  value = analogRead(ANALOG_INPUT); //Value of the sensor connected Option 1 pin of Mux
  Serial.print("Variable_1:");
  Serial.print(value);
  Serial.print(",");

  changeMux(LOW, HIGH, LOW);
  value = analogRead(ANALOG_INPUT); //Value of the sensor connected Option 2 pin of Mux
  Serial.print("Variable_2:");
  Serial.print(value);
  Serial.print(",");

  changeMux(LOW, HIGH, HIGH);
  value = analogRead(ANALOG_INPUT); //Value of the sensor connected Option 3 pin of Mux
  Serial.print("Variable_3:");
  Serial.print(value);
  Serial.print(",");

  changeMux(HIGH, LOW, LOW);
  value = analogRead(ANALOG_INPUT); //Value of the sensor connected Option 4 pin of Mux
  Serial.print("Variable_4:");
  Serial.print(value);
  Serial.print(",");

  changeMux(HIGH, LOW, HIGH);
  value = analogRead(ANALOG_INPUT); //Value of the sensor connected Option 5 pin of Mux
  Serial.print("Variable_5:");
  Serial.println(value);
}

ESPHOME Code

esphome:
  name: flamedetector
  friendly_name: FlameDetector
  on_boot:
    priority: 600
    then:
      - switch.turn_off: enable 

esp8266:
  board: d1_mini

# Enable logging
logger:

# Enable Home Assistant API
api:
  encryption:
    key: "BMHbLdN6Rxxxxxxxxxxxxxxxxxxxxv0LE="

ota:
  - platform: esphome
    password: "780fe0xxxxxxxxxxxxxxxxxxxxx7859"

wifi:
  ssid: !secret wifi_ssid
  password: !secret wifi_password

  # Enable fallback hotspot (captive portal) in case wifi connection fails
  ap:
    ssid: "Flamedetector Fallback Hotspot"
    password: "cm1xxxxxxxxxxxxNX"

captive_portal:

switch:
  - platform: gpio
    id: enable
    pin:
      number: D1

cd74hc4067:
  - id: cd74hc4067_1
    pin_s0: D5
    pin_s1: D6
    pin_s2: D7
    pin_s3: D2

globals:
  - id: last_flame_state
    type: bool
    restore_value: no
    initial_value: 'false'
  - id: trigger_on
    type: bool
    restore_value: no
    initial_value: 'false'

sensor:
  - platform: adc
    id: adc_sensor
    pin: A0
    name: flameanalog
    update_interval: 10s
  - platform: cd74hc4067
    id: flame_1_1
    name: flame_1_1
    number: 1
    sensor: adc_sensor
    update_interval: 10s
  - platform: cd74hc4067
    id: flame_1_2
    name: flame_1_2
    number: 2
    sensor: adc_sensor
    update_interval: 10s
  - platform: cd74hc4067
    id: flame_1_3
    name: flame_1_3
    number: 3
    sensor: adc_sensor
    update_interval: 10s
  - platform: cd74hc4067
    id: flame_1_4
    name: flame_1_4
    number: 4
    sensor: adc_sensor
    update_interval: 10s
  - platform: cd74hc4067
    id: flame_1_5
    name: flame_1_5
    number: 5
    sensor: adc_sensor
    update_interval: 10s


interval:
  - interval: 10s
    then:
      - lambda: |-
          const float threshold = 0.01;
          bool any_above =
            id(flame_1_1).state > threshold ||
            id(flame_1_2).state > threshold ||
            id(flame_1_3).state > threshold ||
            id(flame_1_4).state > threshold ||
            id(flame_1_5).state > threshold;

          // Store the result
          if (any_above != id(last_flame_state)) {
            id(last_flame_state) = any_above;
            if (any_above) {
              ESP_LOGI("flame_check", "Flame detected (turning ON)");
              id(trigger_on) = true;
            } else {
              ESP_LOGI("flame_check", "No flame detected (turning OFF)");
              id(trigger_on) = false;
            }
          }

  - interval: 1s
    then:
      - if:
          condition:
            lambda: 'return id(trigger_on);'
          then:
            - homeassistant.service:
                service: homeassistant.turn_on
                data:
                  entity_id: input_boolean.testtoggle
          else:
            - homeassistant.service:
                service: homeassistant.turn_off
                data:
                  entity_id: input_boolean.testtoggle

UPS Load in Home Assistant using Curl

Example is for a UPS, but other generic uses can be setup in same manner.

Create helper (1-100 unit %)

input_number.uspload

Create curl command in configuration.yaml

(Fix grep/cut accordantly )

shell_command:
    getups: curl -s  "http://x.x.x.x/cgi-bin/apcupsd/upsstats.cgi?host=127.0.0.1&img1=5&img2=6&img3=5&temp=C&refresh=30" | grep "UPS Load" | grep img  | cut -f4 -d= | cut -f1 -d. | head -1


Automation

alias: UPStest
description: ""
triggers:
  - trigger: time_pattern
    minutes: /5
conditions: []
actions:
  - action: shell_command.getups
    metadata: {}
    data: {}
    response_variable: upsload
  - action: input_number.set_value
    metadata: {}
    data:
      value: " {{ upsload['stdout'] }} "
    target:
      entity_id: input_number.uspload
mode: single

Home Assistant and Dehumidifier

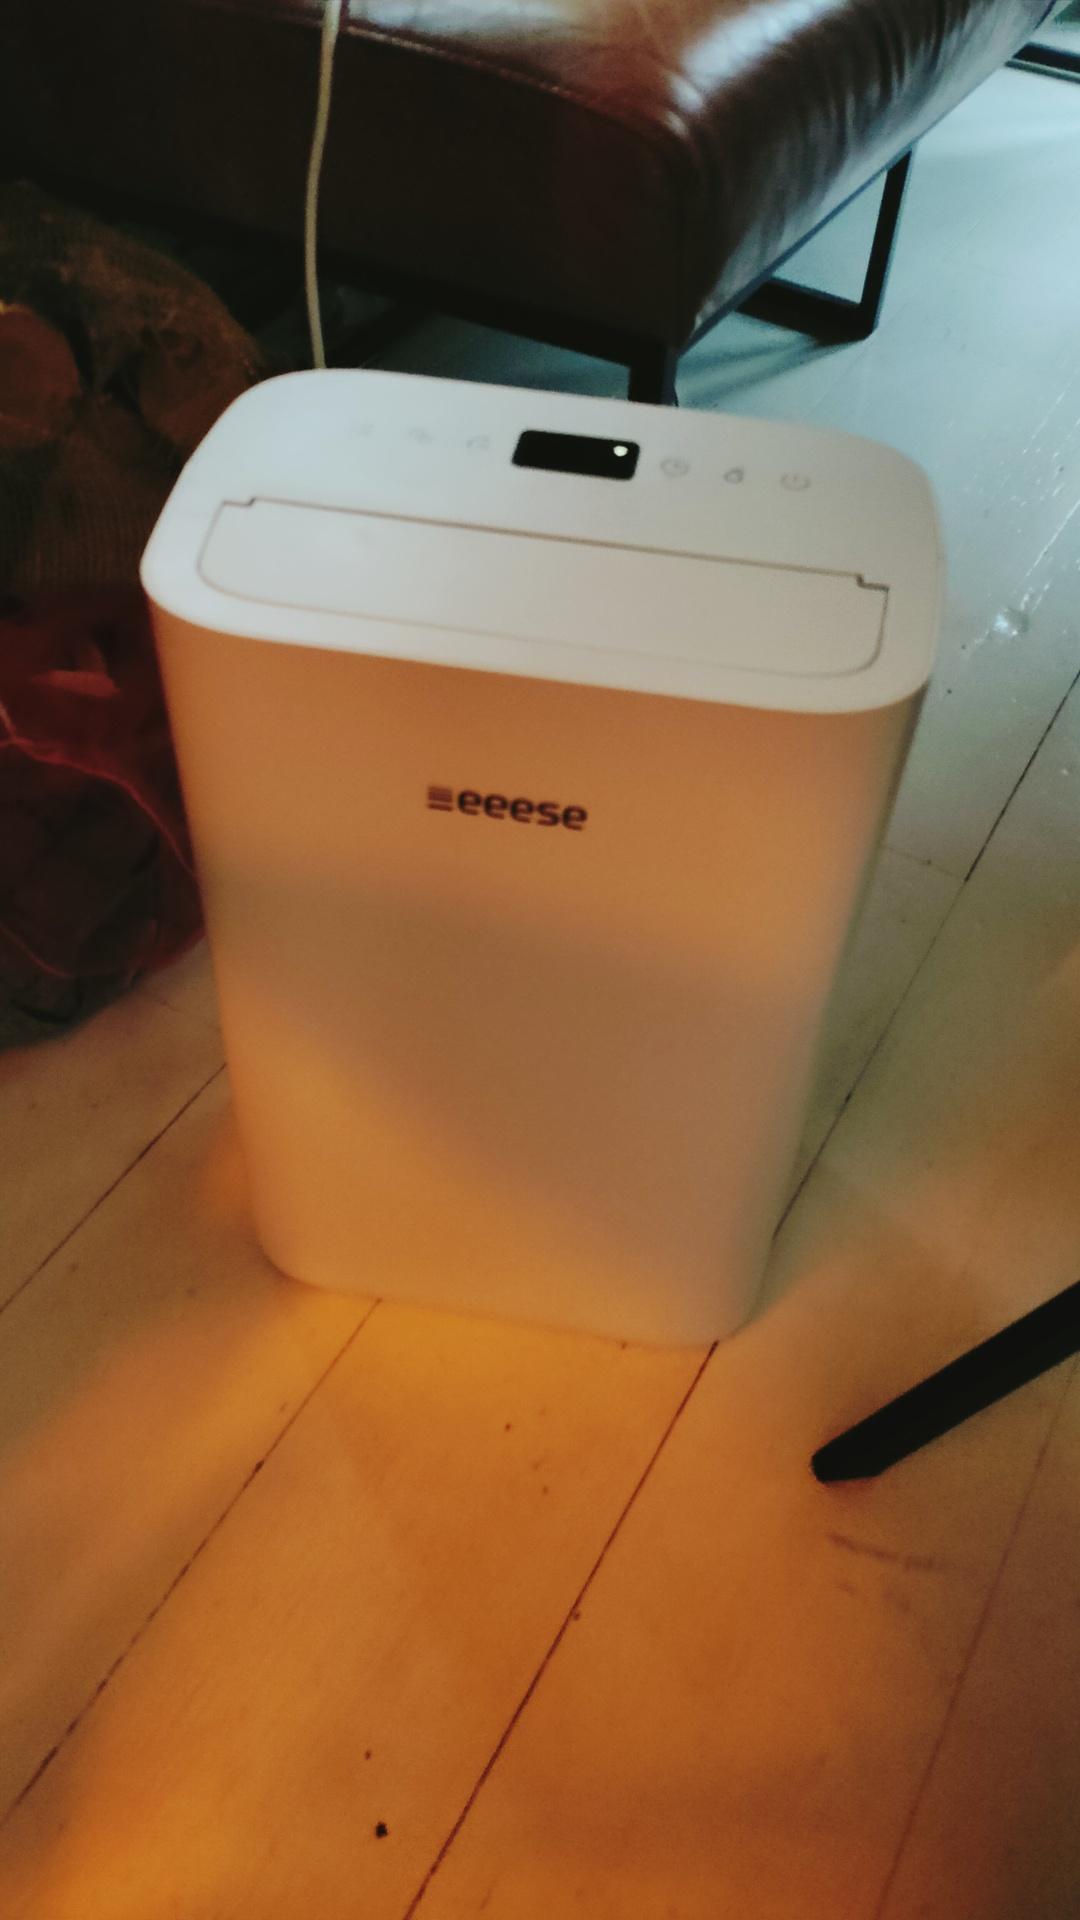
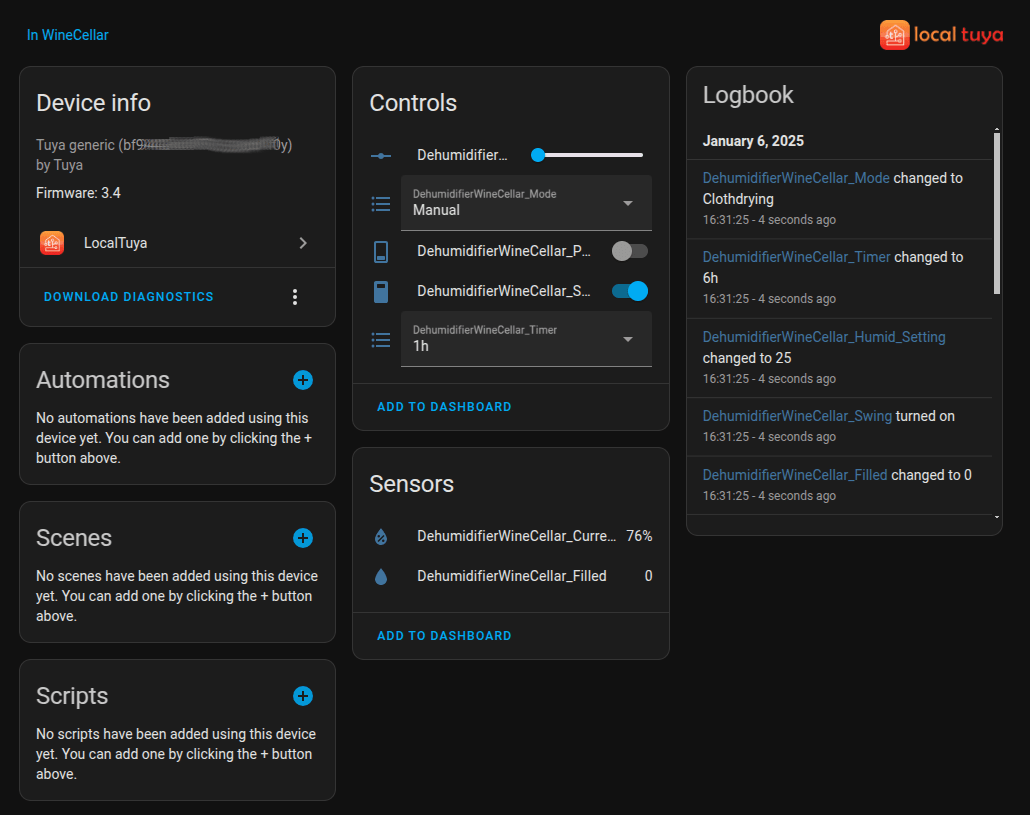
A while ago, I bought a small Dehumidifier for my wine cellar.
I liked it a lot, so I bought another for our bedroom.

I saw some posts about people asking which Dehumidifier is supported by Home Assistant.
This one is. The “Eeese Otto Dehumidifier”

This works with the LocalTuya integration.

There are many examples how to integrate LocalTuya in HA which can be found easily using a search on the net. So, I’m not going to explain that.

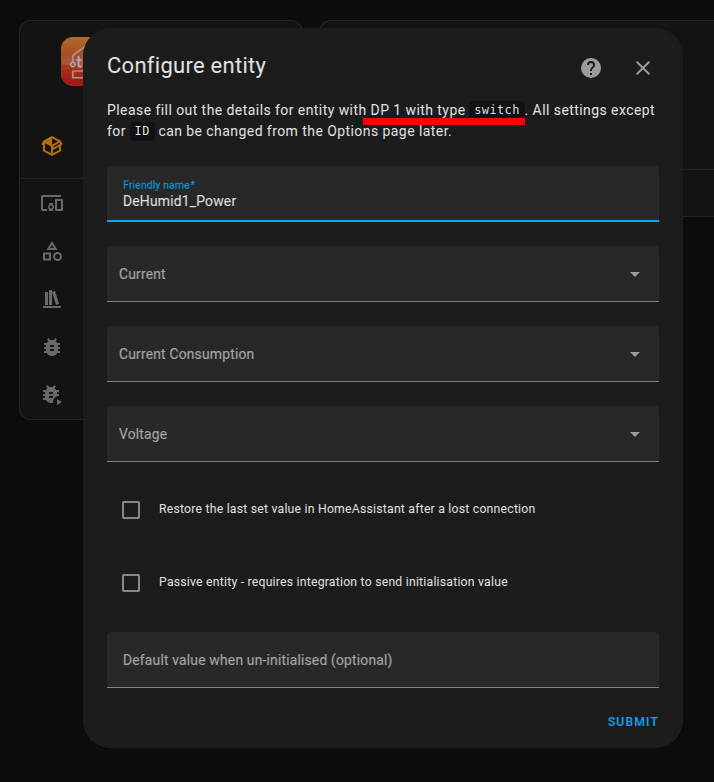
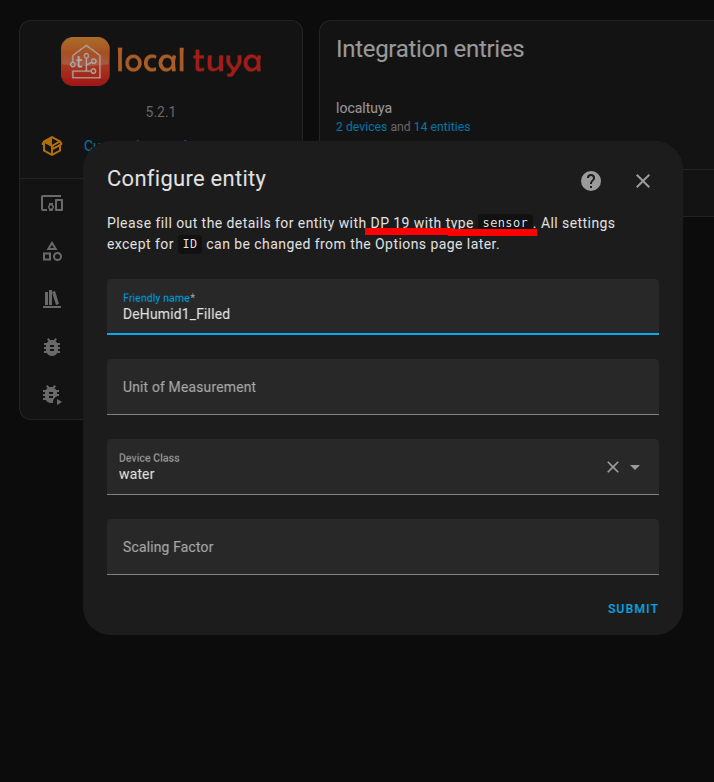
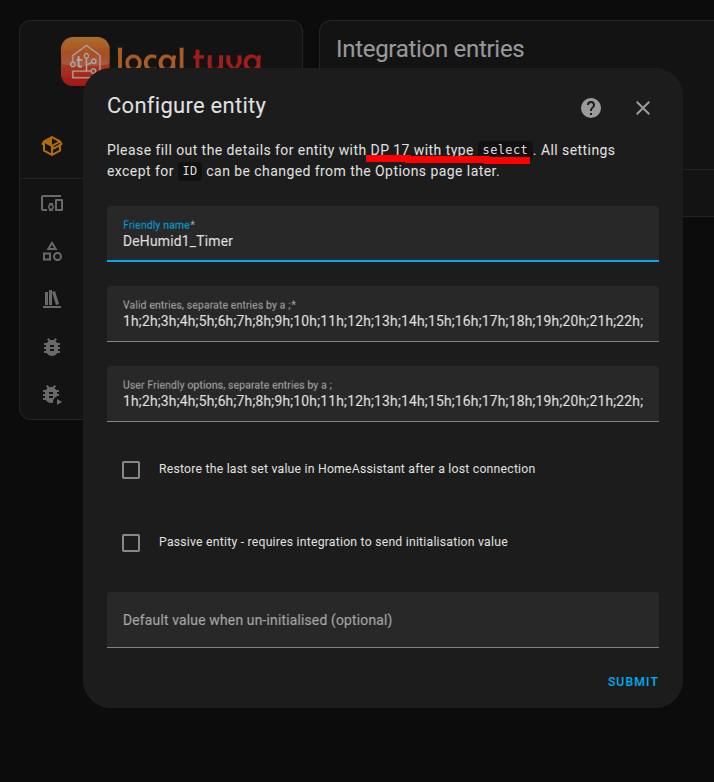
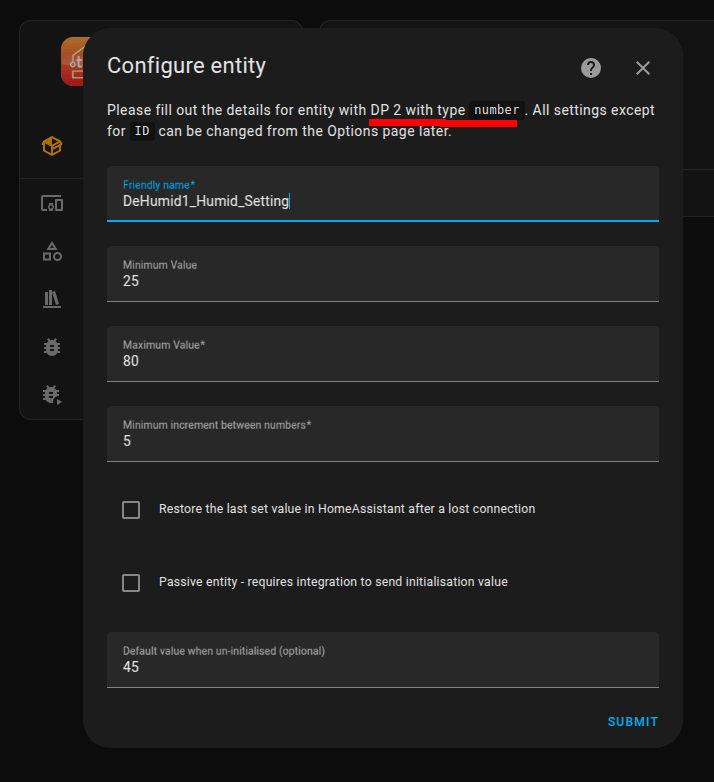
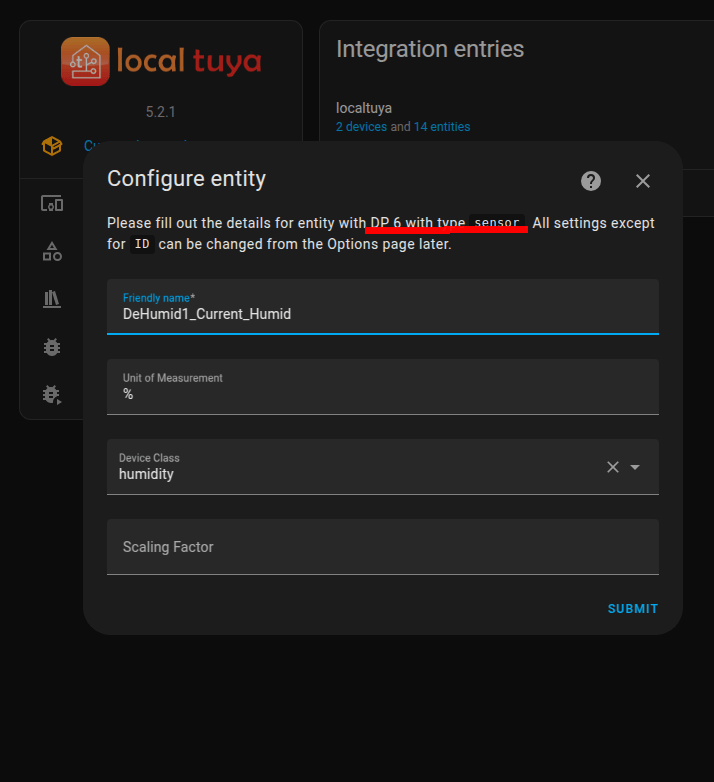
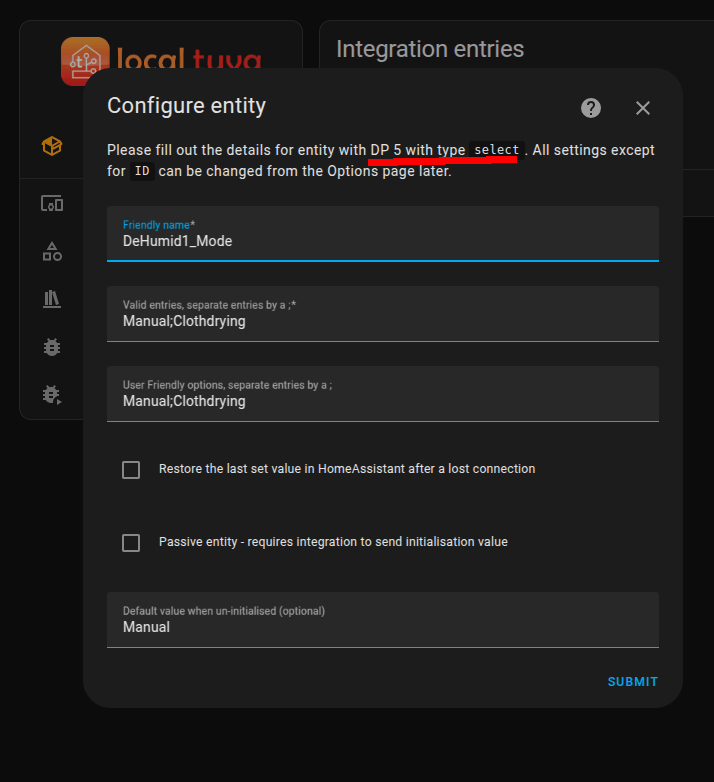
I could not find a configuration example, that’s why I’ll post that part here.

Pre config:

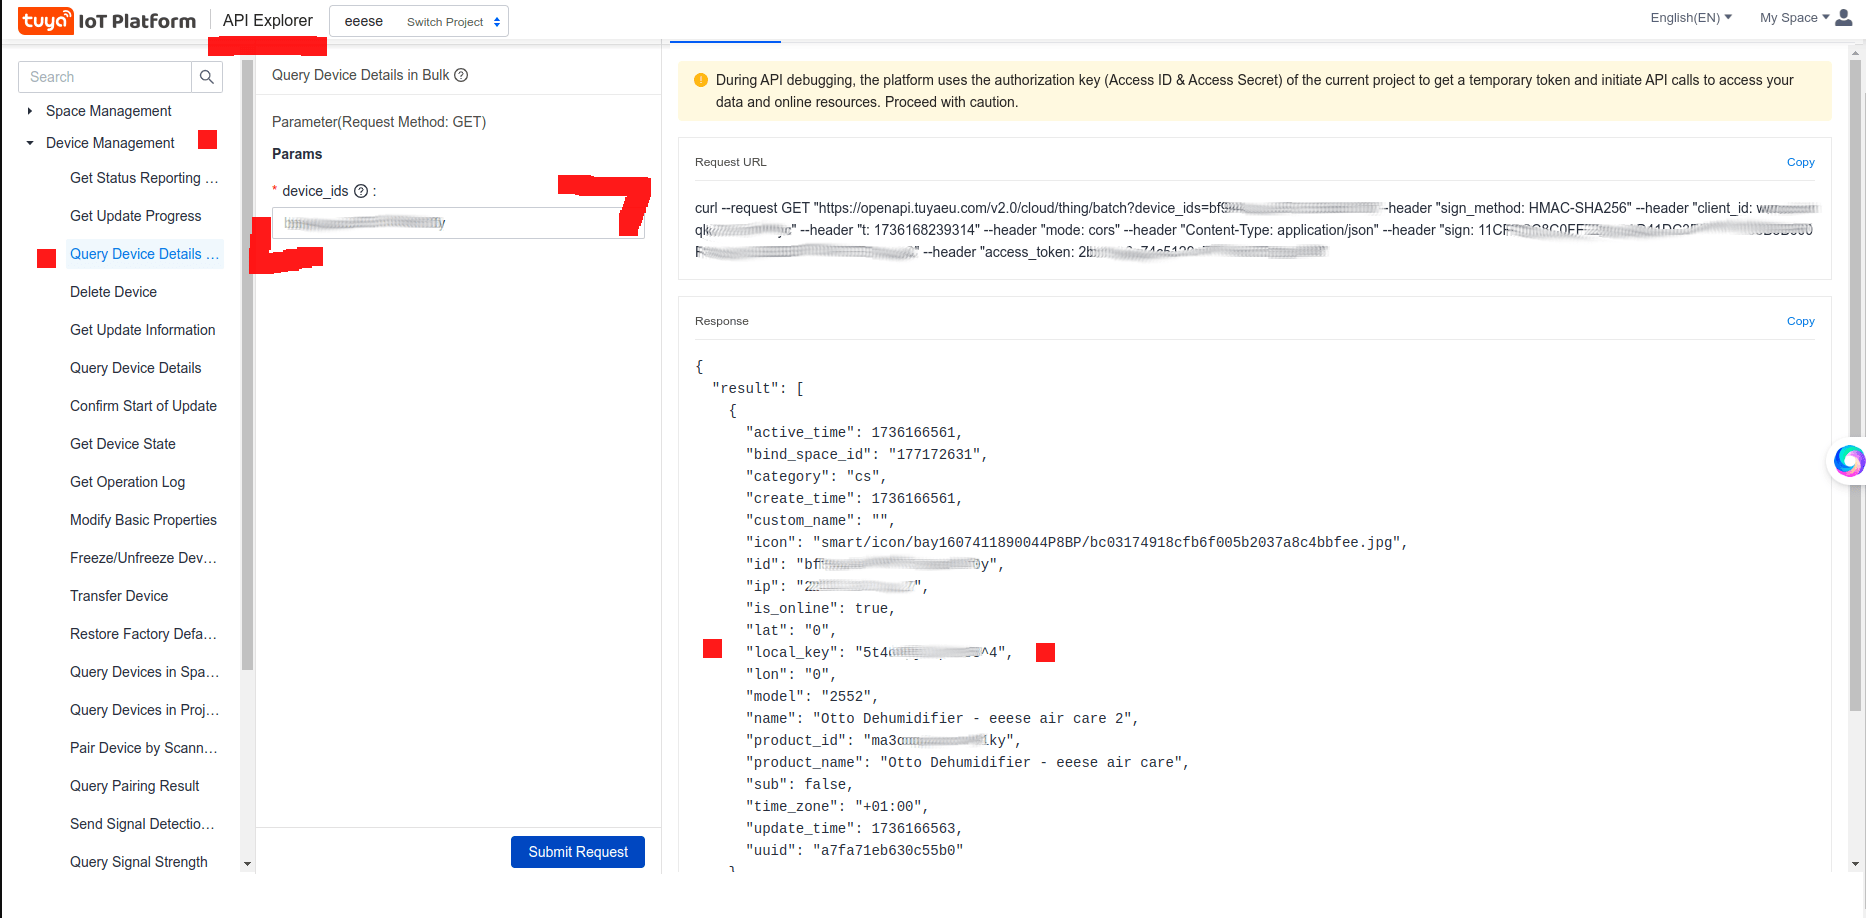
  • Install App on phone to connect Tuya device to cloud (one time only)
    You need this to extract the localkey
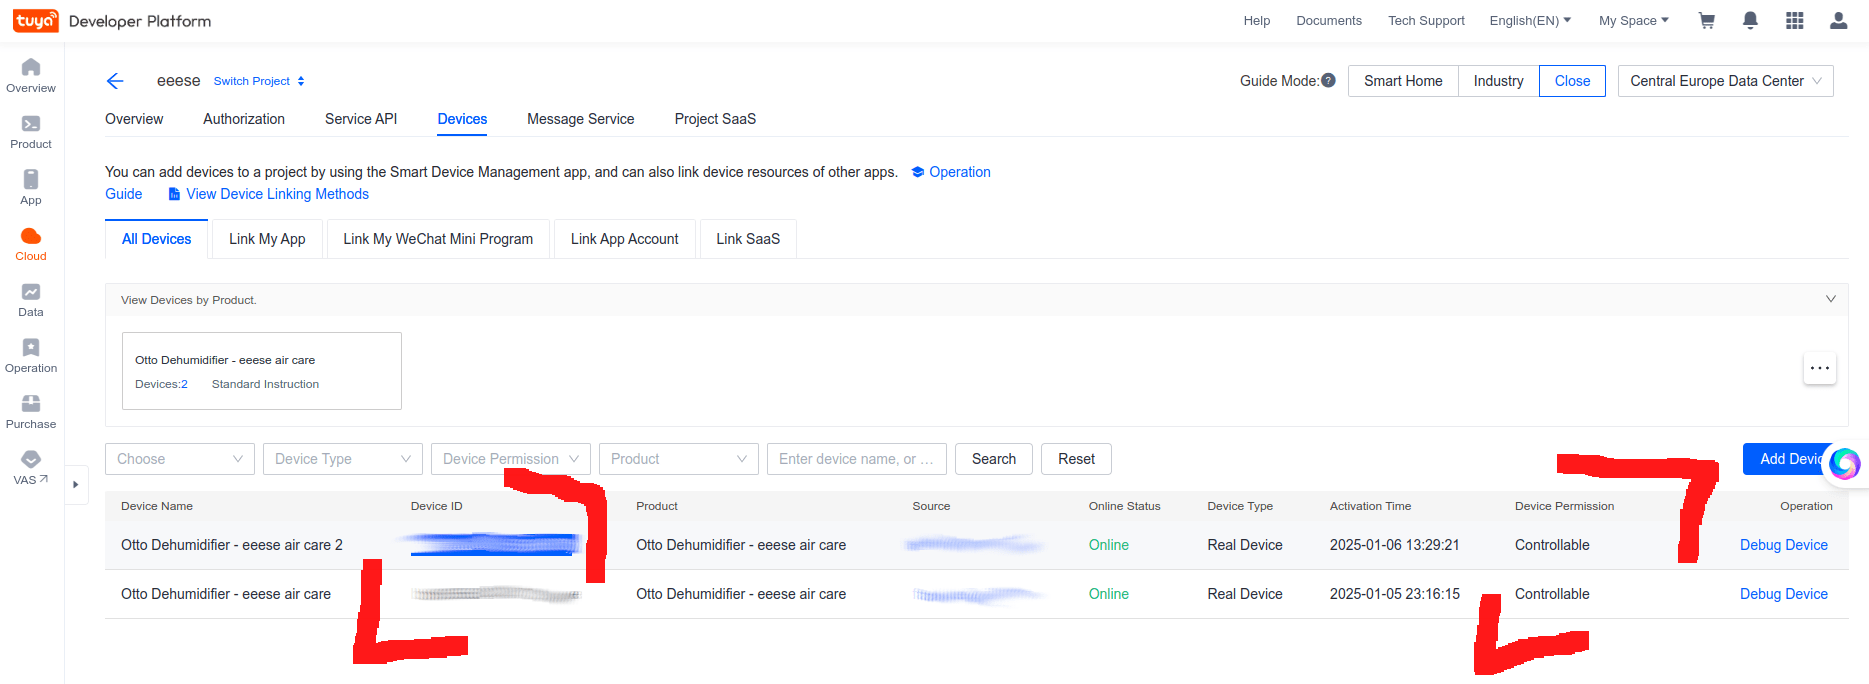
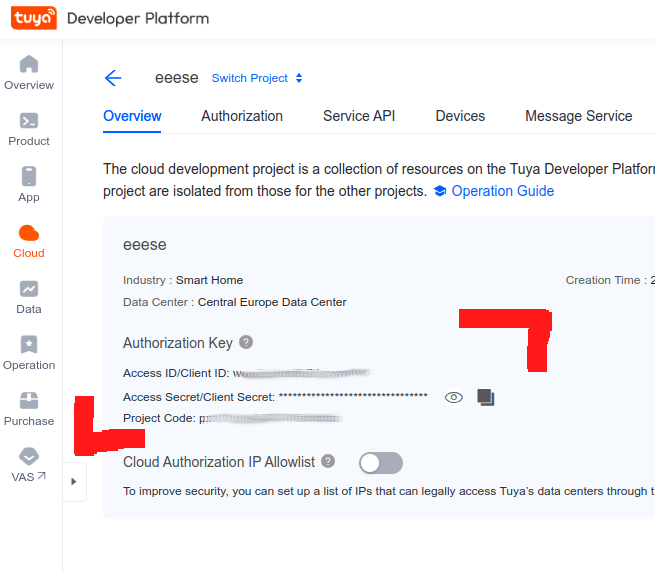
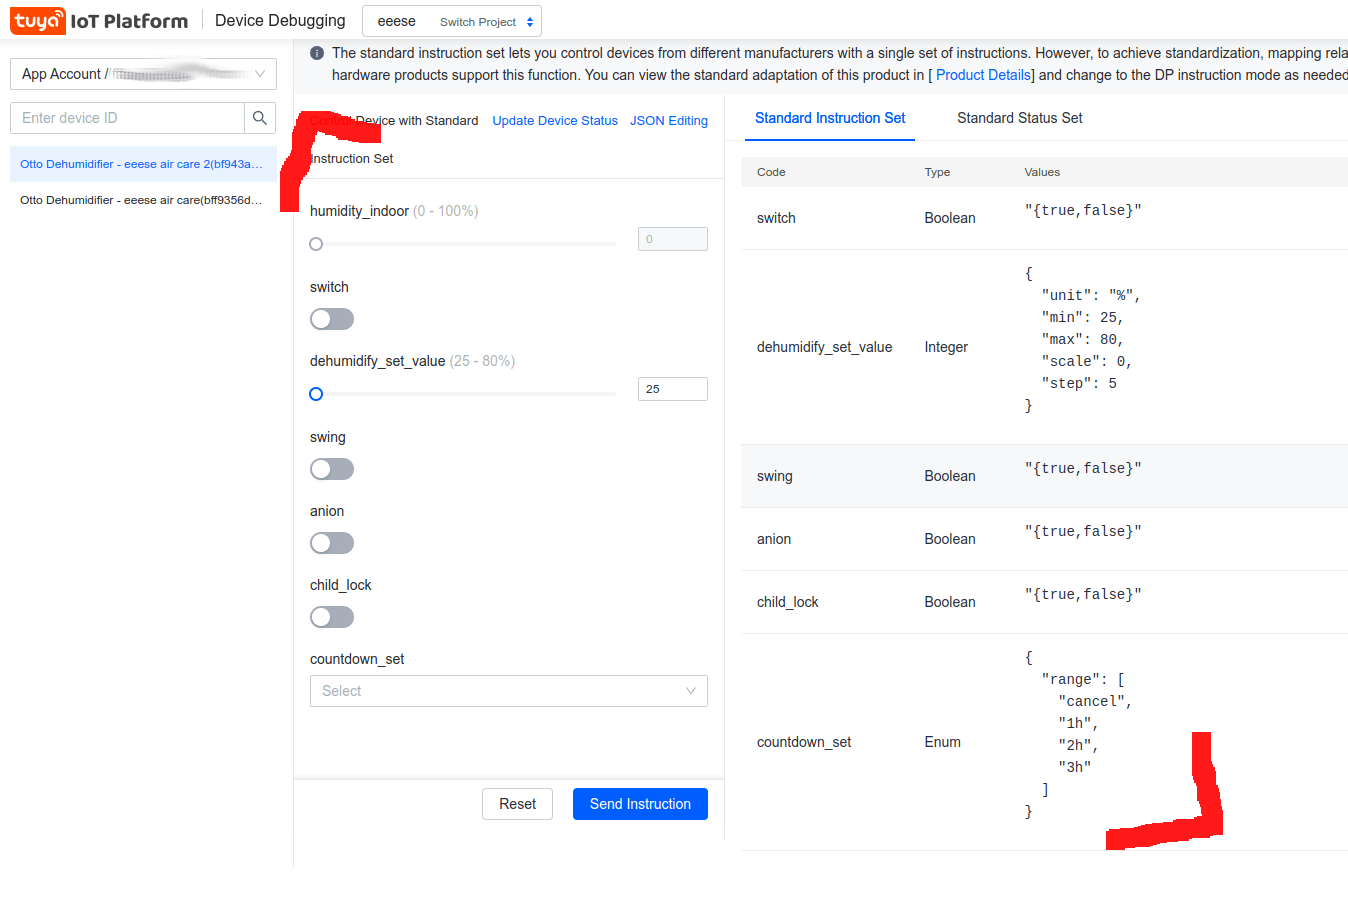
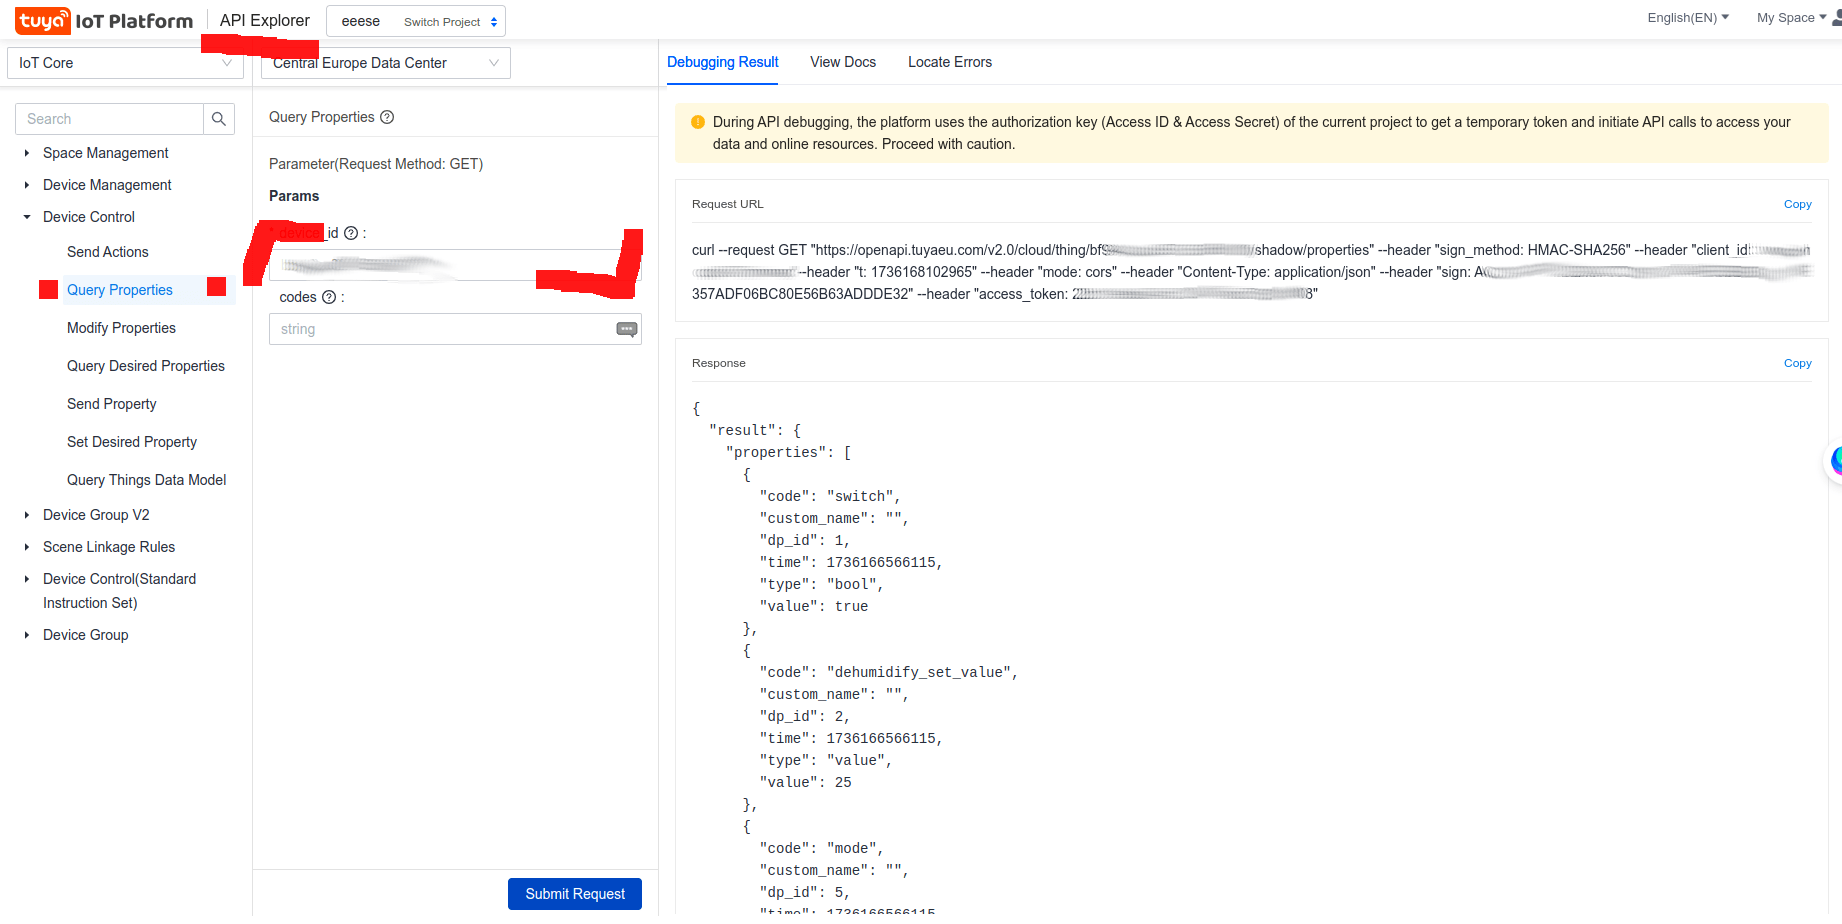
  • Add a developer account to https://eu.platform.tuya.com/
    (Enable devices and change from Read to Control)
    (Get localkey from API Explorer, here is also a hint to be found about the entities)
    See below pictures
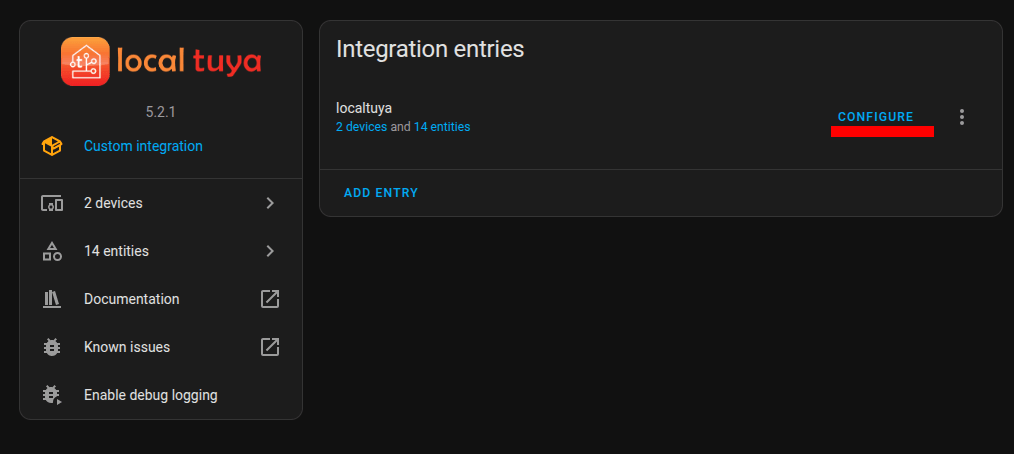
  • Install LocalTuya to HA
End result after config

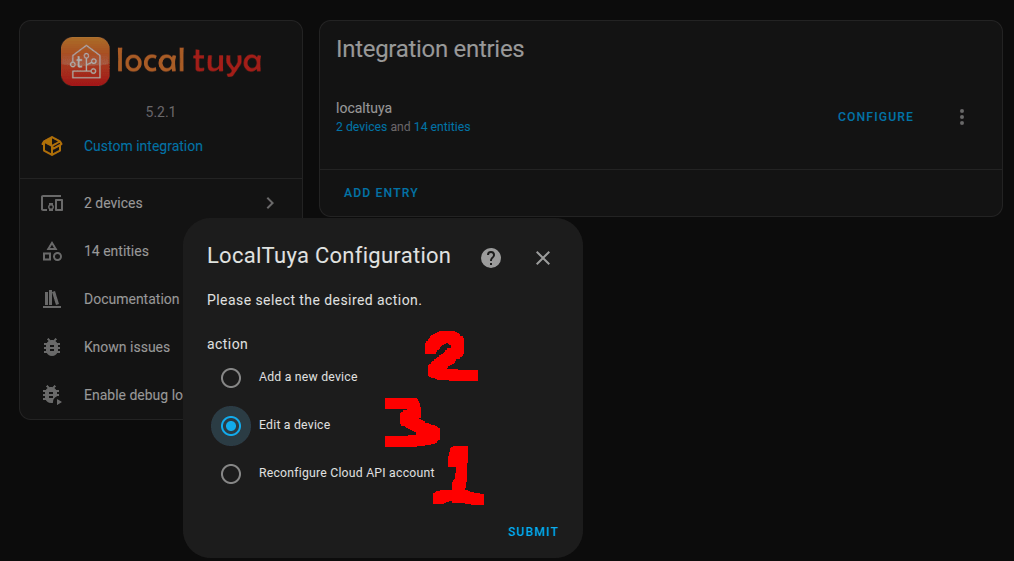
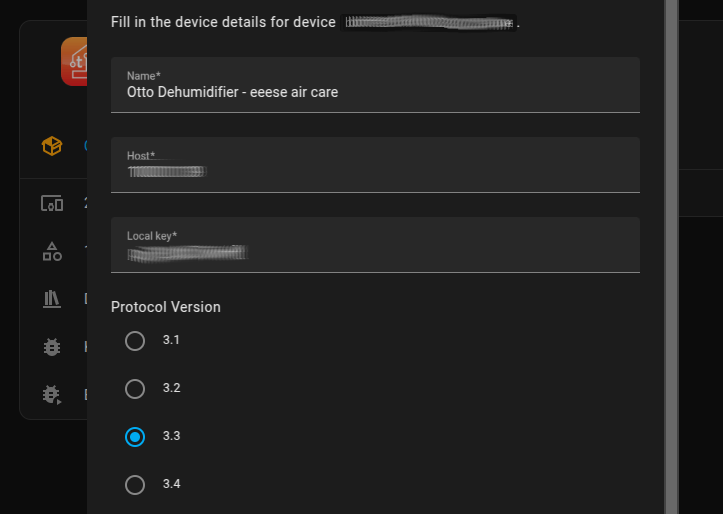
Gallery of config steps

Developer website information, where to find your credentials.
(And a list of entities)

Home Assistant Voice and OpenMqttGateway

Yesterday I got my Home Assistant Voice!

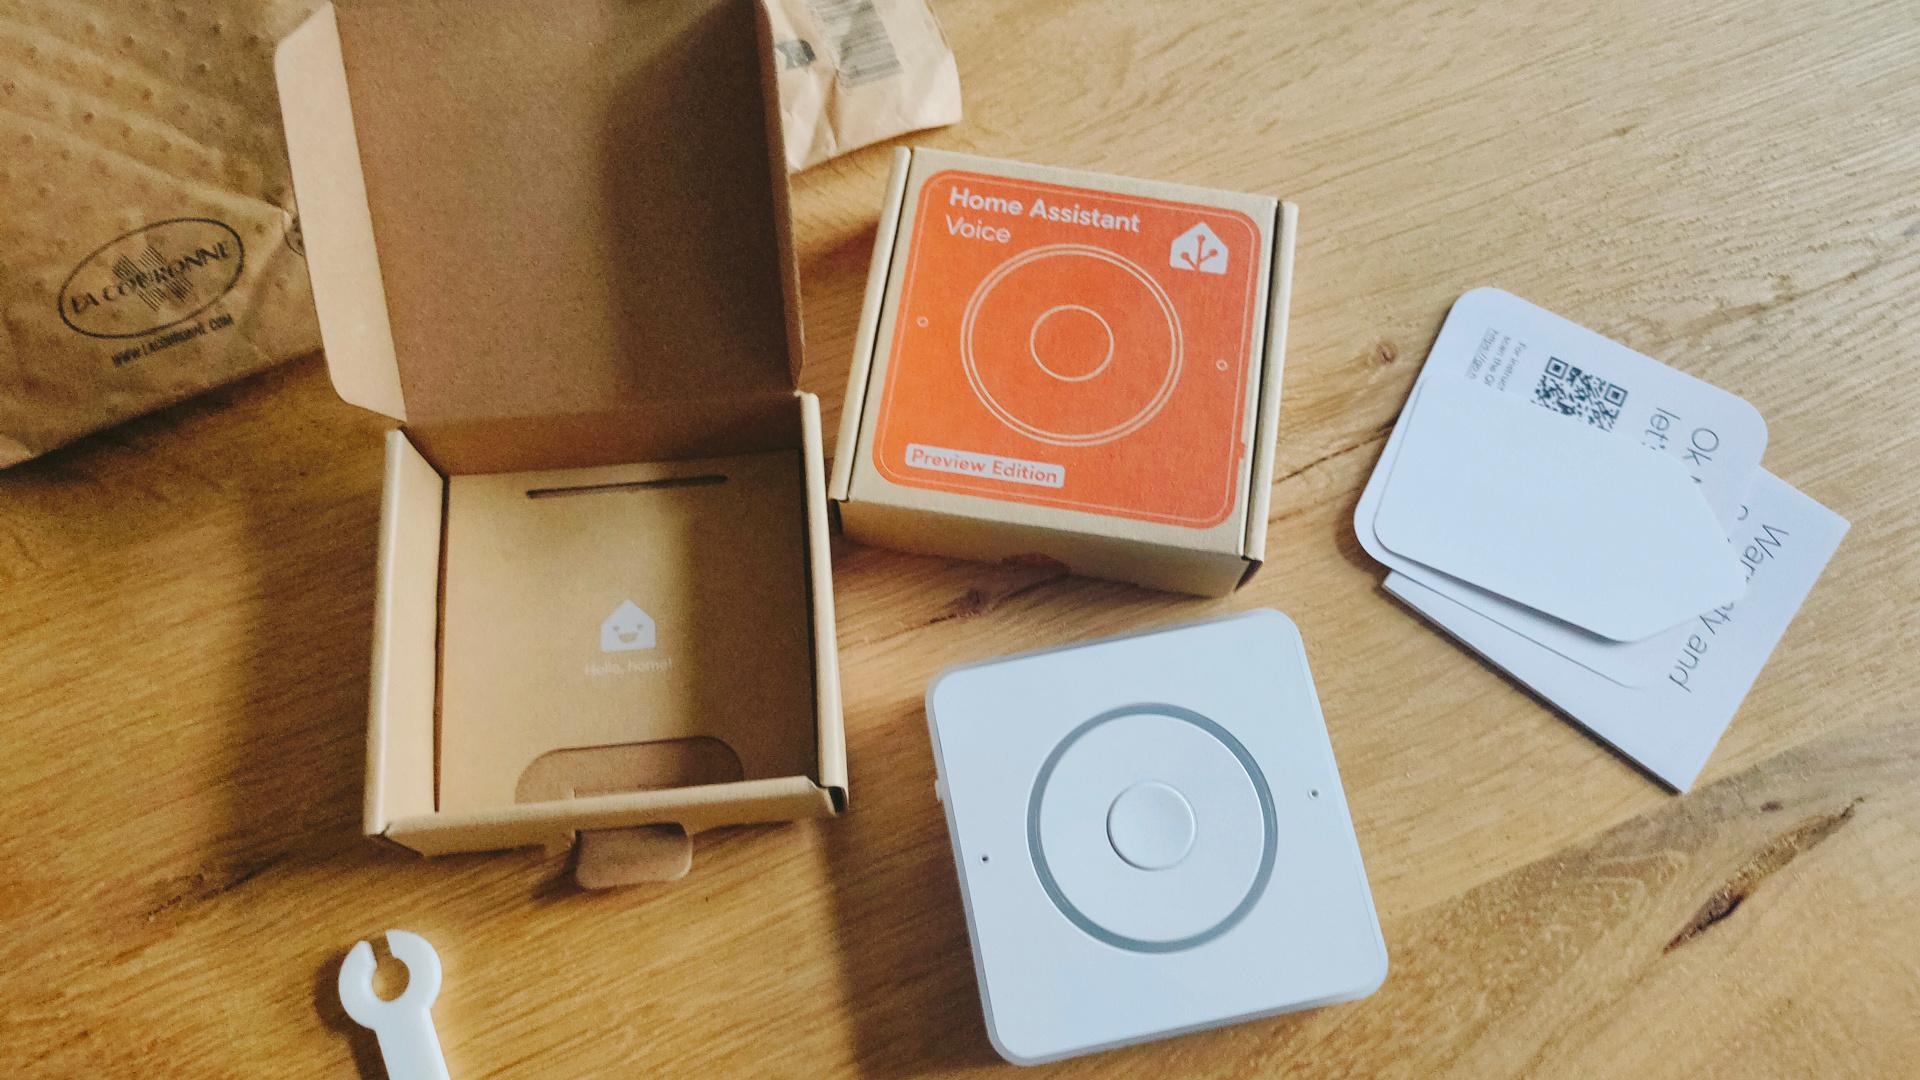
This is a Non-Cloud solution like Alexa and Google devices.
I only could play with it for a few minutes because I was working on Arduino code with an ILI9341 Display and a BME280 (Temperature/Humidity/Air pressure).

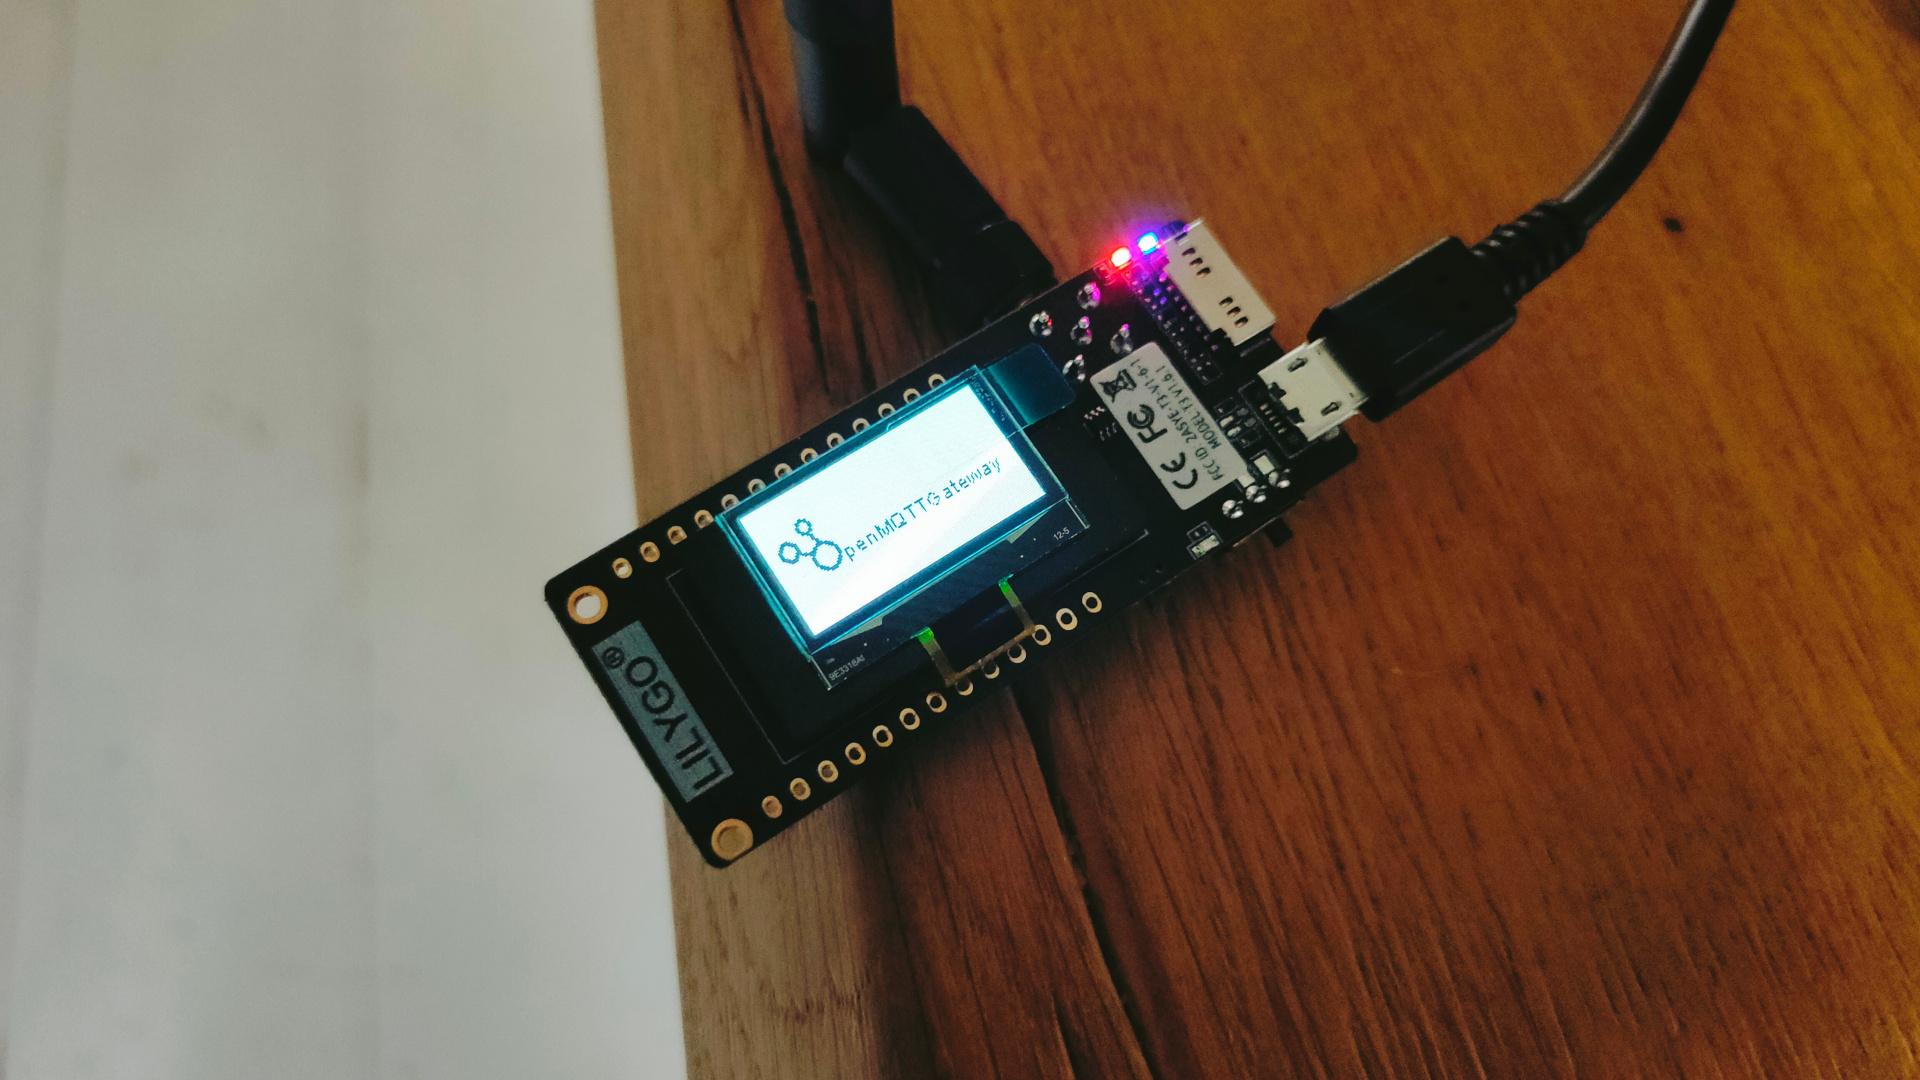
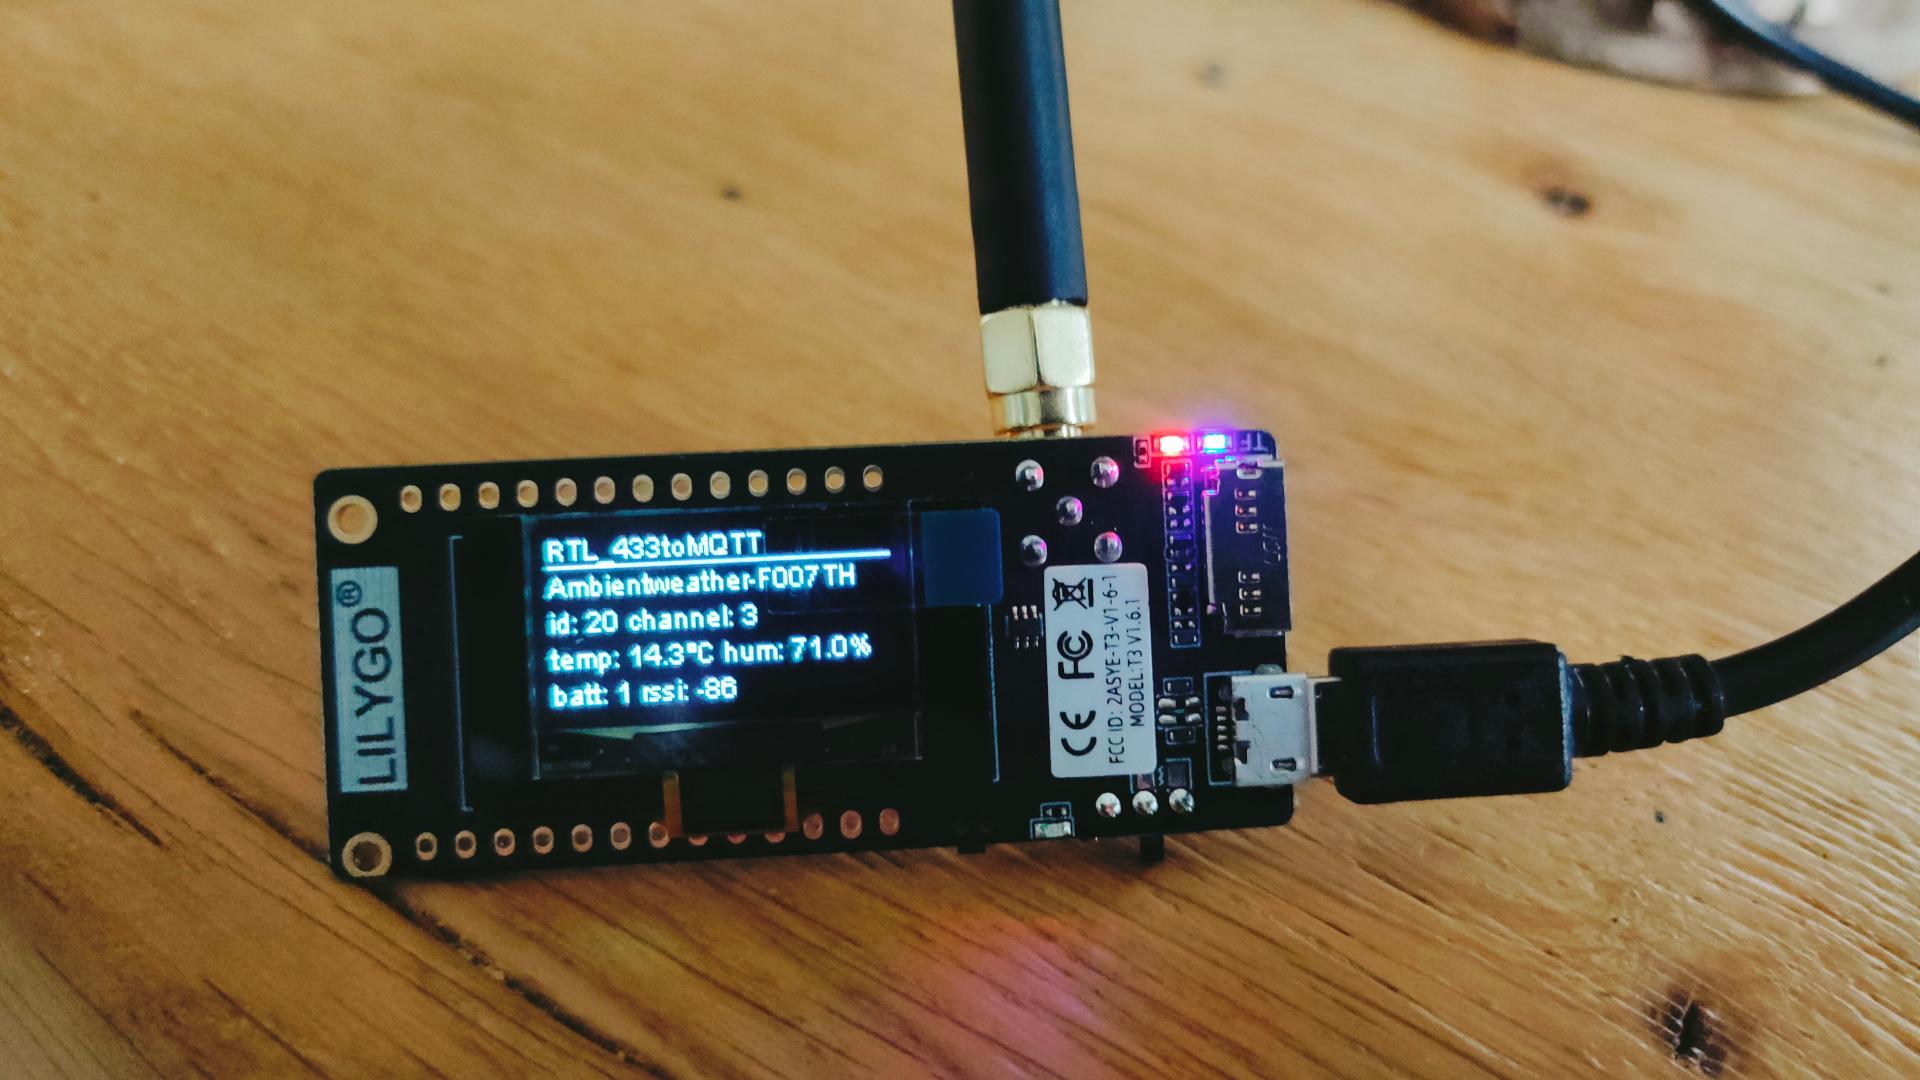
Today I got some new goodies in, one of these is a LilyGO LoRa display which works on 433 Mhz.

I flashed OpenMQTTGateway on this device.

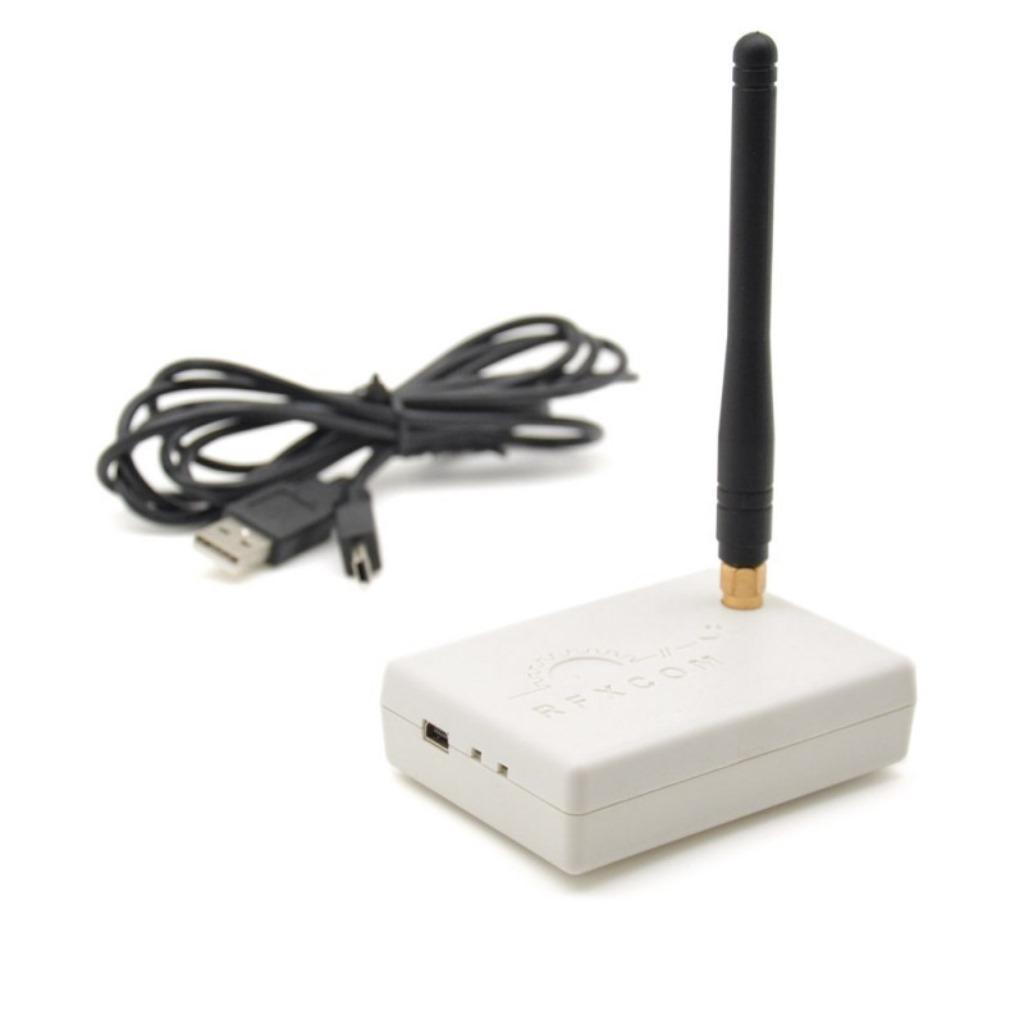
In the past, I posted about the RFCOM Gateway using Domoticz.
This runs on a Raspberry Pi.
While looking for alternatives, I found a rtl-sdr solution.

https://github.com/merbanan/rtl_433

Using this:

But I liked the ESP32 solution more.
Now I can dismantle Domoticz, which served me well for many years.

How cool to see realtime updates!

Note: This is a receiver device only!
But I only use read-only sensors like : Door/window, doorbell, temperature/humidity and Firesensors.

These are automatically detected in Home Assistant.

No more RFXCOM with a Raspberry.

Media control automation in HA revisited

I was not happy with my old setup to control all media devices in my living room.

Controlling all devices using a single button and automations was not easy.

Problems encountered :

  1. Switching from one device to another toggled a device used by both.
  2. Switching from TV to Spotify (using my Onkyo), turned off the TV and cec turned off the Onkyo
  3. Using the Home Assistant Onkyo integration, I could select NET but not NET>Spotify
  4. The Harmony hub I’m using for Infrared Control didn’t expose all buttons.
  5. My Set-top box only power toggles. No way of reading the state.

Addressing problems:

Number 1 & 2 : Disable CEC, and manual add all that cec tried to do for me. (https://en.wikipedia.org/wiki/Consumer_Electronics_Control)

Number 5 :
(See post : https://www.henriaanstoot.nl/2024/04/01/multipurpose-rgb-sensor-esphome/)

Number 3 & 4 : Two options, integrate my web controller for onkyo.
(https://www.henriaanstoot.nl/2009/10/23/onkyo-web-control-hack/)
Or give HA more functionality.

Lets add an Onkyo python script to HA.
Open a webterminal and enter following command

pip install onkyo-eiscp

This will give you:
(Hint: want to copy text from the web terminal? Hold shift while selecting text)

➜  ~ pip install onkyo-eiscp   
Looking in indexes: https://pypi.org/simple, https://wheels.home-assistant.io/musllinux-index/
Collecting onkyo-eiscp
  Downloading https://wheels.home-assistant.io/musllinux-index/onkyo_eiscp-1.2.7-py3-none-any.whl.metadata (9.9 kB)
Collecting docopt>=0.4.1 (from onkyo-eiscp)
  Downloading https://wheels.home-assistant.io/musllinux-index/docopt-0.6.2-py2.py3-none-any.whl.metadata (17 kB)
Collecting netifaces (from onkyo-eiscp)
  Downloading https://wheels.home-assistant.io/musllinux-index/netifaces-0.11.0-cp311-cp311-musllinux_1_2_x86_64.whl.metadata (8.9 kB)
Downloading https://wheels.home-assistant.io/musllinux-index/onkyo_eiscp-1.2.7-py3-none-any.whl (45 kB)
   ━━━━━━━━━ 45.7/45.7 27.8     eta 0:00:00
             kB        MB/s                
Downloading https://wheels.home-assistant.io/musllinux-index/docopt-0.6.2-py2.py3-none-any.whl (13 kB)
Downloading https://wheels.home-assistant.io/musllinux-index/netifaces-0.11.0-cp311-cp311-musllinux_1_2_x86_64.whl (13 kB)
Installing collected packages: netifaces, docopt, onkyo-eiscp
Successfully installed docopt-0.6.2 netifaces-0.11.0 onkyo-eiscp-1.2.7
WARNING: Running pip as the 'root' user can result in broken permissions and conflicting behaviour with the system package manager. It is recommended to use a virtual environment instead: https://pip.pypa.io/warnings/venv
➜  ~ onkyo
Usage:
  onkyo [--host <host>] [--port <port>]
        [--all] [--name <name>] [--id <identifier>]
        [--verbose | -v]... [--quiet | -q]... <command>...
  onkyo --discover
  onkyo --help-commands [<zone> <command>]
  onkyo -h | --help
➜  ~ which onkyo
/usr/bin/onkyo

Now we can integrate shell commands in HA!

NET > Spotify
onkyo --host 192.168.1.2 NSV0A0

Spotify > track info
onkyo --host 192.168.1.2 NTIQSTN

Spotify > Artist
onkyo --host 192.168.1.2 NATQSTN

Turn Onkyo ON/OFF
onkyo --host 192.168.1.2 PWR01
onkyo --host 192.168.1.2 PWR00

Get Power state
onkyo --host 192.168.1.2 PWRQSTN

Mute on/off
onkyo --host 192.168.1.2 AMT01 or AMT00

Volume Level
onkyo --host 192.168.1.2 MVLQSTN

Home Assistant Shell Command example

  - platform: command_line
    switches:
      onkyo_mute:
        command_on: "/usr/bin/onkyo --host 192.168.1.2 AMT00"
        command_off: "/usr/bin/onkyo --host 192.168.1.2 AMT01"

Getting album art:

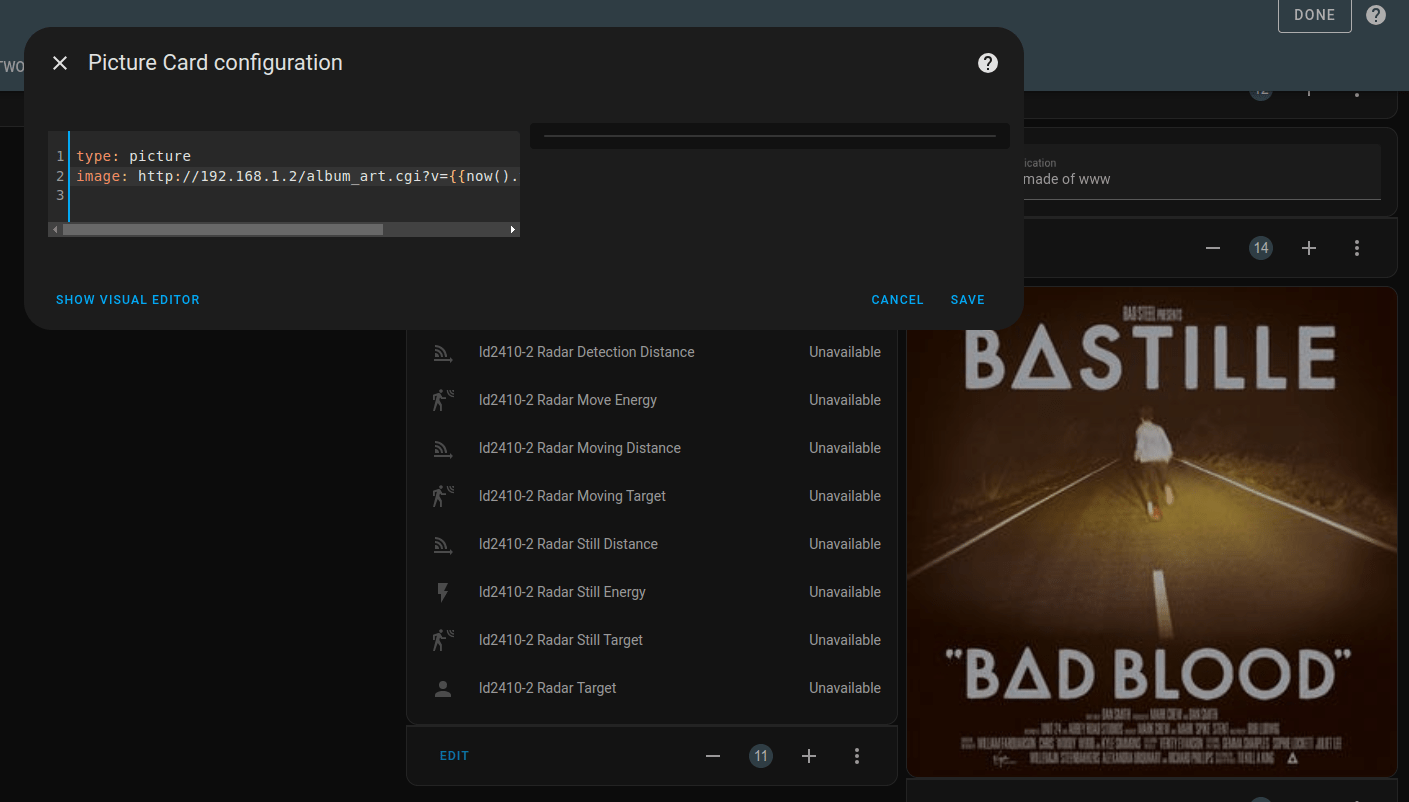
Get image from below url.
Note! .. its a static non refreshing image!

http://192.168.1.2/album_art.cgi

Note: This gives me a file which shows fine in a browser, but being a http feed you cannot embed this in a https site.
Another ‘problem’ with this image is that it includes headers, rendering this a invalid jpg when processing!
(remove first 3 lines programmatically)
I also want to have it updated, so I could make a mjpeg streamer for this.
Probably i’m going to use my reverse proxy which uses SSL offloading to access cover art over https.
(Then I can push this cover image on this webblog so you guys can see what we are listing to)

Another idea is to push this to an arduino display.

Not using https?

You can embed the album art in a dashboard. This won’t refresh, but the added time code will stop caching problems.

type: picture<br>image: http://192.168.1.2/album_art.cgi?v={{now().timestamp()|int }}")

Todo:

Make the automations foolproof.

Watching TV and want to listen to Spotify?

  1. Turn TV off
  2. Switch Onkyo to Net and Spotify
  3. (Adjust volume)
  4. Toggle TV set-top box off

etc

Next todo:
Cover art embed in HA.
Maybe in embed in this blog.
Make a small cover art display.

PHP code to strip lines and put behind a reverse proxy

<?php
header('Content-type: image/jpg');
$lines = file_get_contents('http://192.168.1.2/album_art.cgi', false);
$lines = explode("\n", $lines);
$content = implode("\n", array_slice($lines, 3));
print $content;
?>

You can use Generic Camera to refesh!

https://www.home-assistant.io/integrations/generic

Current Cover Art

Get cover art from Logitech Media Server

http://192.168.1.3:9000/music/current/cover.jpg?player=<playerid>

Home Assistant – Reboot, start,shutdown and switch OS

This is my short log about (re)starting booting machines.

configuration.yaml

#WOL to start a machine
  - platform: wake_on_lan
    name: "wakeserver"
    mac: ec:be:5f:ee:11:78

#SHELL command to remote start reboot2windows script (multiboot machine)
shell_command:
    ssh_reboottowindows: ssh -i /config/ssh/id_ed25519 -o 'StrictHostKeyChecking=no' root@192.168.1.2 '/root/reboot2windows'
shell_command:
    ssh_haltlinux: ssh -i /config/ssh/id_ed25519 -o 'StrictHostKeyChecking=no' root@192.168.1.2 'halt -p'

reboot2windows linux script (on the remote server)

#!/bin/bash
#place in /root/
#chmod +x /root/reboot2windows
PATH=/usr/local/sbin:/usr/local/bin:/usr/sbin:/usr/bin:/sbin:/bin:/usr/games:/usr/local/games:/snap/bin
WINDOWS_TITLE=`grep -i "^menuentry 'Windows" /boot/grub/grub.cfg|head -n 1|cut -d"'" -f2`
grub-reboot "$WINDOWS_TITLE"
reboot

install https://iotlink.gitlab.io/ on your windows instance

scripts.yaml (with a helper button rebootwindows2linux, shutdownwindows)

#Reboot windows, linux is the default
windows2linux:
  alias: rebootwinserver
  sequence:
  - service: mqtt.publish
    metadata: {}
    data:
      qos: 0
      retain: false
      topic: iotlink/workgroup/winserver/commands/reboot
  mode: single
shutdownwindows:
  alias: shutdownwinserver
  sequence:
  - service: mqtt.publish
    metadata: {}
    data:
      qos: 0
      retain: false
      topic: iotlink/workgroup/winserver/commands/shutdown
  mode: single

automation rebootlinux2windows

(using a helper button rebootlinux2windows)

alias: rebootlinux2windows
description: ""
trigger:
  - platform: state
    entity_id:
      - input_button.rebootlinux2windows
condition: []
action:
  - service: shell_command.ssh_reboottowindows
    data: {}
mode: single

Configuring ssh keys

Open HA terminal

cd
ssh-keygen (enter) (enter) (enter) (enter) 
mkdir -p config/ssh
cp ~/.ssh/id* config/ssh/ 

Server scripts notification for Home Assistant

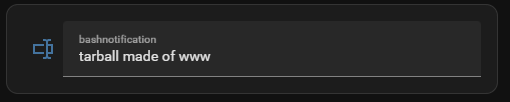
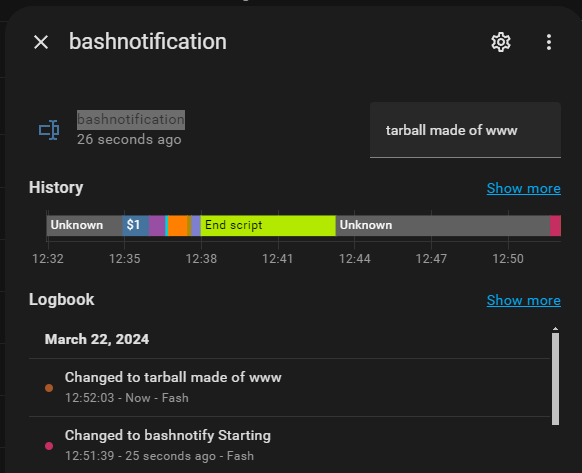
I’m running loads of housekeeping scripts on my servers.

I thought it would be cool to see states in HA.

Steps:

  • Log into your HA instance, and press your profile icon in the bottom left.
    Scroll to Long-lived access tokens, and create a new token.
    (Save the token string in a text file, you need it later)
  • Goto Settings > Devices & services > Helpers
    Create helper: Text and give it a name (bashnotification)
  • Next create a script in a path on your server, or place in an existing script directly.
    (Change SAVEDTOKENSTRING,HA-IP and bashnotification)
curl -s -X POST -H "Authorization: Bearer SAVEDTOKENSTRING" -H "Content-Type: application/json" -d "{\"state\": \"$1\"}" http://HA-IP:8123/api/states/input_text.bashnotification >/dev/null

I use it like this in a script

#!/bin/bash
bashnotify "Starting this script"

bash commands bash commands 
bash commands 
bash commands bash commands bash commands 
bash commands bash commands 

bashnotify "Bash command finished"

Running an adhoc command

tar czvf /tmp/test.tgz /var/www/html ; bashnotify "tarball made of www"