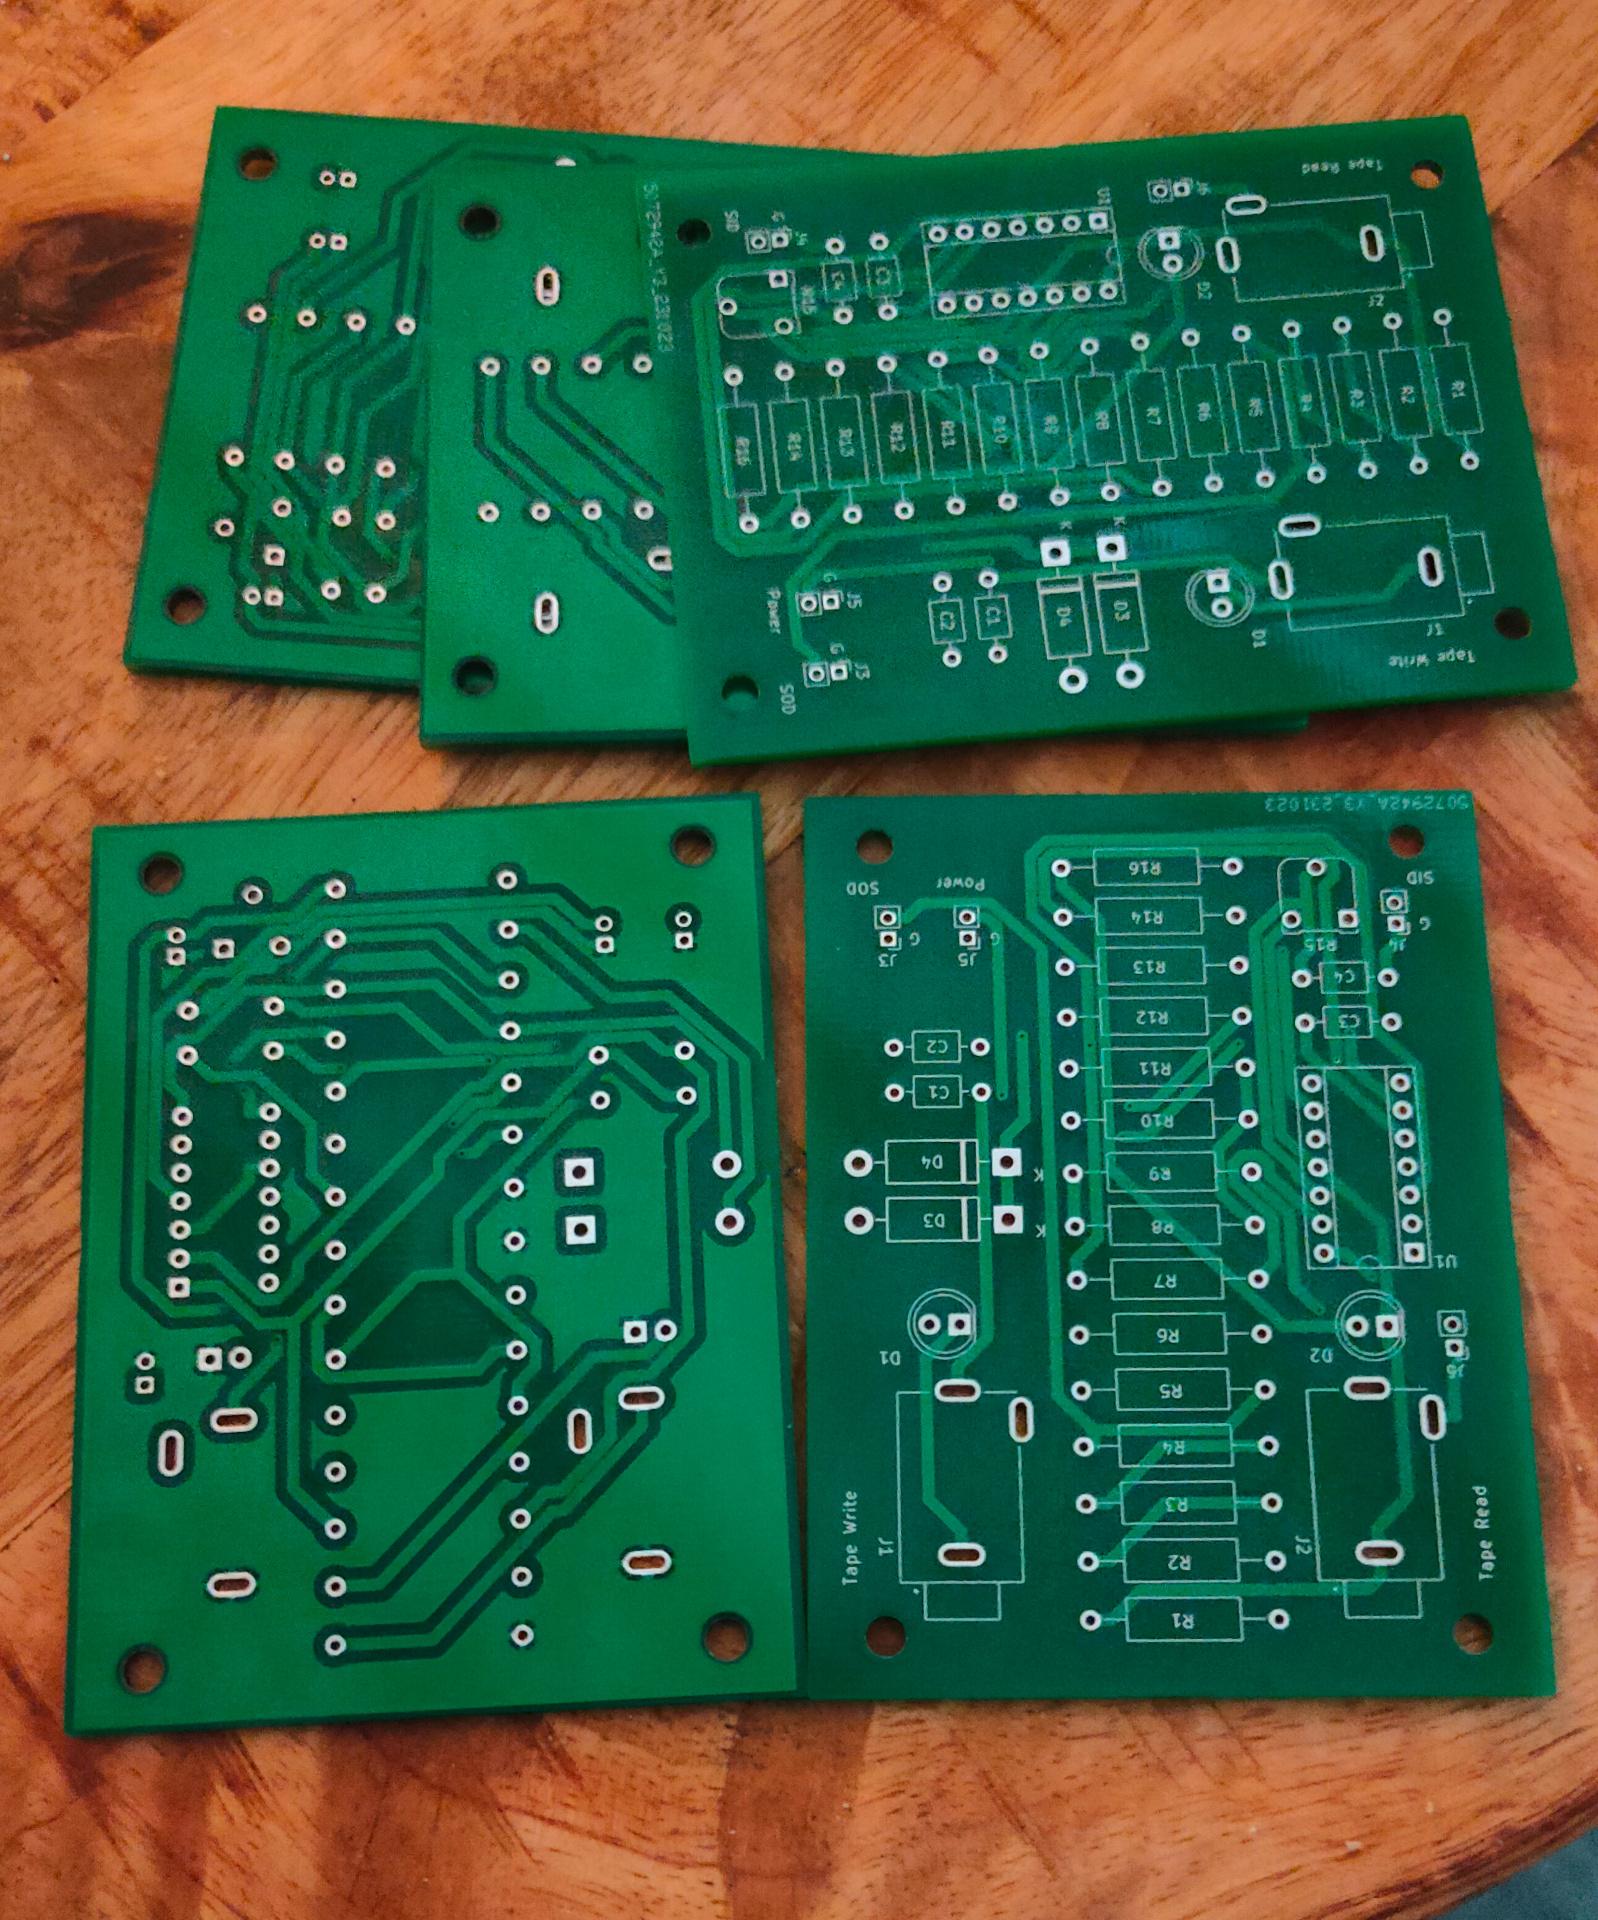
I’ve got my SDK-85 cassette interface PCB’s in, If you want to have the Kicad files. Message me.
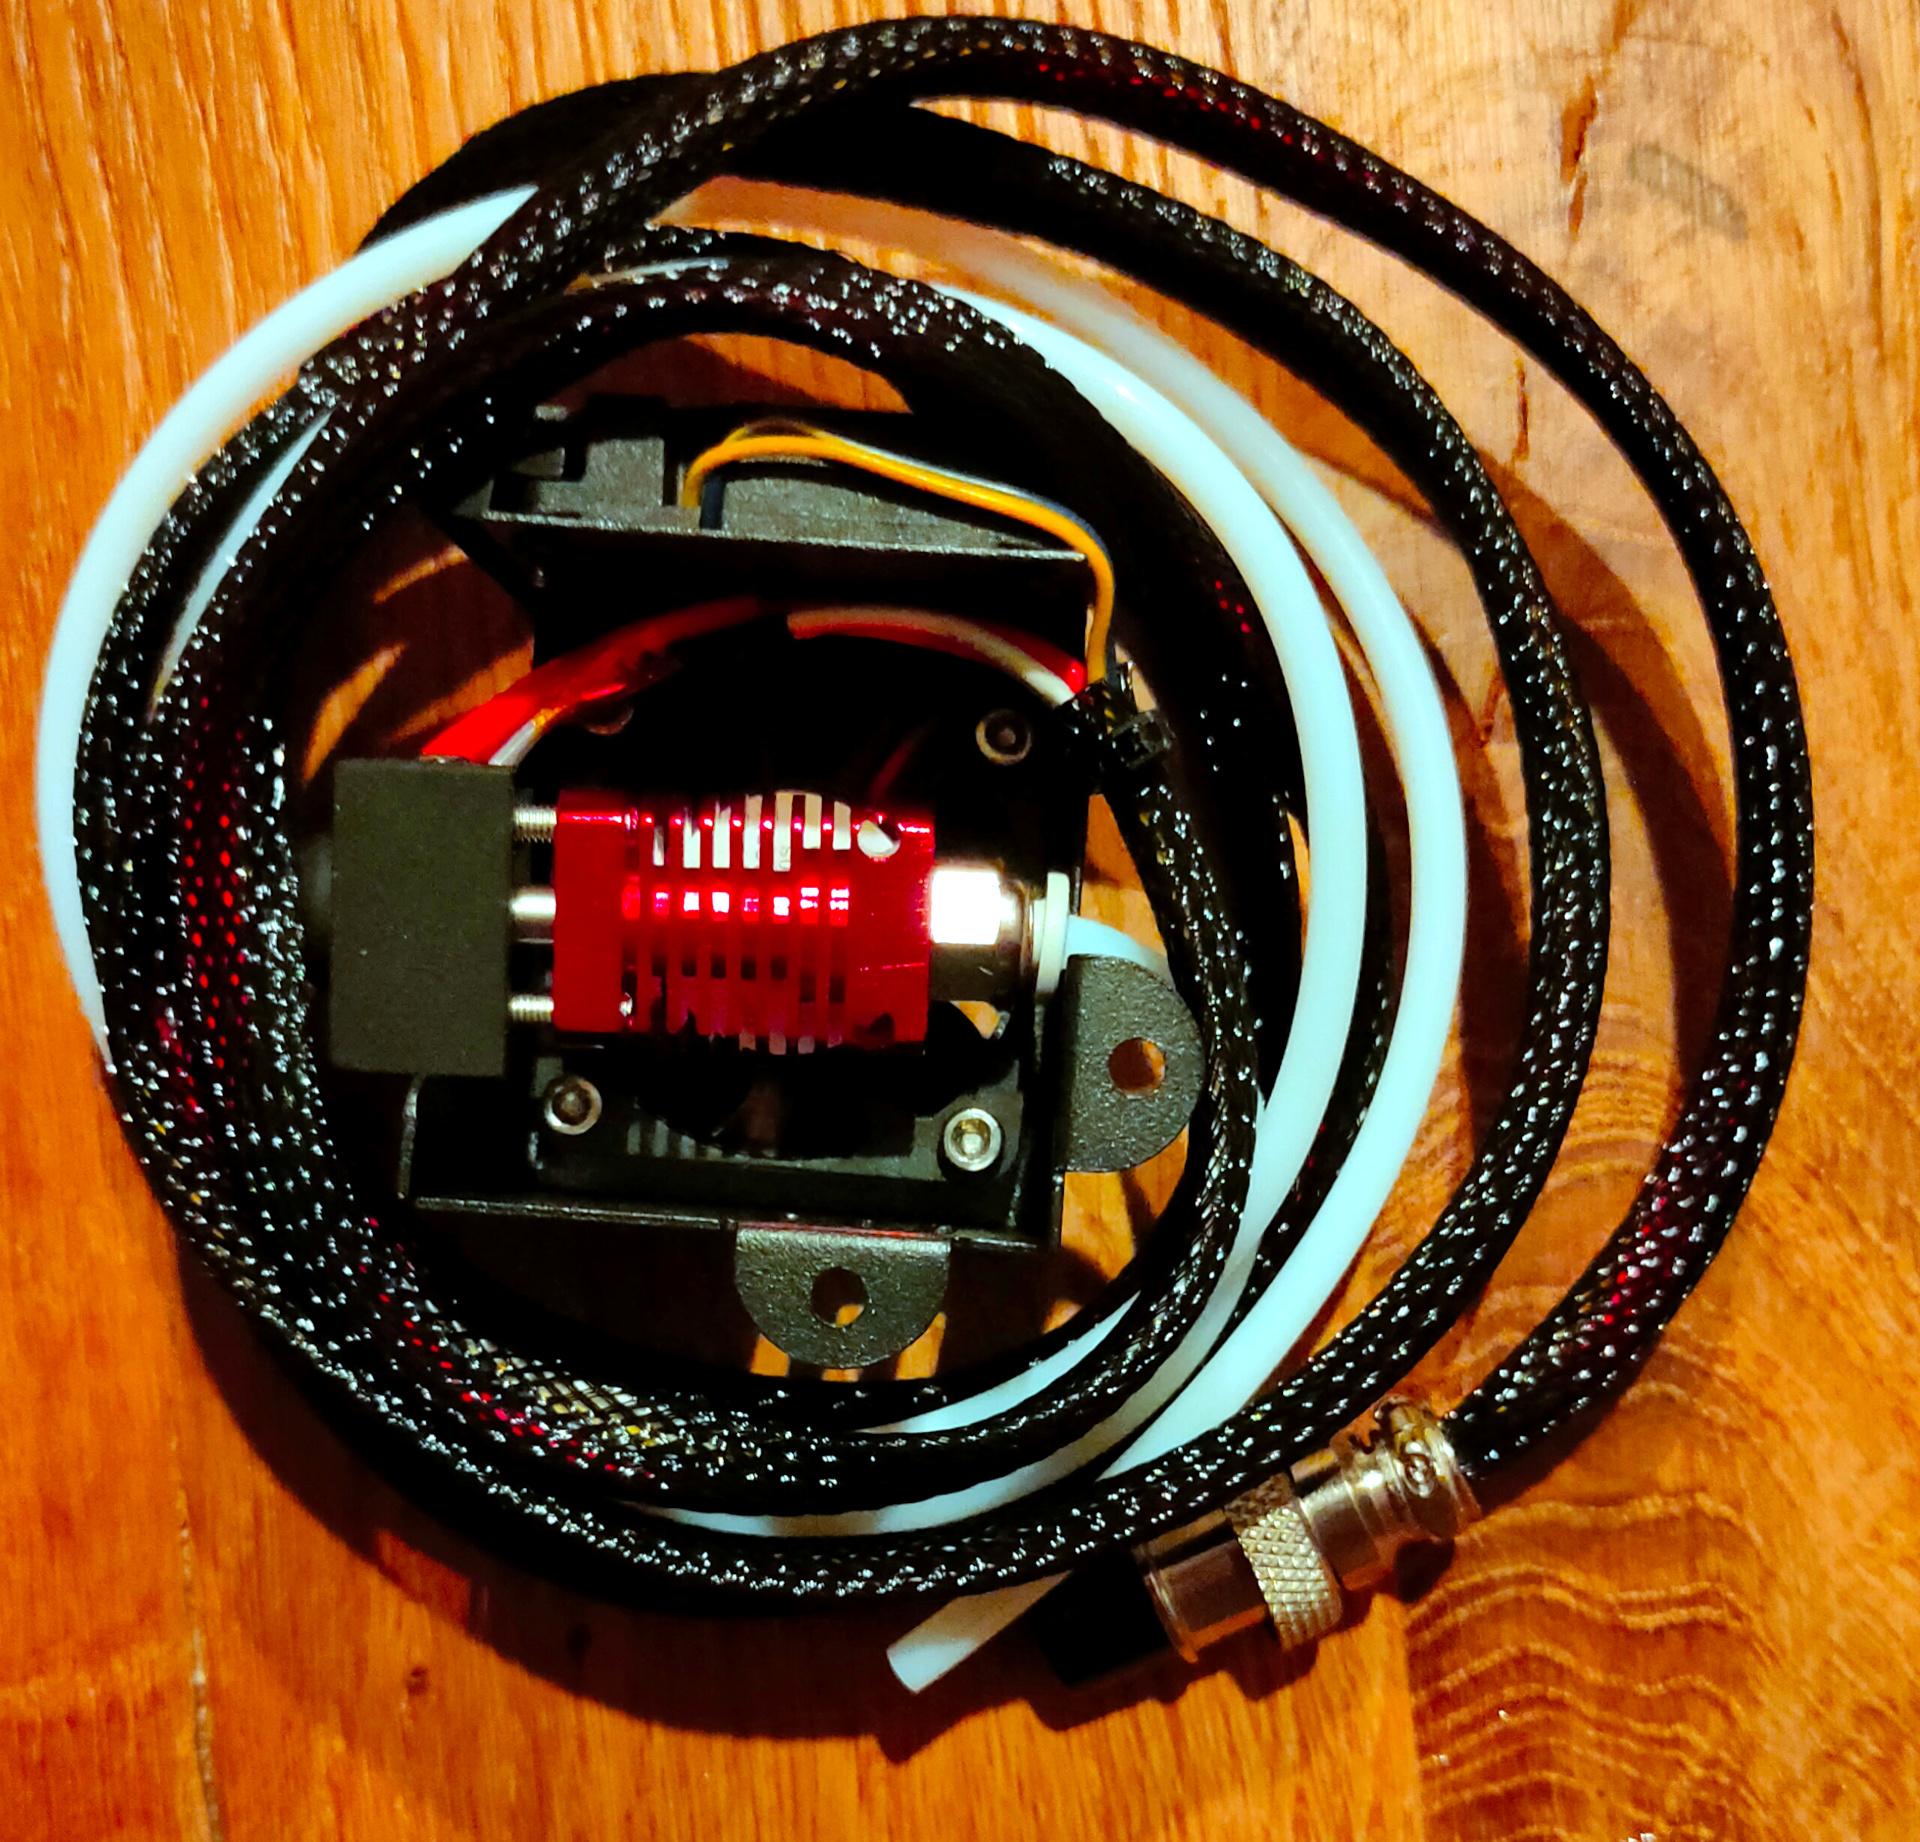
My 3D printer has a worn out hot-end .. so a new one to install.
BBQ time! .. That’s from 1-januari till 31-december .. rain, snow storm whatever. I’ve made a lot of Rubs/Sauces and marinades. But a new book i always welcome ..
Also new recipes and tips. Let me know.
Sunday a day of music with our folkband. Played some old and new tunes.
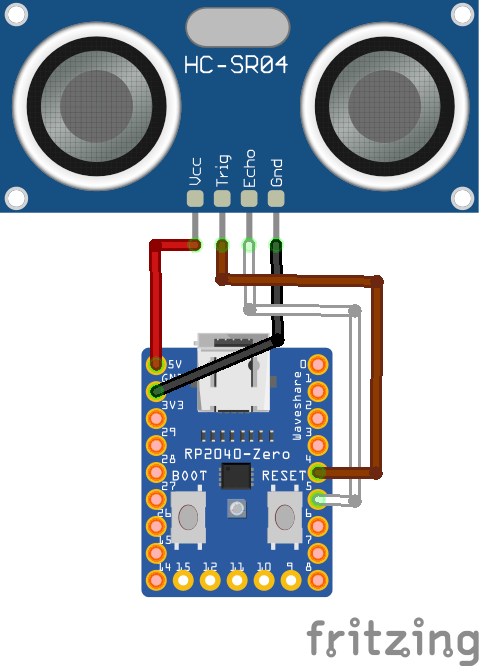
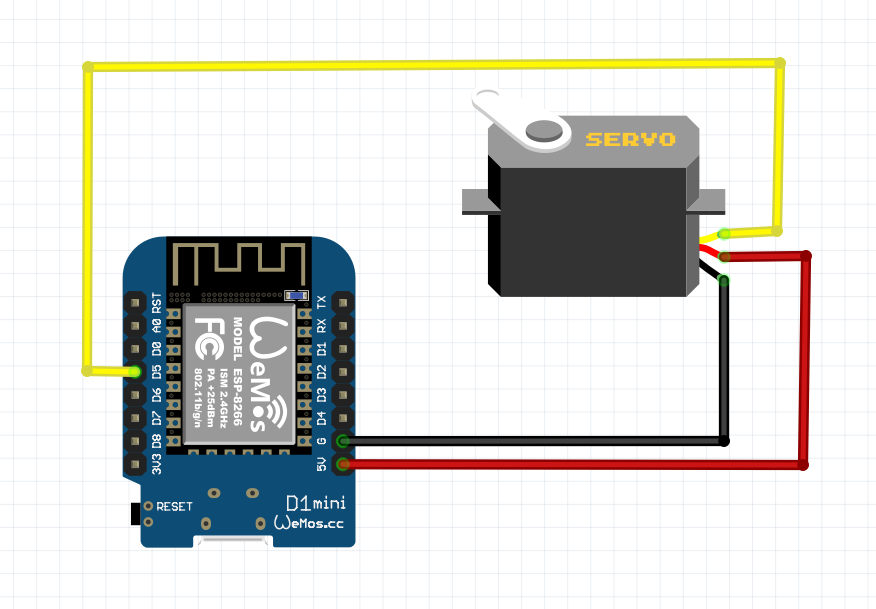
Point the sensor at yourself when behind your computer. When you leave your computer for some seconds, it wil automatically lock your screen. (Windows-L keypress) The RP2040 is configured as HID so it emulates a keyboard. Just connect via an usb-cable to your machine
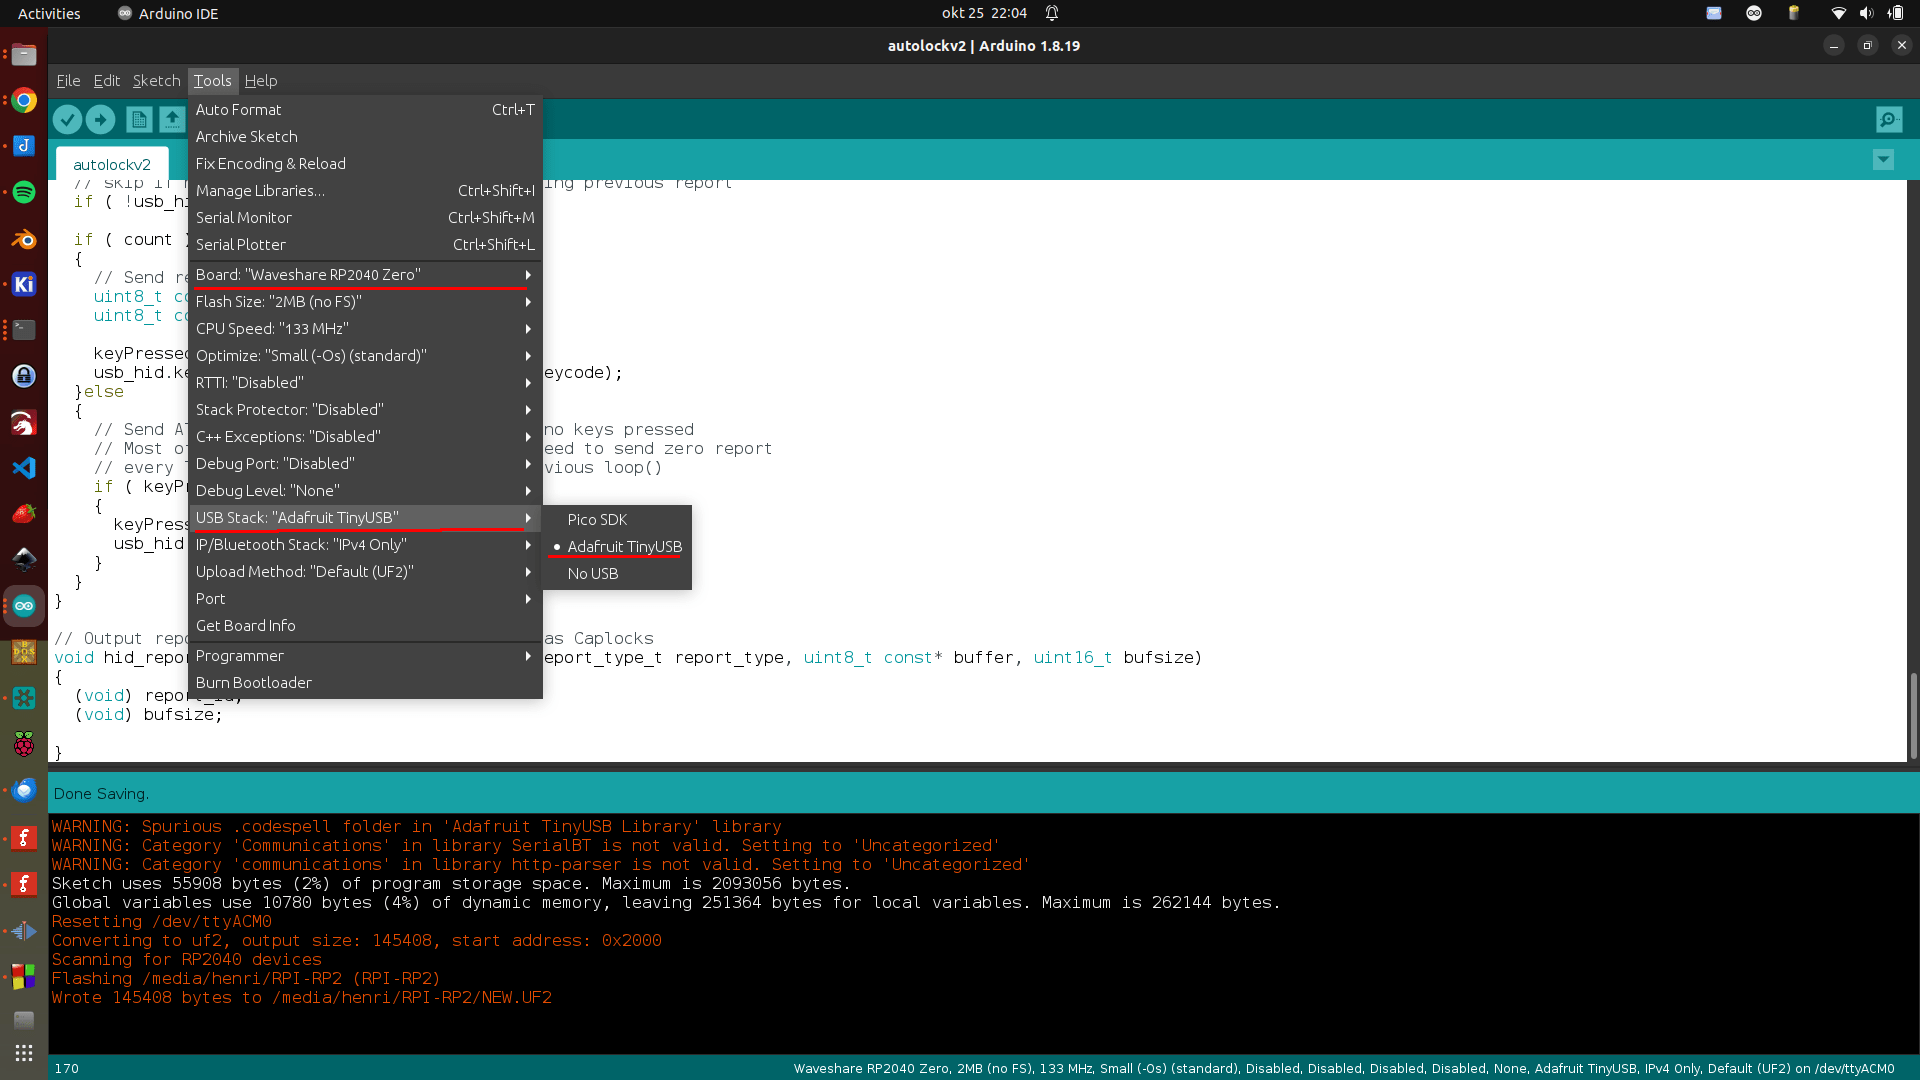
#include "Adafruit_TinyUSB.h"
// defines pins numbers
const int trigPin = D4;
const int echoPin = D5;
// defines variables
long duration;
int distance;
int maxcounter;
uint8_t const desc_hid_report[] =
{
  TUD_HID_REPORT_DESC_KEYBOARD()
};

// D0-D3 NOT USED AT THE MOMENT, I'VE GOT IDEAS FOR EXTRA FUNCTIONALLITY!

// USB HID object. For ESP32 these values cannot be changed after this declaration
// desc report, desc len, protocol, interval, use out endpoint
Adafruit_USBD_HID usb_hid(desc_hid_report, sizeof(desc_hid_report), HID_ITF_PROTOCOL_KEYBOARD, 2, false);

//------------- Input Pins -------------//
// Array of pins and its keycode.
  uint8_t pins[] = { D0, D1, D2, D3 };


// number of pins
uint8_t pincount = sizeof(pins)/sizeof(pins[0]);

// For keycode definition check out https://github.com/hathach/tinyusb/blob/master/src/class/hid/hid.h
uint8_t hidcode[] = { HID_KEY_0, HID_KEY_1, HID_KEY_2, HID_KEY_3 , HID_KEY_4, HID_KEY_5 };

#if defined(ARDUINO_SAMD_CIRCUITPLAYGROUND_EXPRESS) || defined(ARDUINO_NRF52840_CIRCUITPLAY) || defined(ARDUINO_FUNHOUSE_ESP32S2)
  bool activeState = true;
#else
  bool activeState = false;
#endif

void setup()
{
  // Setting pins for Ultrasonic Sensor HC-SR04
  pinMode(trigPin, OUTPUT); // Sets the trigPin as an Output
  pinMode(echoPin, INPUT); // Sets the echoPin as an Input

#if defined(ARDUINO_ARCH_MBED) && defined(ARDUINO_ARCH_RP2040)
  // Manual begin() is required on core without built-in support for TinyUSB such as mbed rp2040
  TinyUSB_Device_Init(0);
#endif

  // Set up output report (on control endpoint) for Capslock indicator
  // Not used .. yet
  usb_hid.setReportCallback(NULL, hid_report_callback);

  usb_hid.begin();

  // overwrite input pin with PIN_BUTTONx
  // NOT USED
#ifdef PIN_BUTTON1
  pins[0] = PIN_BUTTON1;
#endif

#ifdef PIN_BUTTON2
  pins[1] = PIN_BUTTON2;
#endif

#ifdef PIN_BUTTON3
  pins[2] = PIN_BUTTON3;
#endif

#ifdef PIN_BUTTON4
  pins[3] = PIN_BUTTON4;
#endif

  // Set up pin as input
  for (uint8_t i=0; i<pincount; i++)
  {
    pinMode(pins[i], activeState ? INPUT_PULLDOWN : INPUT_PULLUP);
  }

  // wait until device mounted
  while( !TinyUSBDevice.mounted() ) delay(1);

maxcounter =0;
}

void loop()
{

  // Clears the trigPin
  digitalWrite(trigPin, LOW);
  delayMicroseconds(2);
  // Sets the trigPin on HIGH state for 10 micro seconds
  digitalWrite(trigPin, HIGH);
  delayMicroseconds(10);
  digitalWrite(trigPin, LOW);
  // Reads the echoPin, returns the sound wave travel time in microseconds
  duration = pulseIn(echoPin, HIGH);
  // Calculating the distance
  distance = duration * 0.034 / 2;
  // Prints the distance on the Serial Monitor - DEBUG
  //Serial.print("Distance: ");
  //Serial.println(distance);

  // Below will wait for more than 100 measurements with a distance of 100
  // Then it will send a WINDOWS-L (lock) keyboard combination
  if (distance > 100)
  {
    maxcounter +=1;
  }
  else
  {
    maxcounter = 0;
  }
  if (maxcounter > 100 && maxcounter < 150)
  {
    maxcounter = 200;
       // Send report if there is key pressed
    uint8_t const report_id = 0;


    uint8_t  modifier = KEYBOARD_MODIFIER_LEFTGUI;
          uint8_t keycode[6] = { 0 };
      keycode[0] = HID_KEY_L;


    usb_hid.keyboardReport(report_id, modifier, keycode);
    delay(10);
    // Un-press keys :)
    usb_hid.keyboardRelease(0);

  }


  // poll gpio once each 2 ms
  delay(20);

  // used to avoid send multiple consecutive zero report for keyboard
  static bool keyPressedPreviously = false;

  uint8_t count=0;
  uint8_t keycode[6] = { 0 };

  // scan normal key and send report
  for(uint8_t i=0; i < pincount; i++)
  {
    if ( activeState == digitalRead(pins[i]) )
    {
      // if pin is active (low), add its hid code to key report
      keycode[count++] = hidcode[i];

      // 6 is max keycode per report
      if (count == 6) break;
    }
  }

  if ( TinyUSBDevice.suspended() && count )
  {
    // Wake up host if we are in suspend mode
    // and REMOTE_WAKEUP feature is enabled by host
    TinyUSBDevice.remoteWakeup();
  }

  // skip if hid is not ready e.g still transferring previous report
  if ( !usb_hid.ready() ) return;

  if ( count )
  {
    // Send report if there is key pressed
    uint8_t const report_id = 0;
    uint8_t const modifier = 0;

    keyPressedPreviously = true;
    usb_hid.keyboardReport(report_id, modifier, keycode);
  }else
  {
    // Send All-zero report to indicate there is no keys pressed
    // Most of the time, it is, though we don't need to send zero report
    // every loop(), only a key is pressed in previous loop()
    if ( keyPressedPreviously )
    {
      keyPressedPreviously = false;
      usb_hid.keyboardRelease(0);
    }
  }
}

// Output report callback for LED indicator such as Caplocks
void hid_report_callback(uint8_t report_id, hid_report_type_t report_type, uint8_t const* buffer, uint16_t bufsize)
{
  (void) report_id;
  (void) bufsize;

}
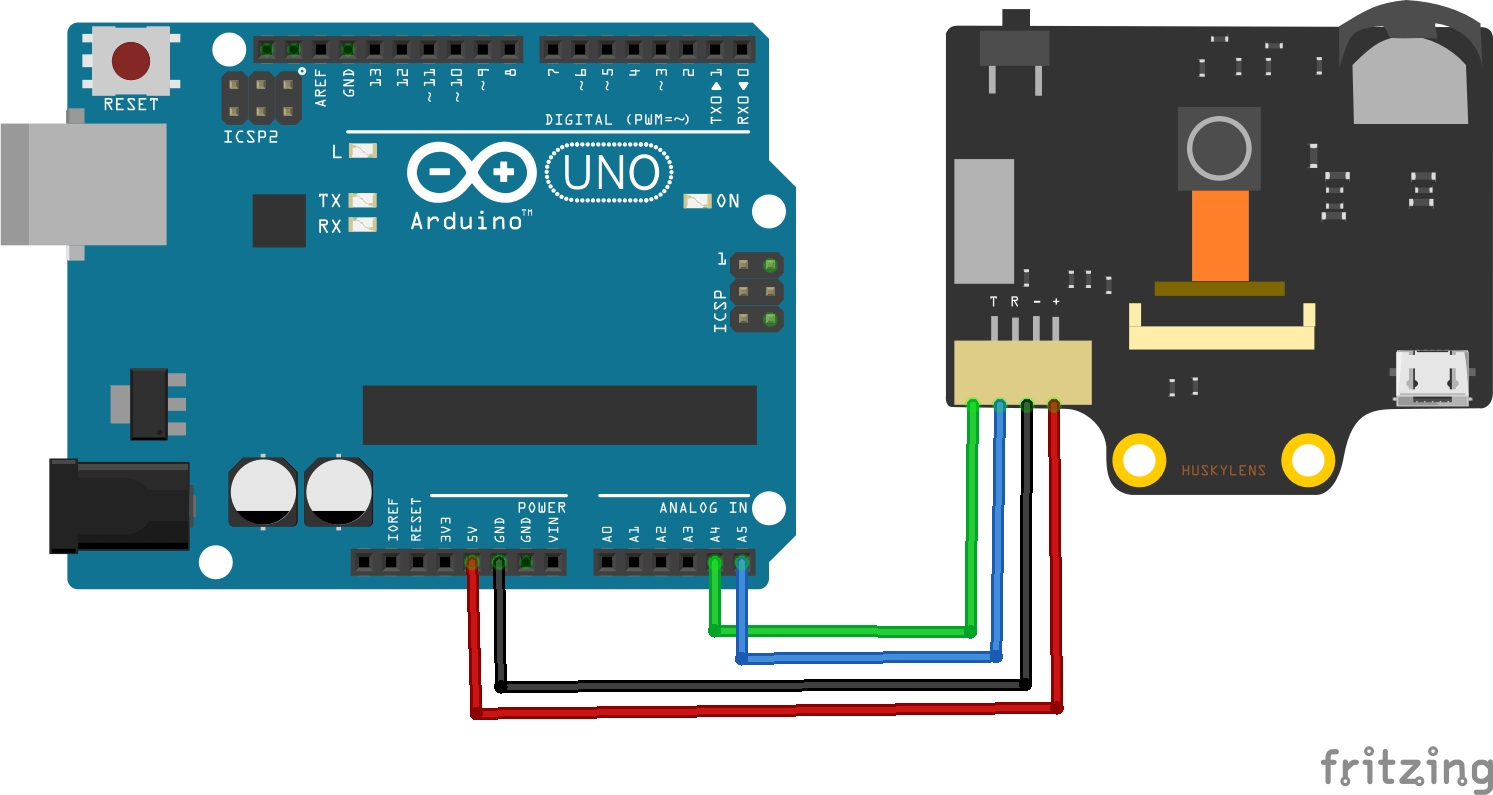
The HuskyLens is an easy-to-use AI machine vision sensor. It is equipped with multiple functions such as:
Face recognition
Object tracking
Object recognition
Line trace
Color recognition
Tag recognition (QR code).
Via the UART / I2C port you can among others: boards connect:
Arduino
micro:bit
Raspberry Pi
Steps to take: Press Face detection, when a cross in a square is displayed, press the button on your HuskyLens
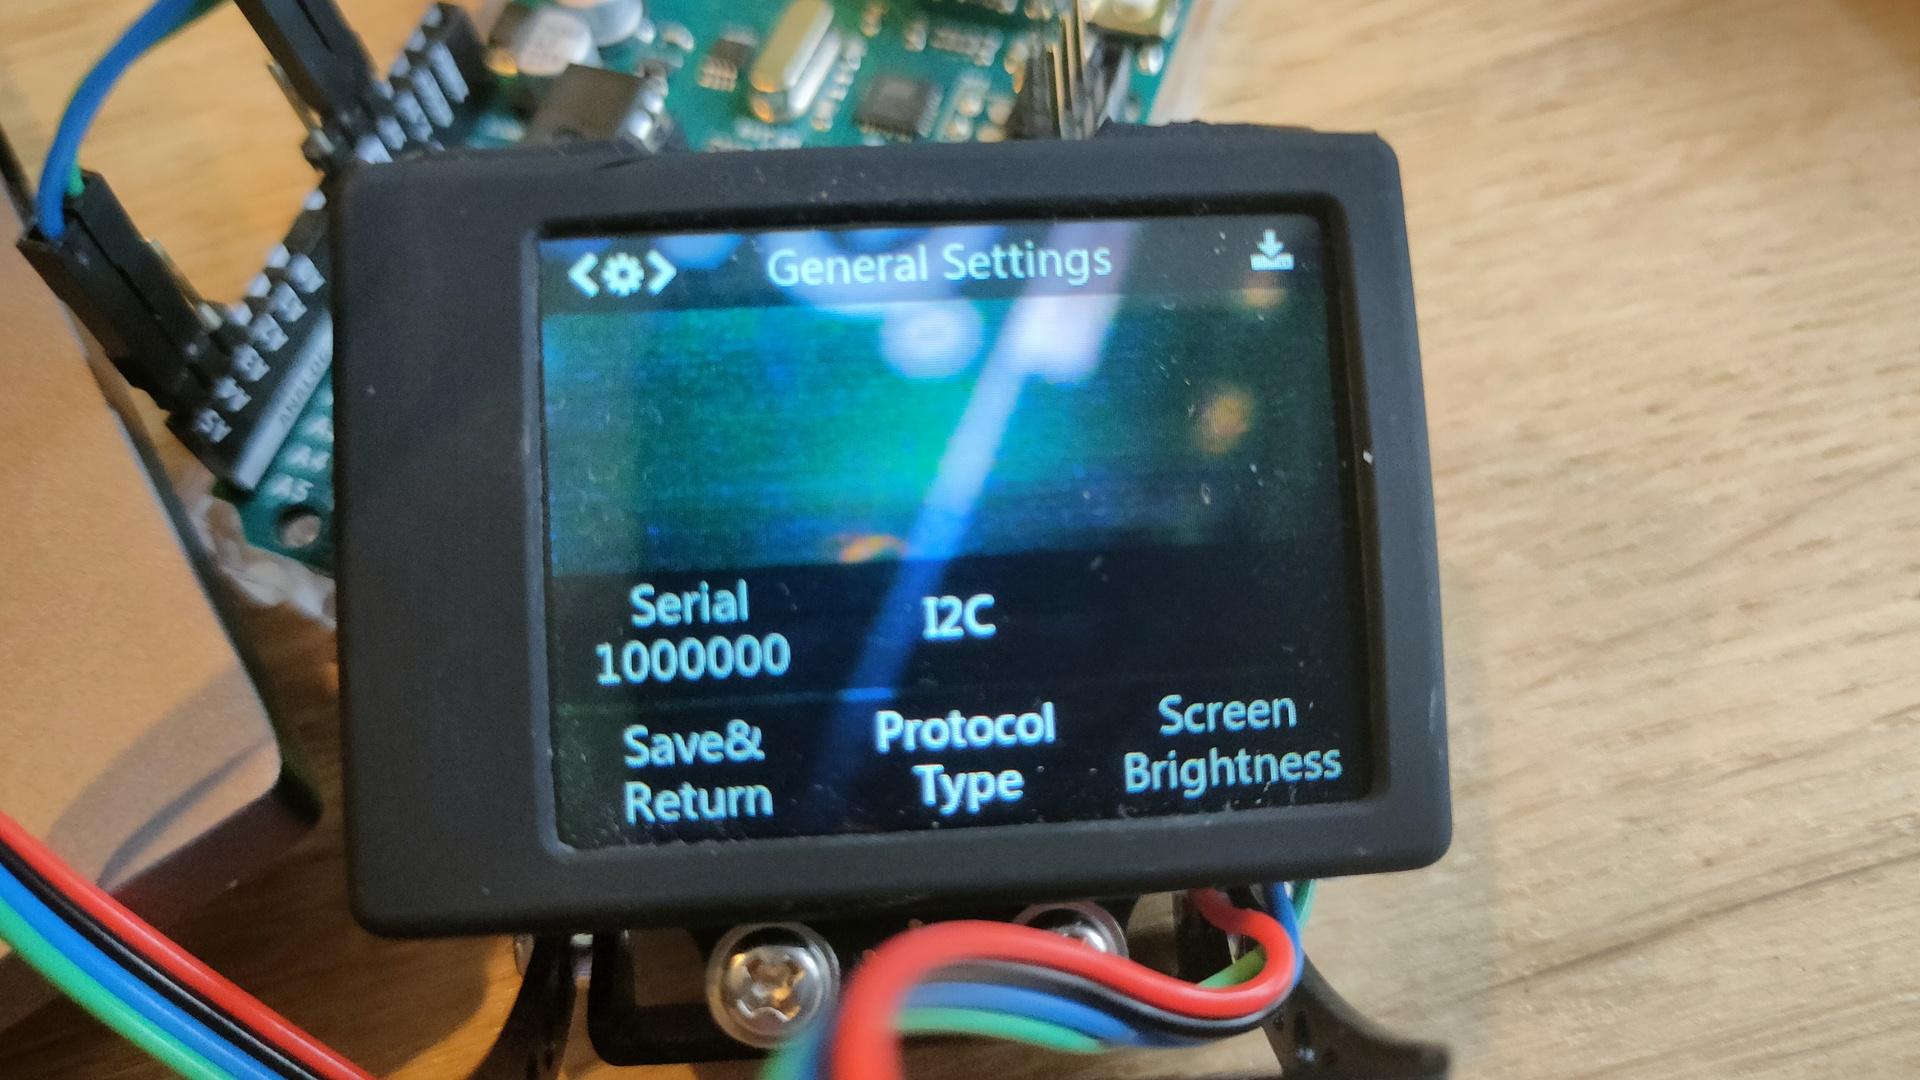
Set your husky protocol to I2C in the settings.
Minimal Code needed
/***************************************************
 HUSKYLENS An Easy-to-use AI Machine Vision Sensor
 <https://www.dfrobot.com/product-1922.html>
****************************************************/

#include "HUSKYLENS.h"

HUSKYLENS huskylens;
//HUSKYLENS green line >> SDA; blue line >> SCL
int ID0 = 0; //not learned results. Grey result on HUSKYLENS screen
int ID1 = 1; //first learned results. colored result on HUSKYLENS screen
int ID2 = 2; //second learned results. colored result on HUSKYLENS screen
// and so on.....

int arjprevious = 0;
void printResult(HUSKYLENSResult result);
void setup() {
    Serial.begin(115200);
    Wire.begin();
    while (!huskylens.begin(Wire))
    {
        Serial.println(F("Begin failed!"));
        Serial.println(F("1.Please recheck the \"Protocol Type\" in HUSKYLENS (General Settings>>Protocol Type>>I2C)"));
        Serial.println(F("2.Please recheck the connection."));
        delay(100);
    }

     huskylens.writeAlgorithm(ALGORITHM_FACE_RECOGNITION);
}

void loop() {
   if (huskylens.requestLearned())          //request blocks and arrows tangged ID != 0 from HUSKYLENS
   if (huskylens.requestBlocksLearned())    //request blocks tangged ID != ID0 from HUSKYLENS

    {
        for (int i = 0; i < huskylens.countArrows(ID0); i++)
        {
            HUSKYLENSResult result = huskylens.getArrow(ID0, i);
        }
        int arj = huskylens.count(ID1);
        if ( arj != arjprevious )
        {
        if ( arj == 1 )
            {
            Serial.println("Learned face detected");
            }
            else
            {
            Serial.println("Learned face not detected");
            }
            arjprevious = arj;
        }
    }
    else
    {
        Serial.println("Fail to request objects from Huskylens!");
    }
}
Learned face detected ID1
Learned face not detected
Learned face detected ID1
Learned face not detected
Learned face detected ID1
Learned face not detected
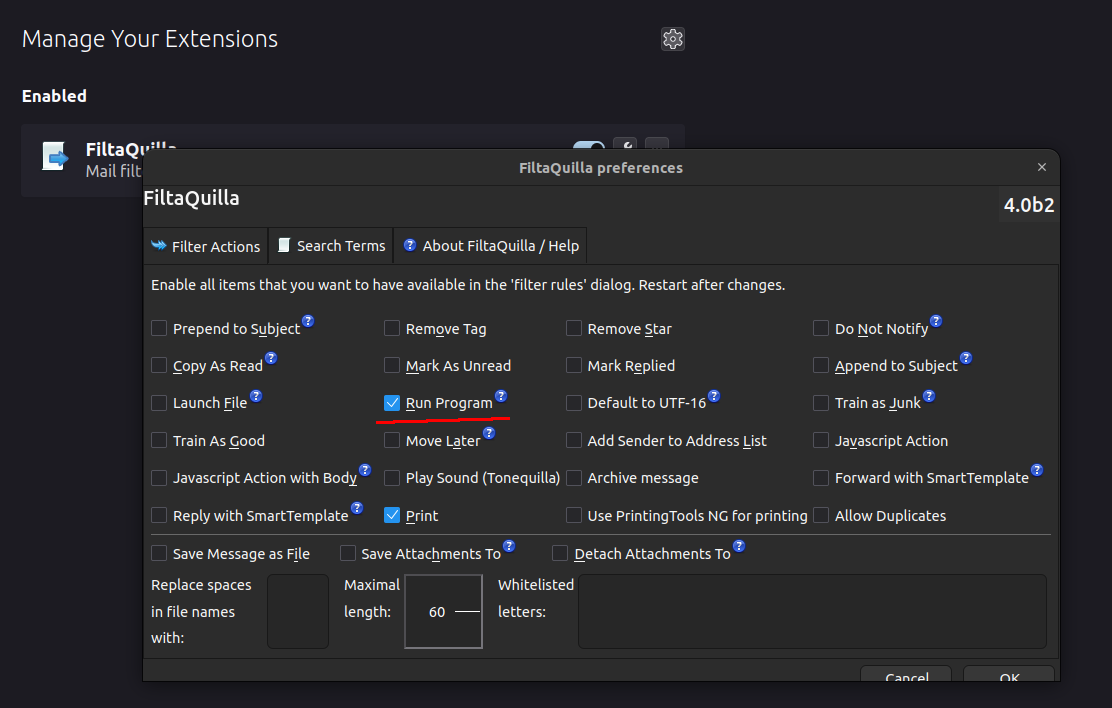
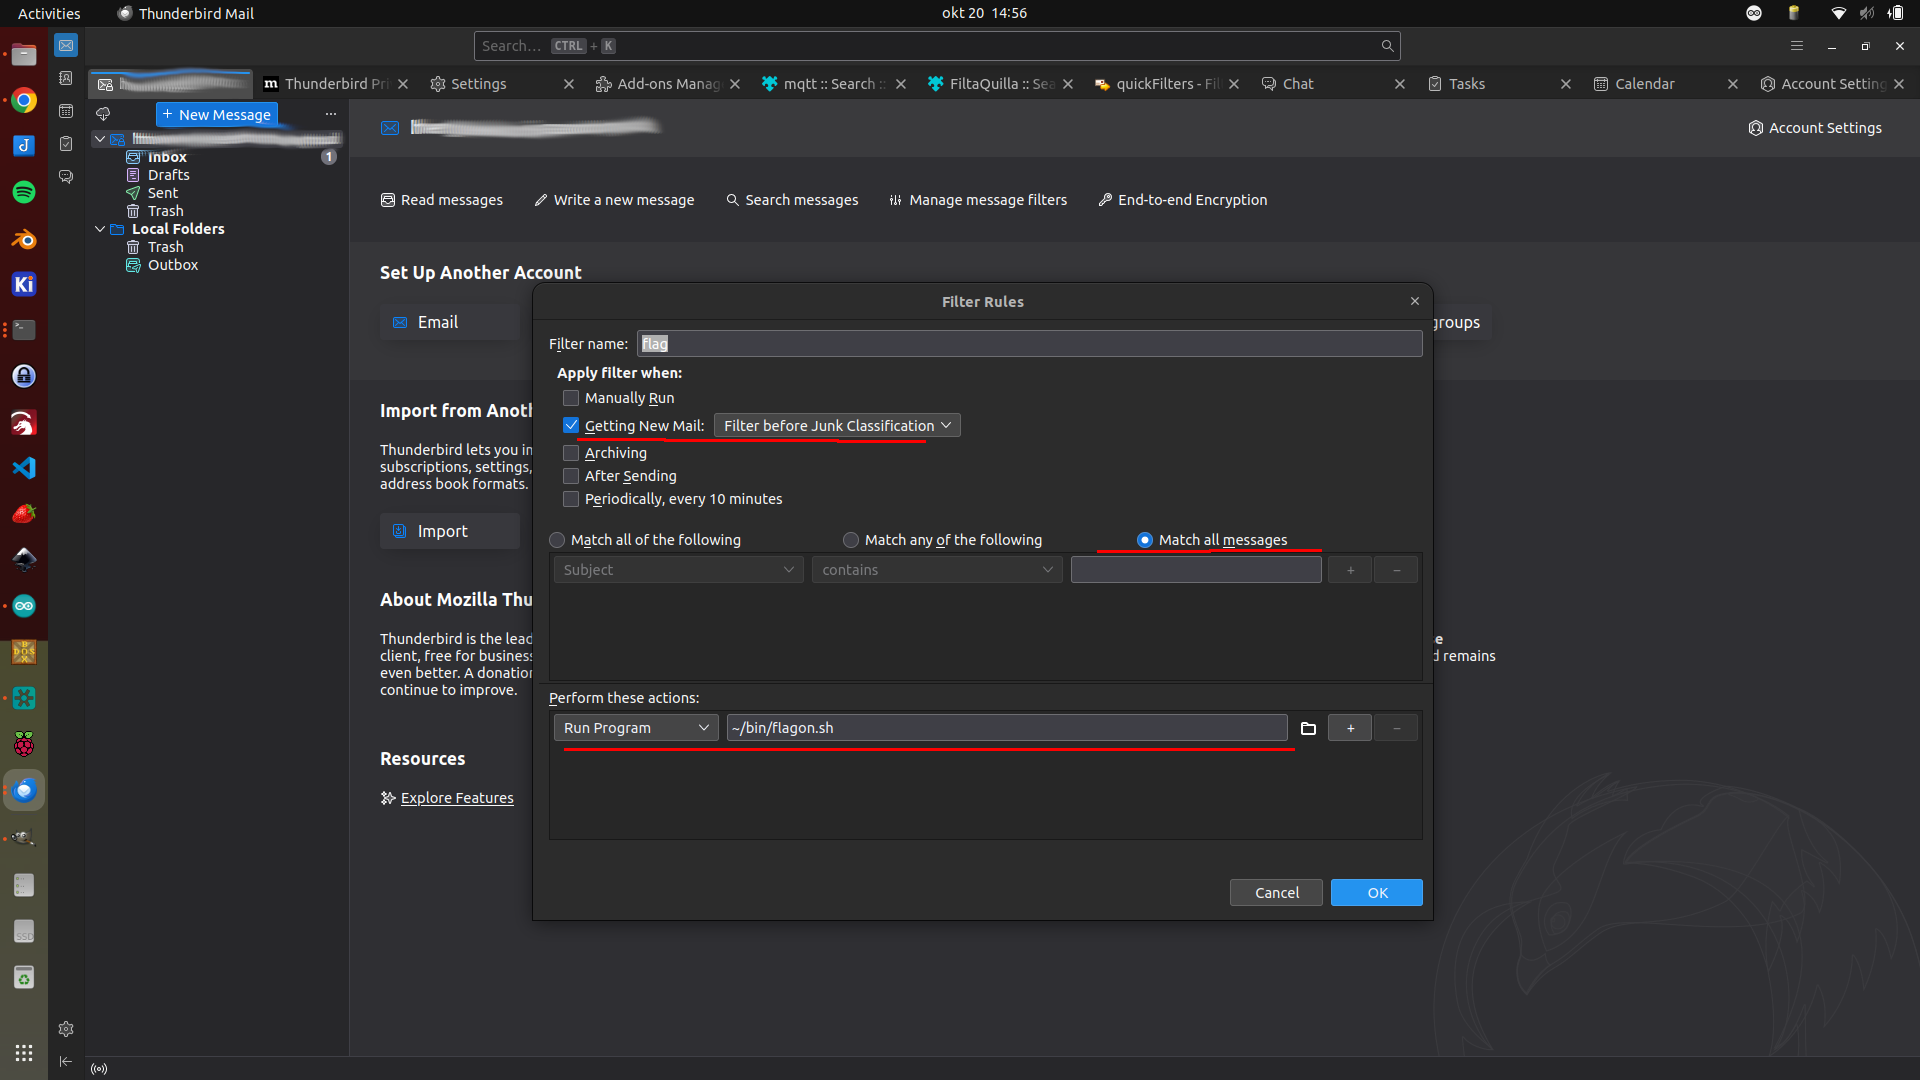
Now i’ve changed the notification flag for Email using Thunderbird. Just connect the wemos to a USB on your computer, no mqtt/wifi needed. (On the road solution)
Steps:
Install FiltaQuilla Add-on in thunderbird select run program in config.
Next create a filter
Create two bash files (i’ve got mine in ~/bin/ ) Change ttyUSB0 if needed
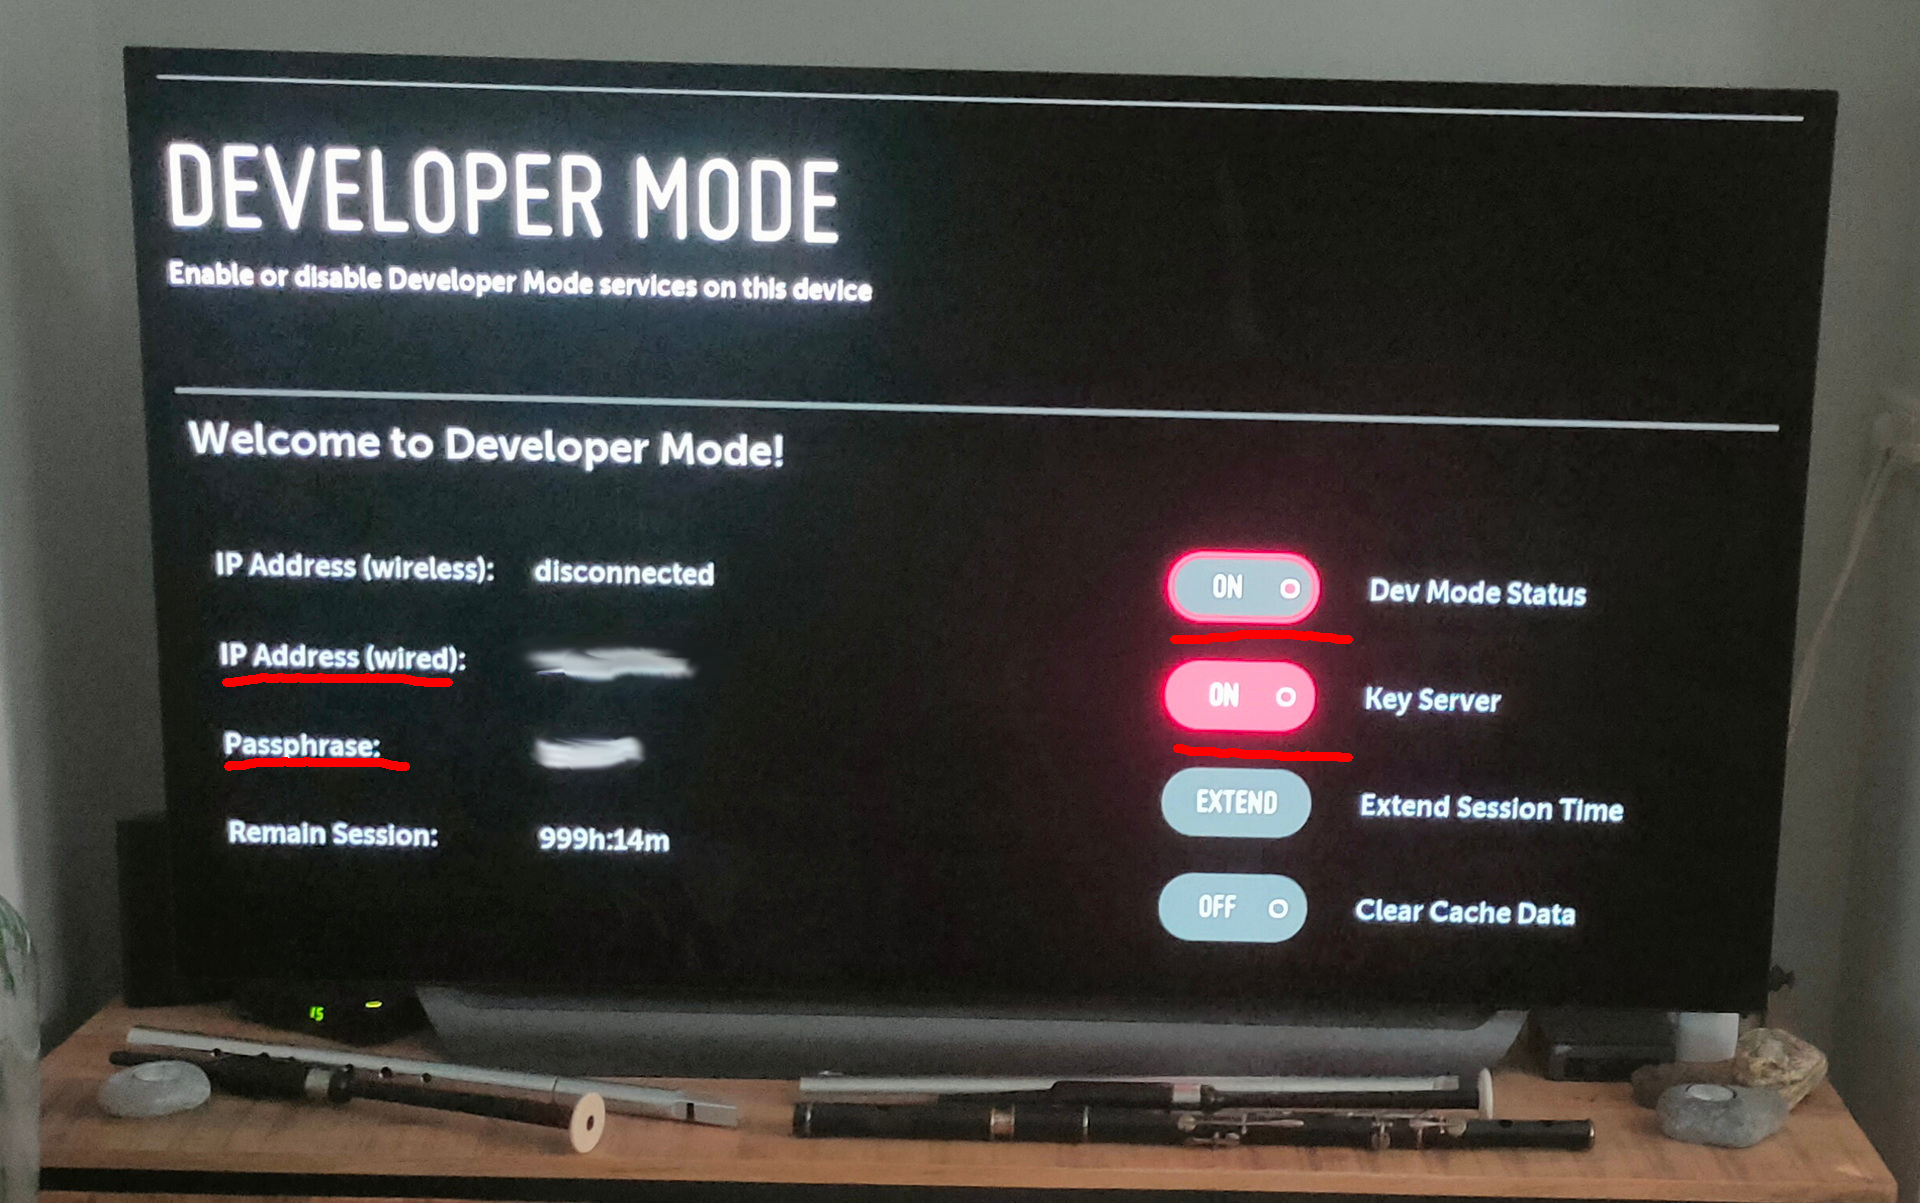
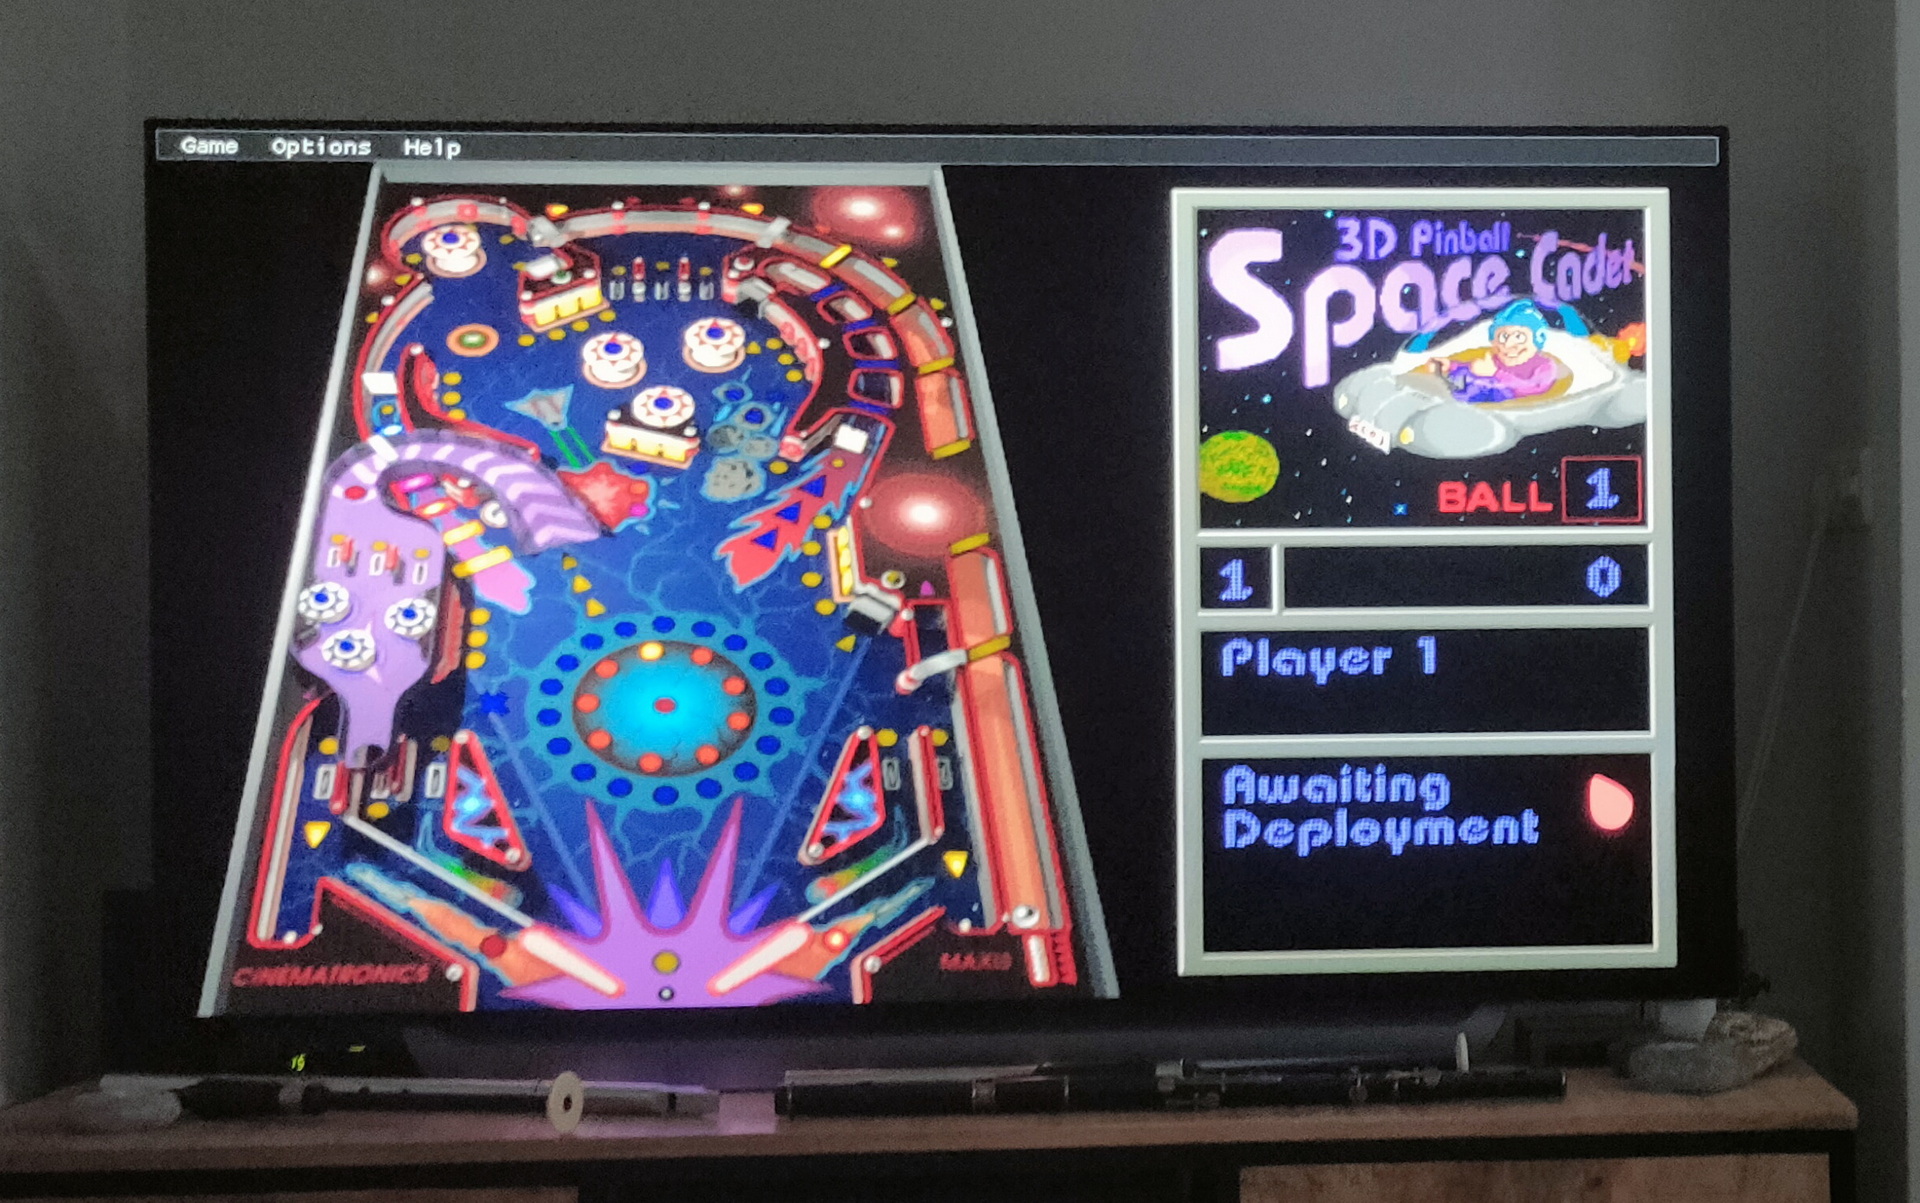
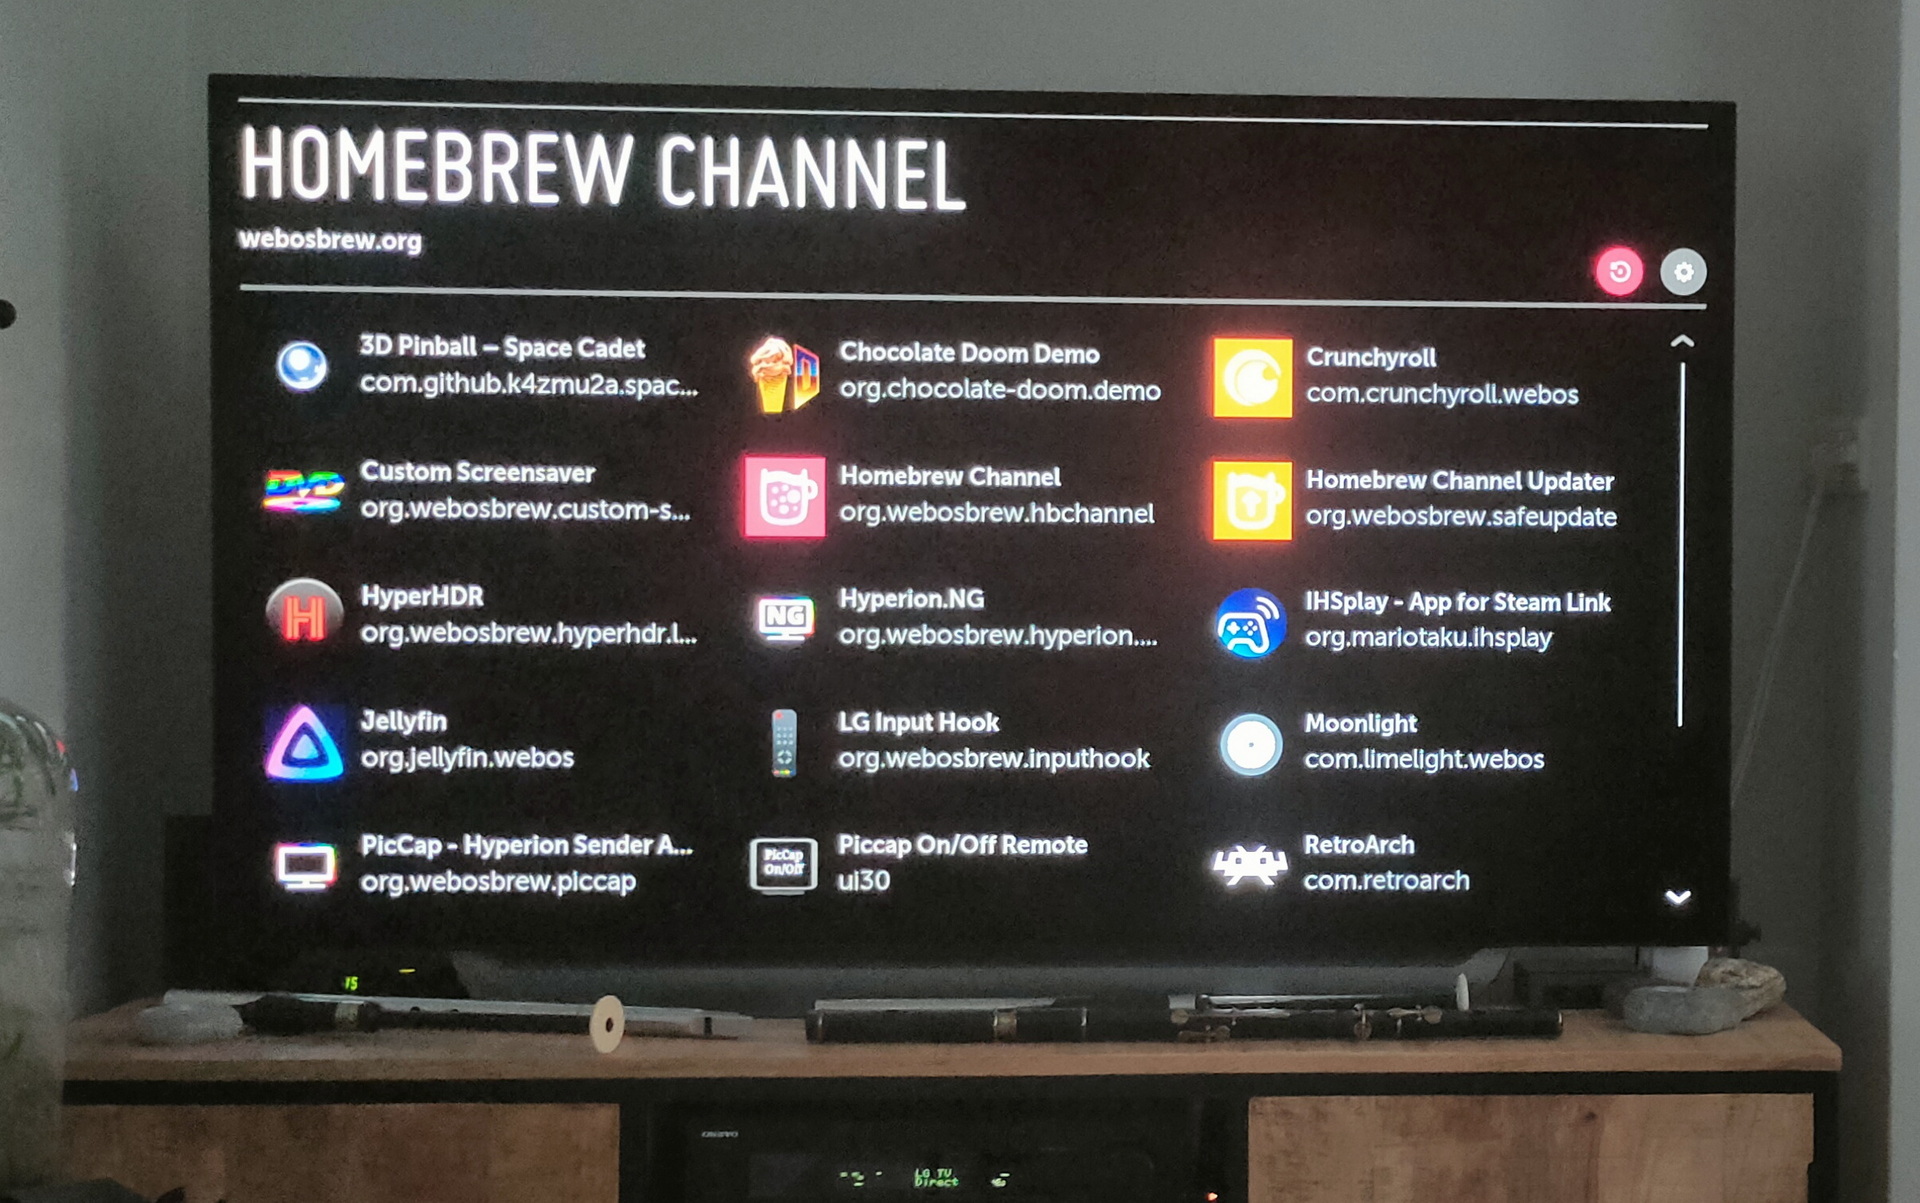
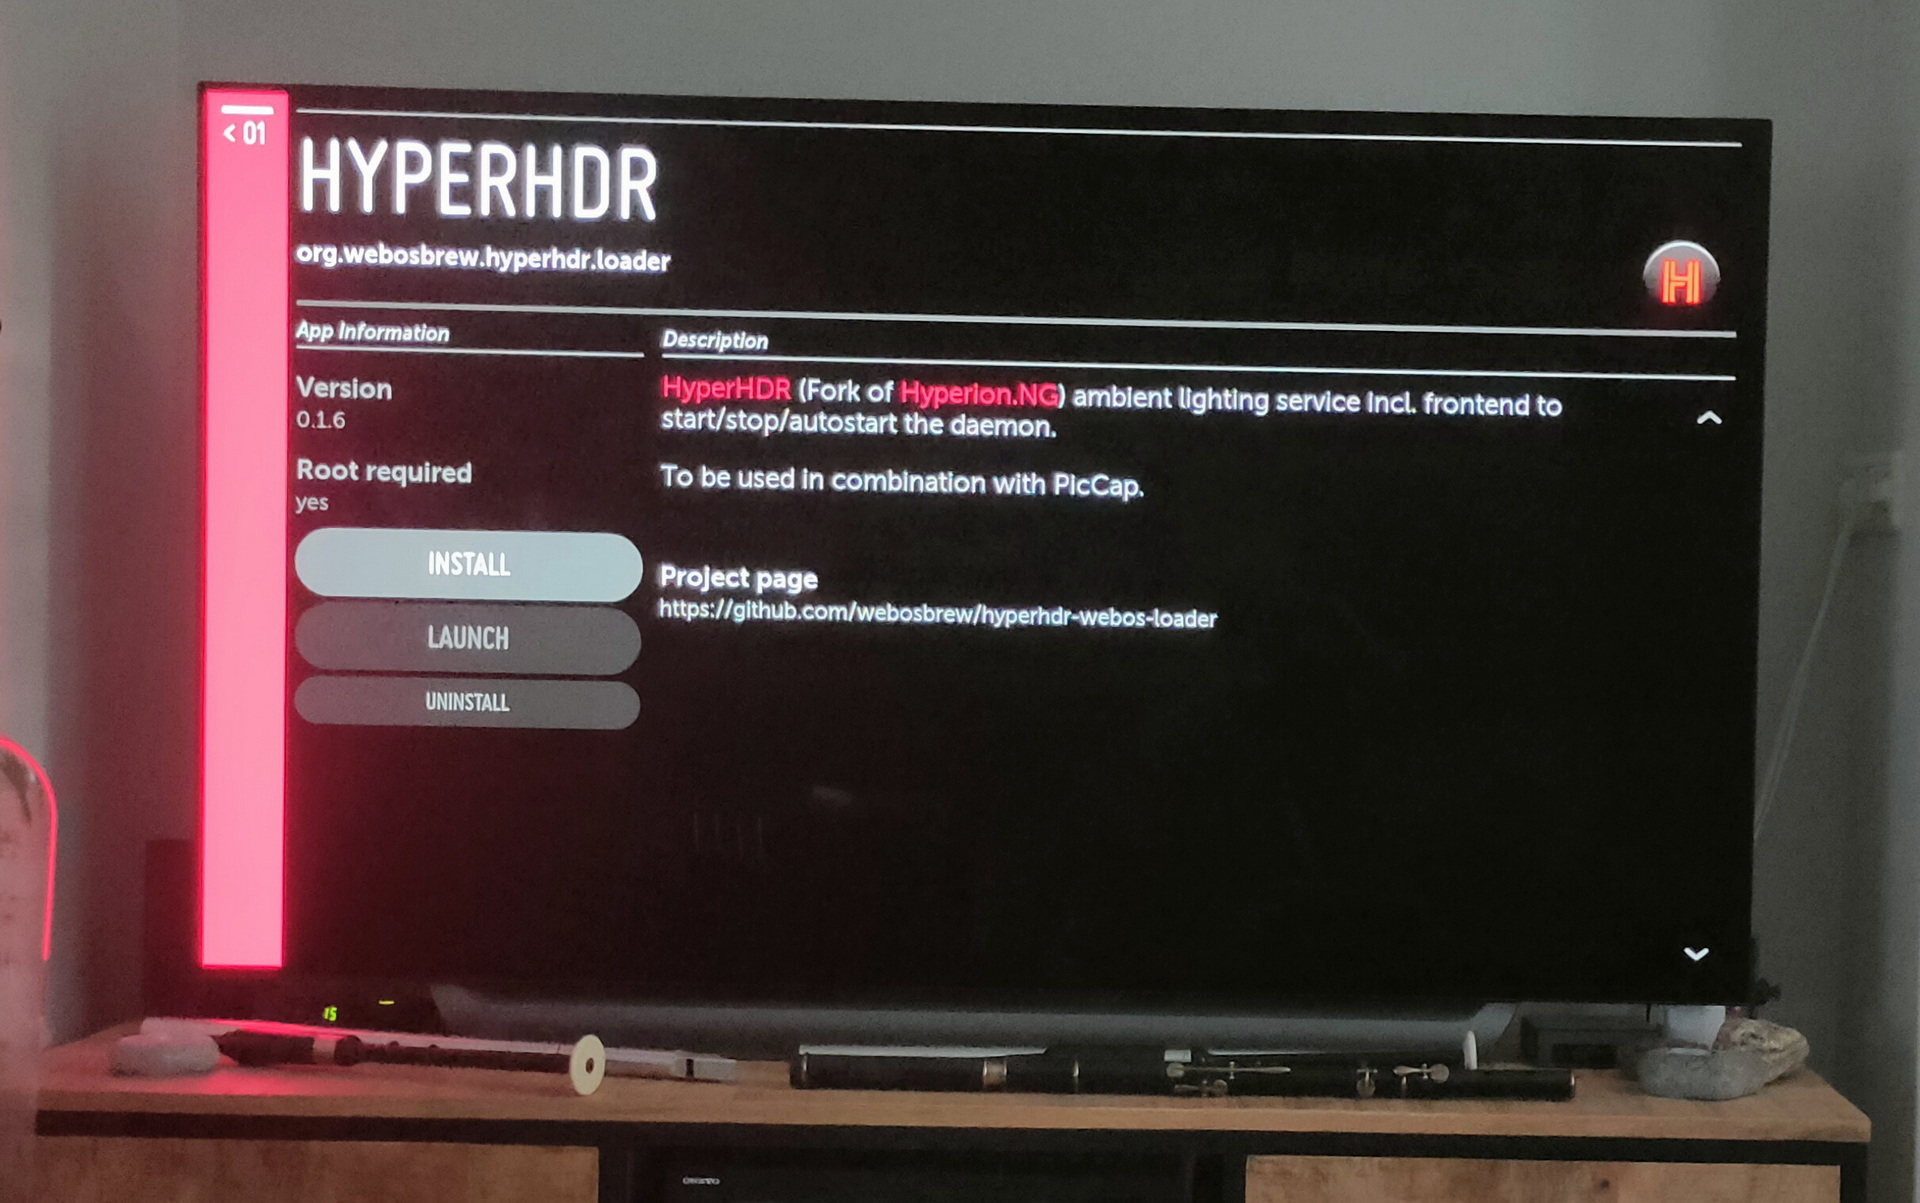
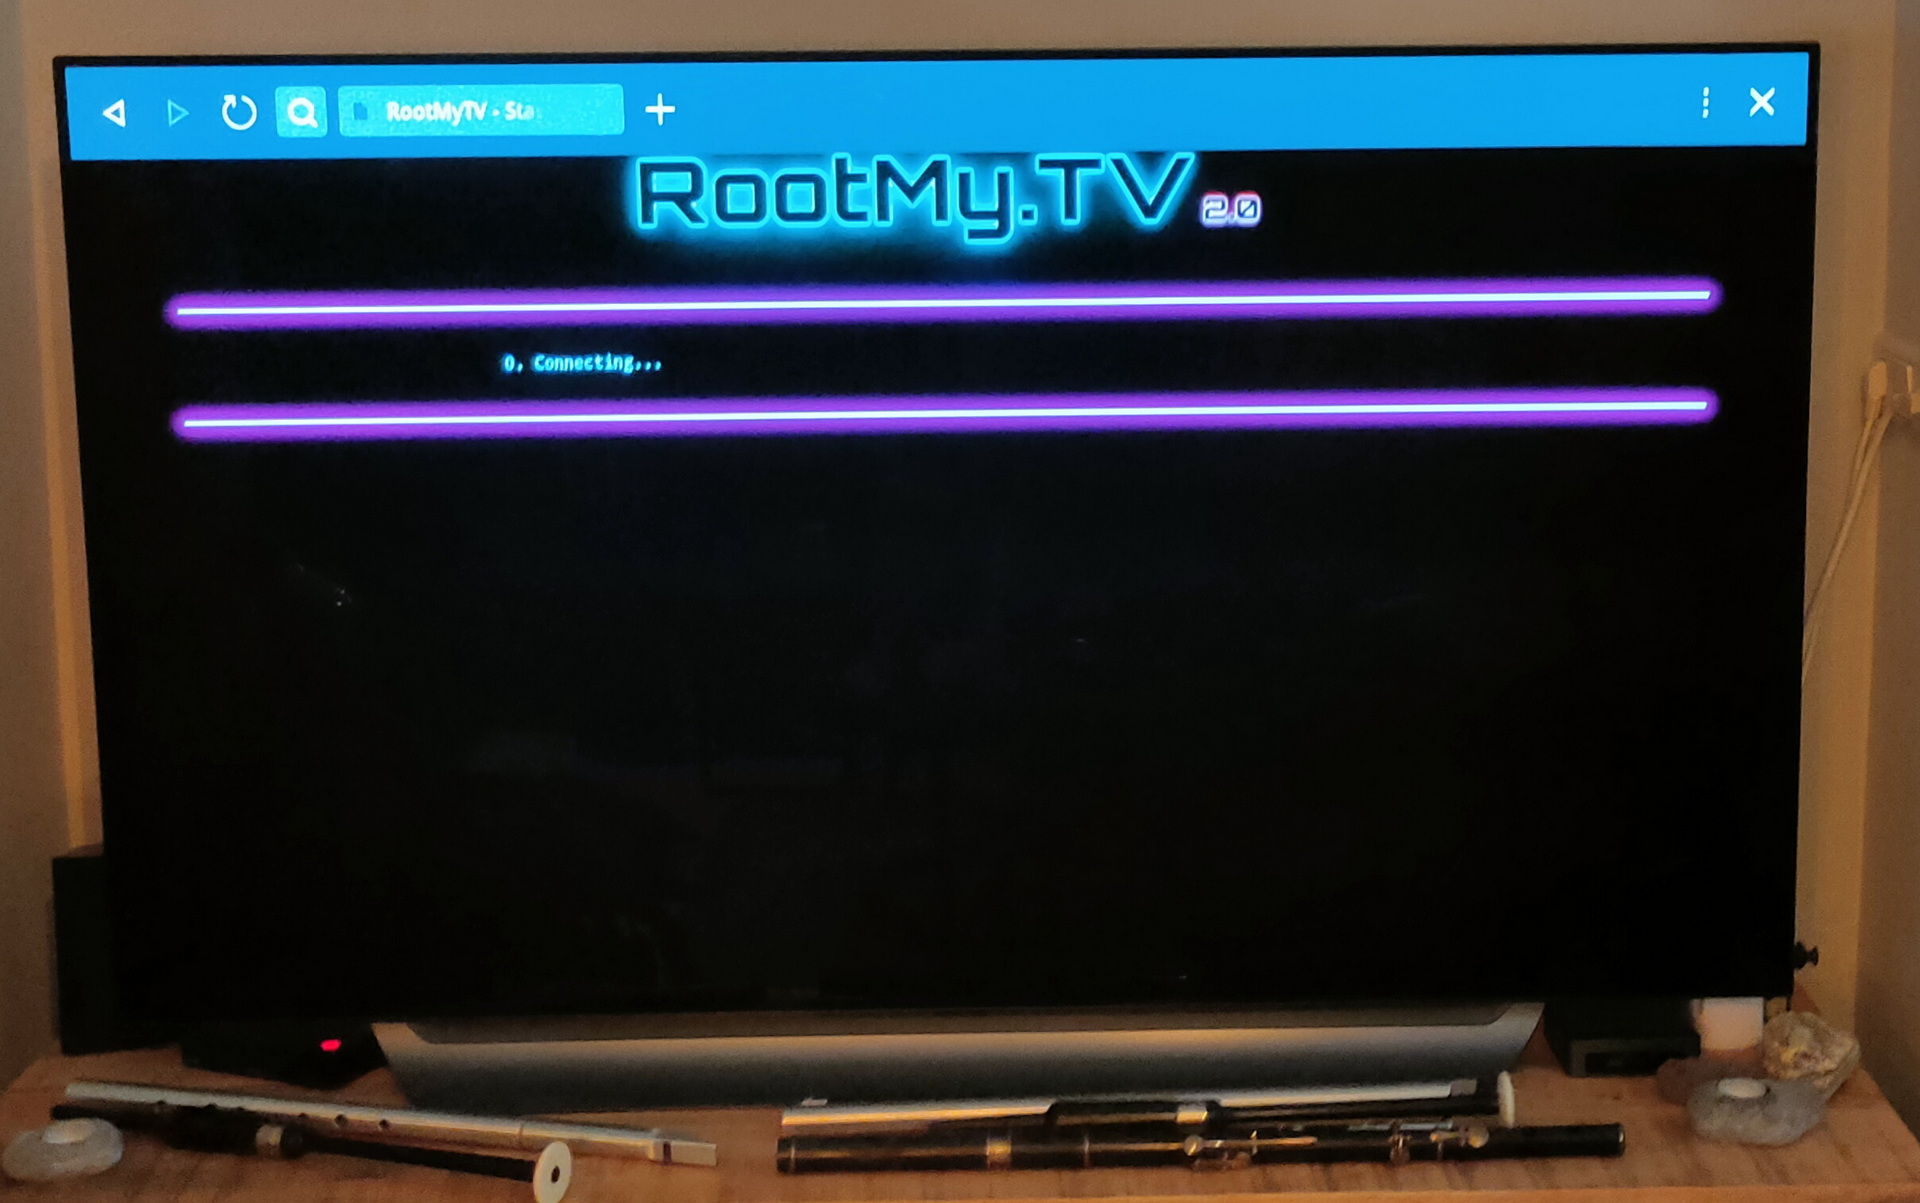
Besides sending notifications and controlling my tv using bash, Nodered and HomeAssistant, i wanted to look at developing and homebrew for WebOS.
Goto the WebOS Dev website and register.
Install Developer App on your TV.
Login and write down your access information.
Remain session can be extended using the button, or using a script.
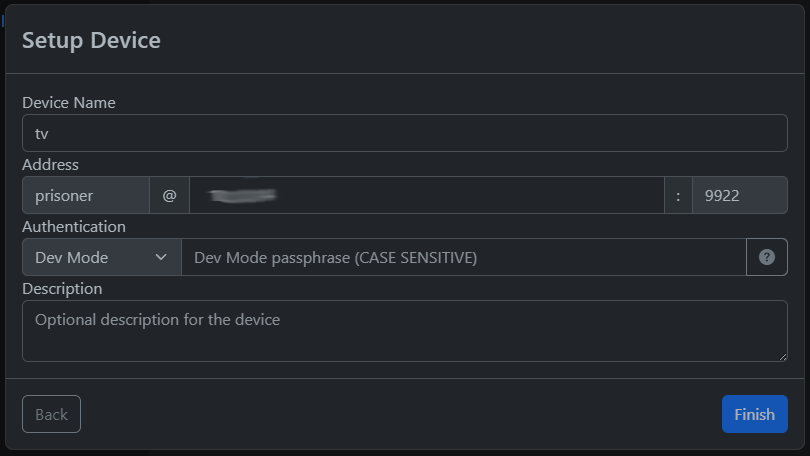
Below how to access you tv using ssh
wget http://IP_FROM_YOUR_TV:9991/webos_rsa
mv webos_rsa .ssh/
chmod 600 .ssh/webos_rsa
ssh -i .ssh/webos_rsa prisoner@10.1.0.14 -p9922 -T
       Enter passphrase for key '.ssh/webos_rsa':
Enter the key mentioned on the Developer App Screen on your TV

Note the -T .. this disables pseudo terminals,
You won't see a prompt, but commands work

You can remove passphrases on ssh keys using below
ssh-keygen -p -f .ssh/webos_rsa
Enter old passphrase:
Enter new passphrase (empty for no passphrase):
Enter same passphrase again:
Your identification has been saved with the new passphrase.
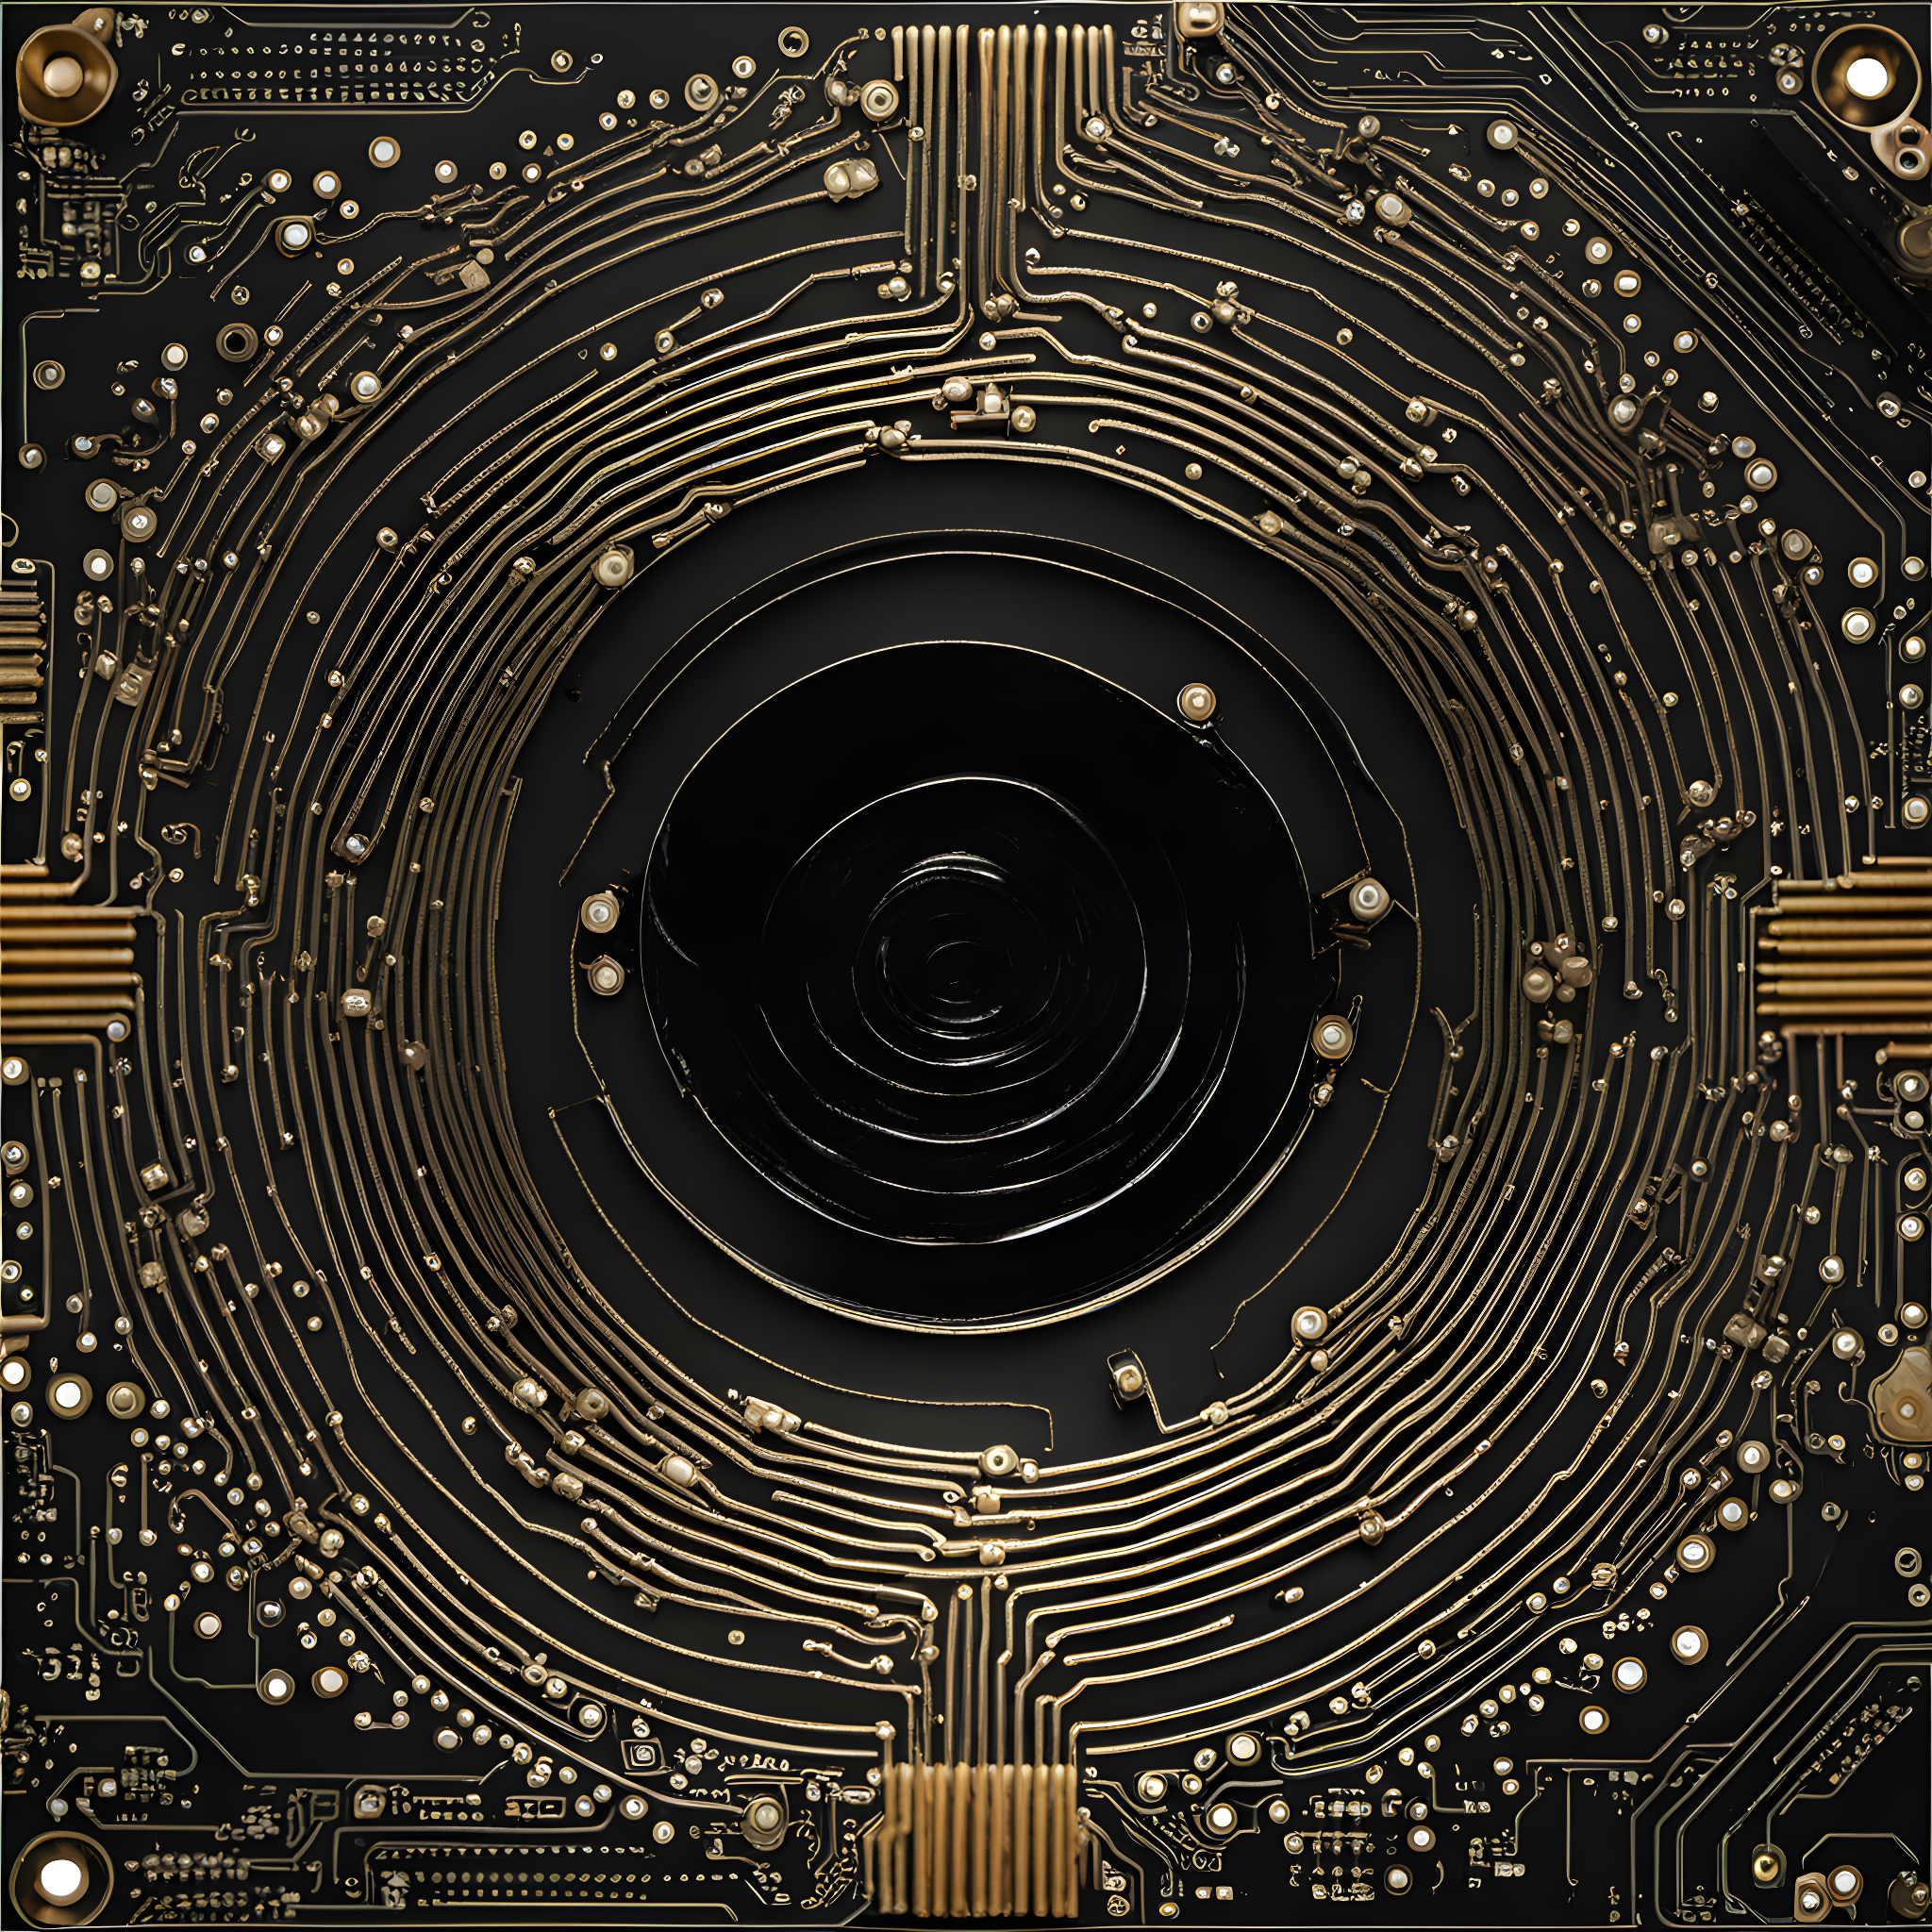
Some AI generated art I made – electronic components being sucked into a black hole.
This is NOT a post about the pi-hole project. Of which I apparantly never posted my setup.
I needed an extra PI for a project, and I always try to keep one spare. But they are always gone, in use, missing .. whatever.
So I can´t work on this project right now, so lets rant about disappearing stuff
Like they are being sucked up in another dimension .. gone. WHERE ARE THEY?!?
How to keep track of them?
Any suggestions?
I used to have a sheet, but I often forget to keep track. Do I use a MAC address scan on my switches? First 3 parts of the Mac address are vendor specific.
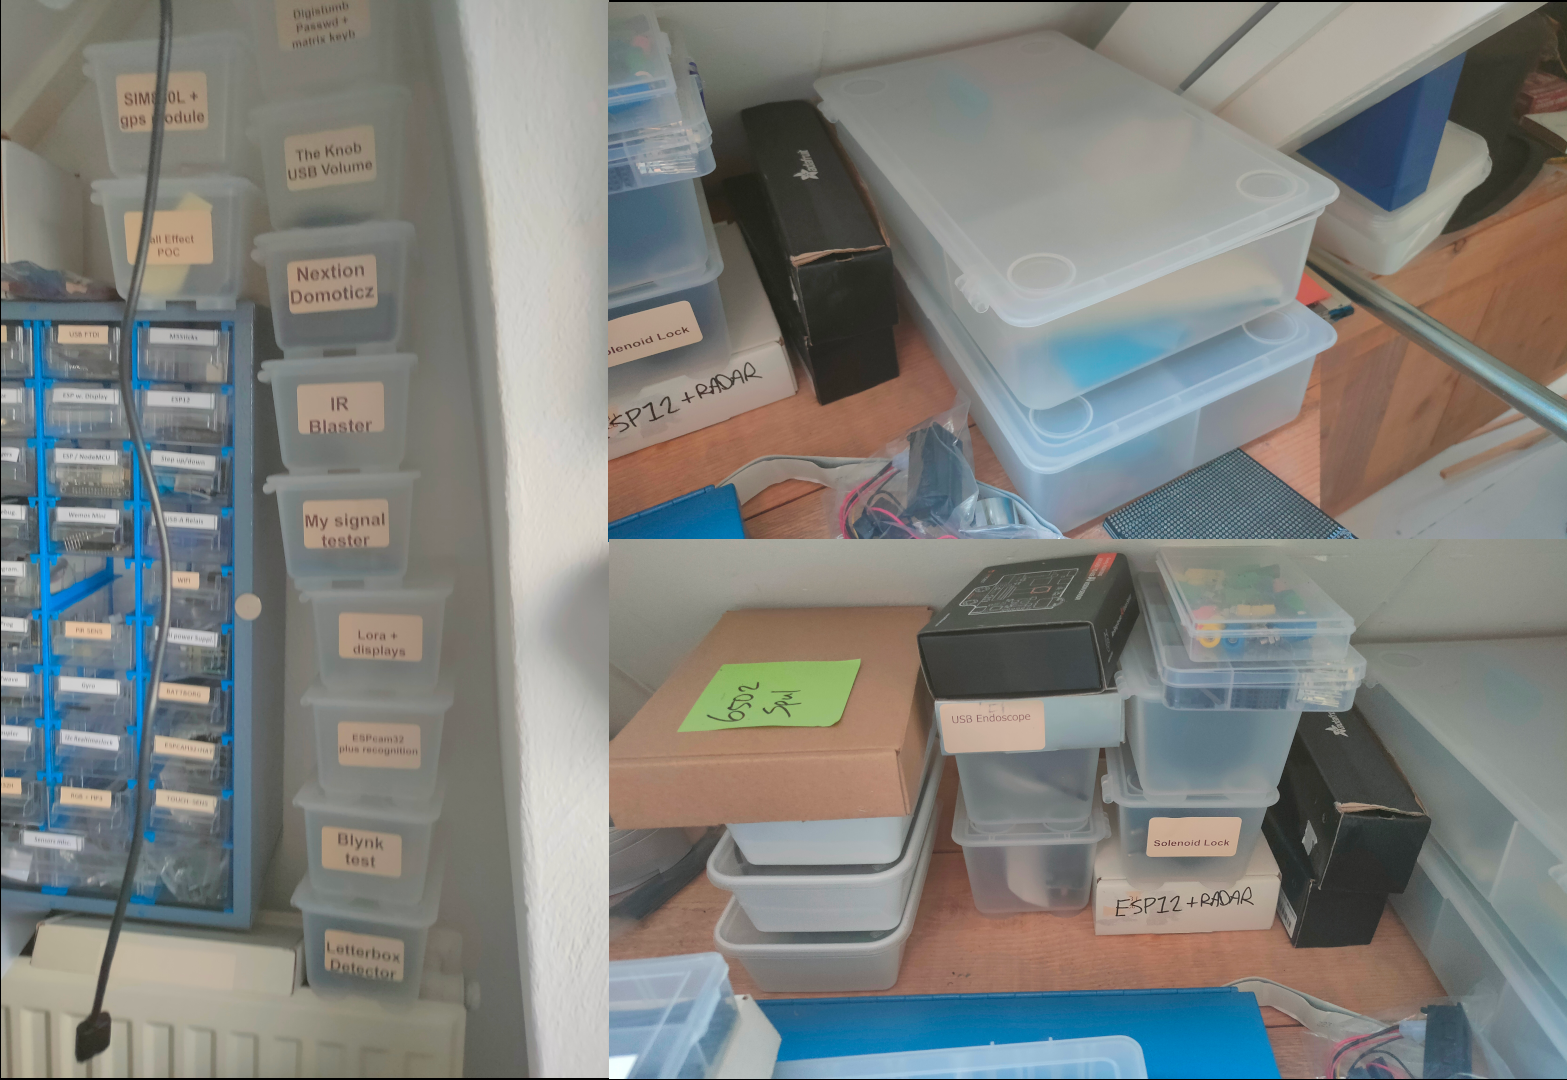
So far i’ve found : Octopi, Beerbrew computer, Retro Arcade, Picore, Nodered, Domoticz 433toMqtt, Ledserver, Lasercutter-etch-a-sketch, mobile LMS music server, Pressure Lab AP, Escape Game AP (3 of them), one unused Raspberry zero (without Wifi), One at my old work, one broke, Kodi+Netflix,Ansible project, found another one .. Jumanji/Dashticz/NoderedDashboard demo (with screen) WHERE THE F are the rest of them? (Sdcards with temporary projects on them 29, I need to combine project on those cards. I’ve got a 64Gb card holding a Rpi OS and only a 1K python script!)
And Arduino’s are even worse … they are all over the place. Those are probably 100+ (ESP32, 8266, Nano’s, Mega, M5Stack and alikes)
I know i have many temporary projects, but I keep most things organized in my projects containers.
One of the rows with Ikea containers, a few for bigger projects and now i’m using the plastic boxes you get when you order chinese or thai.
"If something is worth doing, it's worth overdoing."