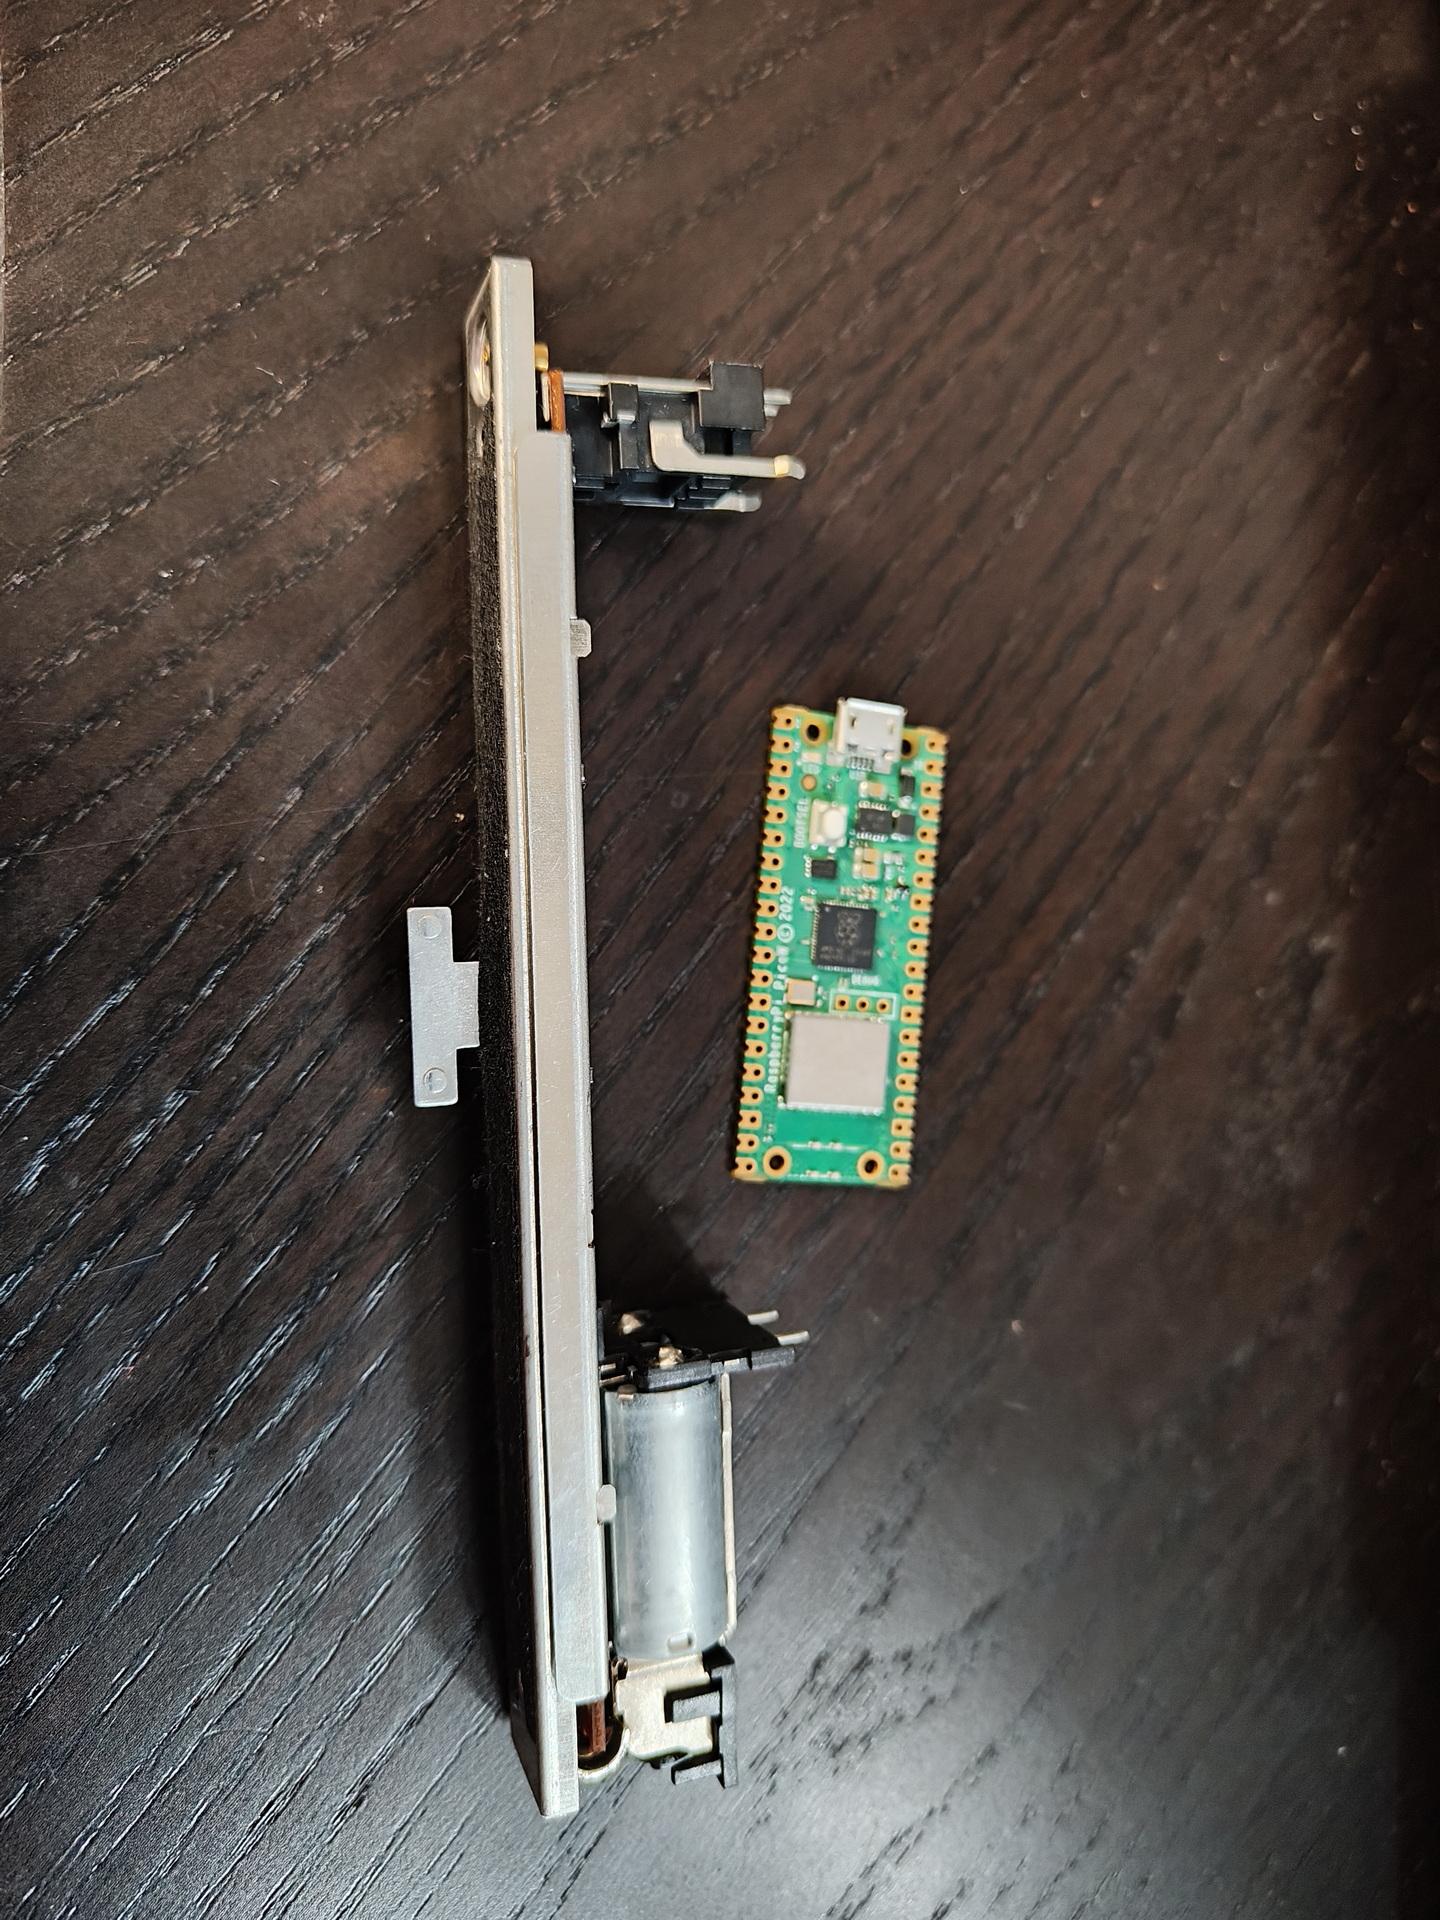
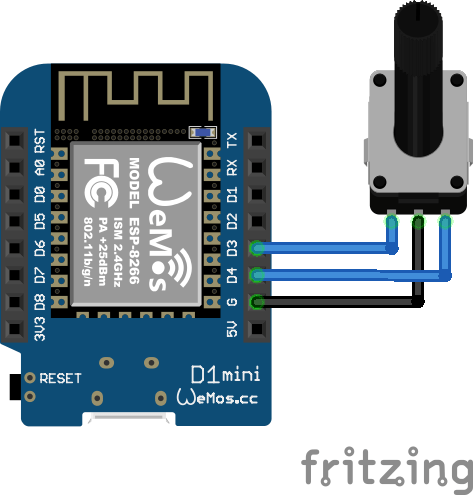
PC Volume control using motorized potentiometer. Sends state to PC using media buttons (HID-device) Uses python script to update pot position. Probably replace Raspberry Pico with Arduino Pro
Maze Wars (1970s) in javascript using MQTT backend for multiple users
This weekend we went to Nerdland in Belgium. I saw a cool game when we had to wait before some talks started.
What is so special about pong? Well, half of the audience was playing the other part of the audience. 250 against 250 Multiplayer. It used mqtt websockets, and the audience mobile phones with tilting. Average of 33+ % choosing up? Paddle goes up, Center and down the same.
I think I can make it myself. So below my two days progression. MQTT via internet. Sound and score counter. Using the mobile phone’s tilt sensor.
I changed left and right because we sat in the wrong chairs.
Maybe I’m going to change it into some 3D maze game. Code soon
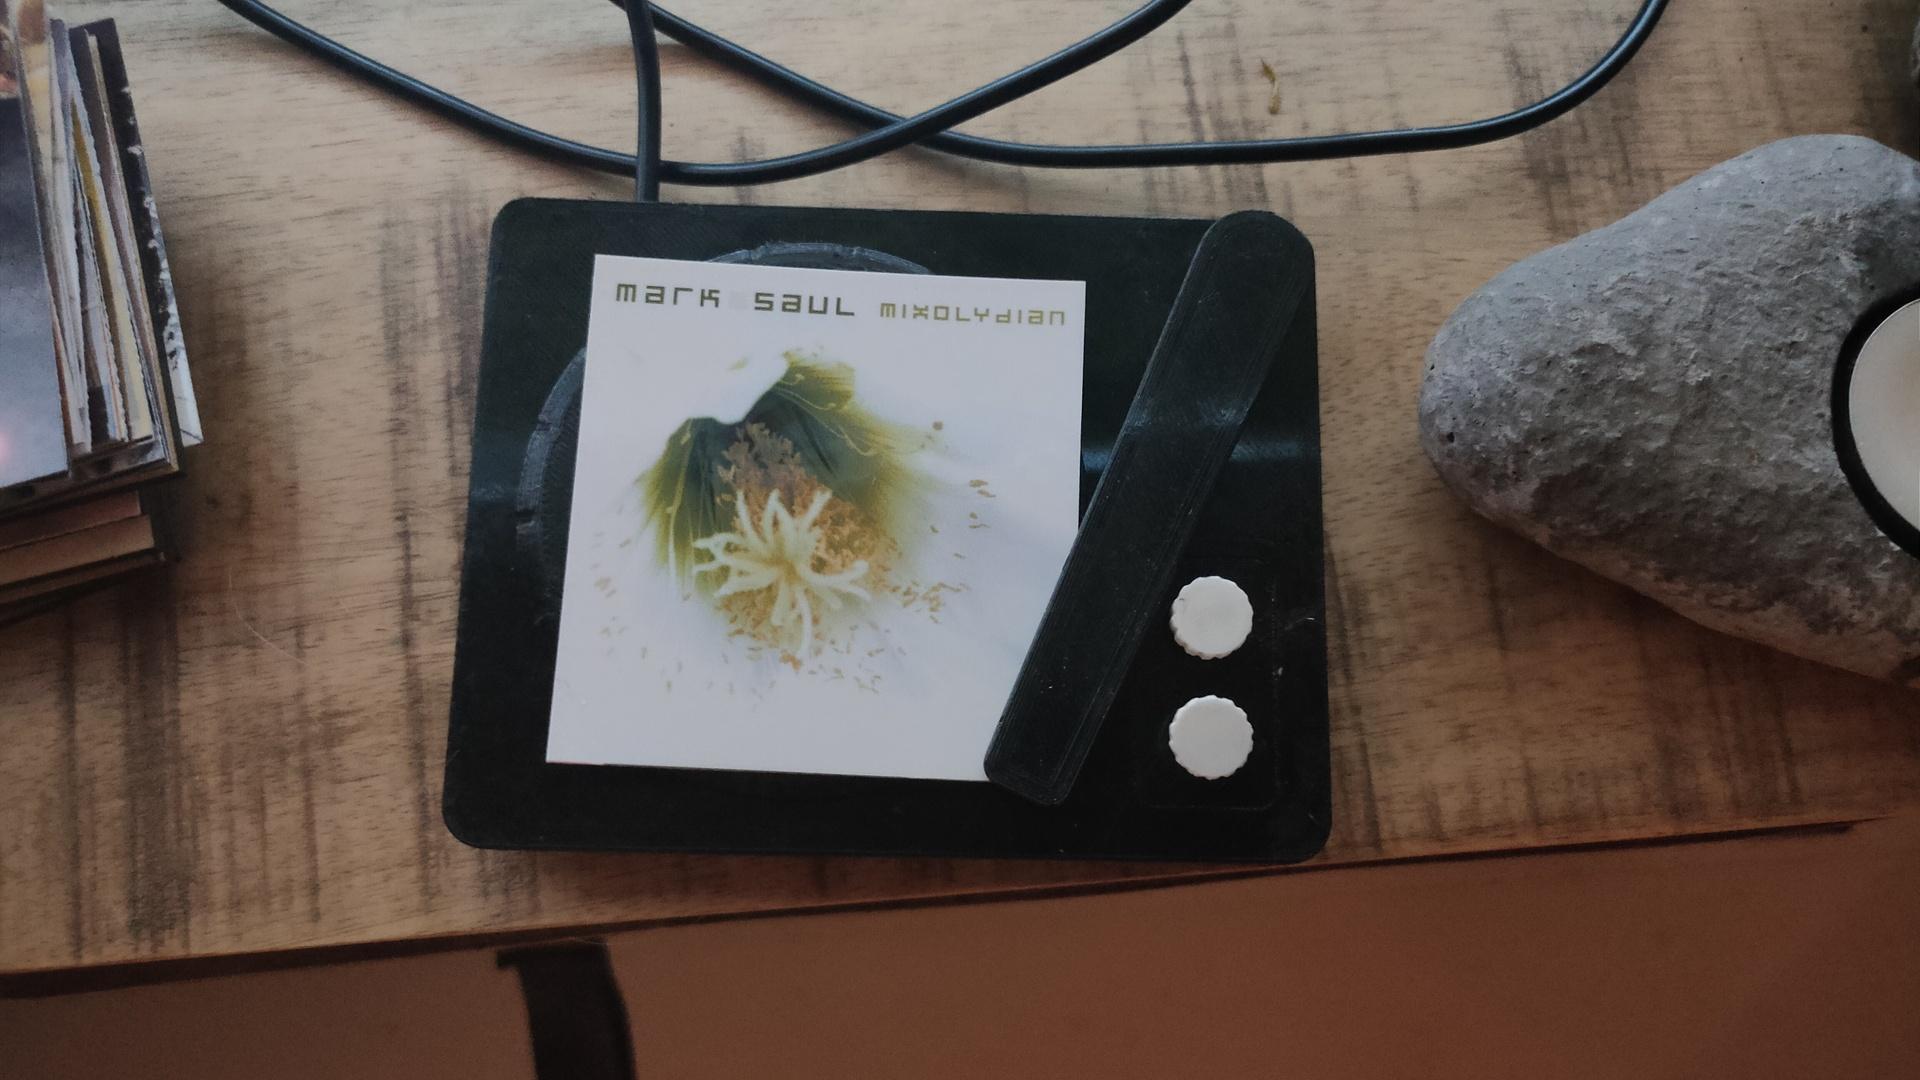
Recordplayer model by kriswillcode, but heavily remixed
Record player is going to be re-printed at a higher quality.
Put a printed image on the player, and it plays the album
Move the arm, and the next track will be played
Press upper white button, and the music will pause/resume
Press lower button … ??? Don’t know yet
Updated python client (see previous posts)
import paho.mqtt.client as mqtt
import urllib.request
from time import sleep

def on_connect(client, userdata, flags, rc):  # The callback for when the client connects to the broker
        print("Connected with result code {0}".format(str(rc)))
        client.subscribe("spotify/rfid/idlms")
        client.subscribe("spotify/rfid/but1")
        client.subscribe("spotify/rfid/but2")
        client.subscribe("spotify/rfid/arm")

def on_message(client, userdata, msg):  # The callback for when a PUBLISH message is received from the server.
        print("Message received-> " + msg.topic + " " + str(msg.payload))  # Print a received msg
        if msg.topic == "spotify/rfid/idlms":
            urllib.request.urlopen("http://LMS-SERVER-IP:9000/anyurl?p0=playlistcontrol&p1=album_id:" + msg.payload.decode() + "&p2=cmd:load&player=00:04:20:16:d9:04")
        if msg.topic == "spotify/rfid/but1":
            urllib.request.urlopen("http://LMS-SERVER-IP:9000/anyurl?p0=pause&player=00:04:20:16:d9:04")
            sleep(1)
        if msg.topic == "spotify/rfid/but2":
            urllib.request.urlopen("http://LMS-SERVER-IP:9000/anyurl?p0=pause&pt=1&player=00:04:20:16:d9:04")
            sleep(1)
        if msg.topic == "spotify/rfid/arm":
            urllib.request.urlopen("http://LMS-SERVER-IP:9000/status.html?p0=button&p1=jump_fwd&player=00:04:20:16:d9:04")
            sleep(1)

client = mqtt.Client("lmsclient")  # Create instance of client with client ID “digi_mqtt_test”
client.on_connect = on_connect  # Define callback function for successful connection
client.on_message = on_message  # Define callback function for receipt of a message
client.connect('MQTTSERVER', 1883)
client.loop_forever()  # Start daemon
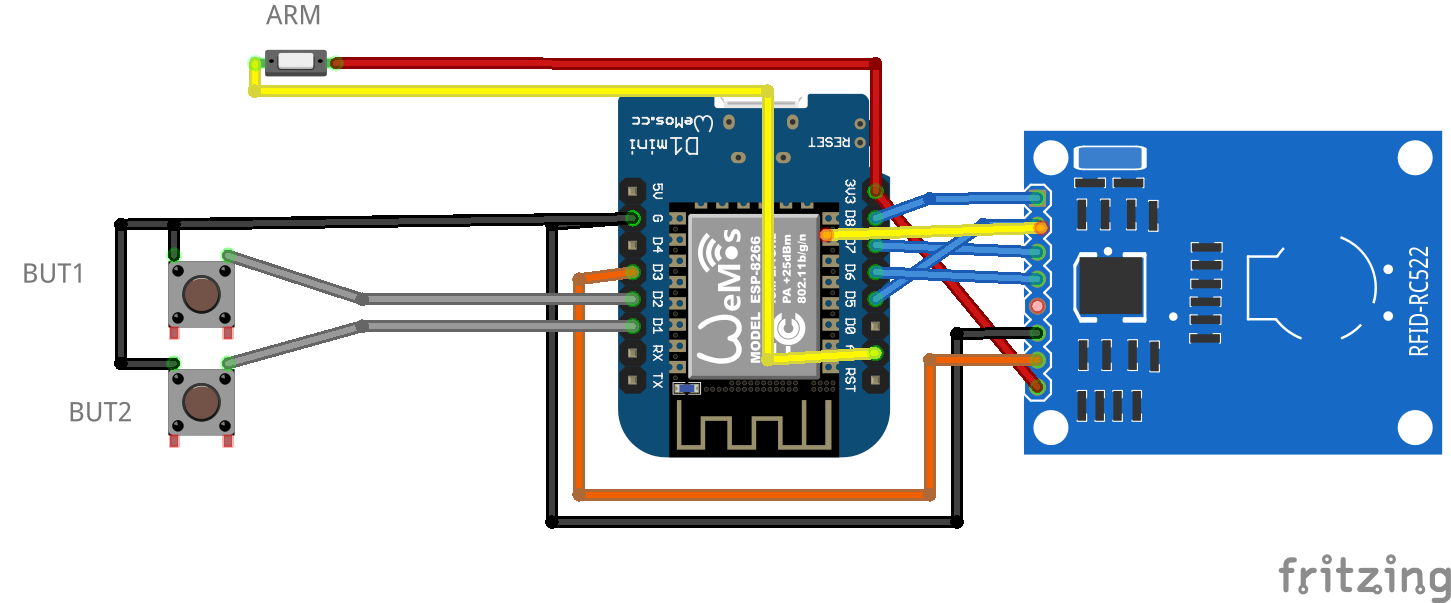
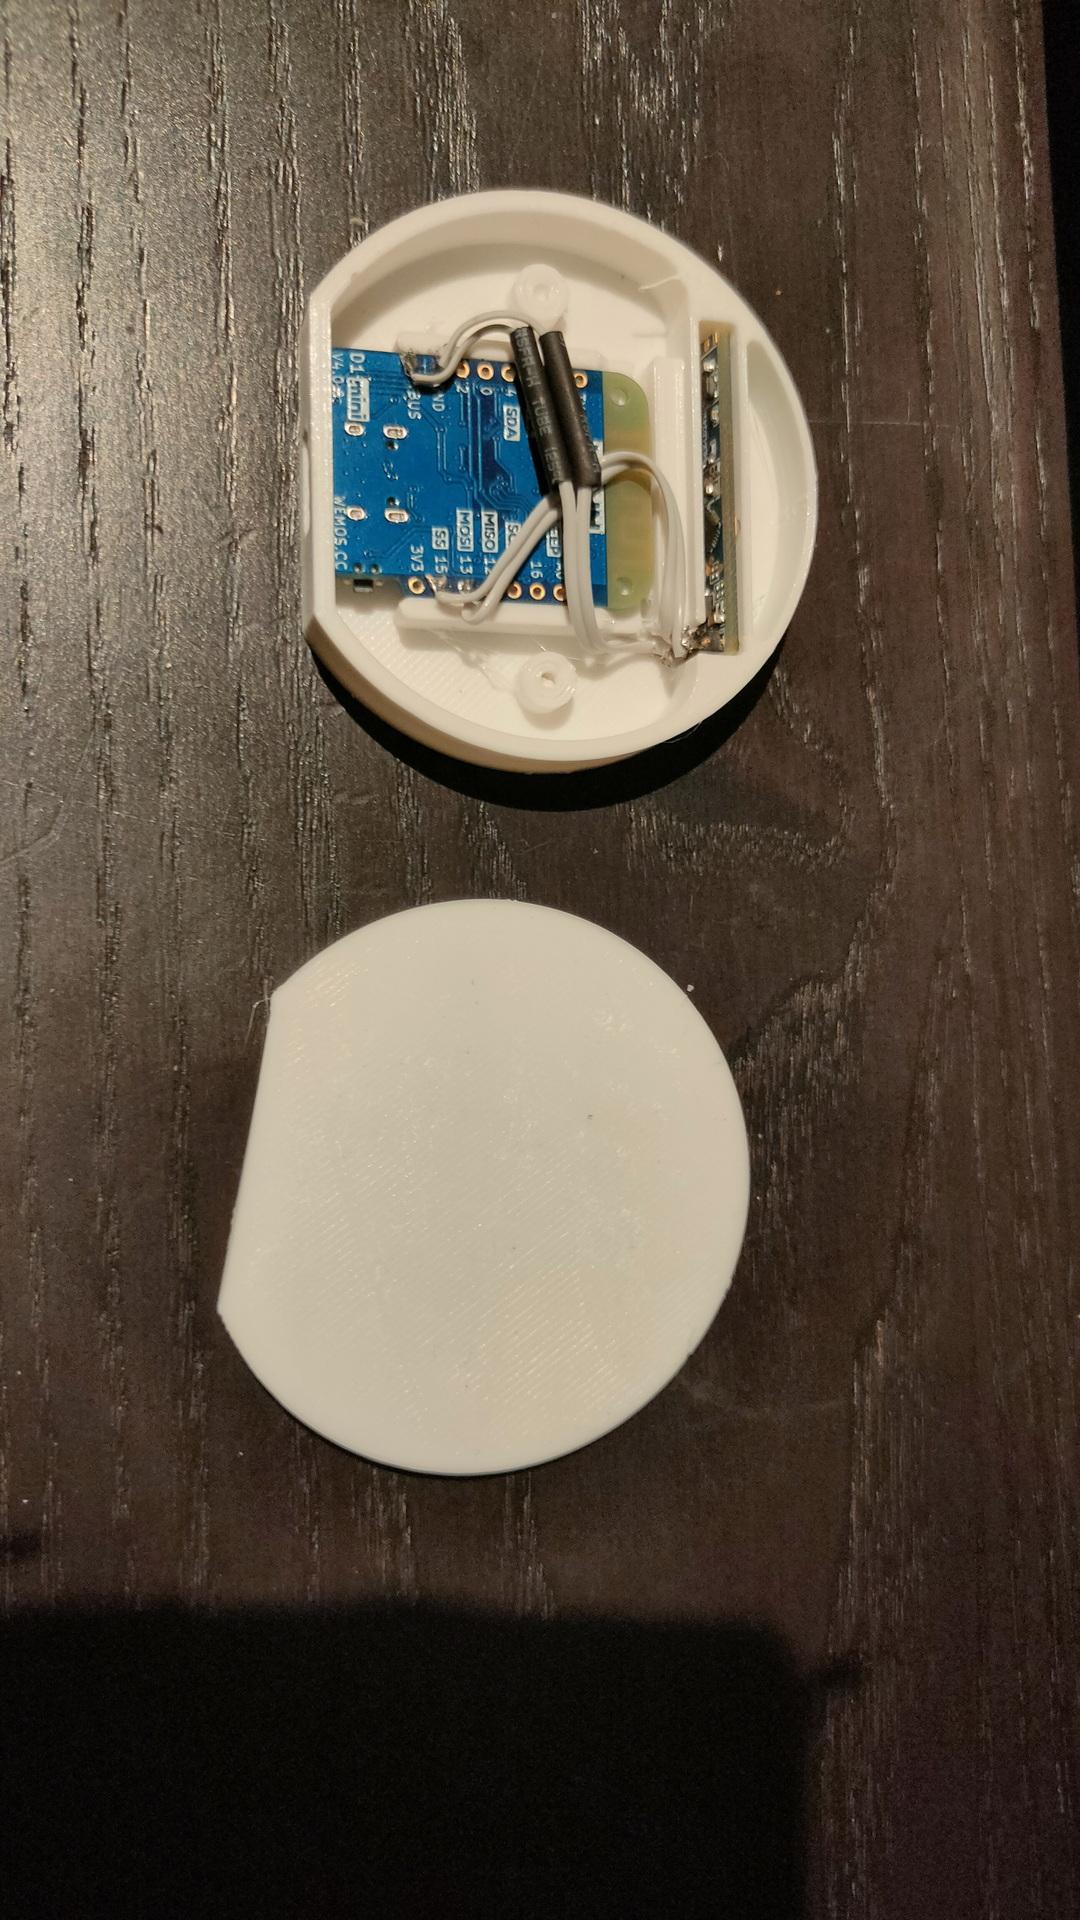
Wemos INO file
#include <Arduino.h>
#include <SPI.h>
#include <MFRC522.h>
#include <ESP8266WiFi.h>
#include <WiFiClient.h>
#include <PubSubClient.h>
#define SS_PIN 15
#define RST_PIN 0

const int buttonPin1 = D1;
const int buttonPin2 = D2;

int buttonState1 = 0;
int buttonState2 = 0;

MFRC522 mfrc522(SS_PIN, RST_PIN);
  MFRC522::StatusCode status; //variable to get card status

  byte buffer[18];  //data transfer buffer (16+2 bytes data+CRC)
  byte size = sizeof(buffer);

  uint8_t pageAddr = 0x06;  //In this example we will write/read 16 bytes (page 6,7,8 and 9).
                            //Ultraligth mem = 16 pages. 4 bytes per page.
                            //Pages 0 to 4 are for special functions.

unsigned long cardId = 0;
WiFiClient net;
PubSubClient client(net);
const char* mqtt_server = "MQTTBROKER";
const char* ssid = "MYSSID";
const char* password = "MYWIFIPASWORD";
String topicStr = "";
byte buffer2[8];

boolean Rflag=false;
int r_len;
char payload[5];
byte value[5];
void setup() {
  Serial.begin(9600);
    pinMode(buttonPin1, INPUT_PULLUP);
    pinMode(buttonPin2, INPUT_PULLUP  );

  SPI.begin();
  mfrc522.PCD_Init();
  WiFi.mode(WIFI_AP_STA);
  WiFi.begin(ssid, password);
  client.setServer(mqtt_server, 1883);
     delay(100);
    client.setCallback(callback);
      delay(100);
    client.subscribe("spotify/rfid/in/#");
}
void reconnect() {
  while (WiFi.waitForConnectResult() != WL_CONNECTED) {
  }
  while (!client.connected()) {
    String clientId = "rfid-";
    clientId += String(random(0xffff), HEX);
    if (!client.connect(clientId.c_str(), "rfidclient", "...")) {
      delay(5000);
    }
  }
  client.subscribe("spotify/rfid/in/#");
}
void callback(char* topic, byte* payload, unsigned int length) {
  Serial.print(F("Called"));
   Rflag=true; //will use in main loop
   r_len=length; //will use in main loop
   int j=0;
     for (j;j<length;j++) {
       buffer2[j]=payload[j];
       //Serial.print((char)payload[j]);
       }
if (r_len < 3) {
  Rflag=false;
  Serial.print(F("Set false"));
}
buffer2[j]='\0'; //terminate string
}

void loop() {
    if (!client.connected()) {
    reconnect();
  }

buttonState1 = digitalRead(buttonPin1);
  //Serial.print(buttonState1);
  if (buttonState1 == 0 ) {
    client.publish("spotify/rfid/but1", "0");
  }
buttonState2 = digitalRead(buttonPin2);
  //Serial.println(buttonState2);
  if (buttonState2 == 0 ) {
    client.publish("spotify/rfid/but2", "0");
  }

int reading = analogRead(0);
  //Serial.println(reading);
  if (reading > 500 ) {
    client.publish("spotify/rfid/arm", "0");
  }

  client.loop();
  if (!mfrc522.PICC_IsNewCardPresent()) {
    return;
  }
  if (!mfrc522.PICC_ReadCardSerial()) {
    return;
  }
if (Rflag) {
        for (int i=0; i < 4; i++) {
    //data is writen in blocks of 4 bytes (4 bytes per page)
    status = (MFRC522::StatusCode) mfrc522.MIFARE_Ultralight_Write(pageAddr+i, &buffer2[i*4], 4);
    if (status != MFRC522::STATUS_OK) {
      return;
    }

  }
  Rflag=false;
}

  cardId = getCardId();
  char buffer3[10];
  sprintf(buffer3, "%lu", cardId);
  client.publish("spotify/rfid/id", buffer3);

  status = (MFRC522::StatusCode) mfrc522.MIFARE_Read(pageAddr, buffer, &size);
  if (status != MFRC522::STATUS_OK) {
    Serial.println(F("MIFARE_Read() failed: (R)"));
    Serial.println(mfrc522.GetStatusCodeName(status));
    return;
  }

  Serial.println(F("Read data: "));
  for (byte i = 0; i < 5; i++) {
    Serial.write(buffer[i]);
       buffer2[i]=buffer[i];
    }

  client.publish("spotify/rfid/idlms", buffer,5);
  delay(1000);
  mfrc522.PICC_HaltA();
}

unsigned long getCardId() {
  byte readCard[4];
  for (int i = 0; i < 4; i++) {
    readCard[i] = mfrc522.uid.uidByte[i];
  }
  return (unsigned long)readCard[0] << 24
    | (unsigned long)readCard[1] << 16
    | (unsigned long)readCard[2] << 8
    | (unsigned long)readCard[3];
}
The next iteration of my Rfid controller will have a write function for the RFID tags.
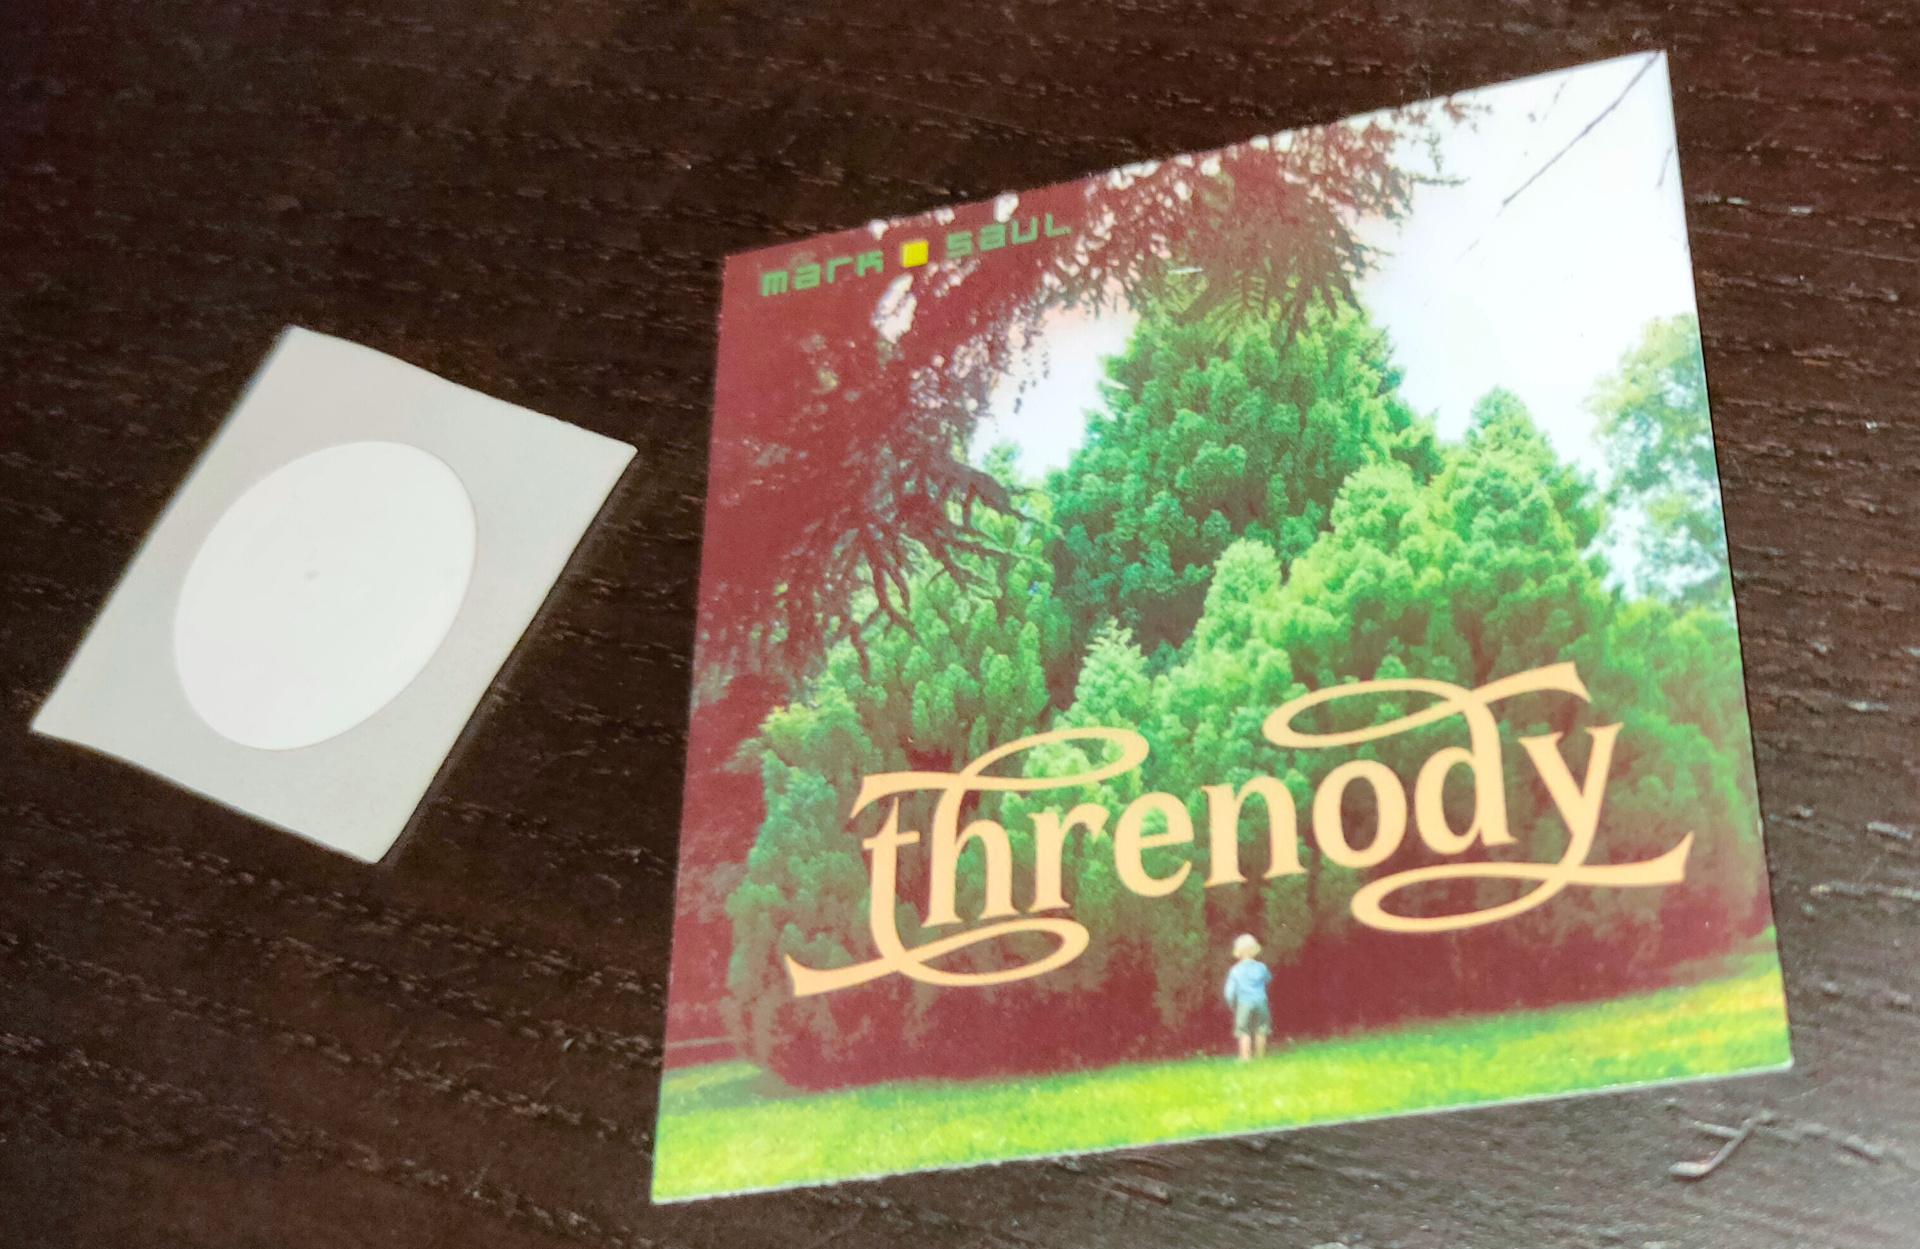
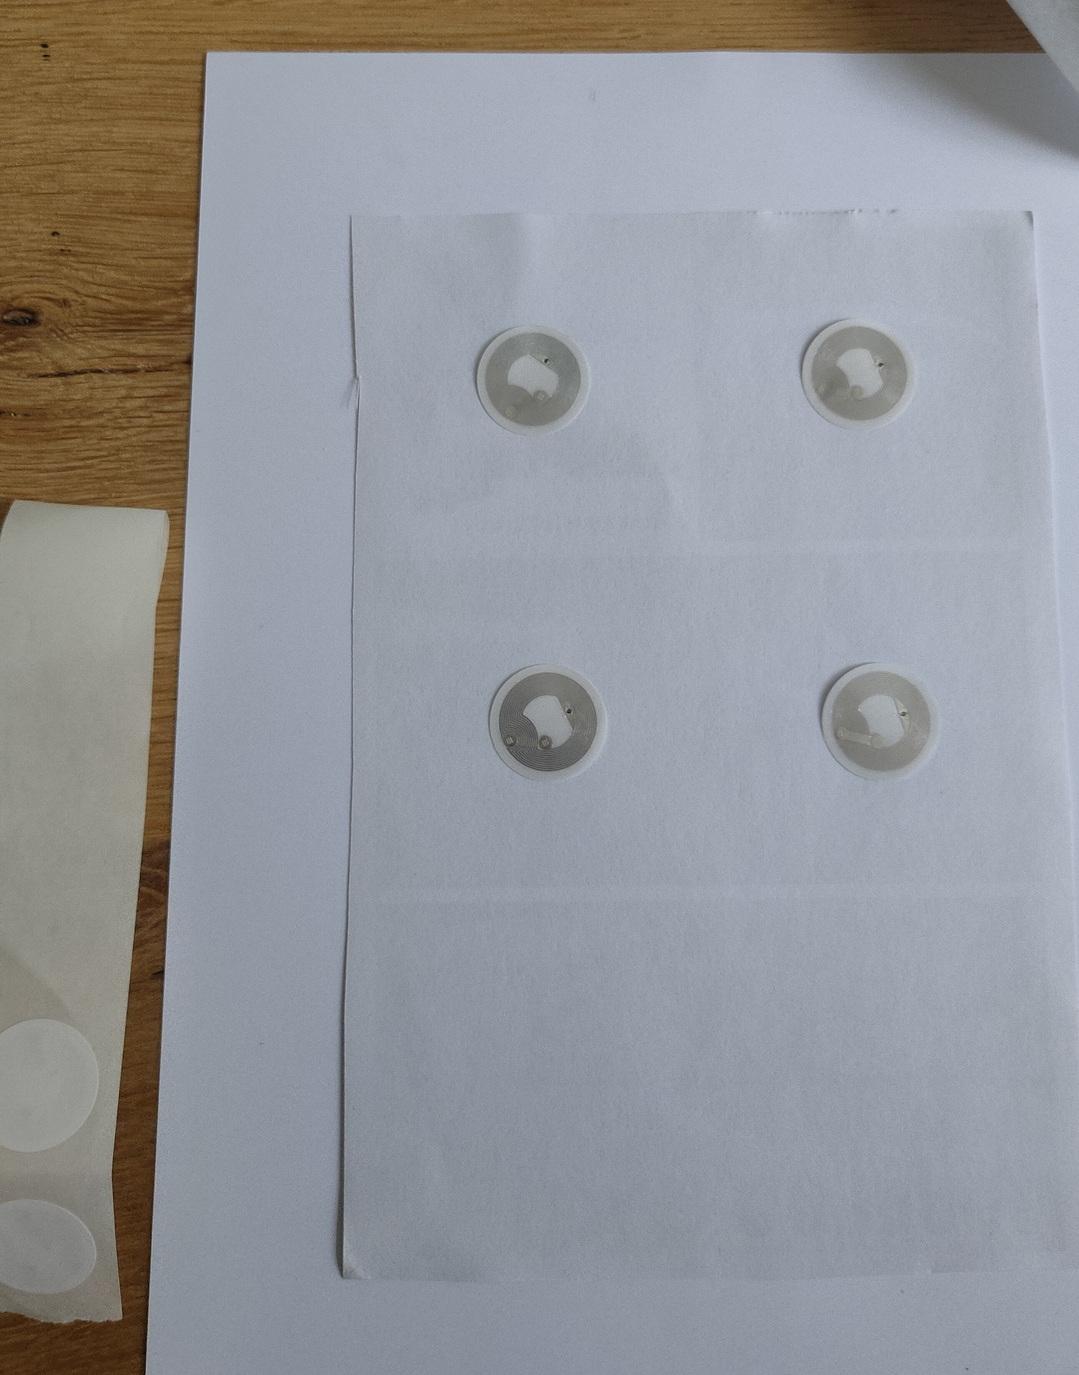
Stick a tag on a cover art piece of cardboard. (see below)
Read path from data sector.
Send path to player automation
Send path to program using MQTT or website if needed.
Back of printed sticker, to stick on 250gr paper below
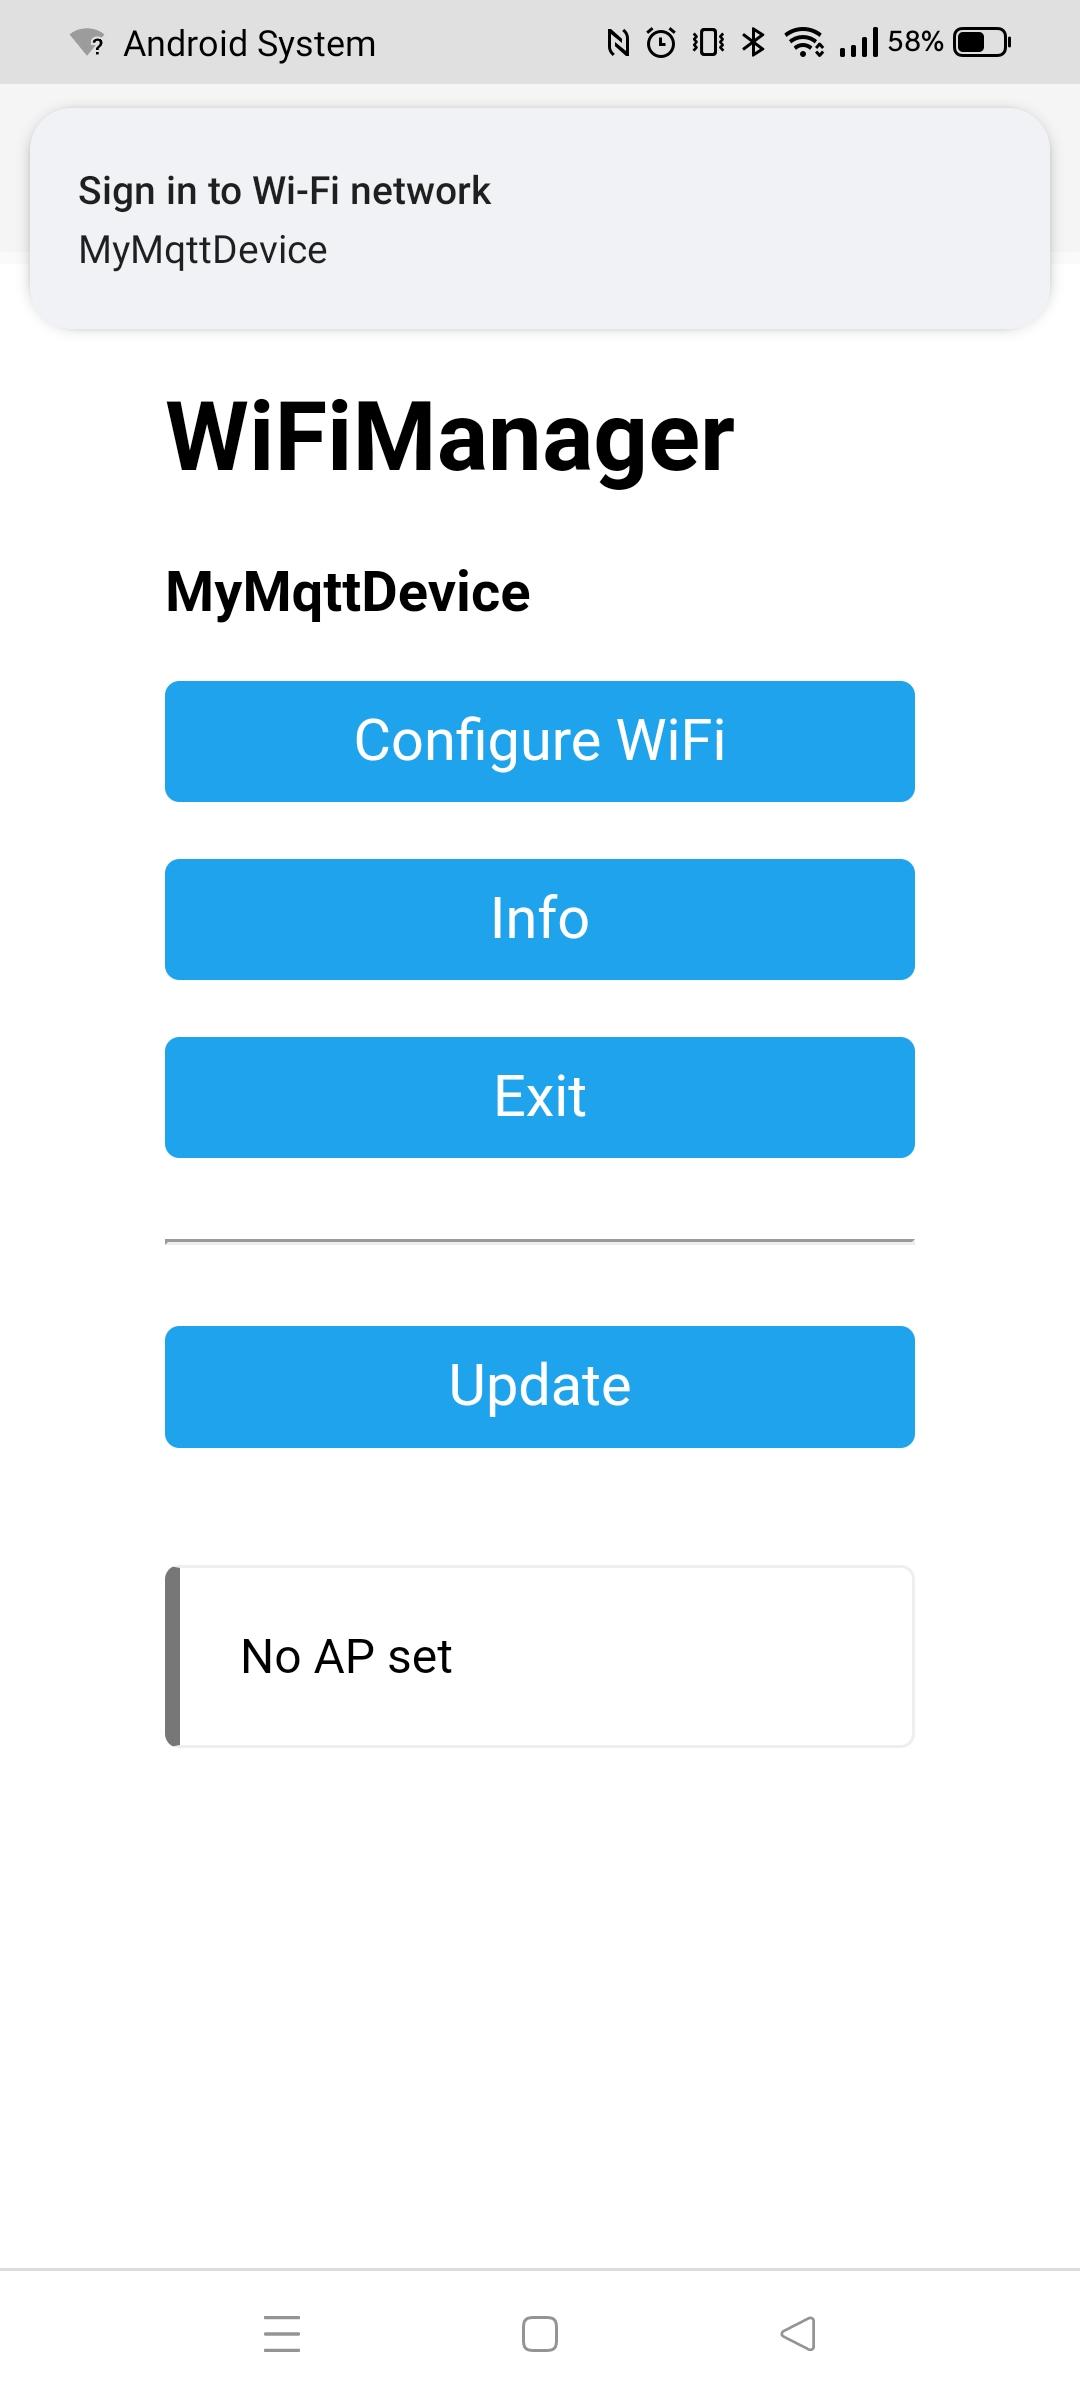
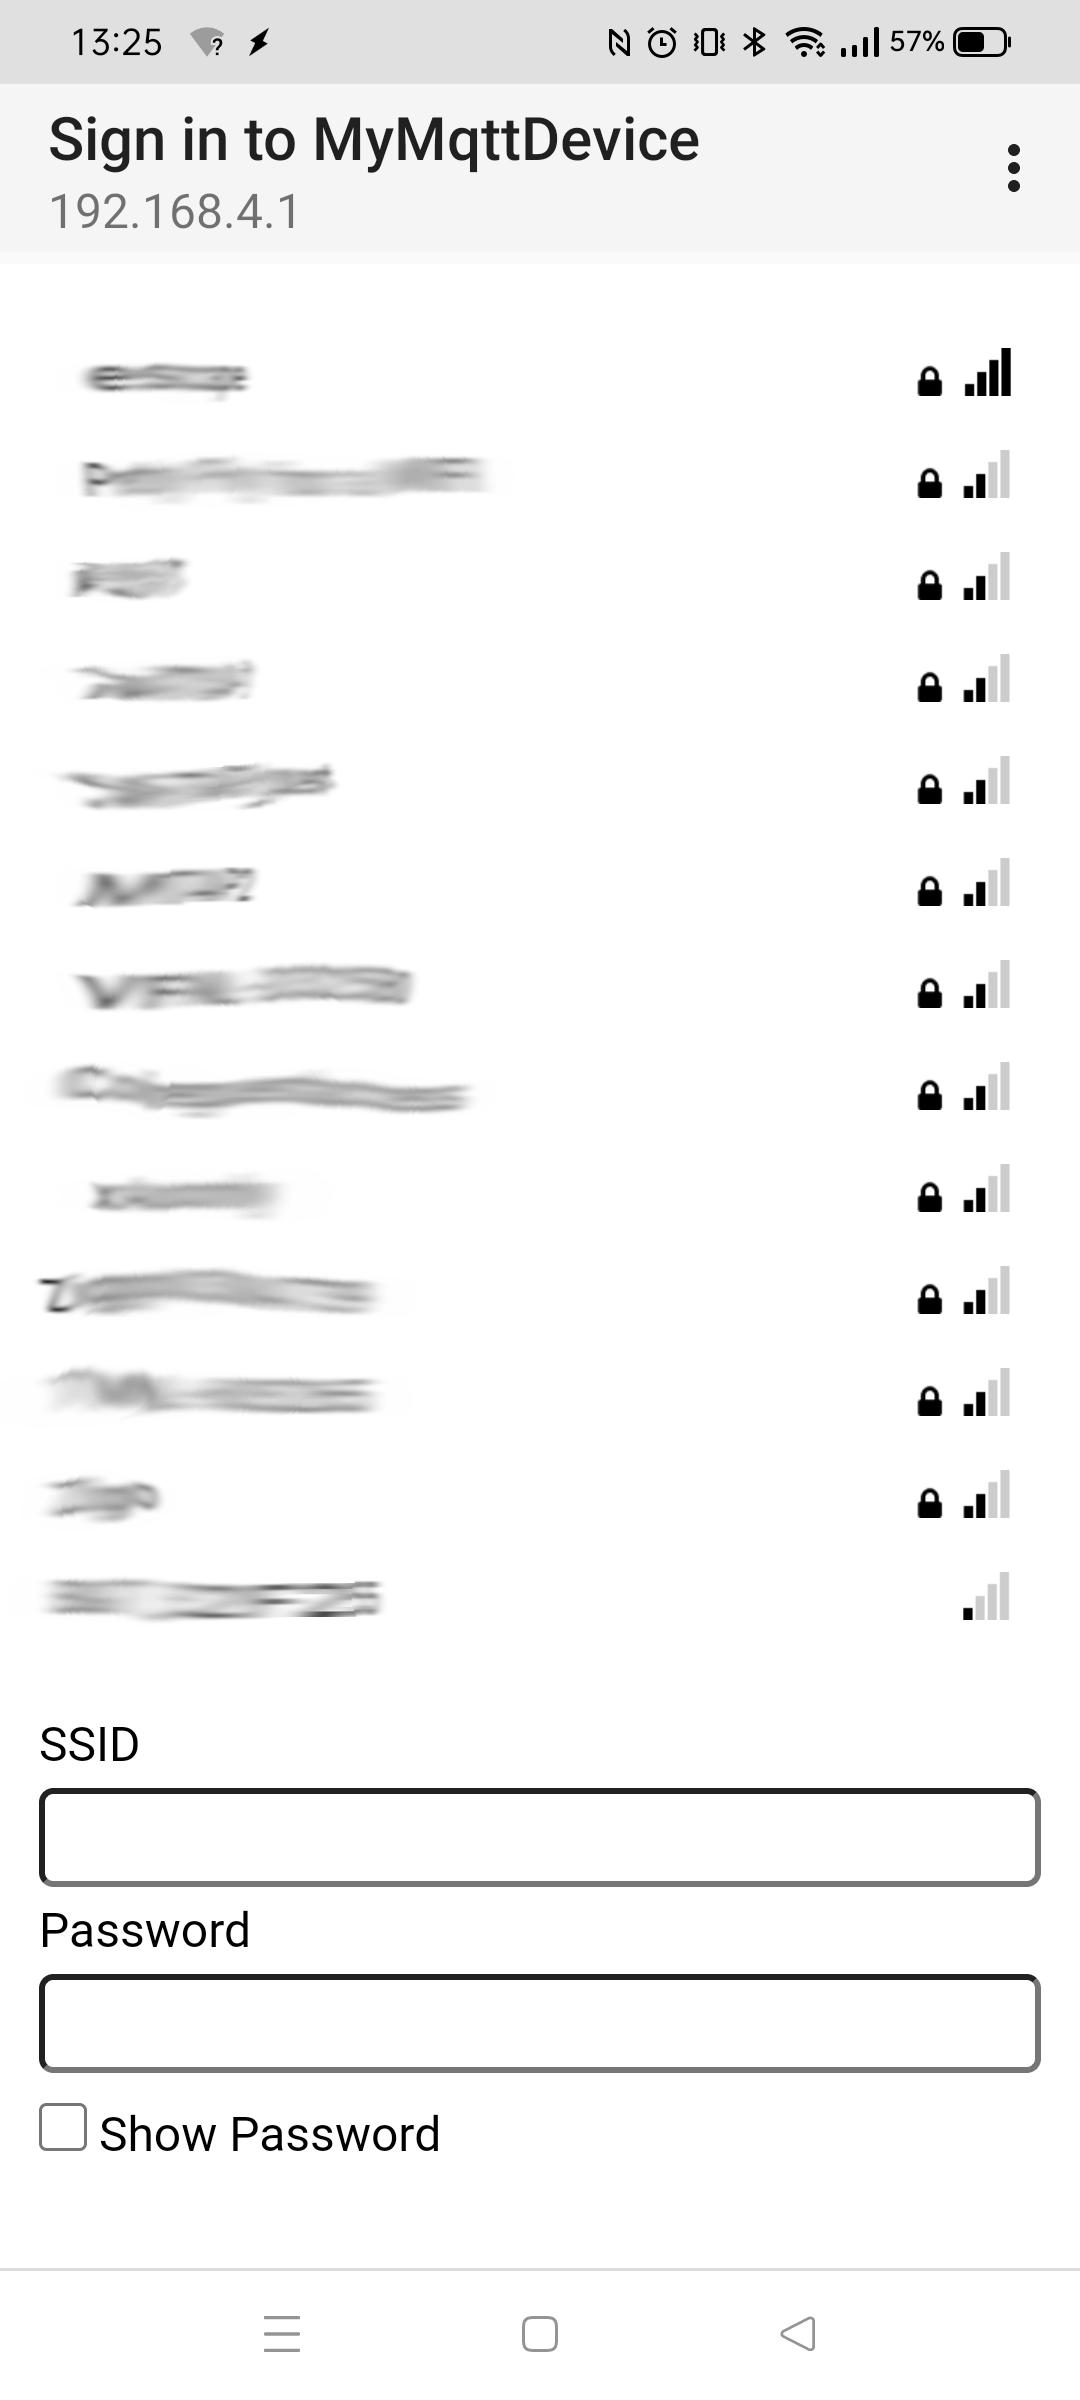
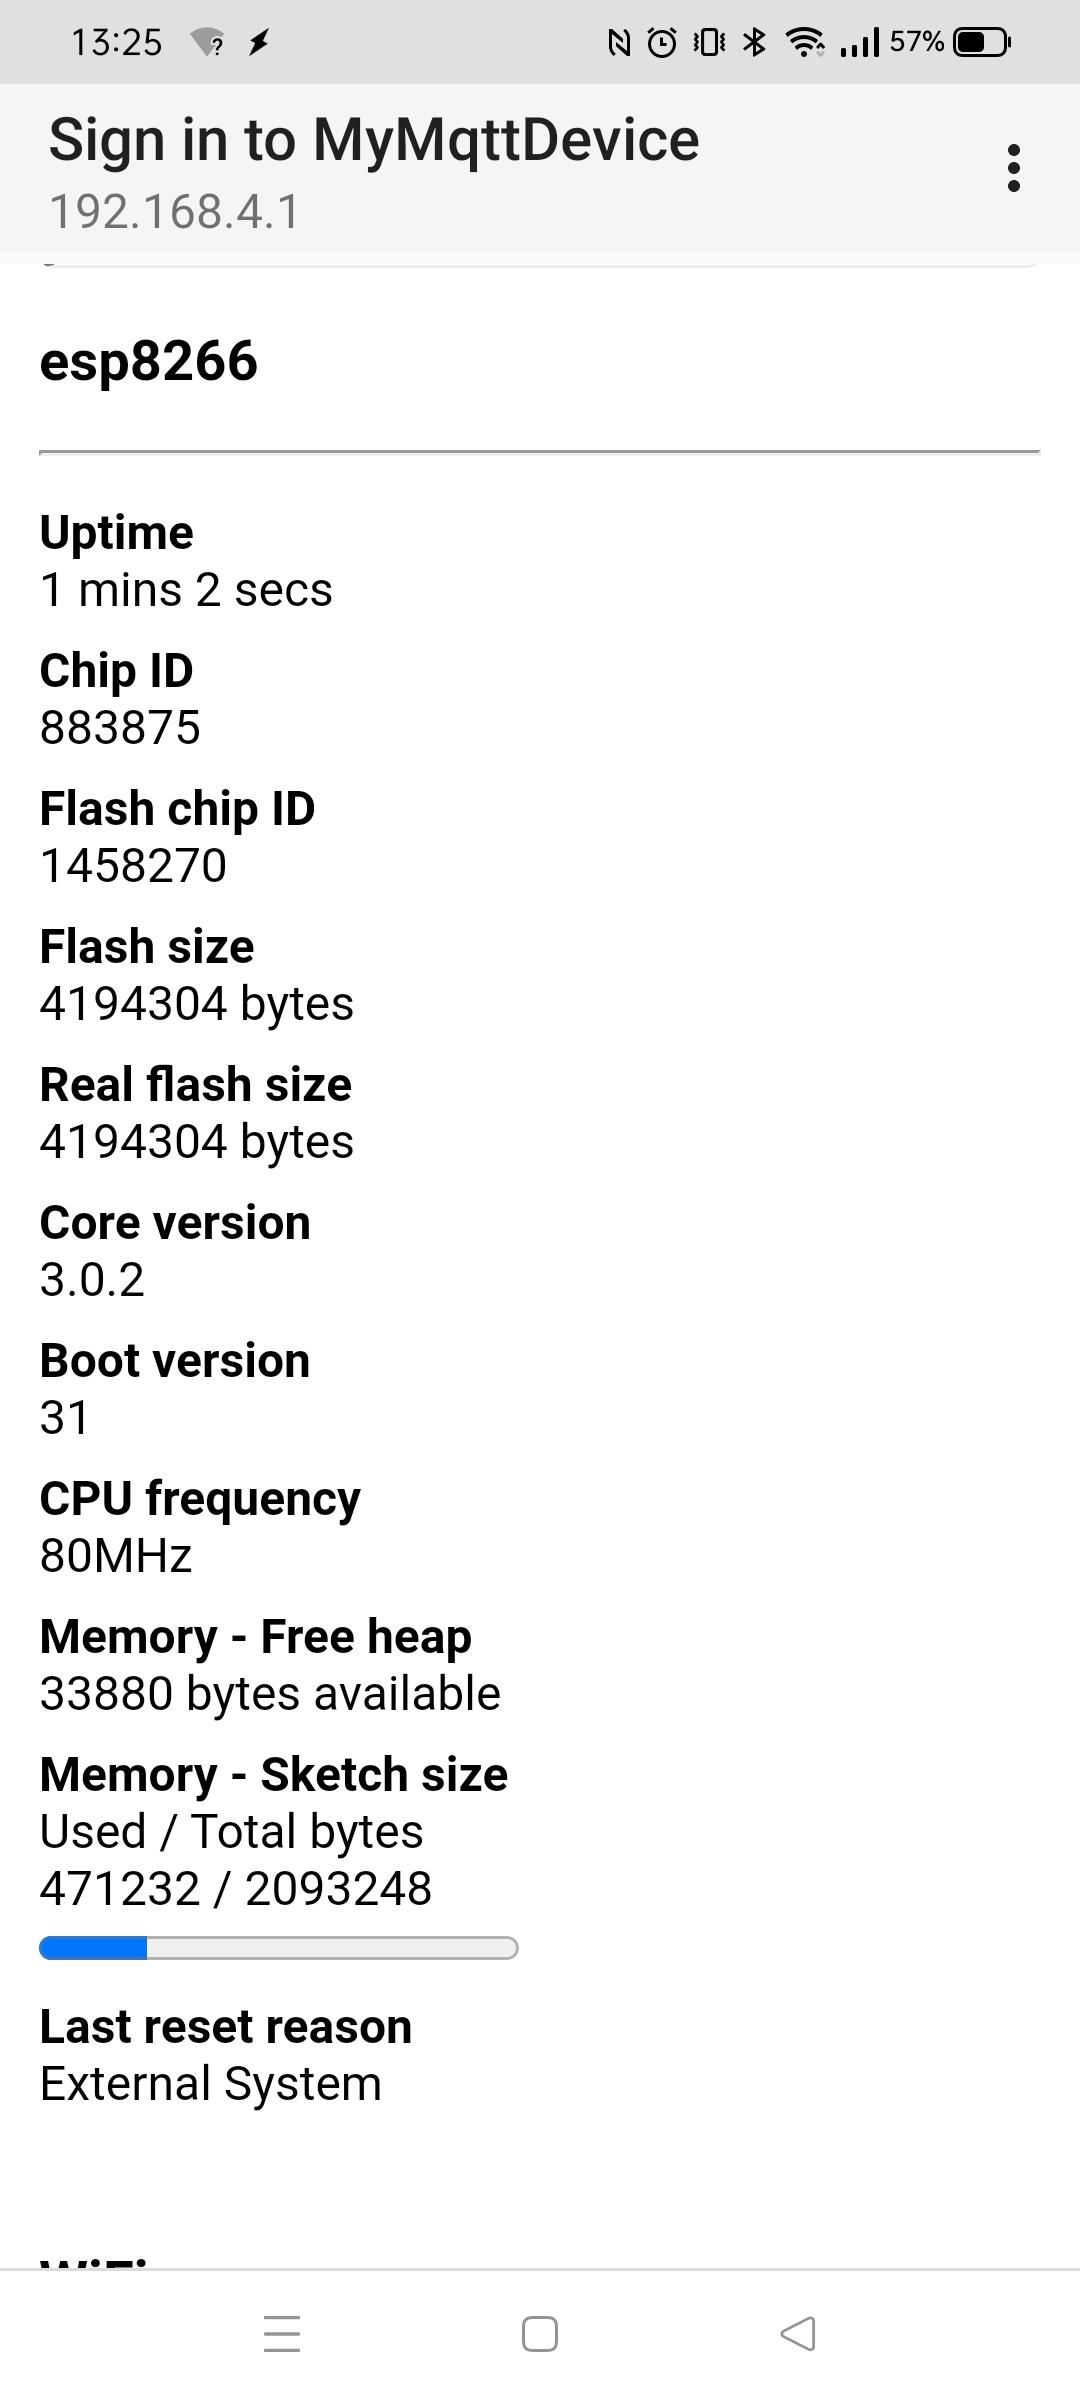
Not sure yet, also want to implement a wifi manager on the wemos.
Changes on above idea:
Paths are too long, I could not work out how to create a working program using this.
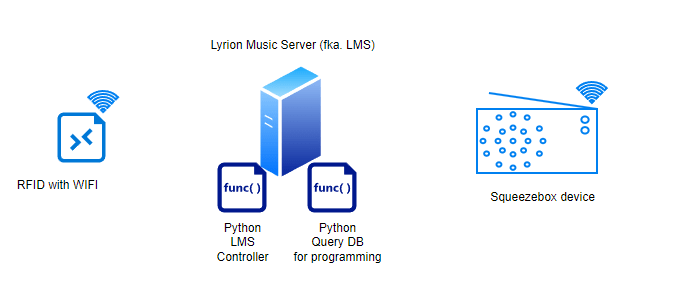
I stopped using paths, instead I’m using the Logitech media server album IDs.
Using two python scripts, I can use one for programming the card, and another script to control LMS.
How does it work
RFid device is connected to the network.
Start query.py on your LMS server. Search for an album name, it will present an ID and Album name in a list. Enter the ID you want to program, or 0 to exit. (This will also reset the programming mode)
Place an empty or previously programmed tag on the device. It will write the album ID on the tag.
Then it will start the album. Changing the tags will also just change the album playing.
(NOTE: My genre spotify player still works using this method, using the same device)
A second python script will read the Mqtt topic and control the Squeezebox player.
Python Code DB Query
import sqlite3
#paho-mqtt
import paho.mqtt.publish as publish

host = "IPMQTTBROKER"
port = 1883
topic = "spotify/rfid/in/write"
auth = {'username': 'xxxx','password': 'xxxxx'}
client_id = "spotithing"

def readSqliteTable(albumname):
    try:
        sqliteConnection = sqlite3.connect('/var/lib/squeezeboxserver/cache/library.db')
        cursor = sqliteConnection.cursor()
        albumname = "%" + albumname + "%"
        cursor.execute("select * from albums where title Like ?",
               (albumname,))
        records = cursor.fetchall()
        for row in records:
            print("Id: ", row[0],row[1])
        cursor.close()

    except sqlite3.Error as error:
        print("Failed to read data from sqlite table", error)
    finally:
        if sqliteConnection:
            sqliteConnection.close()

album = input("Album name ? ")
readSqliteTable(album)

number = input("Enter ID or 0 to quit : ")
publish.single(topic, "00000" , qos=1, hostname=host, port=port,
        auth=auth, client_id=client_id)
if number == 0:
        exit()
publish.single(topic, number, qos=1, hostname=host, port=port,
        auth=auth, client_id=client_id)
print("Program your tag")
print("Reset/disable writing using exit with 0!")
Python Code Controller (this one needs to be running at all times)
import paho.mqtt.client as mqtt
import urllib.request

def on_connect(client, userdata, flags, rc):
        print("Connected with result code {0}".format(str(rc)))
        client.subscribe("spotify/rfid/idlms")

def on_message(client, userdata, msg):
        print("Message received-> " + msg.topic + " " + str(msg.payload))  # Print a received msg
        urllib.request.urlopen("http://IPADDRESLMS:9000/anyurl?p0=playlistcontrol&p1=album_id:" + msg.payload.decode() + "&p2=cmd:load&player=b8:27:eb:11:16:ab")
#NOTE also change b8:27:eb:11:16:ab into you players MACAddress!

client = mqtt.Client("digi_mqtt_test")
client.on_connect = on_connect
client.on_message = on_message
client.connect('IPMQTTBROKER', 1883)
client.loop_forever()
Arduino Code (see schematic in other post)
#include <Arduino.h>
#include <SPI.h>
#include <MFRC522.h>
#include <ESP8266WiFi.h>
#include <WiFiClient.h>
#include <PubSubClient.h>
#define SS_PIN 15
#define RST_PIN 0
MFRC522 mfrc522(SS_PIN, RST_PIN);
  MFRC522::StatusCode status; //variable to get card status
  byte buffer[18];  //data transfer buffer (16+2 bytes data+CRC)
  byte size = sizeof(buffer);
  uint8_t pageAddr = 0x06;  //In this example we will write/read 16 bytes (page 6,7,8 and 9).
                            //Ultraligth mem = 16 pages. 4 bytes per page.
                            //Pages 0 to 4 are for special functions.
unsigned long cardId = 0;
WiFiClient net;
PubSubClient client(net);
const char* mqtt_server = "IPMQTTBROKER";
const char* ssid = "MYSSID";
const char* password = "MYSSIDPASS";
String topicStr = "";
byte buffer2[8];

boolean Rflag=false;
int r_len;
char payload[5];
byte value[5];
void setup() {
  Serial.begin(9600);
  SPI.begin();
  mfrc522.PCD_Init();
  WiFi.mode(WIFI_AP_STA);
  WiFi.begin(ssid, password);
  client.setServer(mqtt_server, 1883);
     delay(100);
    client.setCallback(callback);
      delay(100);
    client.subscribe("spotify/rfid/in/#");
}
void reconnect() {
  while (WiFi.waitForConnectResult() != WL_CONNECTED) {
  }
  while (!client.connected()) {
    String clientId = "rfid-";
    clientId += String(random(0xffff), HEX);
    if (!client.connect(clientId.c_str(), "rfidclient", "...")) {
      Serial.print("failed, rc=");
      Serial.print(client.state());
      delay(5000);
    }
  }
  client.subscribe("spotify/rfid/in/#");
}
void callback(char* topic, byte* payload, unsigned int length) {

  Serial.print(F("Called"));
   Rflag=true; //will use in main loop
   r_len=length; //will use in main loop
   Serial.print("length message received in callback= ");
   Serial.println(length);
   int j=0;
     for (j;j<length;j++) {
       buffer2[j]=payload[j];
       }
if (r_len < 3) {
  Rflag=false;
  Serial.print(F("Set false"));
}
buffer2[j]='\0'; //terminate string
}

void loop() {
    if (!client.connected()) {
    reconnect();
  }
  client.loop();
  if (!mfrc522.PICC_IsNewCardPresent()) {
    return;
  }
  if (!mfrc522.PICC_ReadCardSerial()) {
    return;
  }
if (Rflag) {
        for (int i=0; i < 4; i++) {
    //data is writen in blocks of 4 bytes (4 bytes per page)
    status = (MFRC522::StatusCode) mfrc522.MIFARE_Ultralight_Write(pageAddr+i, &buffer2[i*4], 4);
    if (status != MFRC522::STATUS_OK) {
      Serial.print(F("MIFARE_Read() failed: (W) "));
      Serial.println(mfrc522.GetStatusCodeName(status));
      return;
    }
  }
  Serial.println(F("MIFARE_Ultralight_Write() OK "));
  Serial.println();
  Rflag=false;
}
  cardId = getCardId();
  char buffer3[10];
  sprintf(buffer3, "%lu", cardId);
  client.publish("spotify/rfid/id", buffer3);
  // Read data ***************************************************
  Serial.println(F("Reading data ... "));
  //data in 4 block is readed at once.
  status = (MFRC522::StatusCode) mfrc522.MIFARE_Read(pageAddr, buffer, &size);
  if (status != MFRC522::STATUS_OK) {
    Serial.println(F("MIFARE_Read() failed: (R)"));
    Serial.println(mfrc522.GetStatusCodeName(status));
    return;
  }

  Serial.println(F("Read data: "));
  //Dump a byte array to Serial
  for (byte i = 0; i < 5; i++) {
    Serial.write(buffer[i]);
       buffer2[i]=buffer[i];
    }
  client.publish("spotify/rfid/idlms", buffer,5);
  delay(1000);
  mfrc522.PICC_HaltA();
}

unsigned long getCardId() {
  byte readCard[4];
  for (int i = 0; i < 4; i++) {
    readCard[i] = mfrc522.uid.uidByte[i];
  }
  return (unsigned long)readCard[0] << 24
    | (unsigned long)readCard[1] << 16
    | (unsigned long)readCard[2] << 8
    | (unsigned long)readCard[3];
}
UPDATE: AccessPoint on Arduino implemented with captive portal for Wifi Configuration
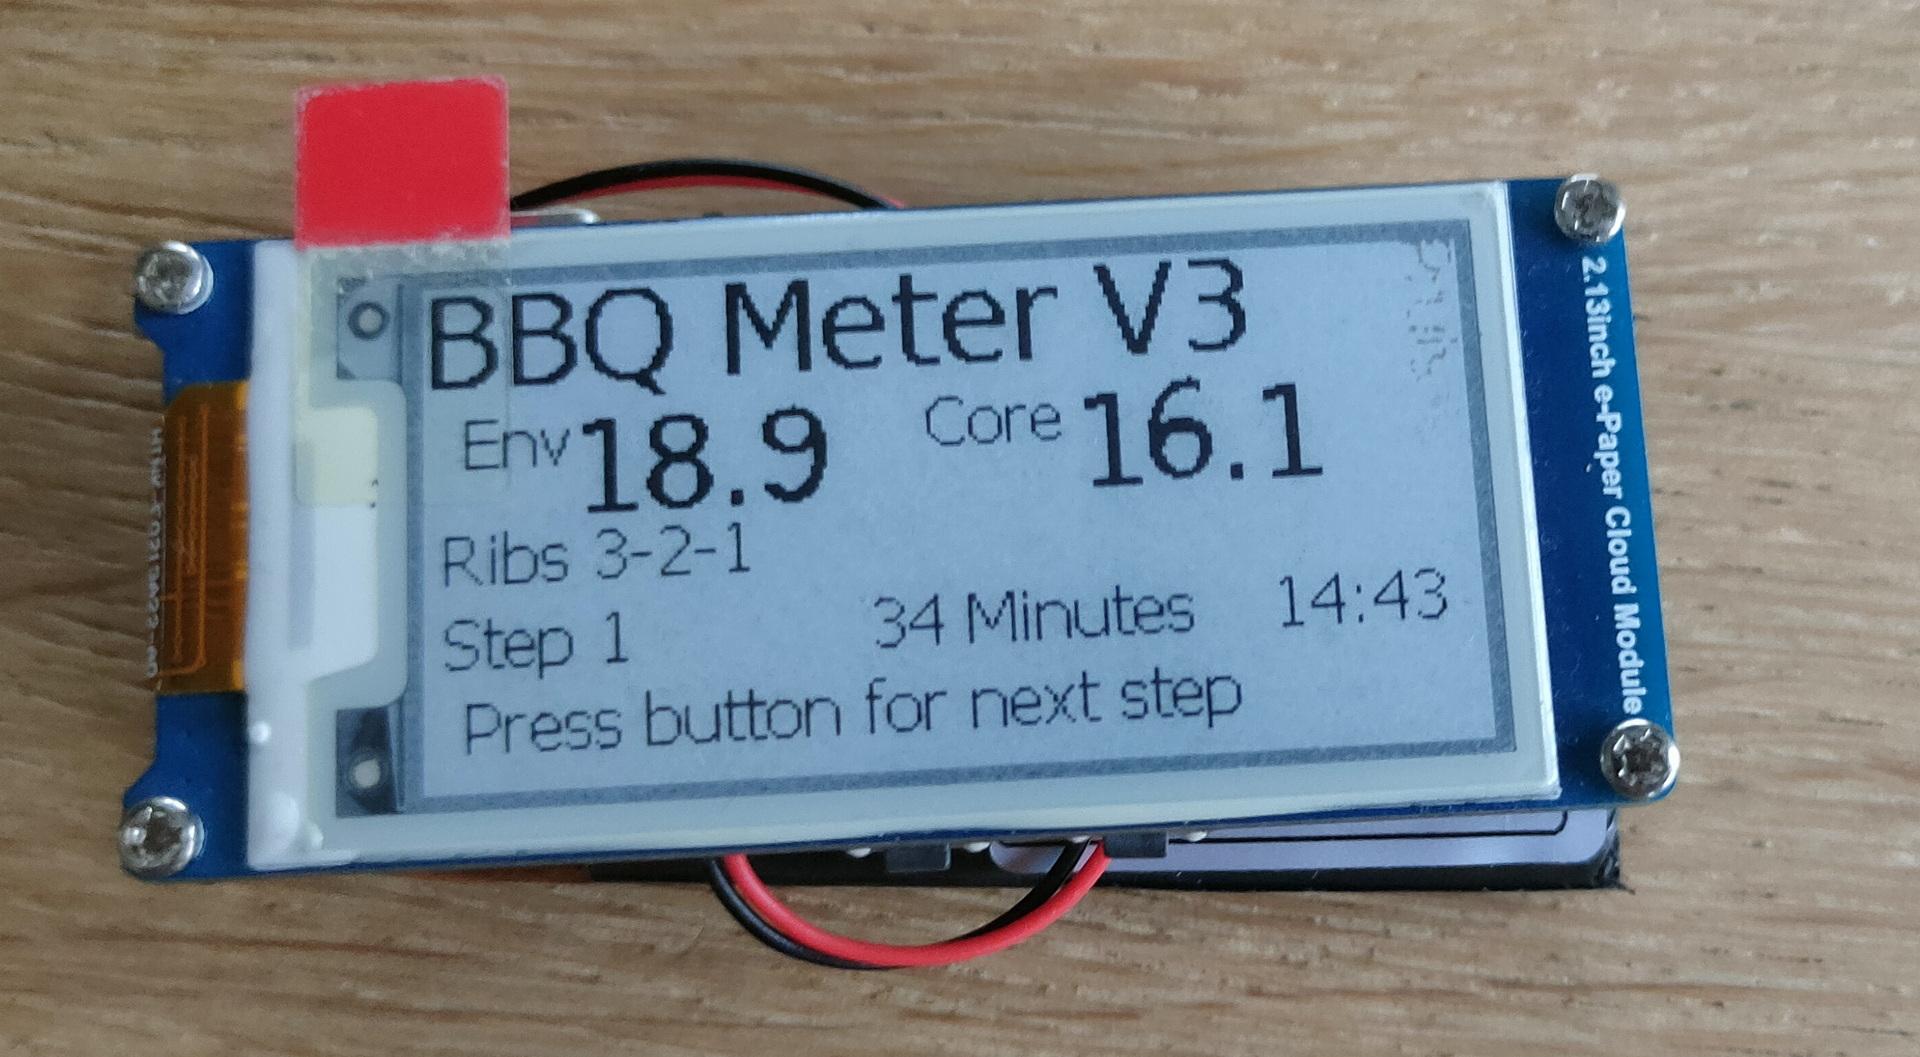
Got my Waveshare Epaper Cloud running on ESPHome
This is a Epaper display with a 2000mAh Lipo and a passive buzzer. Running parts of my Smoker monitor.
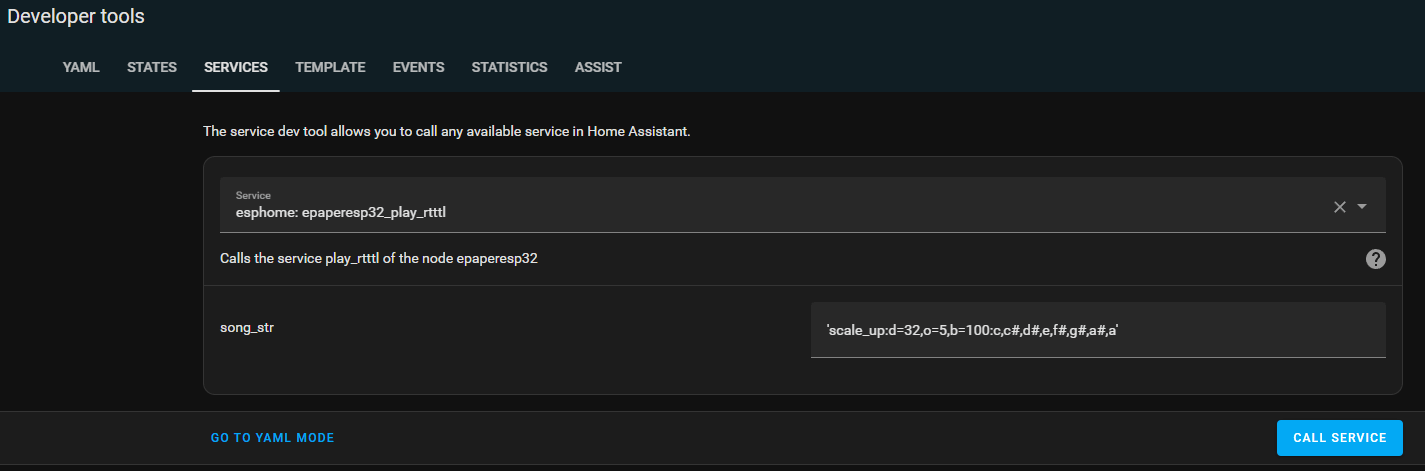
Below a little movie clip with RTTTL sound notification. (Send from Home Assistant) B.t.w. RTTTL are those ringtones we used to have. (Ring Tone Text Transfer Language)
Sending from HA
Parts of the ESPHOME Yaml NOTE: For the time, you need the time integration to get hours:minutes as a sensor!
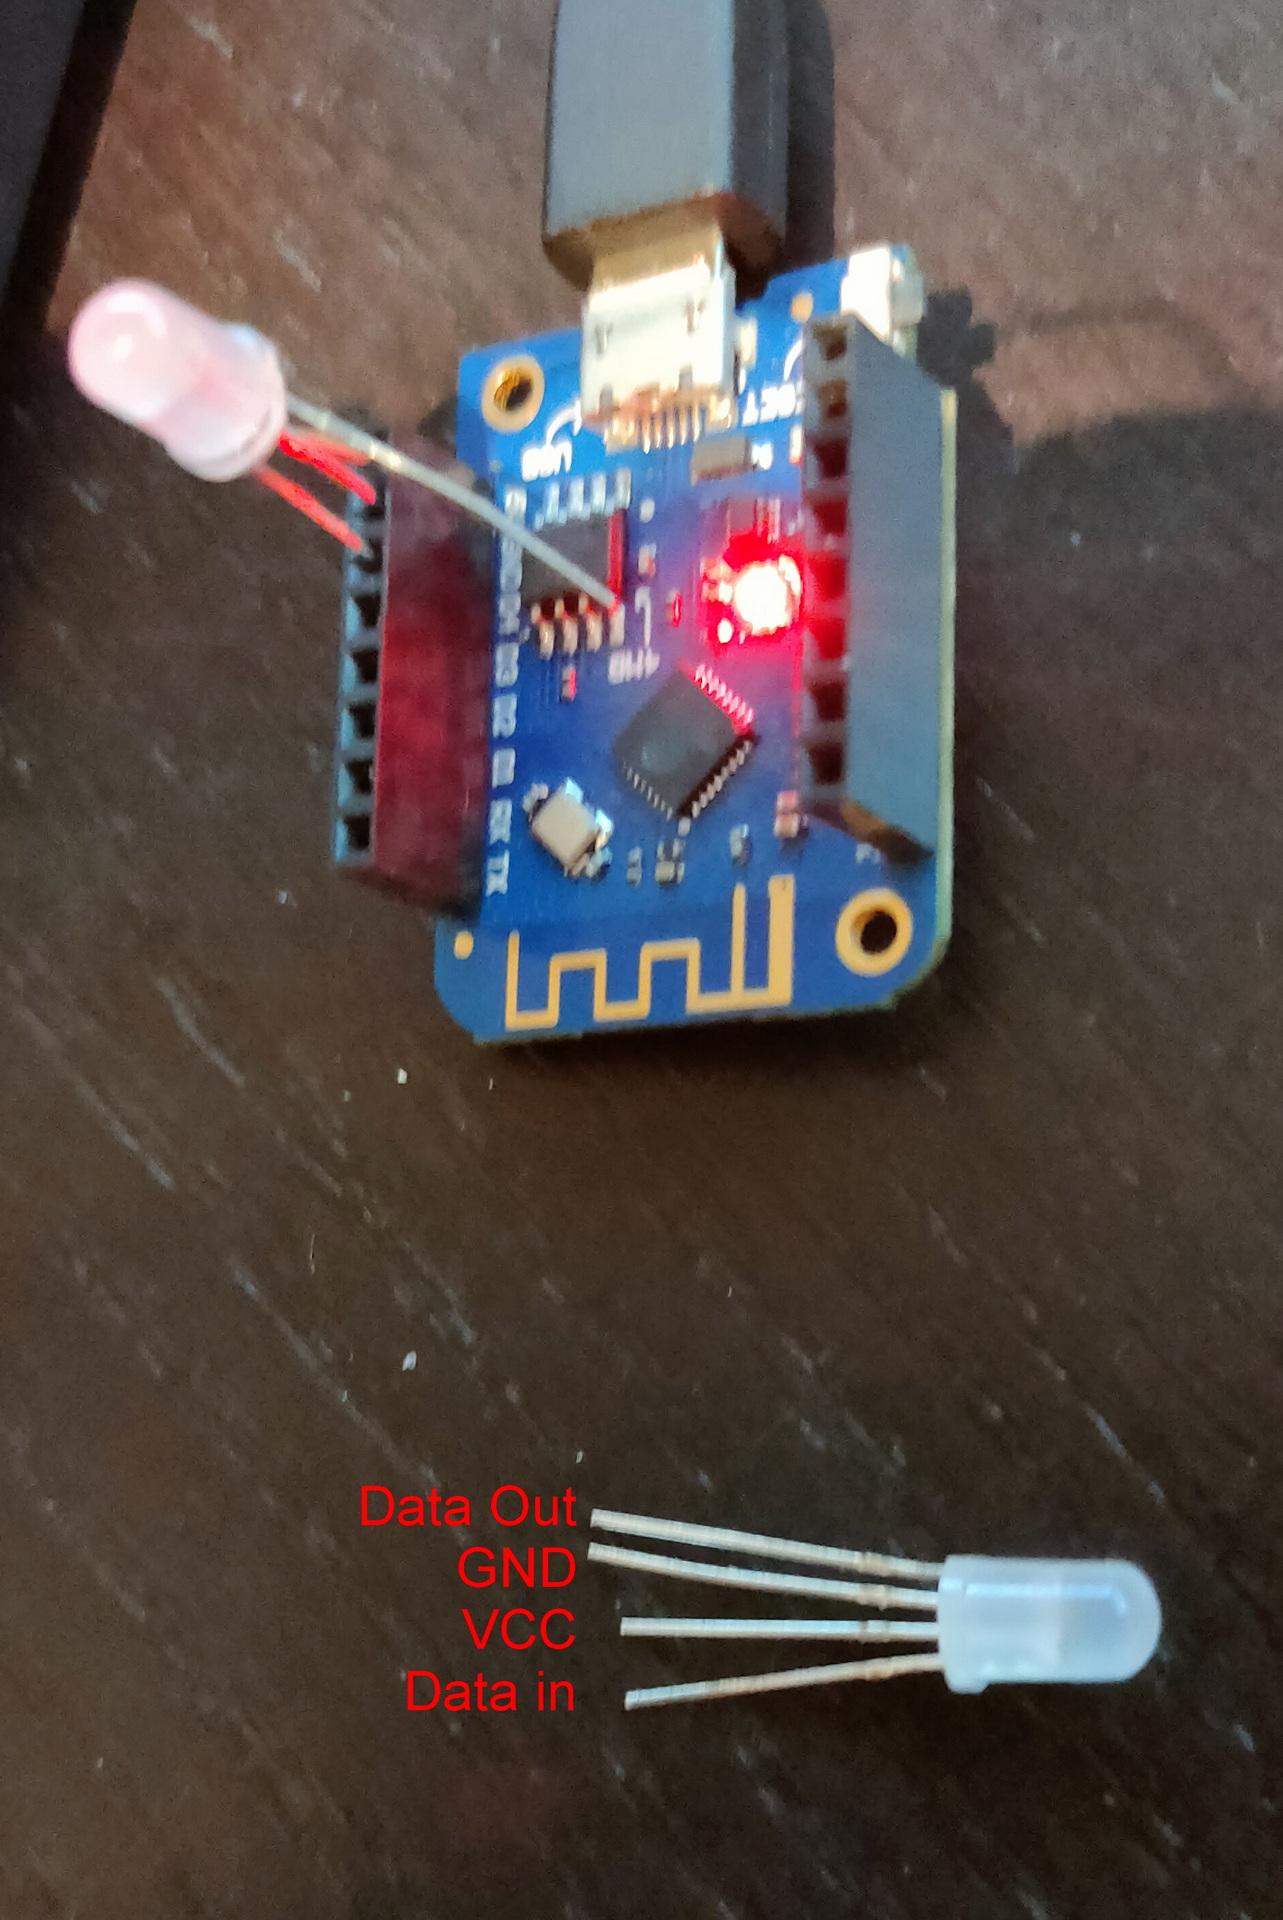
This is part of a test where my friends and me can have notifications LEDs over the internet.
Using certificate parts from: Controlling the led will be done using Mattermost webhooks, or slashcommand with custom scripting. (Mattermost is my own hosted chat server)
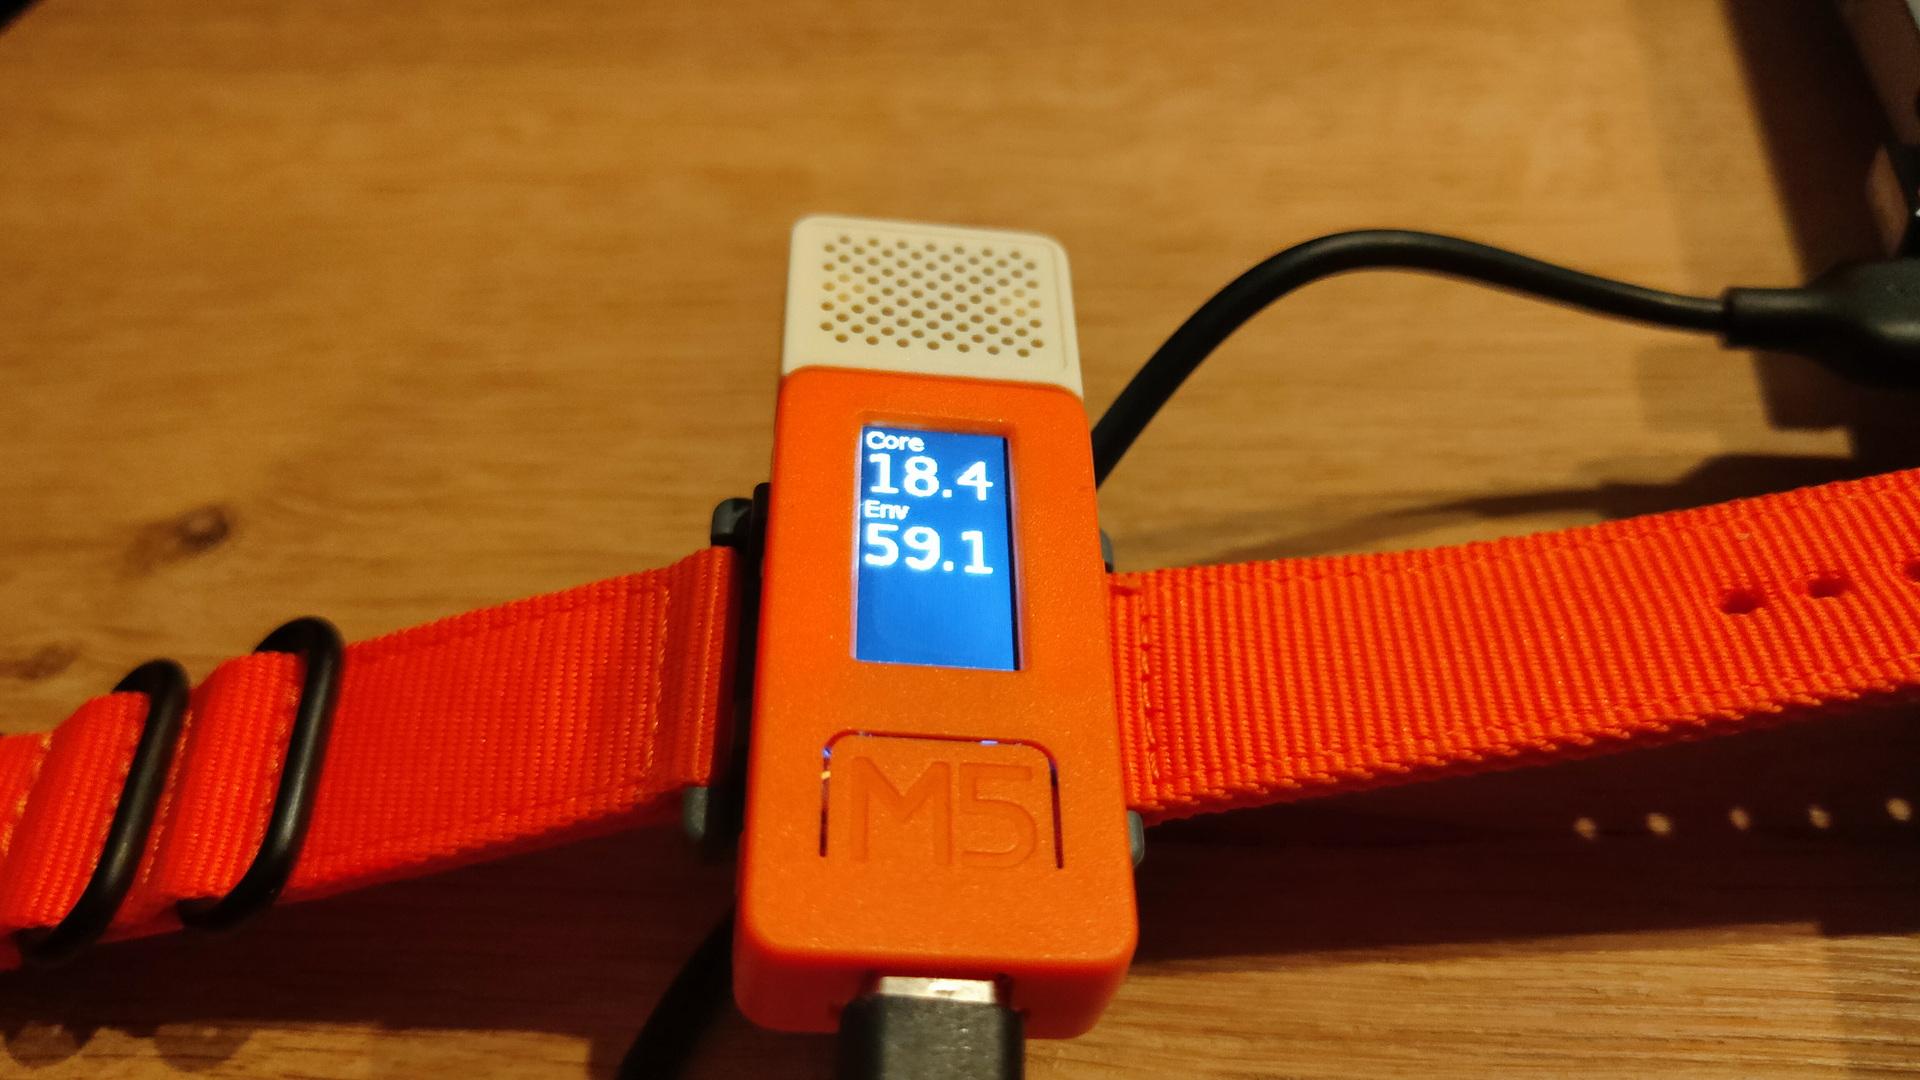
Not posted in the past, new version using ESPHOME and a m5stickc
Previous version using a ESP12
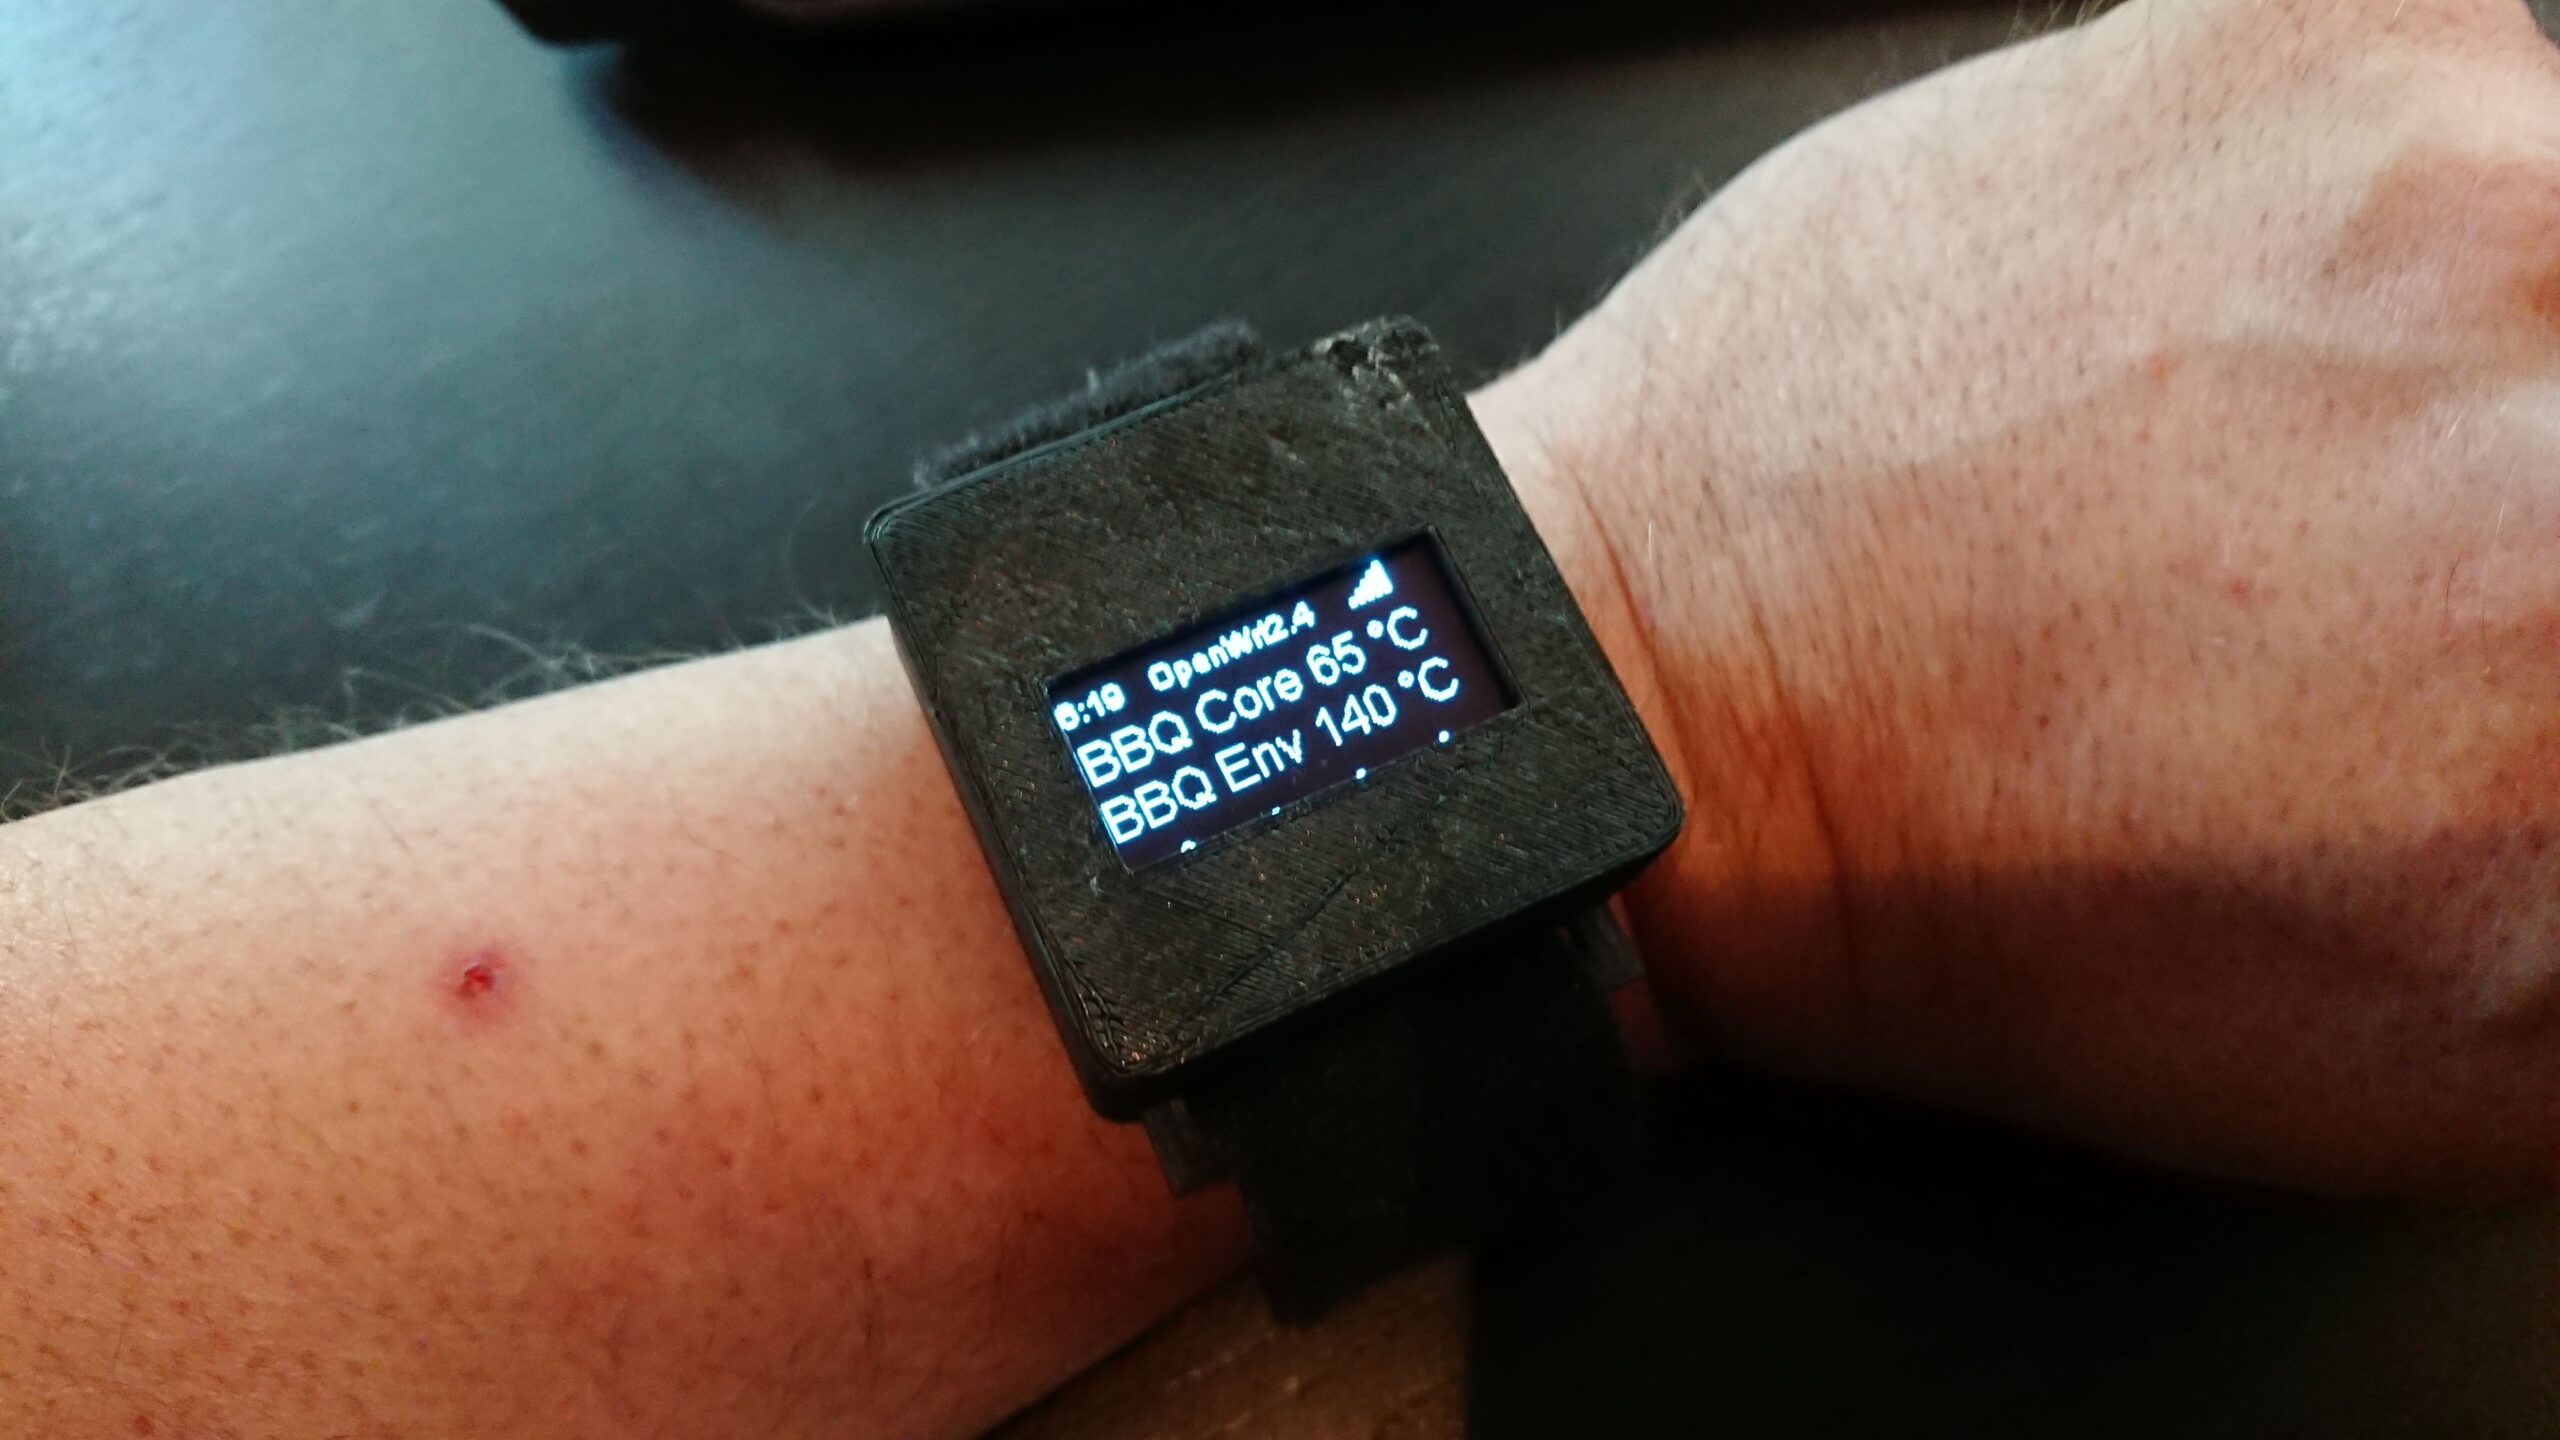
A “watch” with core and environment temperature of my smoker with a alarm, and button for timers.
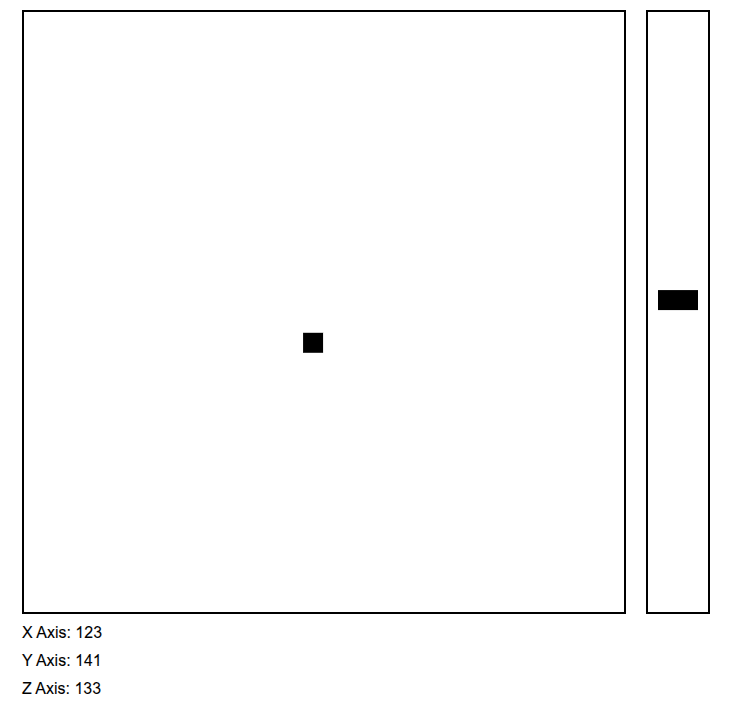
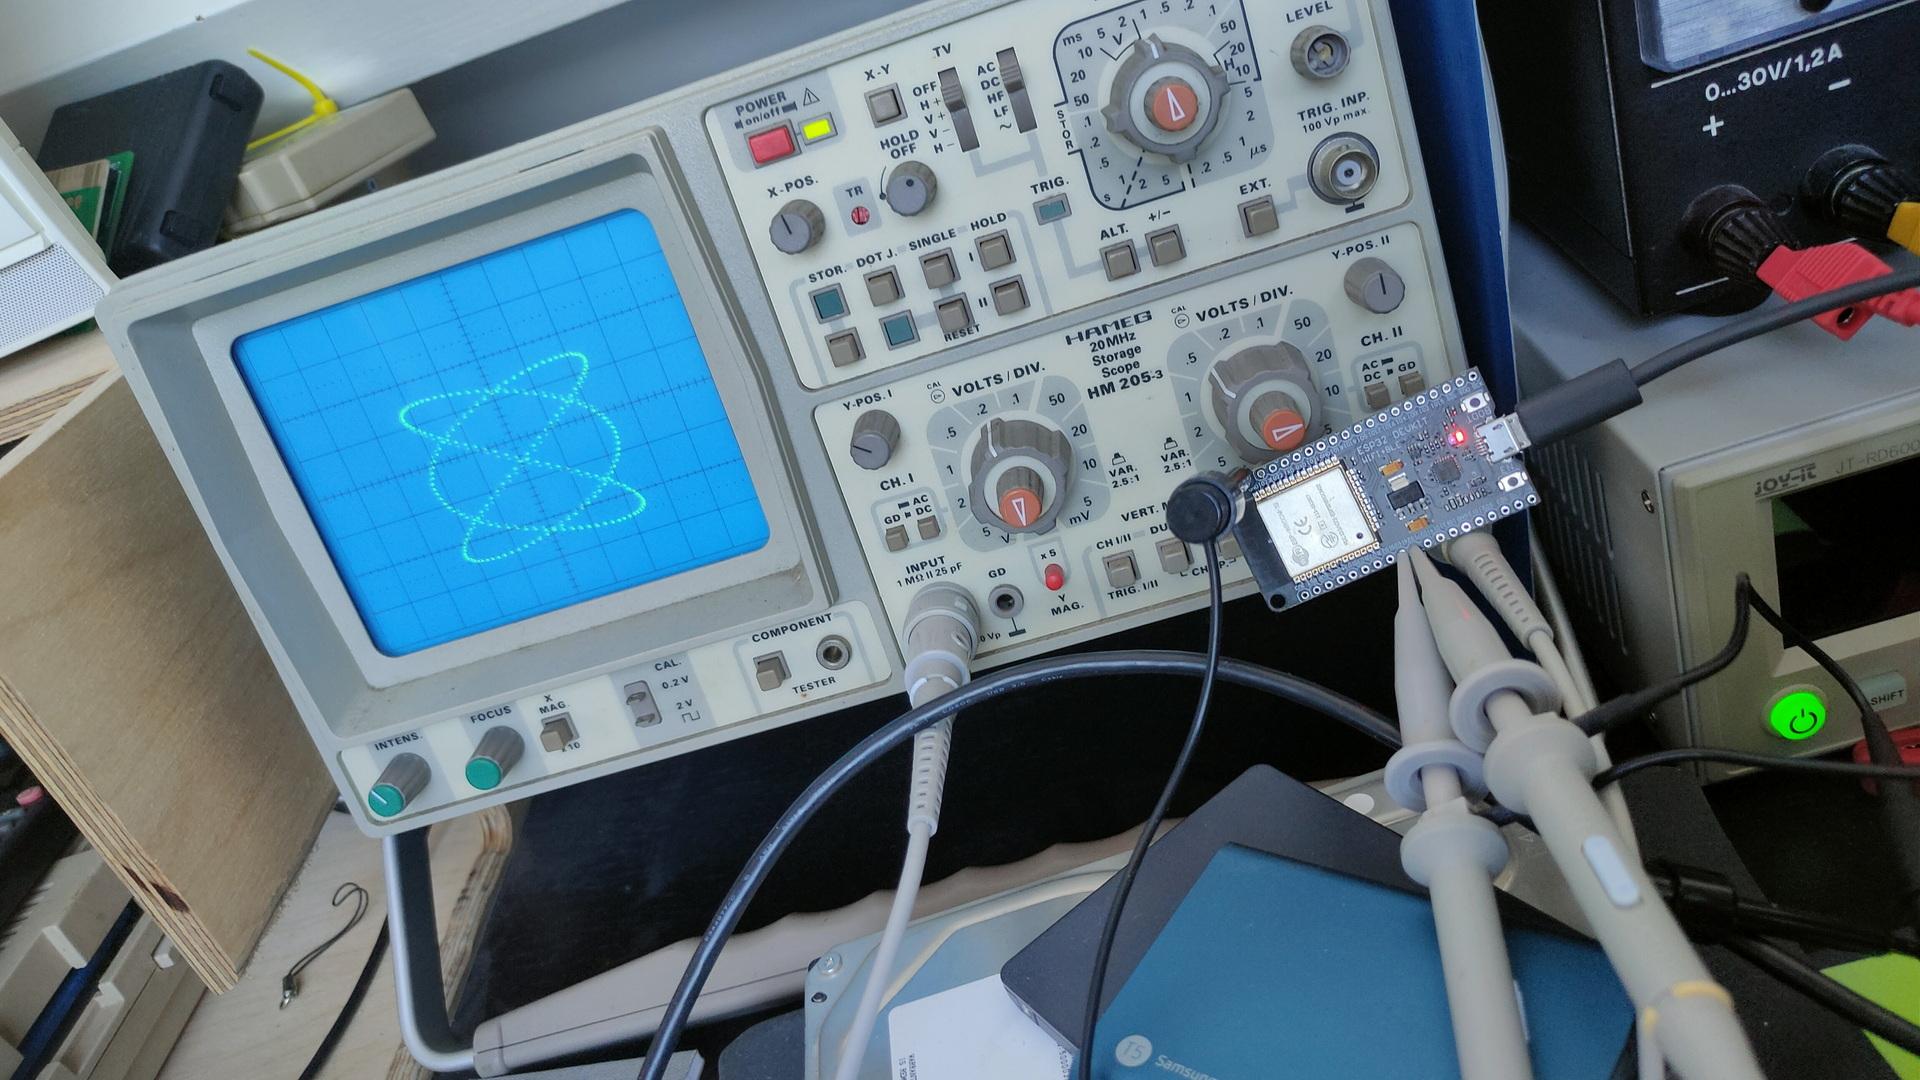
ESP32 dac’s drawing on oscilloscope ( no additional components)
ESP32 in front of scope, two clips for x and y
For above i used sin/cos functions 2:3, which creates Lissajous figures. See: https://www.henriaanstoot.nl/1992/01/01/oscilloscope-graphics-using-a-amiga-bonus-vectrex/
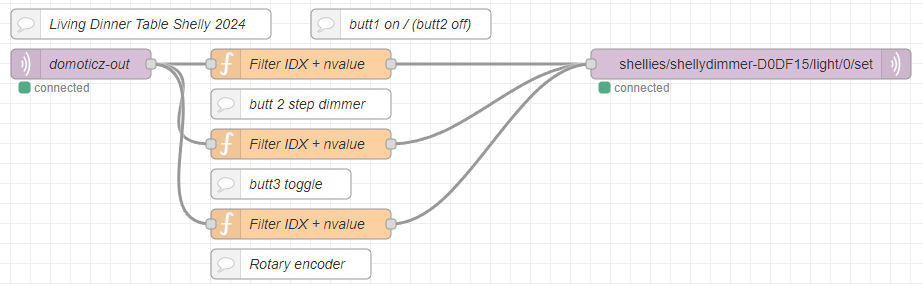
3 battery operated buttons (no wires needed) to control my shelly dimmer at the dinner table.
left button on, middle steps per 20% and 3rd button off. (This cheapass button only sends ON commands)
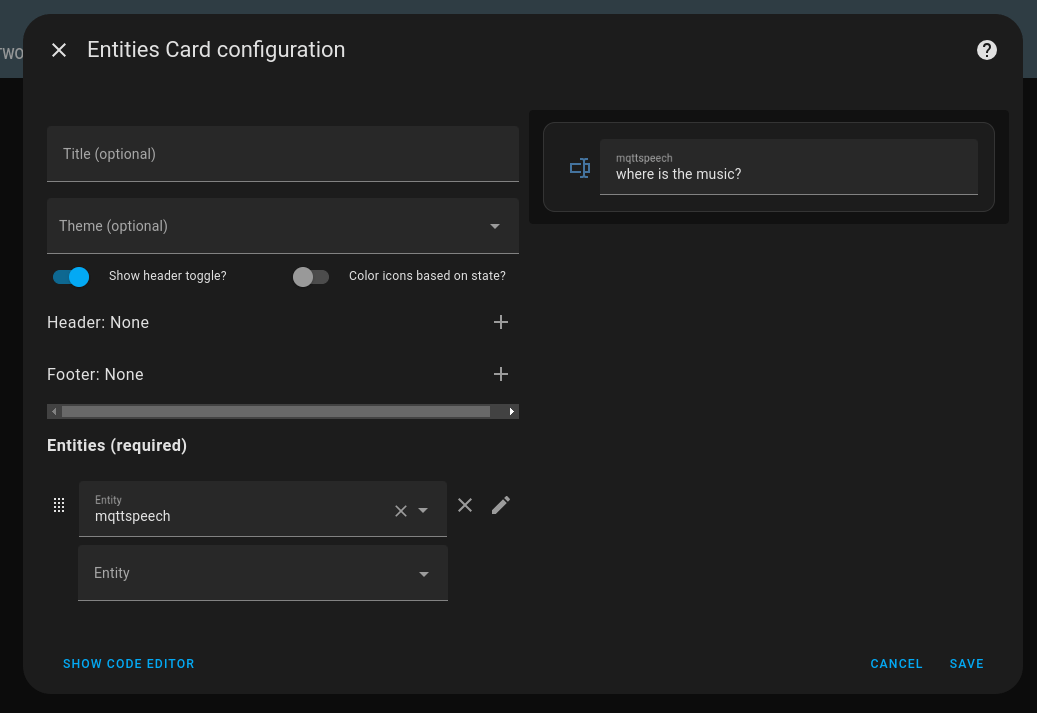
I made my own Mqtt to speech thingy in the past. Sending a text to a mqtt topic would be picked up by my domoticz raspberry and using a bash script the topic payload was converted to speech and being played on a connected speaker.