I was planning to make a RSS reader using this display, but I came across a weather display project I wanted to check out. (So I probably end up buying another one)
There are many questions and issues around this project using the S3.
Below is my python script to push messages via pushover to my phone.
It’s being run from a cron during the day.
CODE
import csv
import datetime
import requests

# configure own creds
PUSHOVER_USER_KEY = 'keykeykeykeykeykeykeykey'
PUSHOVER_API_TOKEN = 'tokentokentokentokentokentokentoken'
CSV_FILE = '/data/notifications.csv'

def send_pushover_notification(message):
    url = "https://api.pushover.net/1/messages.json"
    payload = {
        "token": PUSHOVER_API_TOKEN,
        "user": PUSHOVER_USER_KEY,
        "message": message
    }
    response = requests.post(url, data=payload)
    if response.status_code != 200:
        print("Failed to send notification:", response.text)

def check_and_notify():
    today = datetime.date.today()
    with open(CSV_FILE, newline='') as csvfile:
        reader = csv.DictReader(csvfile)
        for row in reader:
            try:
                day = int(row['day'])
                month = int(row['month'])
                if today.day == day and today.month == month:
                    send_pushover_notification(row['message'])
            except ValueError:
                continue

if __name__ == "__main__":
    check_and_notify()
notifications.csv file
day,month,message
1,1,Birthday of a new year
16,05,Project Deadline
16,05,Test2 (blah) 2
7,3,Glorious bastard Rik Mayall birthday
27,3,International whisky day
Nice to haves (didn’t implement because i’m a lazy bastard)
3rd Saturday every may
Getting dates or updates from another app
Selecting Pushover device, level of alertness .. etc
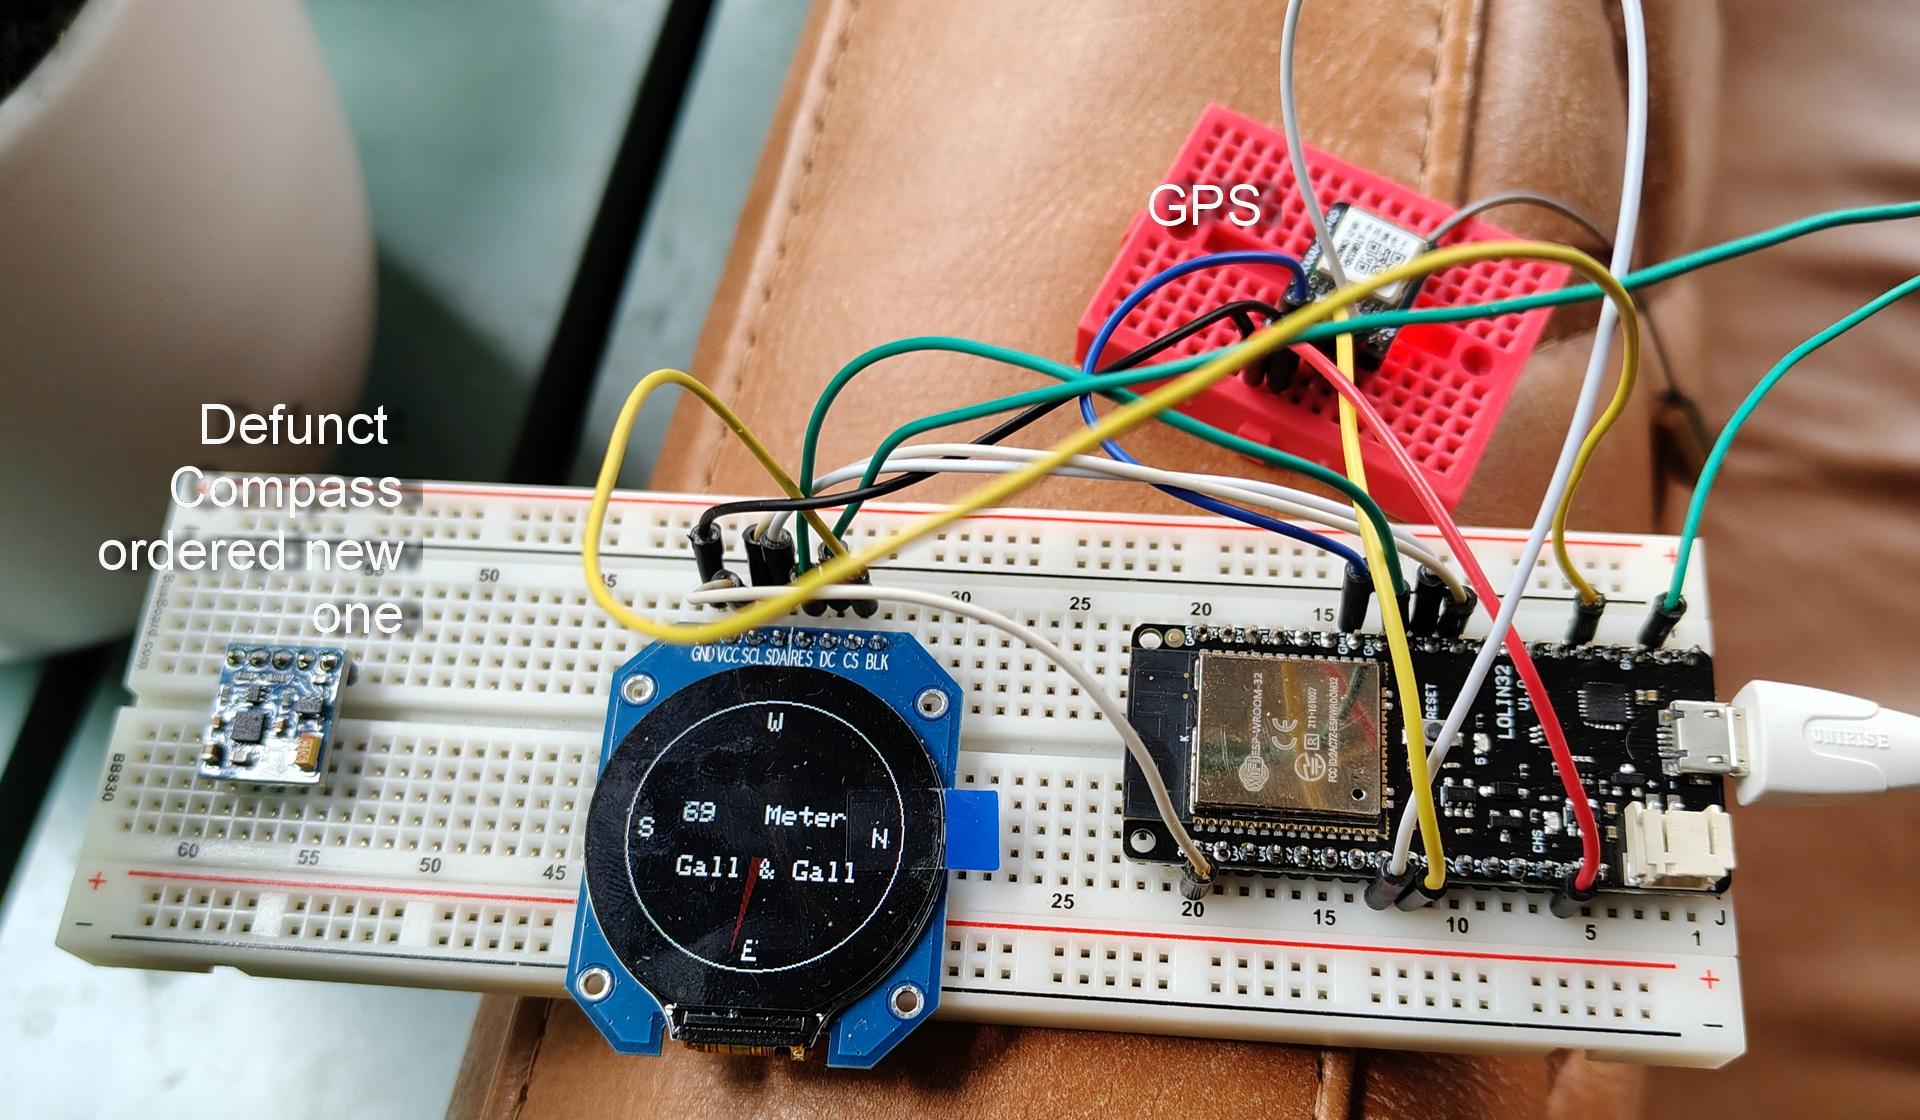
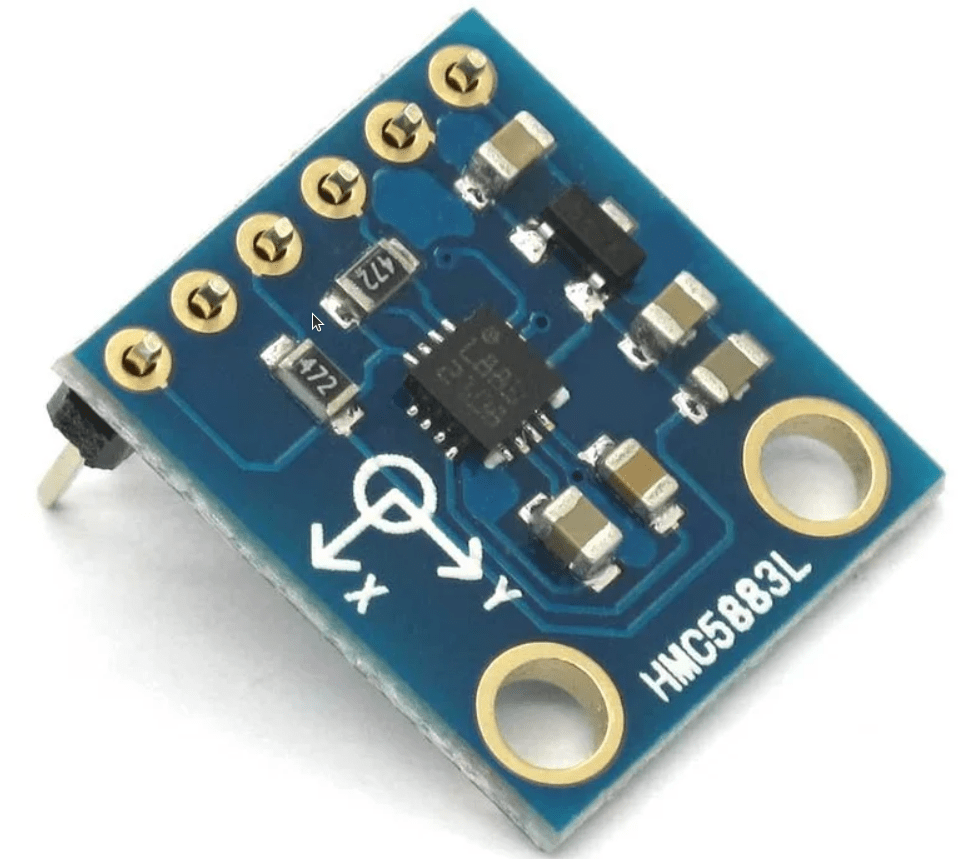
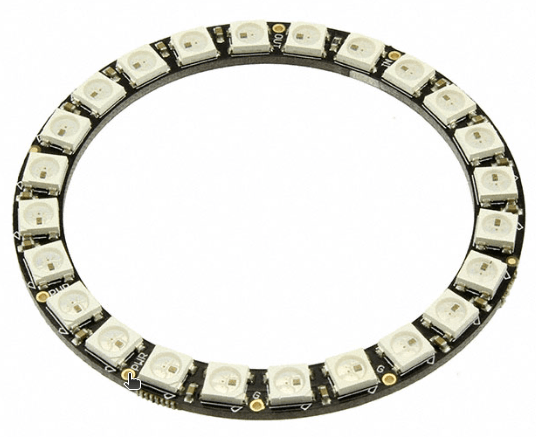
Combining a GPS module, compass, a LED ring and some code, I want to make a little device which shows you the way to the nearest … something.
To make it completely standalone, I have to use a SIM module. (Same as I have used before) This POC will use my phone as hotspot.
The LED ring will show the direction to go.
Edit: Maybe not a LED ring but a little display.
GPS moduleCompass moduleLedring
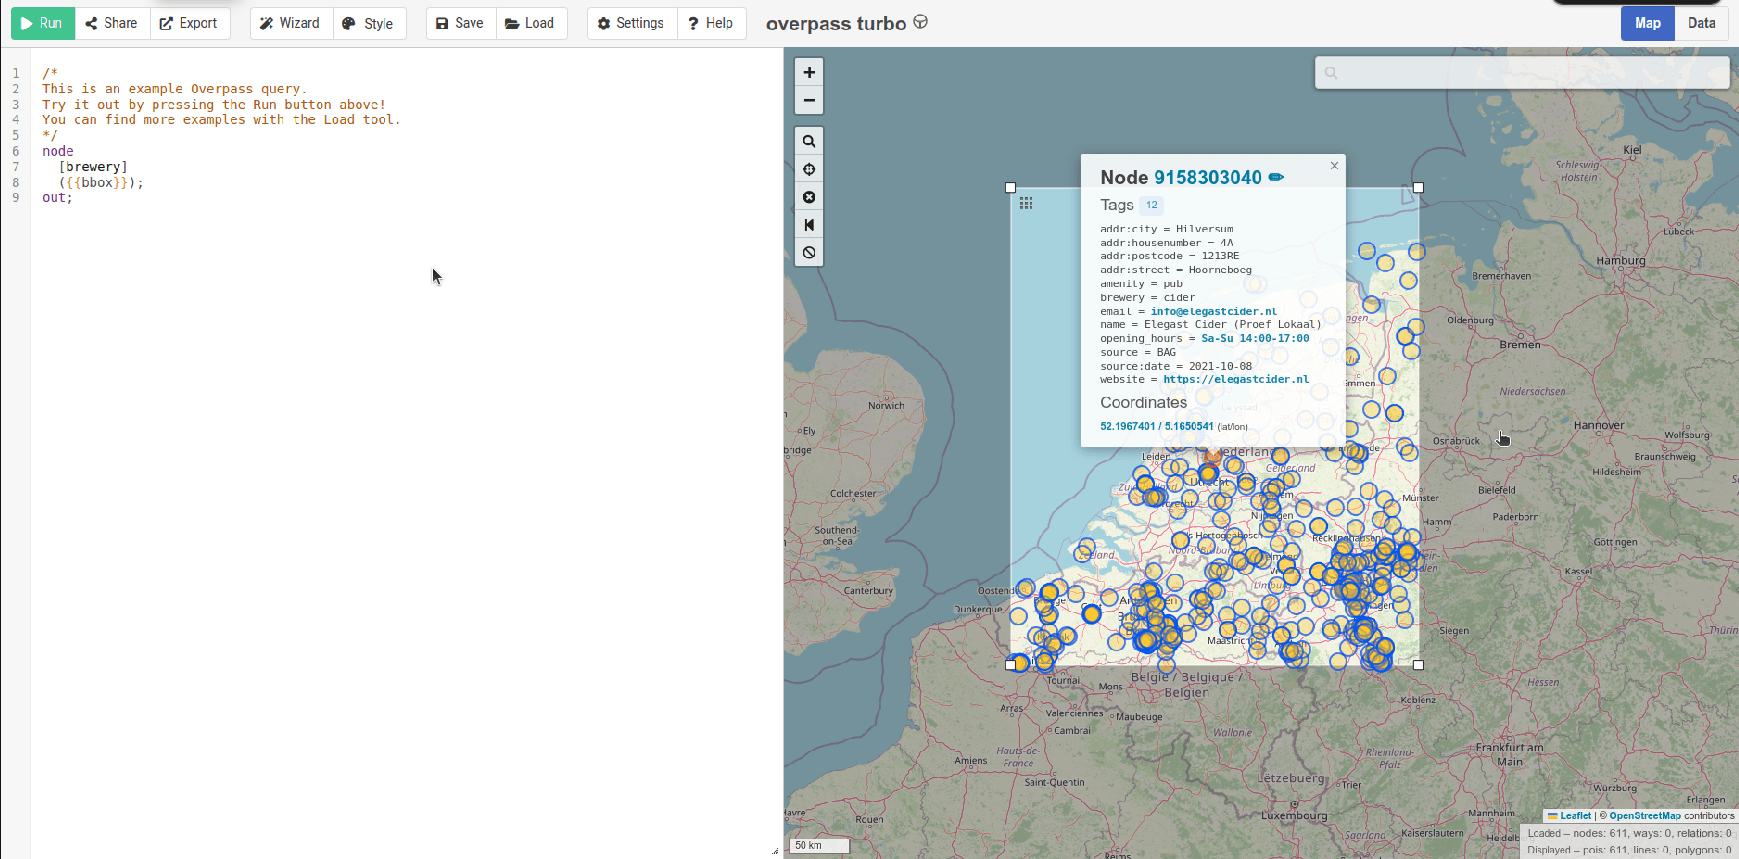
As previously posted, I was playing with Overpass turbo. Using an API, I can use code to query this.
Arduino sends latitude, longitude to my webserver
Webserver queries API for neastest POIs and calculates distance.
Send data from webserver to arduino
Arduino uses heading data to light up direction LED (also on secondary display with distance info?) edit: and shop info
Test code for my web server to query the data
import overpy
import math

api = overpy.Overpass()

# This location will be filled with data from GPS module on Arduino.
latitude = 52.2270745        # Center latitude (e.g. Berlin)
longitude = 5.177519      # Center longitude
box_size = 0.05         # Box size in degrees (about ~5 km)

south = latitude - box_size
north = latitude + box_size
west = longitude - box_size
east = longitude + box_size

def haversine(lat1, lon1, lat2, lon2):
    R = 6371  # Earth radius in km
    phi1 = math.radians(lat1)
    phi2 = math.radians(lat2)
    d_phi = math.radians(lat2 - lat1)
    d_lambda = math.radians(lon2 - lon1)

    a = math.sin(d_phi / 2)**2 + math.cos(phi1) * math.cos(phi2) * math.sin(d_lambda / 2)**2
    c = 2 * math.atan2(math.sqrt(a), math.sqrt(1 - a))

    return R * c  # Distance in kilometers

# Calculate bearing in degrees (0-360)
def bearing(lat1, lon1, lat2, lon2):
    phi1 = math.radians(lat1)
    phi2 = math.radians(lat2)
    delta_lon = math.radians(lon2 - lon1)

    x = math.sin(delta_lon) * math.cos(phi2)
    y = math.cos(phi1) * math.sin(phi2) - math.sin(phi1) * math.cos(phi2) * math.cos(delta_lon)

    initial_bearing = math.atan2(x, y)
    compass_bearing = (math.degrees(initial_bearing) + 360) % 360  # Normalize to 0–360

    return compass_bearing

# Overpass QL query
query = f"""
[out:json];
node
  ["shop"="alcohol"]
  ({south}, {west}, {north}, {east});
out body;
>;
out skel qt;
"""

try:
    result = api.query(query)

    # Collect and sort places by distance
    places = []
    for node in result.nodes:
        node_lat = float(node.lat)
        node_lon = float(node.lon)
        distance = haversine(latitude, longitude, node_lat, node_lon)
        direction = bearing(latitude, longitude, node_lat, node_lon)
        name = node.tags.get("name", "Unnamed")
        places.append((distance, direction, name, node_lat, node_lon))

    places.sort()

    print(f"Found {len(places)} alcohol-related places sorted by distance:")
    for dist, dir_deg, name, lat, lon in places:
        print(f"- {name} at ({lat:.5f}, {lon:.5f}) — {dist:.2f} km, {dir_deg:.0f}°")

except Exception as e:
    print(f"Error: {e}")
Output:
Found 10 alcohol-related places sorted by distance:
- The Skiff at (52.22583, 5.17860) — 0.16 km, 152°
- Onzewijnen at (52.22612, 5.17045) — 0.49 km, 258°
- Gall & Gall at (52.23244, 5.19204) — 1.15 km, 59°
- Gall & Gall at (52.21536, 5.16735) — 1.48 km, 208°
- Eric's Beer Craft at (52.21549, 5.16632) — 1.50 km, 211°
- Slijterij at (52.21082, 5.15692) — 2.29 km, 218°
- Gall & Gall at (52.21590, 5.14074) — 2.80 km, 244°
- Gall & Gall at (52.25422, 5.22705) — 4.53 km, 48°
- Gall & Gall at (52.26808, 5.18348) — 4.58 km, 5°
- Il DiVino at (52.27507, 5.16414) — 5.41 km, 350°
Example using Overpass Turbo to find breweries
Other ideas
Geocaching (Thanks Vincent)
Find each other at festivals?
UPDATE
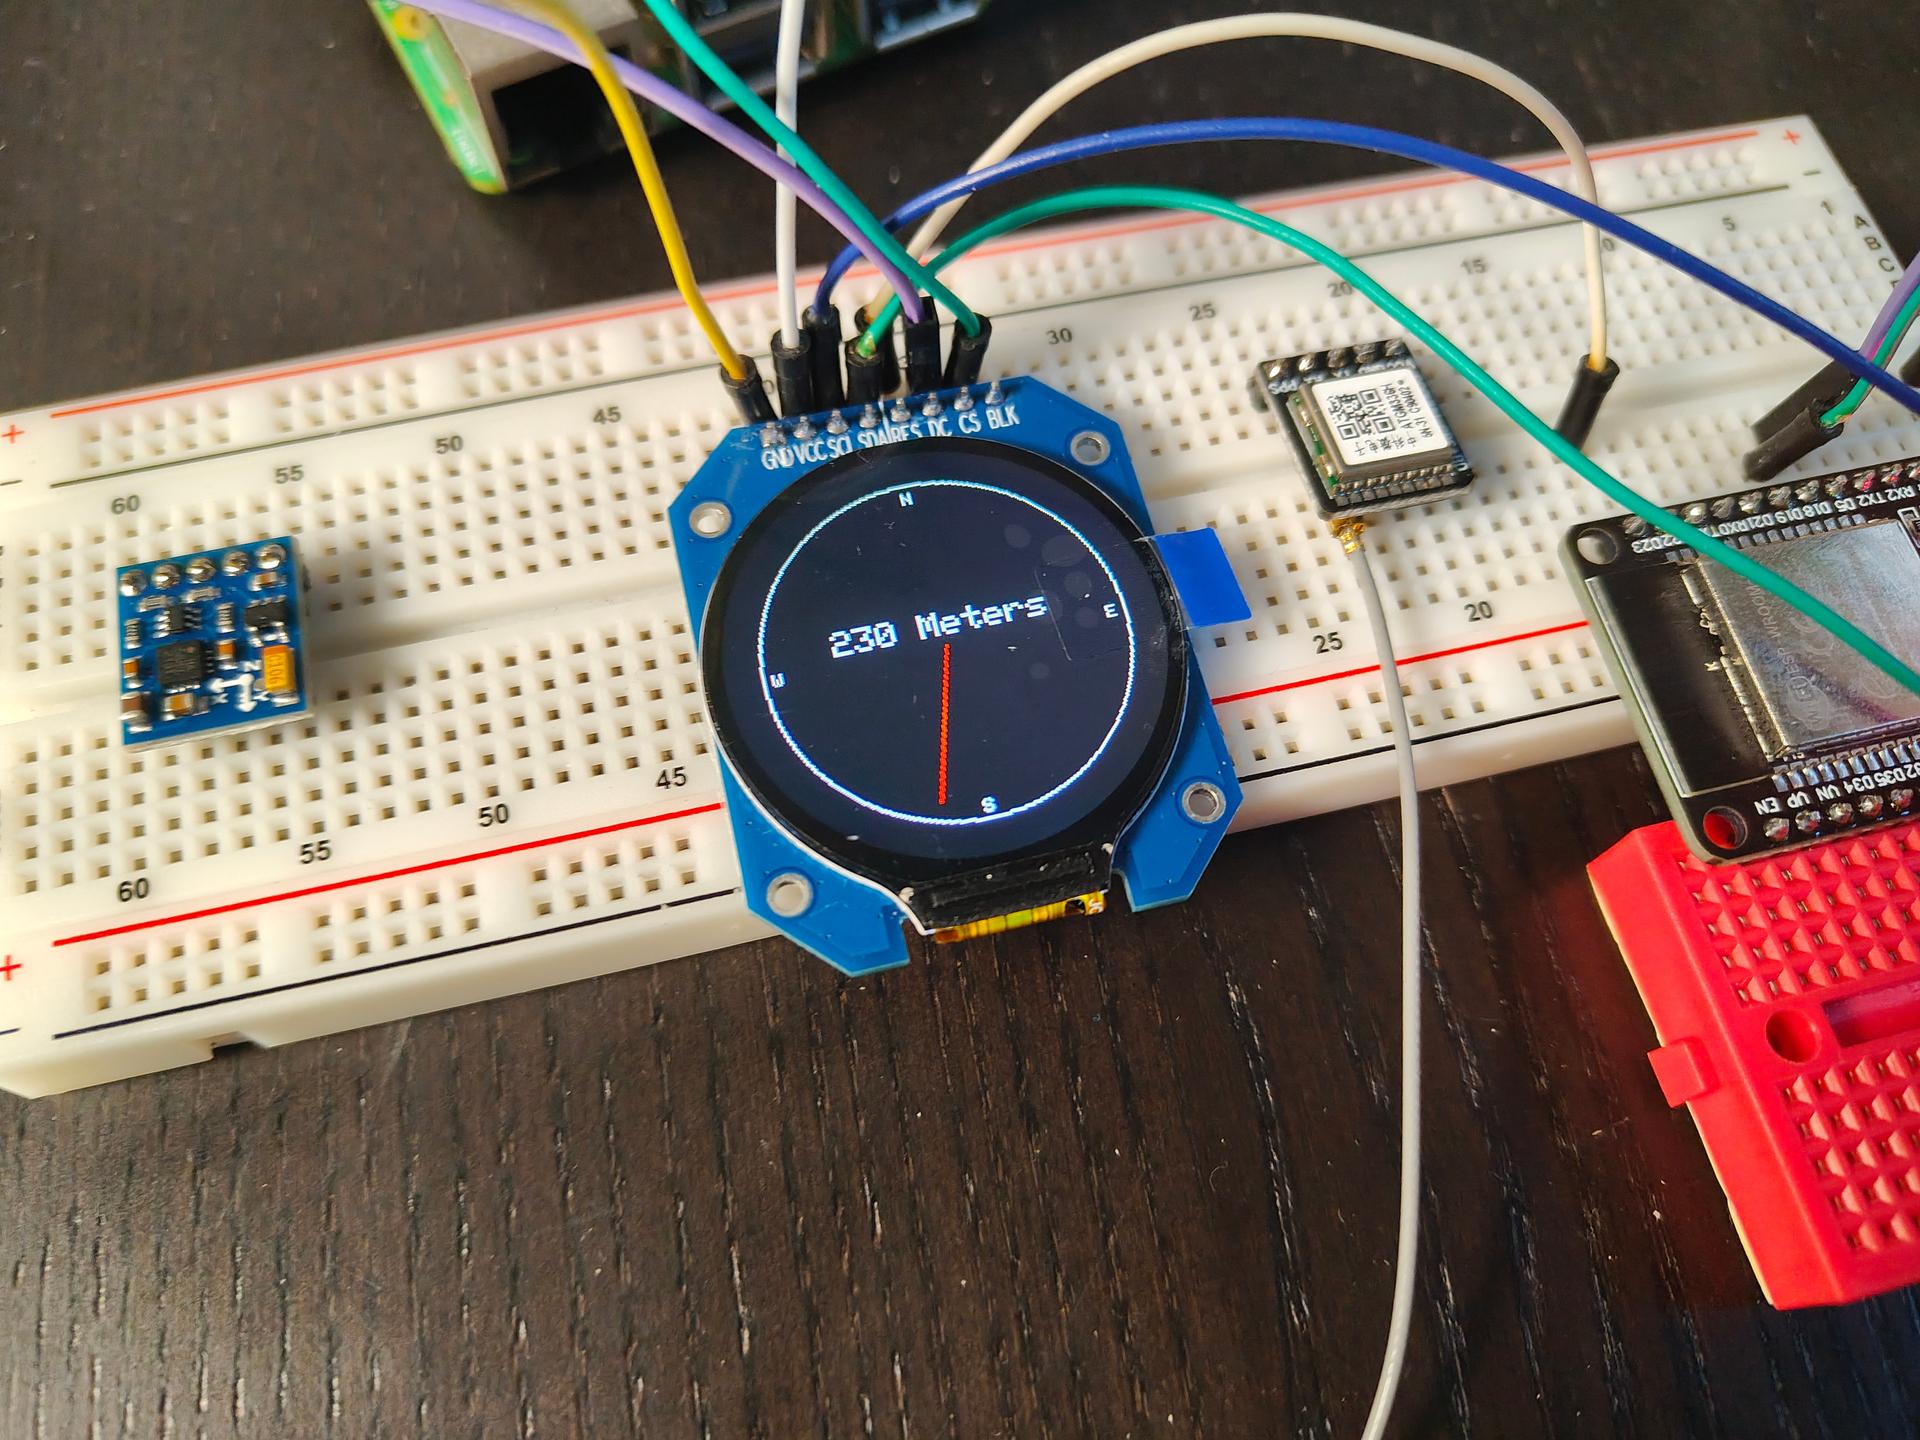
Building the hardware : First design
Screen programming (First setup)
Some test code
#include "SPI.h"
#include "Adafruit_GFX.h"
#include "Adafruit_GC9A01A.h"

// Overrule stuff
#define TFT_CS 18   // Chip select
#define TFT_DC 5    // Data/command mode
#define TFT_BL 4    // Backlight control
#define TFT_MOSI 12 // SPI Out AKA SDA
#define TFT_SCLK 13 // Clock out AKA SCL
#define TFT_MISO -1 // pin not used
#define TFT_RST 23  // Reset ################# IMPORTANT, won't work without!! Took me a hour!

// Need this changed from example also
Adafruit_GC9A01A tft(TFT_CS, TFT_DC,TFT_MOSI,TFT_SCLK,TFT_RST,TFT_MISO);

float angle = 0;

void setup() {
  tft.begin();
  tft.setRotation(0);
  tft.fillScreen(GC9A01A_BLACK);
  drawCompassFace();
}

void loop() {
  drawNeedle(angle, GC9A01A_RED);
  delay(1000);
  drawNeedle(angle, GC9A01A_BLACK);  // Erase previous needle
  angle += 15;
  if (angle >= 360) angle = 0;

  tft.setCursor(60, 100);
  tft.setTextColor(GC9A01A_WHITE);  tft.setTextSize(2);
  tft.println("230 Meters");

}

// Draw static compass face
void drawCompassFace() {
  int cx = tft.width() / 2;
  int cy = tft.height() / 2;
  int radius = 100;

  tft.drawCircle(cx, cy, radius, GC9A01A_WHITE);
  tft.setTextColor(GC9A01A_WHITE);
  tft.setTextSize(1);
  tft.setCursor(cx - 3, cy - radius + 5); tft.print("N");
  tft.setCursor(cx - 3, cy + radius - 10); tft.print("S");
  tft.setCursor(cx - radius + 5, cy - 3); tft.print("W");
  tft.setCursor(cx + radius - 10, cy - 3); tft.print("E");
}

// Draw compass needle
void drawNeedle(float angleDeg, uint16_t color) {
  int cx = tft.width() / 2;
  int cy = tft.height() / 2;
  float angleRad = angleDeg * DEG_TO_RAD;
  int x = cx + cos(angleRad) * 90;
  int y = cy + sin(angleRad) * 90;
  tft.drawLine(cx, cy, x, y, color);
}
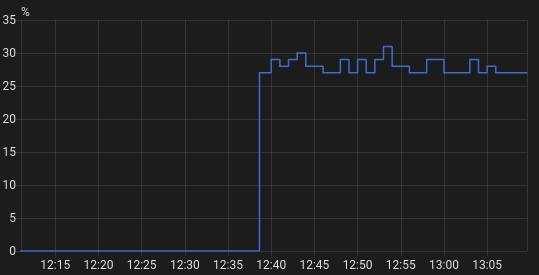
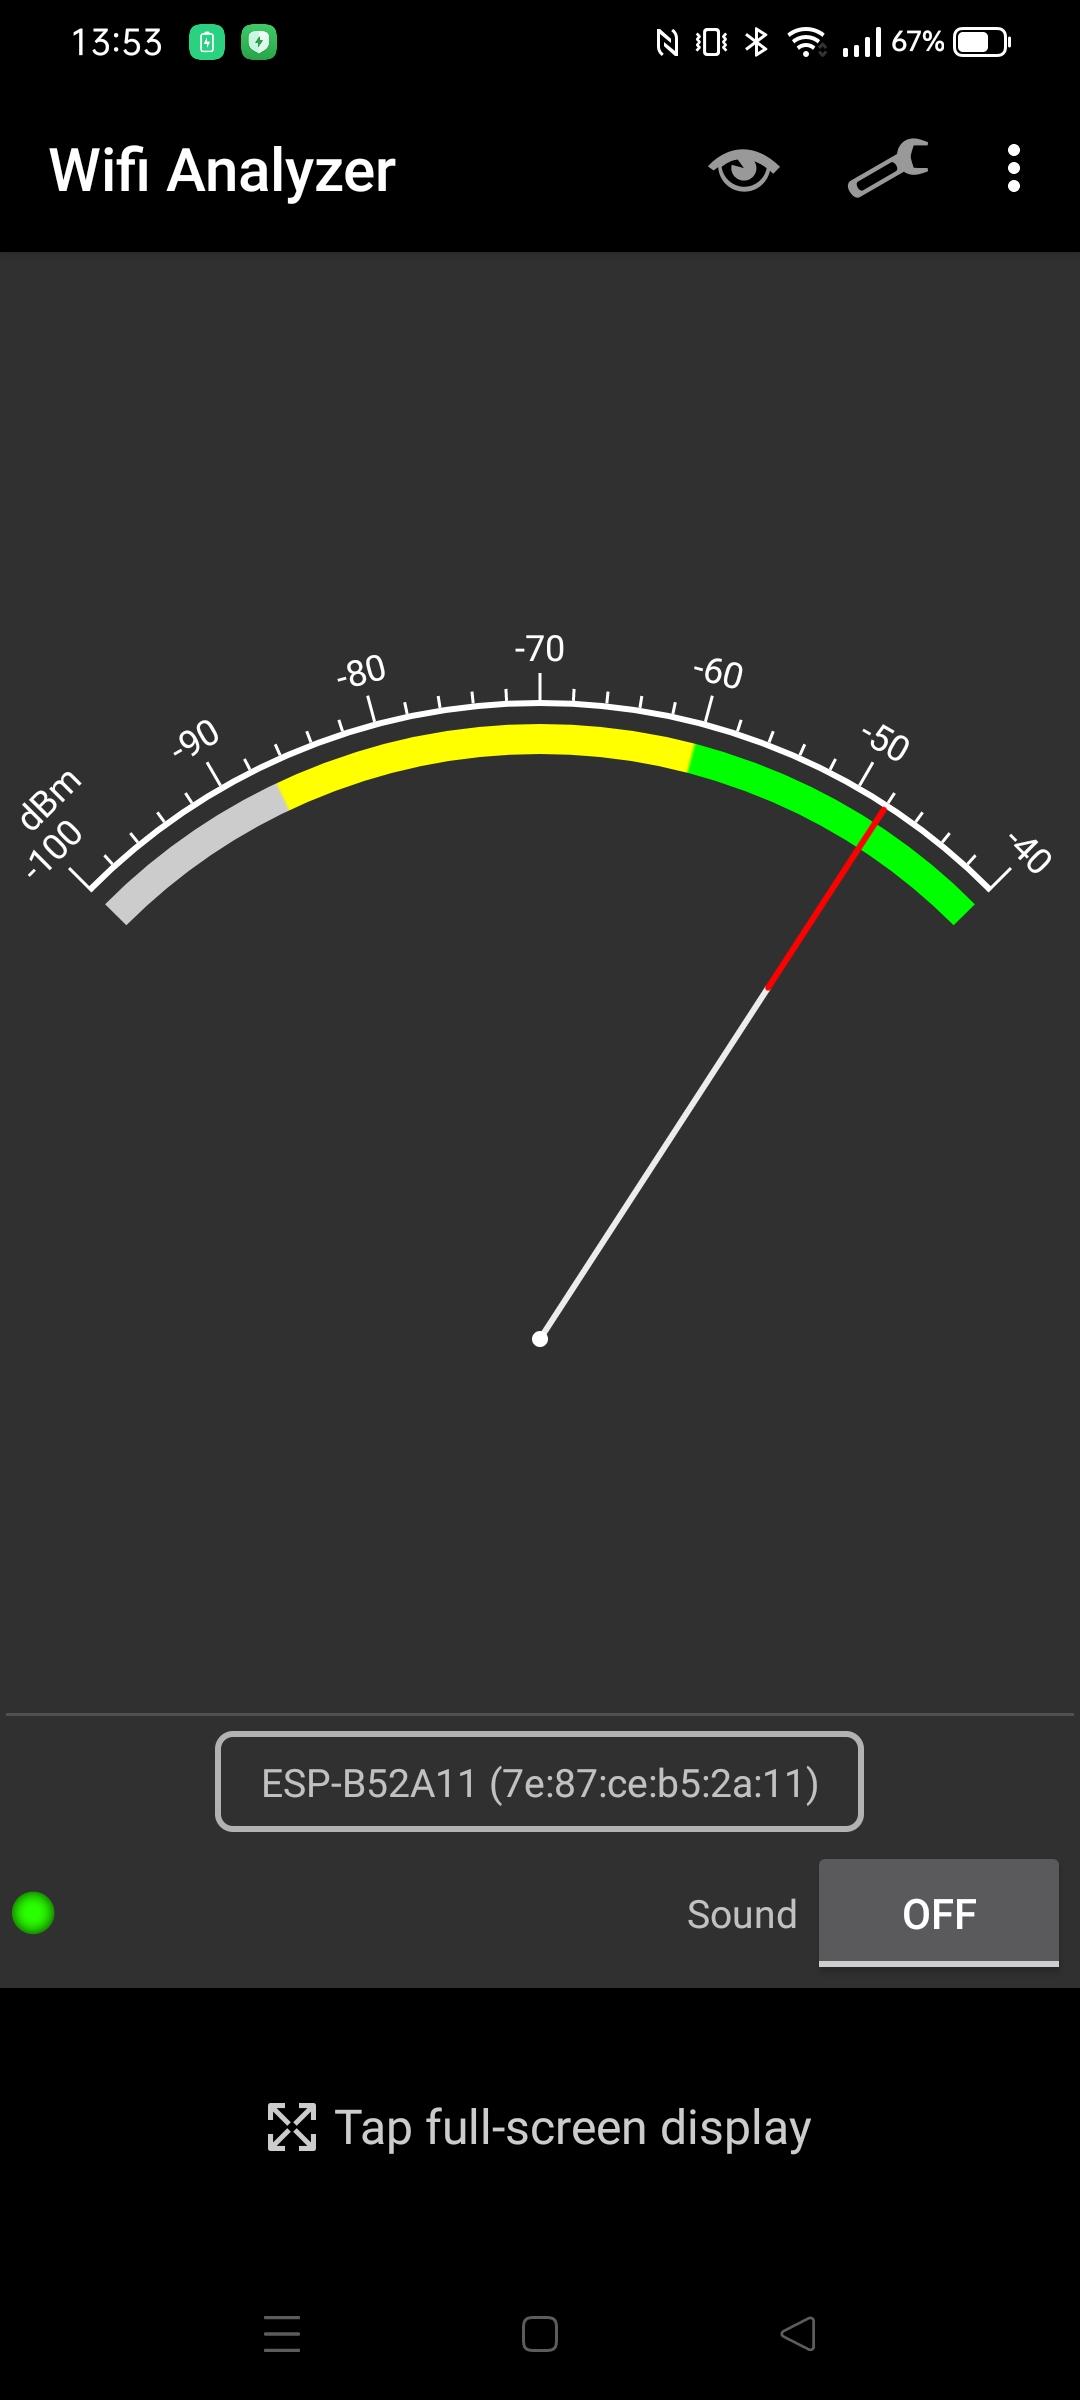
Its SSID started with ESP. So I probably am the one responsible for its existence. I’ve got a sh*tload of ESPs/NodeMCUs/8266 turned on 24-7.
Using a Wifi analizer I could narrow it down to my livingroom. Checked all devices, and they are all connected to my AccessPoint. (So no fallback AP mode)
The problem with this method is that you can’t figure out a direction.
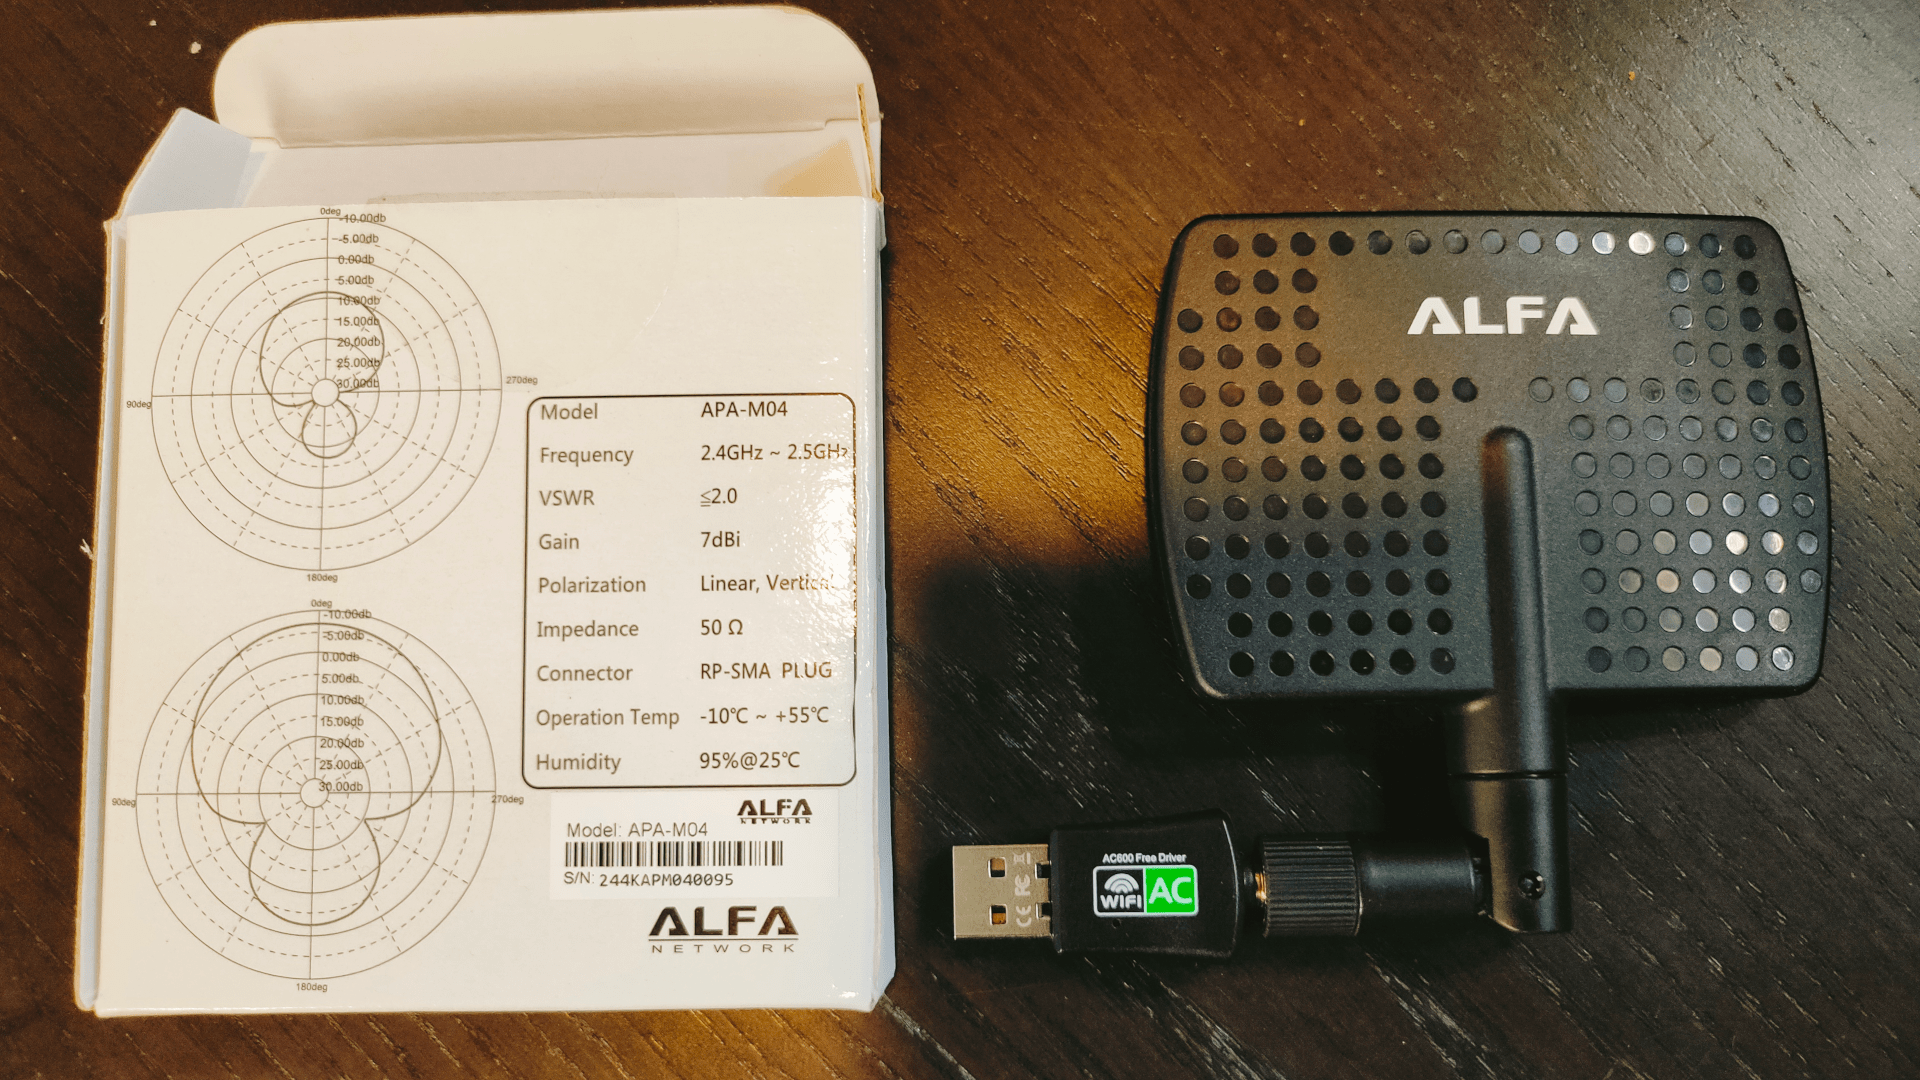
So I used this on my Laptop.
See graphs on the left
This is a directional antenna.
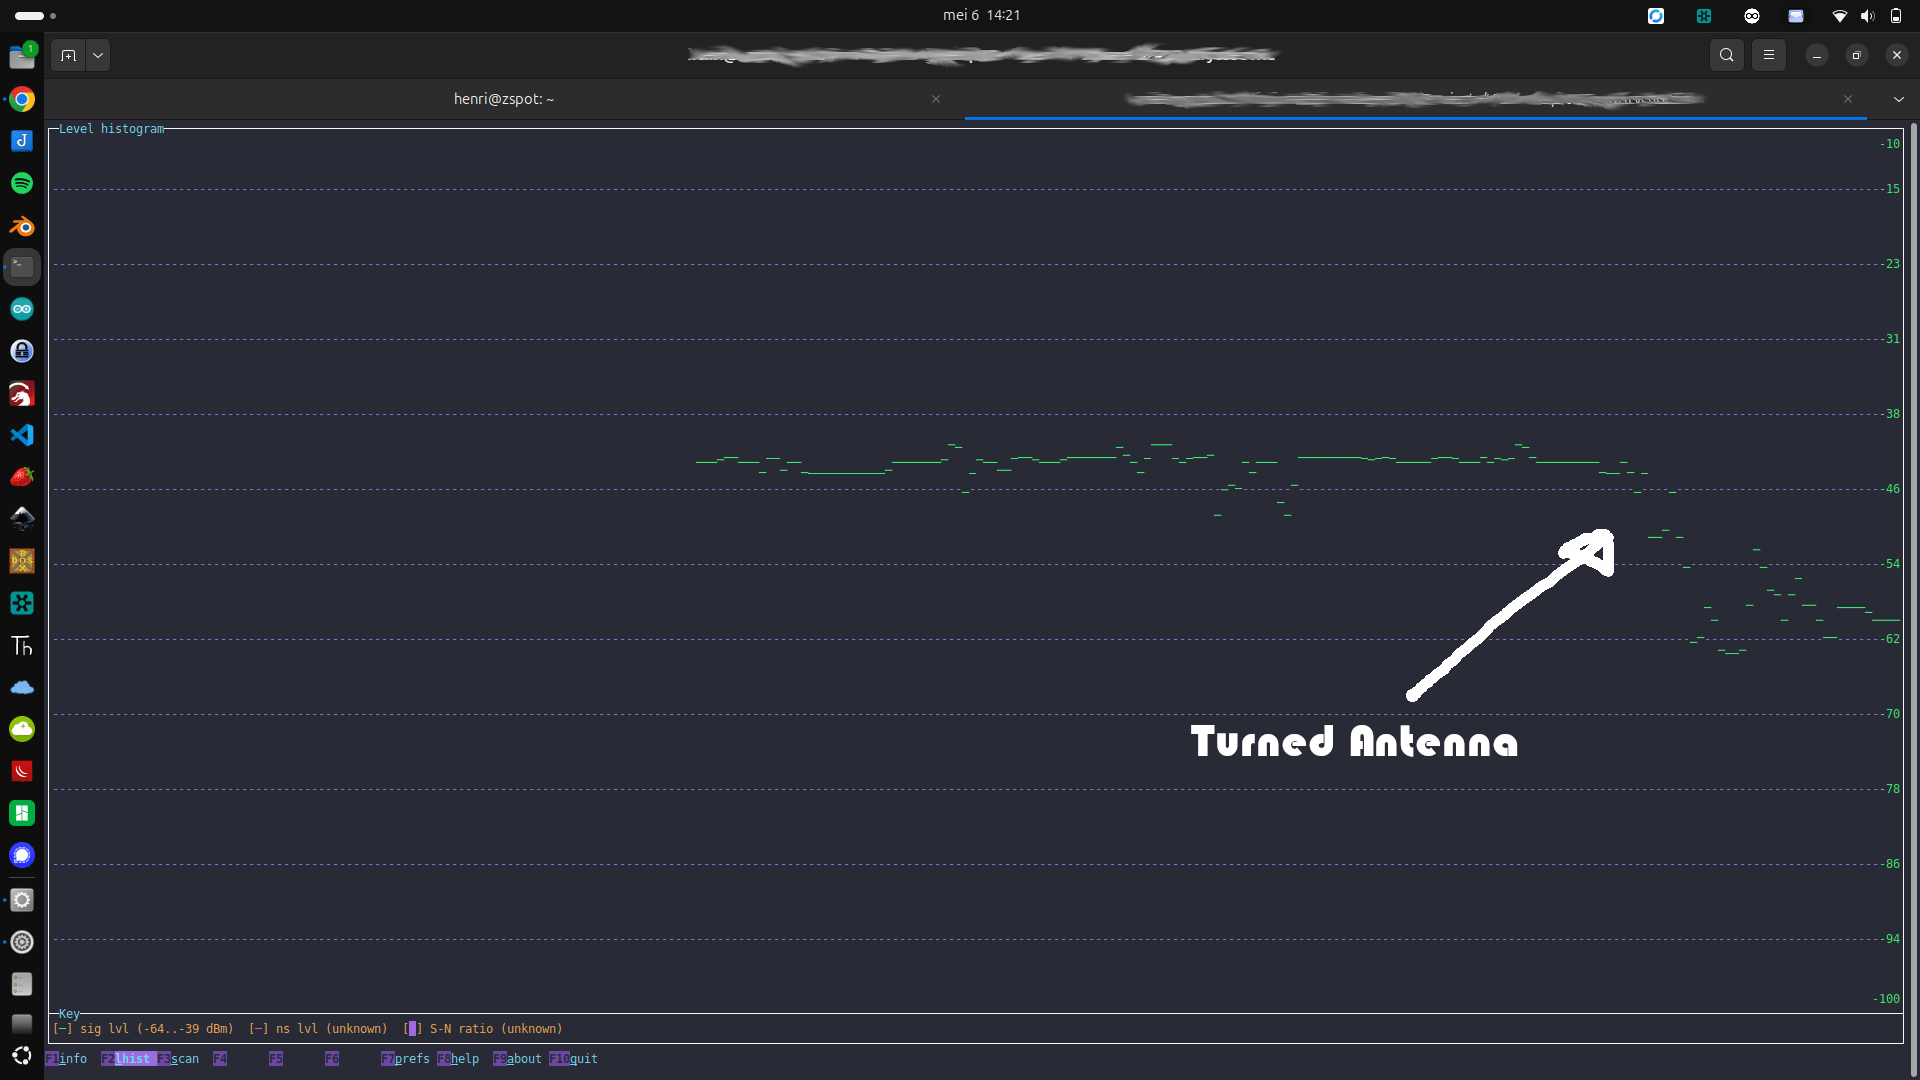
Using Wireshark and wavemon, I could find the direction.
There were only two devices in the direction with the strongest signal. My photo viewer remote, and my mini turntable controller with RFID.
But these devices are working just fine! .. So lets disconnect the power. So it IS the mini recordplayer!
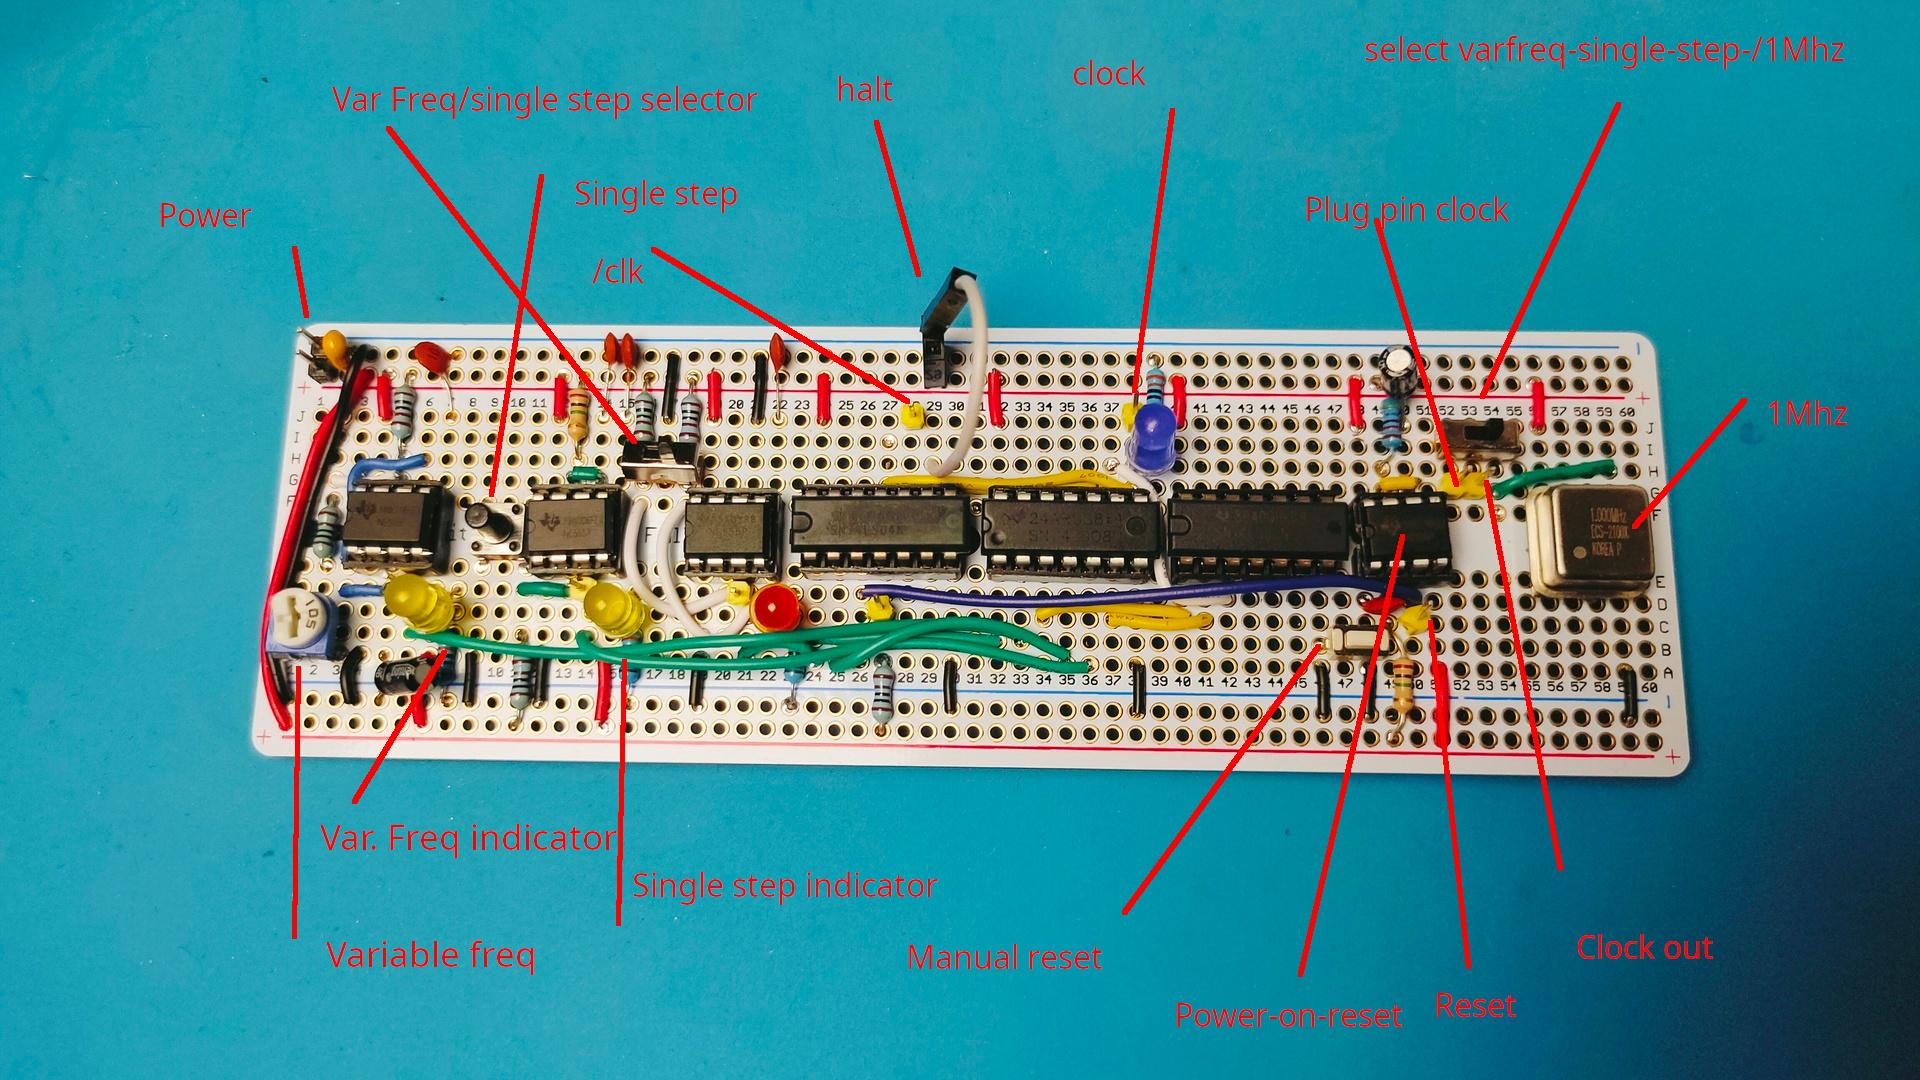
My previous build of the clock module is as Ben designed. Wellll . Not really, I added some components to change the clock range.
Okay, Ben’s design is awesome. Not because of its technical design. No, you will learn to use the NE555 chip in three ways! Variable freq, debounce with delay and a flip-flop like switch I added another function to it. While making my version. I added a 555 power-on reset pulse part.
I used a perm board (which is shorter than a regular breadboard) And I moved some components over and added some LEDs/pin headers. While doing so, I only used 3/4 of the board.
So I added a power-on reset part with a manual push-button. (Partly like the C64 power-on) I also added the 1Mhz crystal.
Rest of the boards will use JST connectors for the bus-connections.
I am working on big motor controllers and 3D print modelling for clients.