Last Updated or created 2022-11-16
Last year i was playing with this radar module also, but today i made a version with MQTT and a linux client.
(There is a project on the internet which uses a HC-SR04, and a arduino connected to the Laptop. This setup is more sensitive and no need for a usb thinghy.)
When using MQTT i can integrate this in HomeAssistant, Domoticz, NodeRed and more.
But i’ve written a python script which runs on my Laptop.
For example i can: Kill vlc, change to my work desktop, stop sound output and lock the screen. (everything you can script)
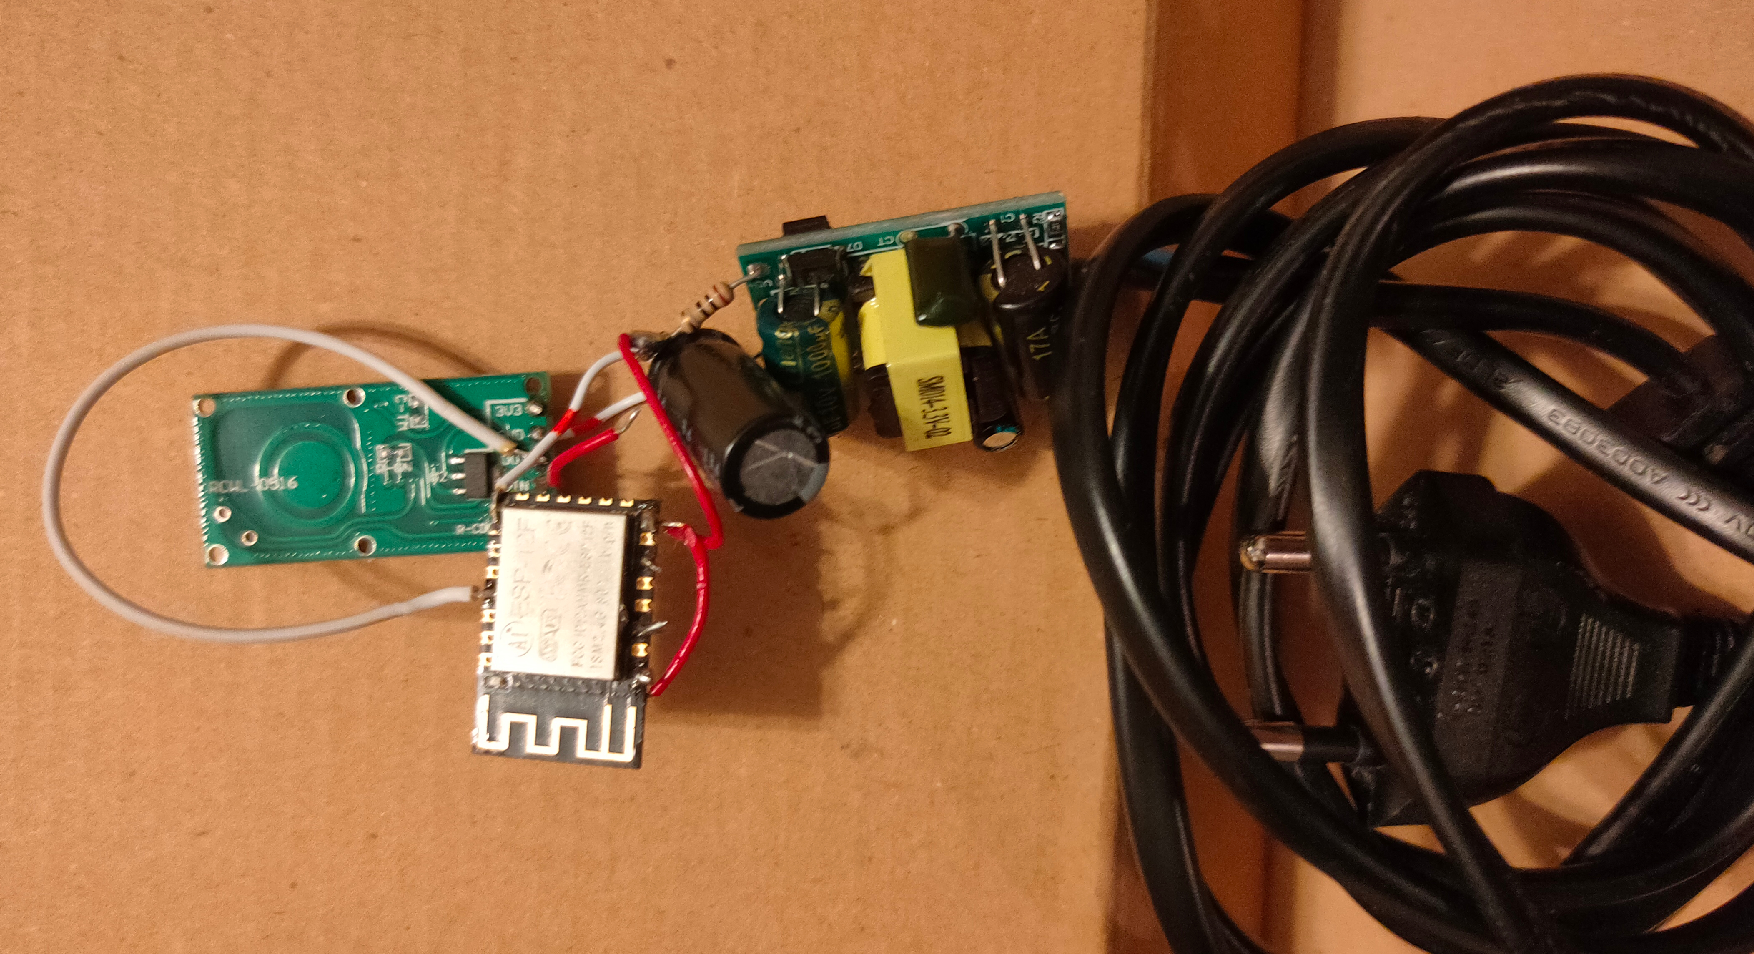
I wanted to have a “mobile” version of the sensor so i can place it anywhere. (Frontdoor, gardengate, candydrawer 🙂 )
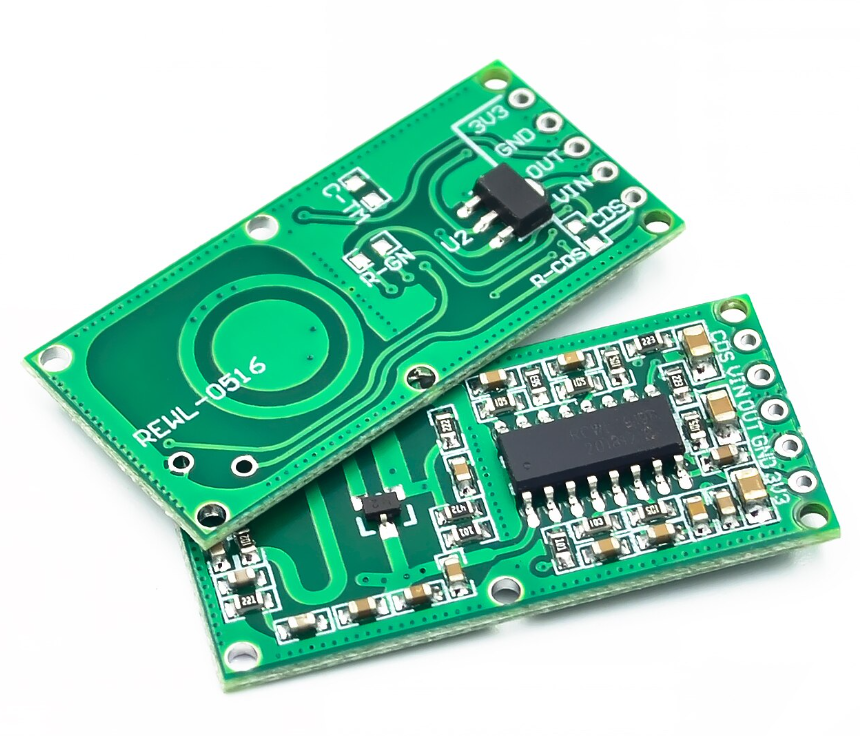
These modules are very cheap, but do their job well!
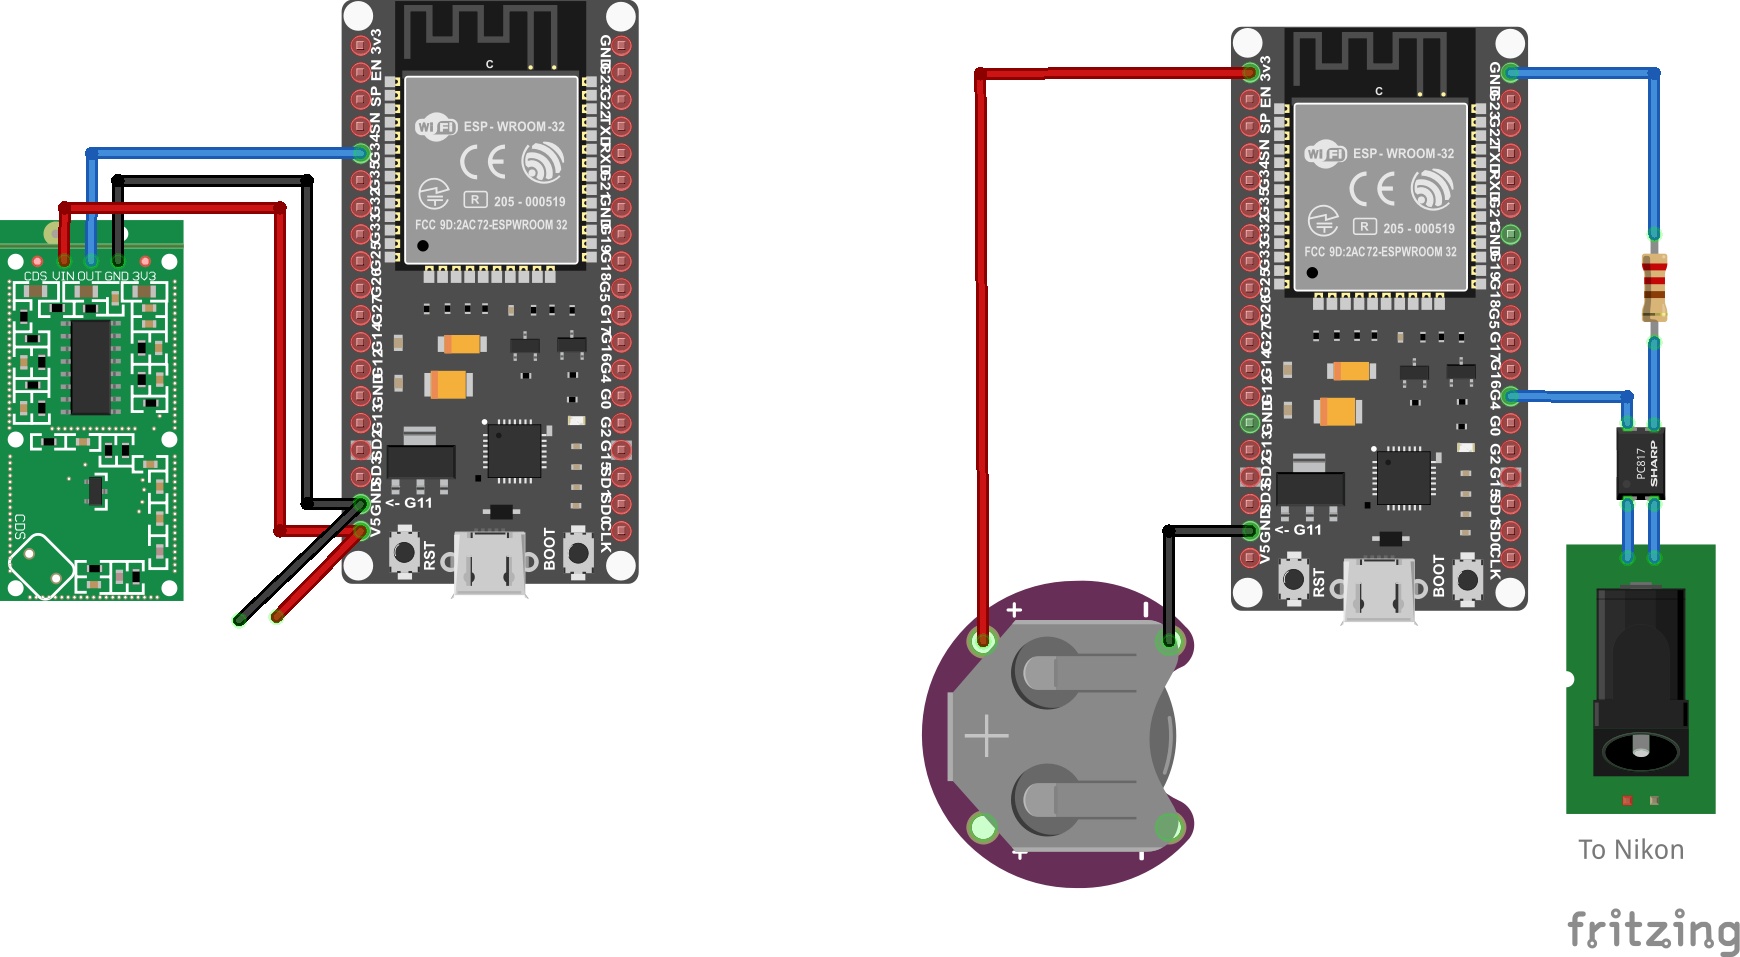
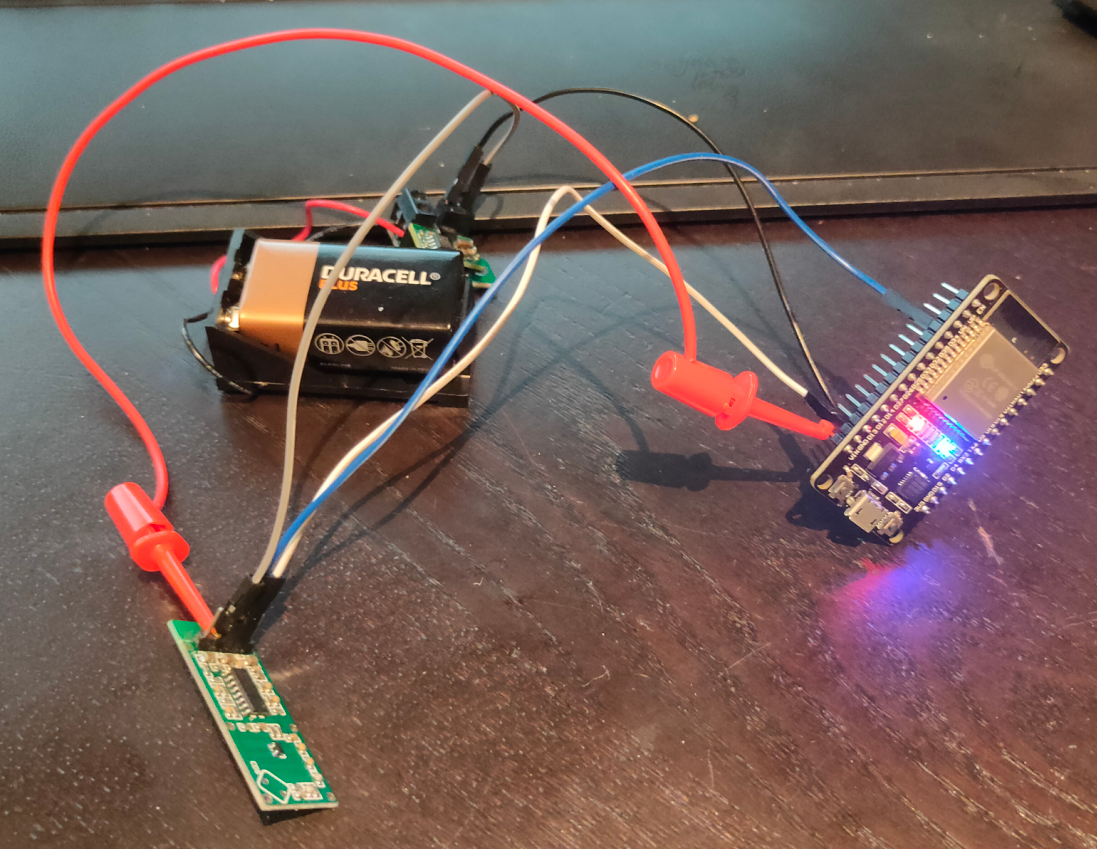
I’ve used a Wroom ESP32 and a BattBorg together with the module, that’s it.
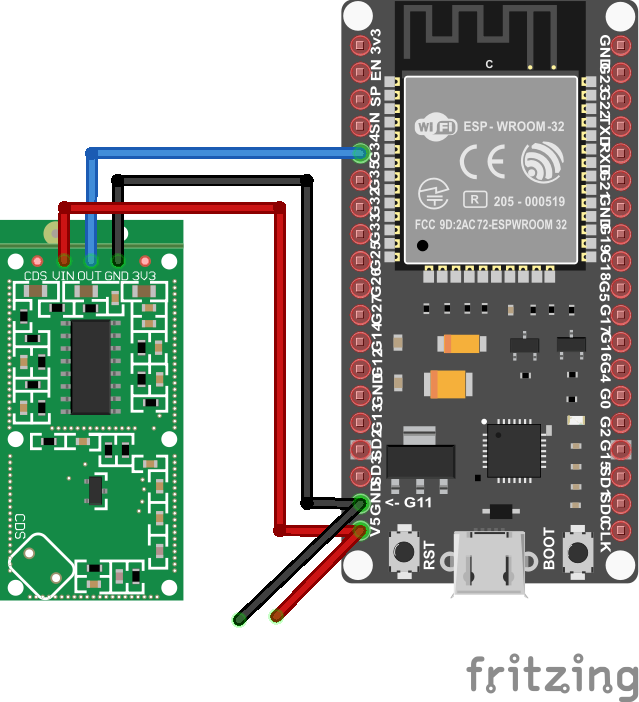
Simplified schematic (without the battborg)
I’m using PIN34 as an analog input.
Radar module pins:
- CDS not used
- VIN 5V power
- OUT 0-3.3V signal (analog)
- GND
- 3v3 not used
Arduino sketch
#include <WiFi.h>
#include <PubSubClient.h>
#include <Wire.h>

const char* ssid = "MYSSID";
const char* password = "MYPASS";
const char* mqtt_server = "IP-MQTT-SERVER";
const char* mqtt_username = "";
const char* mqtt_password = "";
const char* clientID = "radar";

const int tiltPin = 34;
int tiltState = 0;
int previousState = 0;

WiFiClient espClient;

PubSubClient client(espClient);

String translateEncryptionType(wifi_auth_mode_t encryptionType) {

  switch (encryptionType) {
    case (WIFI_AUTH_OPEN):
      return "Open";
    case (WIFI_AUTH_WEP):
      return "WEP";
    case (WIFI_AUTH_WPA_PSK):
      return "WPA_PSK";
    case (WIFI_AUTH_WPA2_PSK):
      return "WPA2_PSK";
    case (WIFI_AUTH_WPA_WPA2_PSK):
      return "WPA_WPA2_PSK";
    case (WIFI_AUTH_WPA2_ENTERPRISE):
      return "WPA2_ENTERPRISE";
  }
}

void scanNetworks() {
   int numberOfNetworks = WiFi.scanNetworks();
   Serial.print("Number of networks found: ");
  Serial.println(numberOfNetworks);
   for (int i = 0; i < numberOfNetworks; i++) {

    Serial.print("Network name: ");
    Serial.println(WiFi.SSID(i));

    Serial.print("Signal strength: ");
    Serial.println(WiFi.RSSI(i));

    Serial.print("MAC address: ");
    Serial.println(WiFi.BSSIDstr(i));

    Serial.print("Encryption type: ");
    String encryptionTypeDescription = translateEncryptionType(WiFi.encryptionType(i));
    Serial.println(encryptionTypeDescription);
    Serial.println("-----------------------");

  }
}

void connectToNetwork() {
  WiFi.begin(ssid, password);
   while (WiFi.status() != WL_CONNECTED) {
    delay(1000);
    Serial.println("Establishing connection to WiFi..");
  }
   Serial.println("Connected to network");
 }

void reconnect() {
  while (!client.connected()) {
    if (client.connect(clientID, mqtt_username, mqtt_password)) {
    } else {
      delay(2000);
    }
  }
}
void setup()
{
  {
    Serial.begin(115200);
    scanNetworks();
    connectToNetwork();
    Serial.println(WiFi.macAddress());
    Serial.println(WiFi.localIP());
    client.setServer(mqtt_server, 1883);
    pinMode(tiltPin, INPUT);
  }
}
void loop() {
  tiltState = analogRead(tiltPin);
    if (tiltState < 3048) {
      client.publish("radar/state", "0"); //
    } else {
      client.publish("radar/state", "1"); //
    }
     delay(100);
   {
    if (!client.connected()) {
      reconnect();
    }
    client.loop();
  }
}
Lockscreen!
Below shows the speed of detection, and sending though the network
Python script which does a lock-screen using XDOTOOL
from paho.mqtt import client as mqtt_client
import subprocess
import time

broker = 'MQTT-SERVER'
port = 1883
topic = "radar/state"
client_id = "radarclient"

def connect_mqtt() -> mqtt_client:
    def on_connect(client, userdata, flags, rc):
        if rc == 0:
            print("Connected to MQTT Broker!")
        else:
            print("Failed to connect, return code %d\n", rc)

    client = mqtt_client.Client(client_id)
    client.on_connect = on_connect
    client.connect(broker, port)
    return client

def subscribe(client: mqtt_client):
    def on_message(client, userdata, msg):
        state = msg.payload.decode()
        print (state)
        if state == "1":
            subprocess.Popen(["xdotool","key","Super_L+l"])
            time.sleep(30)


    client.subscribe(topic)
    client.on_message = on_message

def run():
    client = connect_mqtt()
    subscribe(client)
    client.loop_forever()

if __name__ == '__main__':
    run()
change
subprocess.Popen([“xdotool”,”key”,”Super_L+l”])
into
subprocess.Popen([“switchdesktop”])
to run a script named switchdesktop
#!/bin/bash
# This is the switchdesktop script, it goes to the next screen using winows-page-down combo
xdotool key "Super_L+Page_Down"
Todo:
3D print a case
Make a version which becomes a Access Point.
Then make another arduino setup which controls my Nikon.
So it can act like a wildcam (offline)
Something like below, using a optocoupler ( i still got some leftovers from my doorbell to gpio-pin project.)