Today I made a Linux version of Tyrone’s QuickPath tool.
My friend Tyrone came up with a great idea.
A directory switching tool, to move around in often used directories. You can use a keyword to move around. These keywords are configured in a config file. Even starting Total Commander with preset directories. Work/Private/Programming environments. His version uses PowerShell, but he wanted a multiplatform version, so we have chosen to use Python on both environments.
My version uses Python and Bash. (Bash is used for a change directory workaround on Linux and bash completion.)
Source will be in Tyrone’s git when finished.
Options:
qp – lists config items with number and short key
qp 1 or qp c64demo – changes directory to below example
qp add c64demo /data/store/git/projects/c64code2024 – add a entry
qp del 1 – removes entry
qp mc tmp c64demo – starts midnight commander with left and right directories
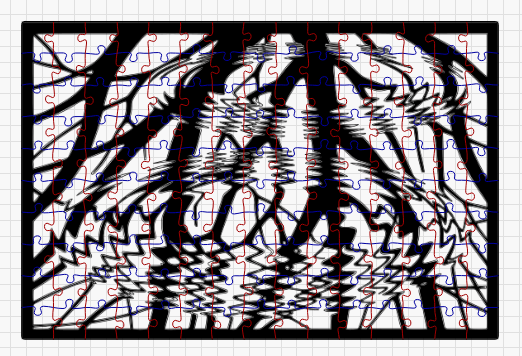
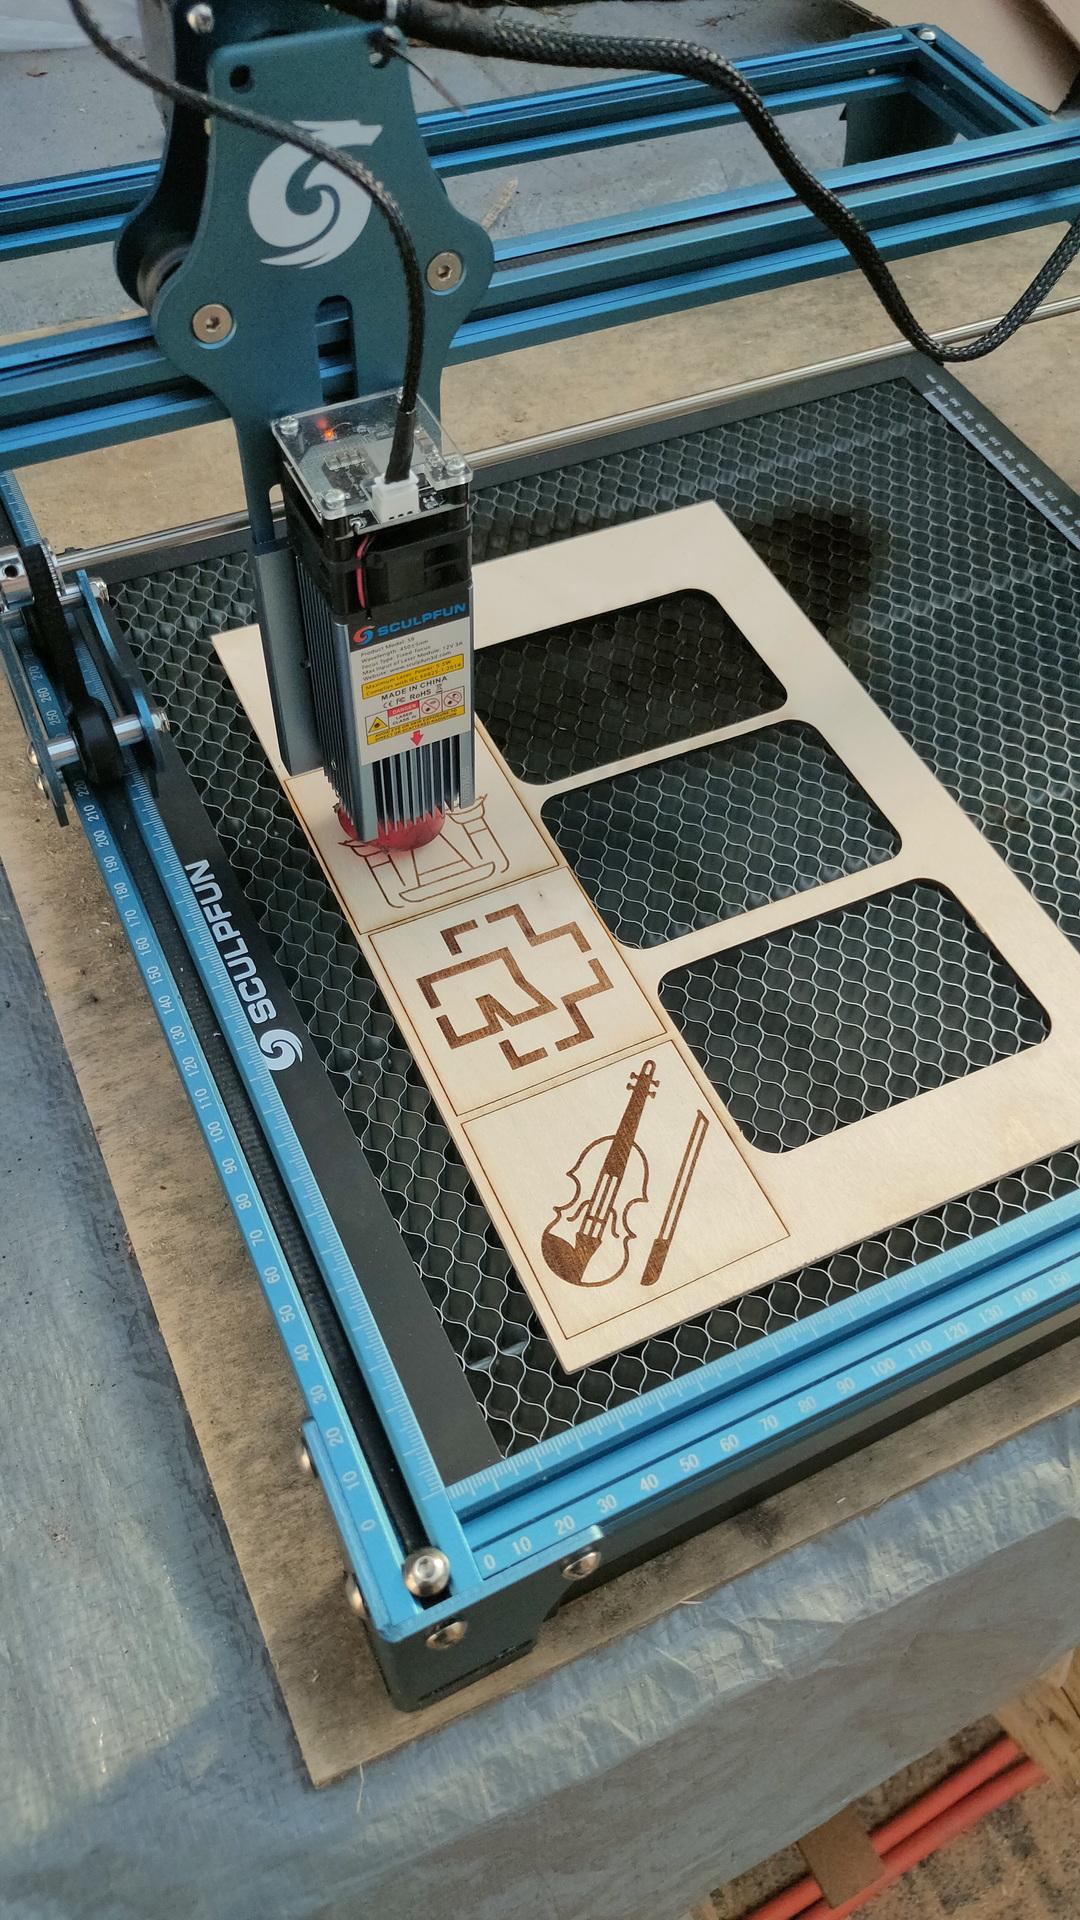
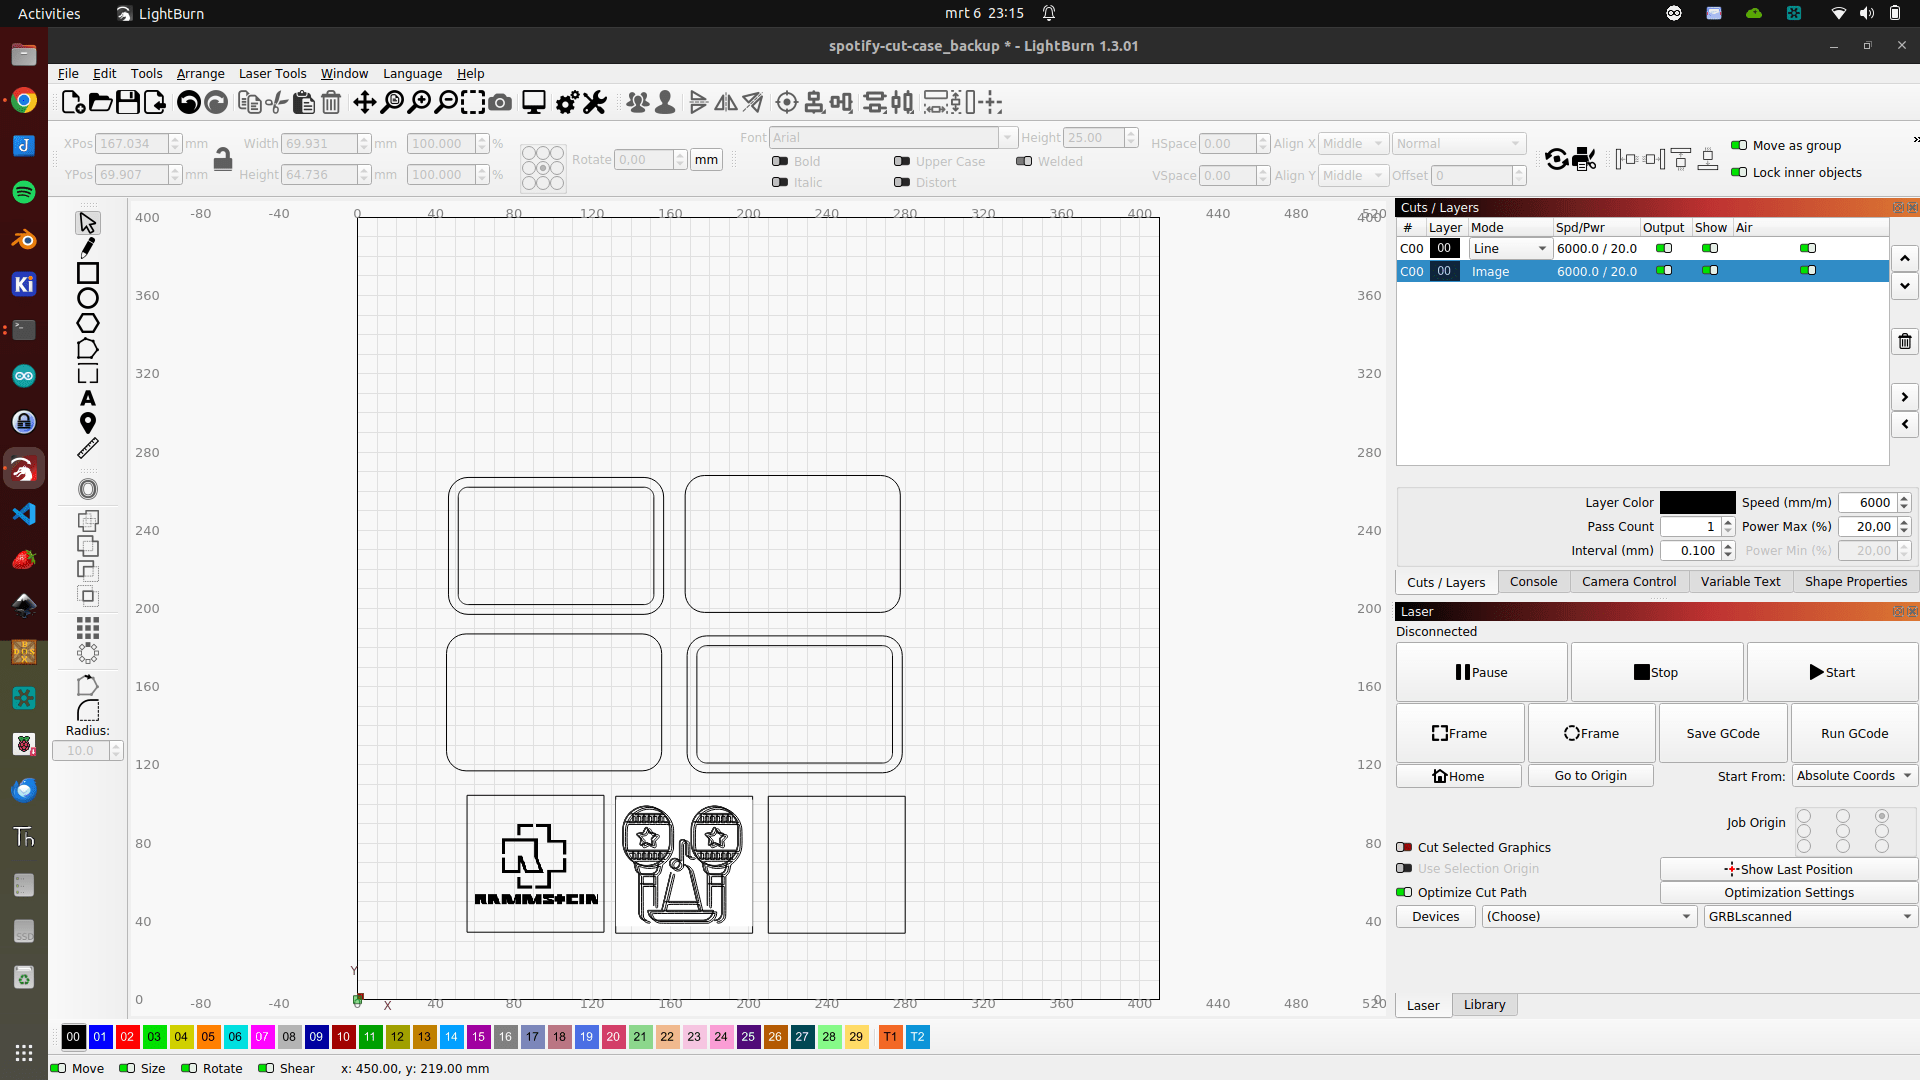
Tomorrow some laser cutting, so let’s design some things to cut.
Jigsaw test – using engraving and cutting
Make a front for my bus manipulator
Make some cases for the game controllers (These are beta, and will be 3D printed at a later stage. My old 3D printer is slow)
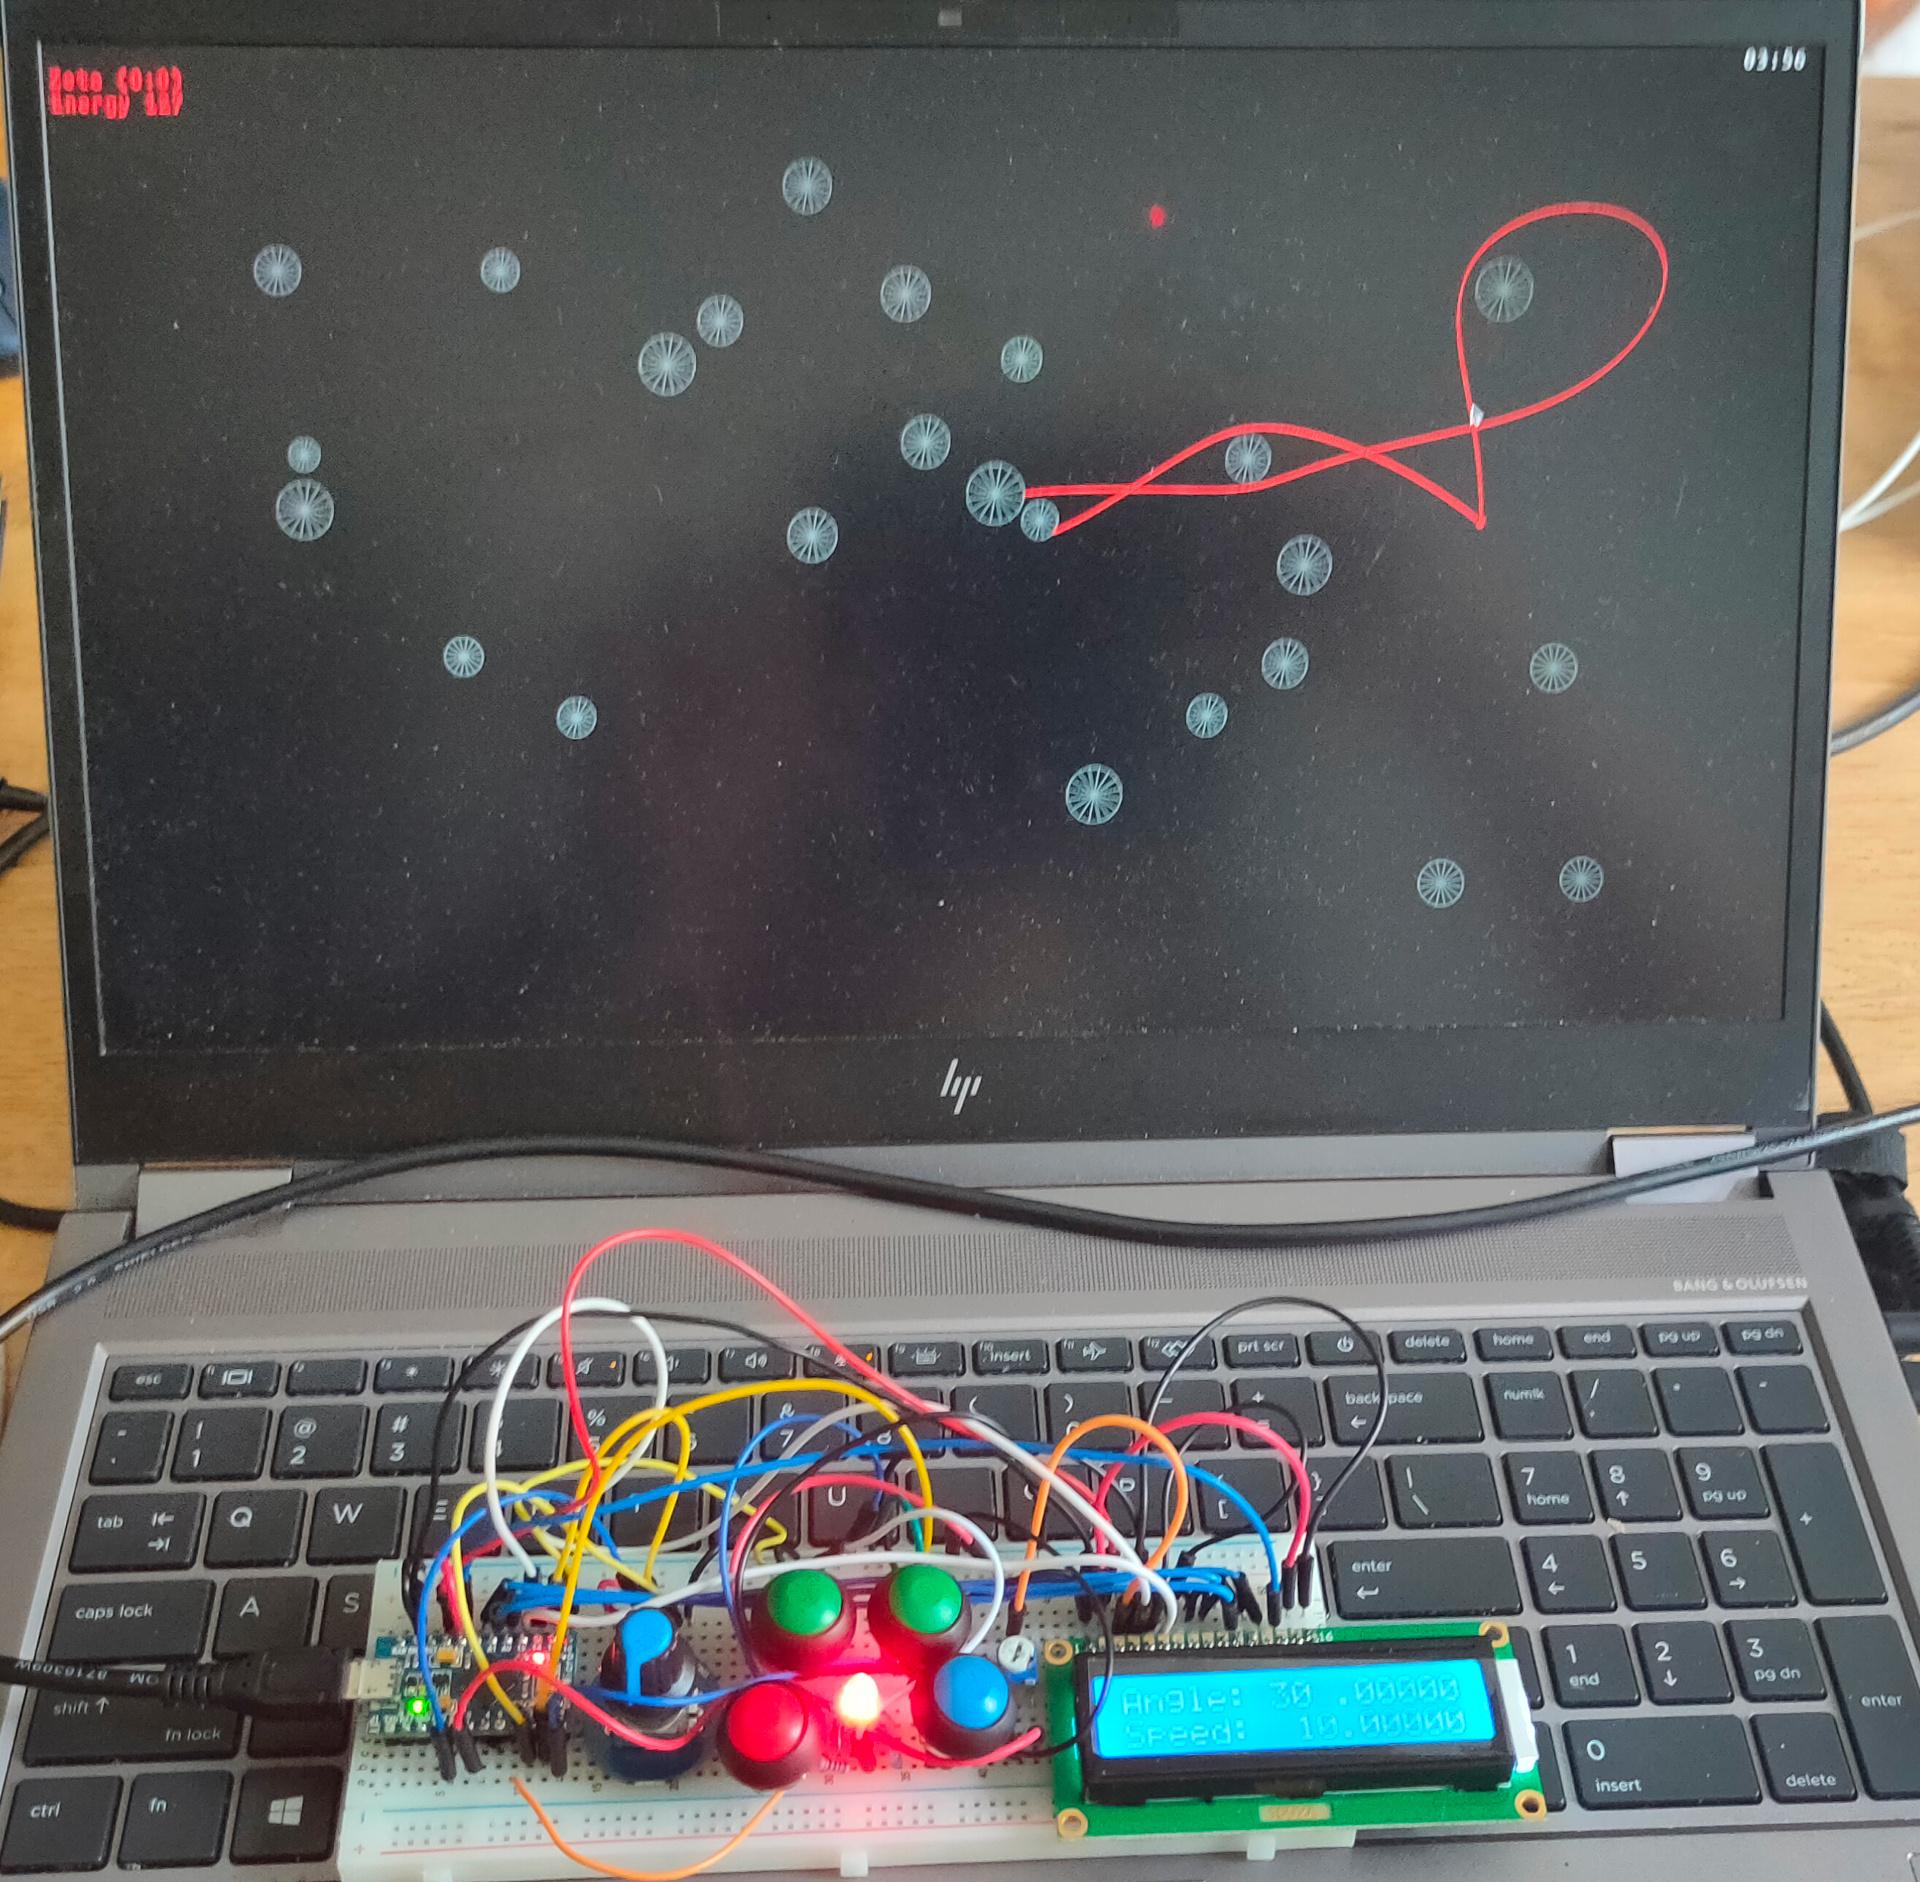
Saw a cool game a while ago, and found some old code. There was no schematic, so I had to reverse engineer it using the Arduino code. This one uses a Micro Pro.
Build a working version, now I can use this as base to create other games. But first i’m going to rebuild it so it can use Wifi and uses a Lipo Battery. Making it usable without wires.
Rotary – set angle/speed (Press resets)
Blue – toggle angle or speed ( was rotary press )
Green – select digit to change
Red – Fire
Led – not completely working yet, shows color of player Wil be changed to addressable leds with more functions (Player color, energy warning and more)
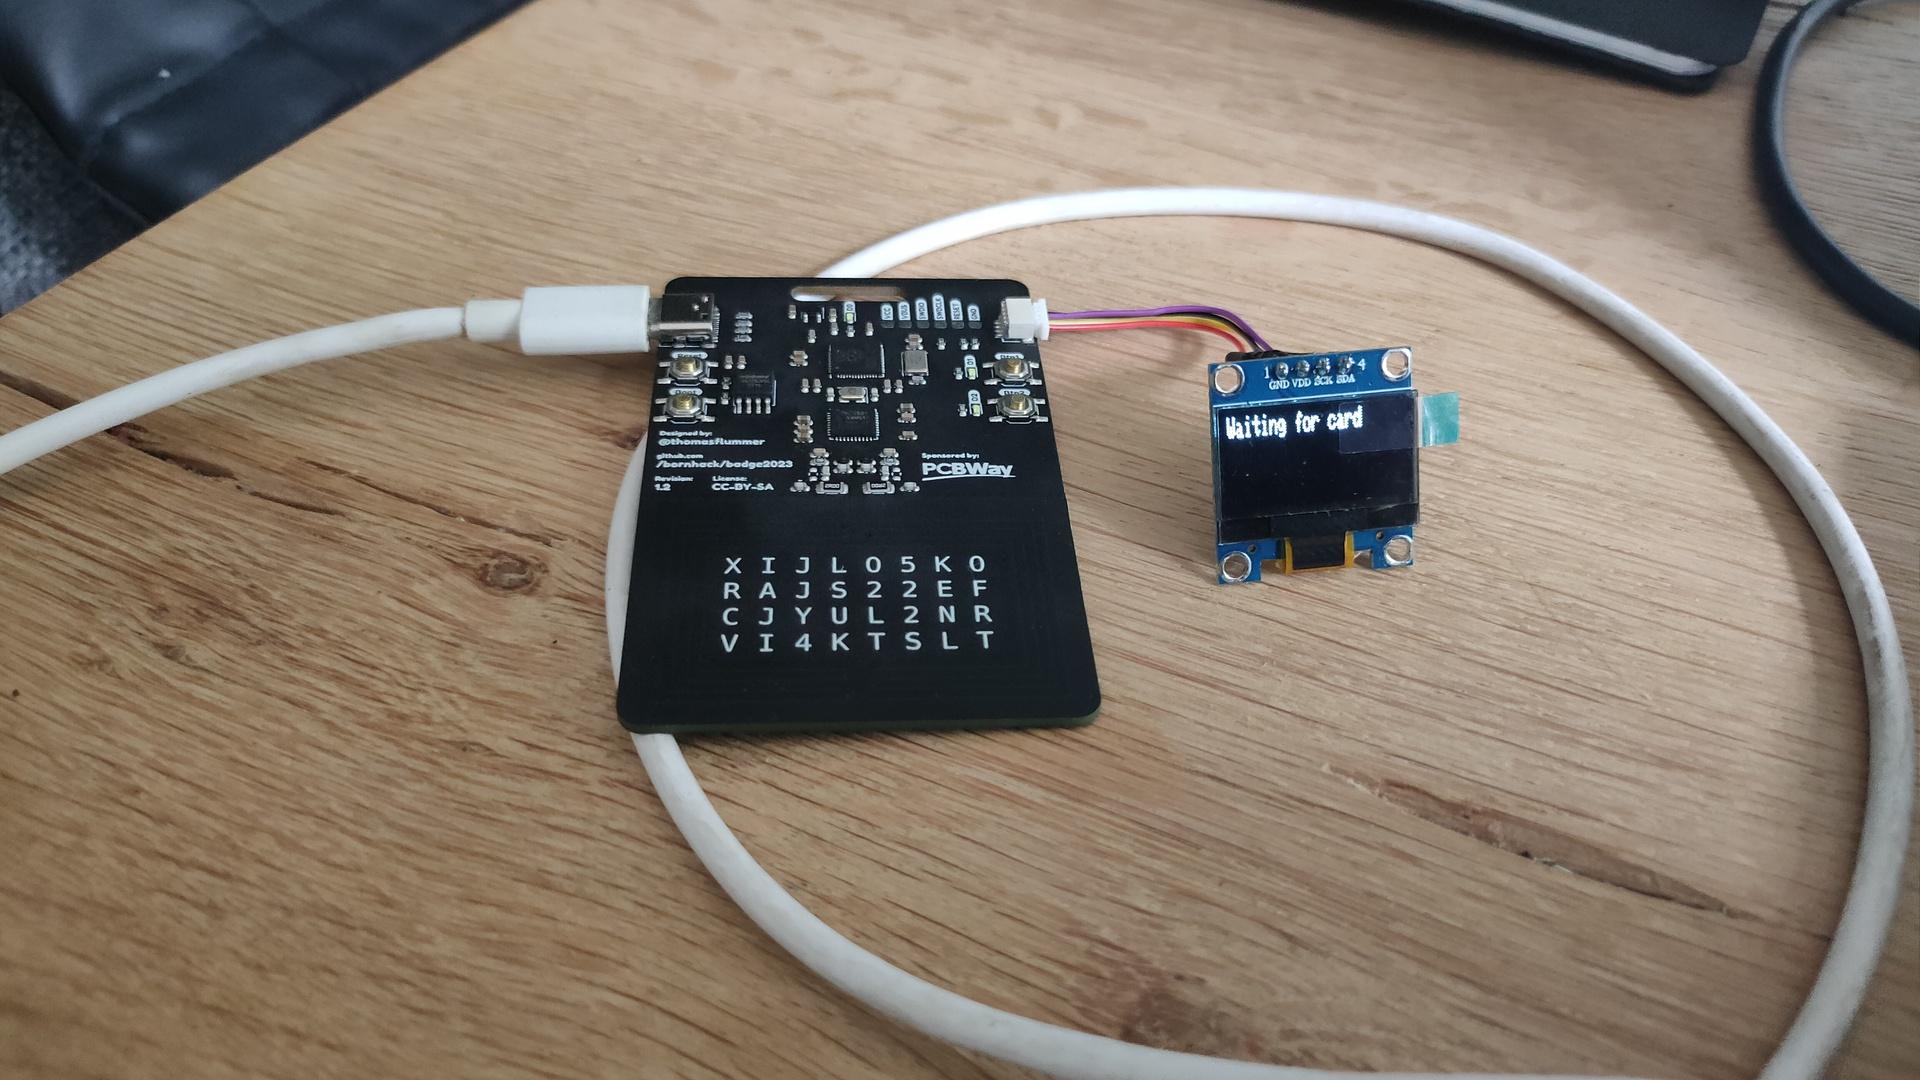
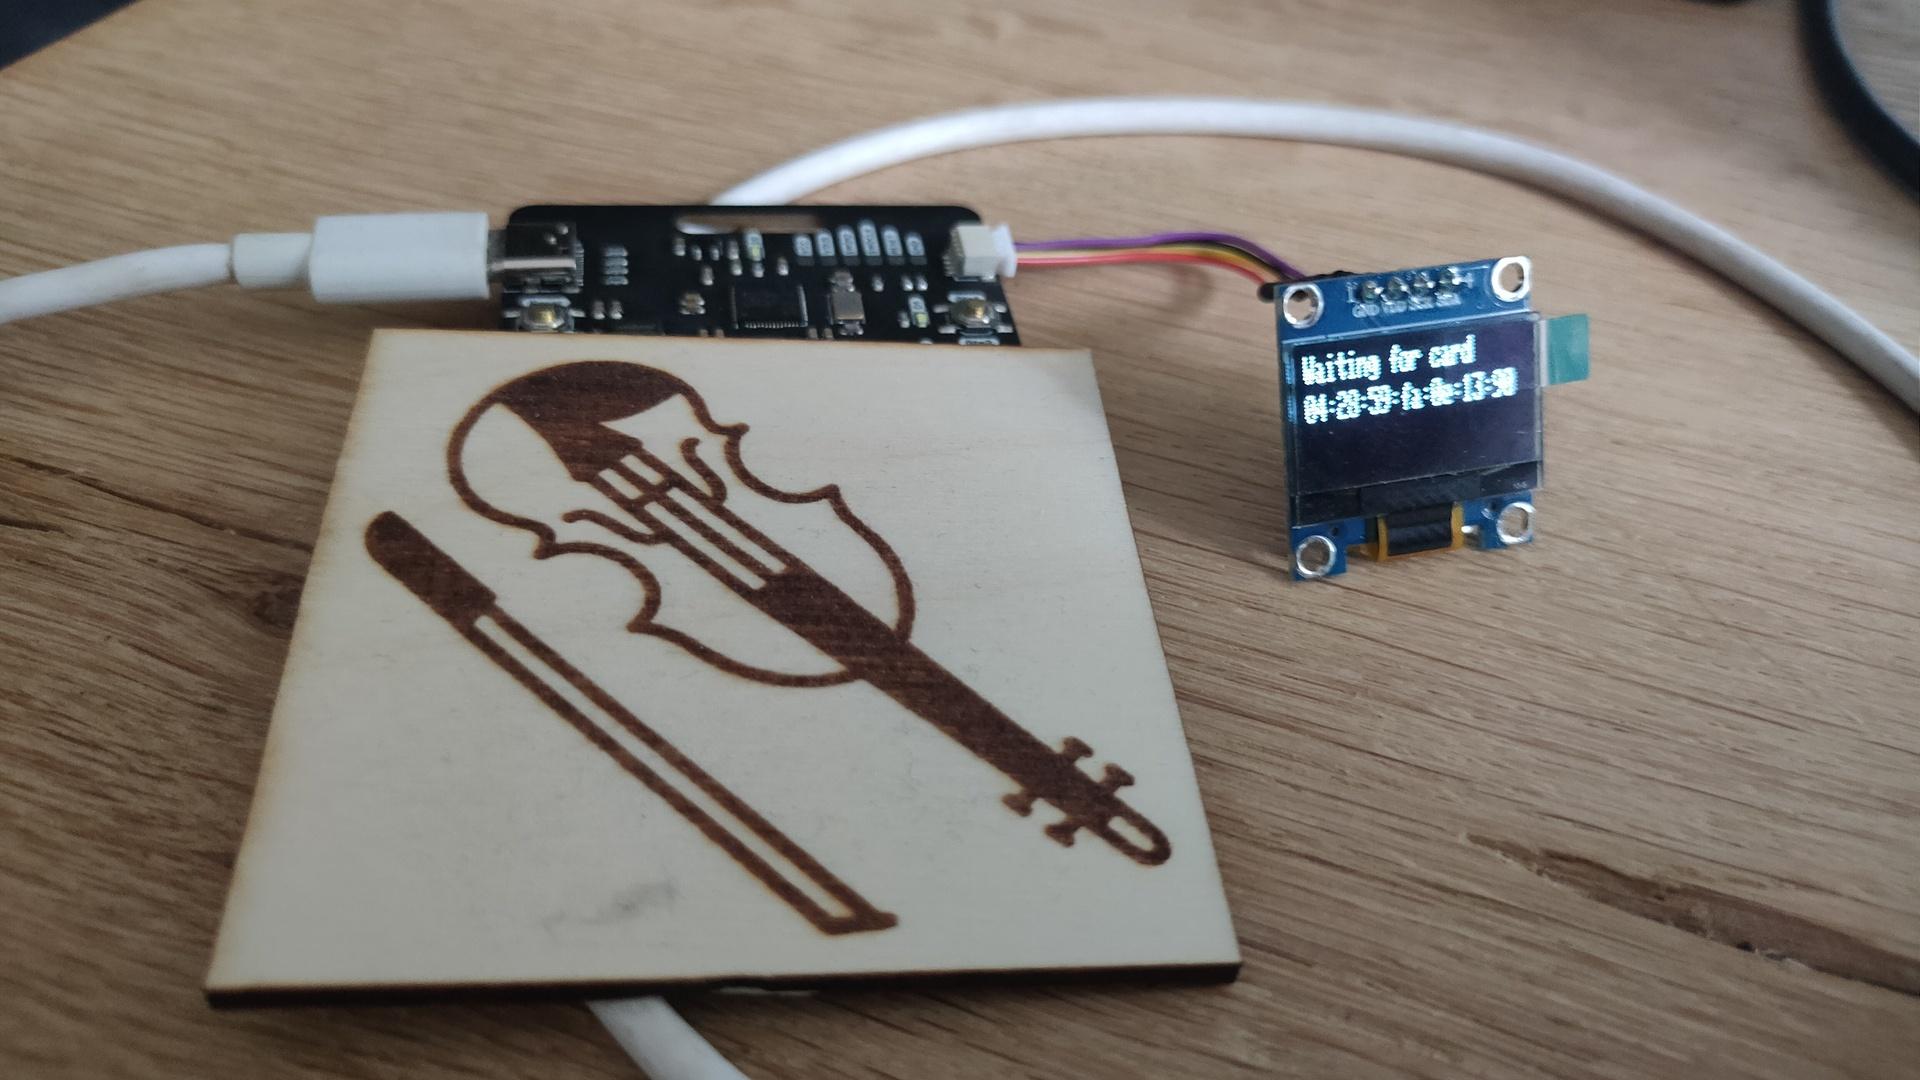
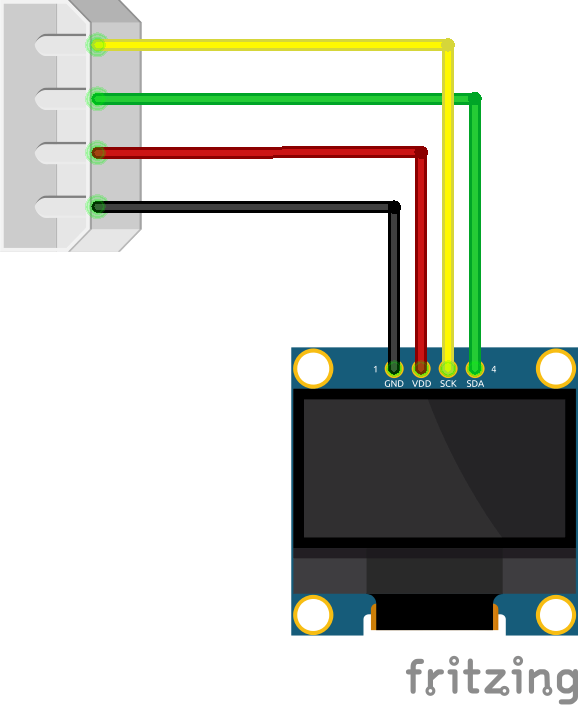
Last week I bought an old Bornhack Badge. I thought it needed a display.
Using a SSD1306 display, and Circuitpython I made this.
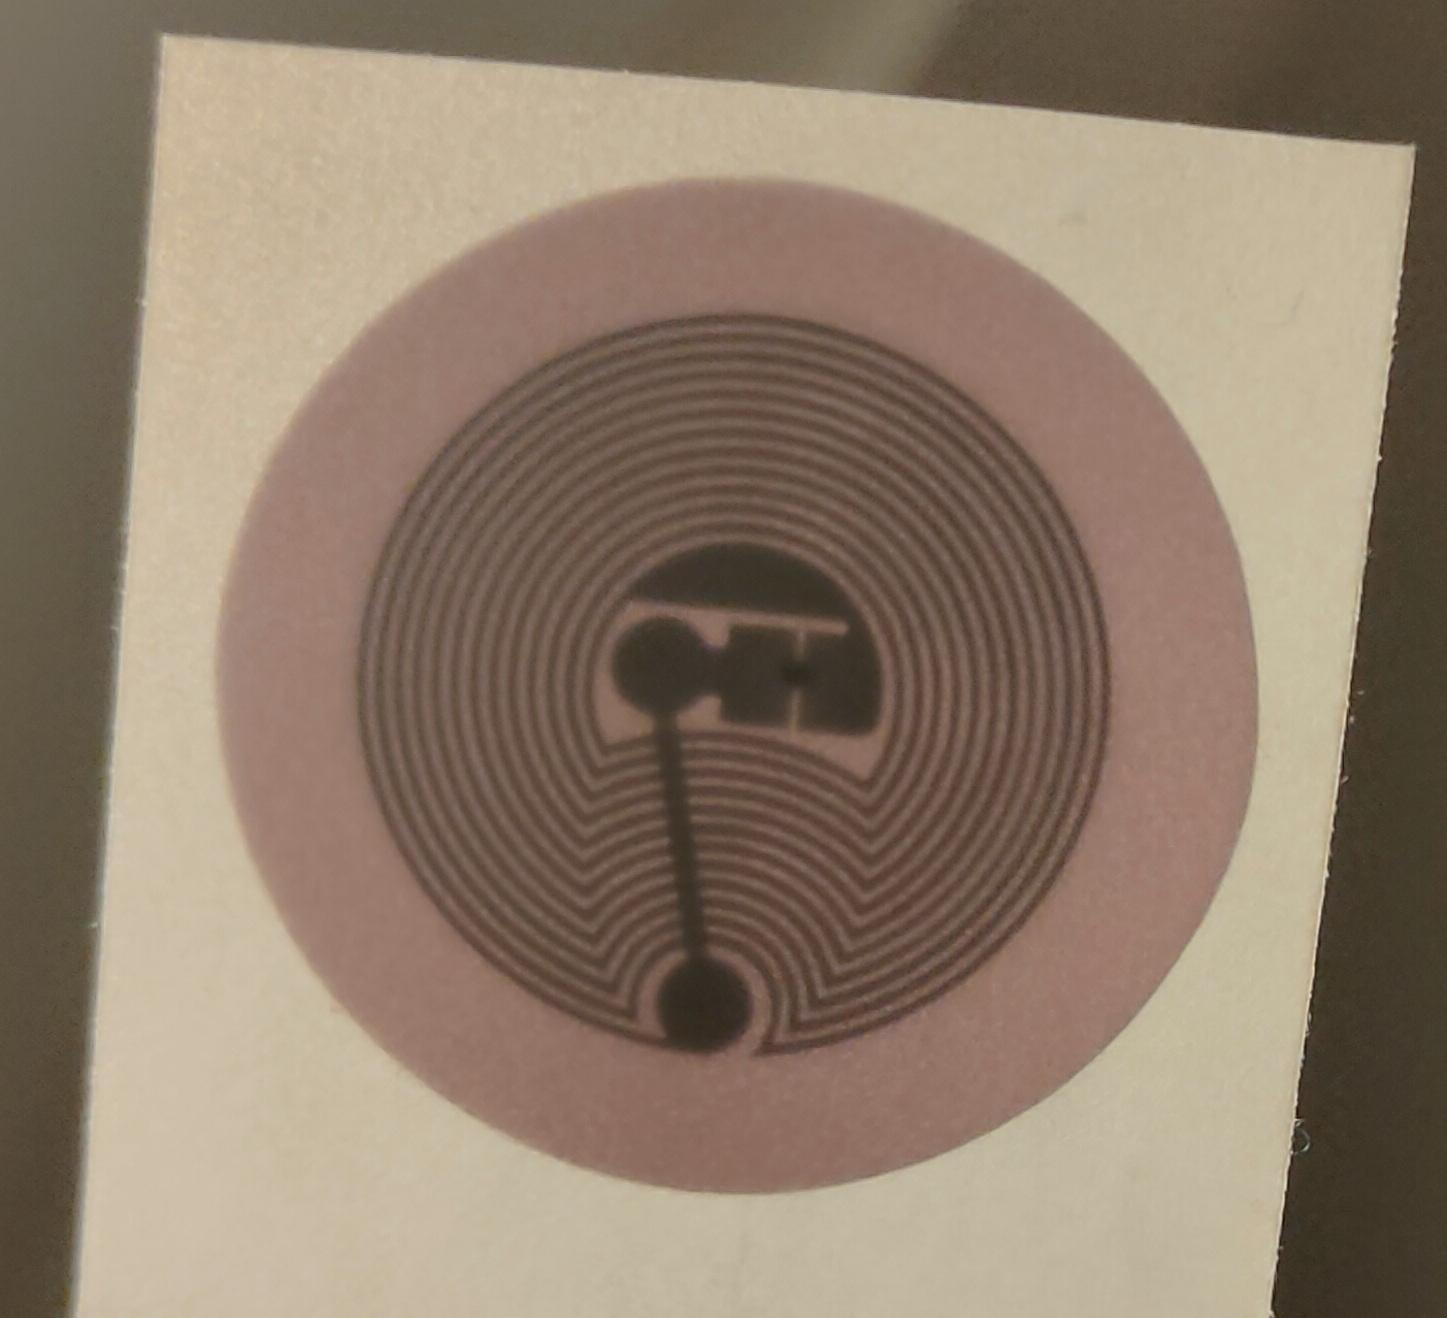
( Wooded thingy contains an RFID chip ( Part of my player ))
Library and files needed:
font5x8.bin in root of filesystem ( just google for this file )
copy of adafruit_framebuf.mpy in /lib
copy of adafruit_ssd1306.mpy in /lib
Code: (midway some pixel examples, just uncomment)
import board
from time import sleep
import busio
from PN7150 import PN7150
import adafruit_ssd1306
import math
import adafruit_framebuf


if True:
    # Fast 400KHz I2C
    i2c = busio.I2C(board.SCL, board.SDA, frequency = 400000)
else:
    # Regular 100kHz I2C
    i2c = board.I2C()


WIDTH = 32
HEIGHT = 8

buffer = bytearray(round(WIDTH * math.ceil(HEIGHT / 8)))
fb = adafruit_framebuf.FrameBuffer(
    buffer, WIDTH, HEIGHT, buf_format=adafruit_framebuf.MVLSB
)


nfc = PN7150(i2c, board.IRQ, board.VEN)

display = adafruit_ssd1306.SSD1306_I2C(128, 32, i2c,addr=0x3c)

assert nfc.connect()
print("Connected.")

assert nfc.modeRW()
print("Switched to read/write mode.")

display.fill(0)

display.show()

#display.fill(0)
#display.text('Hello', 0, 0, 1 )
#display.text('World', 0, 10, 1)
#display.show()
# Set a pixel in the origin 0,0 position.
#display.pixel(0, 0, 1)
# Set a pixel in the middle 64, 16 position.
#display.pixel(64, 16, 1)
# Set a pixel in the opposite 127, 31 position.
#display.pixel(127, 31, 1)
#display.show()

while True:
    display.fill(0)
    display.text('Waiting for card', 0, 0, 1 )
    display.show()

    assert nfc.startDiscoveryRW()

    print("Waiting for card..")
    card = nfc.waitForCard()
    assert nfc.stopDiscovery()

    print("ID: {}".format(card.nfcid1()))
    id = card.nfcid1()
    display.text(id, 0, 10, 1 )
    display.show()

    sleep(0.5)
Not sure about display i2c address? Use below code
import time
import board
import busio

# List of potential I2C busses
ALL_I2C = ("board.I2C()",)

# Determine which busses are valid
found_i2c = []
for name in ALL_I2C:
    try:
        print("Checking {}...".format(name), end="")
        bus = eval(name)
        bus.unlock()
        found_i2c.append((name, bus))
        print("ADDED.")
    except Exception as e:
        print("SKIPPED:", e)

# Scan valid busses
if len(found_i2c):
    print("-" * 40)
    print("I2C SCAN")
    print("-" * 40)
    while True:
        for bus_info in found_i2c:
            name = bus_info[0]
            bus = bus_info[1]

            while not bus.try_lock():
                pass

            print(
                name,
                "addresses found:",
                [hex(device_address) for device_address in bus.scan()],
            )

            bus.unlock()

        time.sleep(2)
else:
    print("No valid I2C bus found.")
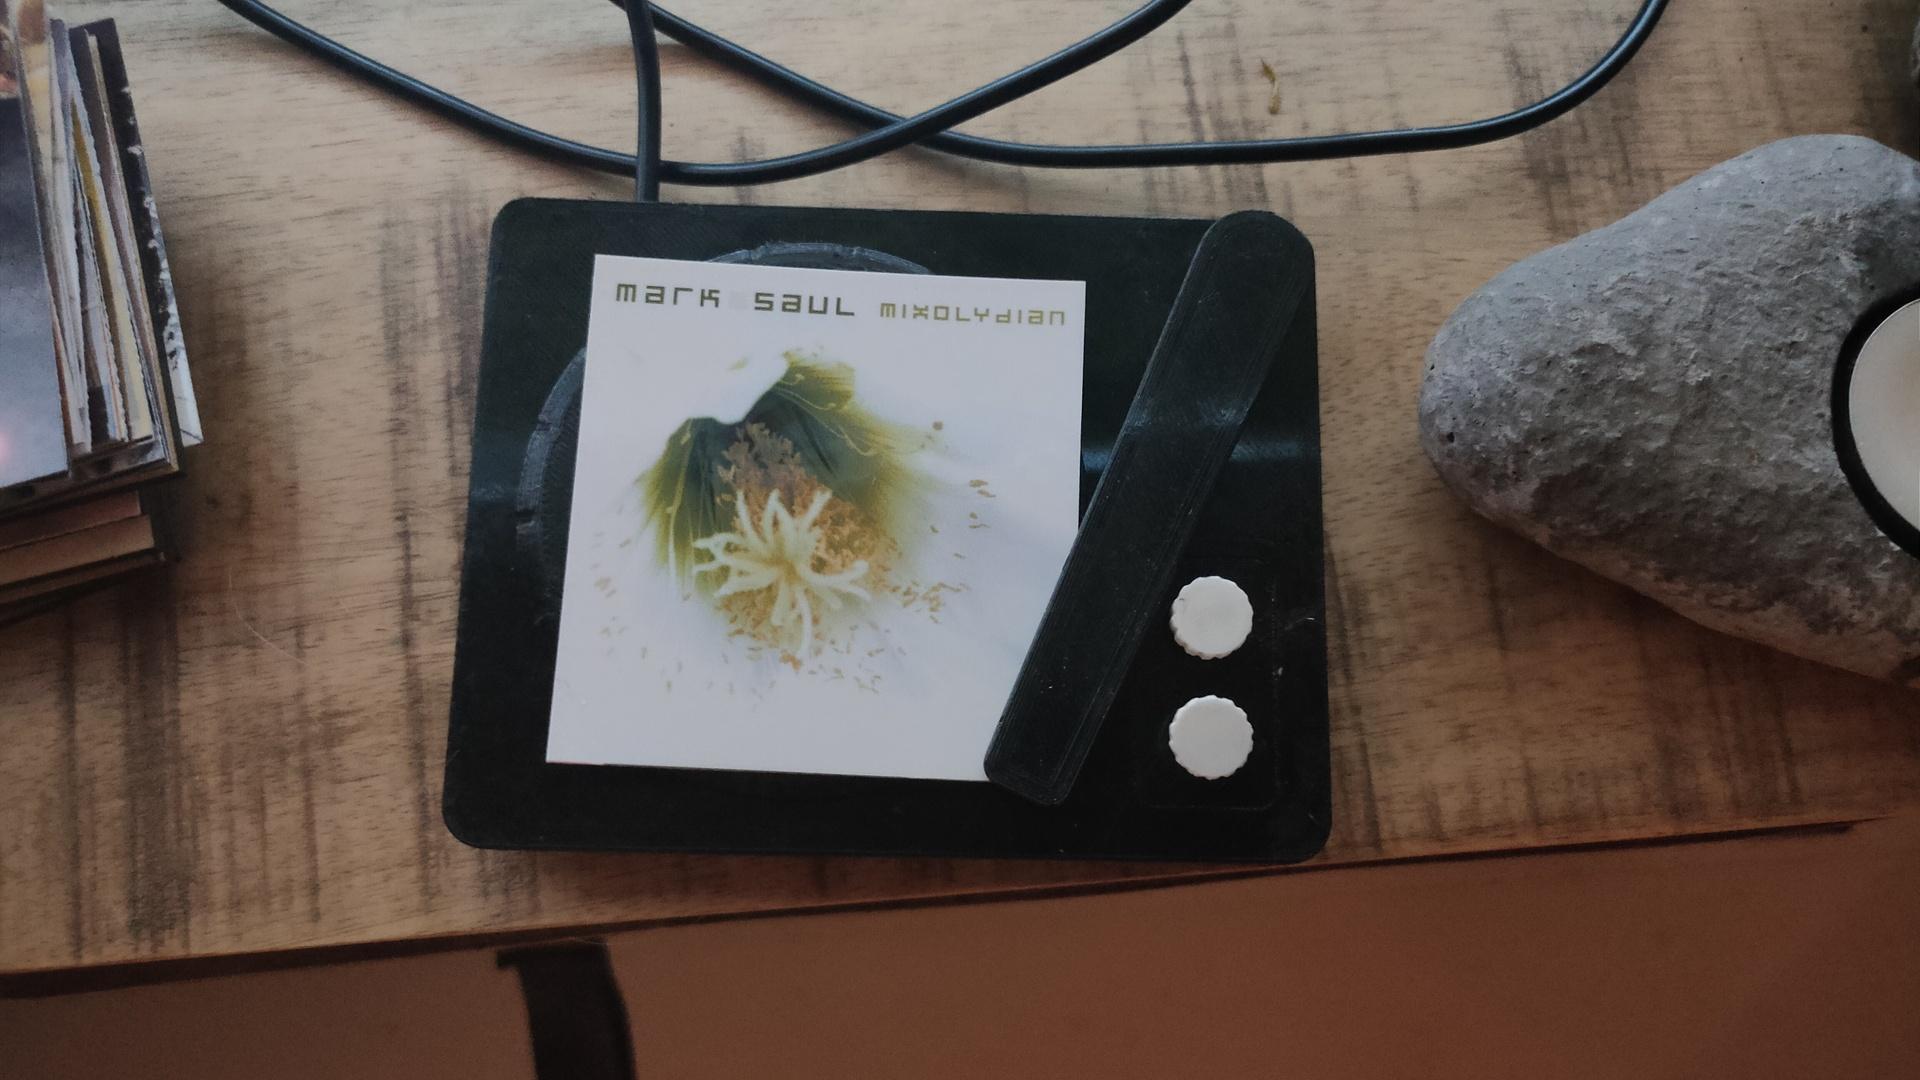
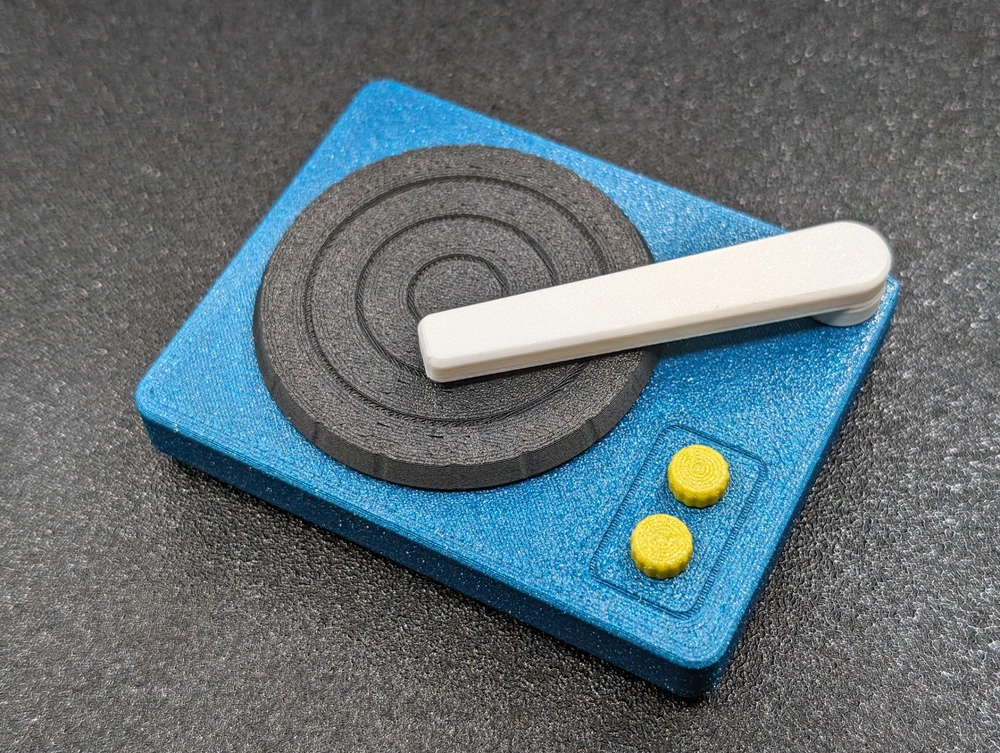
Recordplayer model by kriswillcode, but heavily remixed
Record player is going to be re-printed at a higher quality.
Put a printed image on the player, and it plays the album
Move the arm, and the next track will be played
Press upper white button, and the music will pause/resume
Press lower button … ??? Don’t know yet
Updated python client (see previous posts)
import paho.mqtt.client as mqtt
import urllib.request
from time import sleep

def on_connect(client, userdata, flags, rc):  # The callback for when the client connects to the broker
        print("Connected with result code {0}".format(str(rc)))
        client.subscribe("spotify/rfid/idlms")
        client.subscribe("spotify/rfid/but1")
        client.subscribe("spotify/rfid/but2")
        client.subscribe("spotify/rfid/arm")

def on_message(client, userdata, msg):  # The callback for when a PUBLISH message is received from the server.
        print("Message received-> " + msg.topic + " " + str(msg.payload))  # Print a received msg
        if msg.topic == "spotify/rfid/idlms":
            urllib.request.urlopen("http://LMS-SERVER-IP:9000/anyurl?p0=playlistcontrol&p1=album_id:" + msg.payload.decode() + "&p2=cmd:load&player=00:04:20:16:d9:04")
        if msg.topic == "spotify/rfid/but1":
            urllib.request.urlopen("http://LMS-SERVER-IP:9000/anyurl?p0=pause&player=00:04:20:16:d9:04")
            sleep(1)
        if msg.topic == "spotify/rfid/but2":
            urllib.request.urlopen("http://LMS-SERVER-IP:9000/anyurl?p0=pause&pt=1&player=00:04:20:16:d9:04")
            sleep(1)
        if msg.topic == "spotify/rfid/arm":
            urllib.request.urlopen("http://LMS-SERVER-IP:9000/status.html?p0=button&p1=jump_fwd&player=00:04:20:16:d9:04")
            sleep(1)

client = mqtt.Client("lmsclient")  # Create instance of client with client ID “digi_mqtt_test”
client.on_connect = on_connect  # Define callback function for successful connection
client.on_message = on_message  # Define callback function for receipt of a message
client.connect('MQTTSERVER', 1883)
client.loop_forever()  # Start daemon
Wemos INO file
#include <Arduino.h>
#include <SPI.h>
#include <MFRC522.h>
#include <ESP8266WiFi.h>
#include <WiFiClient.h>
#include <PubSubClient.h>
#define SS_PIN 15
#define RST_PIN 0

const int buttonPin1 = D1;
const int buttonPin2 = D2;

int buttonState1 = 0;
int buttonState2 = 0;

MFRC522 mfrc522(SS_PIN, RST_PIN);
  MFRC522::StatusCode status; //variable to get card status

  byte buffer[18];  //data transfer buffer (16+2 bytes data+CRC)
  byte size = sizeof(buffer);

  uint8_t pageAddr = 0x06;  //In this example we will write/read 16 bytes (page 6,7,8 and 9).
                            //Ultraligth mem = 16 pages. 4 bytes per page.
                            //Pages 0 to 4 are for special functions.

unsigned long cardId = 0;
WiFiClient net;
PubSubClient client(net);
const char* mqtt_server = "MQTTBROKER";
const char* ssid = "MYSSID";
const char* password = "MYWIFIPASWORD";
String topicStr = "";
byte buffer2[8];

boolean Rflag=false;
int r_len;
char payload[5];
byte value[5];
void setup() {
  Serial.begin(9600);
    pinMode(buttonPin1, INPUT_PULLUP);
    pinMode(buttonPin2, INPUT_PULLUP  );

  SPI.begin();
  mfrc522.PCD_Init();
  WiFi.mode(WIFI_AP_STA);
  WiFi.begin(ssid, password);
  client.setServer(mqtt_server, 1883);
     delay(100);
    client.setCallback(callback);
      delay(100);
    client.subscribe("spotify/rfid/in/#");
}
void reconnect() {
  while (WiFi.waitForConnectResult() != WL_CONNECTED) {
  }
  while (!client.connected()) {
    String clientId = "rfid-";
    clientId += String(random(0xffff), HEX);
    if (!client.connect(clientId.c_str(), "rfidclient", "...")) {
      delay(5000);
    }
  }
  client.subscribe("spotify/rfid/in/#");
}
void callback(char* topic, byte* payload, unsigned int length) {
  Serial.print(F("Called"));
   Rflag=true; //will use in main loop
   r_len=length; //will use in main loop
   int j=0;
     for (j;j<length;j++) {
       buffer2[j]=payload[j];
       //Serial.print((char)payload[j]);
       }
if (r_len < 3) {
  Rflag=false;
  Serial.print(F("Set false"));
}
buffer2[j]='\0'; //terminate string
}

void loop() {
    if (!client.connected()) {
    reconnect();
  }

buttonState1 = digitalRead(buttonPin1);
  //Serial.print(buttonState1);
  if (buttonState1 == 0 ) {
    client.publish("spotify/rfid/but1", "0");
  }
buttonState2 = digitalRead(buttonPin2);
  //Serial.println(buttonState2);
  if (buttonState2 == 0 ) {
    client.publish("spotify/rfid/but2", "0");
  }

int reading = analogRead(0);
  //Serial.println(reading);
  if (reading > 500 ) {
    client.publish("spotify/rfid/arm", "0");
  }

  client.loop();
  if (!mfrc522.PICC_IsNewCardPresent()) {
    return;
  }
  if (!mfrc522.PICC_ReadCardSerial()) {
    return;
  }
if (Rflag) {
        for (int i=0; i < 4; i++) {
    //data is writen in blocks of 4 bytes (4 bytes per page)
    status = (MFRC522::StatusCode) mfrc522.MIFARE_Ultralight_Write(pageAddr+i, &buffer2[i*4], 4);
    if (status != MFRC522::STATUS_OK) {
      return;
    }

  }
  Rflag=false;
}

  cardId = getCardId();
  char buffer3[10];
  sprintf(buffer3, "%lu", cardId);
  client.publish("spotify/rfid/id", buffer3);

  status = (MFRC522::StatusCode) mfrc522.MIFARE_Read(pageAddr, buffer, &size);
  if (status != MFRC522::STATUS_OK) {
    Serial.println(F("MIFARE_Read() failed: (R)"));
    Serial.println(mfrc522.GetStatusCodeName(status));
    return;
  }

  Serial.println(F("Read data: "));
  for (byte i = 0; i < 5; i++) {
    Serial.write(buffer[i]);
       buffer2[i]=buffer[i];
    }

  client.publish("spotify/rfid/idlms", buffer,5);
  delay(1000);
  mfrc522.PICC_HaltA();
}

unsigned long getCardId() {
  byte readCard[4];
  for (int i = 0; i < 4; i++) {
    readCard[i] = mfrc522.uid.uidByte[i];
  }
  return (unsigned long)readCard[0] << 24
    | (unsigned long)readCard[1] << 16
    | (unsigned long)readCard[2] << 8
    | (unsigned long)readCard[3];
}
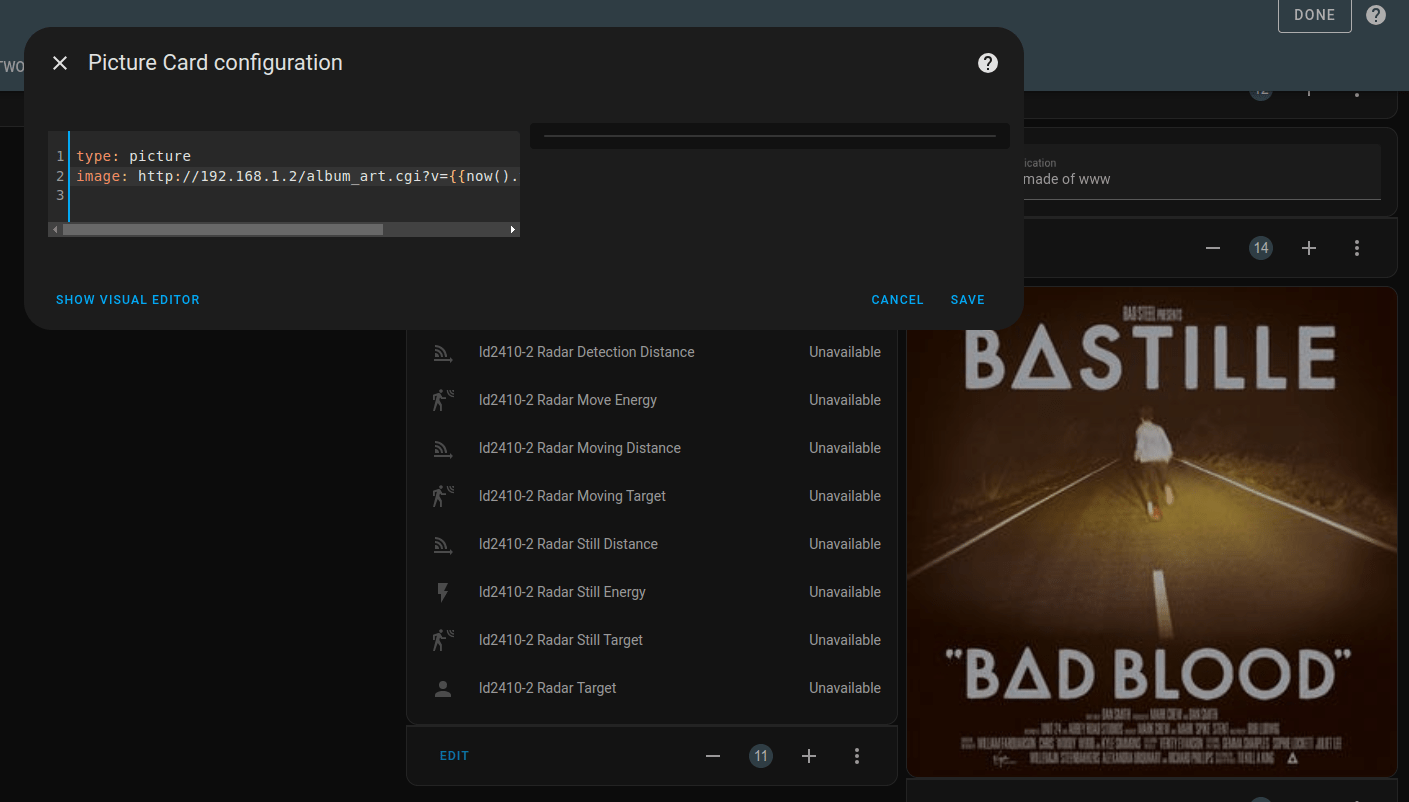
Get image from below url. Note! .. its a static non refreshing image!
http://192.168.1.2/album_art.cgi
Note: This gives me a file which shows fine in a browser, but being a http feed you cannot embed this in a https site. Another ‘problem’ with this image is that it includes headers, rendering this a invalid jpg when processing! (remove first 3 lines programmatically) I also want to have it updated, so I could make a mjpeg streamer for this. Probably i’m going to use my reverse proxy which uses SSL offloading to access cover art over https. (Then I can push this cover image on this webblog so you guys can see what we are listing to)
Another idea is to push this to an arduino display.
Not using https?
You can embed the album art in a dashboard. This won’t refresh, but the added time code will stop caching problems.
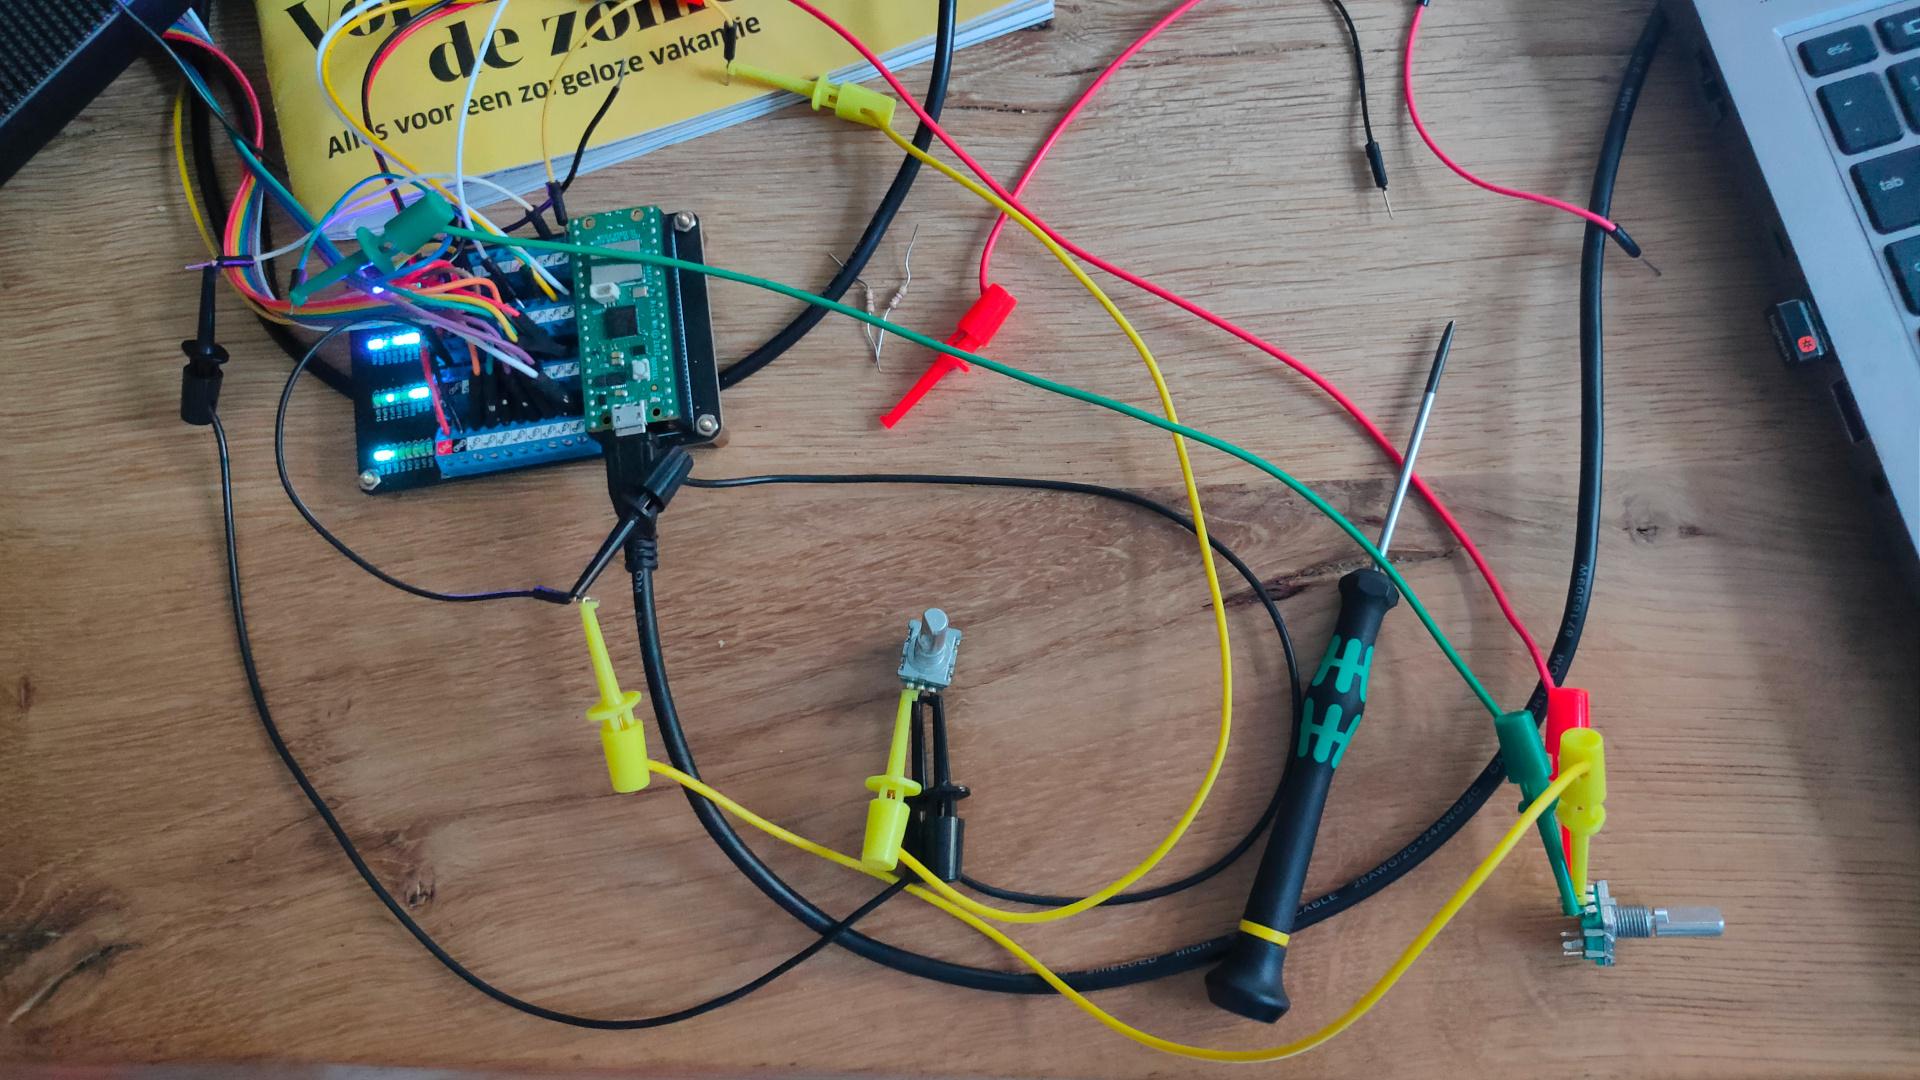
I used to have a “professional” alarm system, but it was too limited.
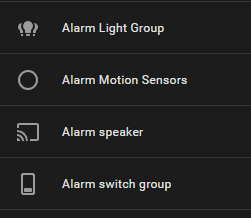
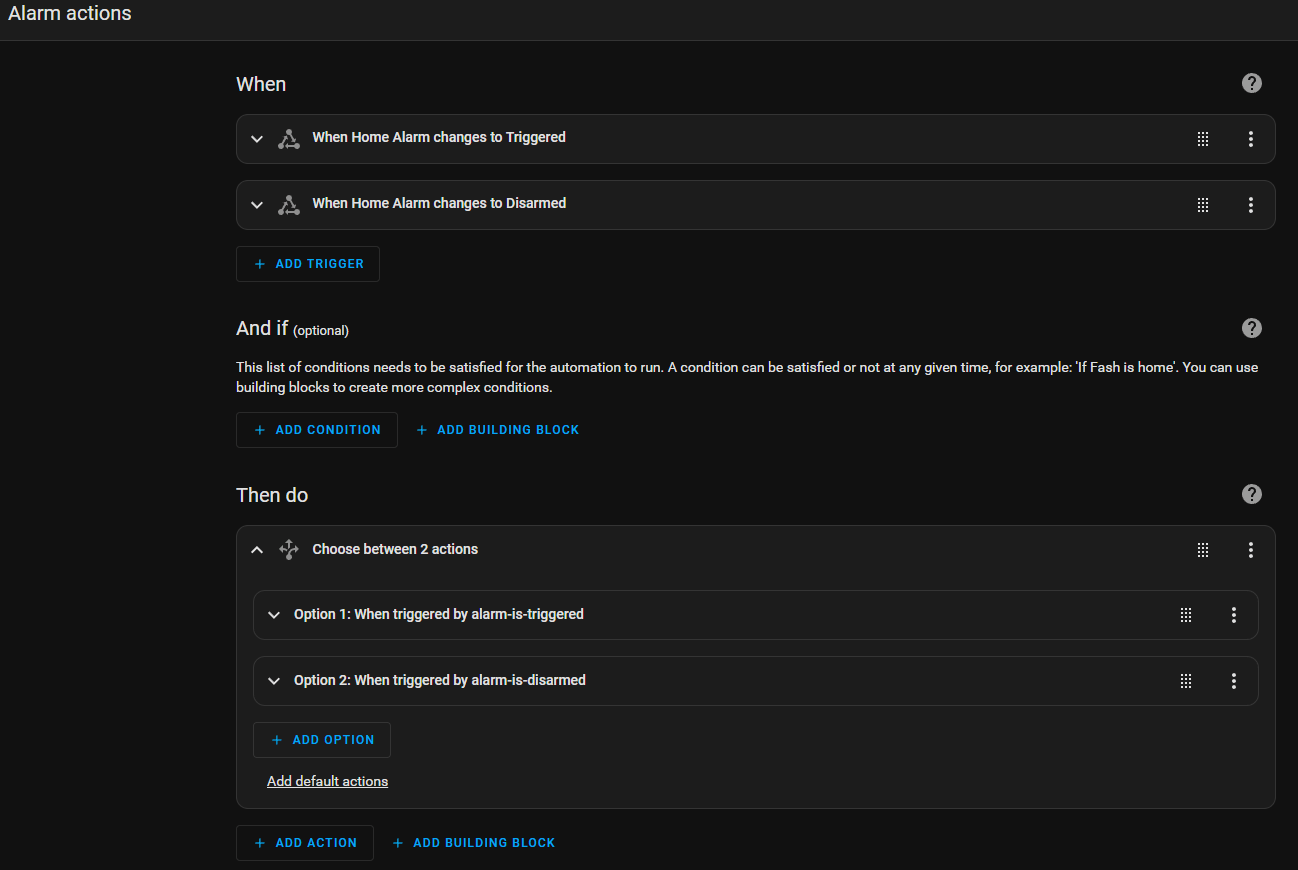
But when making a new alarm system using Home Assistant I thought I could reuse some sensors and the very loud alarm.
Setting up the Alarm within HA was as described on the HA website. I made a group for door and motion sensors. Then I made groups for lighting and switches.
Now I can “ARM” the house.
Motion sensors like PIR and camera sensors are being used for detection.
Lights and sound will be turned on when motion is detected.
When arming the system, the siren mode of the camera’s is also turned on.
When intrusion is detected I get a pushover notification on my phone and watch.
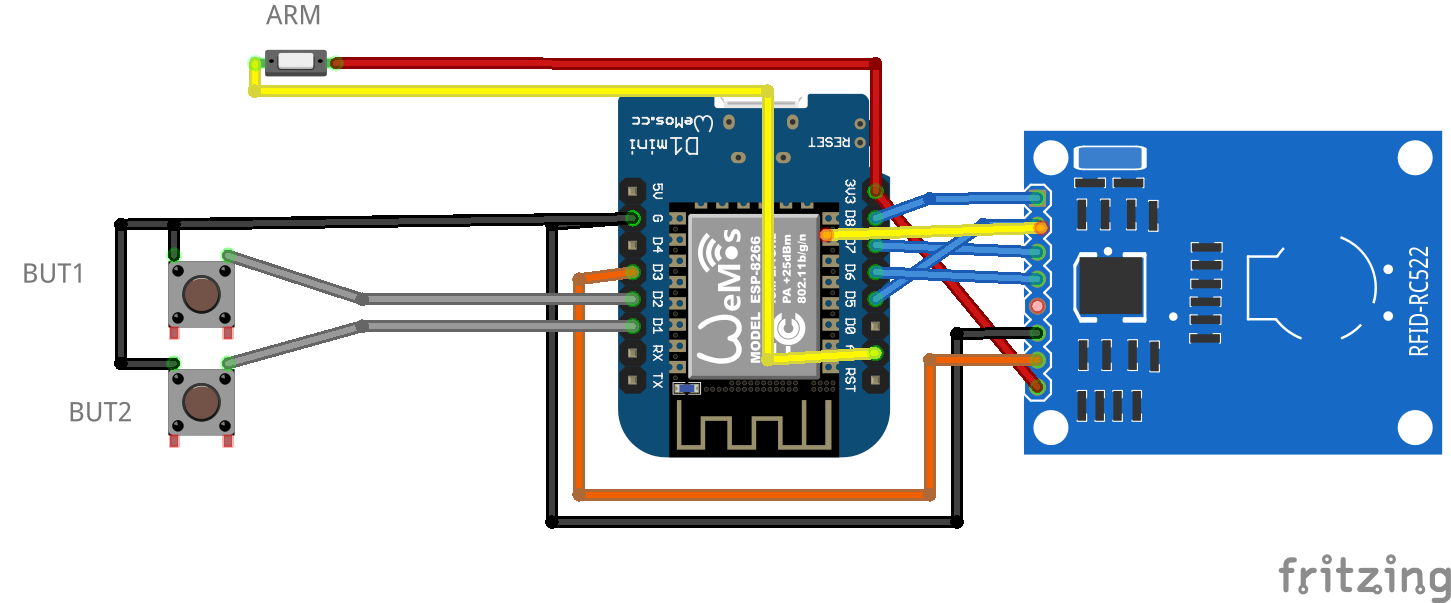
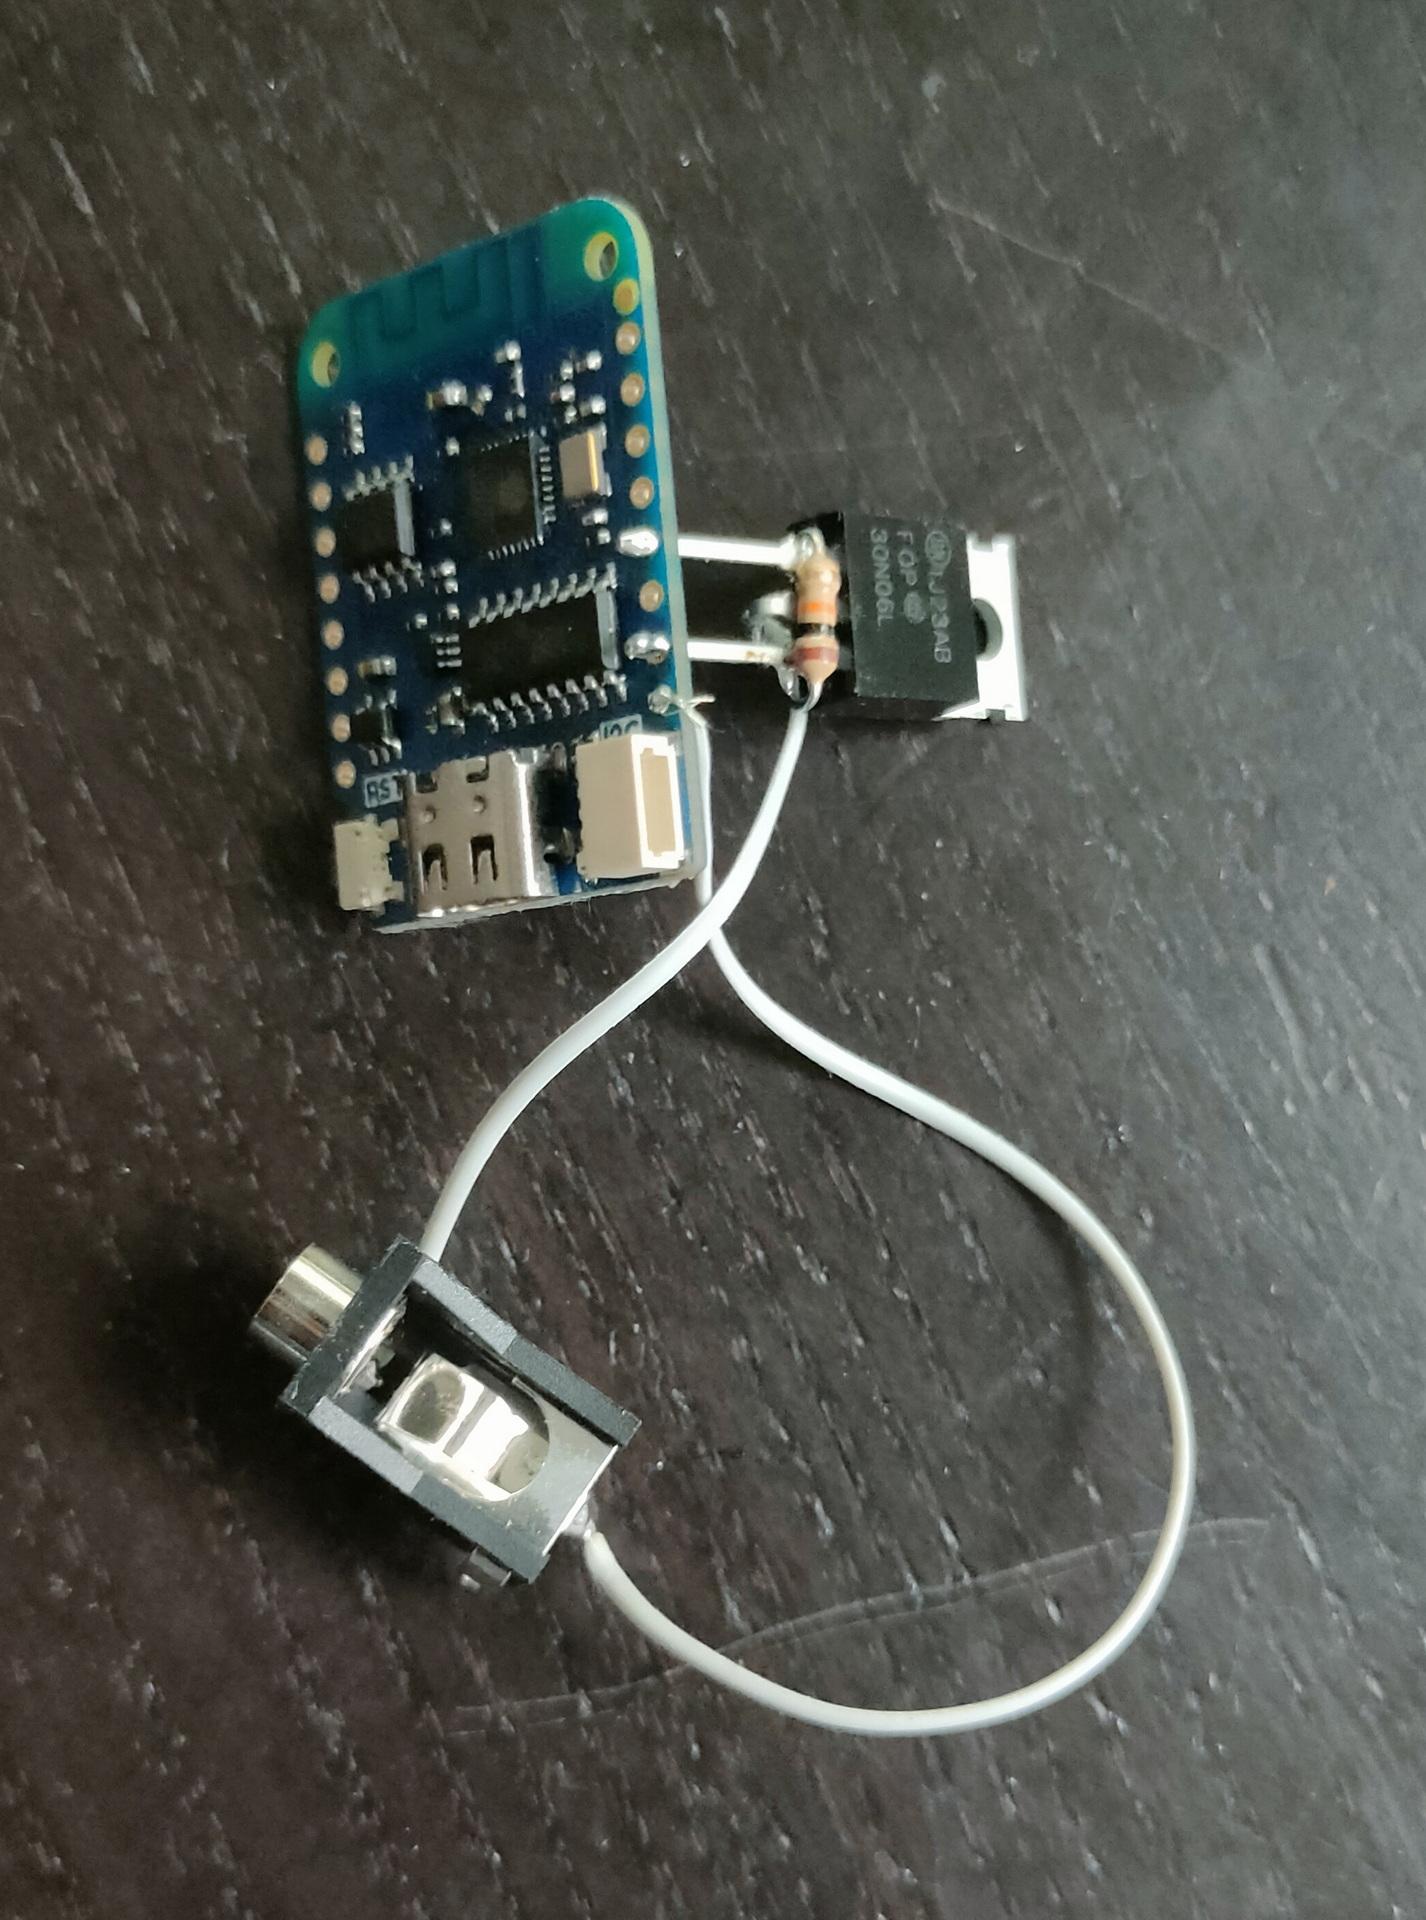
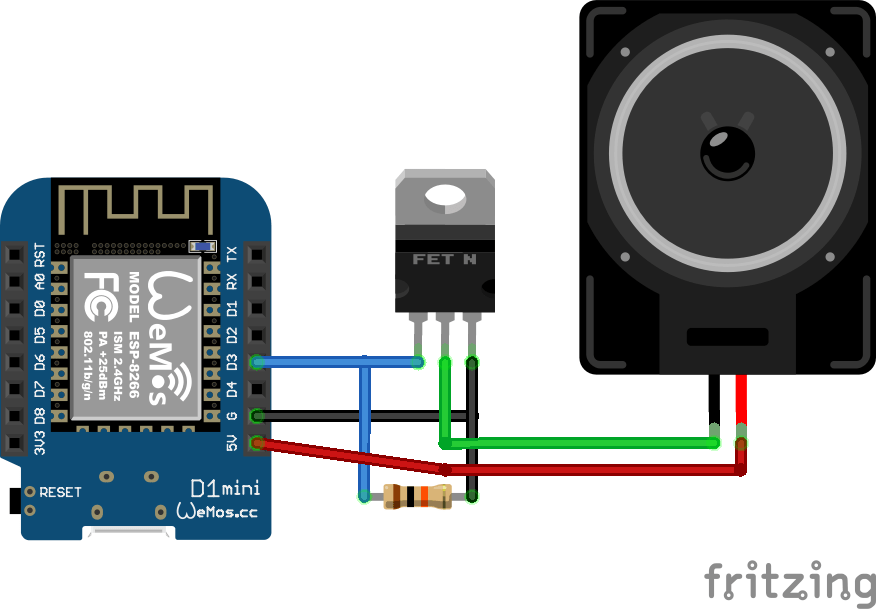
Wemos ESPHOME controllerOld (dirty) alarm siren
The siren is about 4-5 Euro’s on Ali https://nl.aliexpress.com/item/1005006066524139.html
Schematic of the wemos controller
(I don’t have a Siren Fritzing part .. hence the speaker)
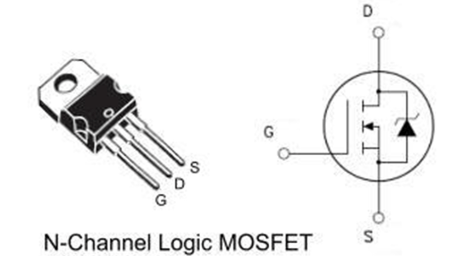
Used mosfet is a N-Channel 30N06L, resistor is 10K
Below is a test with different methods. I like reading the booklets, so a CD i cool, and I don’t need a CD player. (The RFID tag is in the case) The little cards are for bought audio files I don’t have a physical CD for.
Wooden case with RFID reader being powered by external powerbank
What am I gonna do? Cube as I had? Wooden playlist selectors as in above movies? The cards I’ve printed? Maybe a small record player with an RFID reader inside?
3D printed like this? https://makerworld.com/en/models/66671
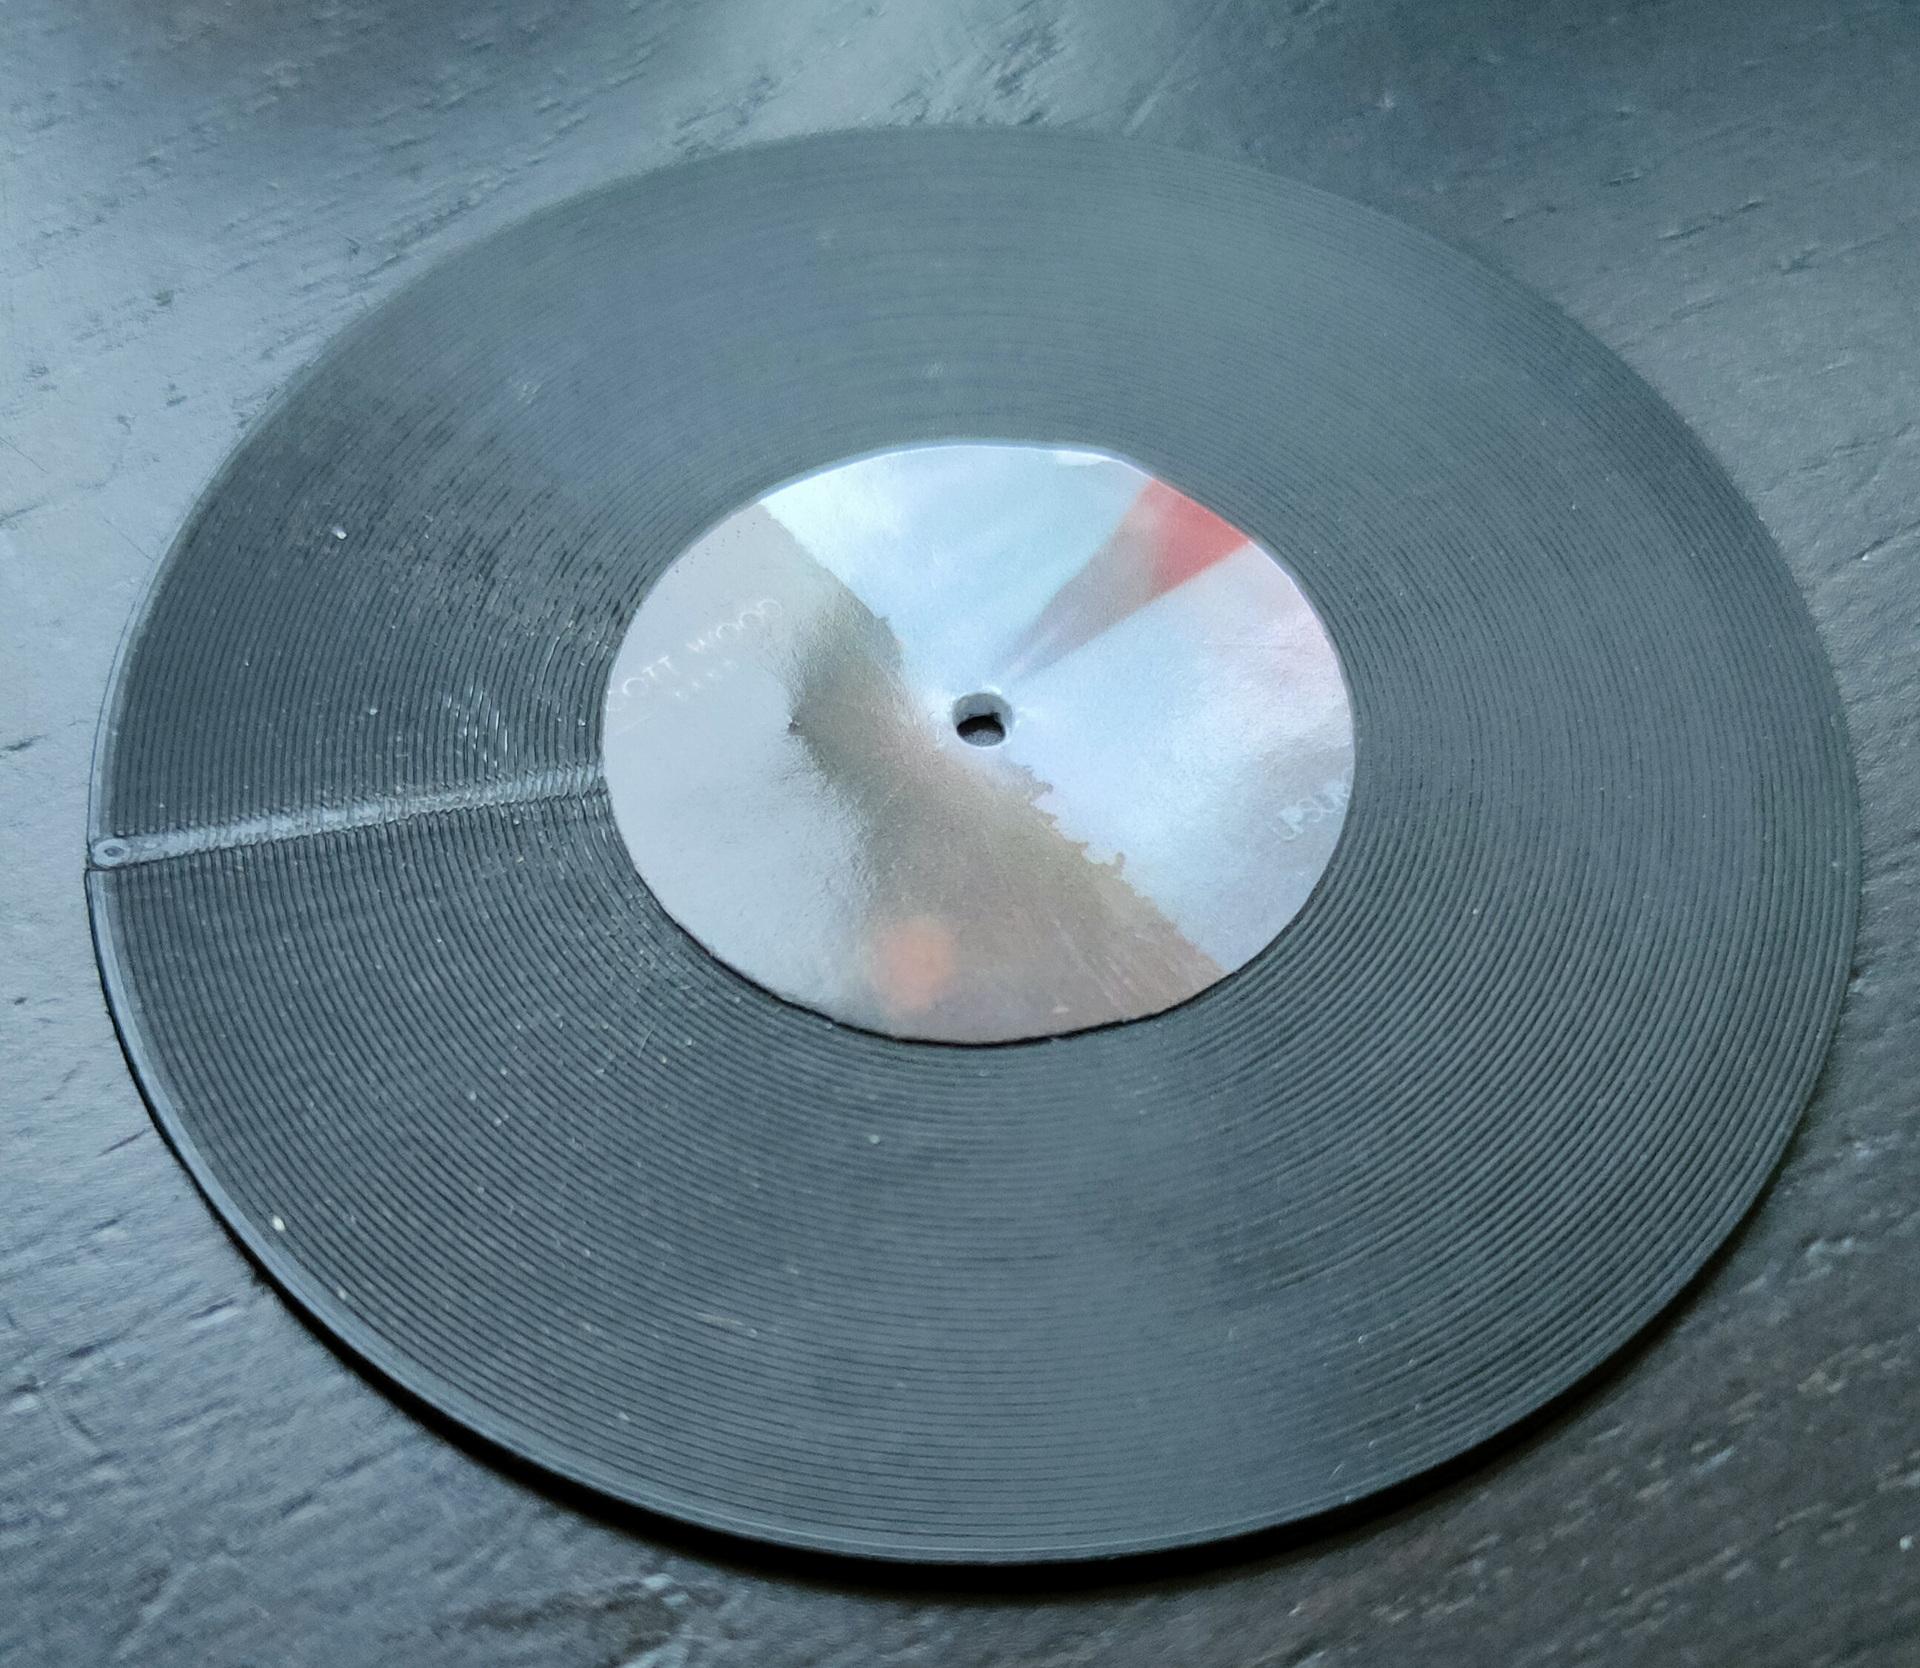
UPDATE: 20240327 – Little Record I 3D printed with little groves.
Home Assistant code for Playlist and Album automations (B.t.w. The method is still using an Arduino and MQTT topics, as mentioned before)
# ALBUM PLAYER
alias: SpotifyAlbum
description: ""
trigger:
  - platform: mqtt
    topic: spotify/rfid/id
condition:
  - condition: template
    value_template: "{{ trigger.payload in playlistkeys.keys() }}"
action:
  - service: media_player.play_media
    target:
      entity_id: media_player.spotify_fashice
    data:
      media_content_type: album
      media_content_id: spotify:album:{{ playlistkeys.get(trigger.payload) }}
mode: single
variables:
  playlistkeys:
    "71719674": 20TANs4iXVeLp387zjgmec
    "71260666": 5325ECcBhnIysoqyENGCYi
    "71457530": 7wyOeD9HcUuMFMO8pTflap
In the past, Aloha and I made a simple solution like this using barcodes in < 2000s. Due to the many obscure recordings I have, I am thinking about creating something like this for Picore player and my local Squeezebox server.
I used MCE to control some Windows VMs and programs running in it in the past. (Below link and a web interface engine which on the backend converted BWW/BMW (bagpipe music files) to PDF automated comes to mind)
Controlling a Windows VM using MQTT, very nice! (Use HA mqtt or mosquitto_pub in bash)
Question: anyone got a better solution to control programs within a VM? Let me know.
Next:
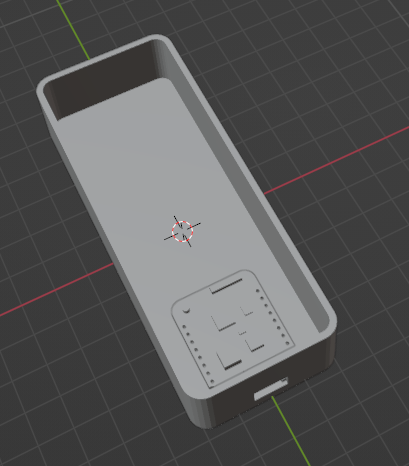
I’m creating a new case for my Wemos, LCD16x2, button, Led, Buzzer project (see other post)
I’m redesigning my previous case in blender.
But I really miss something like a generator function for different cases, like the one I made using Openscad. Question: Anyone know a tool/add-on to generate cases? I used a model of a wemos to get the usb connector/screw holes in place.
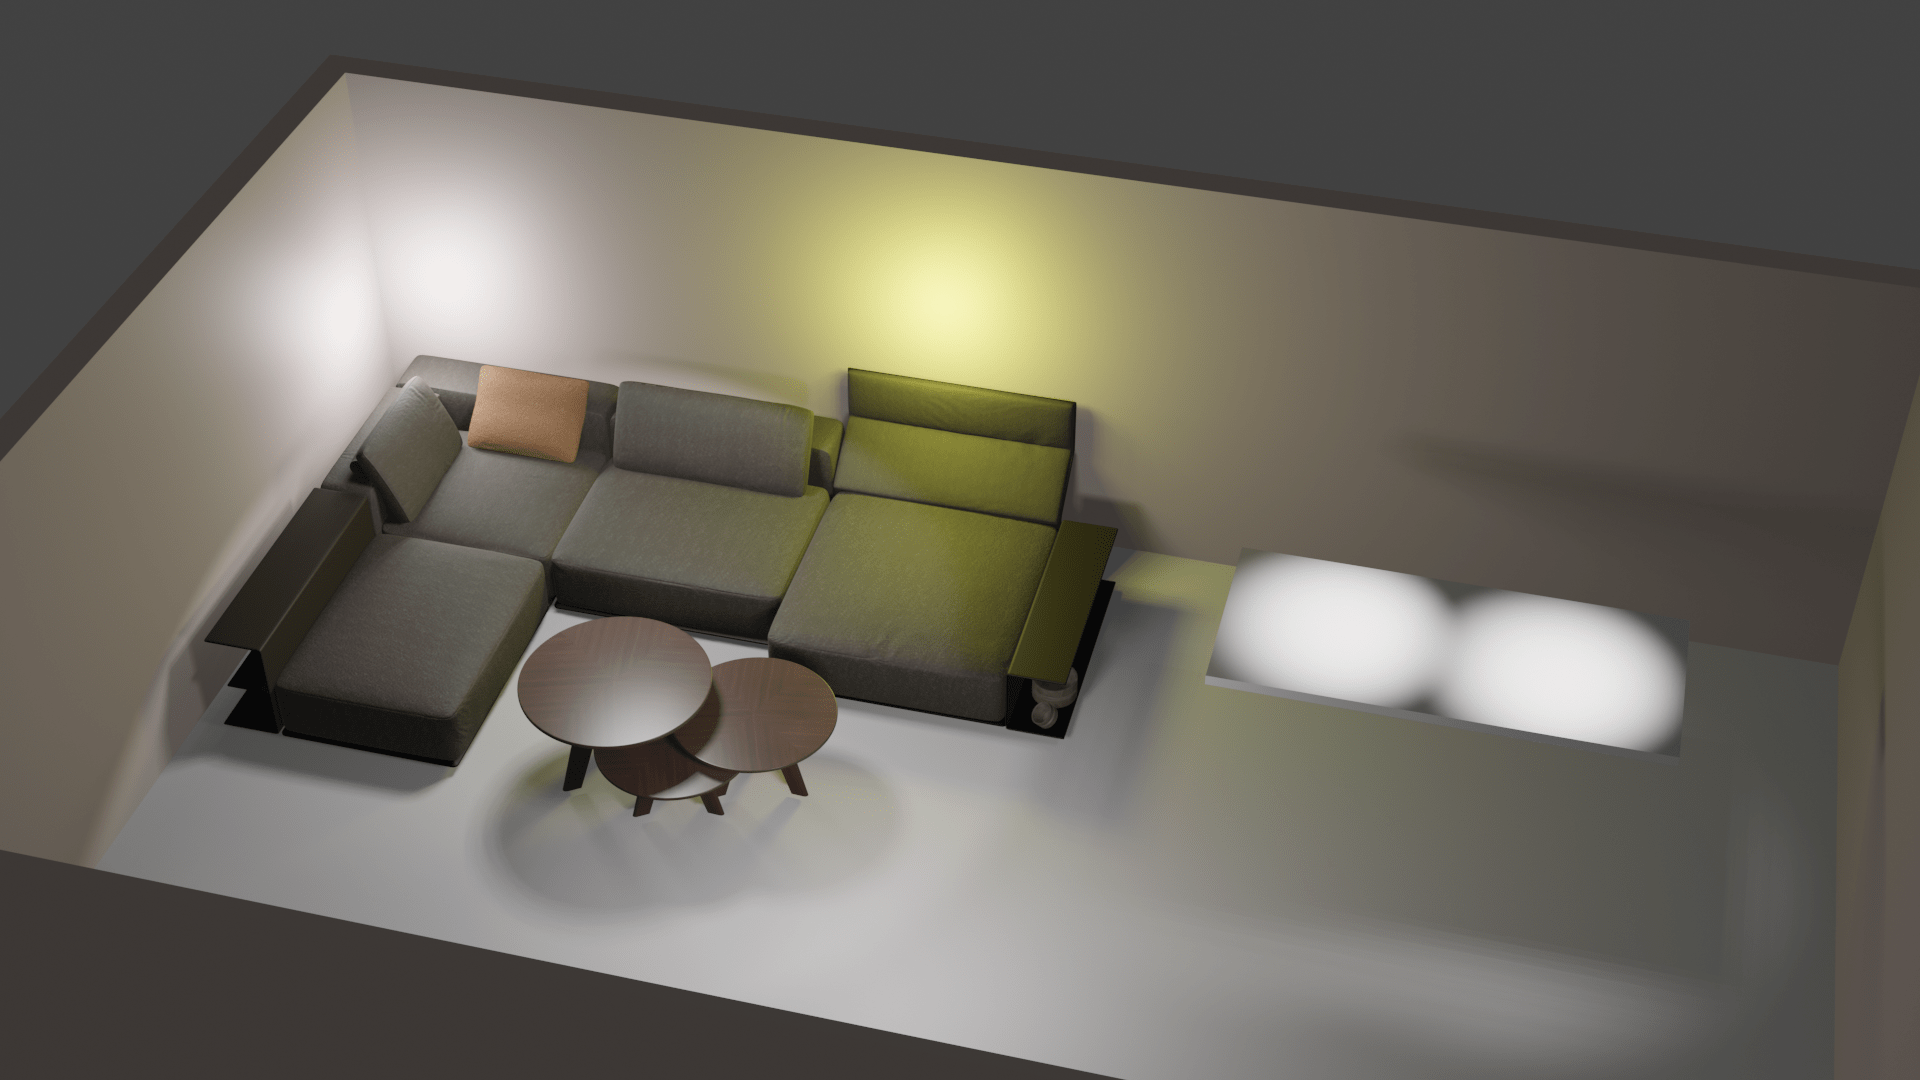
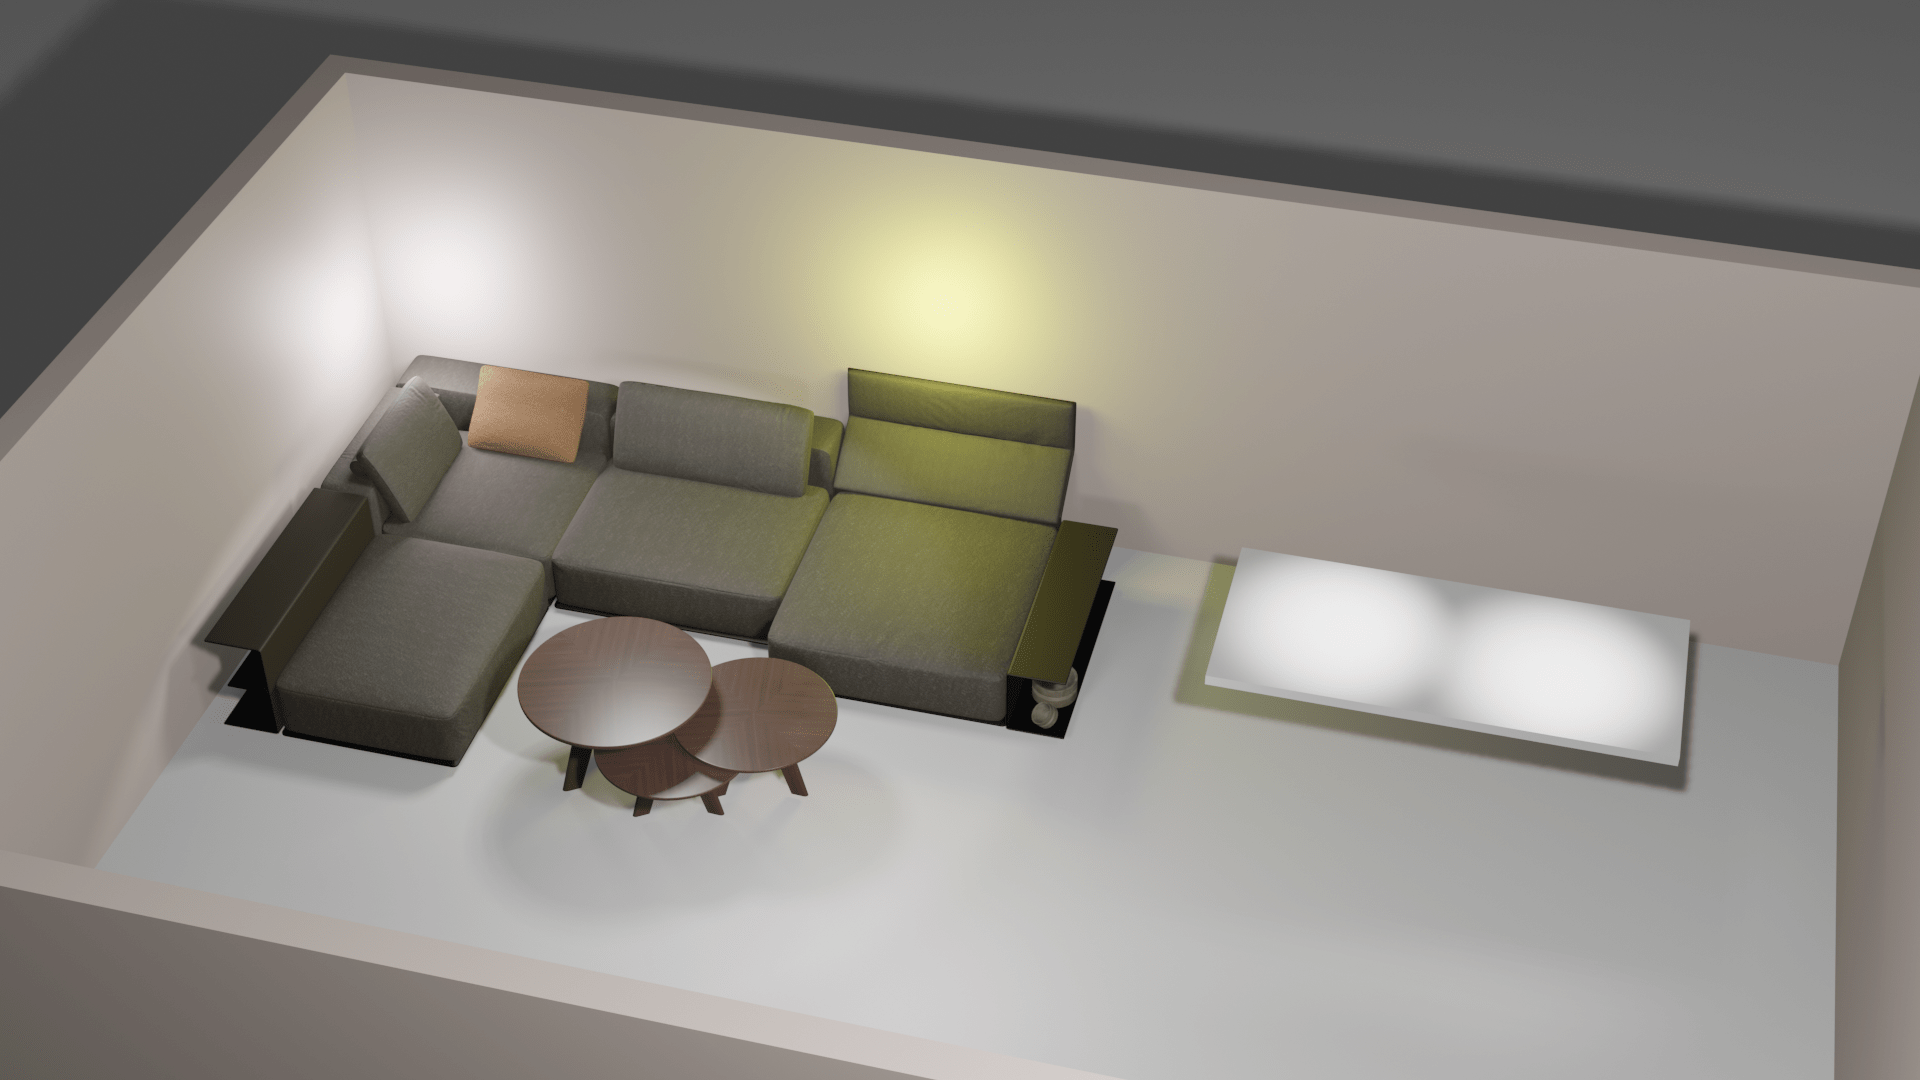
In the past, I’ve controlled some blender lights using python and MQTT. But now I’m trying to control it using DMX.
Example of lighting in our living using mock-up couch and tables.
I found a cool add-on called Blender-DMX. (B.t.w. wled can also use DMX)
Looks cool but, can I make a floorplan with this?
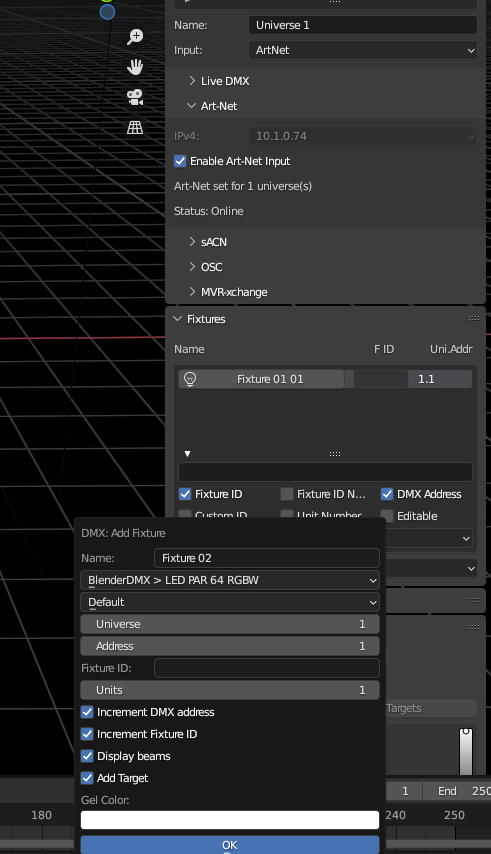
Blender add-on configuration
In Home Assistant I used a HACS add-on called : Art-net LED Lighting for DMX
Configuration can be done in configuration.yaml
light:
- platform: artnet_led
  host: BLENDERHOSTIP                   # IP of Art-Net Node
  max_fps: 25
  refresh_every: 0                      # Resend values if no fades are running every x seconds, 0 disables automatic refresh
  node_type: artnet-direct              # Which protocol to use
  universes:                            # Support for multiple universes
    1:                                  # .Nr of Universe (see configuration of your Art-Net Node)
      send_partial_universe: True       # Only send the universe which contains data
      devices:
        - channel: 1                    # first channel of dmx dimmer
          name: dmx_dimmer_rgbw         # name
          type: rgbw                    # type
          transition: 1                 # default duration of fades in sec.
          channel_size: 8bit            # width of the channel sent to DMX device, default "8bit", "16bit", "24bit" and "32bit"
          channel_setup: Wrgb           # This is the magic to get colors correct
It works, but I’m not happy, anyone got a better solution?
And I have to check out GDTF profiles for fixtures.
At a later stage I’m going to 3d print a white floorplan about 1cm high, with LEDs and buttons. A floorplan you can hang on your wall.
"If something is worth doing, it's worth overdoing."