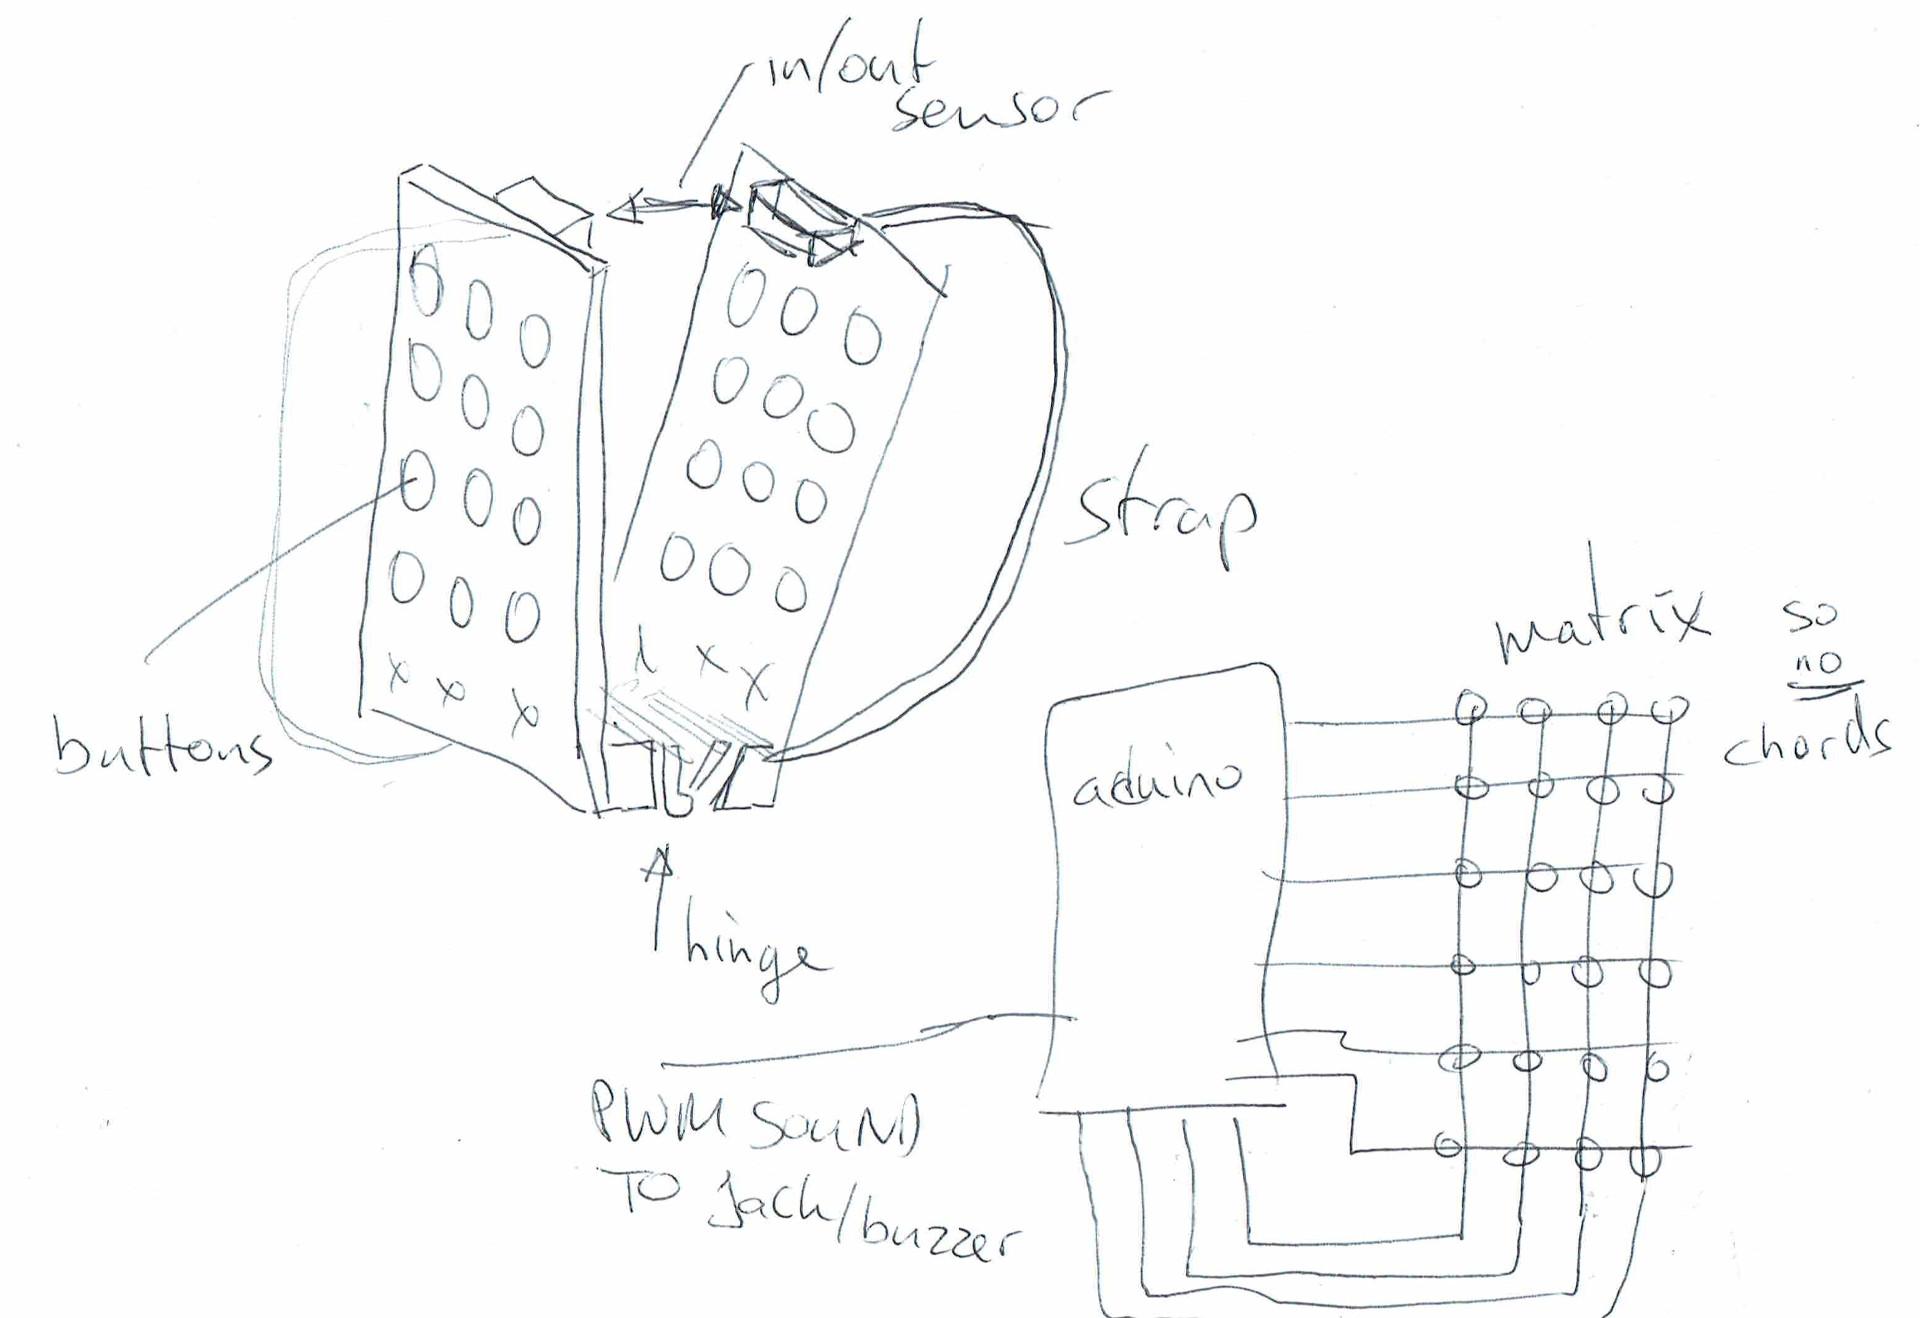
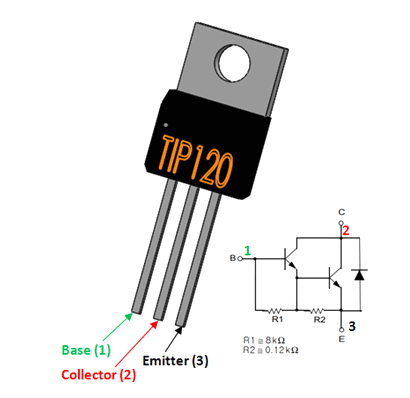
So we need some pushbuttons … at least 14 .. for the most simple tunes. A sensor for push and pull. A buzzer or better yet .. a jack for earphones. Arduino with enough pins to connect a keyboard matrix. When using a keyboard matrix only single keypresses are detected. So we cant do chords!
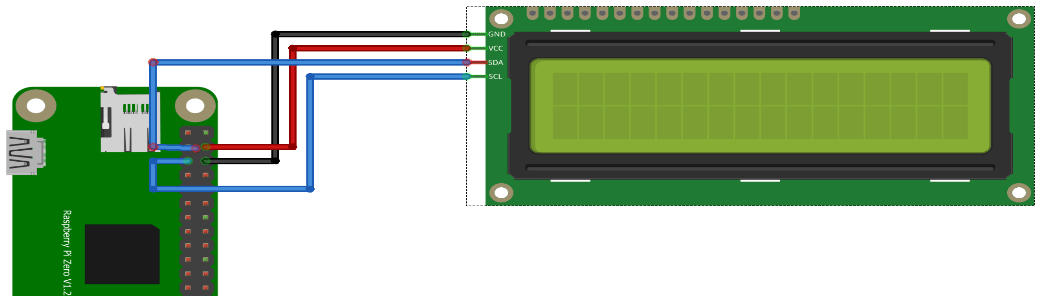
I’ve installed a headless Raspbian on a Pi Zero with a 2×16 Chars lcd display. As part of the Escape Room over the internet
Using the raspberry imager: I’ve set the username/password and ssh access in this tool. For wifi access i’ve placed below file on the SDcard in /boot (You can do this in the tool, but i want to make this dynamic when connected at a remote site.) file: wpa_supplicant.conf
sudo raspi-config
Interface options and enable I2C

sudo apt-get install python3-smbus

wget https://gist.githubusercontent.com/DenisFromHR/cc863375a6e19dce359d/raw/36b82e787450d127f5019a40e0a55b08bd43435a/RPi_I2C_driver.py
and
wget https://gist.githubusercontent.com/DenisFromHR/cc863375a6e19dce359d/raw/36b82e787450d127f5019a40e0a55b08bd43435a/examples.py

For python3 edit the example and put at the top

# requires RPi_I2C_driver.py
import RPi_I2C_driver
from time import *
unichr = chr

Run with
python3 examples.py
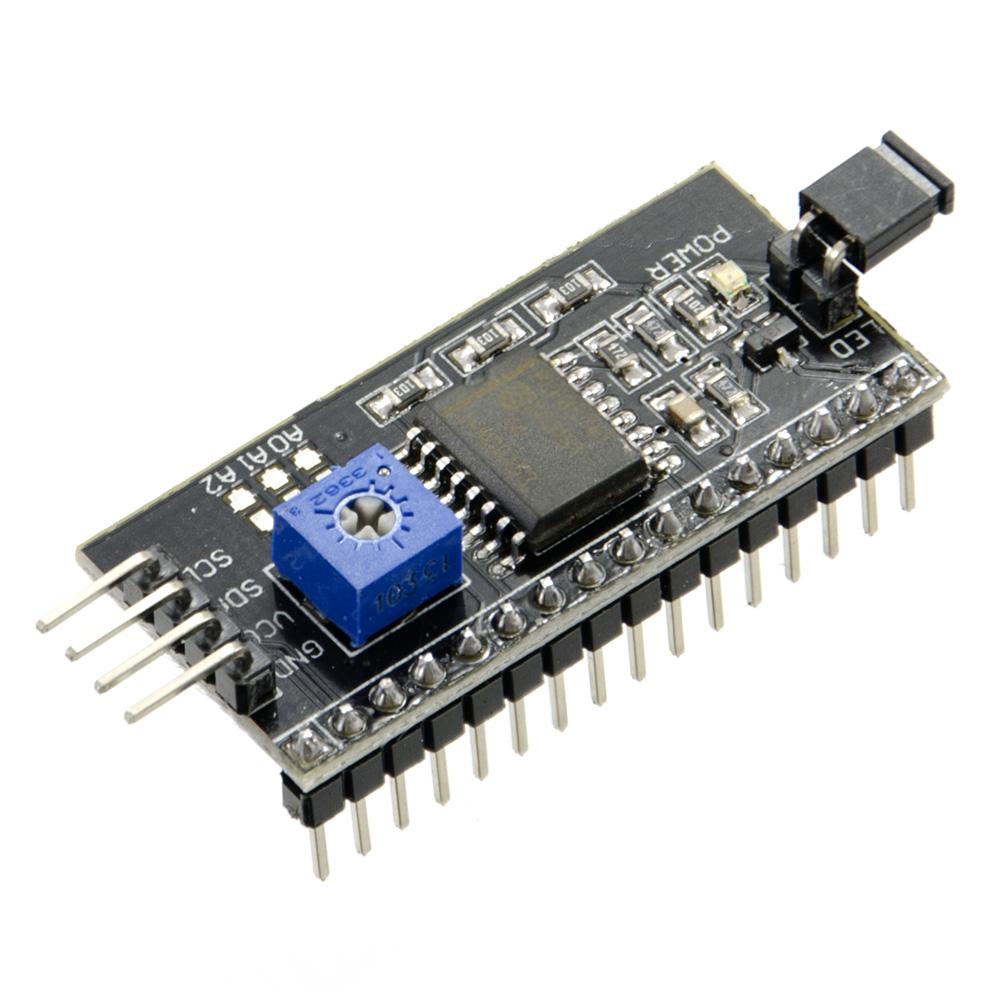
lcd display with i2c backpack
I2C backpack
Below is a mockup session.
Next todo:
Add more hardware (like buttons) to the RPI
Configure an Accesspoint on this Rpi for other devices to connect to
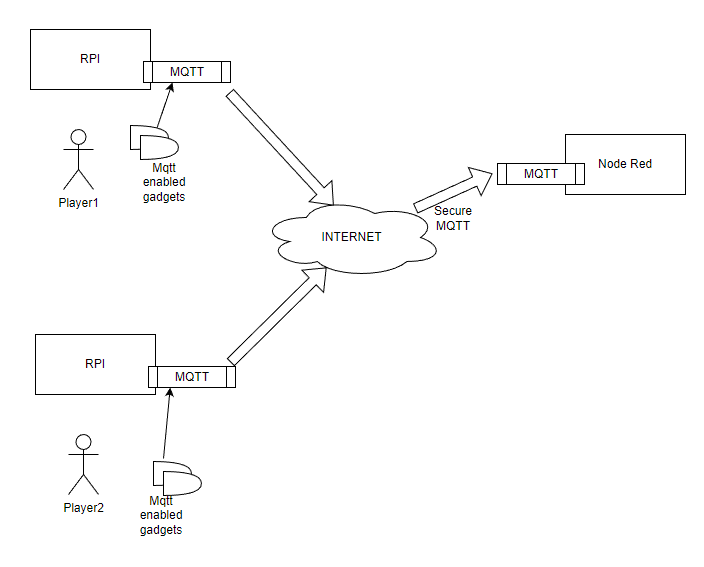
Install a local Mqtt broker, which connects secure to my internet facing broker
I’ve been working on some modular gadgets which can be combined to make a complete puzzle.
I like games like Keep-talking-and-nobody-dies. (Which is a computer game, but you have to play it with multiple persons and a physical “manual” Great fun!) https://keeptalkinggame.com/
And i like real escape rooms. There are some puzzle “rooms” you can buy in the game store, it is okay but many are for single use only.
I’ve been following some people on youtube, i saw some great ideas but not a remote over the internet using physical knobs and switches.
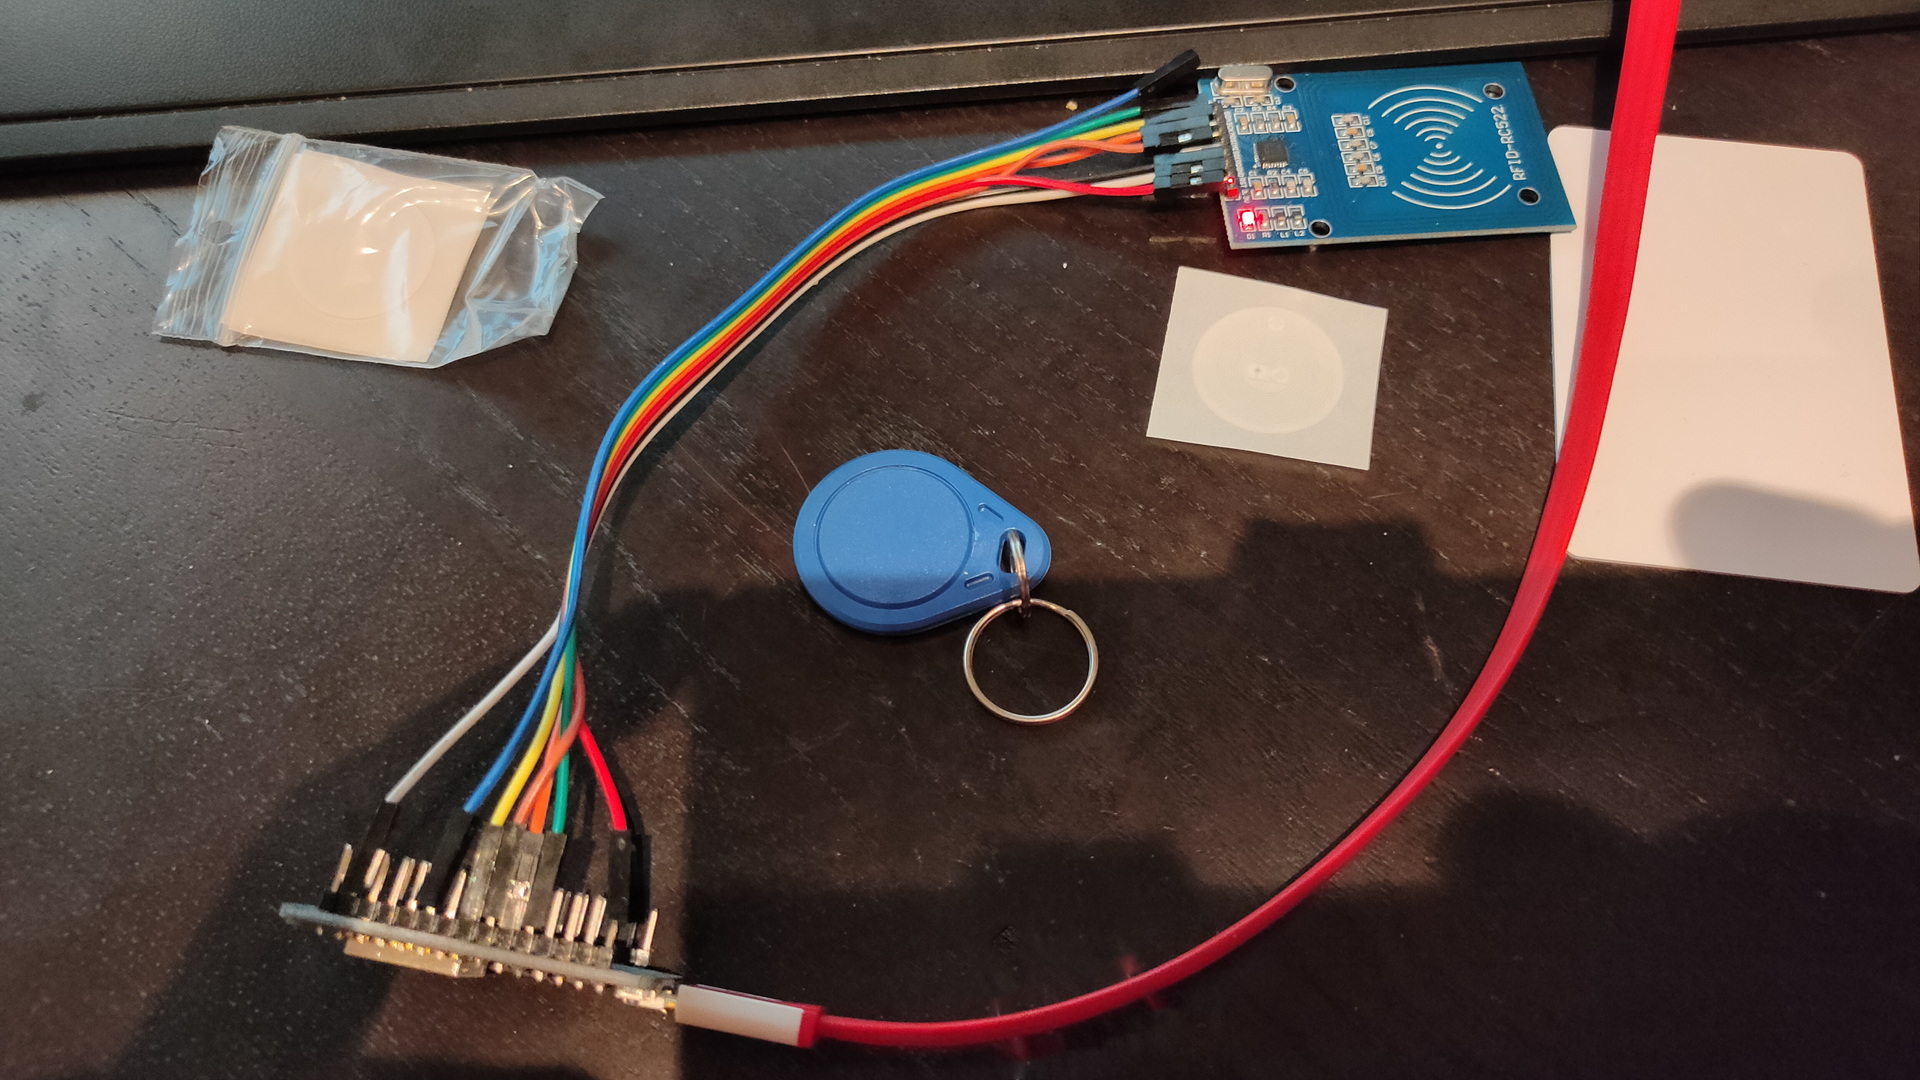
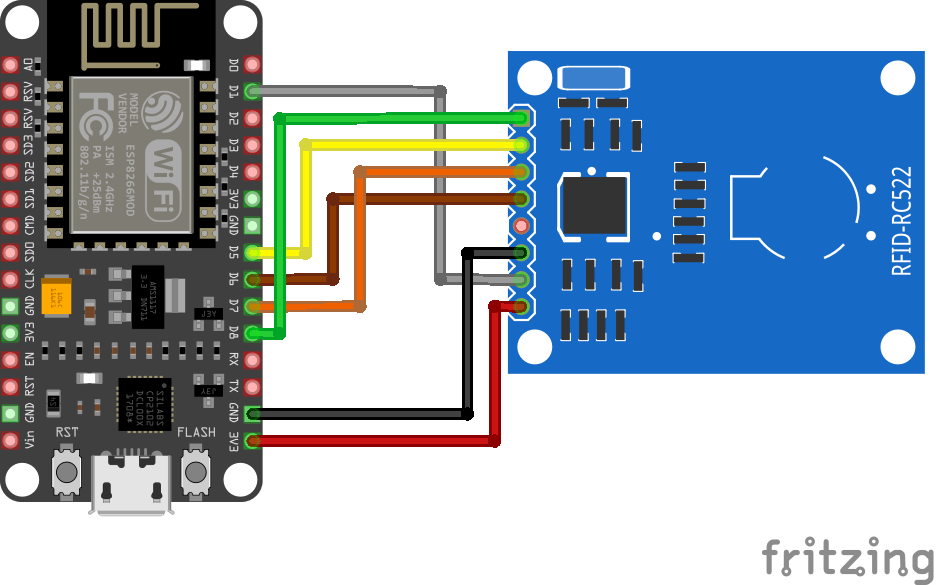
This is a RFID reader with an old Amico Esp8266 Arduino. It sends RFID information to the MQTT broker
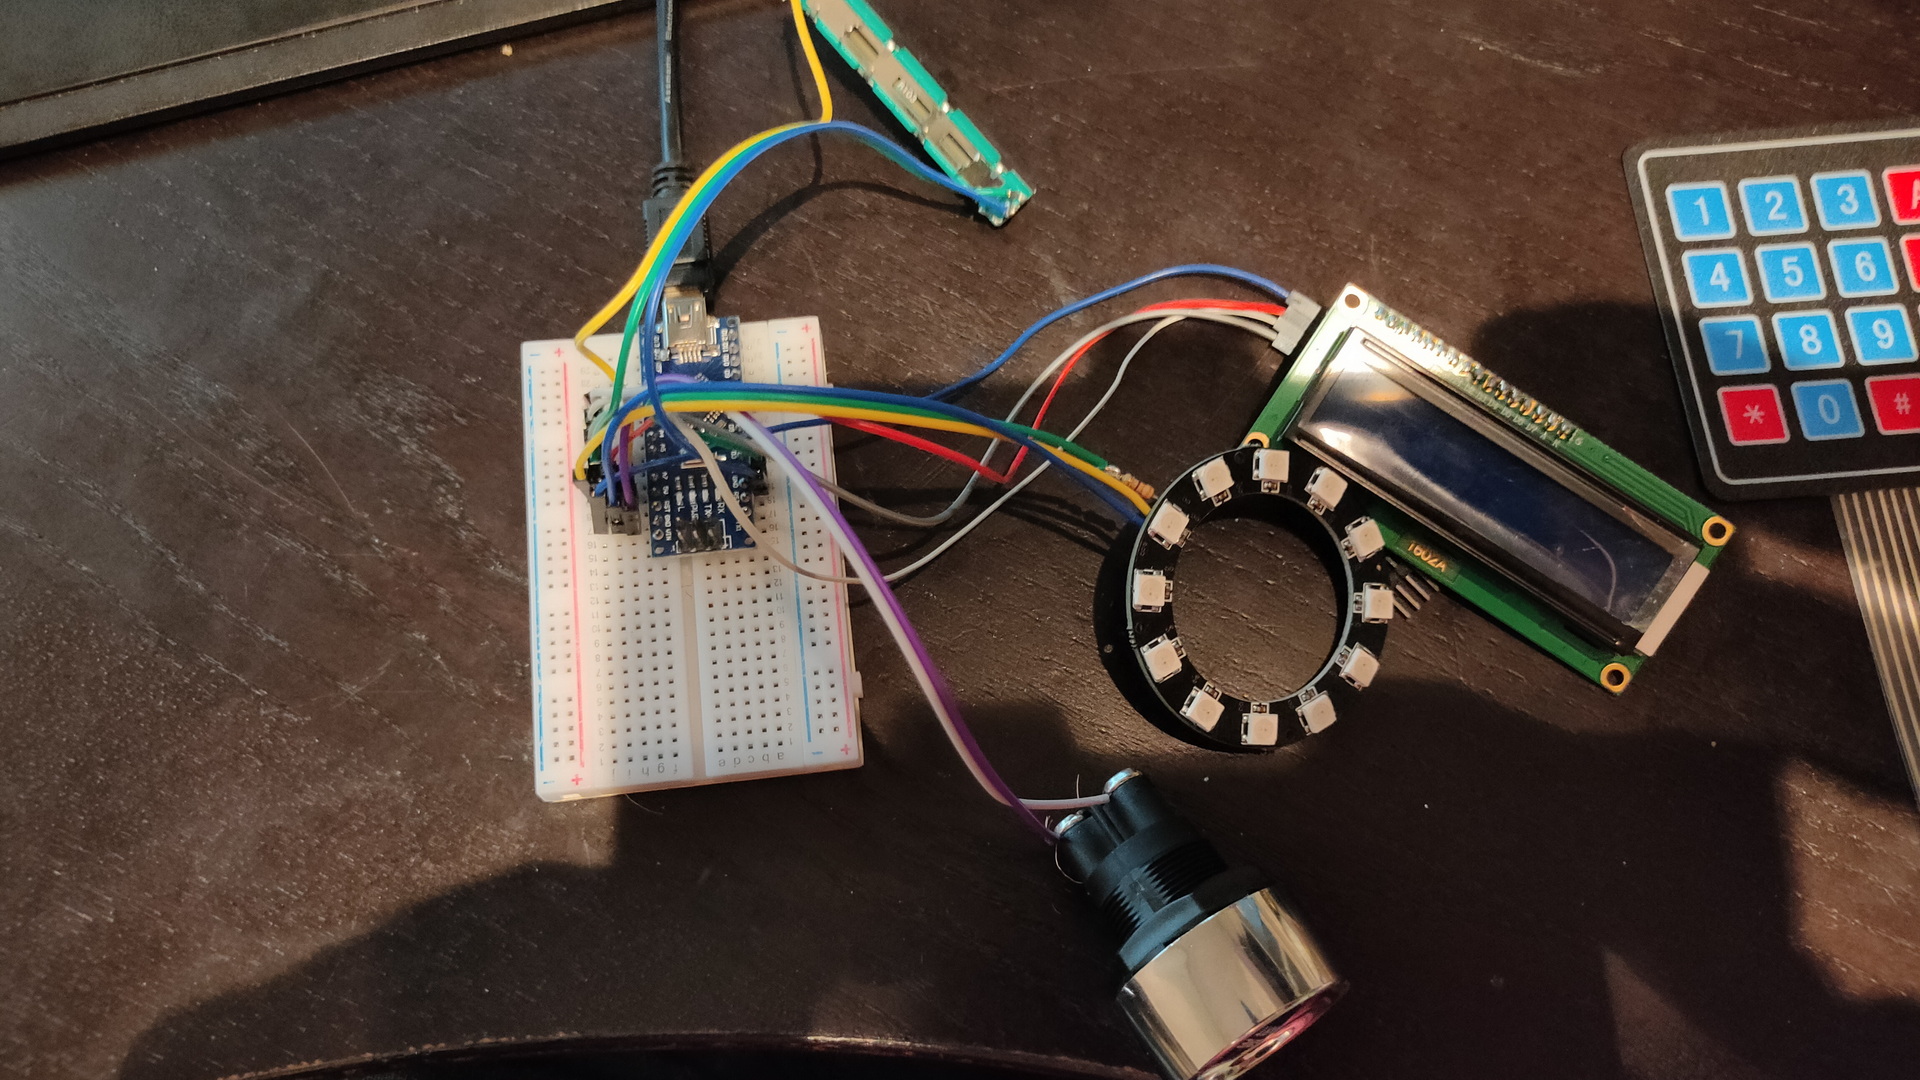
Some other tools ‘n knobs .. and stuff
I want to use Adhoc Wifi and a Mqtt/Nodered setup which uses a mqtt over the internet to get people (and their knobs) connected
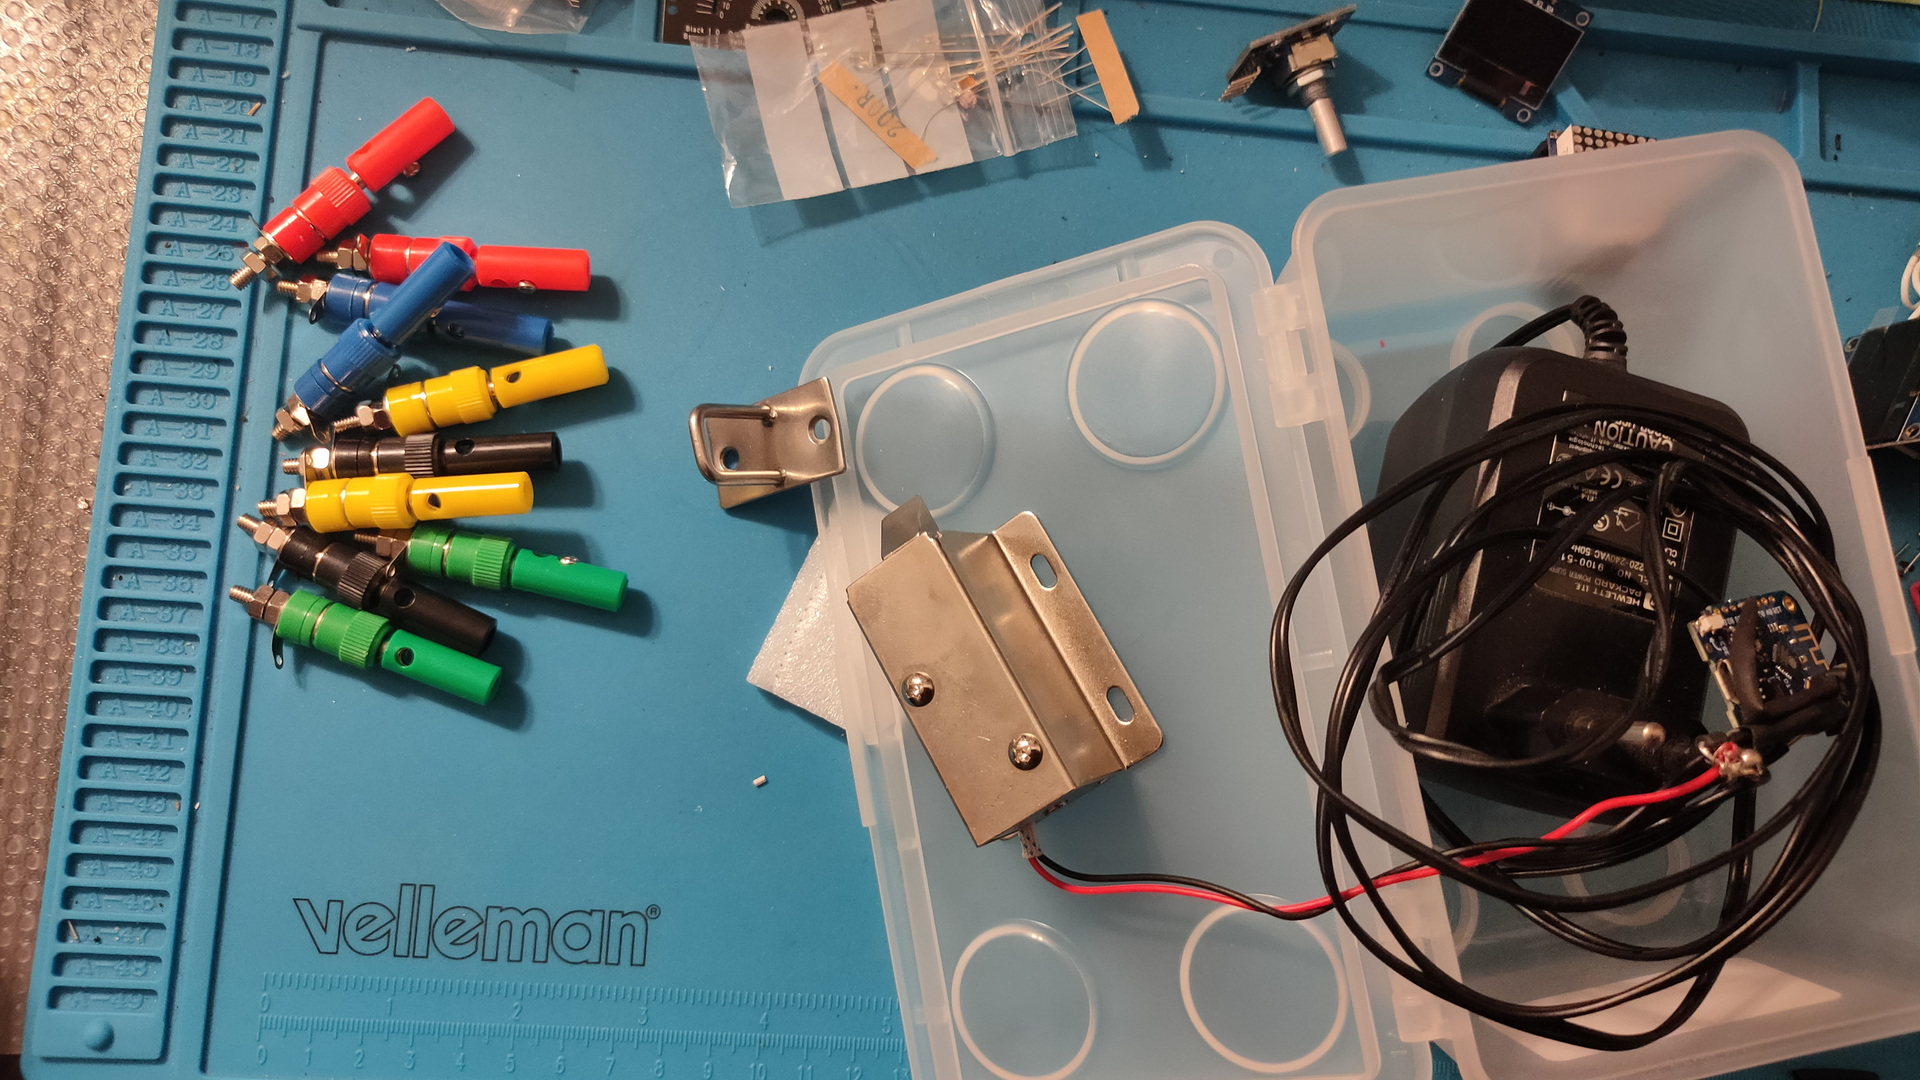
I already got a lot of test schematics
Left part of the “connect the wires puzzle” right a solenoid electrical lock)
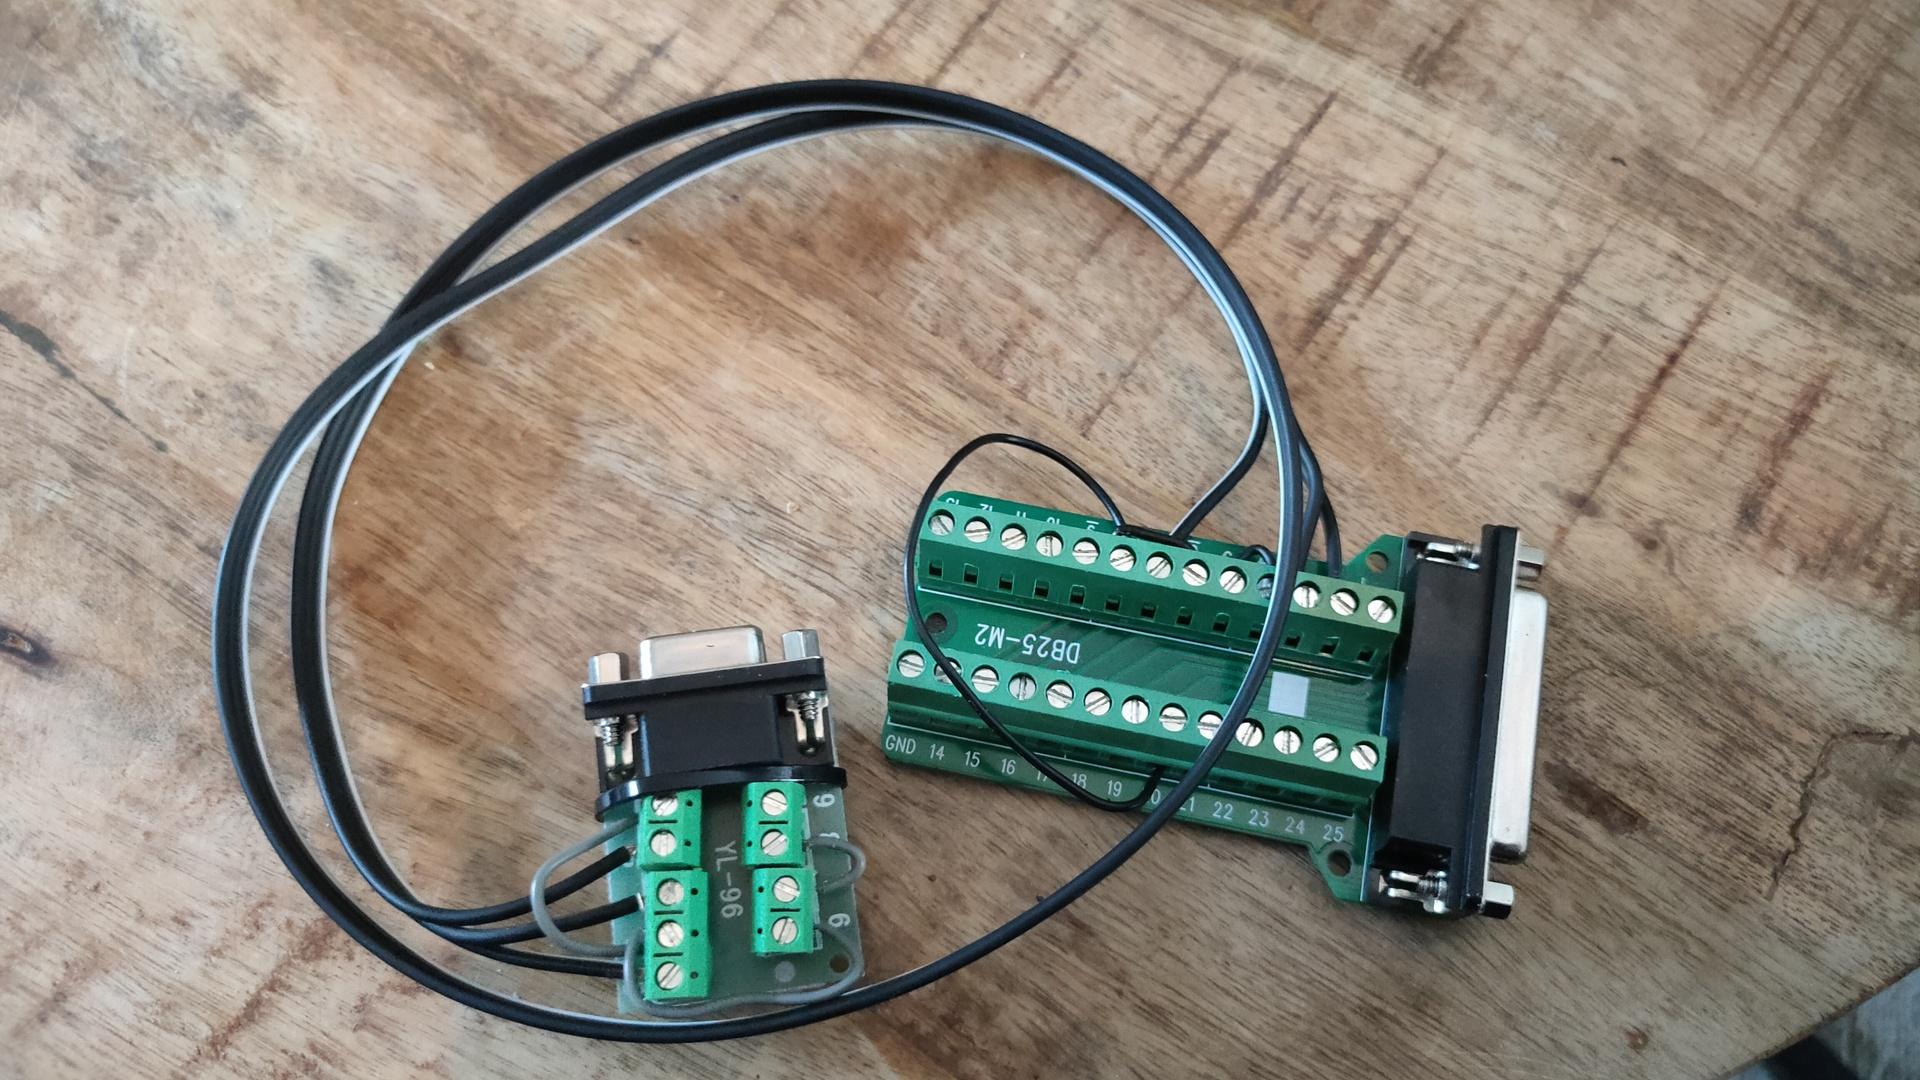
In post https://www.henriaanstoot.nl/2022/11/25/disk-troubles-or-missing-old-skool-hardware/ i mentioned the serial connectors i’ve bought to connect the Laser XT to my Workstation to transfer files.
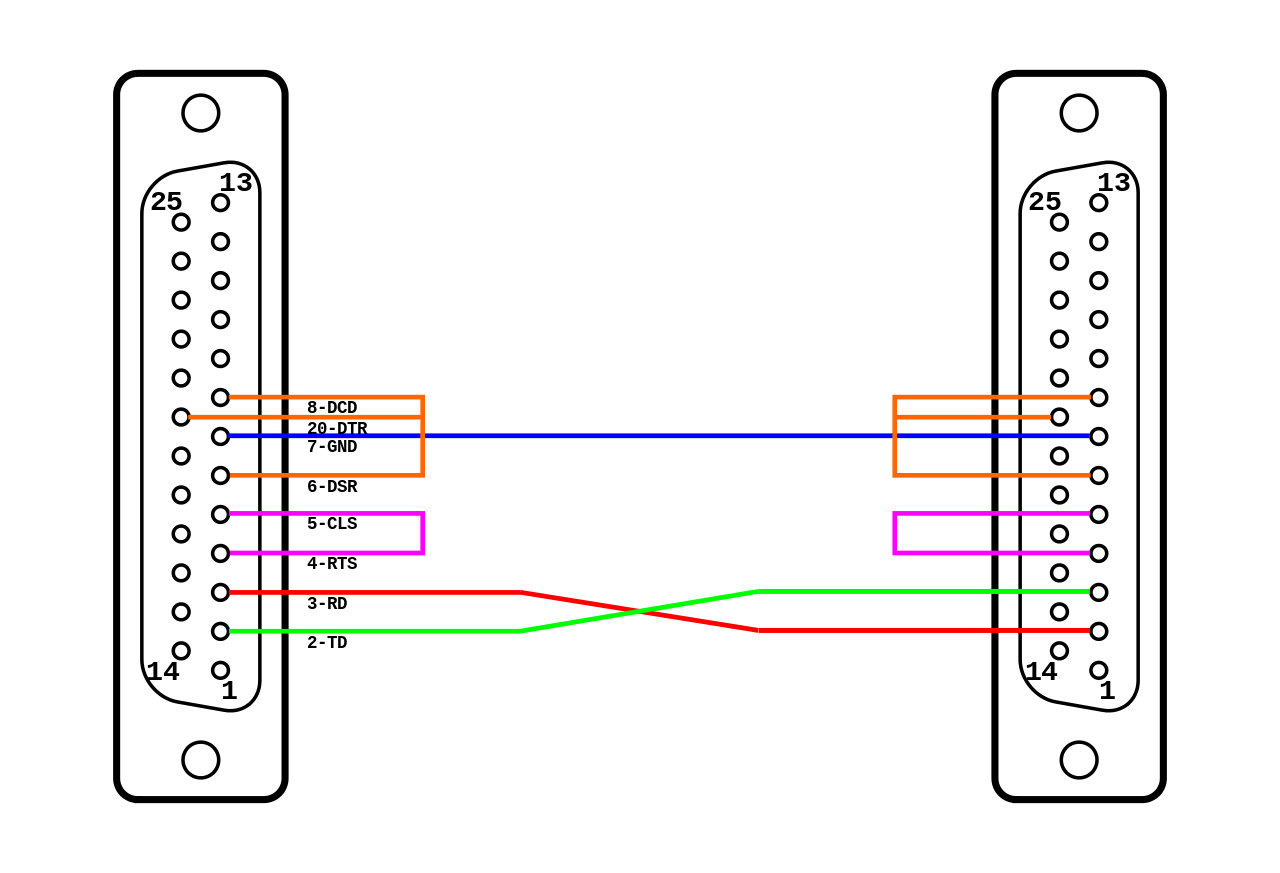
The null modem i’ve made is like mentioned on https://en.wikipedia.org/wiki/Null_modem
I’ve used the loopback handshaking using 3 wires. ( Only using a DB25 and a DB9 on the other end )
So i configured the Linux side as follows.
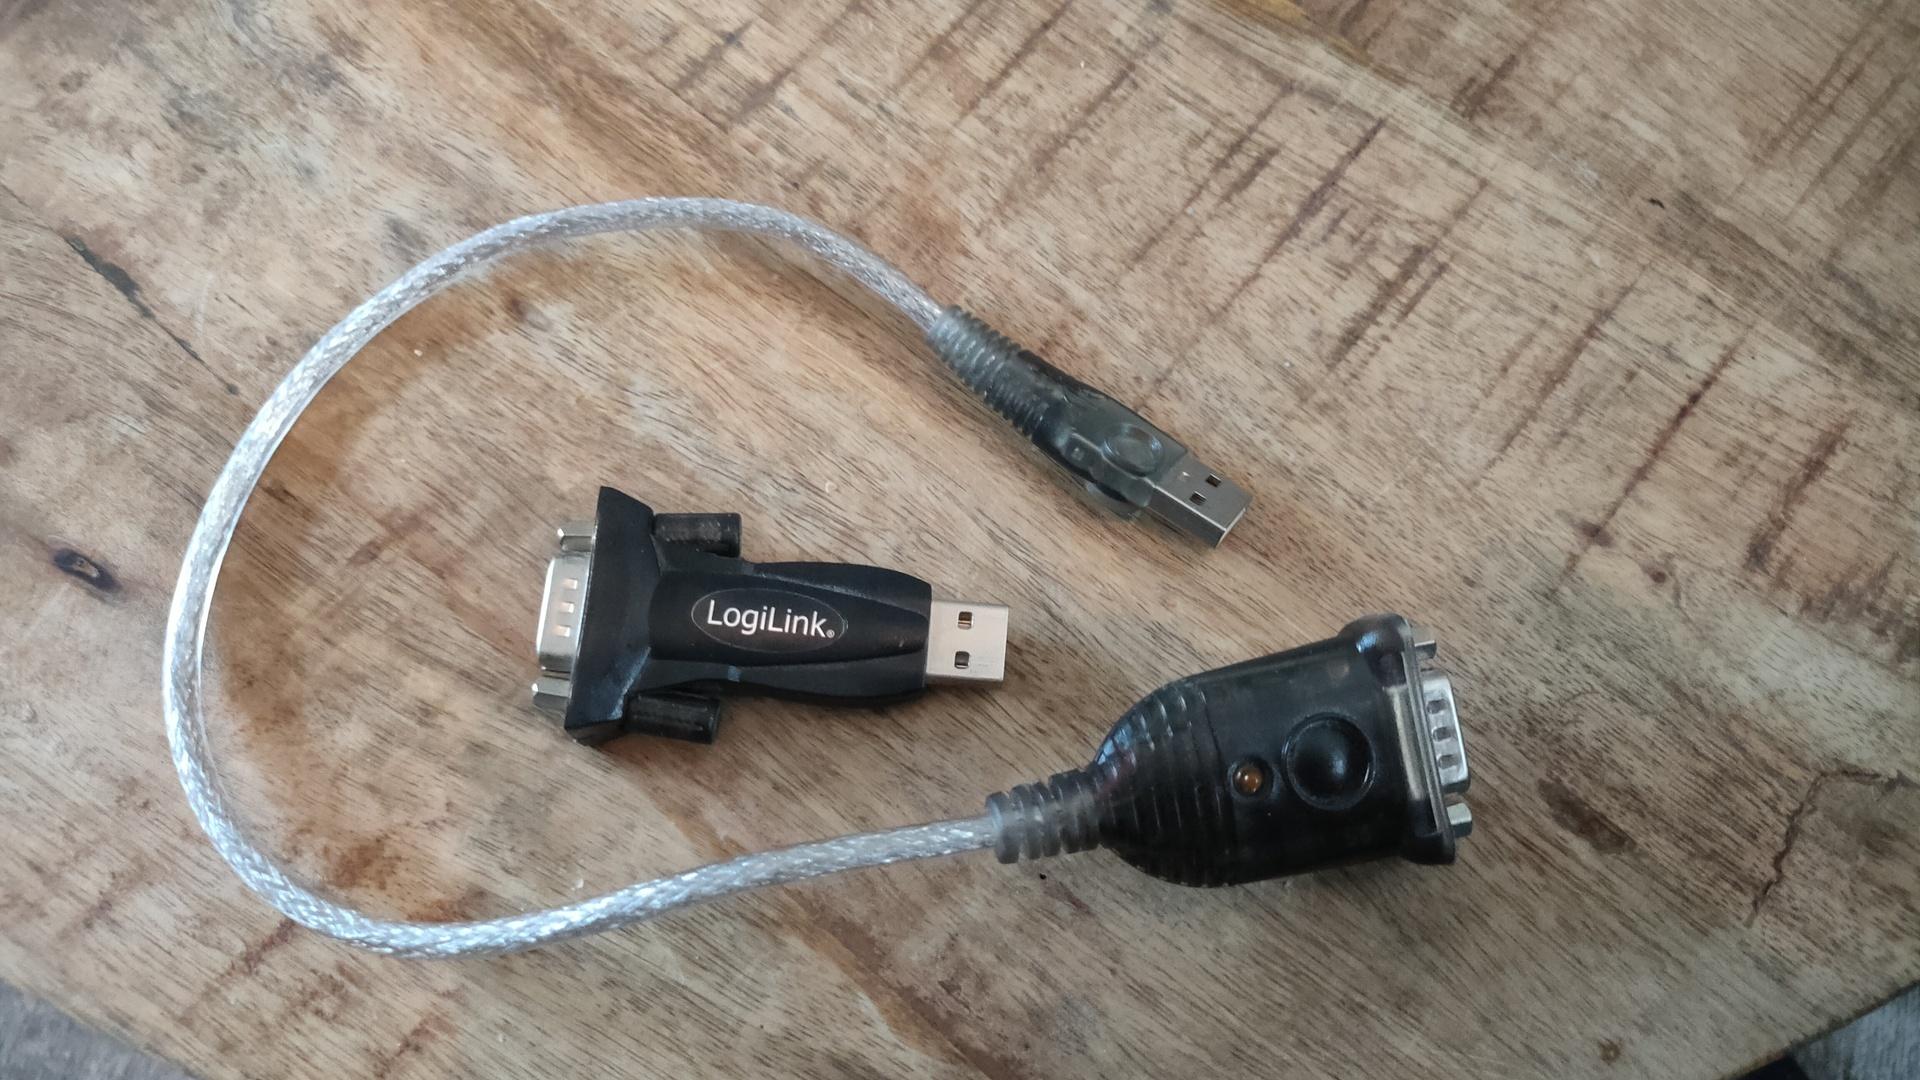
I’ve tried two usb to serial converters.
Both when trying on windows 10 are not supported any more
Dec 14 17:34:40 zspot kernel: [ 1082.299607] usb 1-4: pl2303 converter now attached to ttyUSB0
sudo stty -F /dev/ttyUSB0 9600
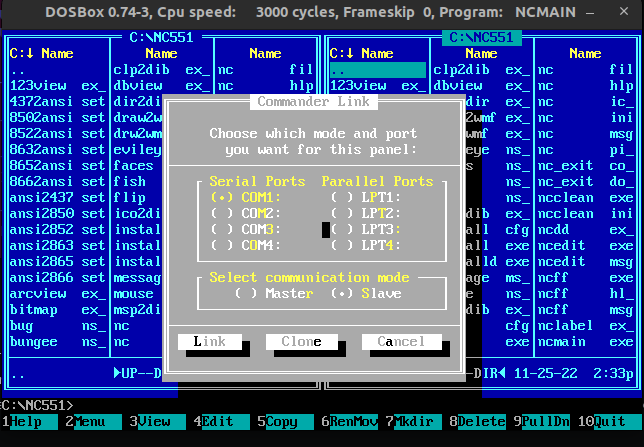
Then i start dosbox. To enable a com port i have to enter:
serial1=directserial realport:ttyUSB0
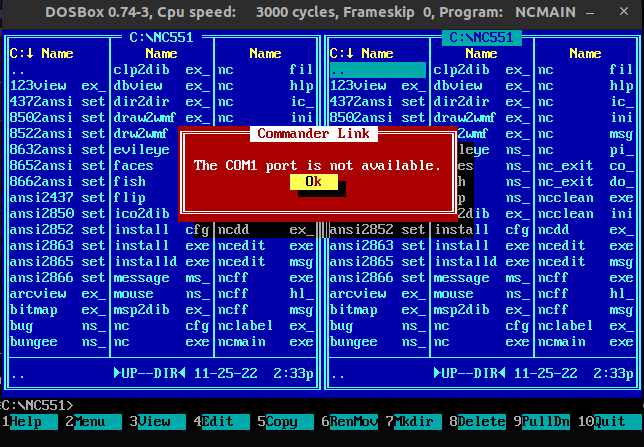
Starting Norton Commander and selecting COM1
After a few seconds i got this ..
What else is there to check? At least i’ve still got the Flux Engine!
I never look in the mirror, so why do i need one? The mirror foil was already ugly in the corners. There were bumps. Never finished a proper interface
This one was made using a touch screen, so there are always fingerprints you could see
I’m going to use the display for an in-house small Escape Room idea i have.
Only the time part still worked, but i could not find the right cables for the touch part. The buttons displayed are meaningless anyway 🙂 Just a mockup
Mirror part was done using a Safety/One way mirror foil. Cut a part as large as you screen, spray a little water and stick it on.
At some point i displayed Dashticz on there. Apparently i started playing with a magic mirror setup in 2015, according some timestamps of code on my fileserver.
I wanted to learn Bella Ciao on my Concertina. I find the sound of the Concerina fitting the tune. So i used vi and conversion tools to create a pdf for my concertina tunebook.
(While being popular nowadays because it was used in La Casa de Papel (Money Heist). It has a interesting history) https://en.wikipedia.org/wiki/Bella_ciao
X:
T: Bella Ciao
M: 4/4
L: 1/8
R: reel
K:C
Zz EAB | cA-A z  EAB | cA-A z  EAB | c2 BA c2 BA |
e2 e2 eede | ff-f2 z fed | | fe-e z edc | B2 e2 c2 B2 |
A4 z z de | ff-f2 z fed | fe-e2 z edc | B2 e2 c2 B2 |
w: "repeat\ from\ beginning"
A4 z EAB | cA-A z  EAB | cA-A z  EAB | c2 BA c2 BA |
e2 e2 e2 de | ff-f2 z fed | fe-e z edc | B2 e2 c2 B2 |
A4 z EAB | cA-A z  EAB | cA-A z  EAB | c2 BA c2 BA |
e2 e2 eede | ff-f2 z fed | fe-e2 z edc | B2 e2 c2 B2 |
A4 z ede | ff-f2 z fed | fe-e2 z edc | B2 e2 ^f2 ^g2 | a4 Zz |
I’ll probably automate this, for example include this in the tunebook generator. Something like : “If abc file in subdir create pdf to include”
# Reads every file in abcsources and writes filename.pdf in current directory
ls abcsources/*abc | while read abc ; do  abcm2ps -x -O - "$abc" | ps2pdf  -sPAPERSIZE=a4 - "$(echo  $abc | cut -f2 -d/ | sed 's/abc/pdf/g')" ;done
These are my lists, but i’m open for discussions/questions Work in progress
Actors
Tom Hanks
John Lithgow
Dennis Lee Hopper
Jack Nicholson
Clint Eastwood
Dustin Hoffman
Rutger Hauer (RIP) .. see “De kijk van Koolhoven” why
Art
H.R. Giger
M.C. Escher
César Manrique
Comics ( Details from André Franquin, Dark Humor Koen Hottentot, Don Lawrence, Don Martin ) to name a few, they are spot on
One of my comic collections – Don Martin
Classical Music
Paganini
Ludovico Einaudi
Composers
Ennio Morricone
Hans Zimmer
John Williams ( with a remark ) Some of the Starwars Suite was taken from already existing music ( See https://www.youtube.com/watch?v=DN3vl-JnUF8 ! ) Gustav Holst – The Planets Suite – Mars part for example
Folk/pipers (composers)
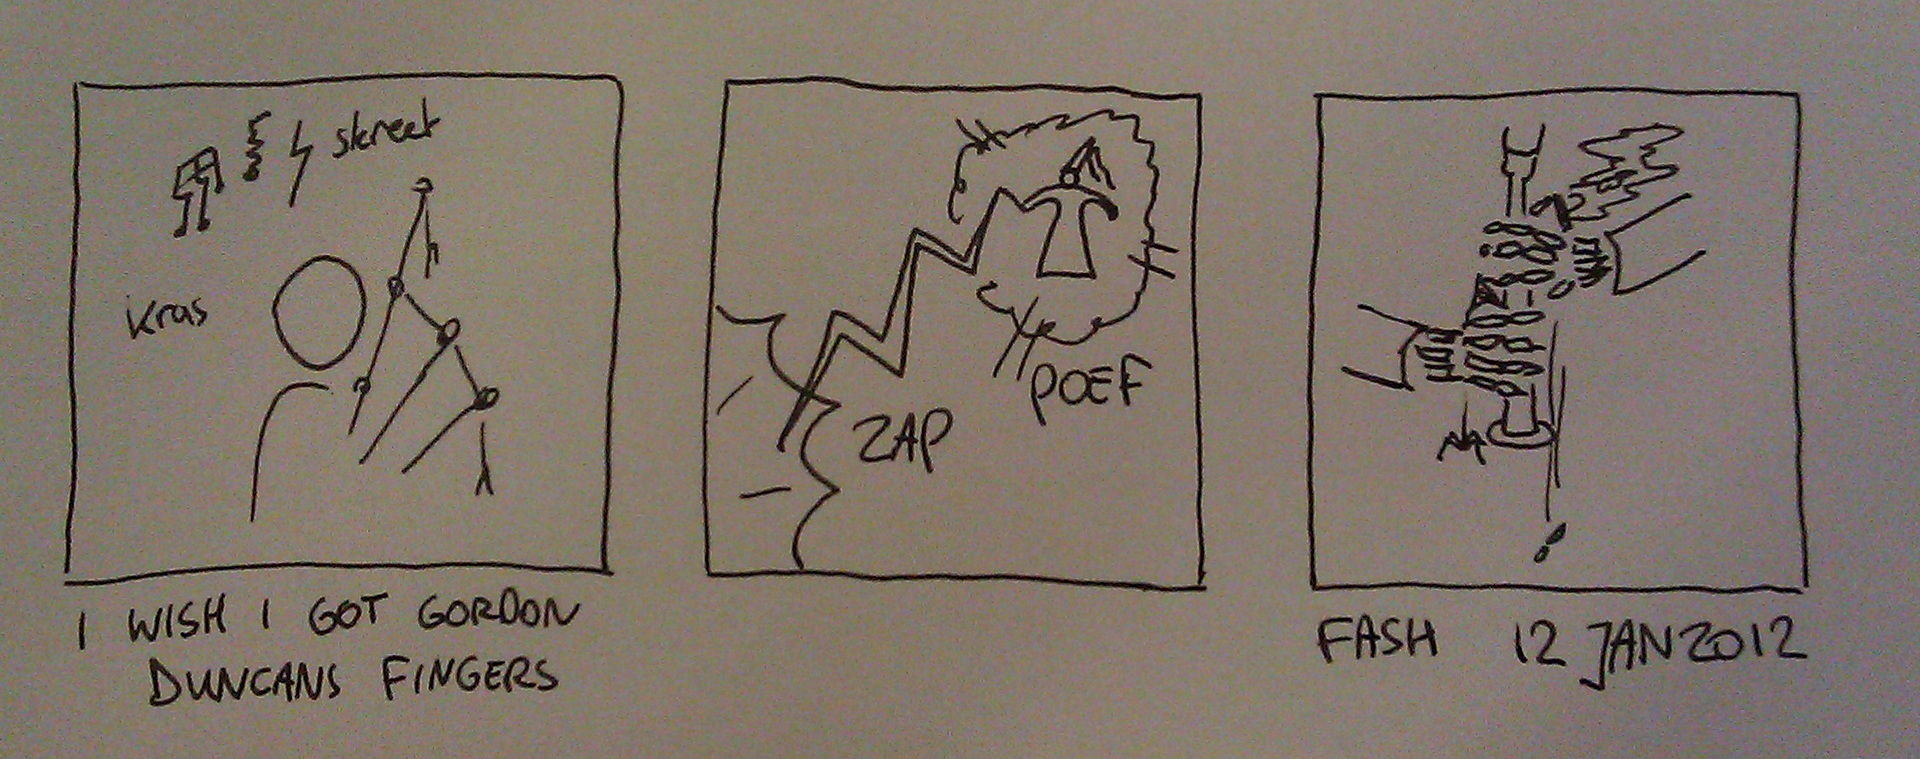
Gordon Duncan (RIP)
Fred Morrison
RS MacDonald
Paddy Keenan
A (bad) comic i drew about Gordon Duncan in 2012
Opera
Bands (non folk)
Rammstein – I know, seems like a obvious populair choice. But hear me out.
I like classical till metal. But it has to be musically interesting.
Most (non-german) people don’t listen to the lyrics, i did not either. I found the music okay. Then i started to listen to the lyrics.
The lyrics are surprisingly deep. Layers in the text, word jokes like: Du… (you) Du hast… (you have, but sounds like hasst .. You hate) Du hast mich… ( You have me, or sounds like you hate me) Du hast mich… Du hast mich gefragt… (You have asked me)
Although people think they are fascists or far-right. Coming from the punk scene, they are kind of the opposite.
Everything they do has a meaning, but sometimes you can “paste” different stories about the song.
Listen to Ohne Dich, and then see the Music Video.
Have a good listen to Germany, and Man gegen man. There are others better in explaining .. see:
And a AI generated Music Video .. perfectly matching the Lyrics
Bonus: Check out this YT channel, all kinds of musicians .. transcripted (is this a word?) by this dude.
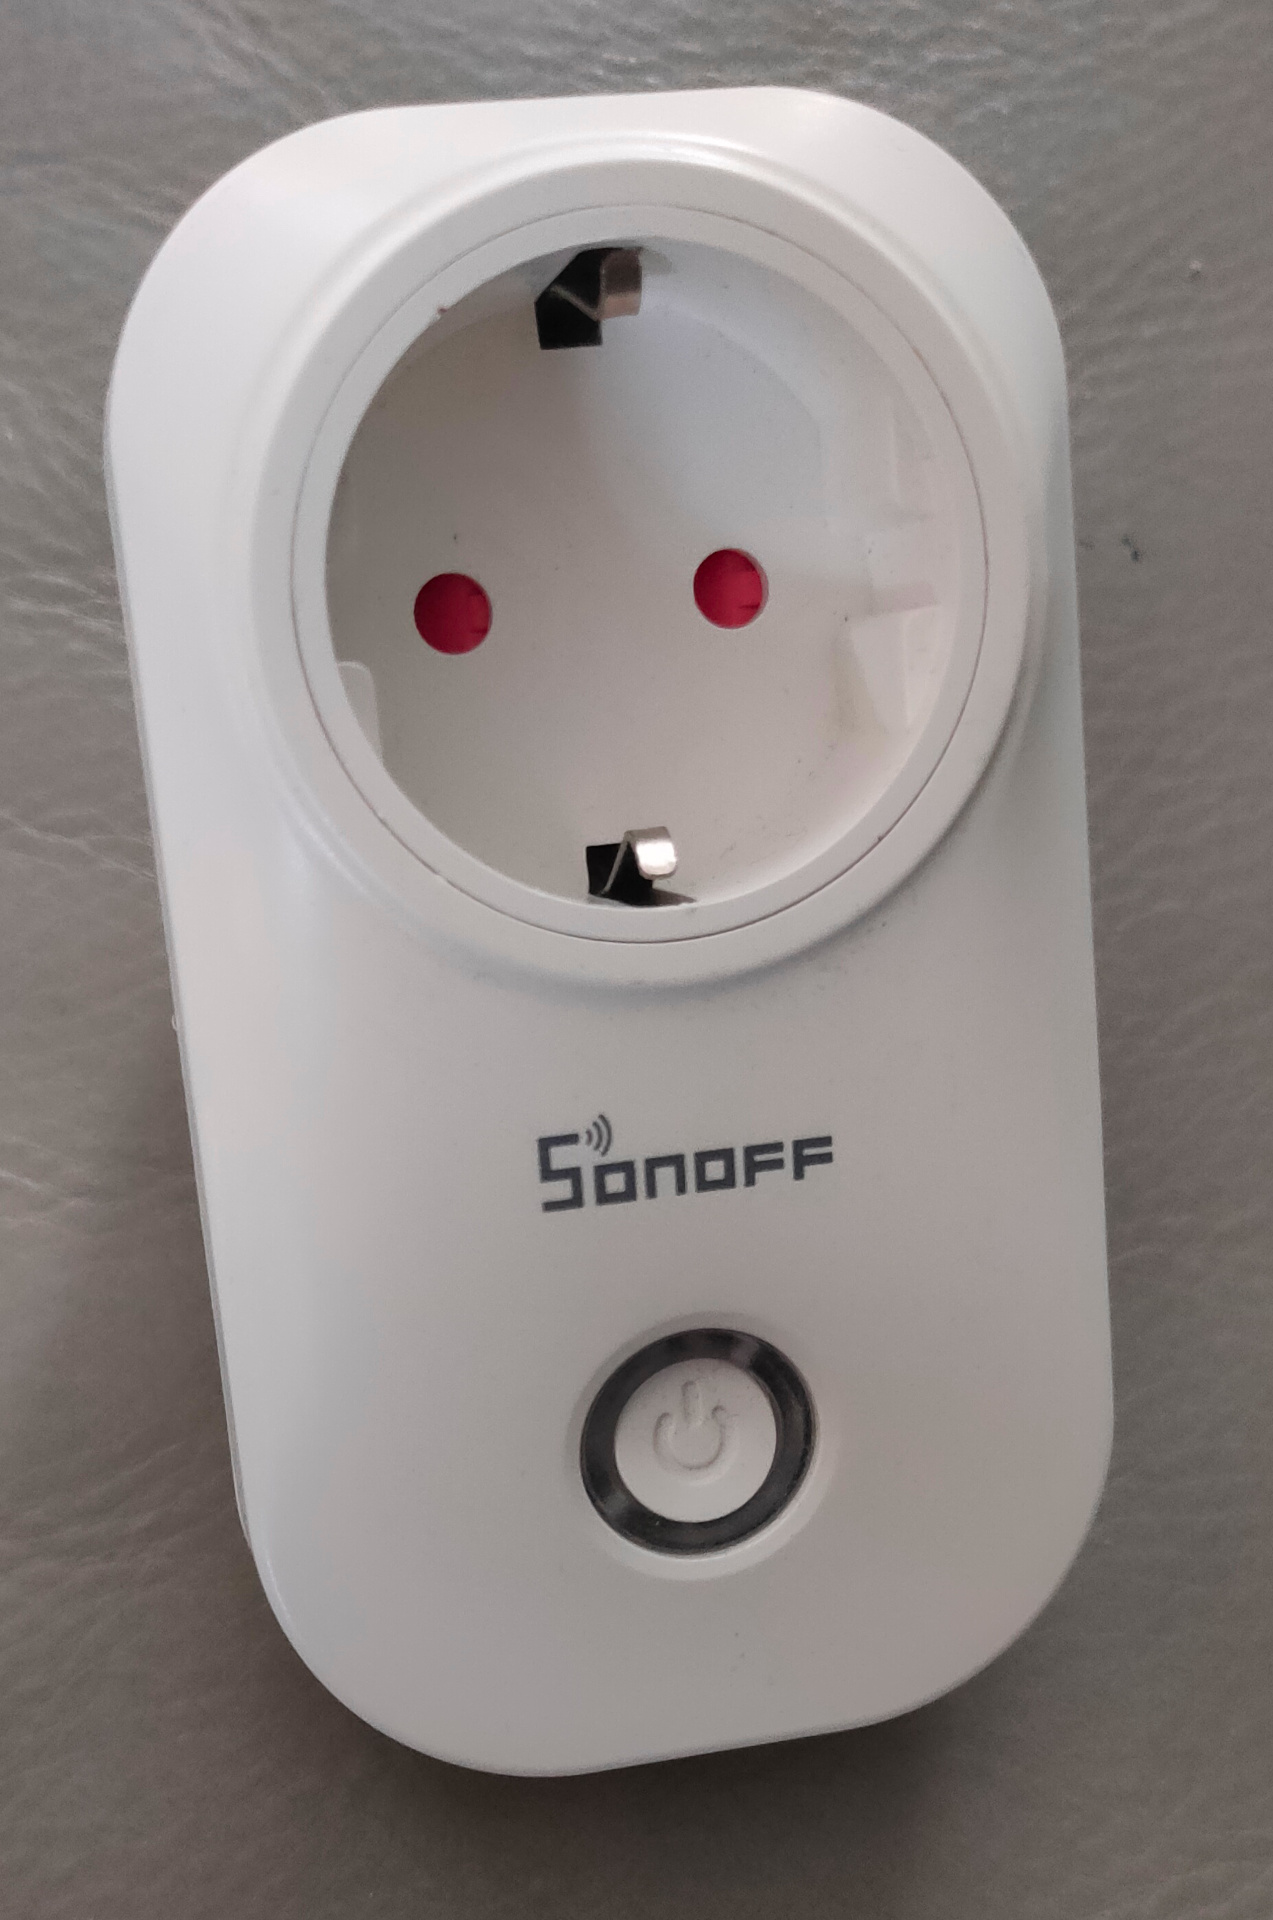
I previously had these smartplugs flashed with EspEasy (I hate cloud enabled devices) I will post something about flashing these and others. Maybe … because you can find a lot of information on the internet. But i’ve used several tools, and made tools for this process. ( Raspberry Zero mobile tool and 3D printed PCB holder for example)
Well ..
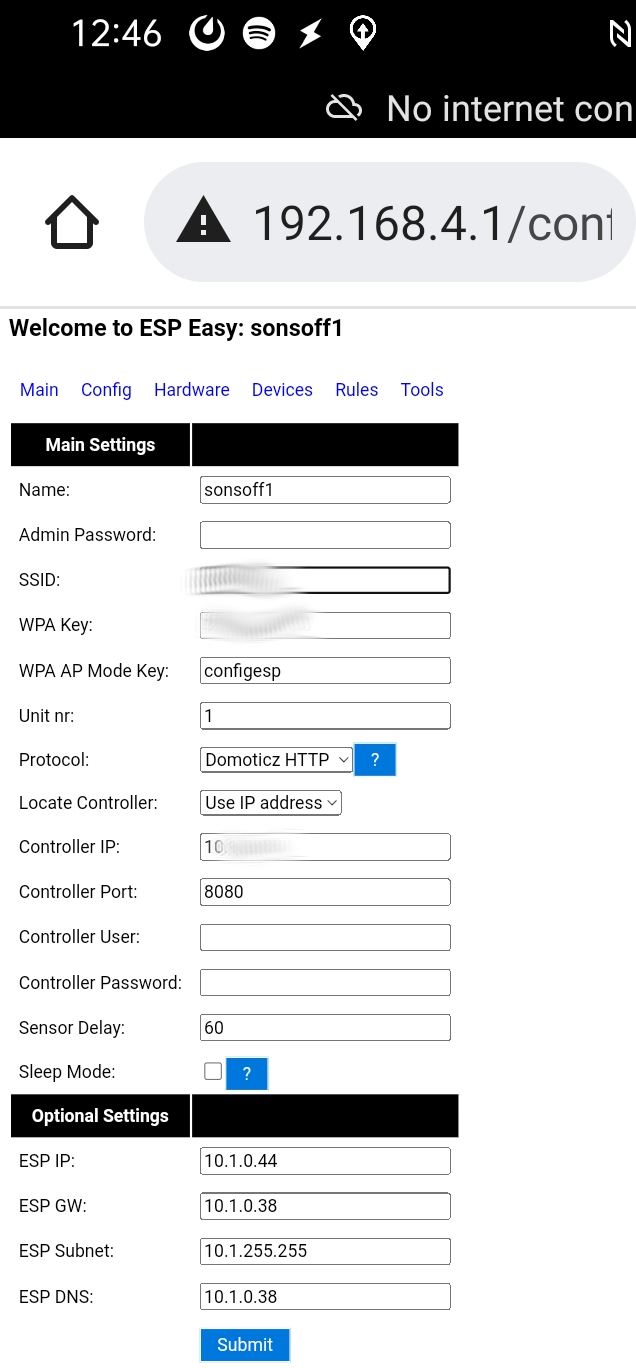
I was using these devices in our previous home using curl commands and on a main wifi network. So i have to change the SSID and migrate from Espeasy to ESPhome so i can use these devices with Home Assistant.
Step 1 : Start in Access Point mode and migrate to my current Wifi Iot network.
Using my phone i made the necessary changes.
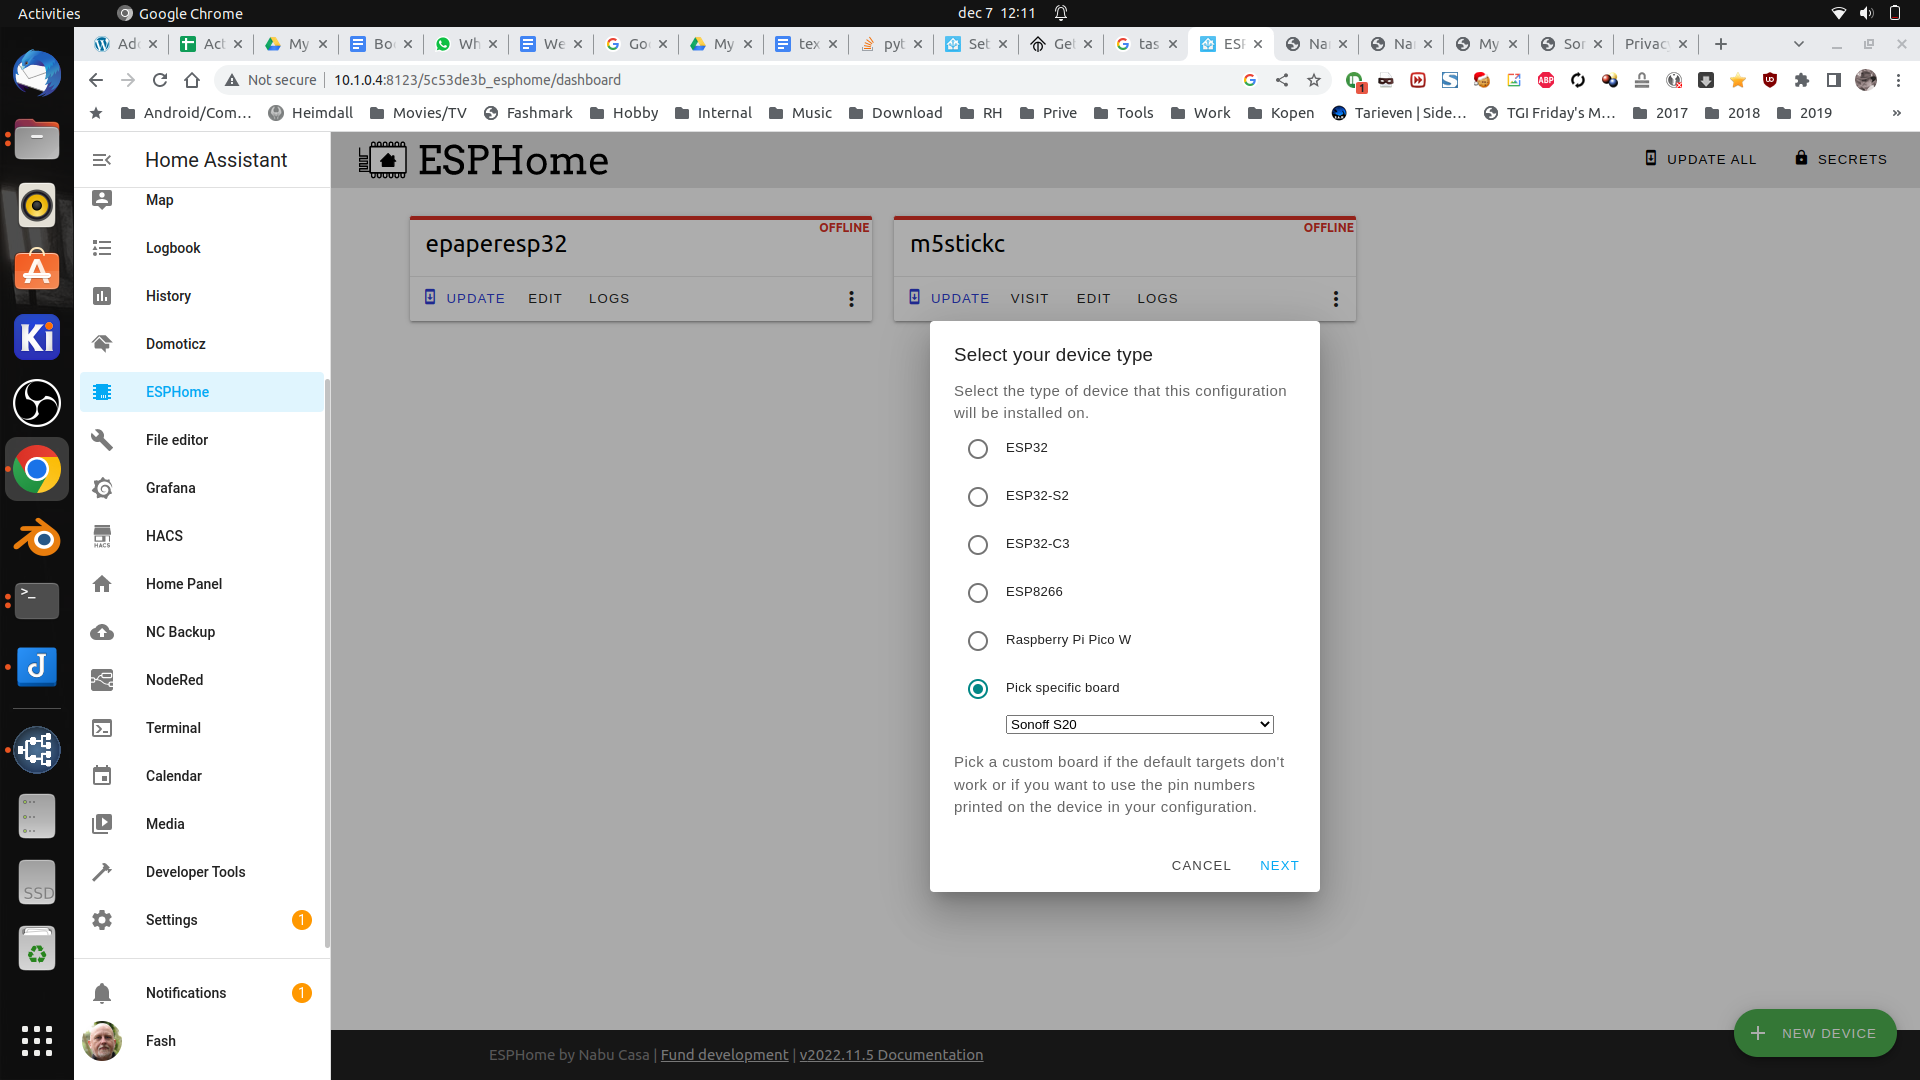
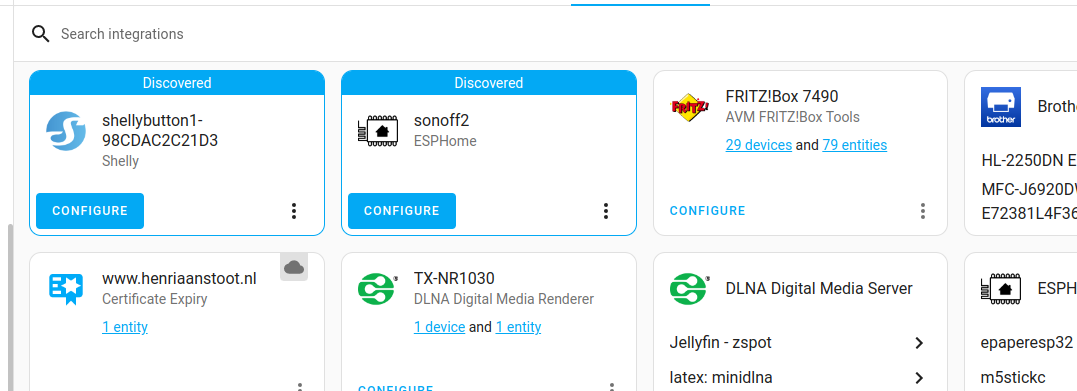
Goto HomeAssistant and ESPhome (you need to install this first via HACS) Press the green + Add device and give it a name
Next select the device type (Sonoff S20 in this case)
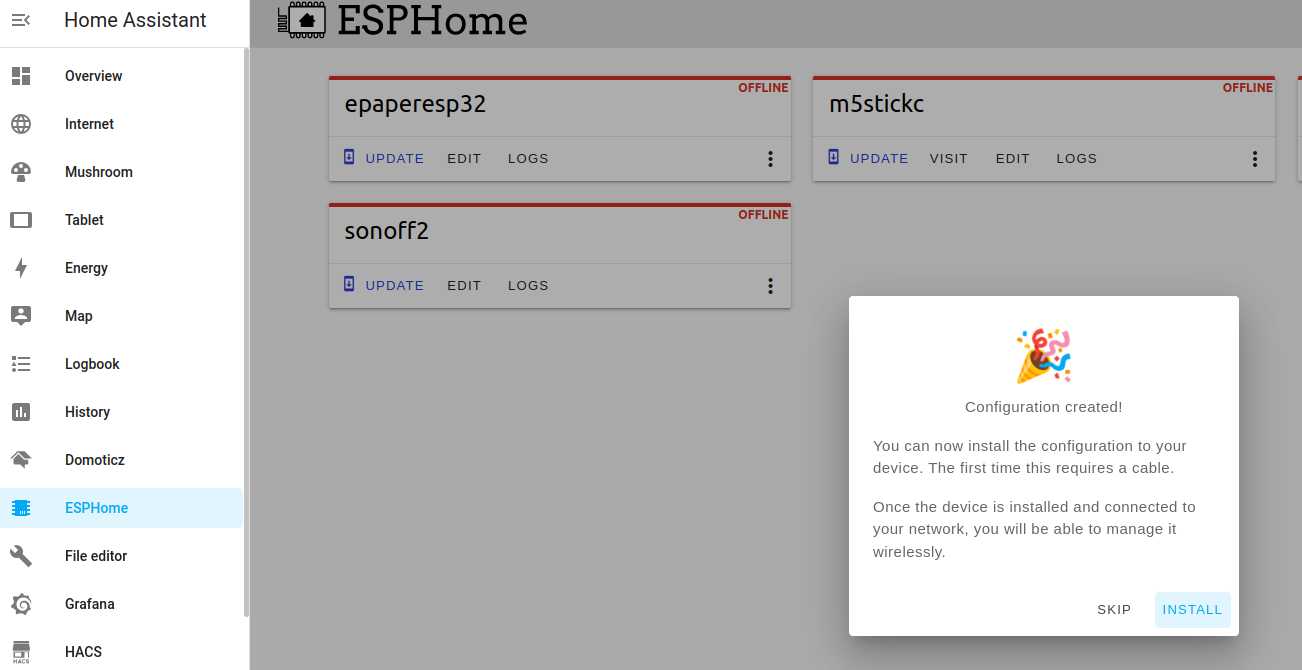
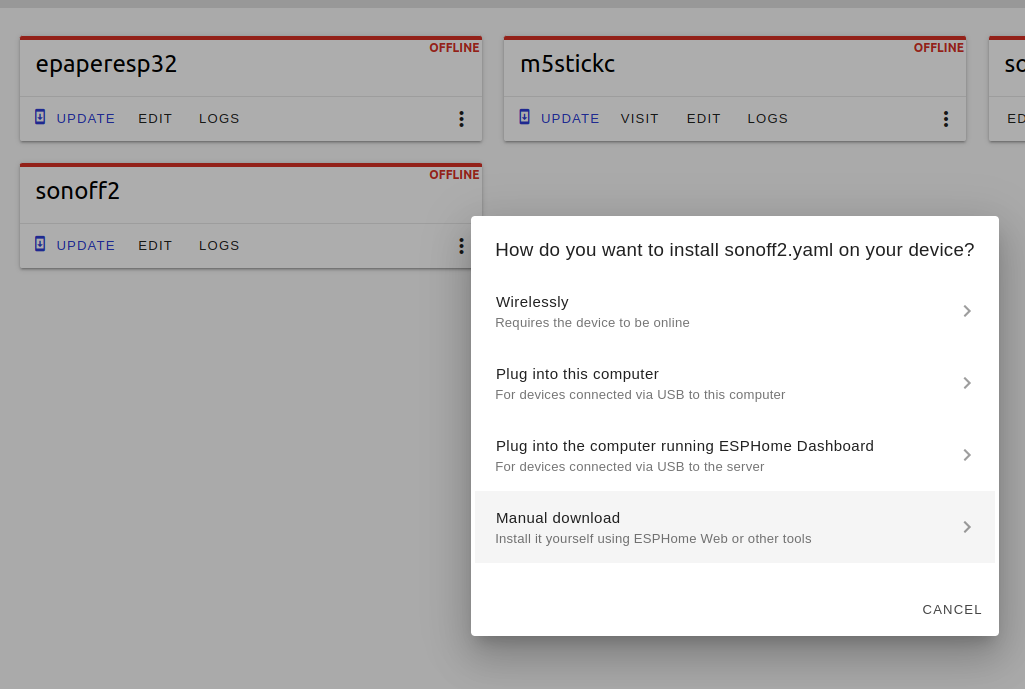
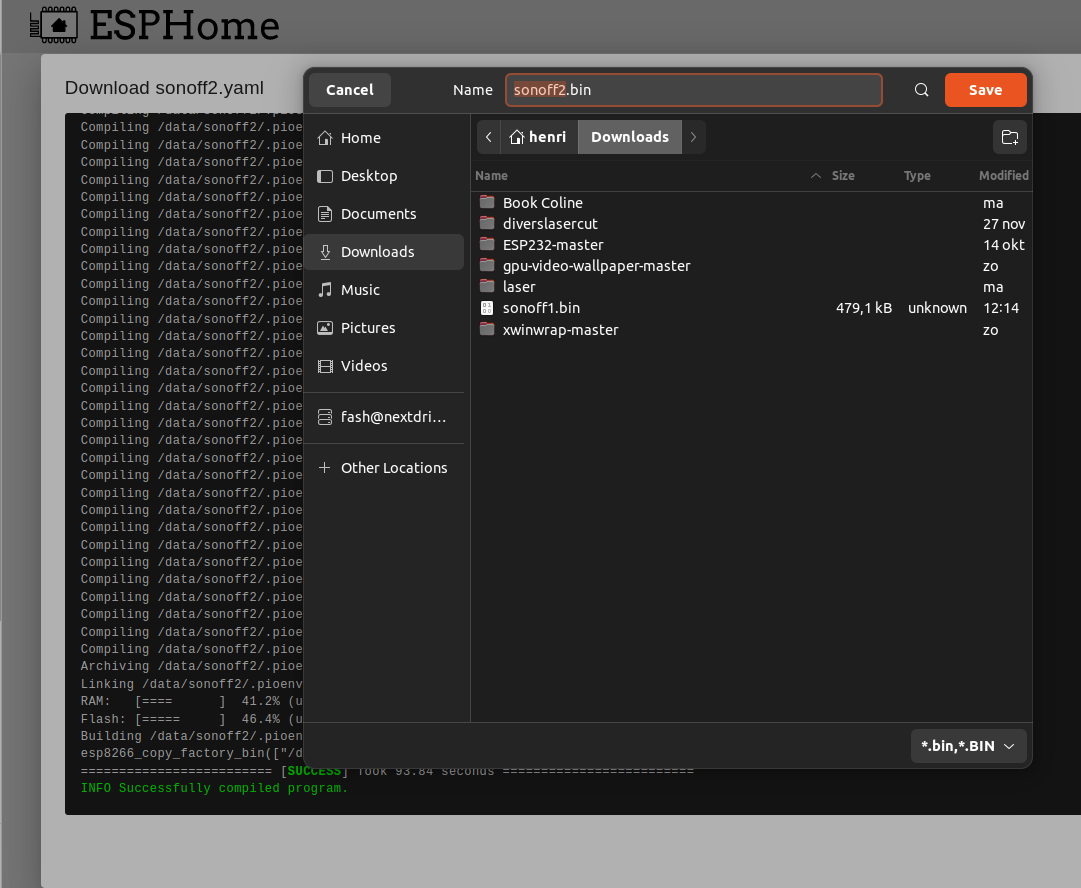
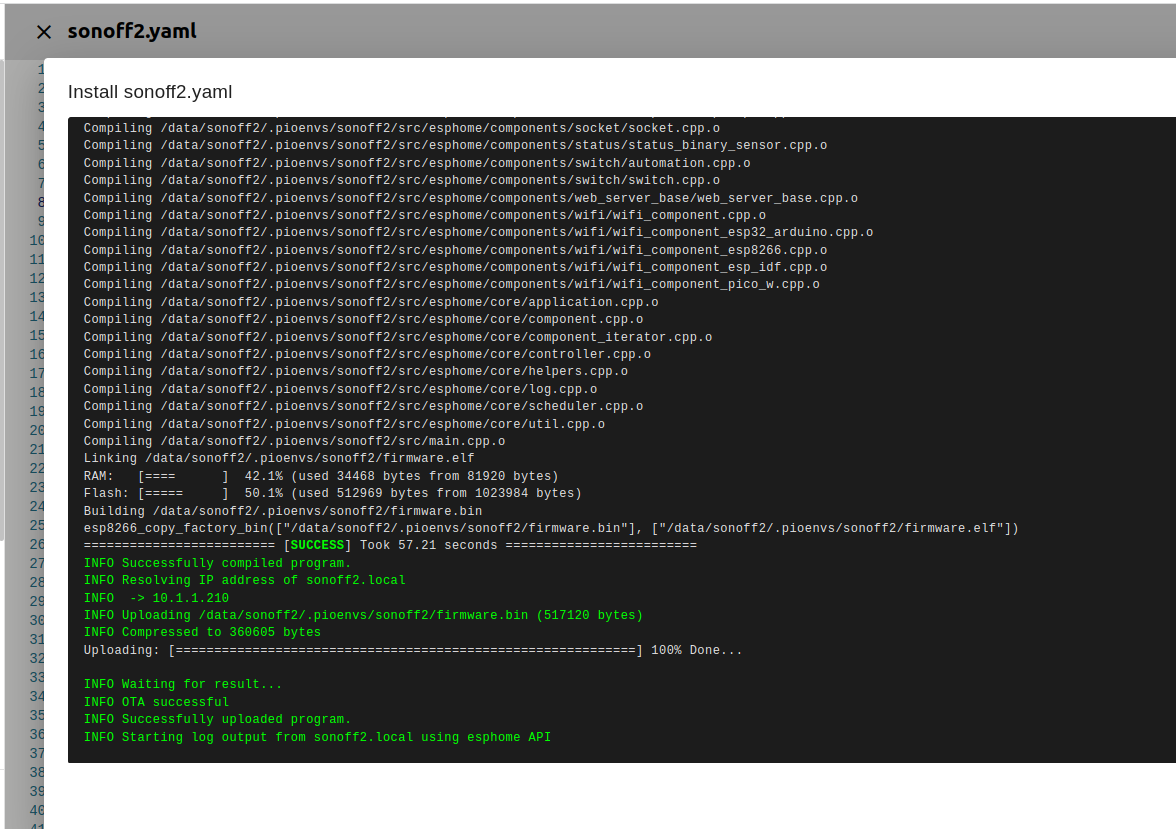
Press install and select manual download
Above will compile a binary for the Sonoff device.
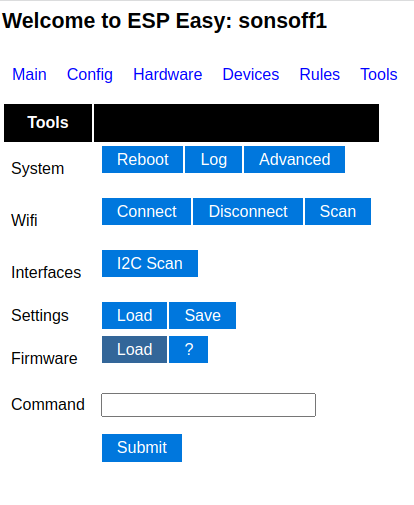
Go back to your Sonoff interface and go to the tools tab. We can reflash the device without connecting this with wires to our computer.
Press Firmware load and select your downloaded binary
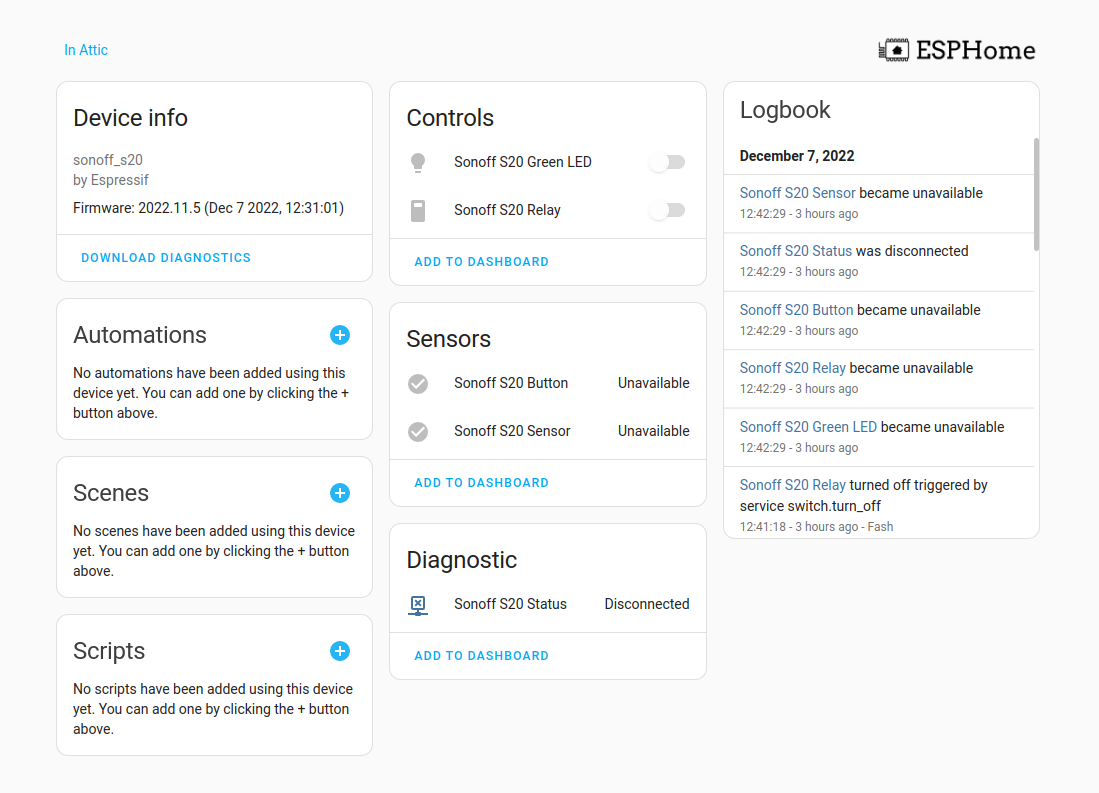
Back in HA it should say “online”
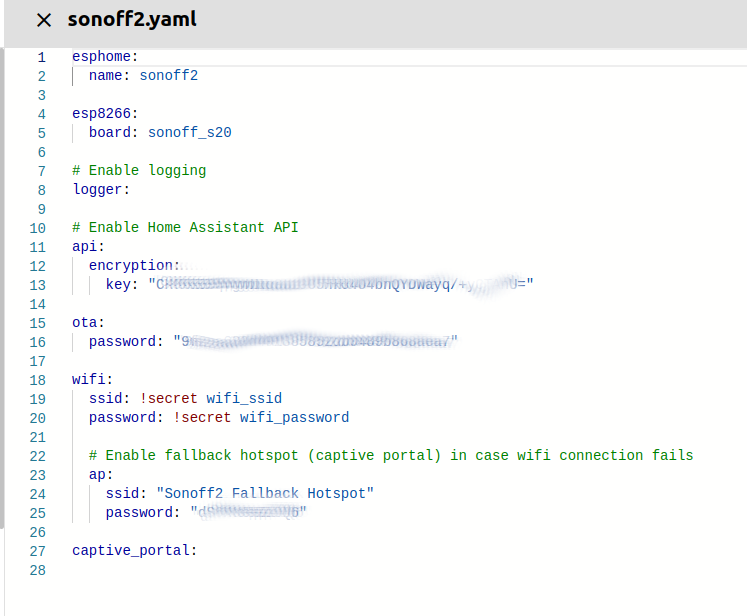
Pressing edit gives us a config page. Nothing works .. yet We need to add some yaml entries. ( use https://esphome.io/devices/sonoff_s20.html )
binary_sensor:
  - platform: gpio
    pin:
      number: GPIO0
      mode:
        input: true
        pullup: true
      inverted: true
    name: "Sonoff S20 Button"
  - platform: status
    name: "Sonoff S20 Status"
  - platform: gpio
    pin: GPIO2
    name: "Sonoff S20 Sensor"


switch:
  - platform: gpio
    name: "Sonoff S20 Relay"
    pin: GPIO12

output:
  # Register the green LED as a dimmable output ....
  - platform: esp8266_pwm
    id: s20_green_led
    pin:
      number: GPIO13
      inverted: true

light:
  # ... and then make a light out of it.
  - platform: monochromatic
    name: "Sonoff S20 Green LED"
    output: s20_green_led
BeforeAfter
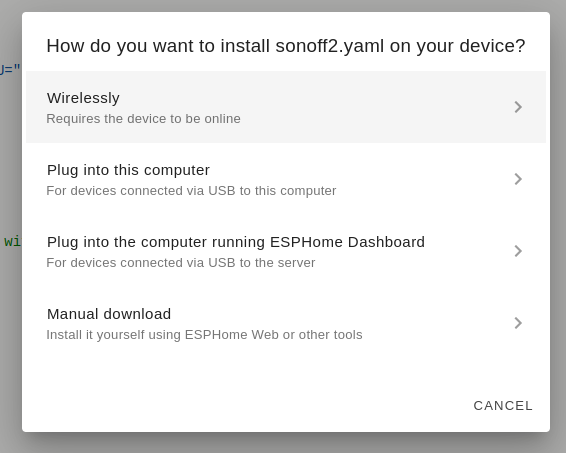
Now press install
Now we can use wirelessly to upload the config
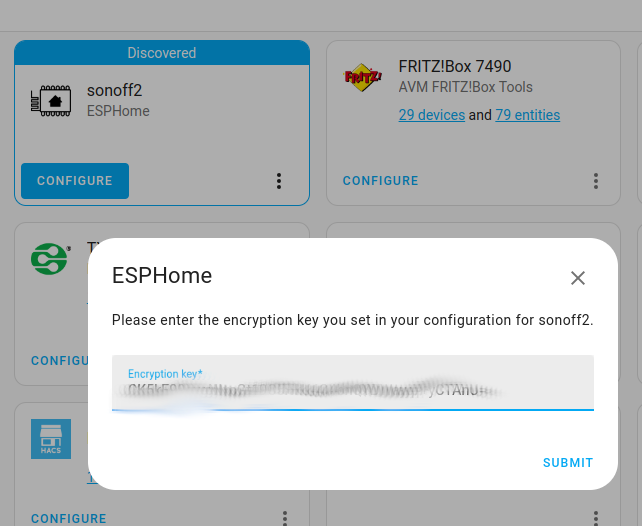
After this the device can be discovered by HA
Click add, and use the encryption key found in the yaml config to add