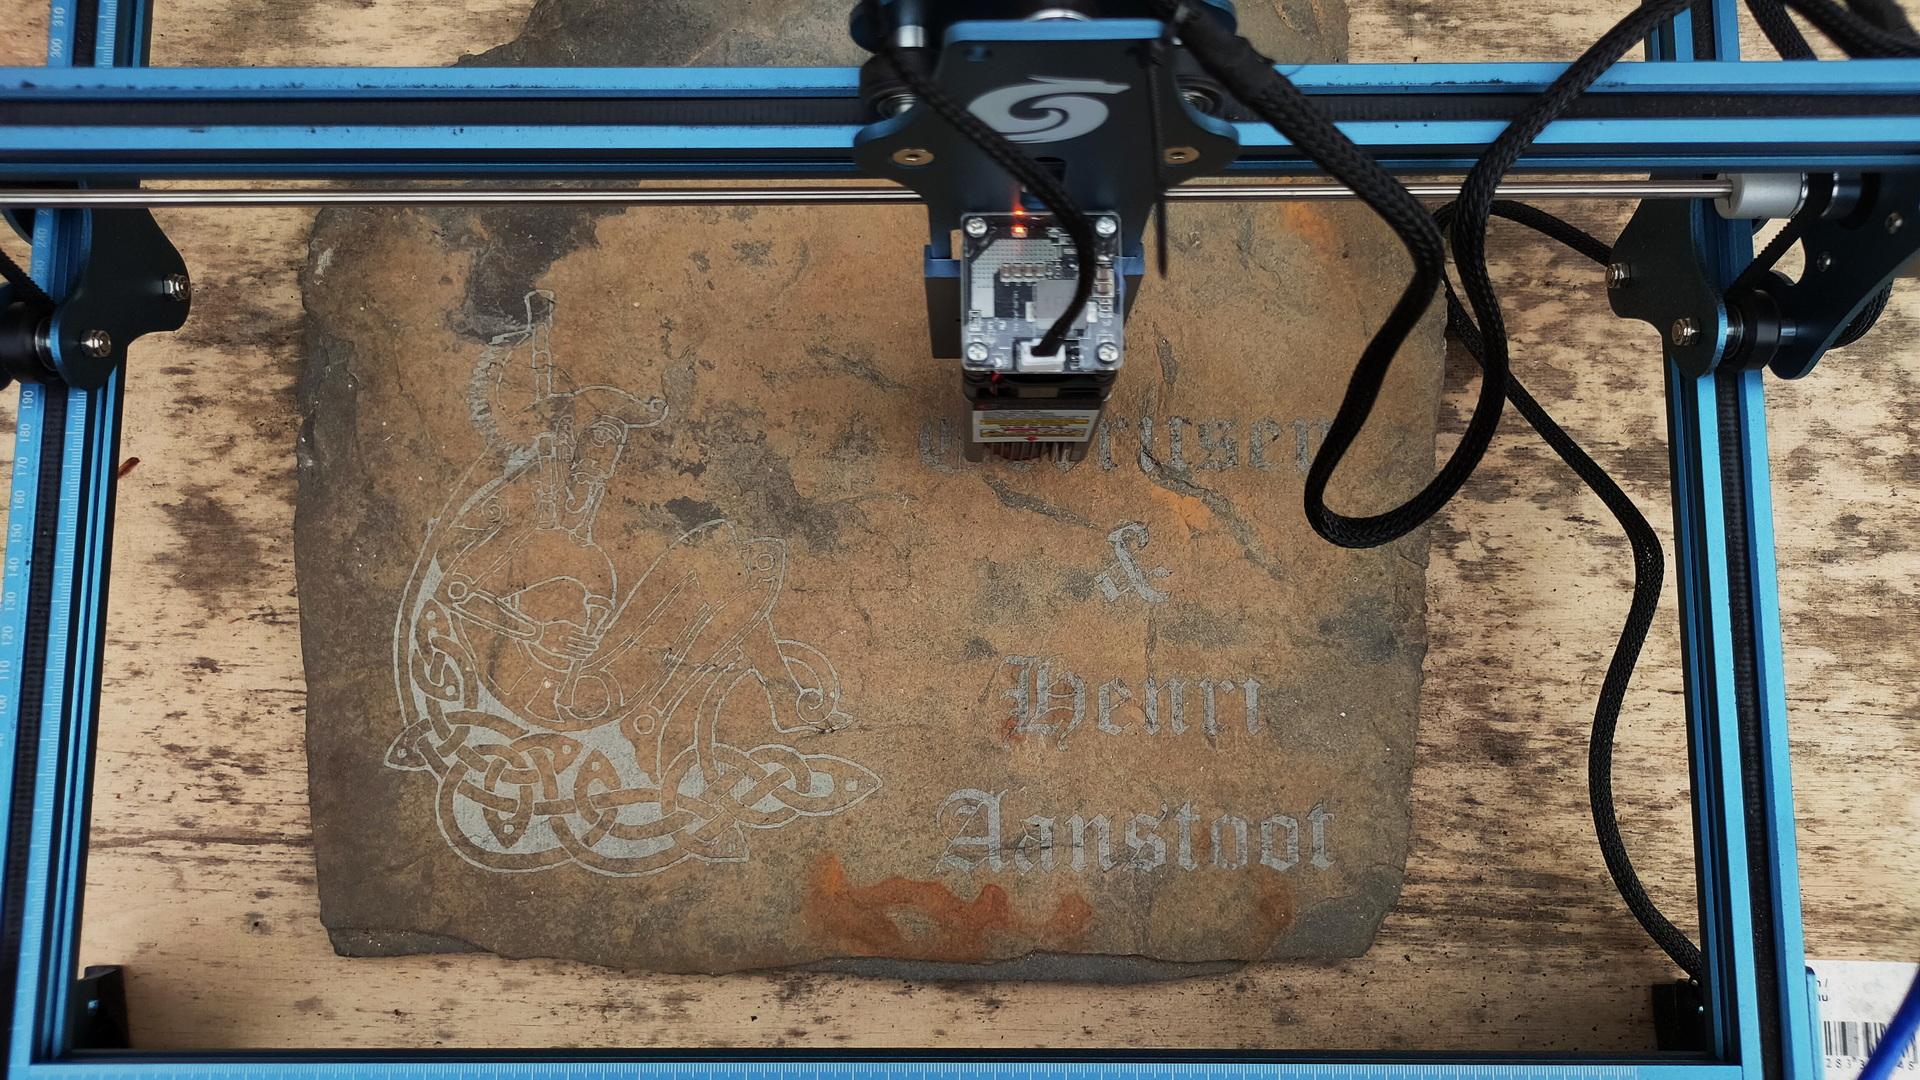
Slate of stone engraved using my Sculpfun S9 Engraver.
It will be placed next to our front door.

Slate of stone engraved using my Sculpfun S9 Engraver.
It will be placed next to our front door.
yes, again. Another change.
UPDATE: Working example at bottom!
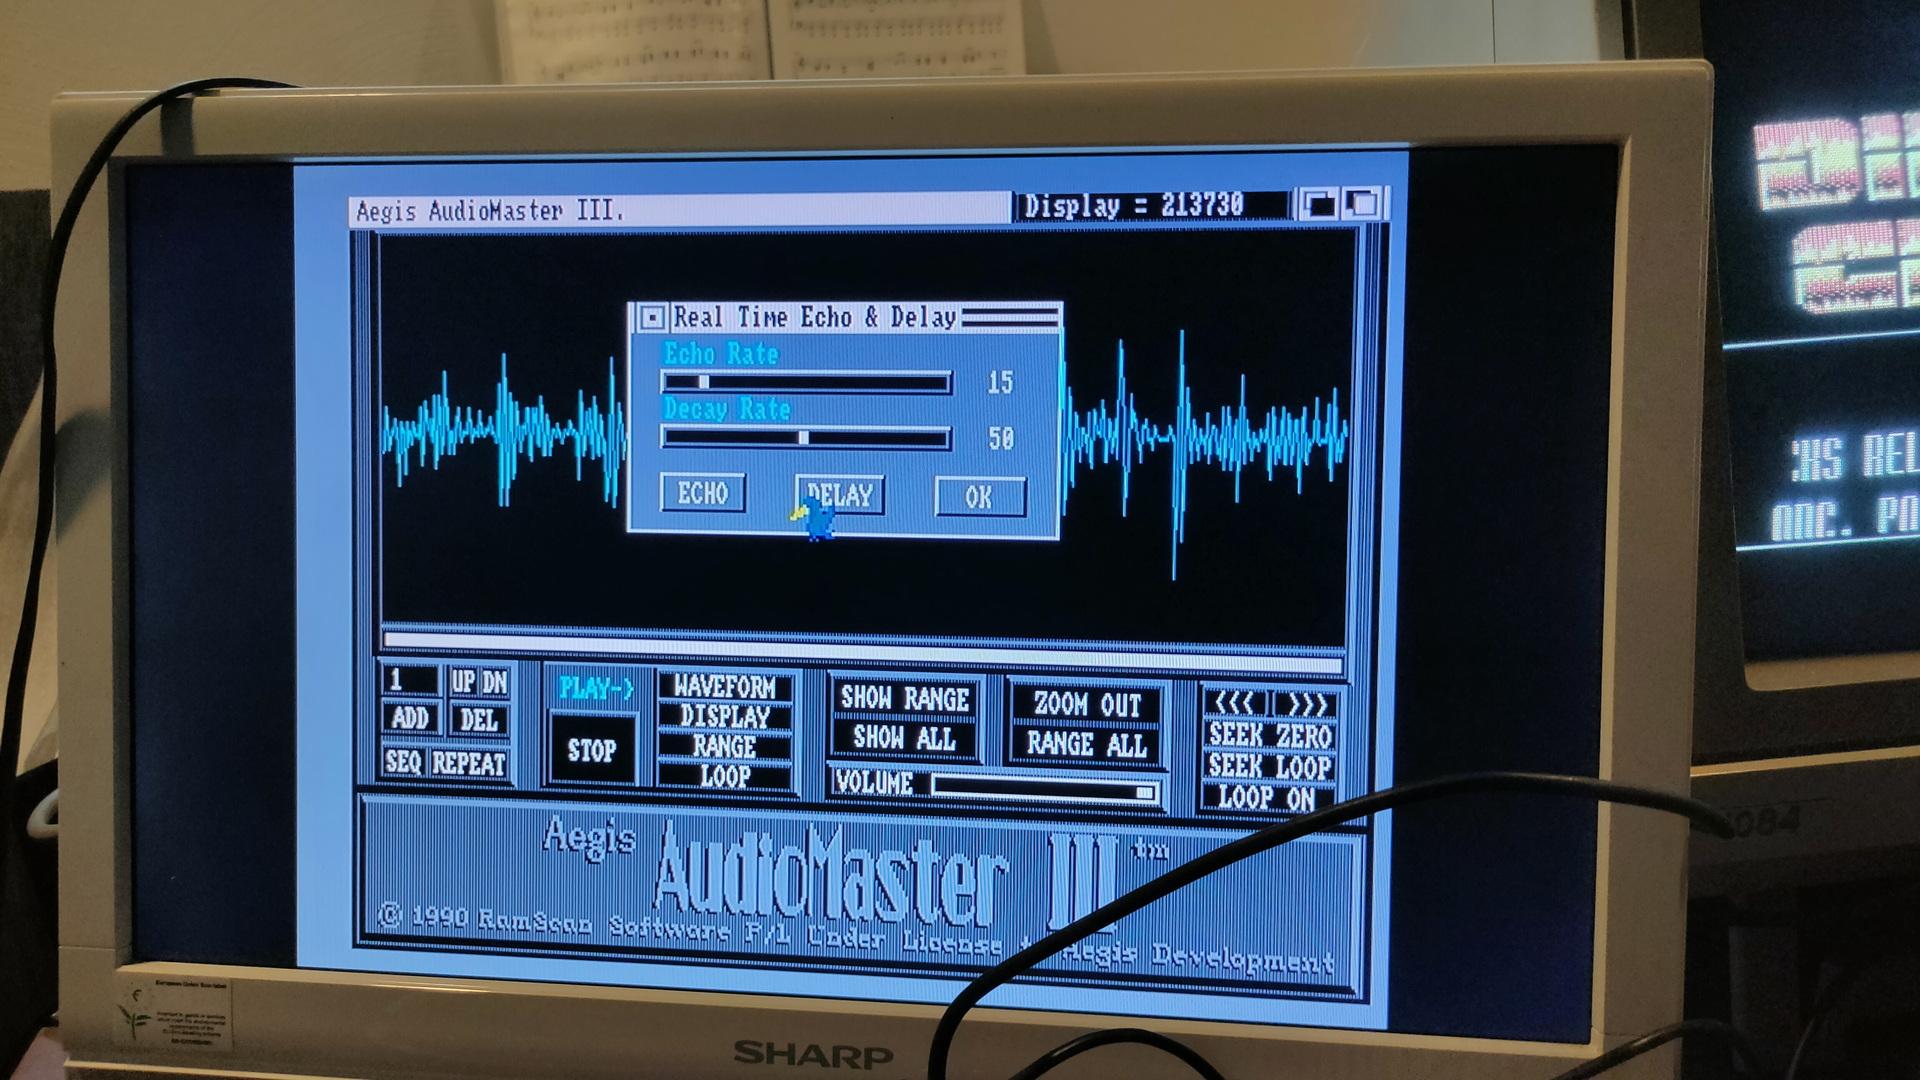
I don’t want IDs and Paths in a Home Assistant automation.
The RFIDs can store more than enough data to store the paths to albums.
I Also tested with ESPHOME in HA, but you can’t write tags.
ESPHOME Config for my RFID device (NOT USED ANYMORE)
esphome:
  name: rfidtag
  friendly_name: rfidtag

esp8266:
  board: d1_mini

mqtt:
  broker: IPMQTTBROKER

# Enable logging
logger:

# Enable Home Assistant API
api:
  encryption:
    key: "xxxxxxxxxxxxxxxxxx="

ota:
  password: "xxxxxxxxxxxxxxxxxxxxx"

wifi:
  ssid: !secret wifi_ssid
  password: !secret wifi_password

  # Enable fallback hotspot (captive portal) in case wifi connection fails
  ap:
    ssid: "Rfidtag Fallback Hotspot"
    password: "xxxxxxxxxxxxxx"

captive_portal:

spi:
  clk_pin: D5
  miso_pin: D6
  mosi_pin: D7
rc522_spi:
  cs_pin: D8
  update_interval: 1s
  on_tag:
    then:
      - mqtt.publish:
          topic: rc522/tag
          payload: !lambda 'return x;'
  on_tag_removed:
    then:
      - mqtt.publish:
          topic: rc522/tag_removed
          payload: !lambda 'return x;'
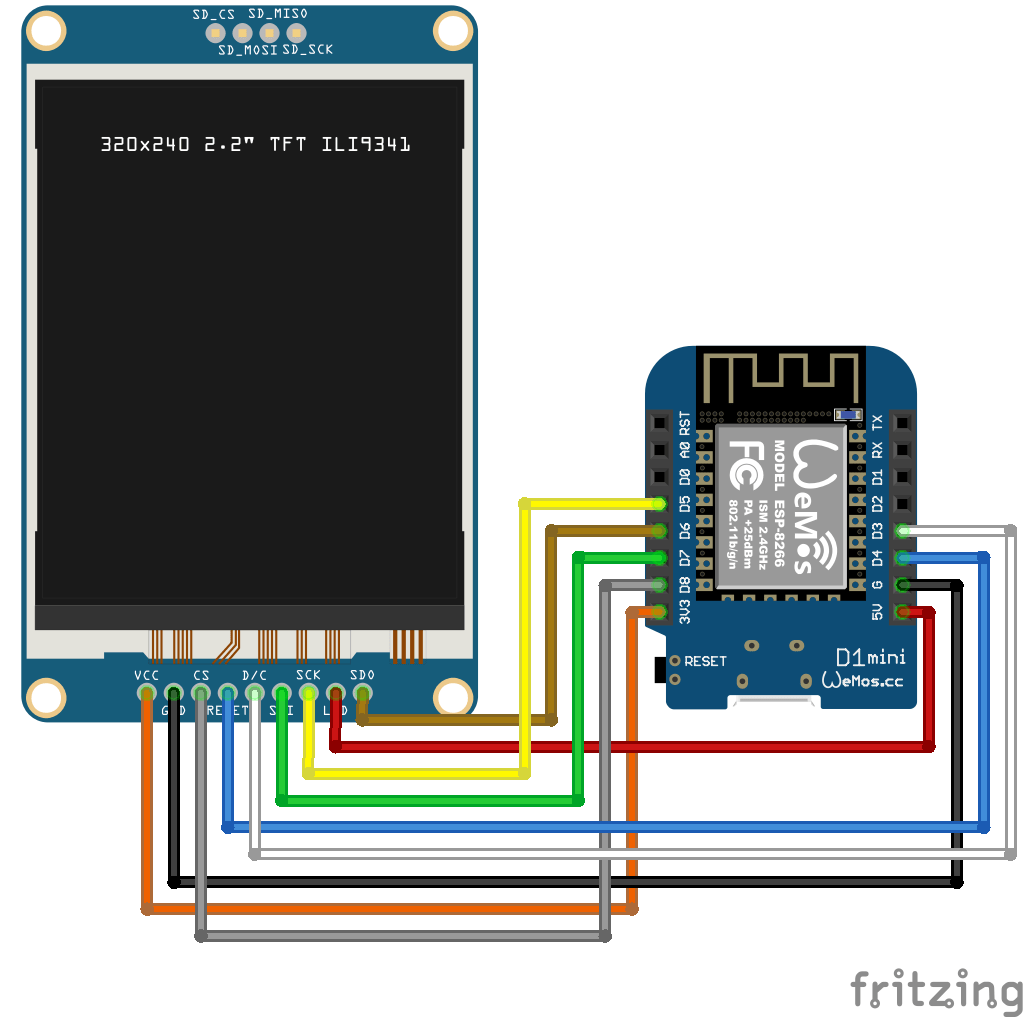
The next iteration of my Rfid controller will have a write function for the RFID tags.
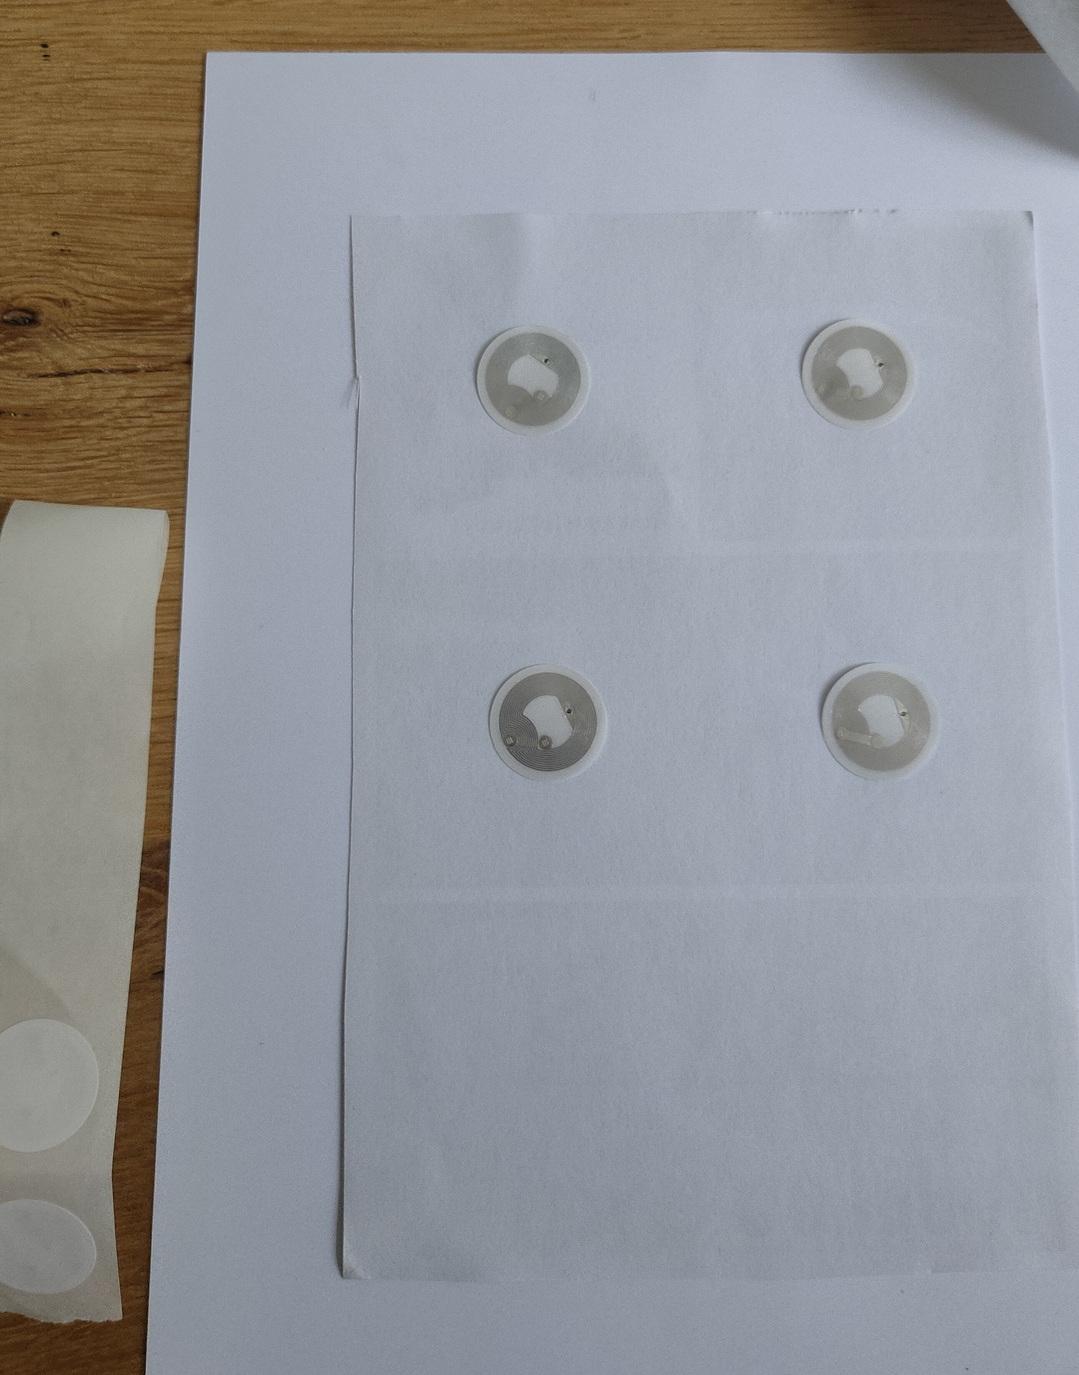
Not sure yet, also want to implement a wifi manager on the wemos.
Changes on above idea:
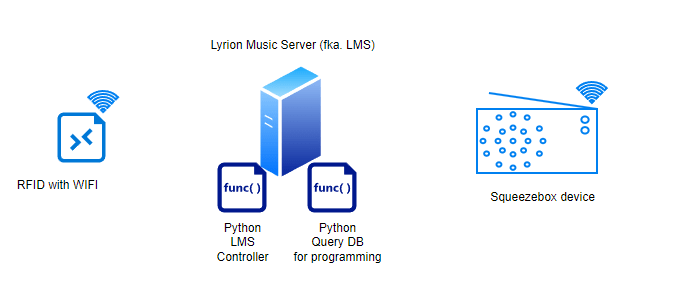
How does it work
RFid device is connected to the network.
Start query.py on your LMS server.
Search for an album name, it will present an ID and Album name in a list.
Enter the ID you want to program, or 0 to exit.
(This will also reset the programming mode)
Place an empty or previously programmed tag on the device.
It will write the album ID on the tag.
Then it will start the album.
Changing the tags will also just change the album playing.
(NOTE: My genre spotify player still works using this method, using the same device)
A second python script will read the Mqtt topic and control the Squeezebox player.
Python Code DB Query
import sqlite3
#paho-mqtt
import paho.mqtt.publish as publish

host = "IPMQTTBROKER"
port = 1883
topic = "spotify/rfid/in/write"
auth = {'username': 'xxxx','password': 'xxxxx'}
client_id = "spotithing"

def readSqliteTable(albumname):
    try:
        sqliteConnection = sqlite3.connect('/var/lib/squeezeboxserver/cache/library.db')
        cursor = sqliteConnection.cursor()
        albumname = "%" + albumname + "%"
        cursor.execute("select * from albums where title Like ?",
               (albumname,))
        records = cursor.fetchall()
        for row in records:
            print("Id: ", row[0],row[1])
        cursor.close()

    except sqlite3.Error as error:
        print("Failed to read data from sqlite table", error)
    finally:
        if sqliteConnection:
            sqliteConnection.close()

album = input("Album name ? ")
readSqliteTable(album)

number = input("Enter ID or 0 to quit : ")
publish.single(topic, "00000" , qos=1, hostname=host, port=port,
        auth=auth, client_id=client_id)
if number == 0:
        exit()
publish.single(topic, number, qos=1, hostname=host, port=port,
        auth=auth, client_id=client_id)
print("Program your tag")
print("Reset/disable writing using exit with 0!")
Python Code Controller (this one needs to be running at all times)
import paho.mqtt.client as mqtt
import urllib.request

def on_connect(client, userdata, flags, rc):
        print("Connected with result code {0}".format(str(rc)))
        client.subscribe("spotify/rfid/idlms")

def on_message(client, userdata, msg):
        print("Message received-> " + msg.topic + " " + str(msg.payload))  # Print a received msg
        urllib.request.urlopen("http://IPADDRESLMS:9000/anyurl?p0=playlistcontrol&p1=album_id:" + msg.payload.decode() + "&p2=cmd:load&player=b8:27:eb:11:16:ab")
#NOTE also change b8:27:eb:11:16:ab into you players MACAddress!

client = mqtt.Client("digi_mqtt_test")
client.on_connect = on_connect
client.on_message = on_message
client.connect('IPMQTTBROKER', 1883)
client.loop_forever()
Arduino Code (see schematic in other post)
#include <Arduino.h>
#include <SPI.h>
#include <MFRC522.h>
#include <ESP8266WiFi.h>
#include <WiFiClient.h>
#include <PubSubClient.h>
#define SS_PIN 15
#define RST_PIN 0
MFRC522 mfrc522(SS_PIN, RST_PIN);
  MFRC522::StatusCode status; //variable to get card status
  byte buffer[18];  //data transfer buffer (16+2 bytes data+CRC)
  byte size = sizeof(buffer);
  uint8_t pageAddr = 0x06;  //In this example we will write/read 16 bytes (page 6,7,8 and 9).
                            //Ultraligth mem = 16 pages. 4 bytes per page.
                            //Pages 0 to 4 are for special functions.
unsigned long cardId = 0;
WiFiClient net;
PubSubClient client(net);
const char* mqtt_server = "IPMQTTBROKER";
const char* ssid = "MYSSID";
const char* password = "MYSSIDPASS";
String topicStr = "";
byte buffer2[8];

boolean Rflag=false;
int r_len;
char payload[5];
byte value[5];
void setup() {
  Serial.begin(9600);
  SPI.begin();
  mfrc522.PCD_Init();
  WiFi.mode(WIFI_AP_STA);
  WiFi.begin(ssid, password);
  client.setServer(mqtt_server, 1883);
     delay(100);
    client.setCallback(callback);
      delay(100);
    client.subscribe("spotify/rfid/in/#");
}
void reconnect() {
  while (WiFi.waitForConnectResult() != WL_CONNECTED) {
  }
  while (!client.connected()) {
    String clientId = "rfid-";
    clientId += String(random(0xffff), HEX);
    if (!client.connect(clientId.c_str(), "rfidclient", "...")) {
      Serial.print("failed, rc=");
      Serial.print(client.state());
      delay(5000);
    }
  }
  client.subscribe("spotify/rfid/in/#");
}
void callback(char* topic, byte* payload, unsigned int length) {

  Serial.print(F("Called"));
   Rflag=true; //will use in main loop
   r_len=length; //will use in main loop
   Serial.print("length message received in callback= ");
   Serial.println(length);
   int j=0;
     for (j;j<length;j++) {
       buffer2[j]=payload[j];
       }
if (r_len < 3) {
  Rflag=false;
  Serial.print(F("Set false"));
}
buffer2[j]='\0'; //terminate string
}

void loop() {
    if (!client.connected()) {
    reconnect();
  }
  client.loop();
  if (!mfrc522.PICC_IsNewCardPresent()) {
    return;
  }
  if (!mfrc522.PICC_ReadCardSerial()) {
    return;
  }
if (Rflag) {
        for (int i=0; i < 4; i++) {
    //data is writen in blocks of 4 bytes (4 bytes per page)
    status = (MFRC522::StatusCode) mfrc522.MIFARE_Ultralight_Write(pageAddr+i, &buffer2[i*4], 4);
    if (status != MFRC522::STATUS_OK) {
      Serial.print(F("MIFARE_Read() failed: (W) "));
      Serial.println(mfrc522.GetStatusCodeName(status));
      return;
    }
  }
  Serial.println(F("MIFARE_Ultralight_Write() OK "));
  Serial.println();
  Rflag=false;
}
  cardId = getCardId();
  char buffer3[10];
  sprintf(buffer3, "%lu", cardId);
  client.publish("spotify/rfid/id", buffer3);
  // Read data ***************************************************
  Serial.println(F("Reading data ... "));
  //data in 4 block is readed at once.
  status = (MFRC522::StatusCode) mfrc522.MIFARE_Read(pageAddr, buffer, &size);
  if (status != MFRC522::STATUS_OK) {
    Serial.println(F("MIFARE_Read() failed: (R)"));
    Serial.println(mfrc522.GetStatusCodeName(status));
    return;
  }

  Serial.println(F("Read data: "));
  //Dump a byte array to Serial
  for (byte i = 0; i < 5; i++) {
    Serial.write(buffer[i]);
       buffer2[i]=buffer[i];
    }
  client.publish("spotify/rfid/idlms", buffer,5);
  delay(1000);
  mfrc522.PICC_HaltA();
}

unsigned long getCardId() {
  byte readCard[4];
  for (int i = 0; i < 4; i++) {
    readCard[i] = mfrc522.uid.uidByte[i];
  }
  return (unsigned long)readCard[0] << 24
    | (unsigned long)readCard[1] << 16
    | (unsigned long)readCard[2] << 8
    | (unsigned long)readCard[3];
}
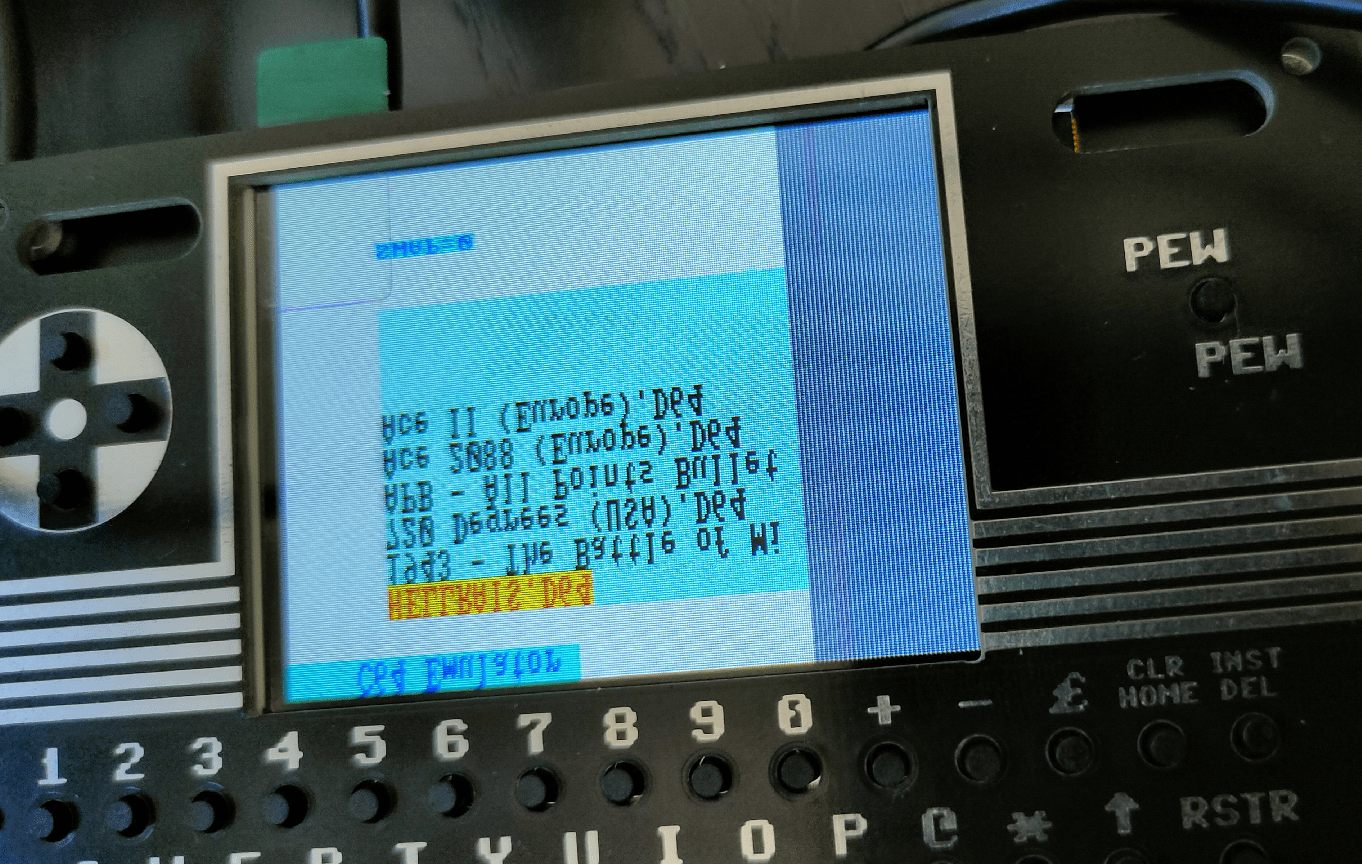
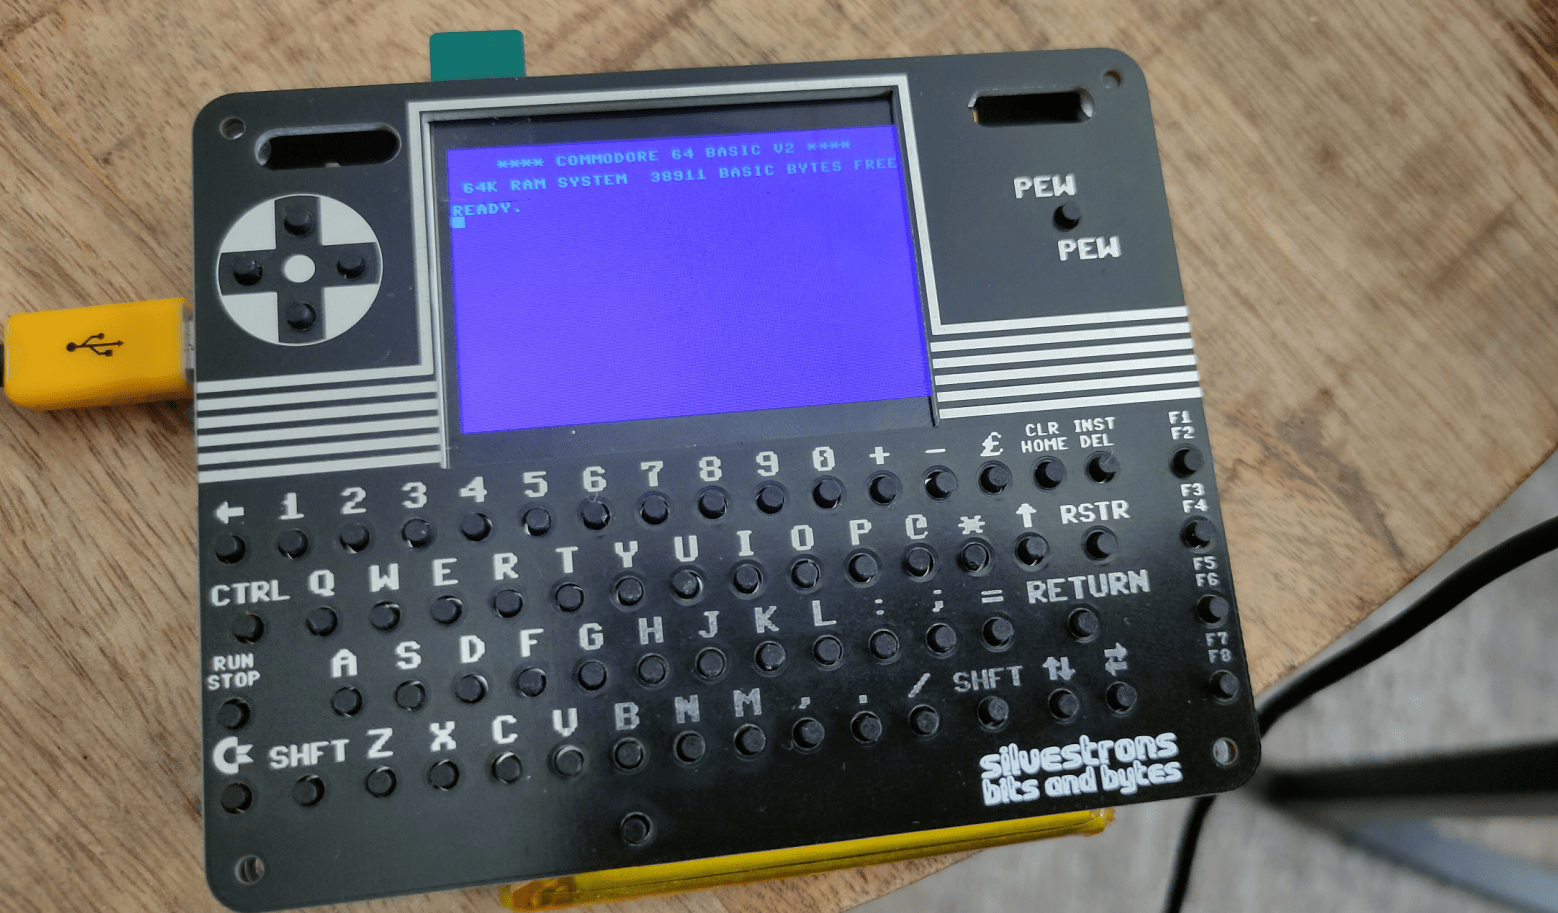
Today we worked on this project again. (Bigred and me)
There were some problems we needed to fix since last time:
Other things still to fix.
Some other things we noticed.
My friend Bigred said: If I can see it, I can solder it.
But it is not easy. This probably keeps a lot of people from building it!
Below the diff from the source we got from:
https://github.com/silvervest/MCUME/tree/c64pico
UPDATE 20240501: We needed to clone the c64pico branch!
git clone -b c64pico https://github.com/silvervest/MCUME.git
Then it worked with the screen and keyboard!
Programming the atmega328pb using usbasp
https://www.henriaanstoot.nl/2022/06/30/morse-with-a-attiny85/
Link above shows the programmer.
To get your Arduino IDE up and running
https://mcudude.github.io/MiniCore/package_MCUdude_MiniCore_index.json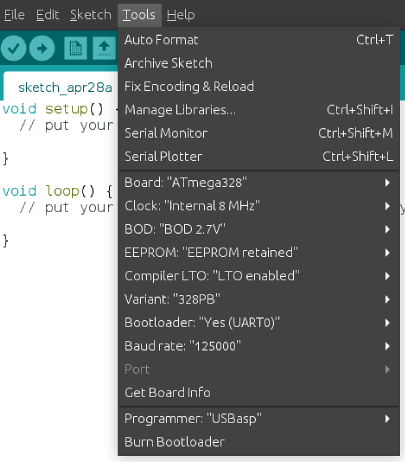
Above settings worked for me, maybe you can also try Programmer: usbasp (slow)
First install the bootloader.
When compiling the keyboard program of silvervest, you can find “Upload using programmer” in the Sketch menu!
(https://github.com/silvervest/c64pico/tree/master/keyboard)
CHARGING using BQ24230RGTT
Maybe I’ve got a problem with the ground plating of the charger.
Also very hard to solder the sides!

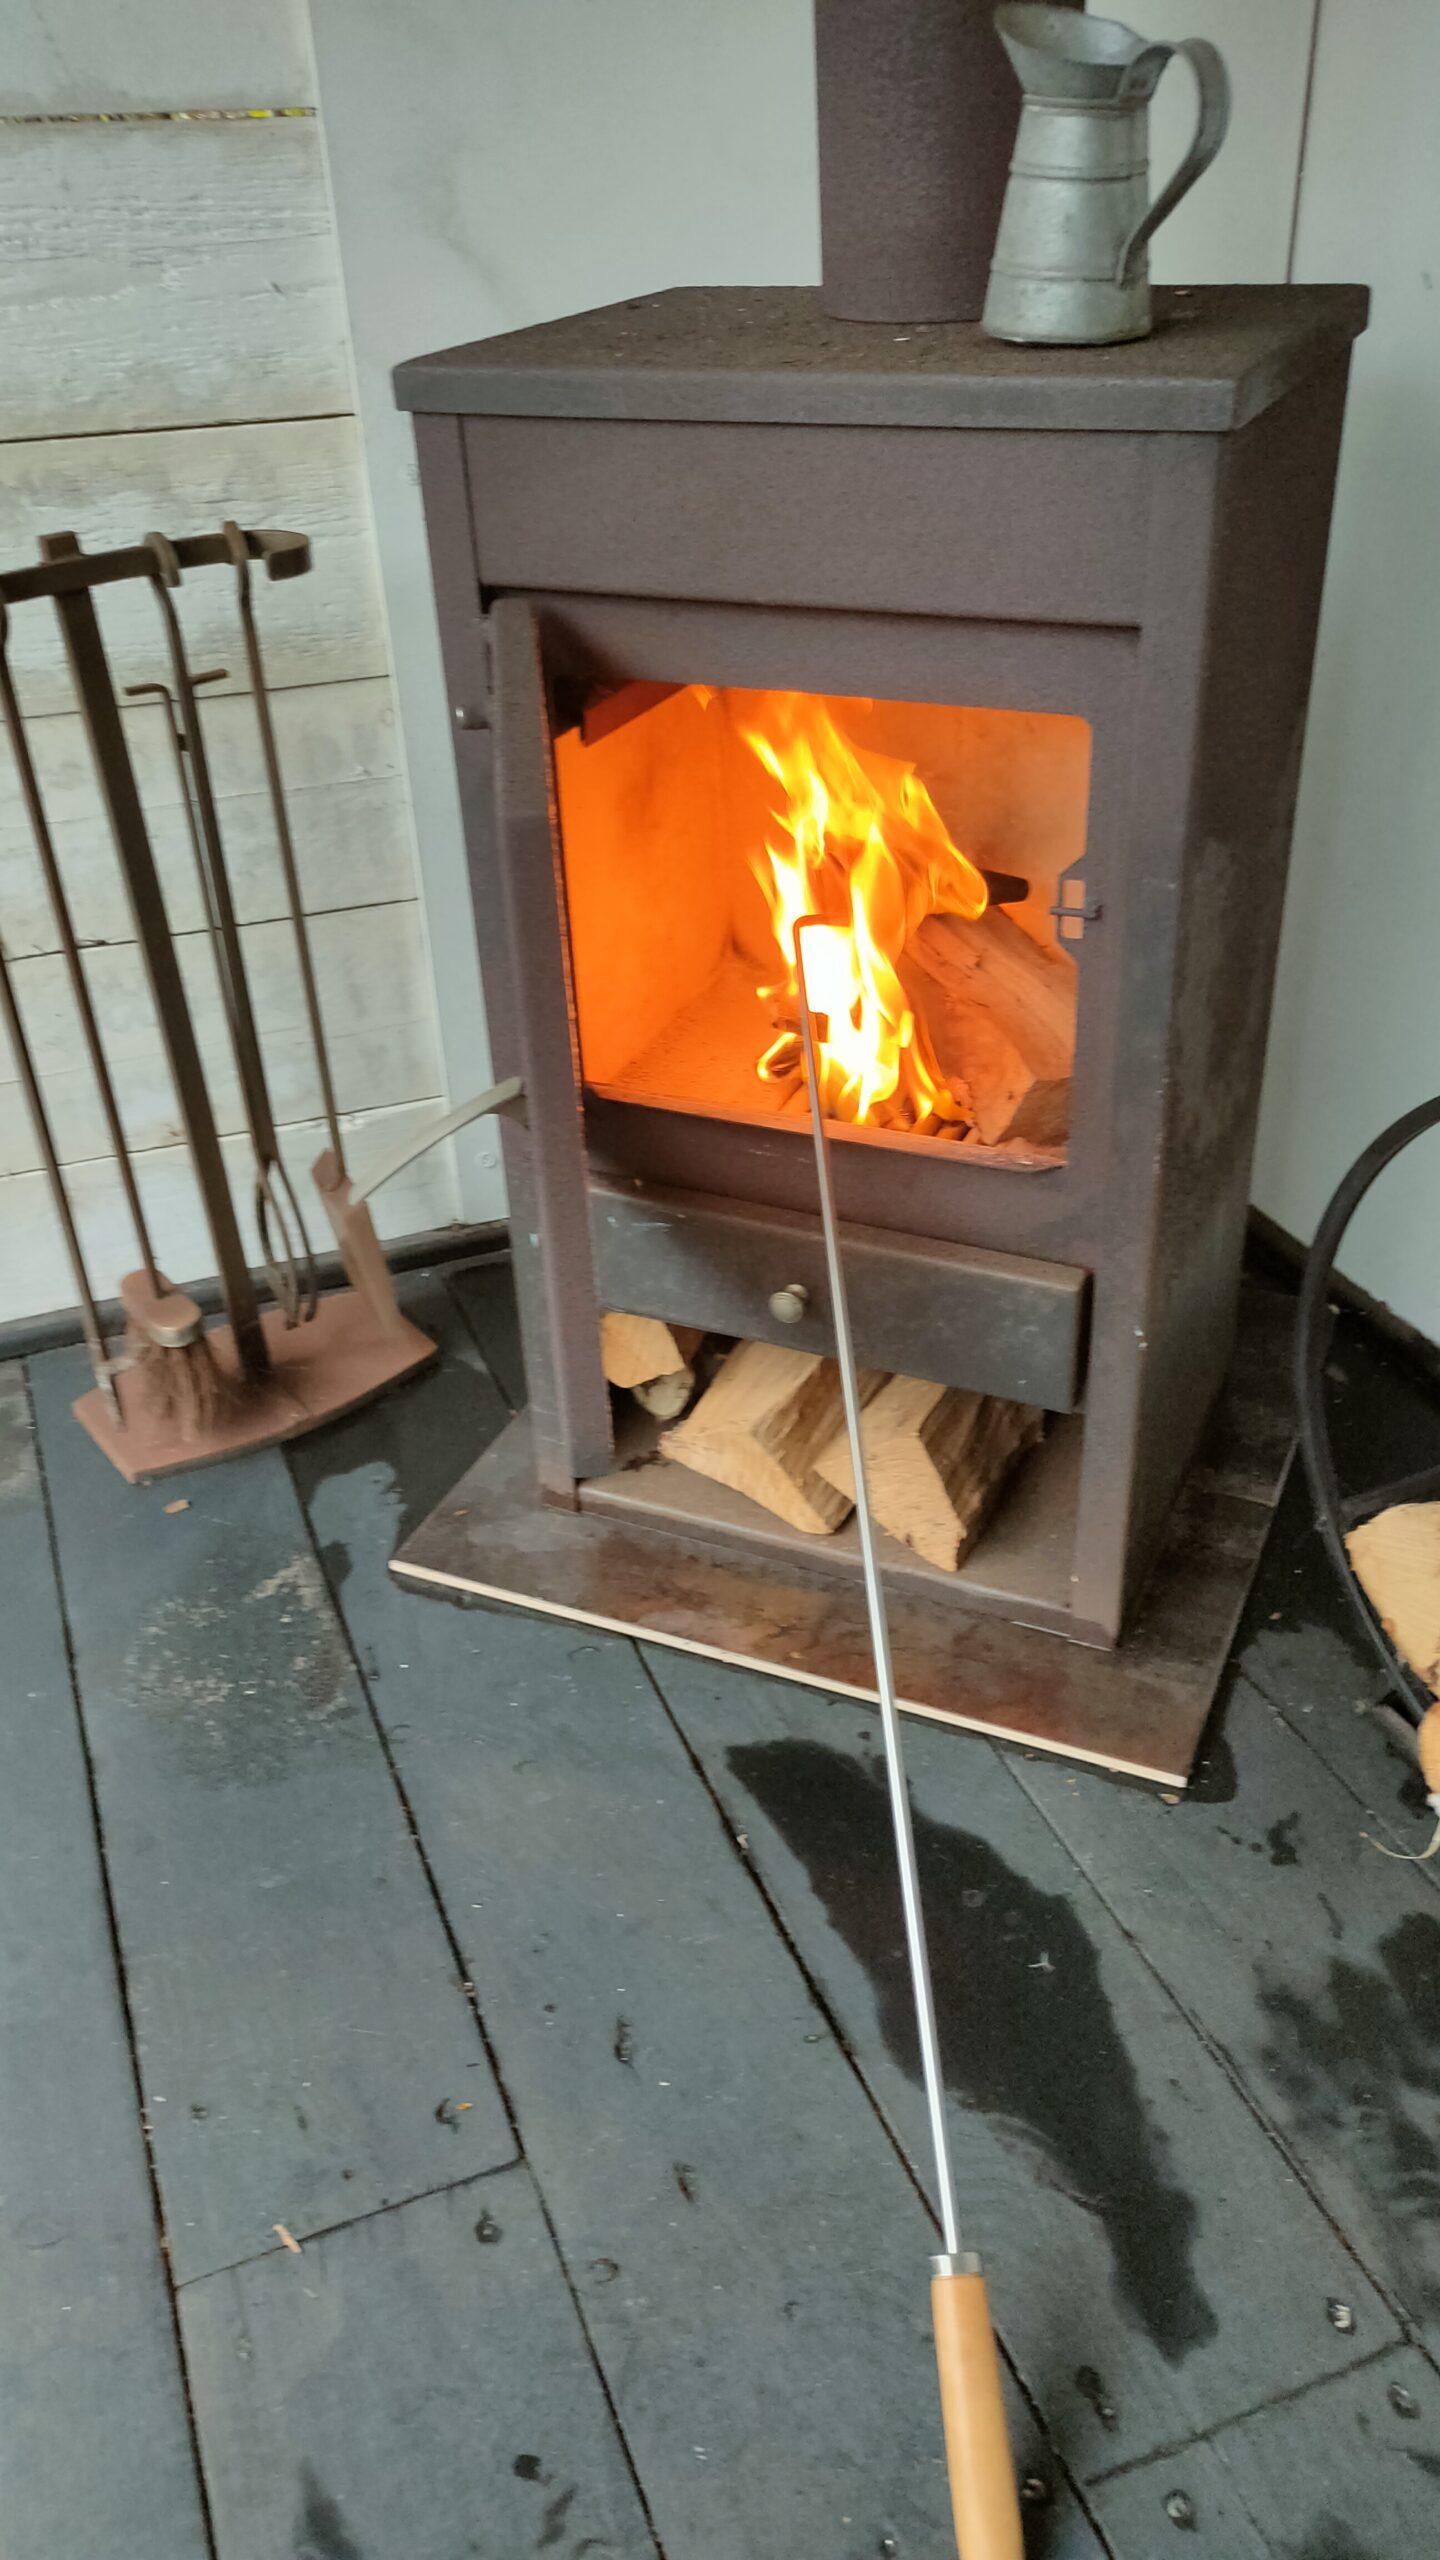
It’s time to try my Flambadou.
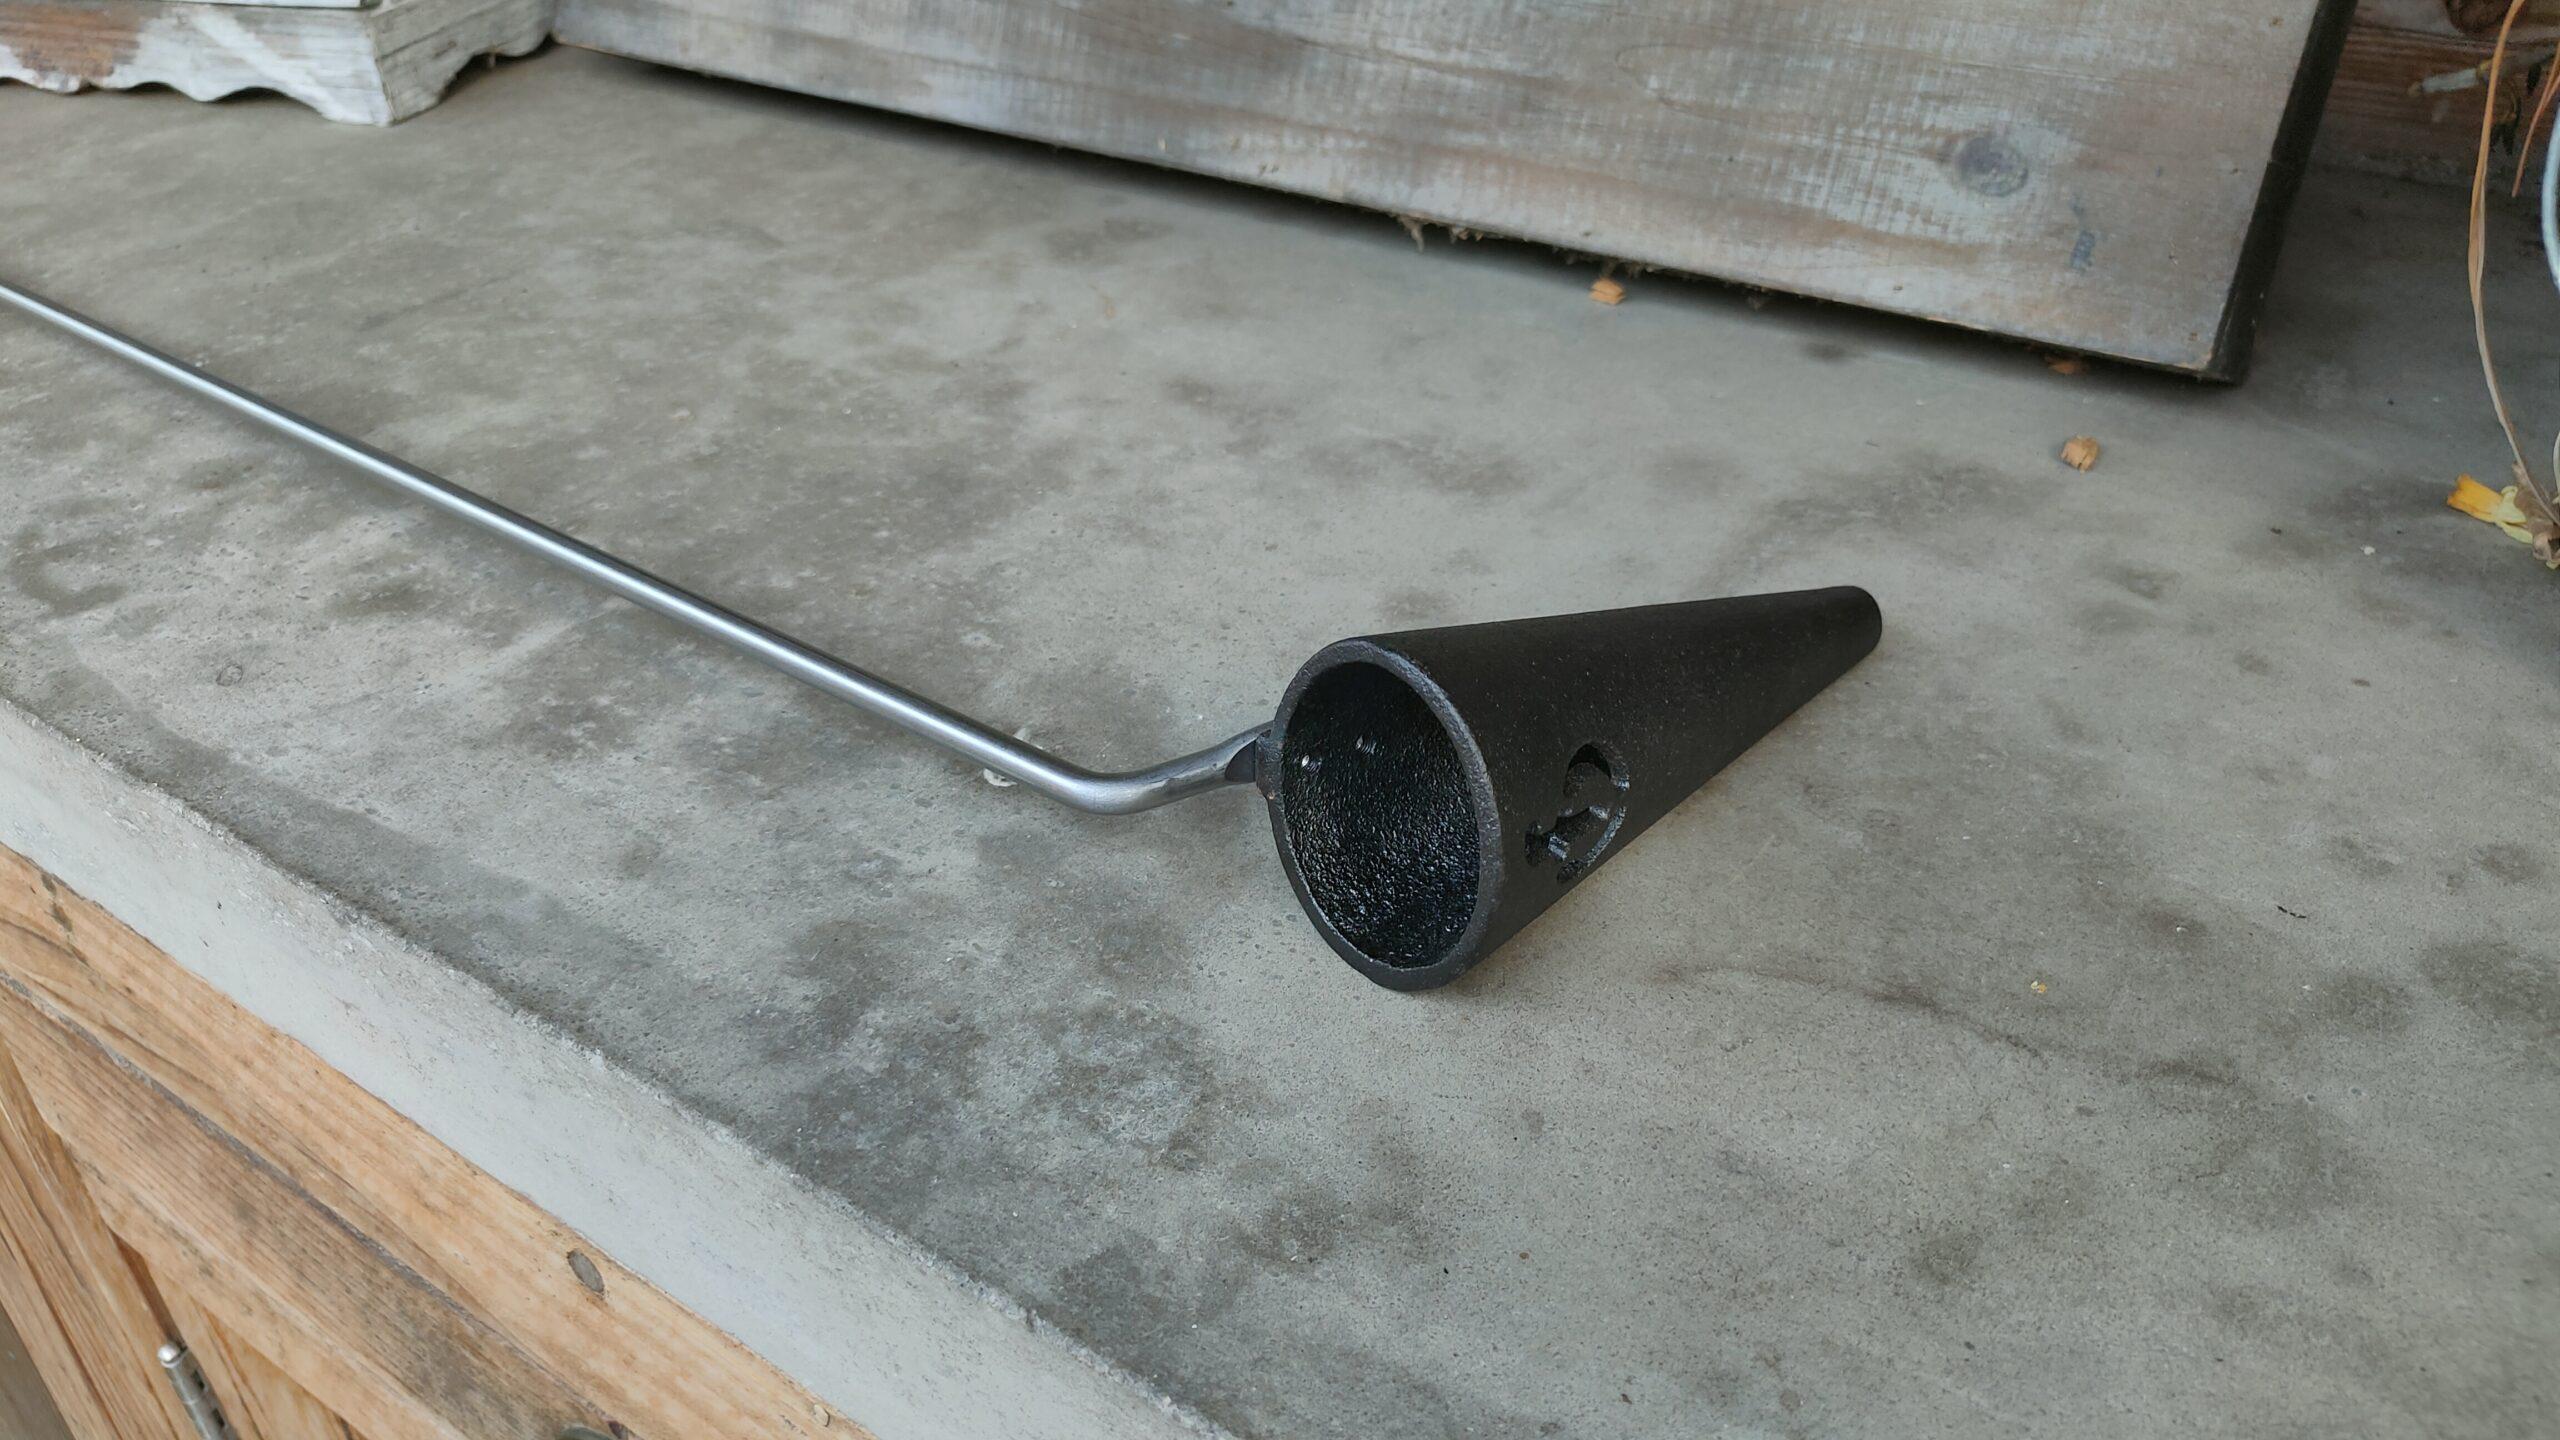
WHAT IS A FLAMBADOU?
It’s a cast iron cone with a large opening at the top and a small one at the bottom attached to a long metal handle (generally 1m) designed to heat until red-hot to ignite and melt fat quickly.
Reportedly from the Middle Ages, flambadous were historically used to sear joints of meat, but are comparatively rare now. It’s also a traditional French technique for basting meat with fat as it cooks over the coals.
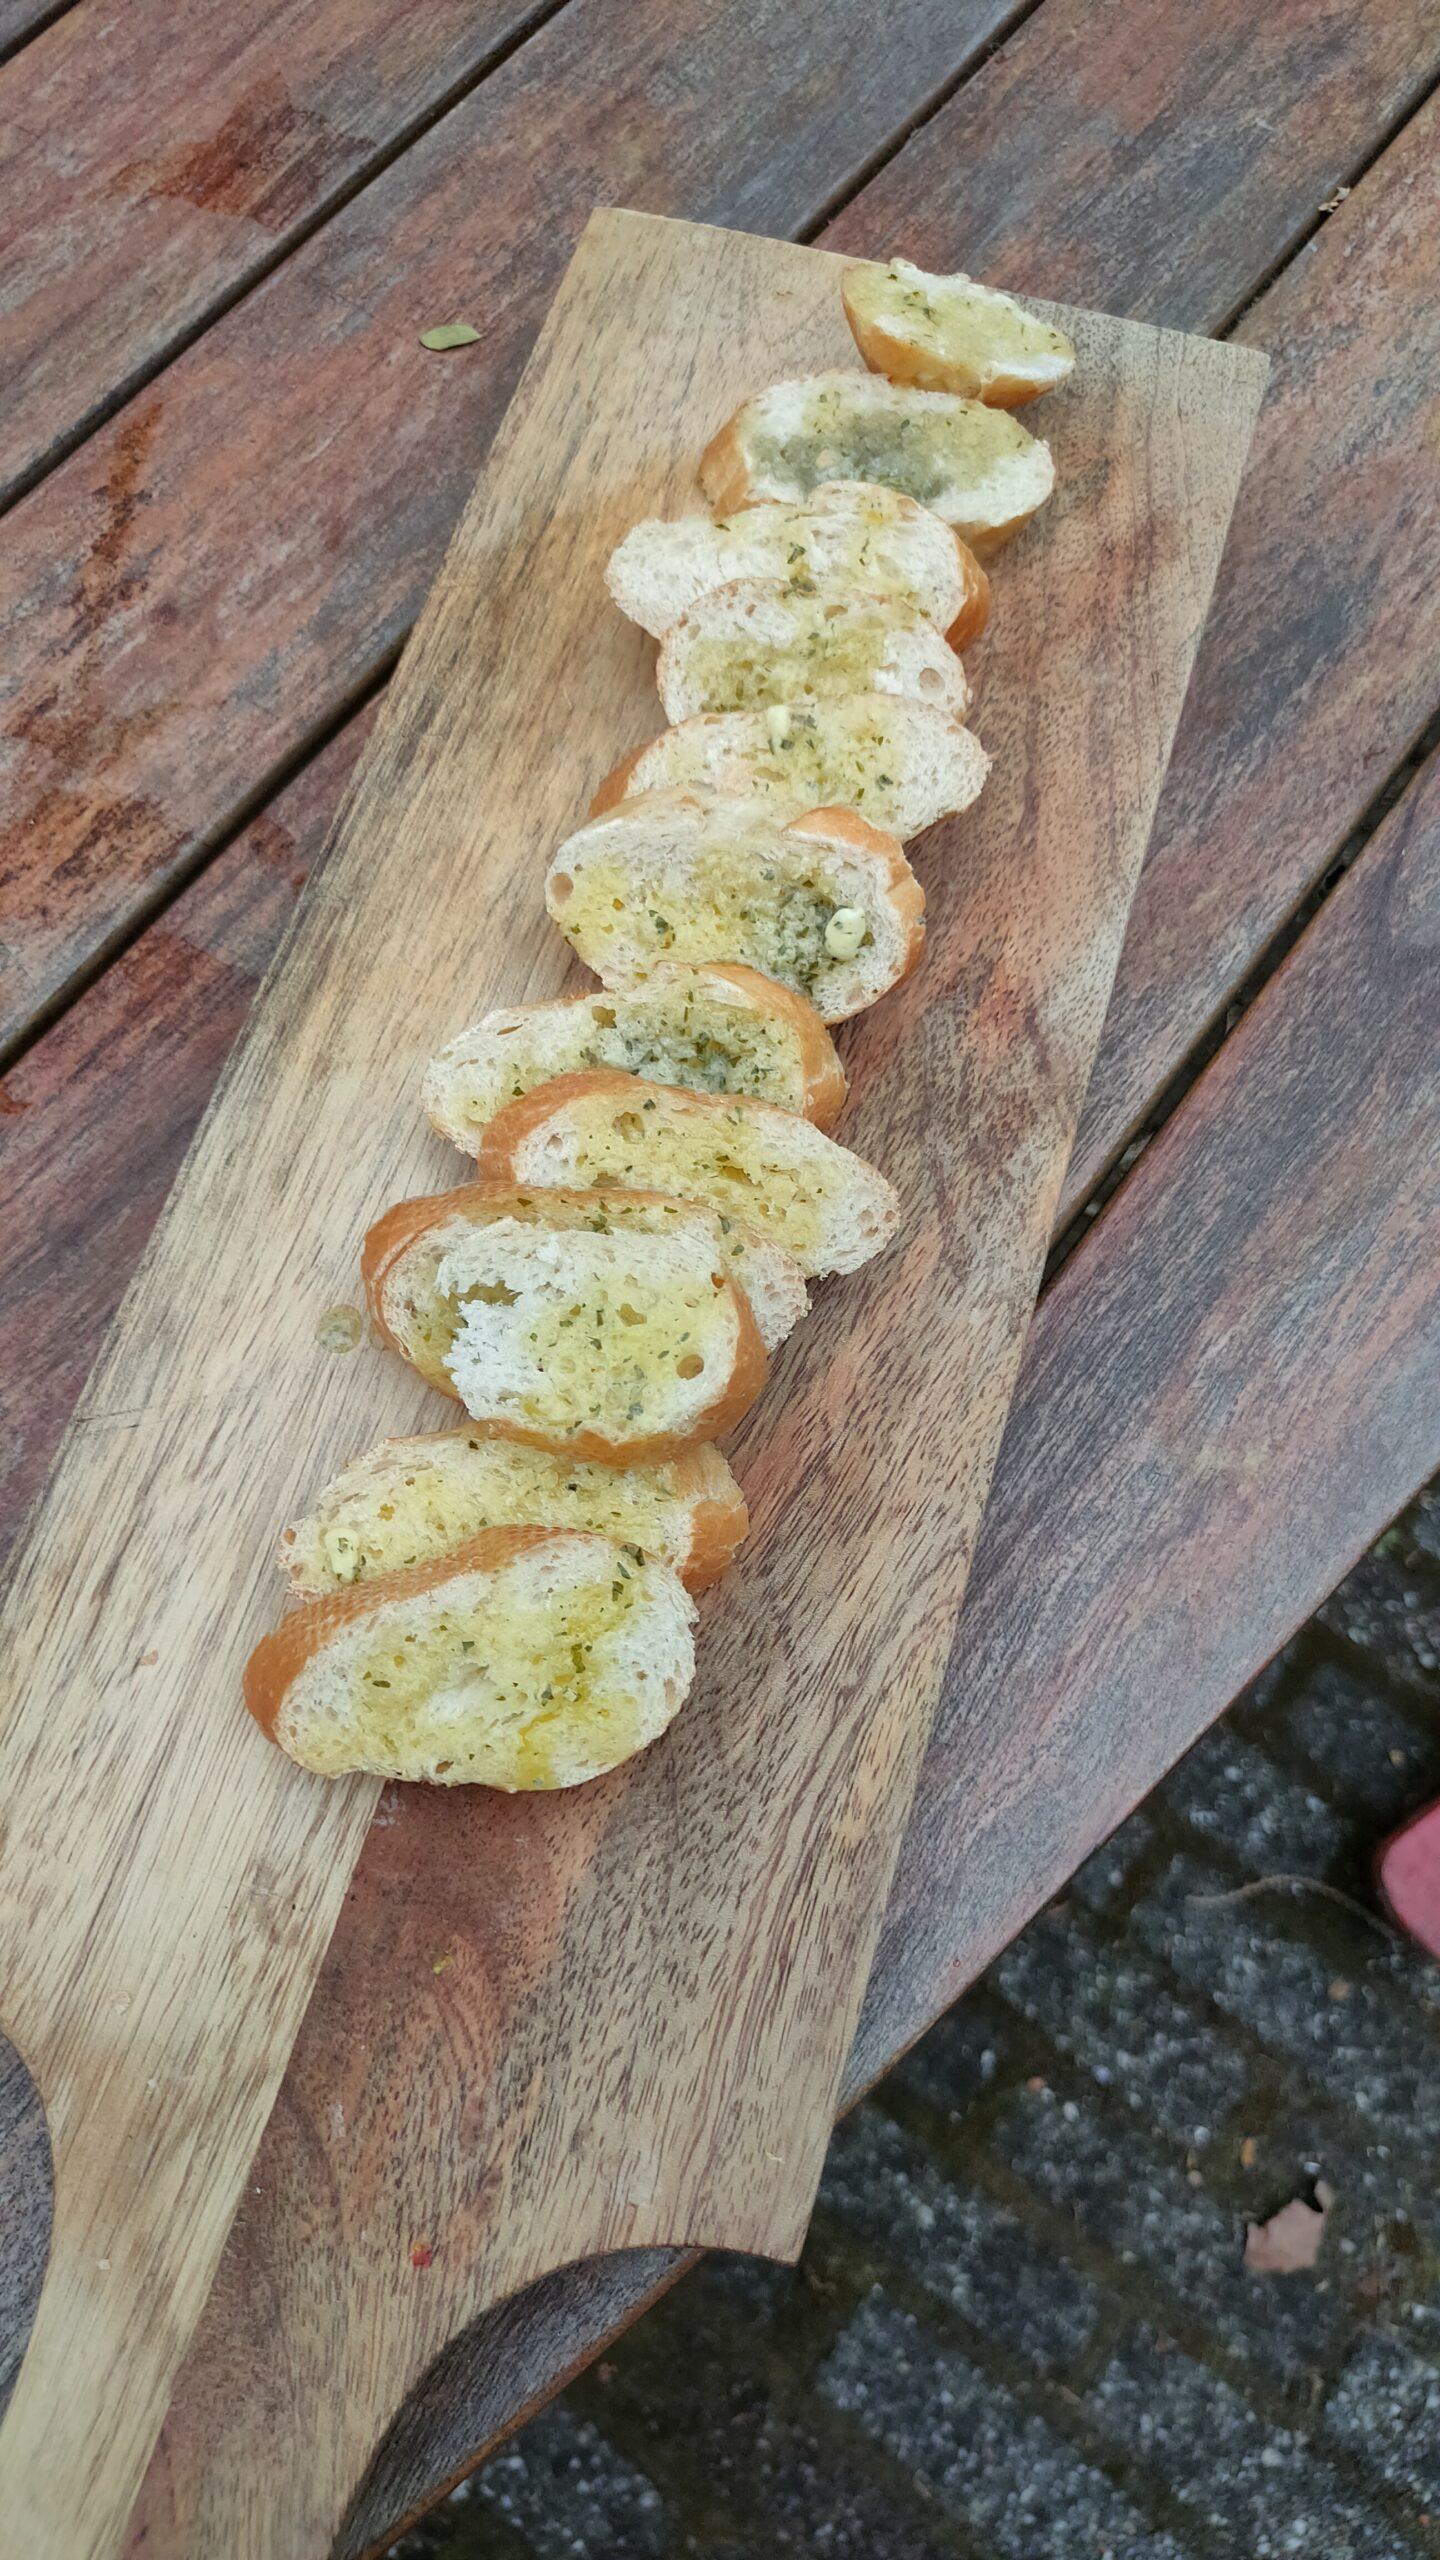
First, a french baguette.
I used Herb butter for the flambadou.
Don’t make the Flambadou as hot as you would do with the fat for the meat.
Recipe own made herb butter.
Mash the butter finely with a fork. Add a pinch of sea salt and a tablespoon of lemon juice. Add finely chopped garlic. Chop the parsley and chives and add at the end and mix everything well.
Wrap in cling film.
Let the herb butter harden in the refrigerator. Remove it a few minutes before use. So not frozen but still solid.
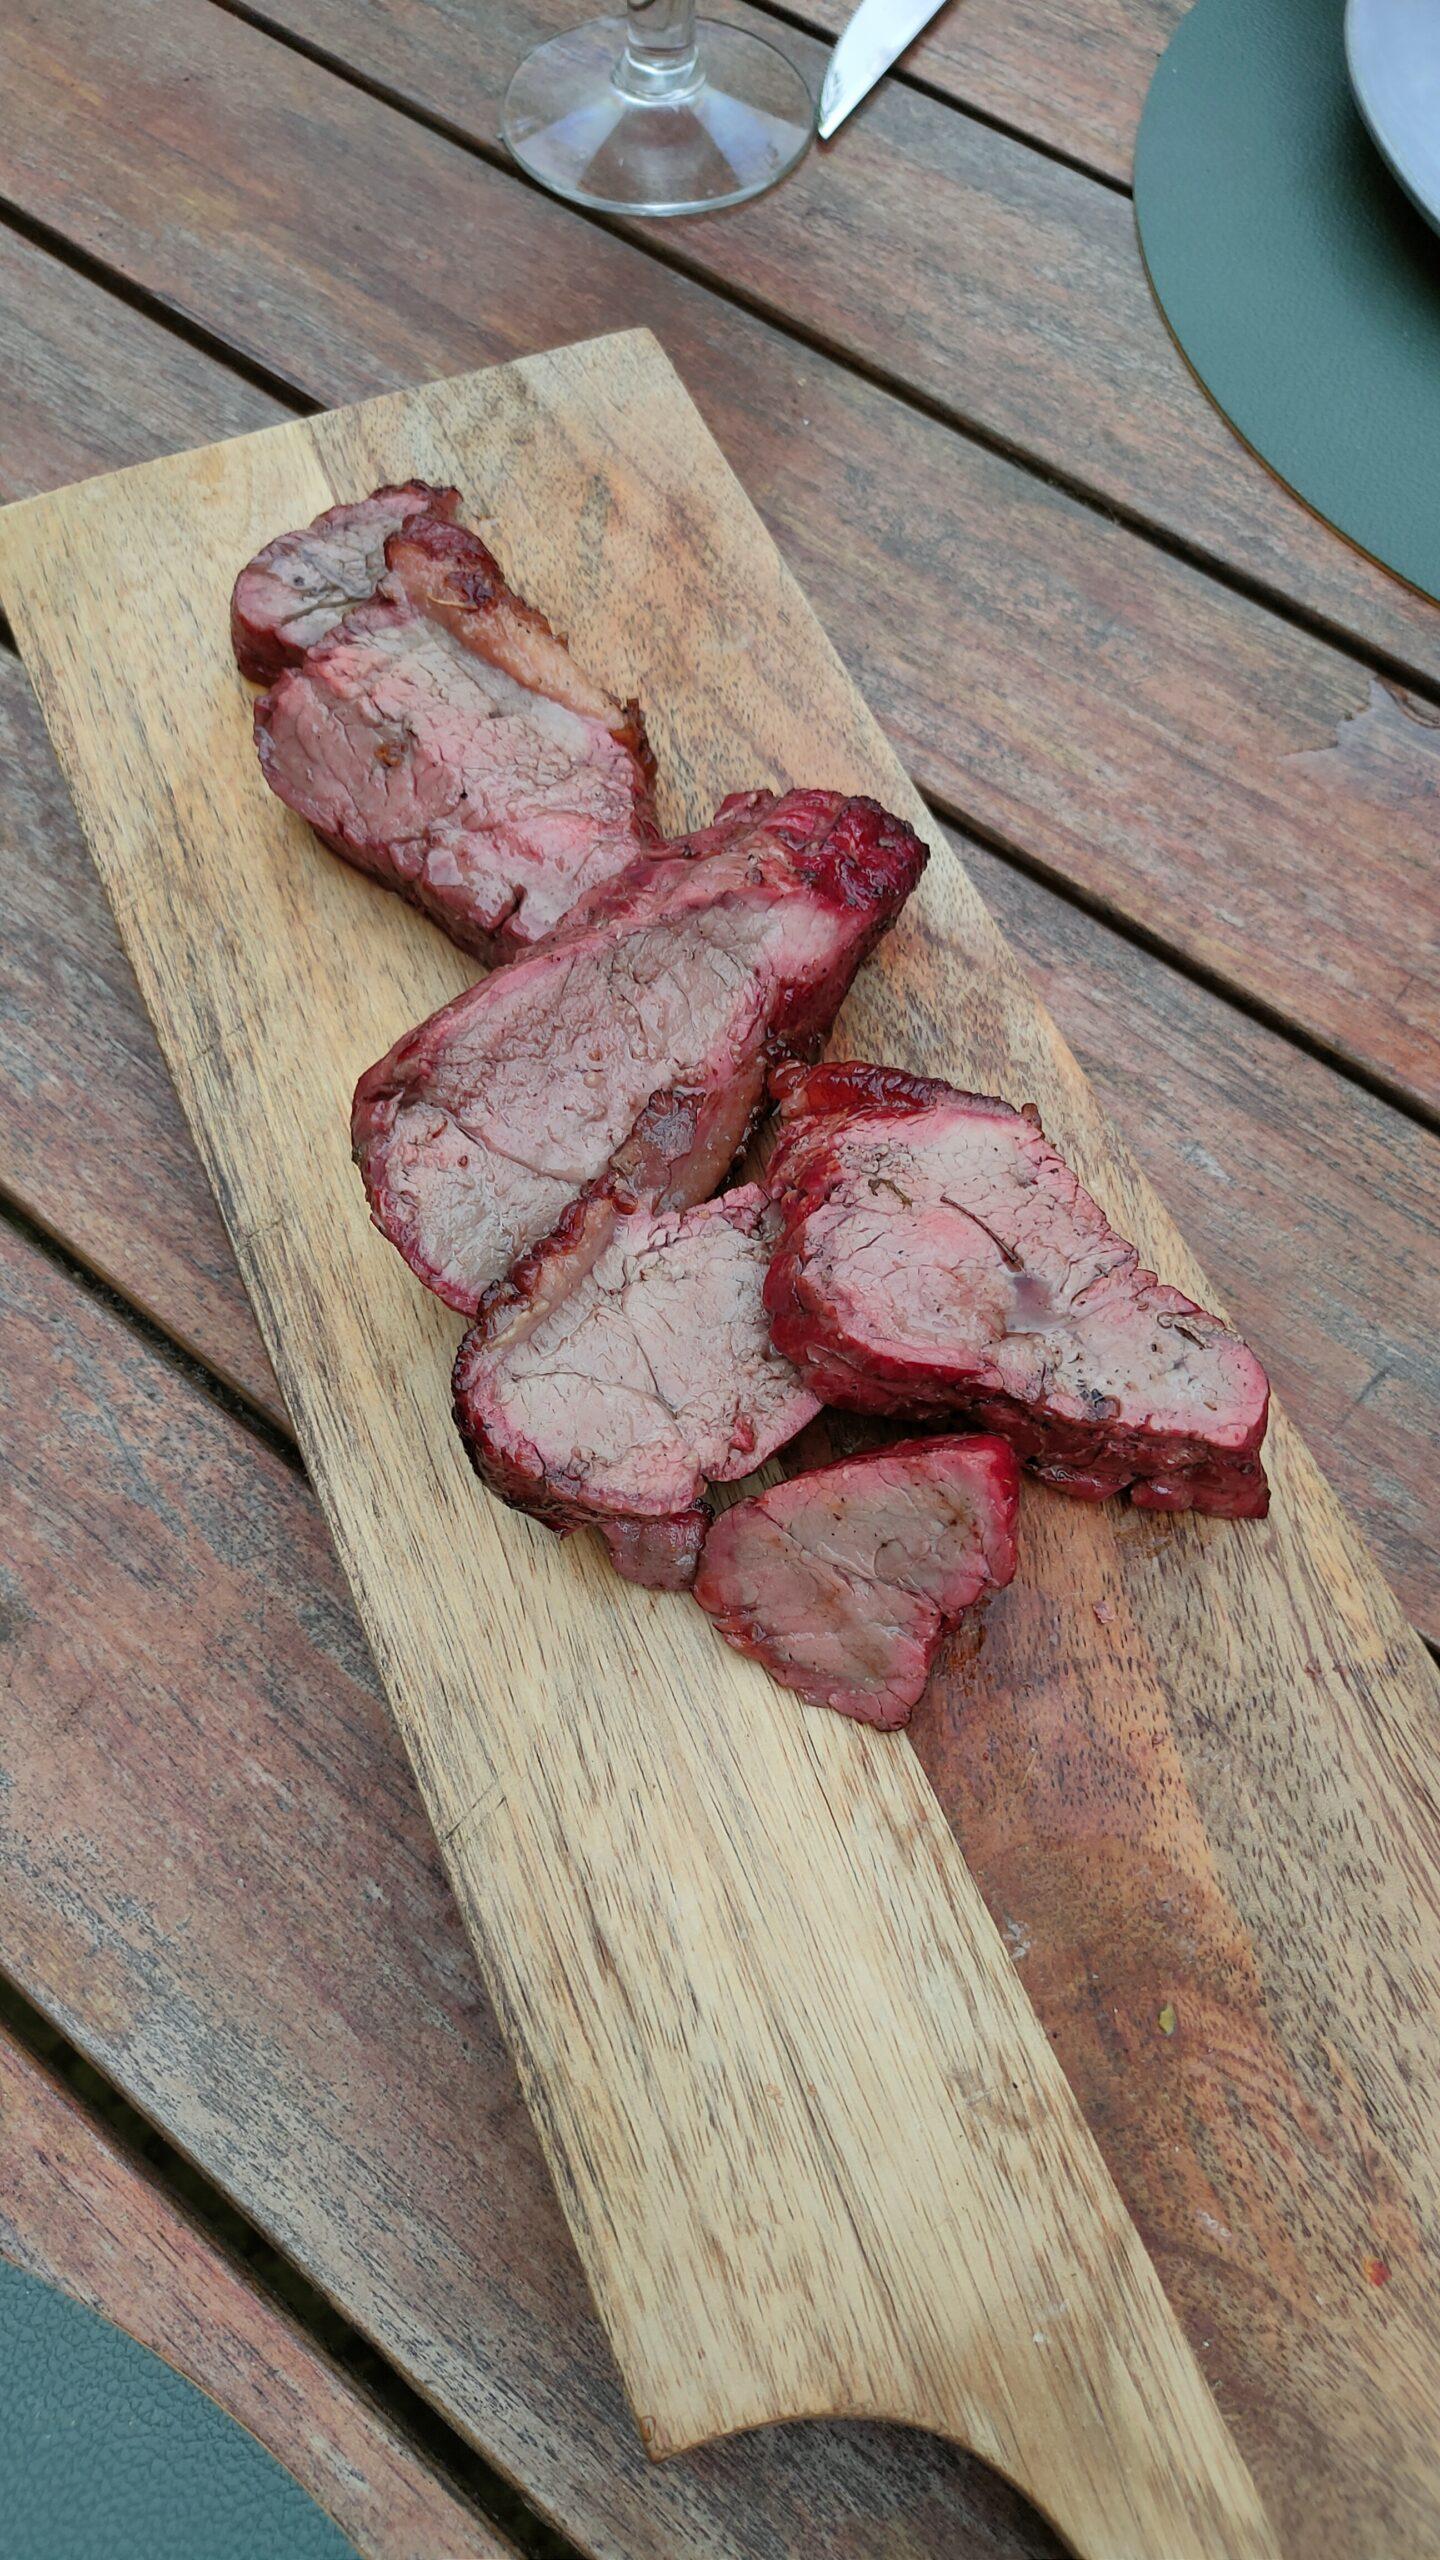
For the meat, I used Picanha and the cubed pieces of fat.
Next time I’m going to use Bacon Fat or Geese Fat.
The Flambadou was NOT hot enough for the fat. Ah well, learning every day.
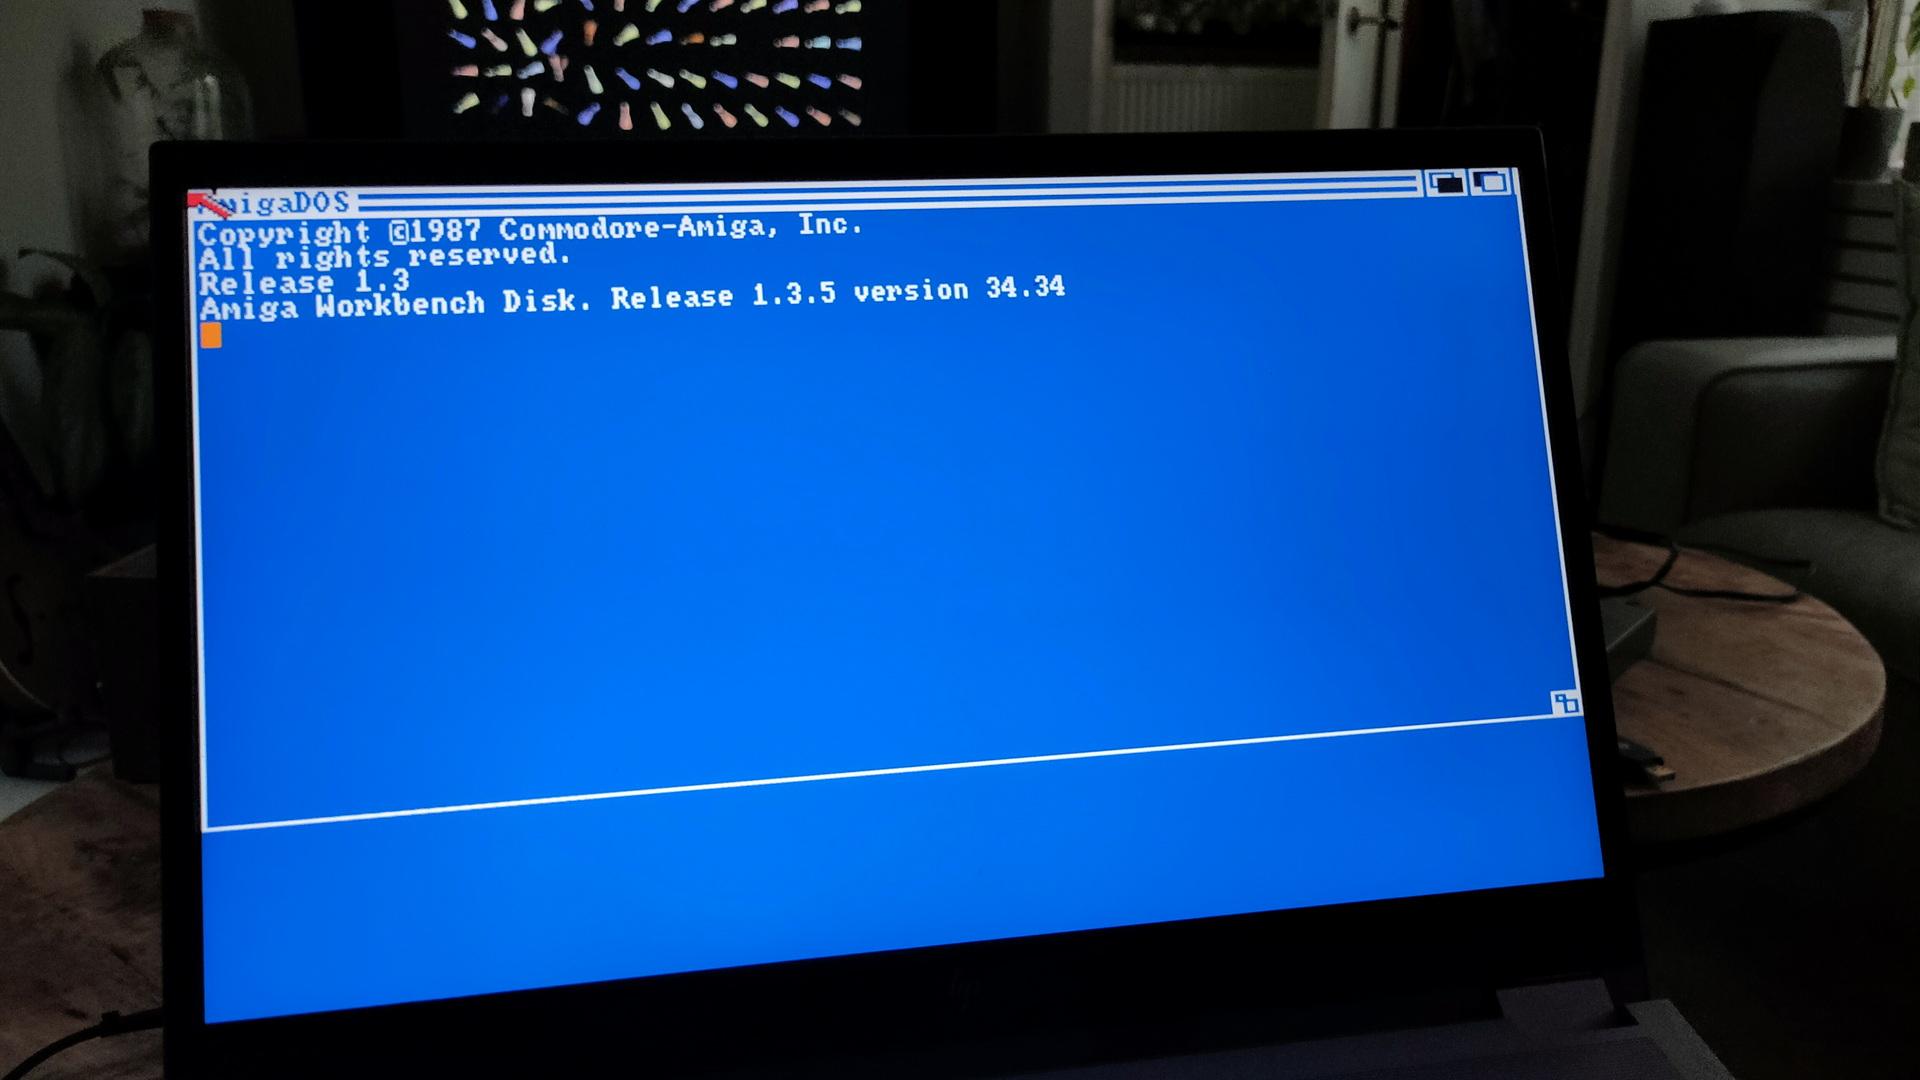
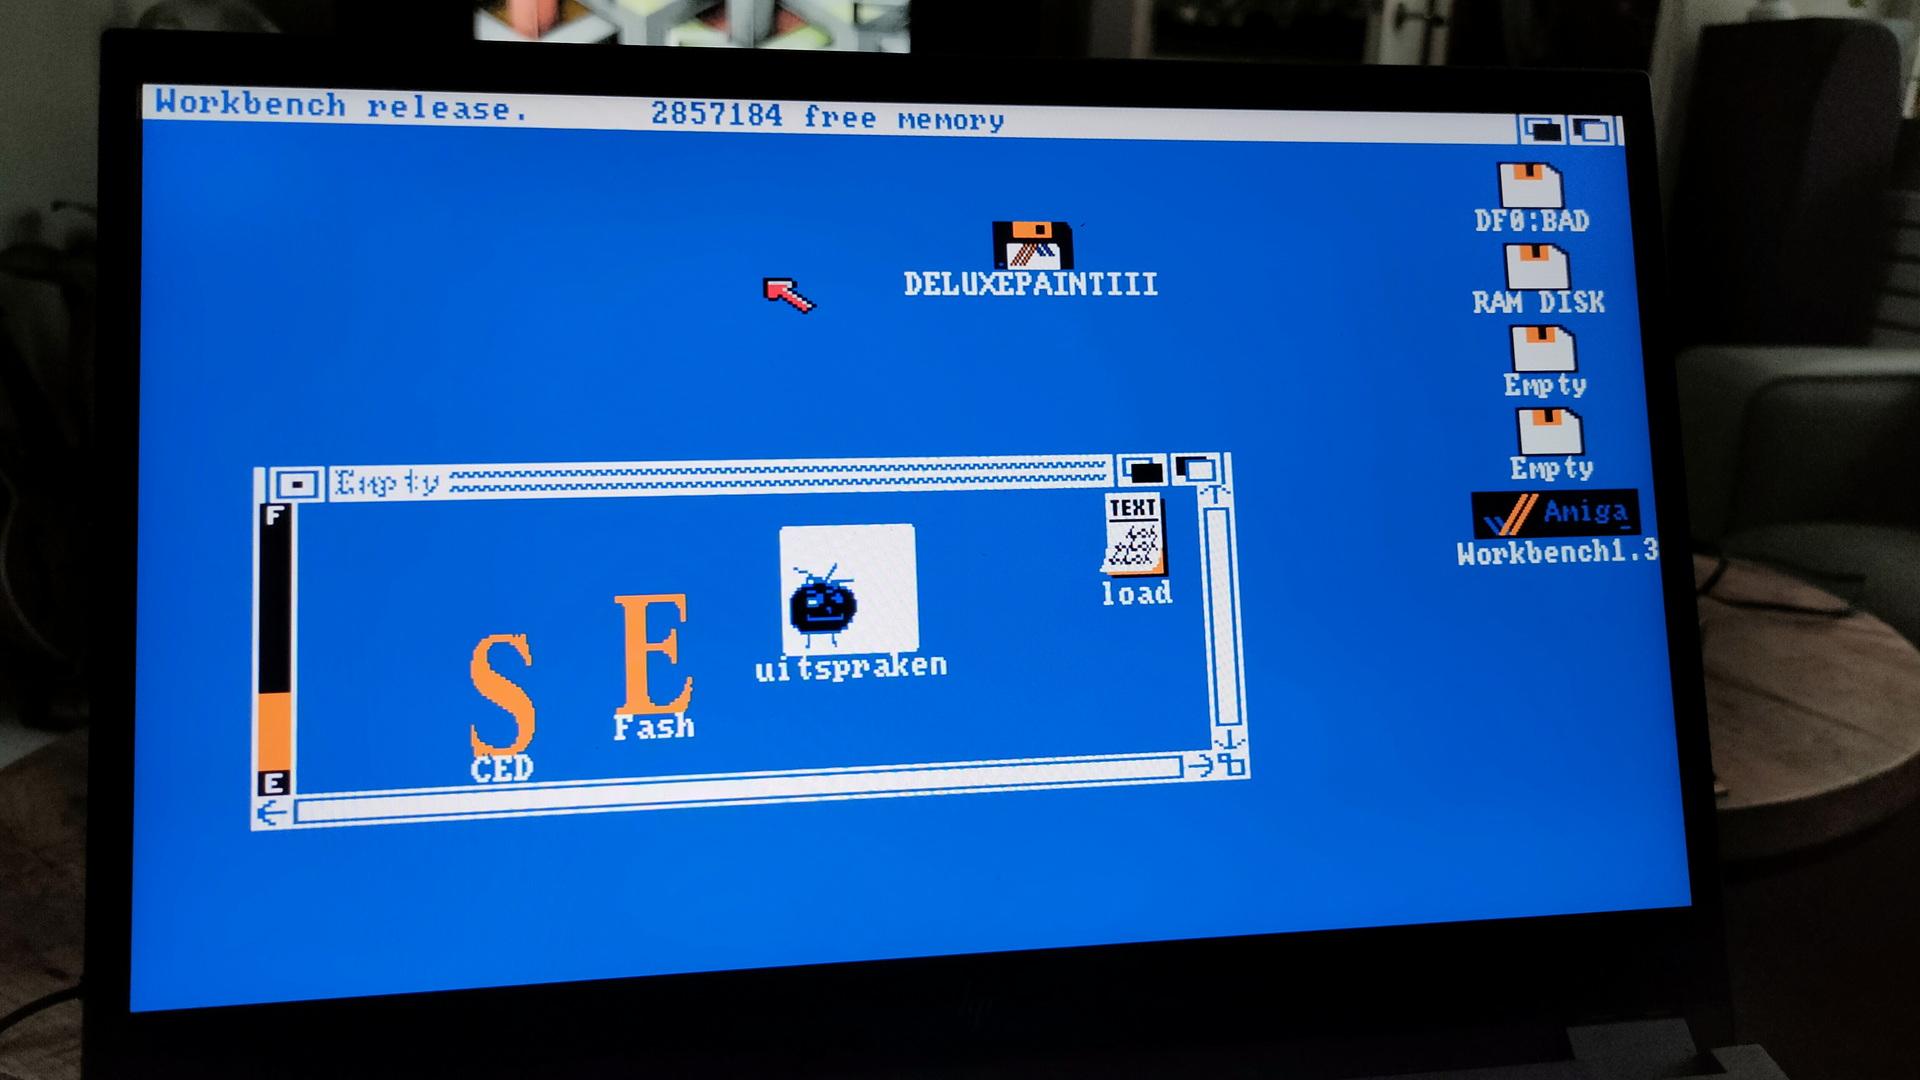
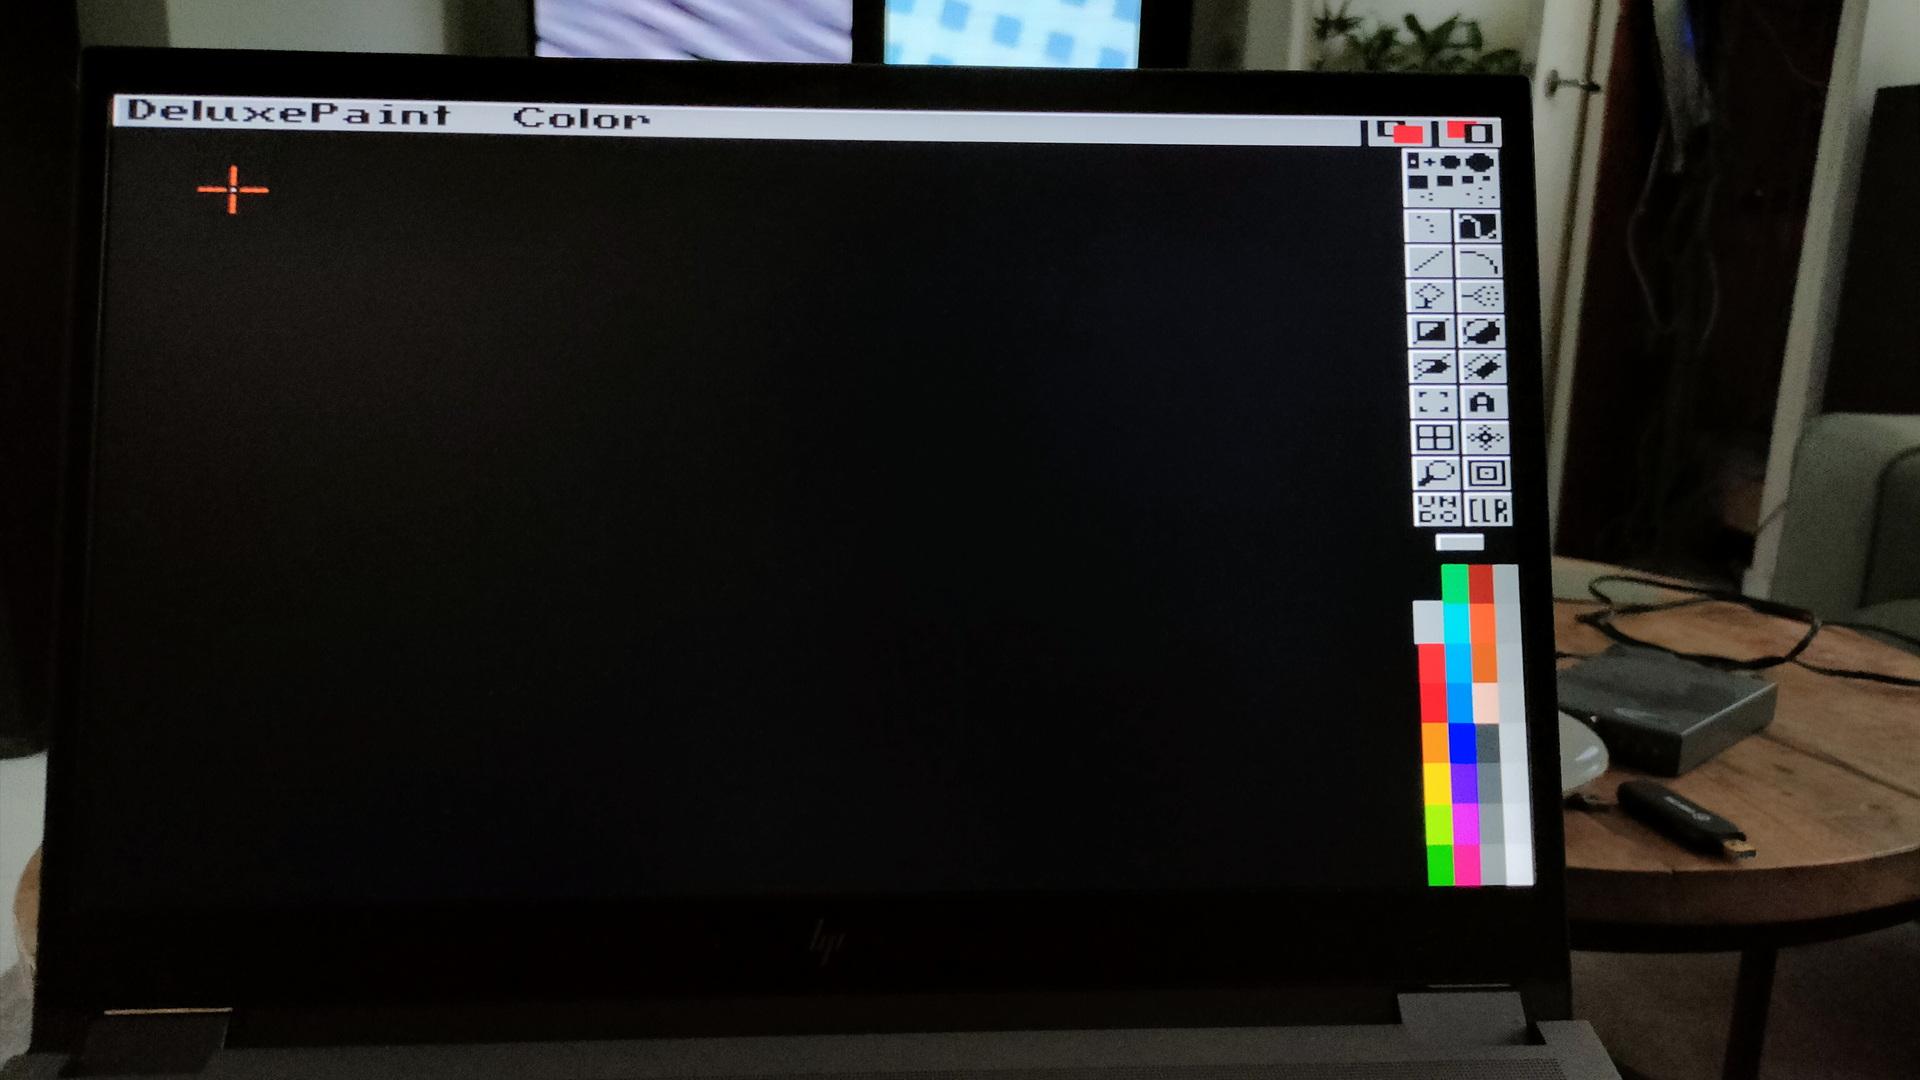
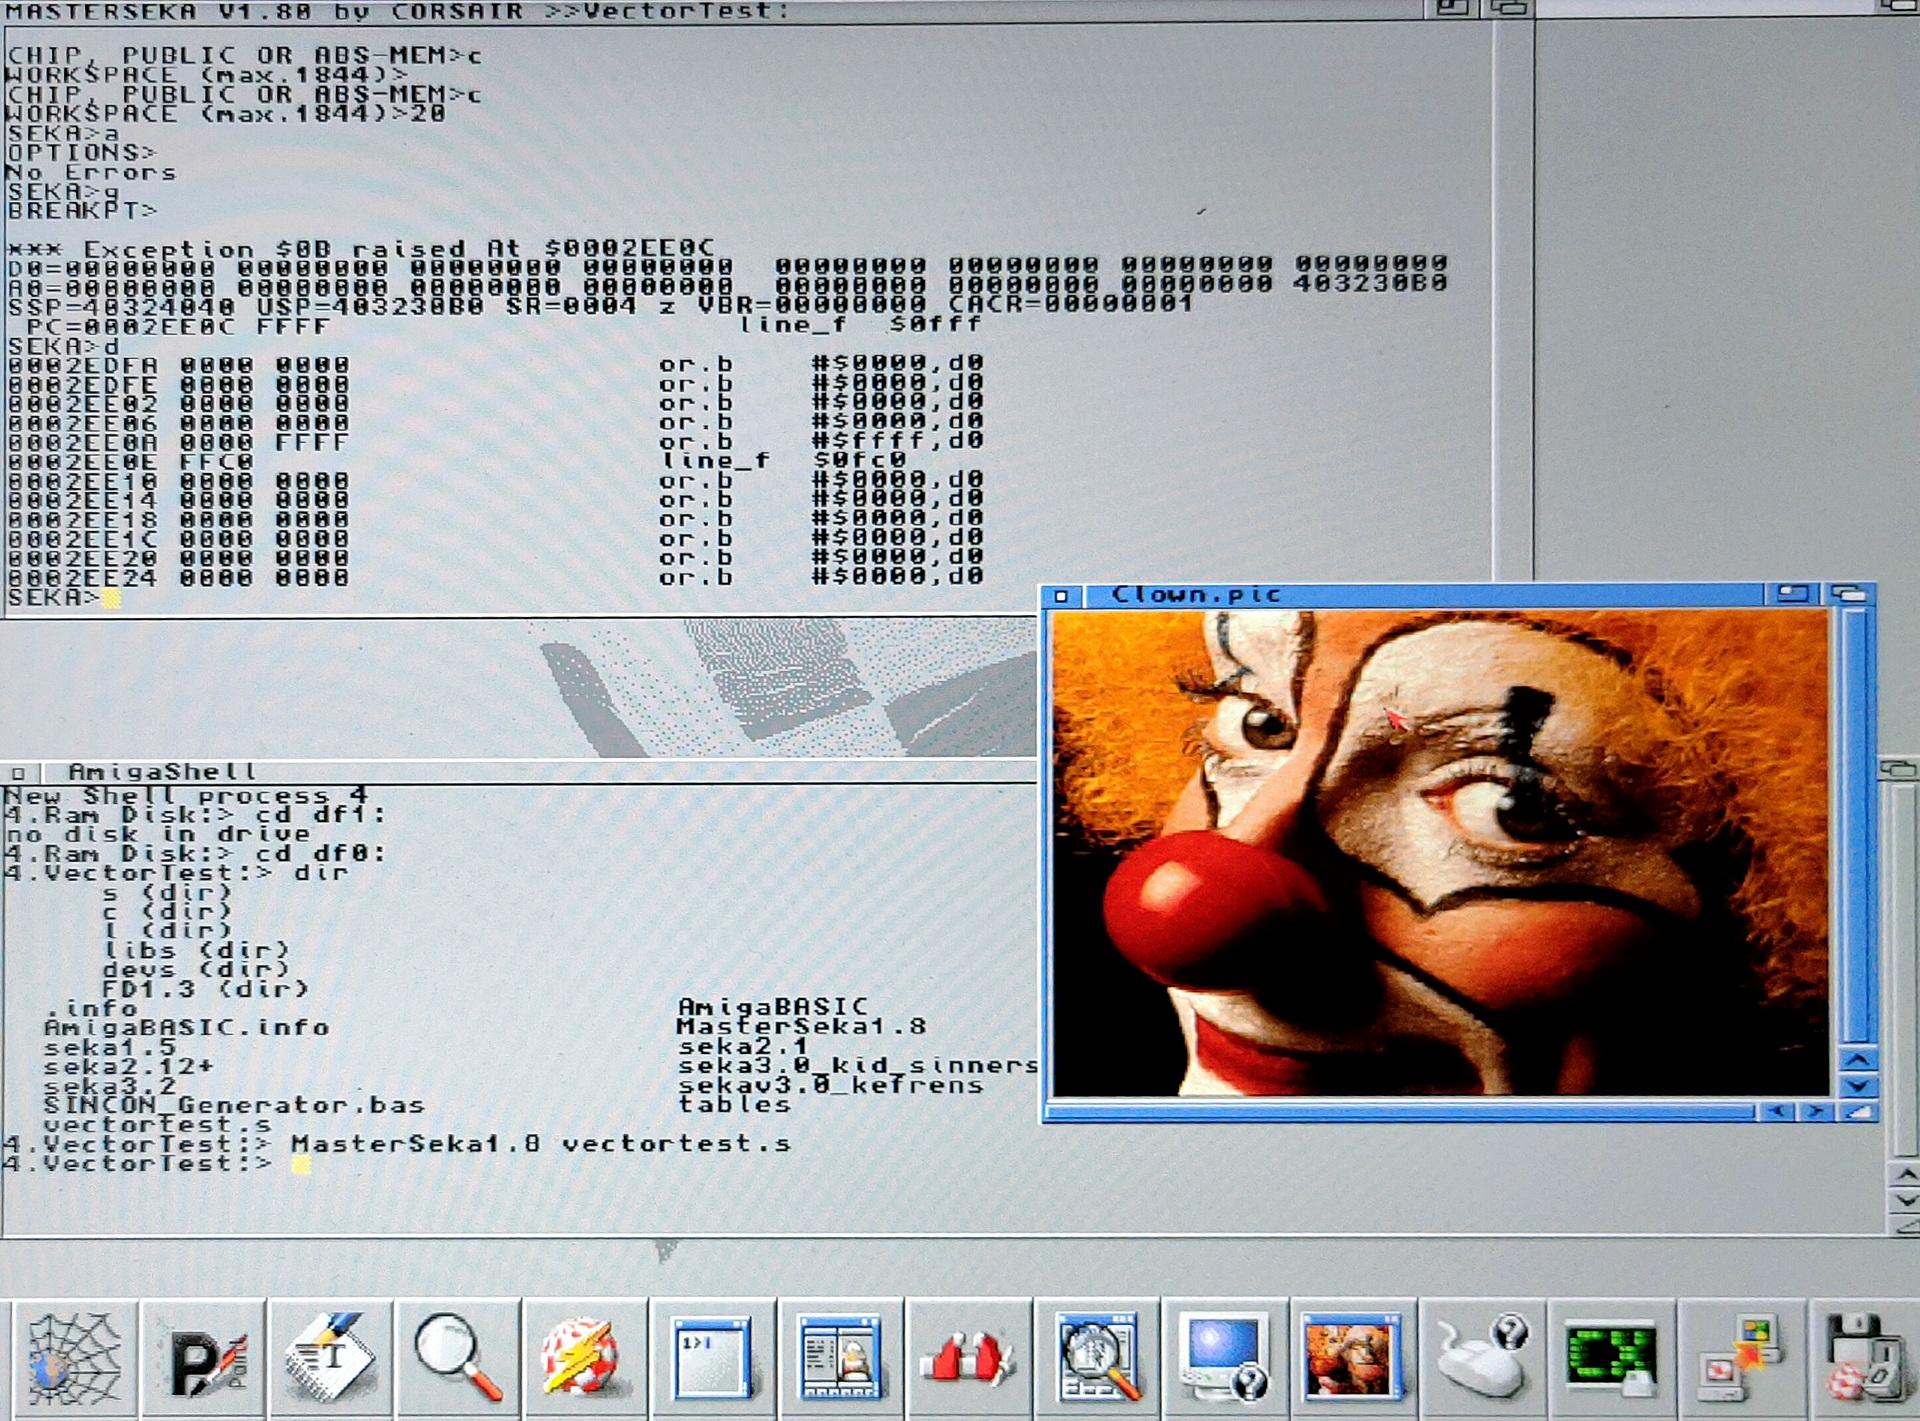
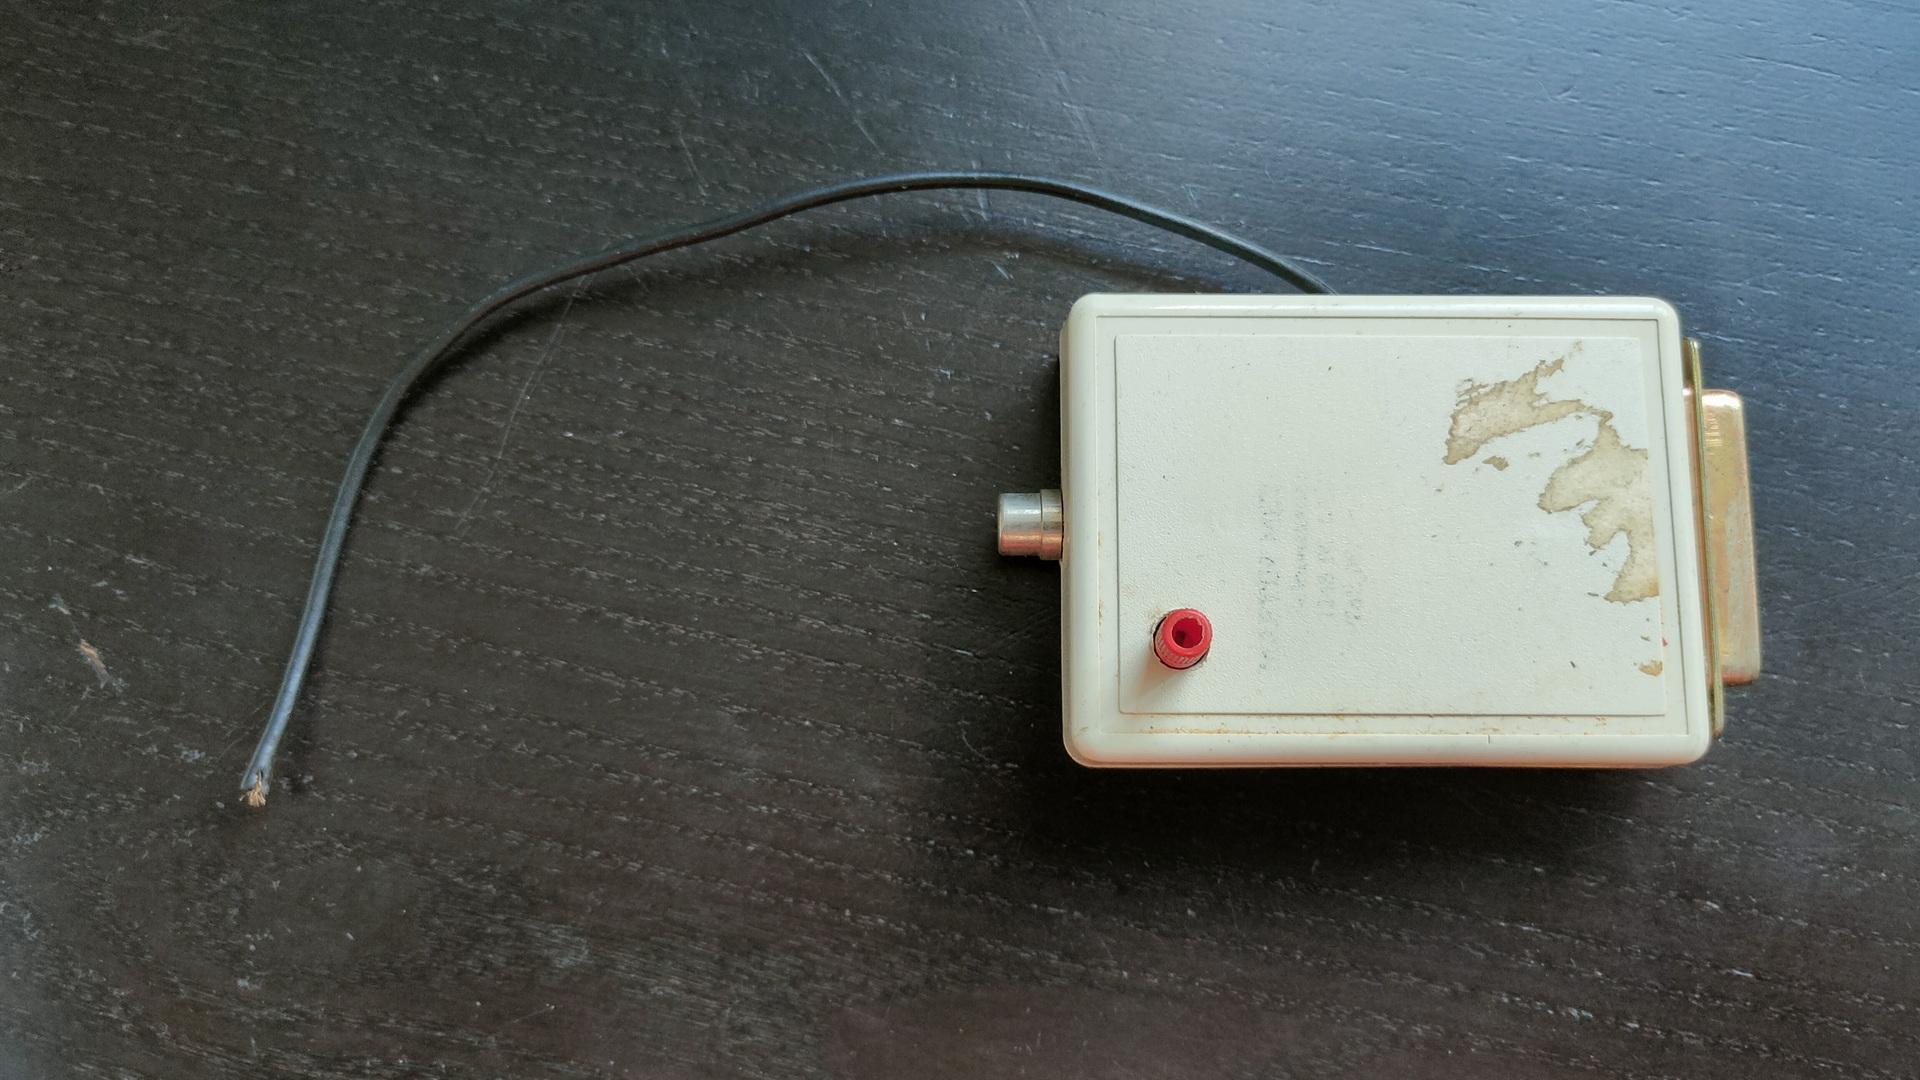
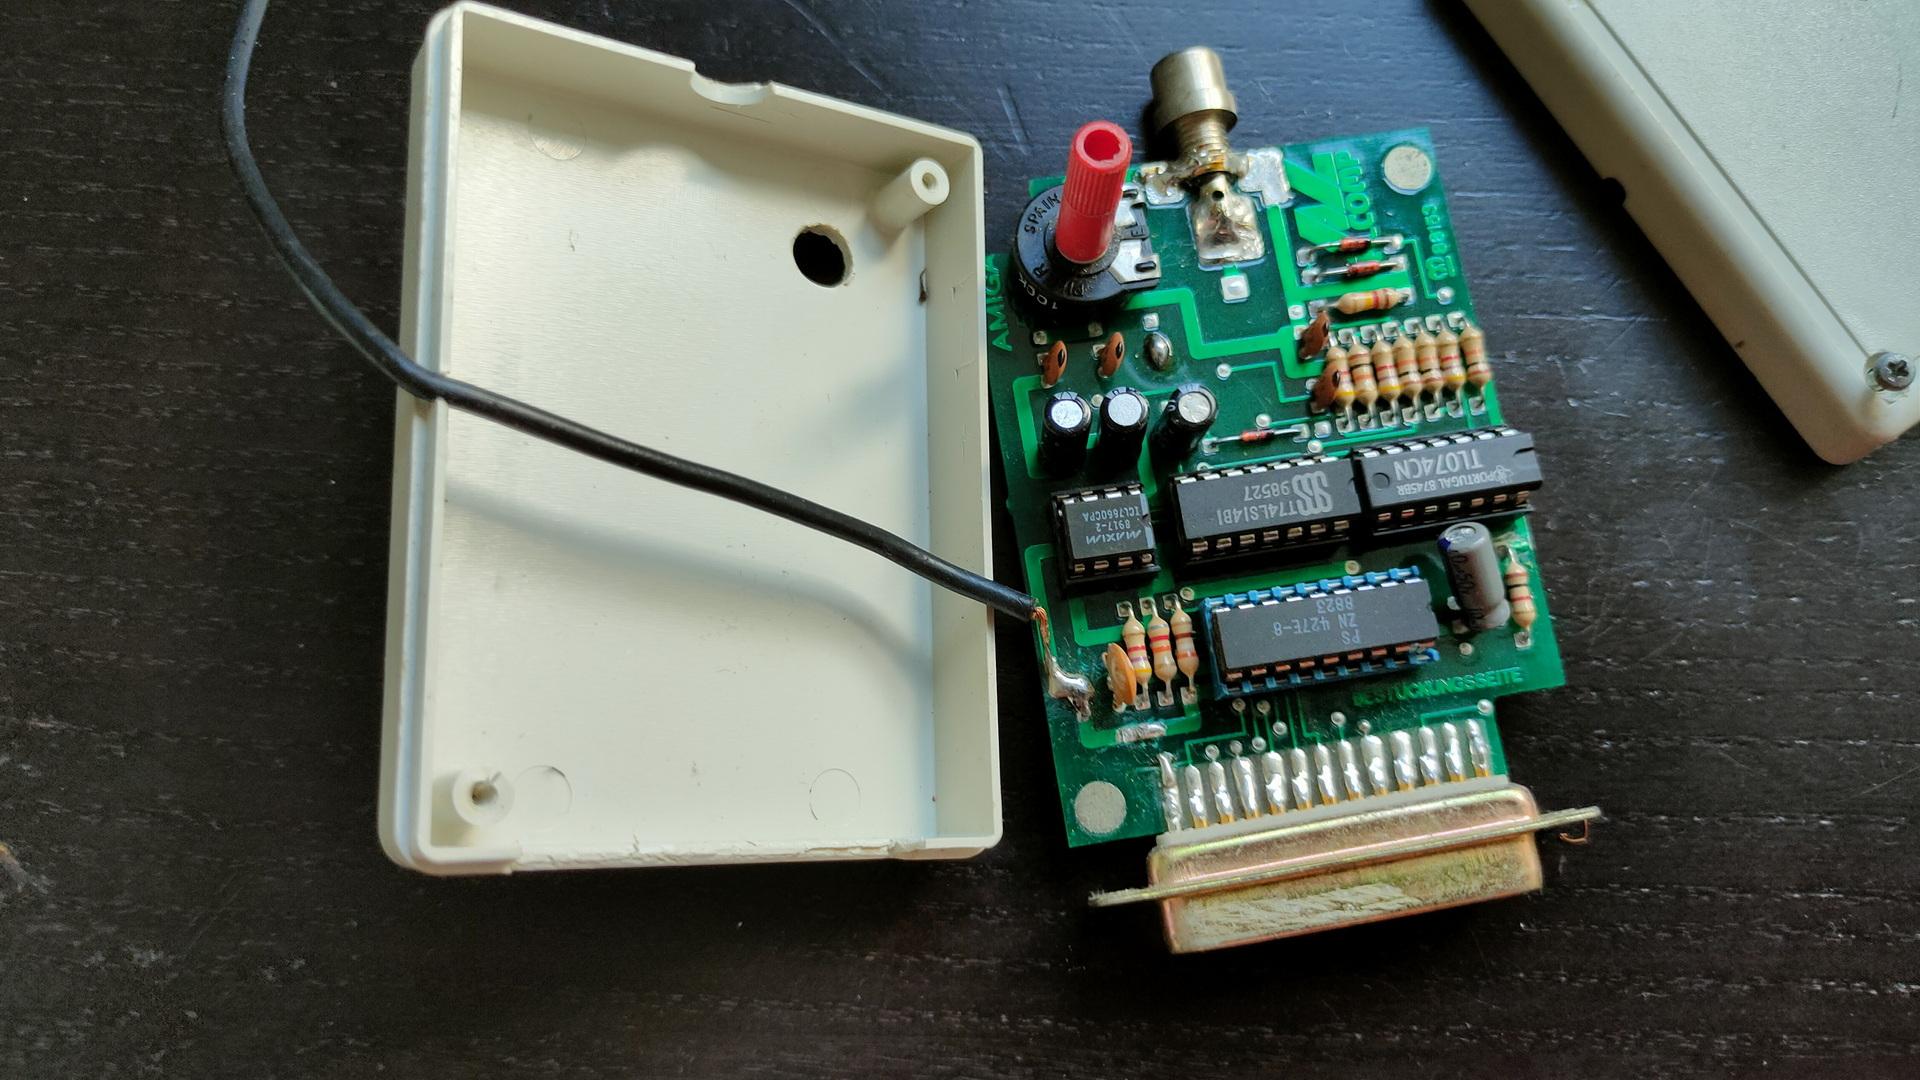
This week (while preparing for a mini retro party) I fixed some Amiga stuff.
I’ve bought a new gadget.
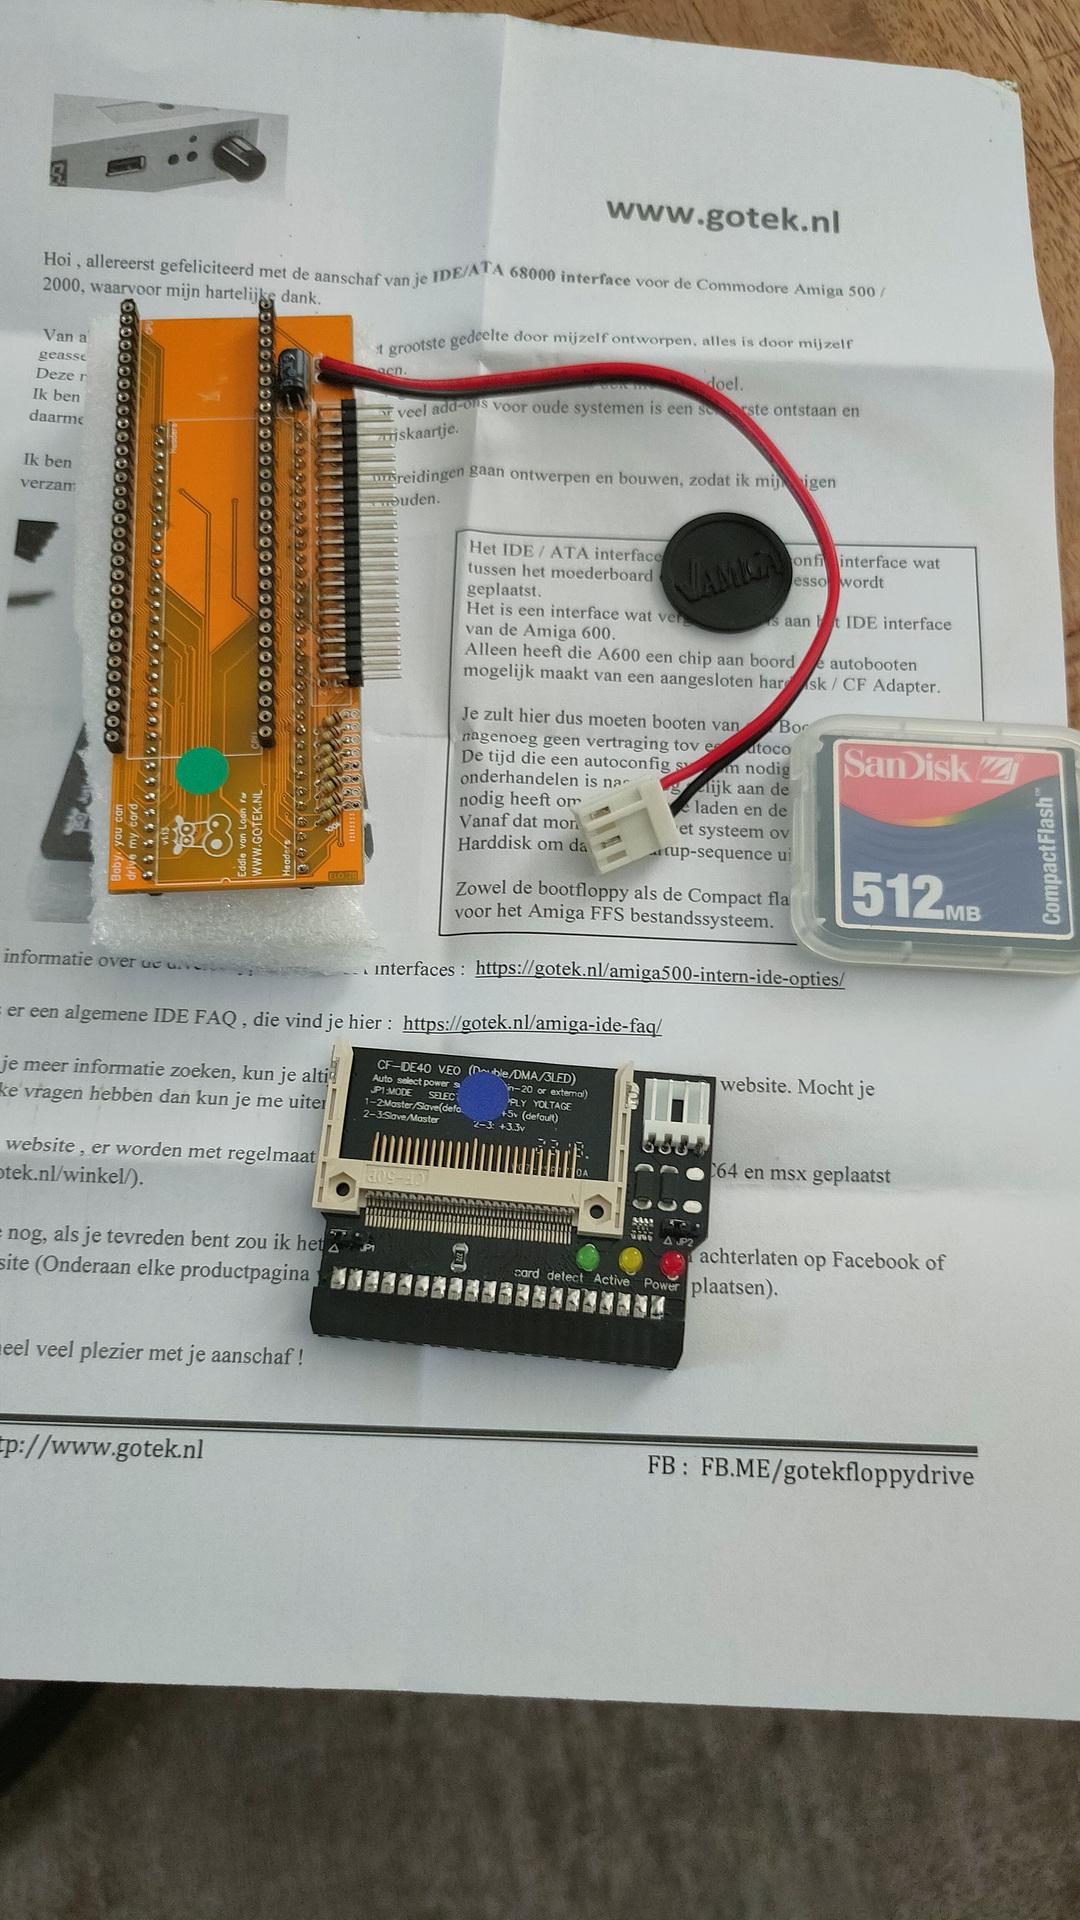
You place this PCB between the CPU IC socket and the CPU (68000) itself.
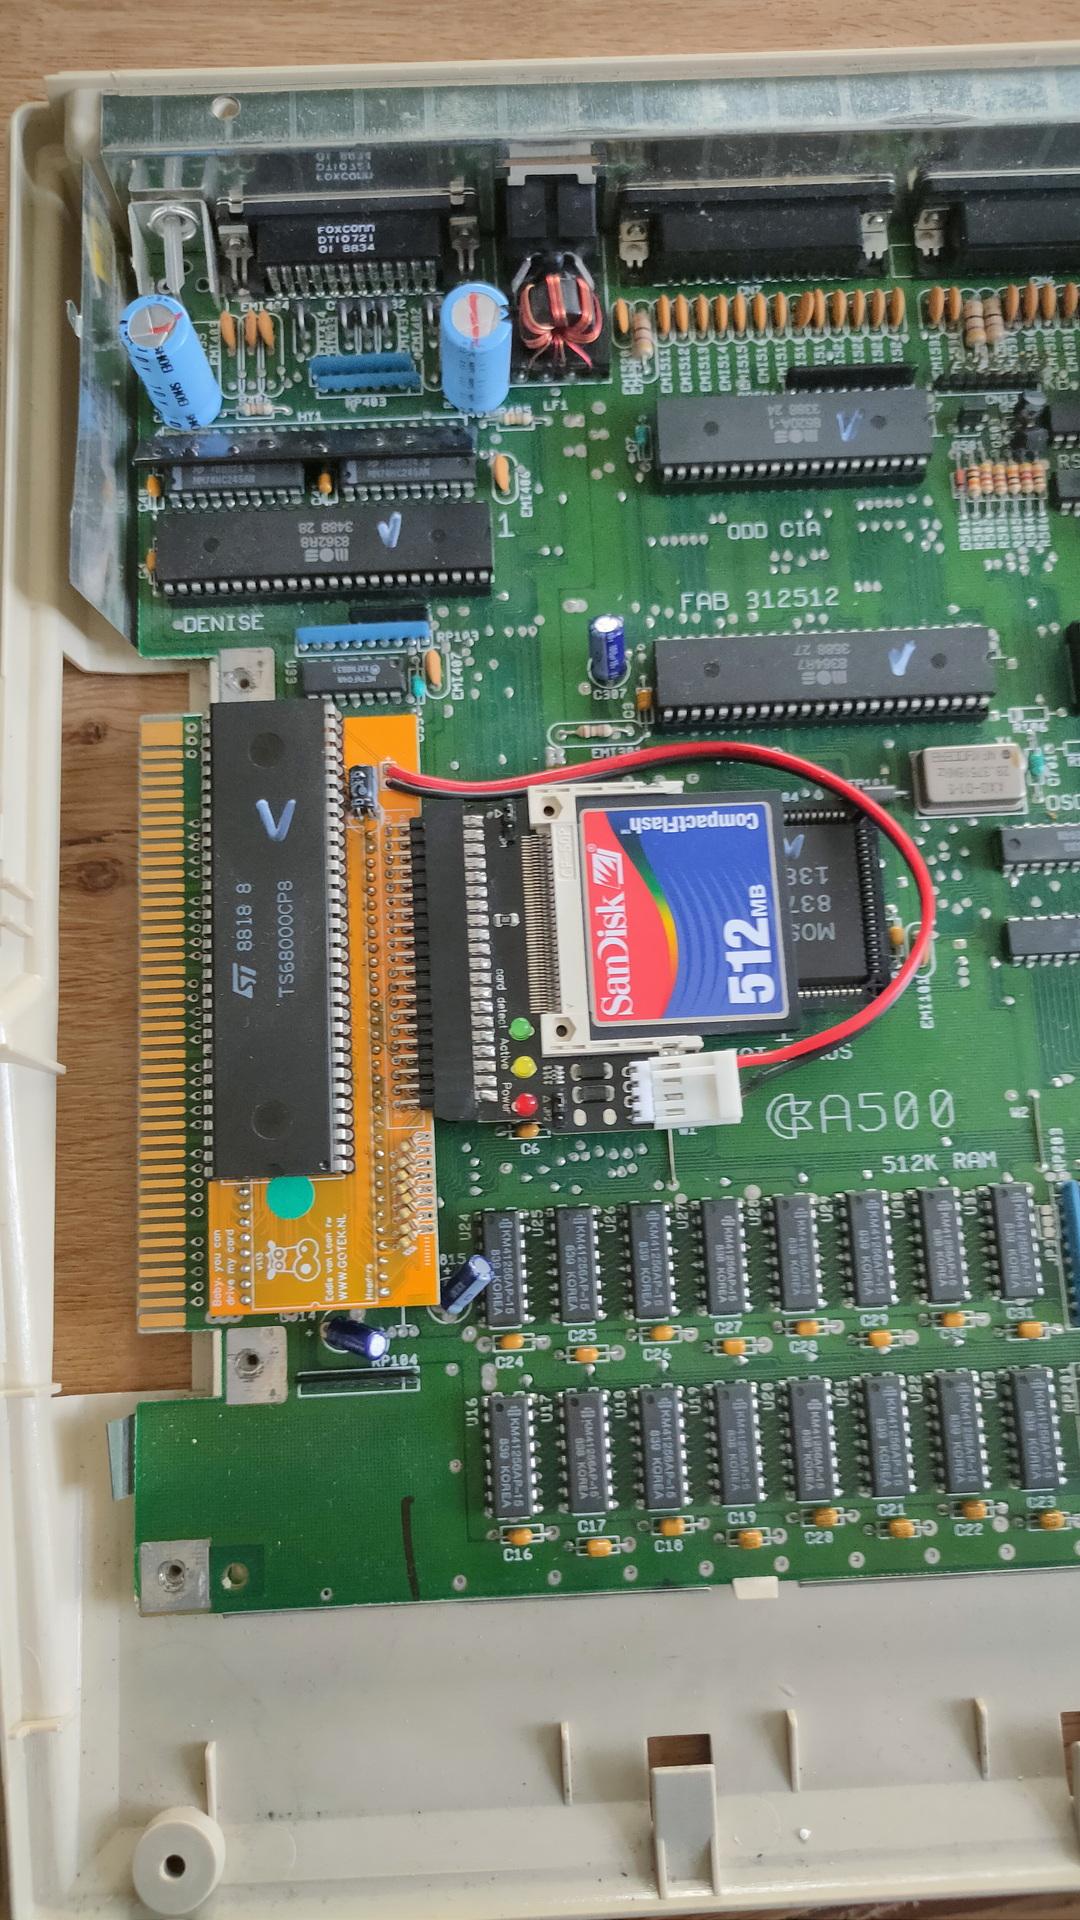
Now running a special floppy image, which loads a driver, I can use the 512MB sdcard as “harddisk”.
It at first ran into all kinds of hangups.
Checking everything, I found CIAB (8520) the culprit.
Timing errors I’ve never noticed before!
Switching this one with CIAA resolved the problem.
(I don’t use a printer anyway, but I have to remember that anything using the parallel port can have problems now.)
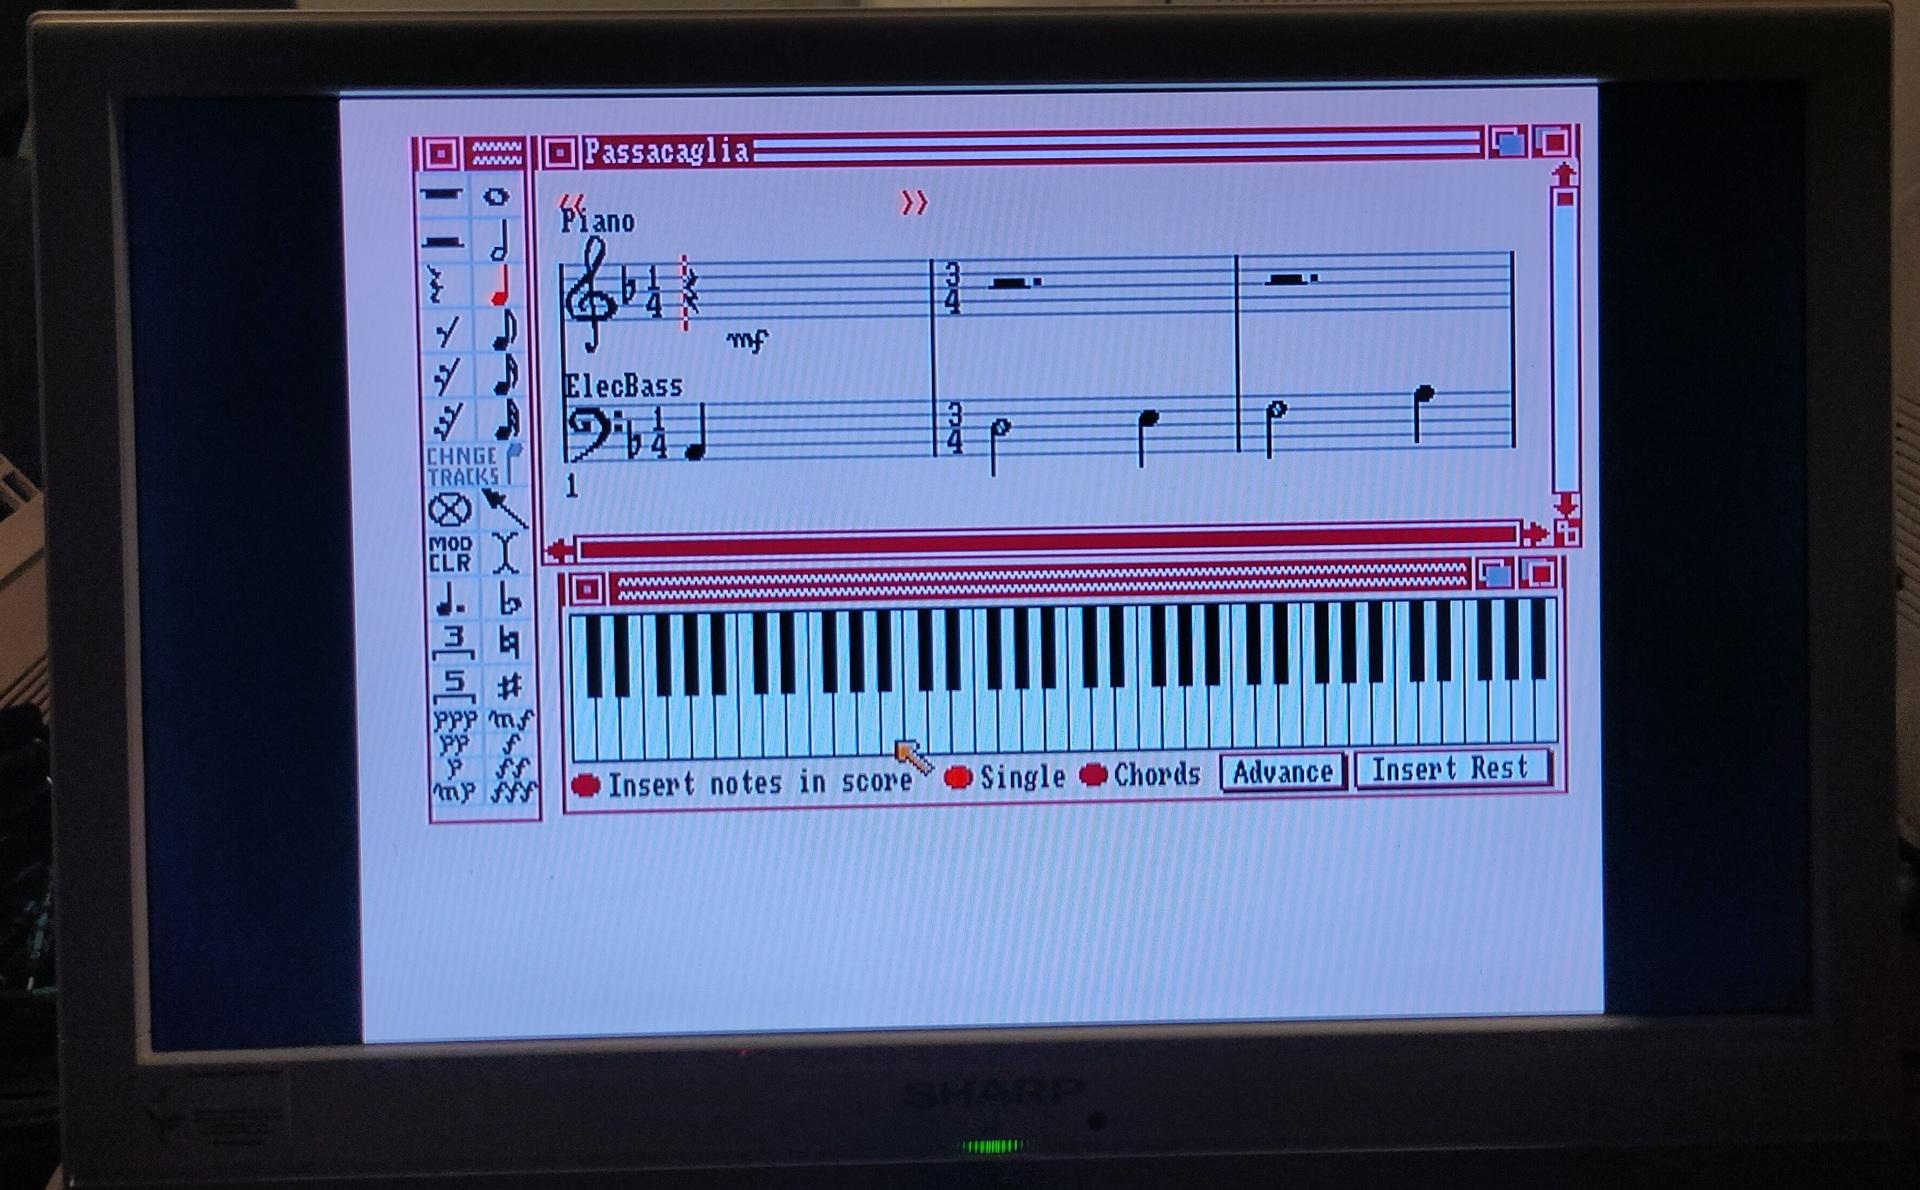
Meanwhile, I wanted to have a better control over the Amiga drives, so I’m planning to use a second switch to reassign drive numbers using a switch.
For switching Internal/External drive (df0/df1) I was using a Gotek boot switch. (Just press 3x ctrl-Amiga-Amiga)
See https://www.henriaanstoot.nl/2022/05/14/gotek-stuff/
But I have TWO external devices.
The Gotek virtual disk device and a real 5.24″ drive.
So I’m going to use a ON-ON double switch to toggle the external devices.
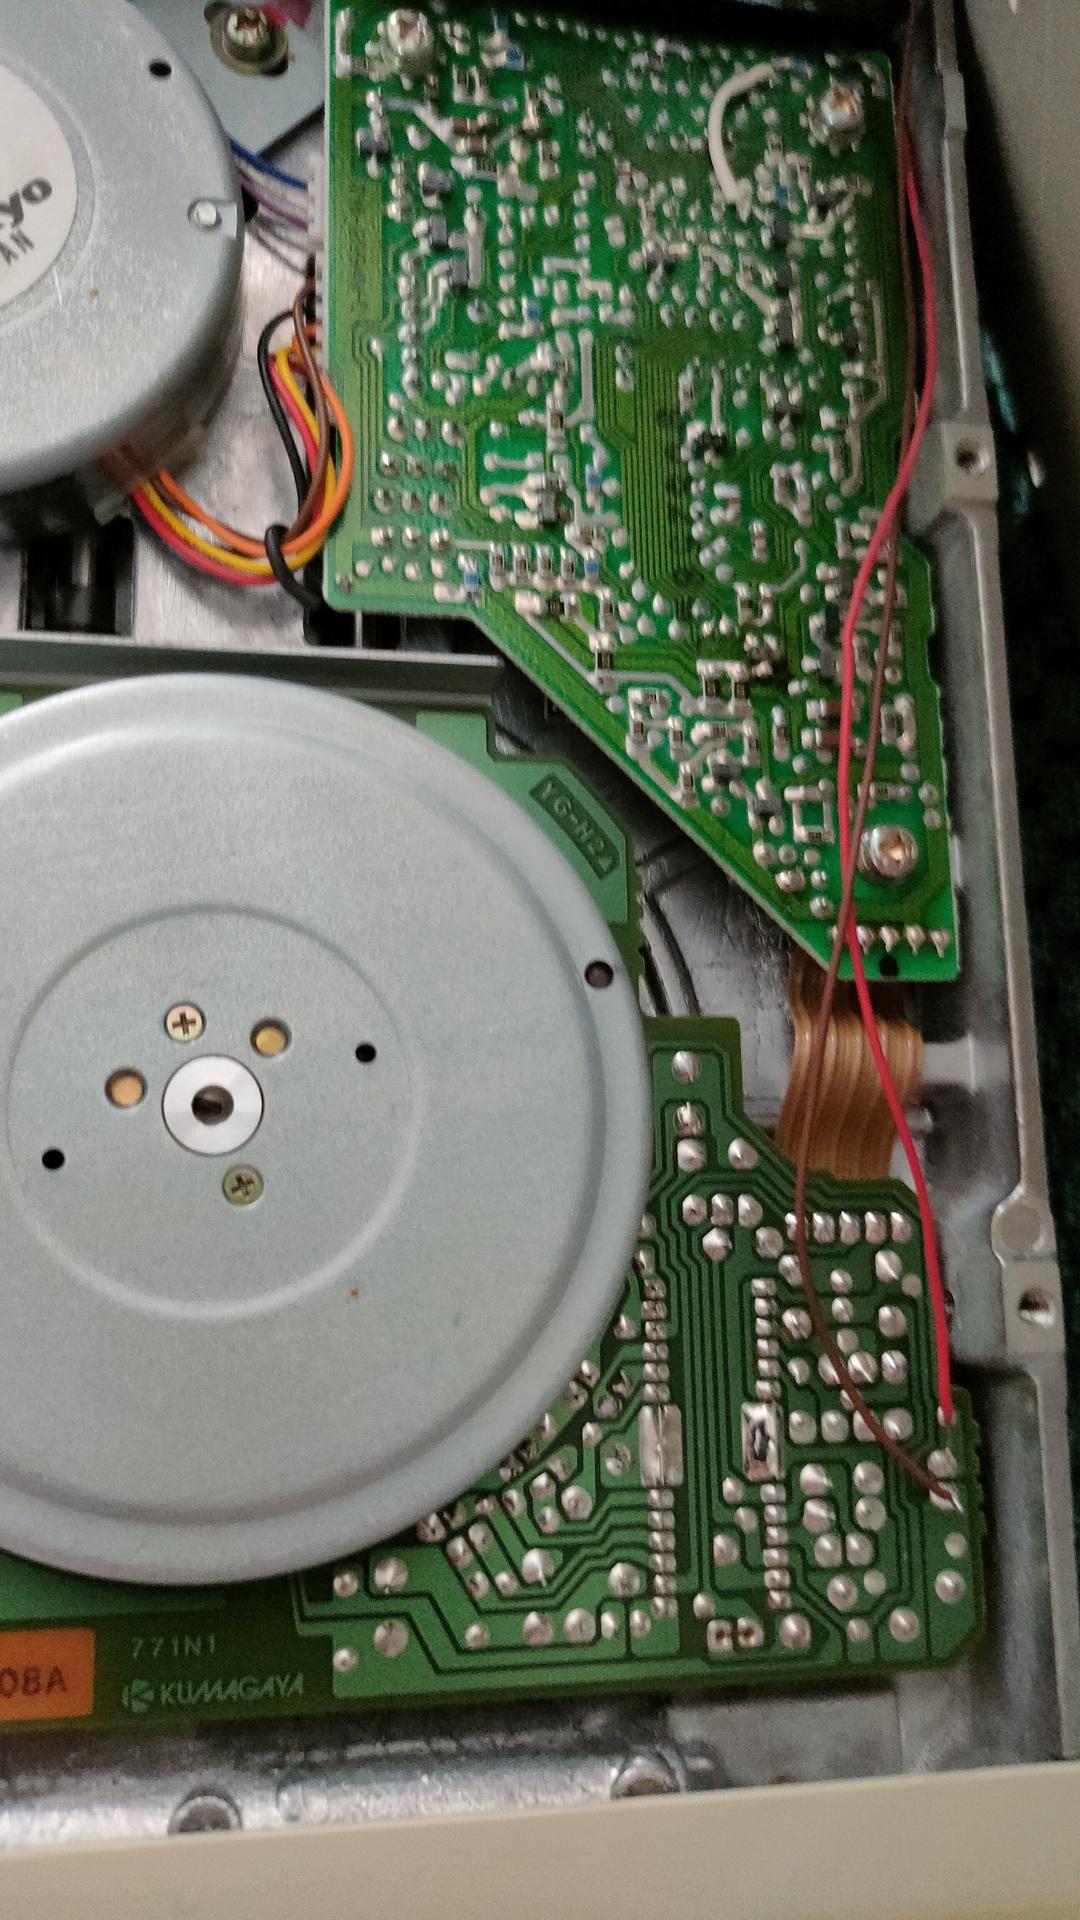
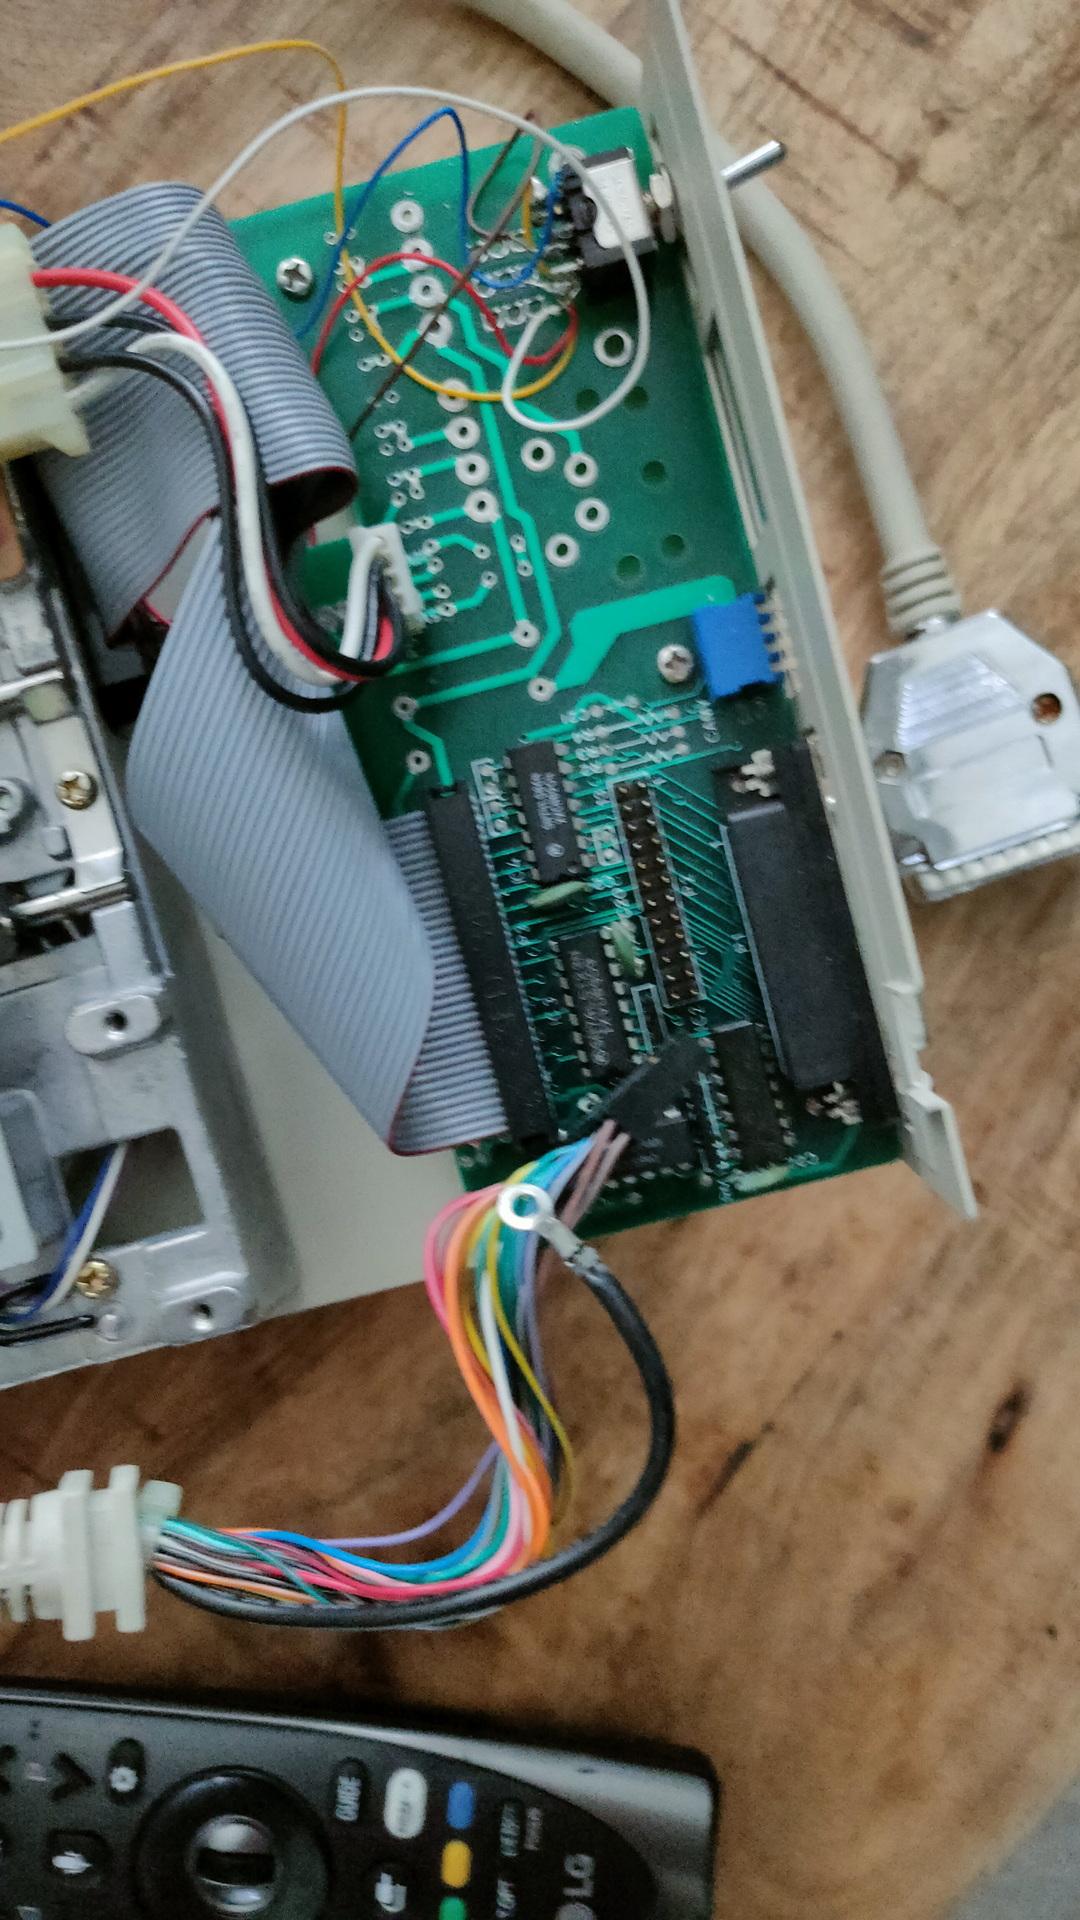
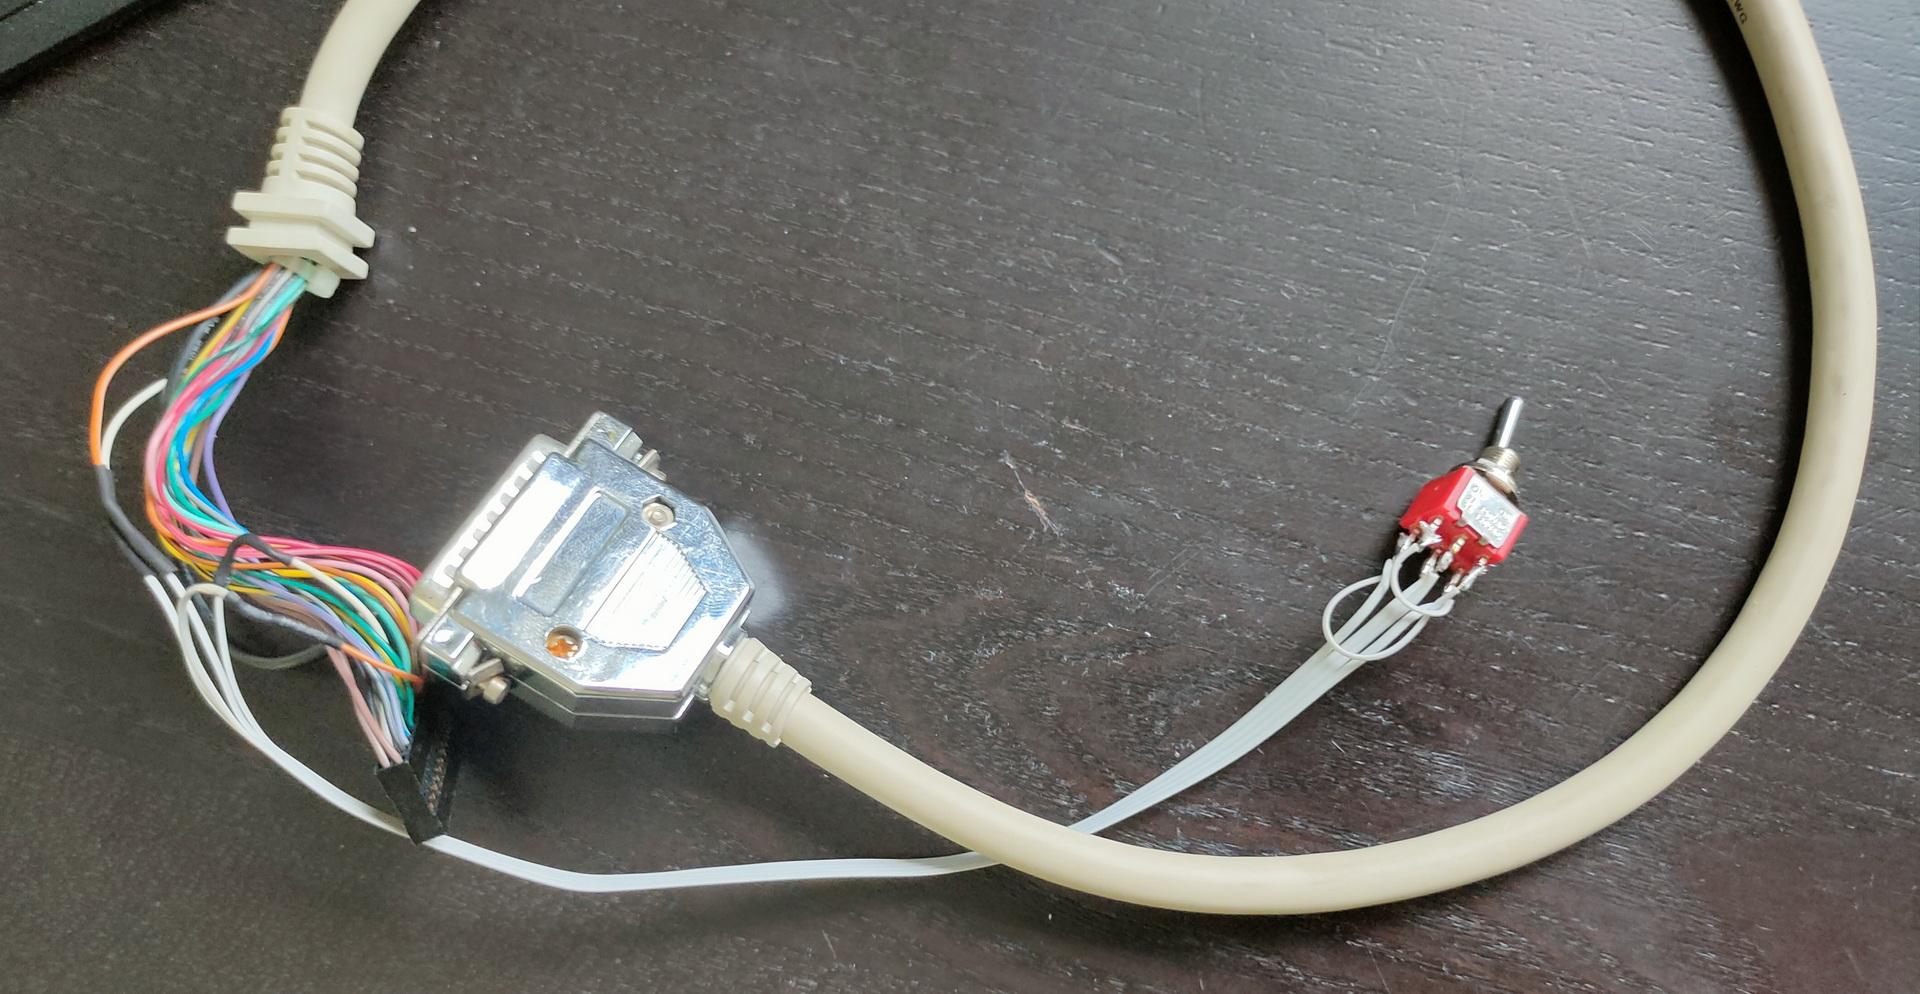
The internal switch toggles internal and external.
The secondary I’m going to build into the 5.25″ drive toggles df2 and the “df1”.
That way the internal drive can be 0 (boot) or 1.
The external drives can be 0,1 or 2.


NOTE: Switch pin 21 and 9 using the cross switch!
SO: Amiga with internal drive -> External 5.24″ which has a passthrough to the Gotek.
Another amiga thing fixed:
I re-installed Aros (on an old Laptop this time)
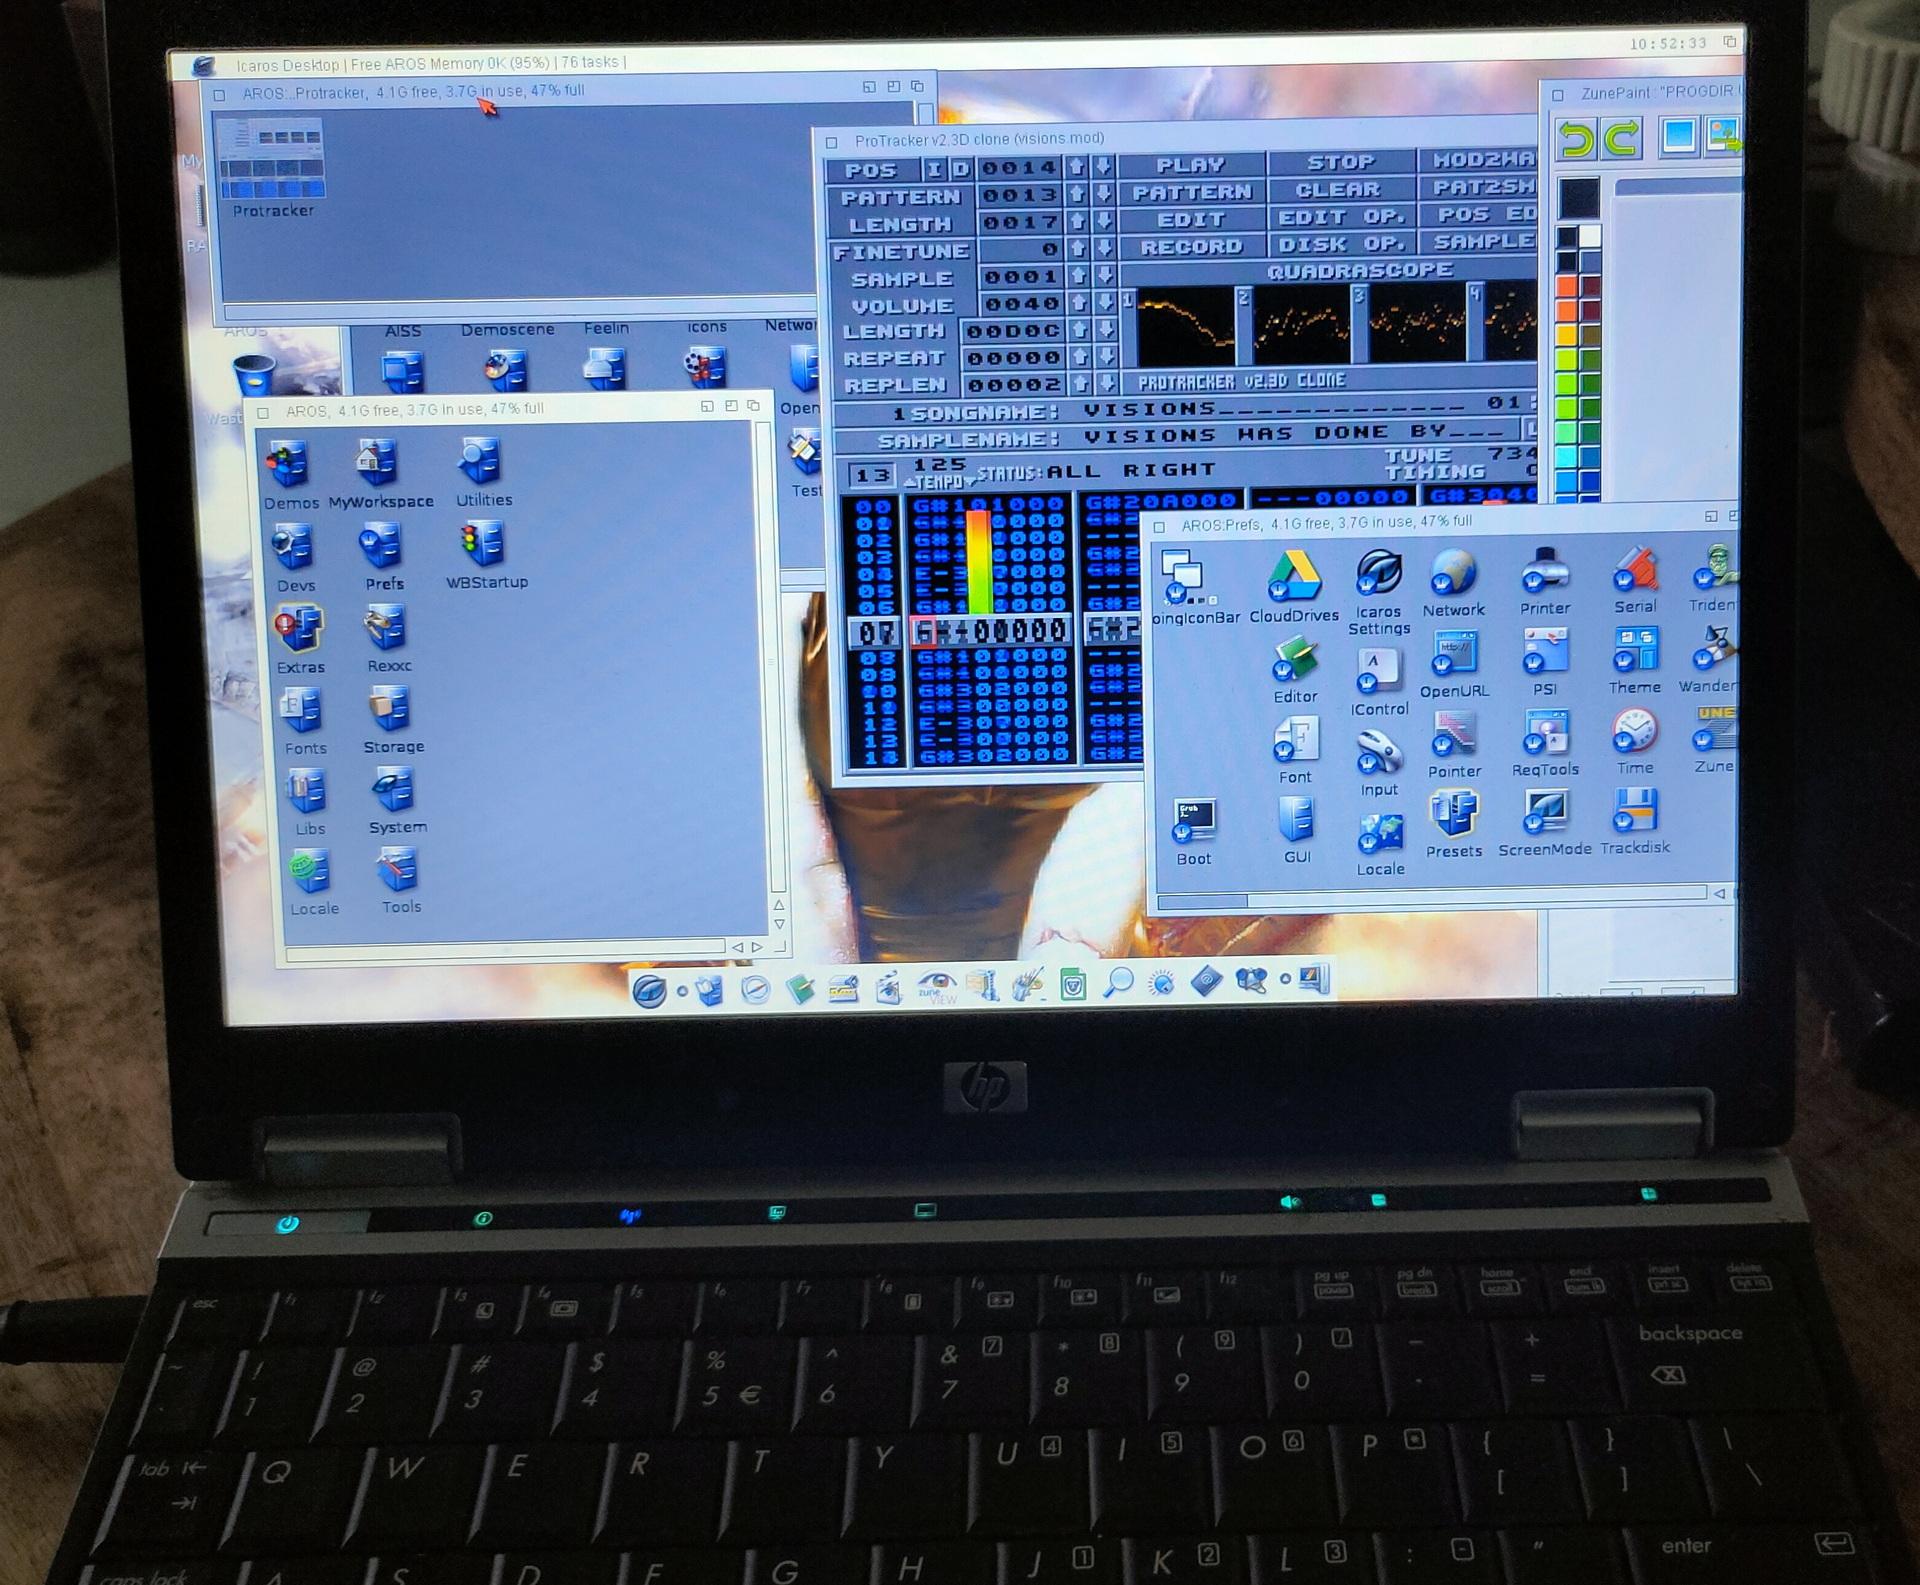
And third: I’ve bought the Amiga Forever cdrom.
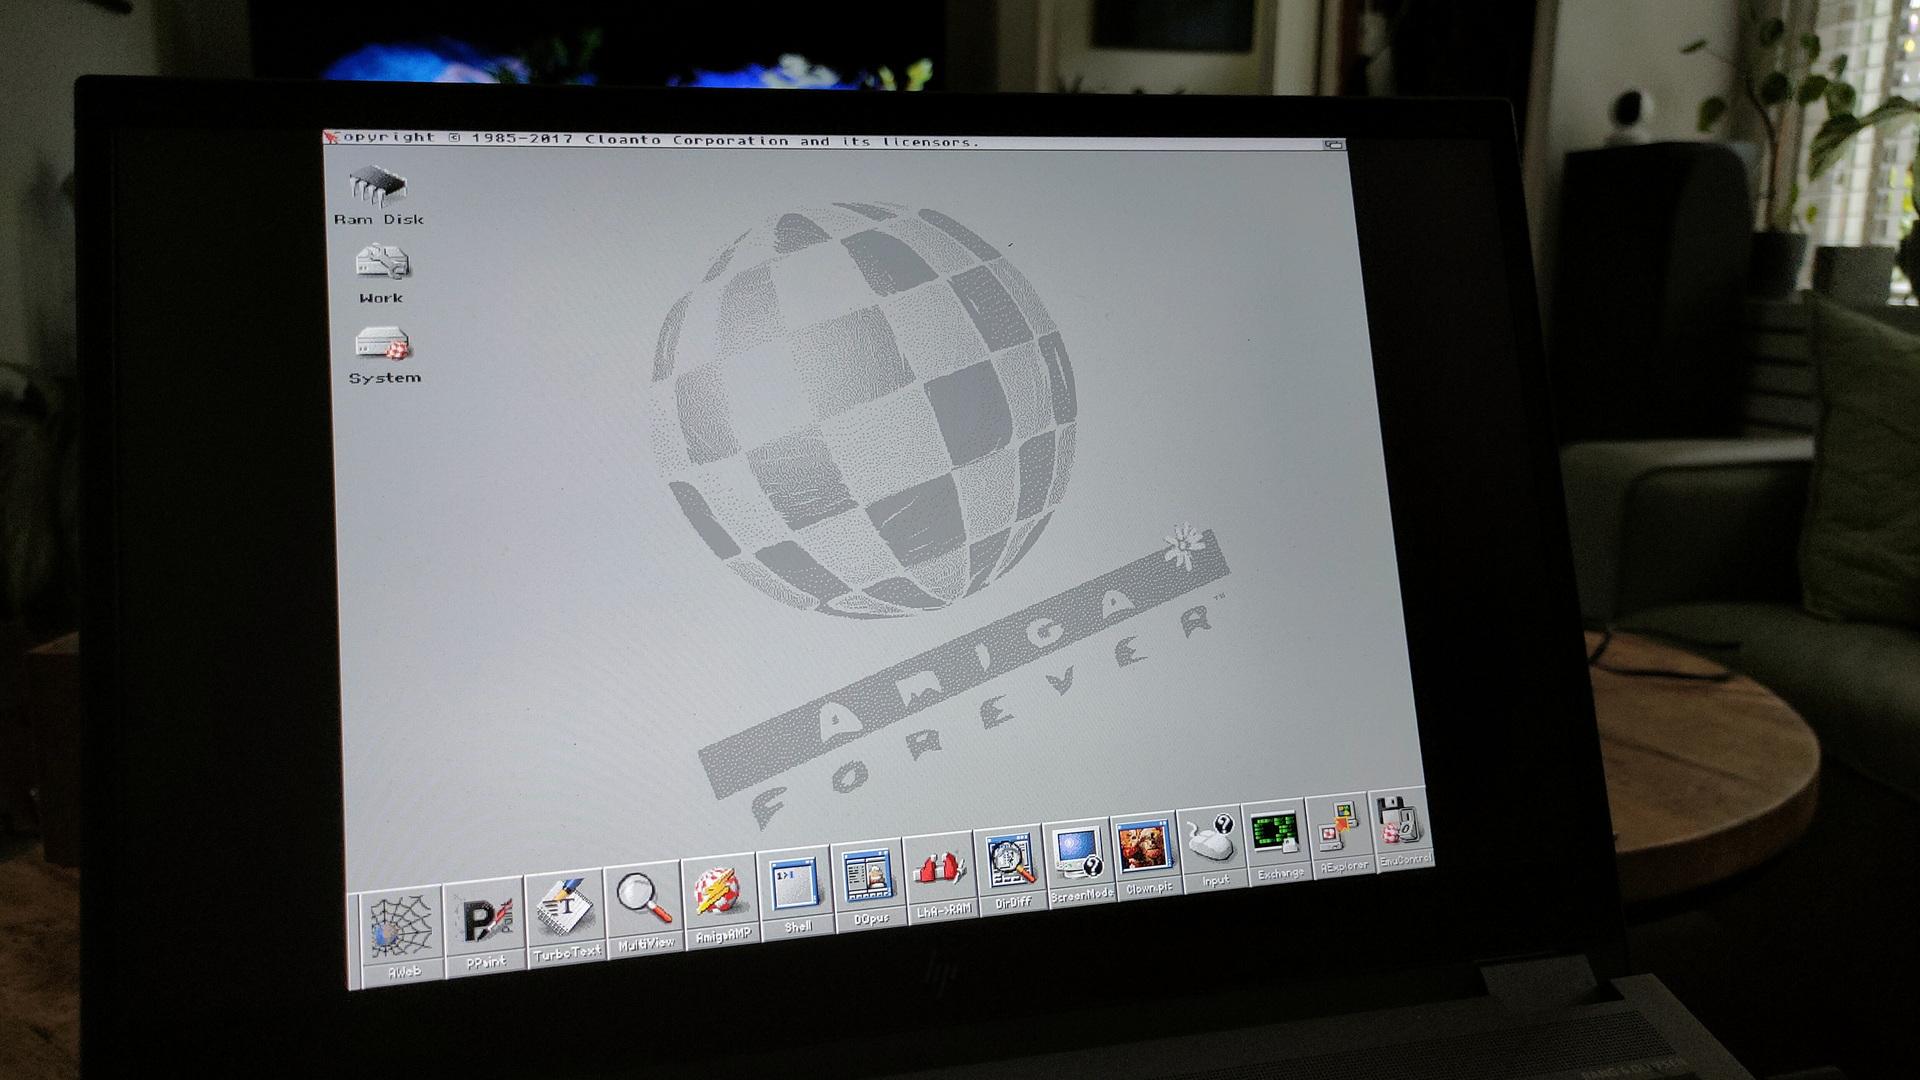
When you get the ISO image from AmigaForever, and want to run it using Linux, do this to get it working
sudo apt install xkbfile1:i386
sudo apt install libxkbfile1:i386
mkdir -p /cdrom
sudo mount -t iso9660 ~/Downloads/AF.iso /cdrom
cd /cdrom/Private/Linux/e-uae/
./kxlight-start.sh

If you install Wine, you can use the windows gui in linux also.
Amiga samplers
Testing the sampler (demo for Tyrone)
Sampling the sound of a C64 on an Amiga.
Started (booted) the sampling program from second external drive using switch setup as above.
Going through some storage boxes, I noticed I’ve got two items of Piet Bos.
Who was Piet Bos? (link to photo)
In 1938 Piet Bos founded the Natural History Museum in Holten. Bos had a nationally renowned taxidermy company in Holten. In the era of emerging tourism, Mr Bos had a good sense of how he could captivate visitors. He had a unique idea at the time, namely to exhibit stuffed animals in their “own” environment through dioramas (viewing boxes). Not only the dioramas, but also display cases with prepared birds and mammals still appeal to the imagination. Over the years, the collection has grown into one of the most extensive in Europe. Son Kees Bos has given the museum a contemporary character as a painter and sculptor. The name of the museum has been changed to Natuurdiorama Holterberg. Visitors to the Sallandse Heuvelrug can learn about the history and flora and fauna of the area in the museum. The nature museum also shows animals that occur in other parts of Europe. More than 1,000 animals and birds can be viewed in eleven life-size dioramas, accompanied by accompanying sounds.
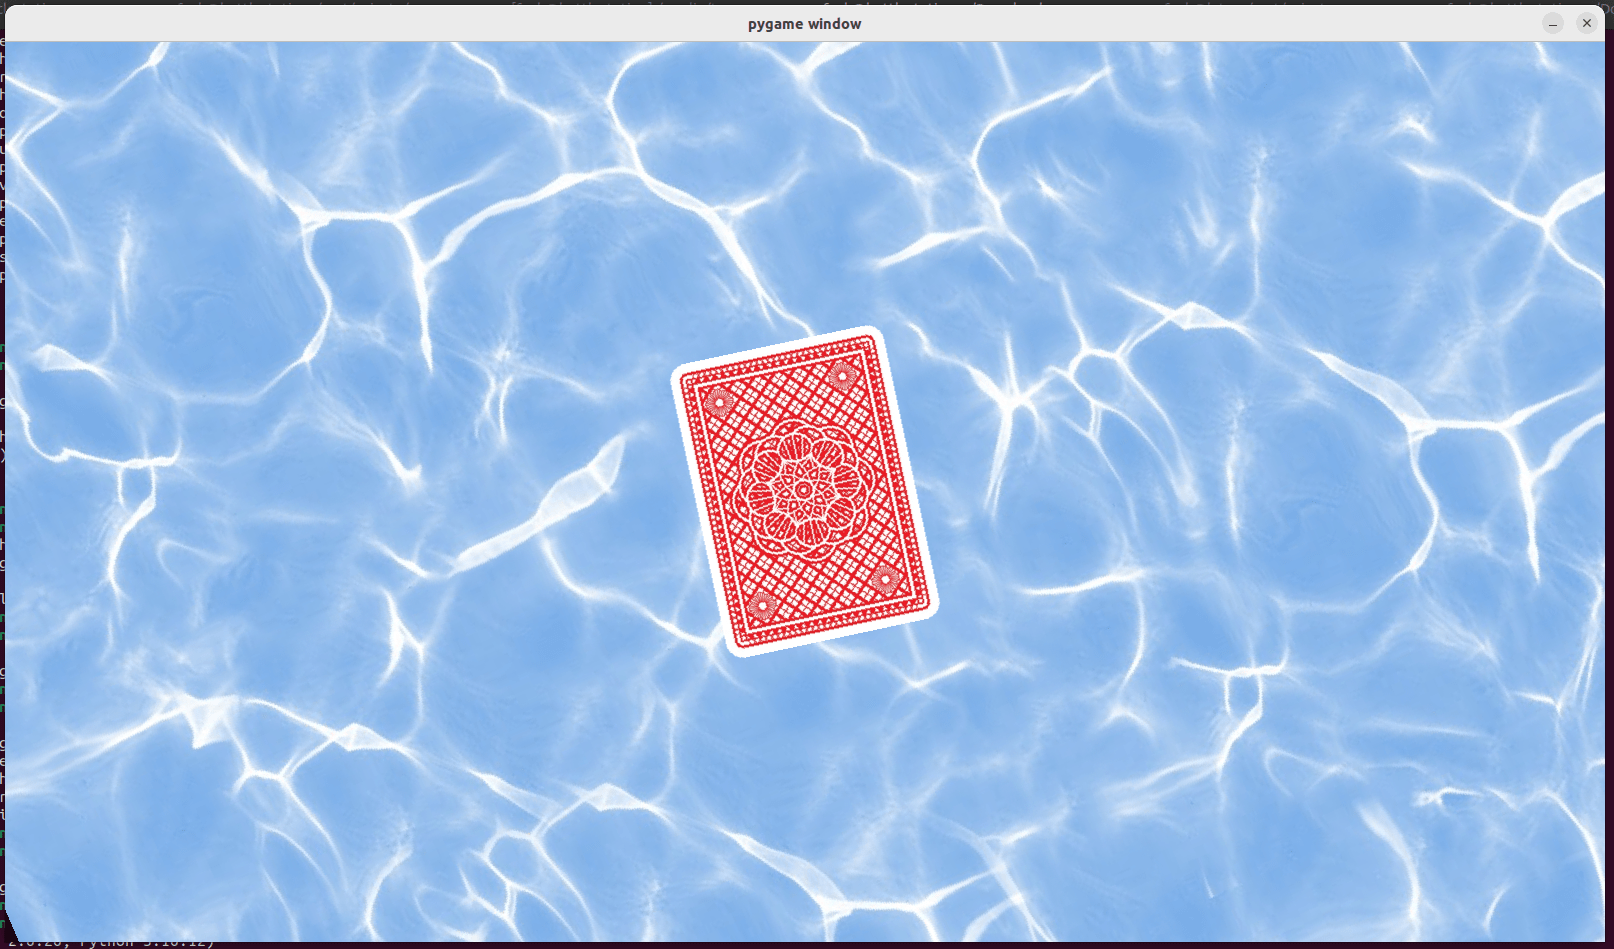
My friend Tyrone posted something he recorded from TV.
It was an illusion, using rotated images.
The effect is that it seems that the card is rotating at different speeds, when pressing the s (show/unshow) key, you see the card rotating at the same speed as before.
So I wanted to try to recreate this using python.
The effect is there, but a little less.
What can I improve?
Mine:
Original:
import pygame
import math

# 20240409 added s to toggle

pygame.init()
screen = pygame.display.set_mode((1600, 900))
clock = pygame.time.Clock()

def blitRotate(surf, image, pos, originPos, angle):

    image_rect = image.get_rect(topleft = (pos[0] - originPos[0], pos[1]-originPos[1]))
    offset_center_to_pivot = pygame.math.Vector2(pos) - image_rect.center
    rotated_offset = offset_center_to_pivot.rotate(-angle)
    rotated_image_center = (pos[0] - rotated_offset.x, pos[1] - rotated_offset.y)
    rotated_image = pygame.transform.rotate(image, angle)
    rotated_image_rect = rotated_image.get_rect(center = rotated_image_center)
    surf.blit(rotated_image, rotated_image_rect)

try:
    image = pygame.image.load('cards.png').convert_alpha()
    image2 = pygame.image.load('clear+sea+water-2048x2048.png').convert_alpha()
except:
    text = pygame.font.SysFont('Times New Roman', 50).render('imagemissing', False, (255, 255, 0))
    image = pygame.Surface((text.get_width()+1, text.get_height()+1))
    image2 = image
    image.blit(text, (1, 1))

w, h = image.get_size()
angle = 0
angle2 = 0
done = False
while not done:
    clock.tick(60)
    for event in pygame.event.get():
        if event.type == pygame.QUIT:
            done = True

    pos = (screen.get_width()/2, screen.get_height()/2)

    screen.fill(0)
    keys = pygame.key.get_pressed()
    if (not keys[pygame.K_s]):
        blitRotate(screen, image2, pos, (900, 900), angle2)
    blitRotate(screen, image, pos, (w/2, h/2), angle)
    angle += 1
    angle2 += math.sin(math.radians(angle))
    pygame.display.flip()

pygame.quit()
exit()
Little Sunday afternoon project.
Two PHP scripts.
Install on your webserver (see previous post)
Resizes images and removes the onkyo header.
(See previous posts)
<?php
// onkyo.php
// write jpeg header
header('Content-type: image/jpg');

$lines = file_get_contents('http://IP-ONKYO-AMPLIFIER/album_art.cgi', false);
$lines = explode("\n", $lines);
// remove weird Onkyo header (3 lines)
$content = implode("\n", array_slice($lines, 3));
print $content;
?>
CoverArt from a squeezeboxserver
<?php
// squeezebox.php
// leave playerid as is, for the default.
// change to MAC address of player to get coverart specific player
$img = file_get_contents('http://IP-LOGITECH_MEDIA_SERVER:9000/music/current/cover.jpg?player=<playerid>');
$im = imagecreatefromstring($img);
$width = imagesx($im);
$height = imagesy($im);
$newwidth = '240';
$newheight = '240';
$thumb = imagecreatetruecolor($newwidth, $newheight);
imagecopyresized($thumb, $im, 0, 0, 0, 0, $newwidth, $newheight, $width, $height);
//imagejpeg($thumb,'small.jpg'); //save image as jpg
header('Content-Type: image/jpeg');
imagejpeg($thumb);
imagedestroy($thumb);
imagedestroy($im);
?>
Arduino install:
Start IDE
Install TJpg_Decoder library
Open examples>Tjpeg_decoder>SPIFFS>SPIFFS_web_spiffs
change wifi credentials
and the url to your php script.
  bool loaded_ok = getFile("https://myserver/onkyo.php", "/M81.jpg"); // Note name preceded with "/"

replace bottom part with

 // while(1) yield();
 delay(5000);
     SPIFFS.remove("/M81.jpg");
I was not happy with my old setup to control all media devices in my living room.
Controlling all devices using a single button and automations was not easy.
Problems encountered :
Addressing problems:
Number 1 & 2 : Disable CEC, and manual add all that cec tried to do for me. (https://en.wikipedia.org/wiki/Consumer_Electronics_Control)
Number 5 :
(See post : https://www.henriaanstoot.nl/2024/04/01/multipurpose-rgb-sensor-esphome/)
Number 3 & 4 : Two options, integrate my web controller for onkyo.
(https://www.henriaanstoot.nl/2009/10/23/onkyo-web-control-hack/)
Or give HA more functionality.
Lets add an Onkyo python script to HA.
Open a webterminal and enter following command
pip install onkyo-eiscpThis will give you:
(Hint: want to copy text from the web terminal? Hold shift while selecting text)
➜  ~ pip install onkyo-eiscp
Looking in indexes: https://pypi.org/simple, https://wheels.home-assistant.io/musllinux-index/
Collecting onkyo-eiscp
  Downloading https://wheels.home-assistant.io/musllinux-index/onkyo_eiscp-1.2.7-py3-none-any.whl.metadata (9.9 kB)
Collecting docopt>=0.4.1 (from onkyo-eiscp)
  Downloading https://wheels.home-assistant.io/musllinux-index/docopt-0.6.2-py2.py3-none-any.whl.metadata (17 kB)
Collecting netifaces (from onkyo-eiscp)
  Downloading https://wheels.home-assistant.io/musllinux-index/netifaces-0.11.0-cp311-cp311-musllinux_1_2_x86_64.whl.metadata (8.9 kB)
Downloading https://wheels.home-assistant.io/musllinux-index/onkyo_eiscp-1.2.7-py3-none-any.whl (45 kB)
   ━━━━━━━━━ 45.7/45.7 27.8     eta 0:00:00
             kB        MB/s
Downloading https://wheels.home-assistant.io/musllinux-index/docopt-0.6.2-py2.py3-none-any.whl (13 kB)
Downloading https://wheels.home-assistant.io/musllinux-index/netifaces-0.11.0-cp311-cp311-musllinux_1_2_x86_64.whl (13 kB)
Installing collected packages: netifaces, docopt, onkyo-eiscp
Successfully installed docopt-0.6.2 netifaces-0.11.0 onkyo-eiscp-1.2.7
WARNING: Running pip as the 'root' user can result in broken permissions and conflicting behaviour with the system package manager. It is recommended to use a virtual environment instead: https://pip.pypa.io/warnings/venv
➜  ~ onkyo
Usage:
  onkyo [--host <host>] [--port <port>]
        [--all] [--name <name>] [--id <identifier>]
        [--verbose | -v]... [--quiet | -q]... <command>...
  onkyo --discover
  onkyo --help-commands [<zone> <command>]
  onkyo -h | --help
➜  ~ which onkyo
/usr/bin/onkyo
Now we can integrate shell commands in HA!
NET > Spotify
onkyo --host 192.168.1.2 NSV0A0

Spotify > track info
onkyo --host 192.168.1.2 NTIQSTN

Spotify > Artist
onkyo --host 192.168.1.2 NATQSTN

Turn Onkyo ON/OFF
onkyo --host 192.168.1.2 PWR01
onkyo --host 192.168.1.2 PWR00

Get Power state
onkyo --host 192.168.1.2 PWRQSTN

Mute on/off
onkyo --host 192.168.1.2 AMT01 or AMT00

Volume Level
onkyo --host 192.168.1.2 MVLQSTN
Home Assistant Shell Command example
  - platform: command_line
    switches:
      onkyo_mute:
        command_on: "/usr/bin/onkyo --host 192.168.1.2 AMT00"
        command_off: "/usr/bin/onkyo --host 192.168.1.2 AMT01"
Getting album art:
Get image from below url.
Note! .. its a static non refreshing image!
http://192.168.1.2/album_art.cgi
Note: This gives me a file which shows fine in a browser, but being a http feed you cannot embed this in a https site.
Another ‘problem’ with this image is that it includes headers, rendering this a invalid jpg when processing!
(remove first 3 lines programmatically)
I also want to have it updated, so I could make a mjpeg streamer for this.
Probably i’m going to use my reverse proxy which uses SSL offloading to access cover art over https.
(Then I can push this cover image on this webblog so you guys can see what we are listing to)
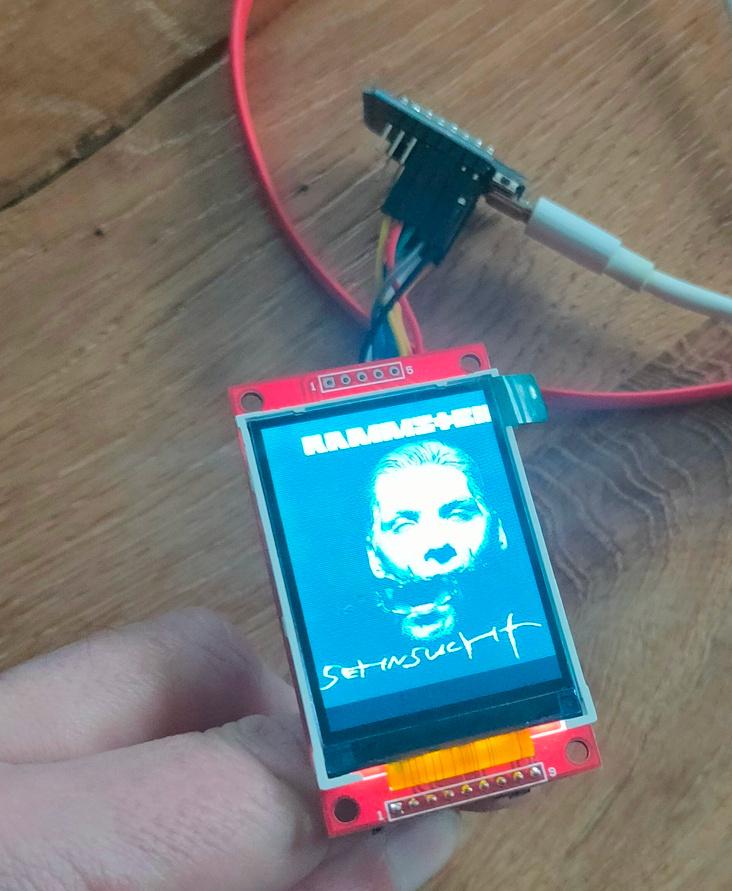
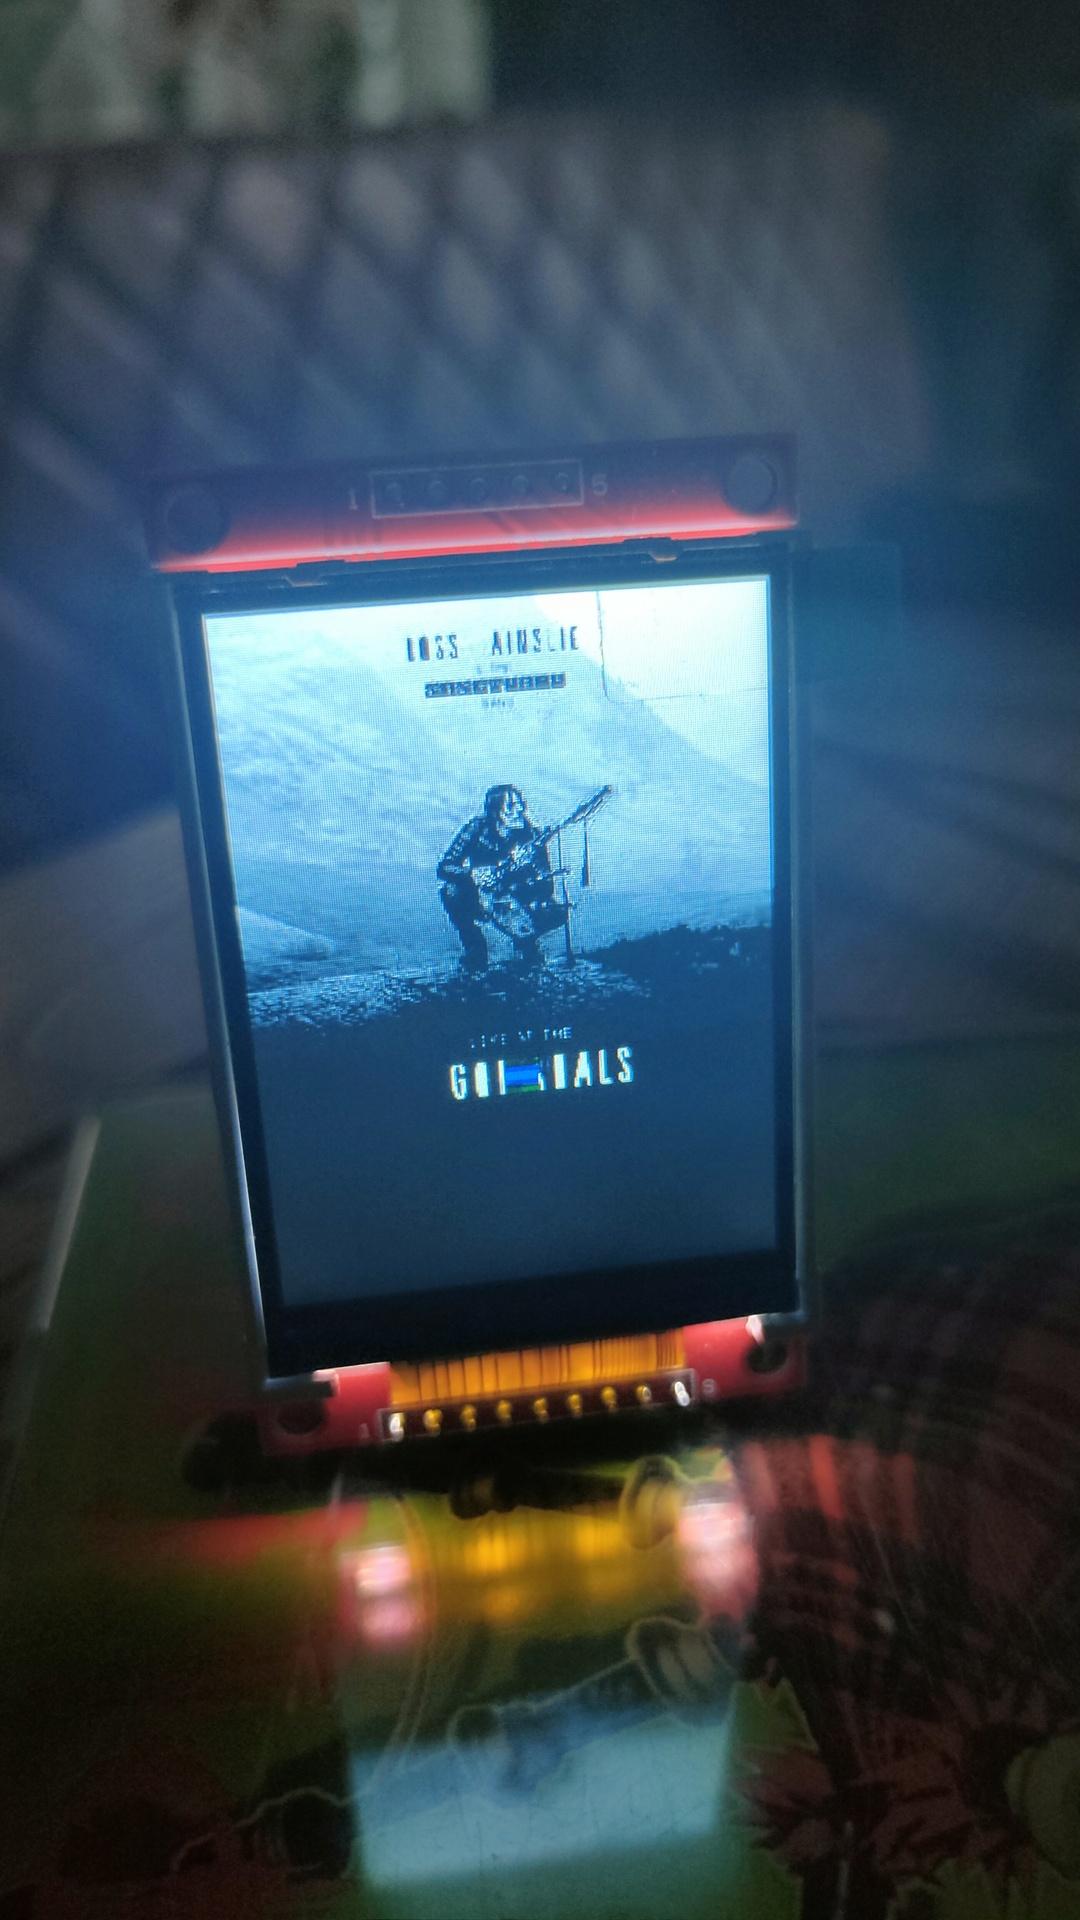
Another idea is to push this to an arduino display.
Not using https?
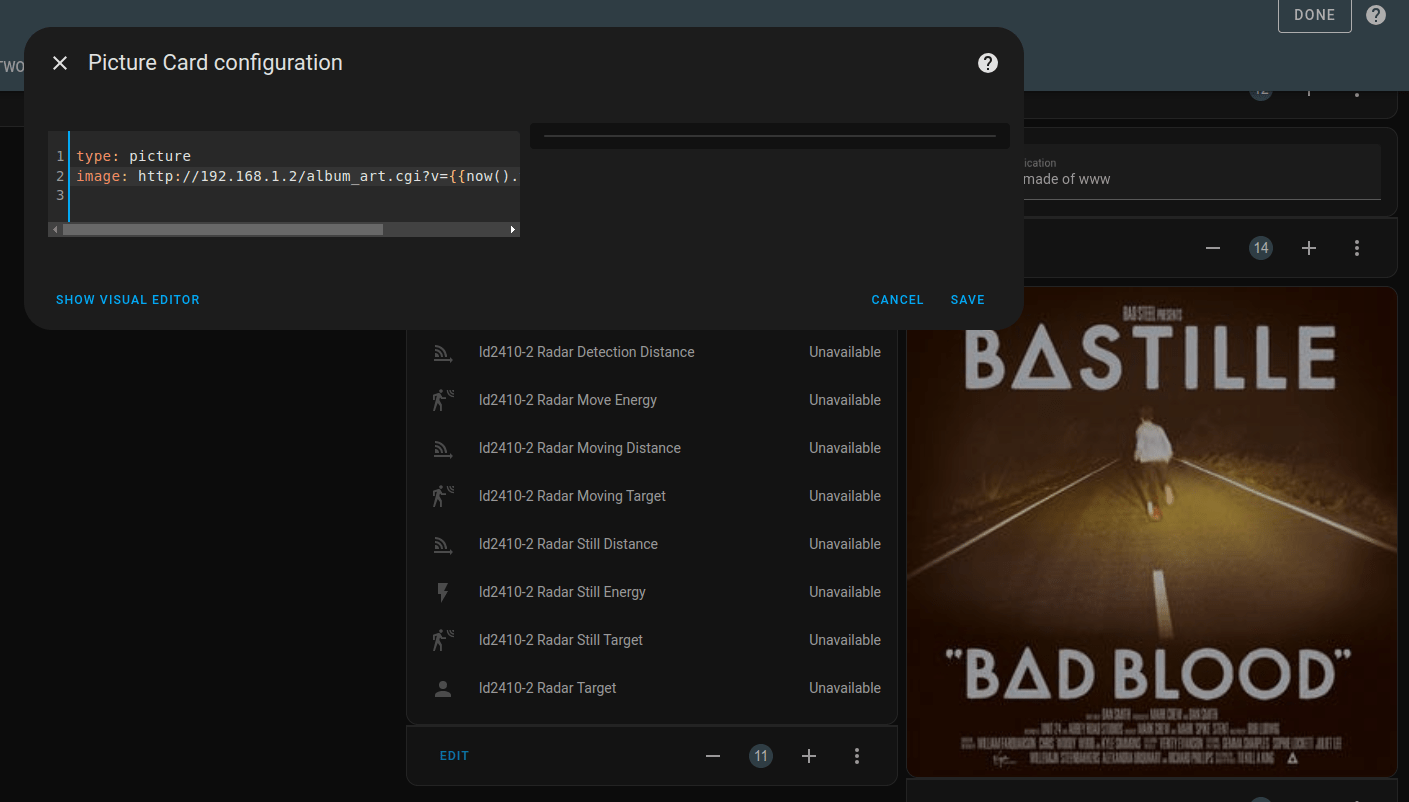
You can embed the album art in a dashboard. This won’t refresh, but the added time code will stop caching problems.
type: picture<br>image: http://192.168.1.2/album_art.cgi?v={{now().timestamp()|int }}")
Todo:
Make the automations foolproof.
Watching TV and want to listen to Spotify?
etc
Next todo:
Cover art embed in HA.
Maybe in embed in this blog.
Make a small cover art display.
PHP code to strip lines and put behind a reverse proxy
<?php
header('Content-type: image/jpg');
$lines = file_get_contents('http://192.168.1.2/album_art.cgi', false);
$lines = explode("\n", $lines);
$content = implode("\n", array_slice($lines, 3));
print $content;
?>
You can use Generic Camera to refesh!
https://www.home-assistant.io/integrations/generic
Get cover art from Logitech Media Server
http://192.168.1.3:9000/music/current/cover.jpg?player=<playerid>
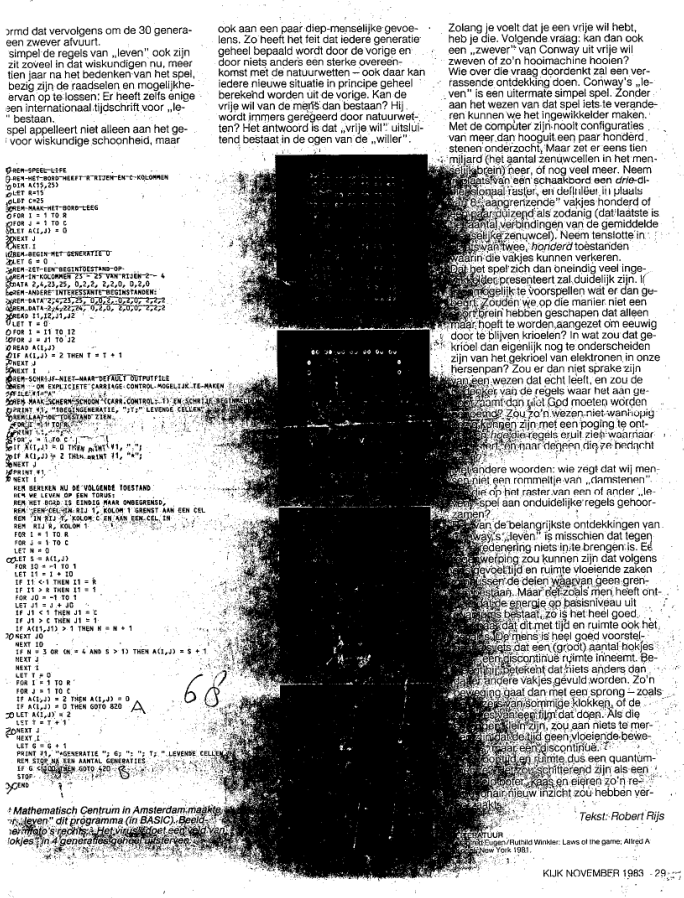
Yesterday I got this nice led matrix I mentioned before.
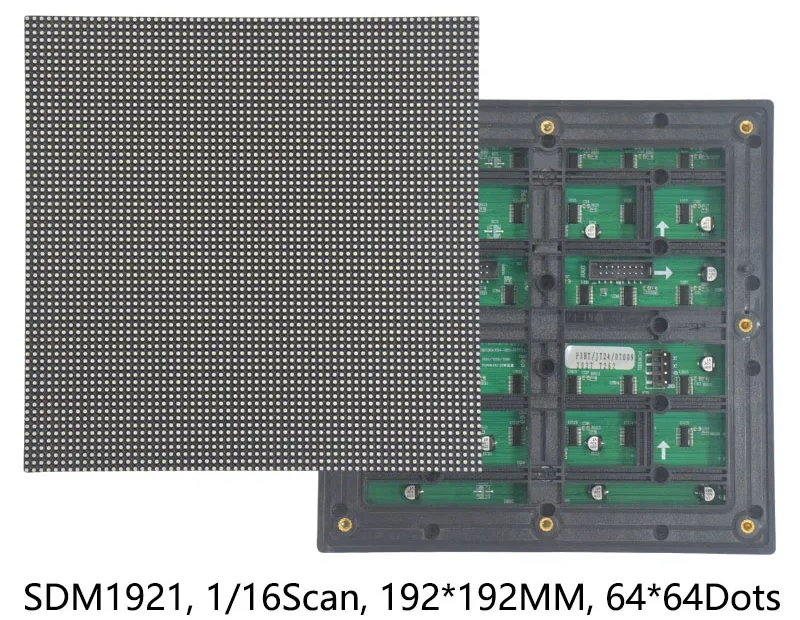
I wanted to control this display using Circuit Python and a Raspberry Pico.
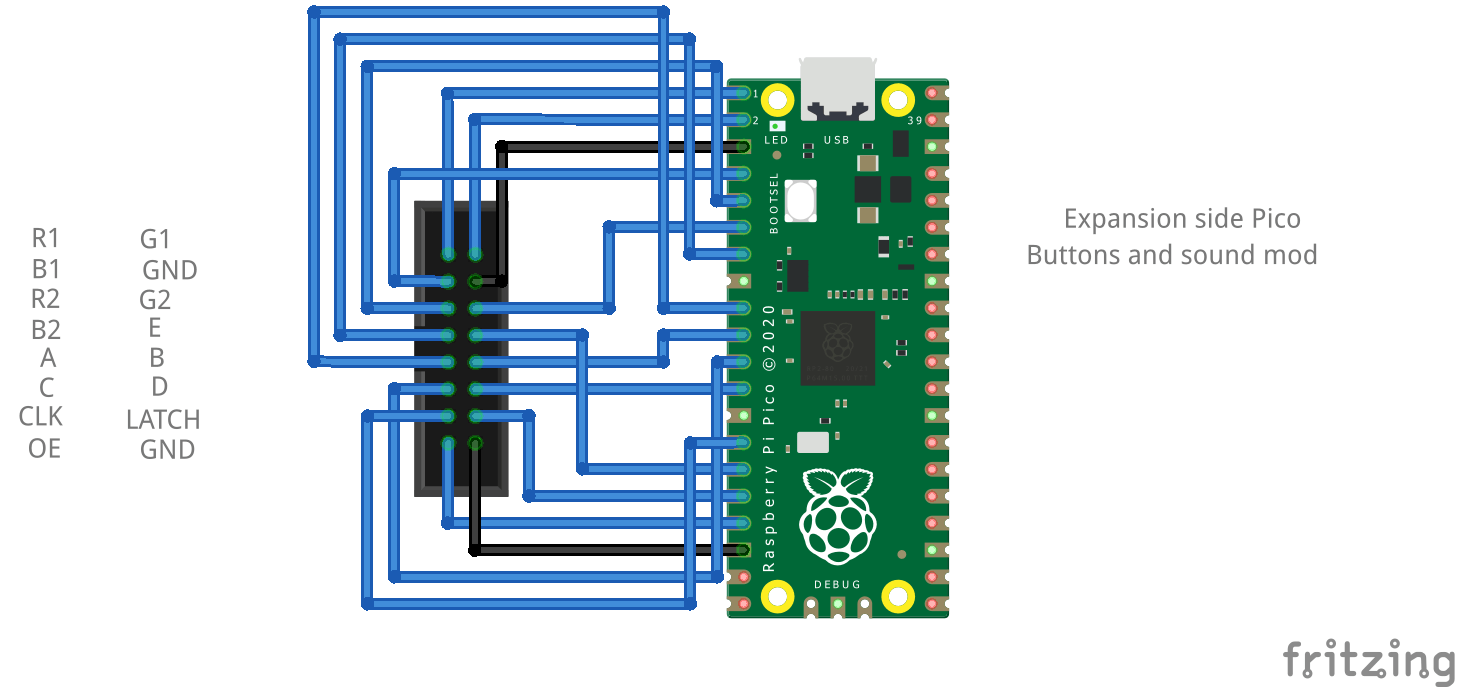
Pico  Matrix
GP0   R1
GP1   G1
GP2   B1
GP3   R2
GP4   G2
GP5   B2
GP6   A
GP7   B
GP8   C
GP9   D
GP10  Clock
GP11  E
GP12  Latch
GP13  Output Enable

GND   GND ( I did both )
I installed Circuit Python and the following libraries.
adafruit_imageload, adafruit_display_text.label (the rest was already in the uf2 firmware.)
(Check this link : https://circuitpython.org/board/raspberry_pi_pico/ )
I could not install the Wifi uf2 file, then I got a out of storage space when installing the adafruit libraries.
importing libaries and init display
import board, digitalio, busio, time, displayio, rgbmatrix, framebufferio
import adafruit_imageload, terminalio, random
import adafruit_display_text.label

displayio.release_displays()
matrix = rgbmatrix.RGBMatrix(
    width=64, bit_depth=2, height=64,
    rgb_pins=[board.GP0, board.GP1, board.GP2, board.GP3, board.GP4, board.GP5],
    addr_pins=[board.GP6, board.GP7, board.GP8, board.GP9, board.GP11],
    clock_pin=board.GP10, latch_pin=board.GP12, output_enable_pin=board.GP13)
display = framebufferio.FramebufferDisplay(matrix)
I became interested in Conway’s “Game of Life”, in 1983. Reading a article in the Dutch Magazine Kijk.
The Game of Life, also known simply as Life, is a cellular automaton devised by the British mathematician John Horton Conway in 1970. It is a zero-player game, meaning that its evolution is determined by its initial state, requiring no further input. One interacts with the Game of Life by creating an initial configuration and observing how it evolves. It is Turing complete and can simulate a universal constructor or any other Turing machine.
https://en.wikipedia.org/wiki/Conway%27s_Game_of_Life
I found these on my server. Bad quality, I know. Scanned these many years ago.
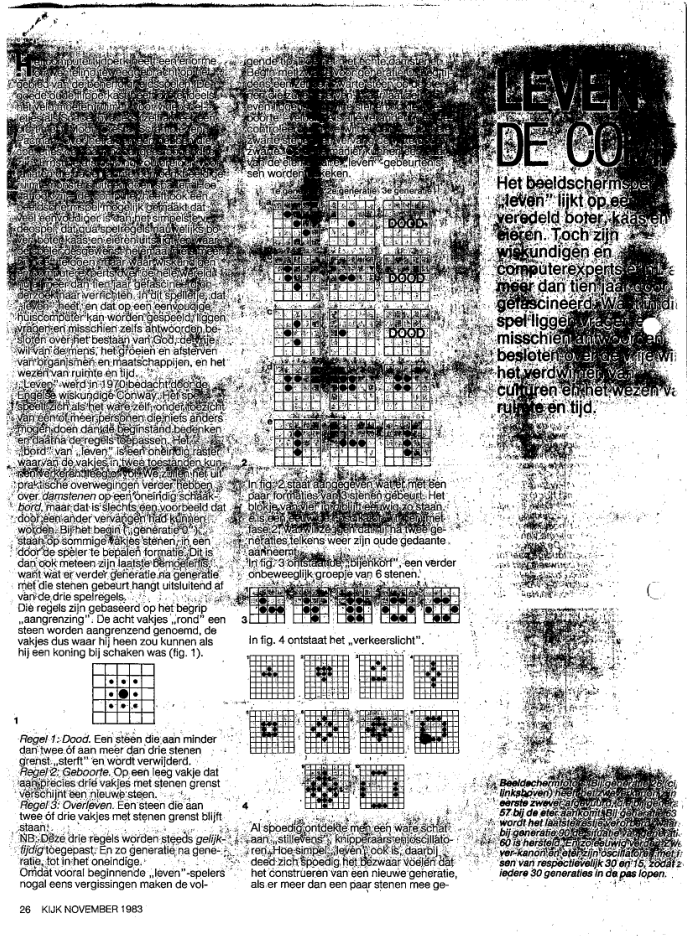
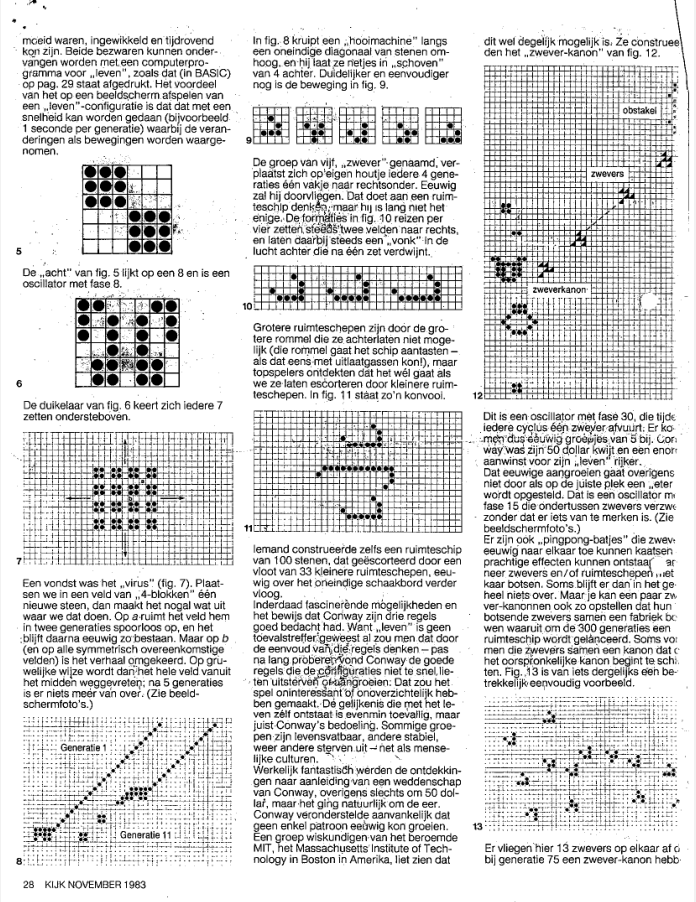
The rules are:
When playing with the Basic code as a kid, I wanted to try if it was possible to make a 3D version of this.
I came up with the following rules:
I think there should be a BBC Acorn basic version I wrote somewhere.
Back to the display
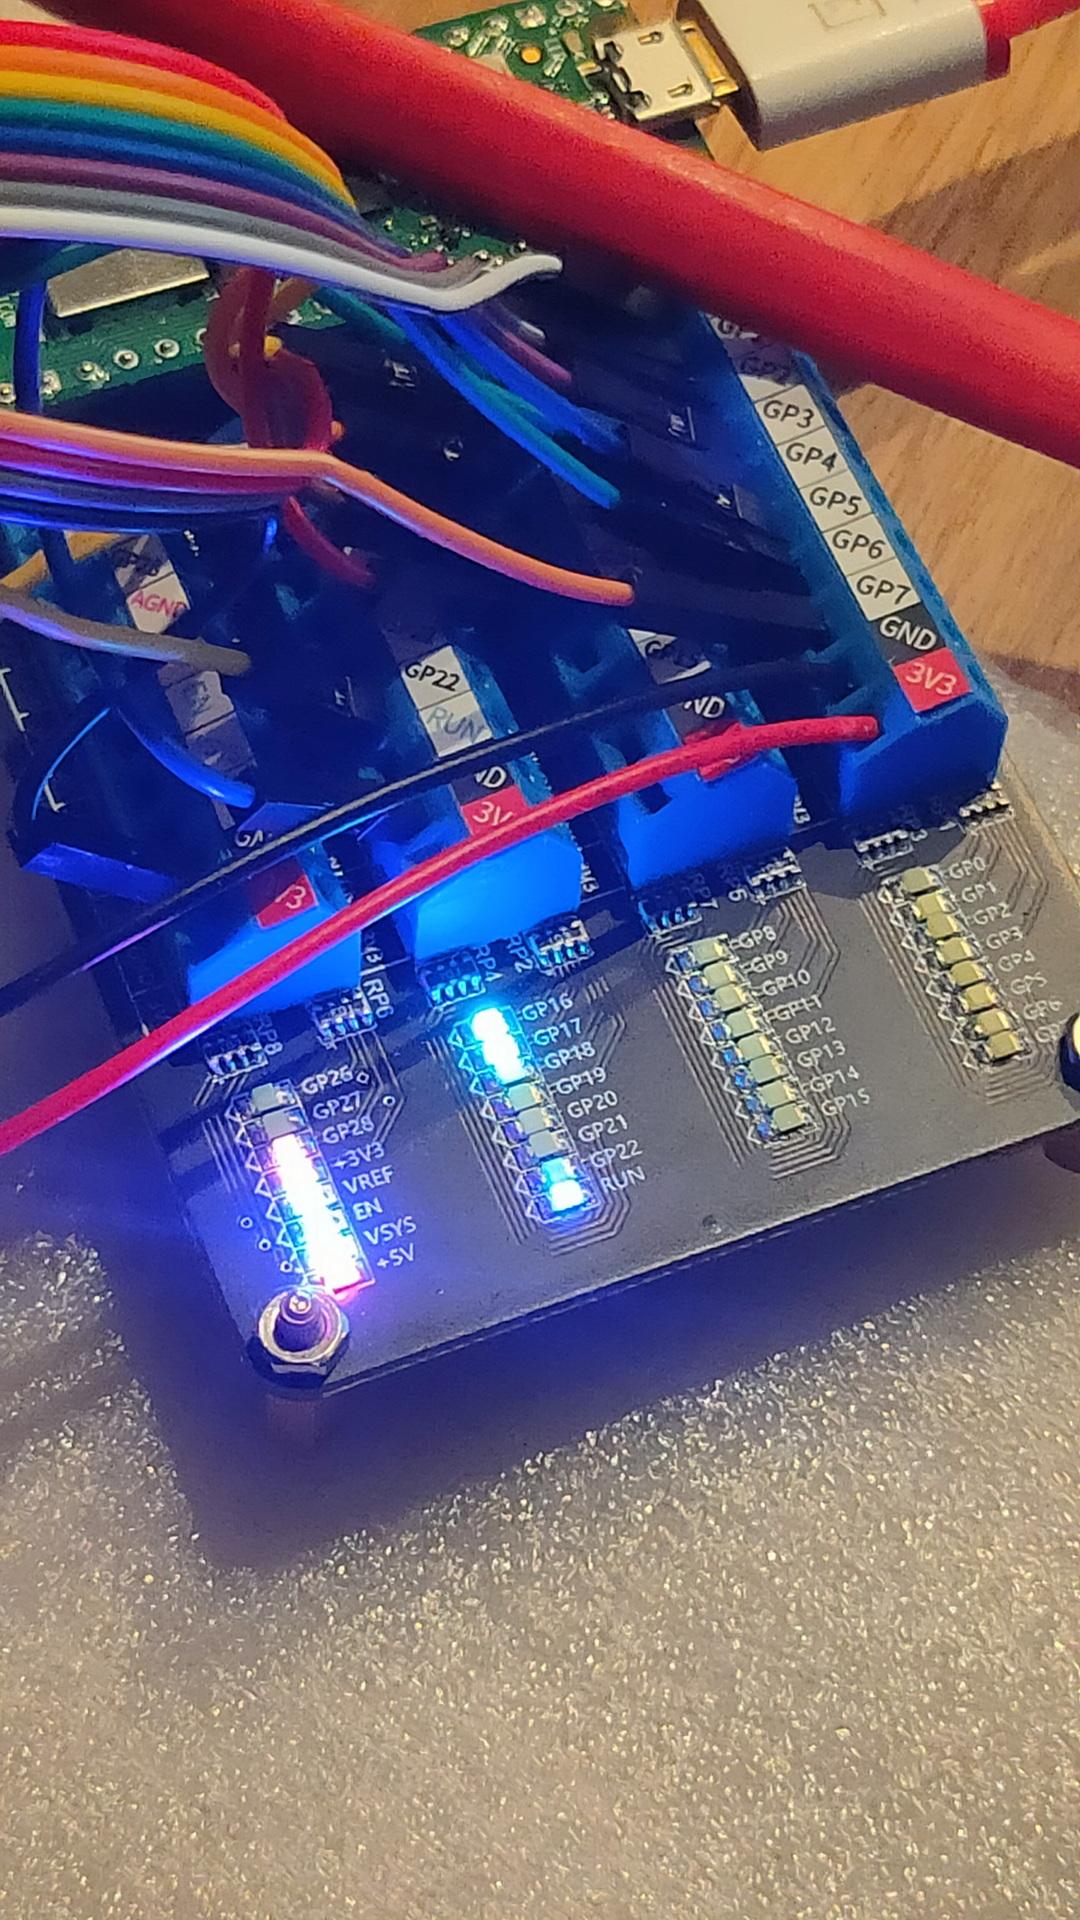

Code for the glider gun
    conway_data = [
        b'                        +           ',
        b'                      + +           ',
        b'            ++      ++            ++',
        b'           +   +    ++            ++',
        b'++        +     +   ++              ',
        b'++        +   + ++    + +           ',
        b'          +     +       +           ',
        b'           +   +                    ',
        b'            ++                      ',
    ]
Next todo: