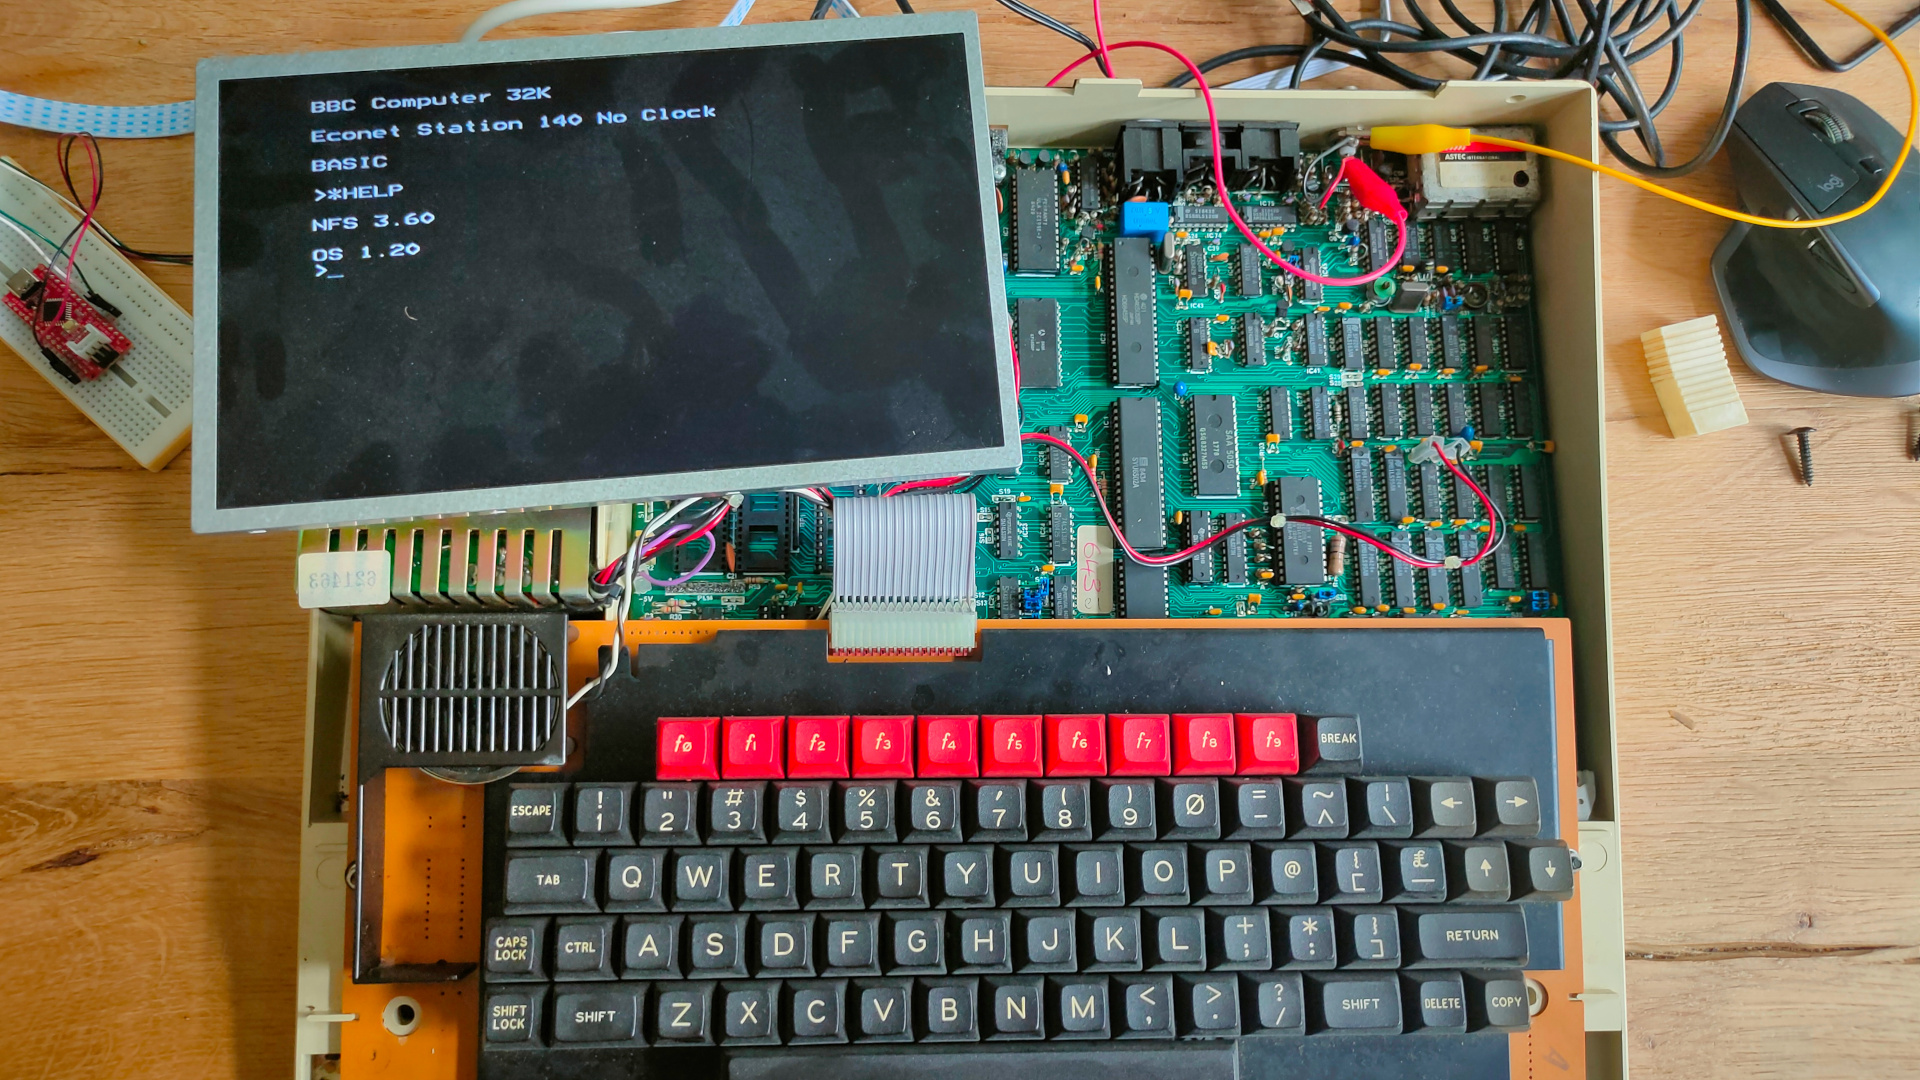
Category Archives: Computer

Bios Extension boot and bootsector programs.

Followup on

Today two boot projects.
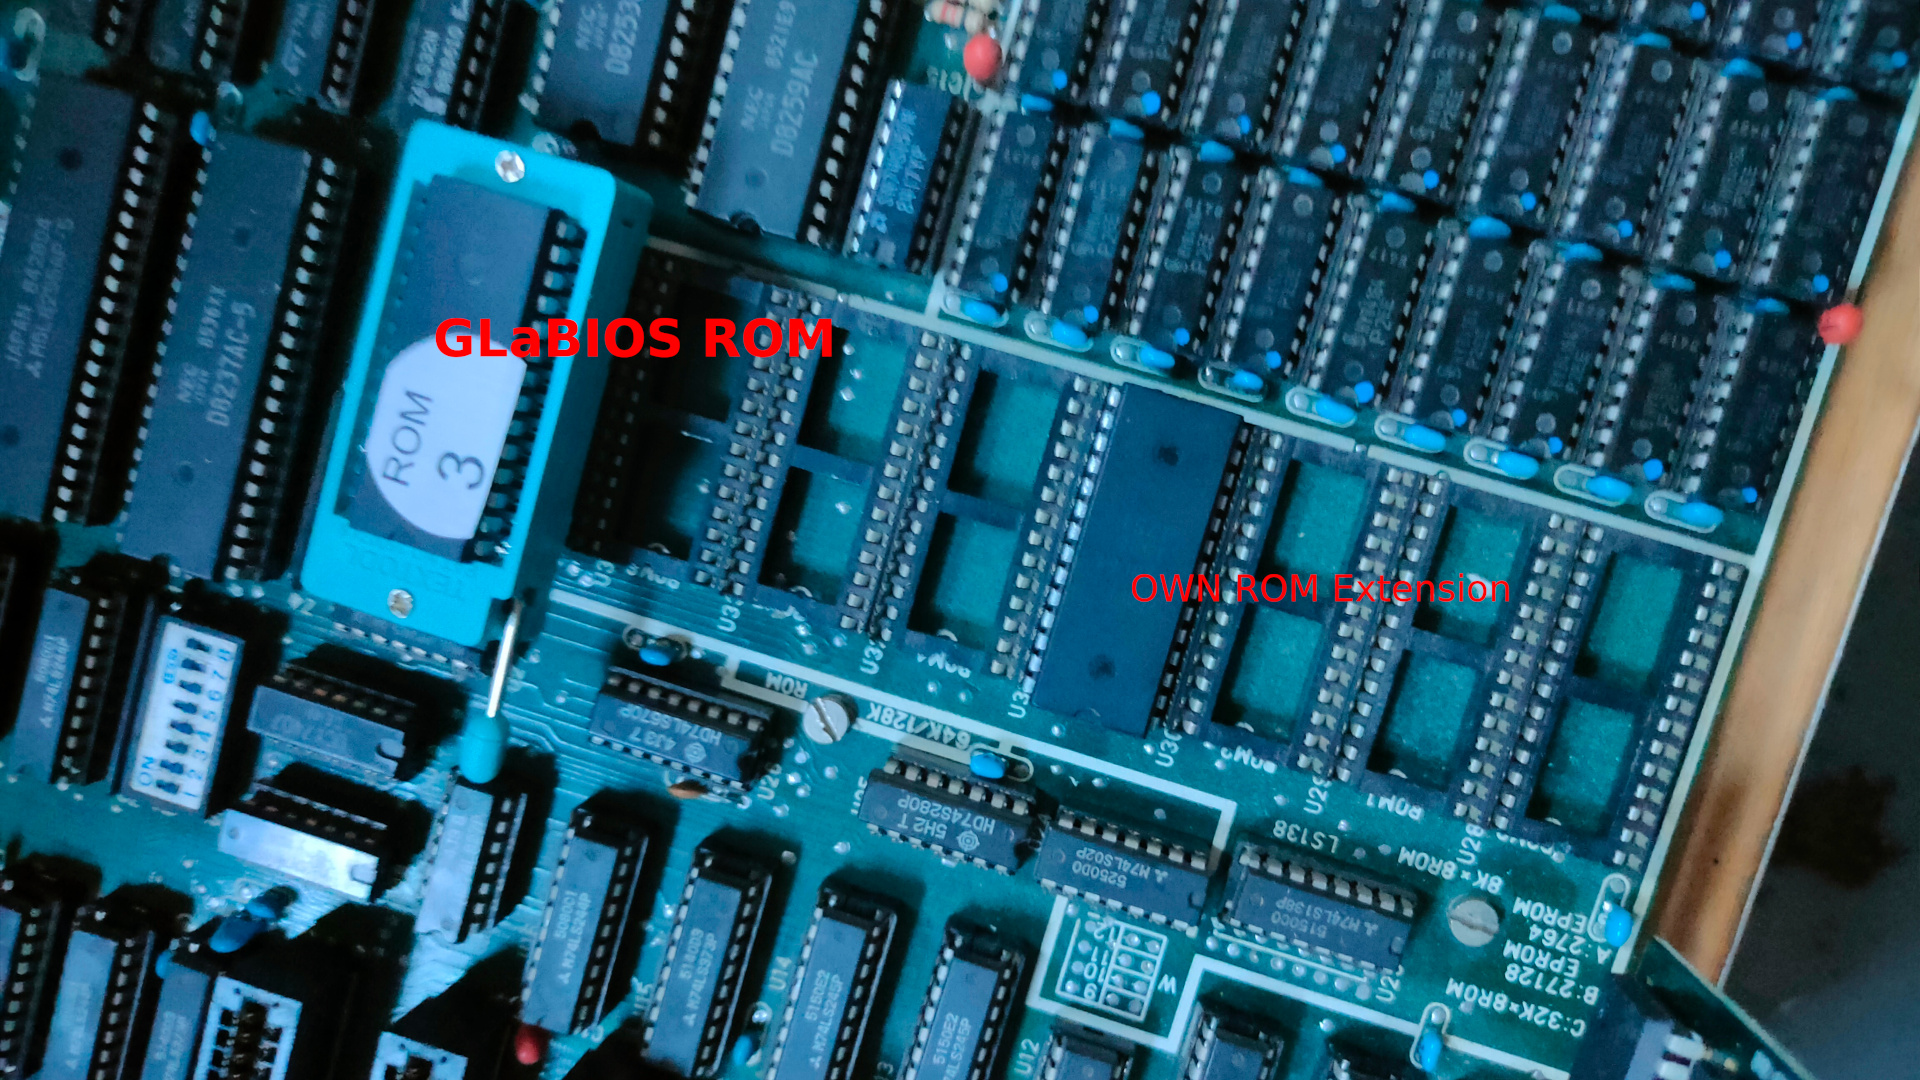
One using a bios extension, so it chip based.
Second is a floppy disk boot program. (Creating a test situation to get our old Boot floppy demo working. ( That one without using an operatingsystem like ms-dos.

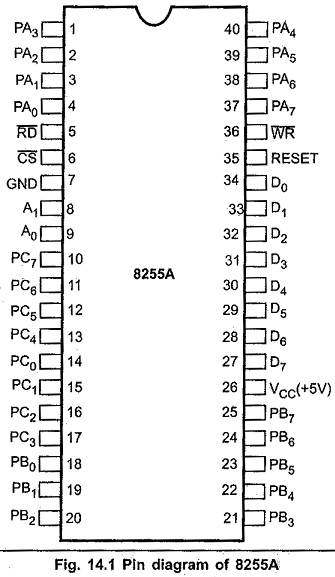
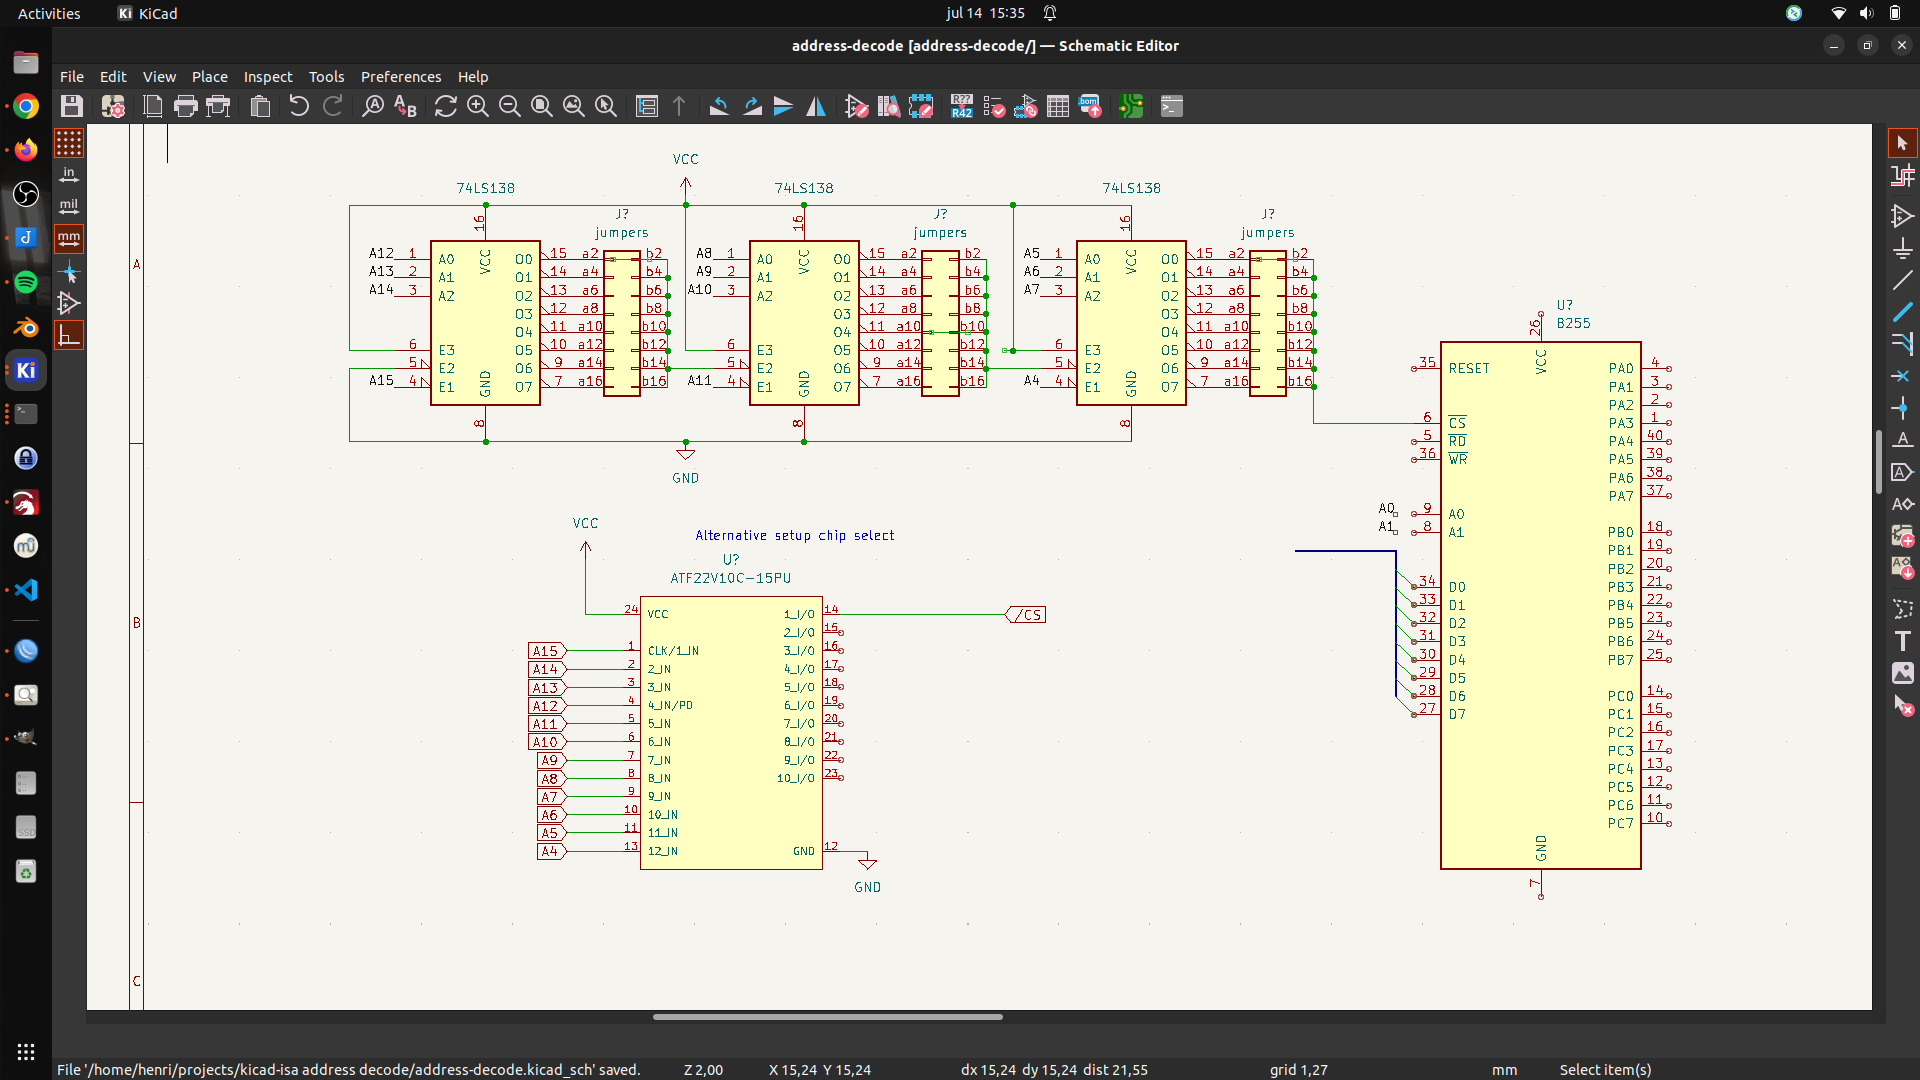
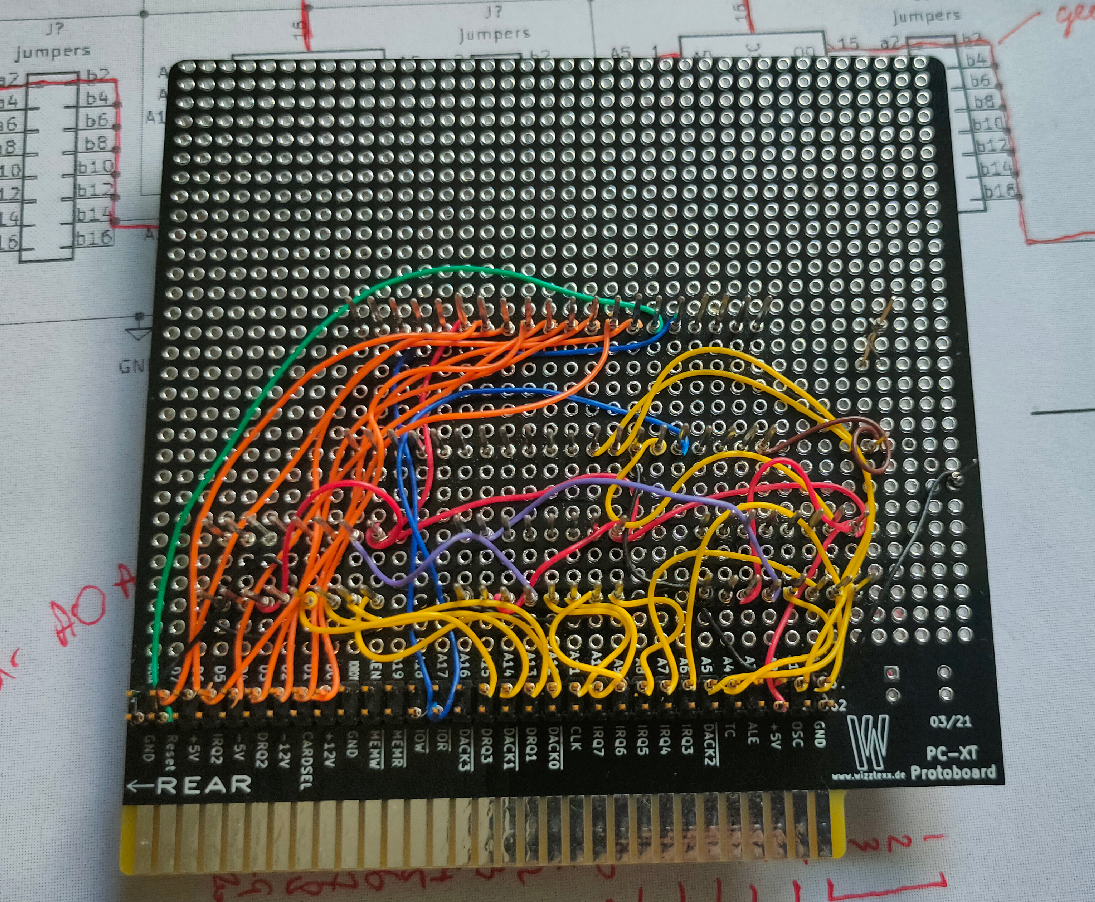
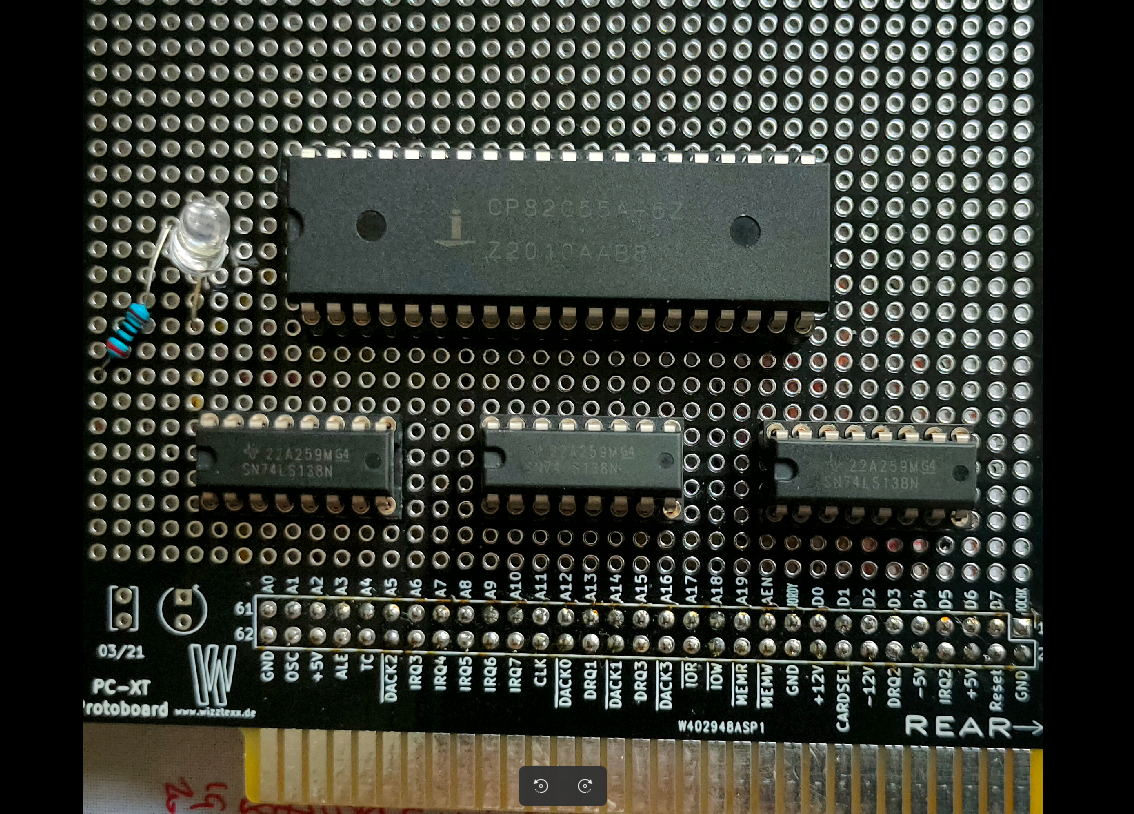
Creating a Secondary Bios ROM

NAME mycode
.model small
ORG 0h

.code
	dw 0AA55h ;  Magic header your bios is looking for
	db 16     ; lenght of this rom in 512 bytes == 8k
	jmp short clear ; jmp to program

ORG 20h                 ; start of program
	
clear:  mov cx,10       ; clear, set keyboard led and print 10 # chars
	mov ah,0ah
	mov al,31h
	int 10h
	mov bh,0
	mov cx,1
start:	mov al, 11000000b
        out 80h, al
print:  mov cx,10
	mov ah,0ah
	mov al,"#"
	int 10h
loop1:  nop           ; loop until doomsday
	jmp loop1
	db -68        ; This makes the checksum 0
                      ; steps to take: edit source, make this byte entry 0
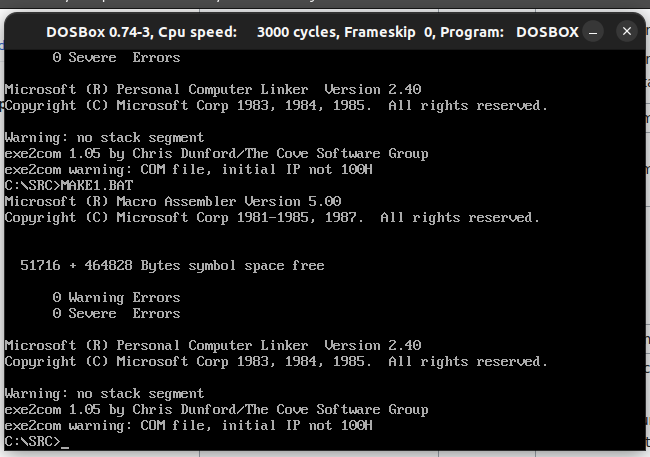
                      ; compile using make.bat in dosbox
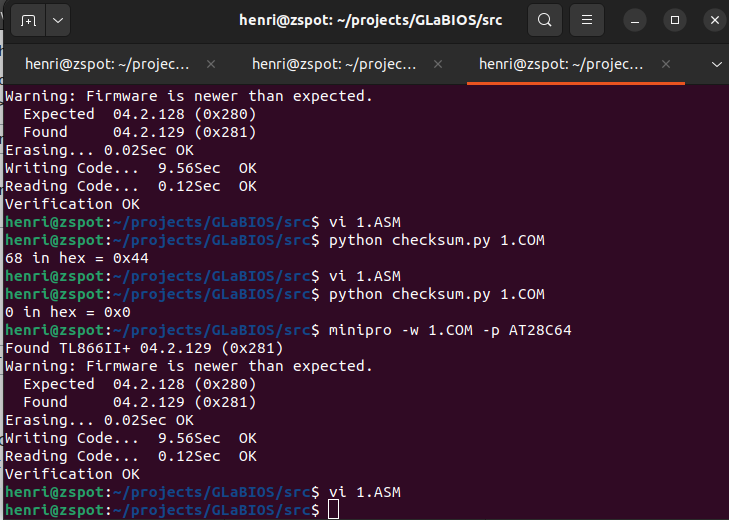
                      ; check checksum using my python script
                      ; output was 68 hex 0x44
                      ; edit asm file place -68 to make the checksum 0x00 again
                      ; compile and burn to ROM
ORG 2000h             ; create end of rom 0000h-1fffh = 8K
END

make.bat in dosbox

@ECHO OFF
MASM /DARCH_TYPE="T" /DCPU_TYPE="V" 1;
LINK 1;
EXE2COM 1.EXE

Python script here: https://www.henriaanstoot.nl/2023/06/20/bios-hacking/

Write EEprom

minipro -w 1.COM -p AT28C64

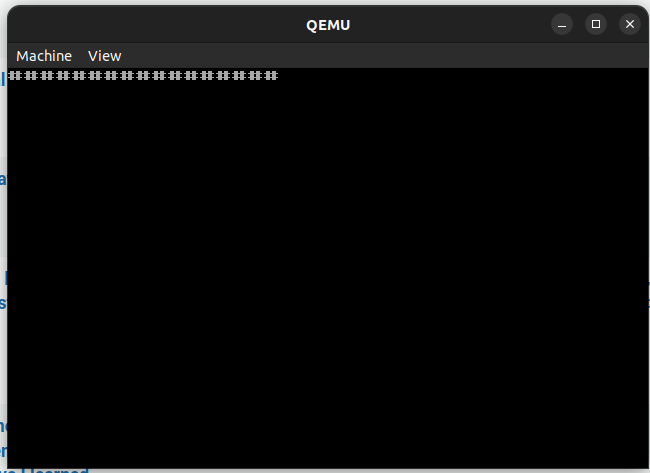
Part 2 – Bootsector program !

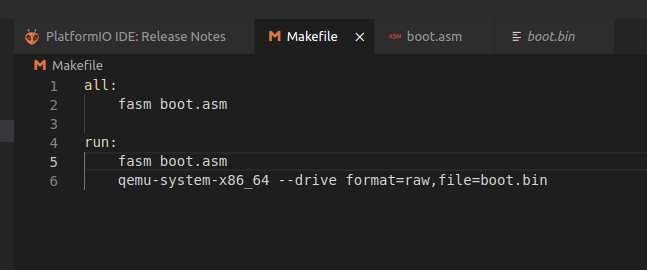
Allmost the same as above, but booting from a Floppy disk.

Video mode info : https://stanislavs.org/helppc/int_10-0.html
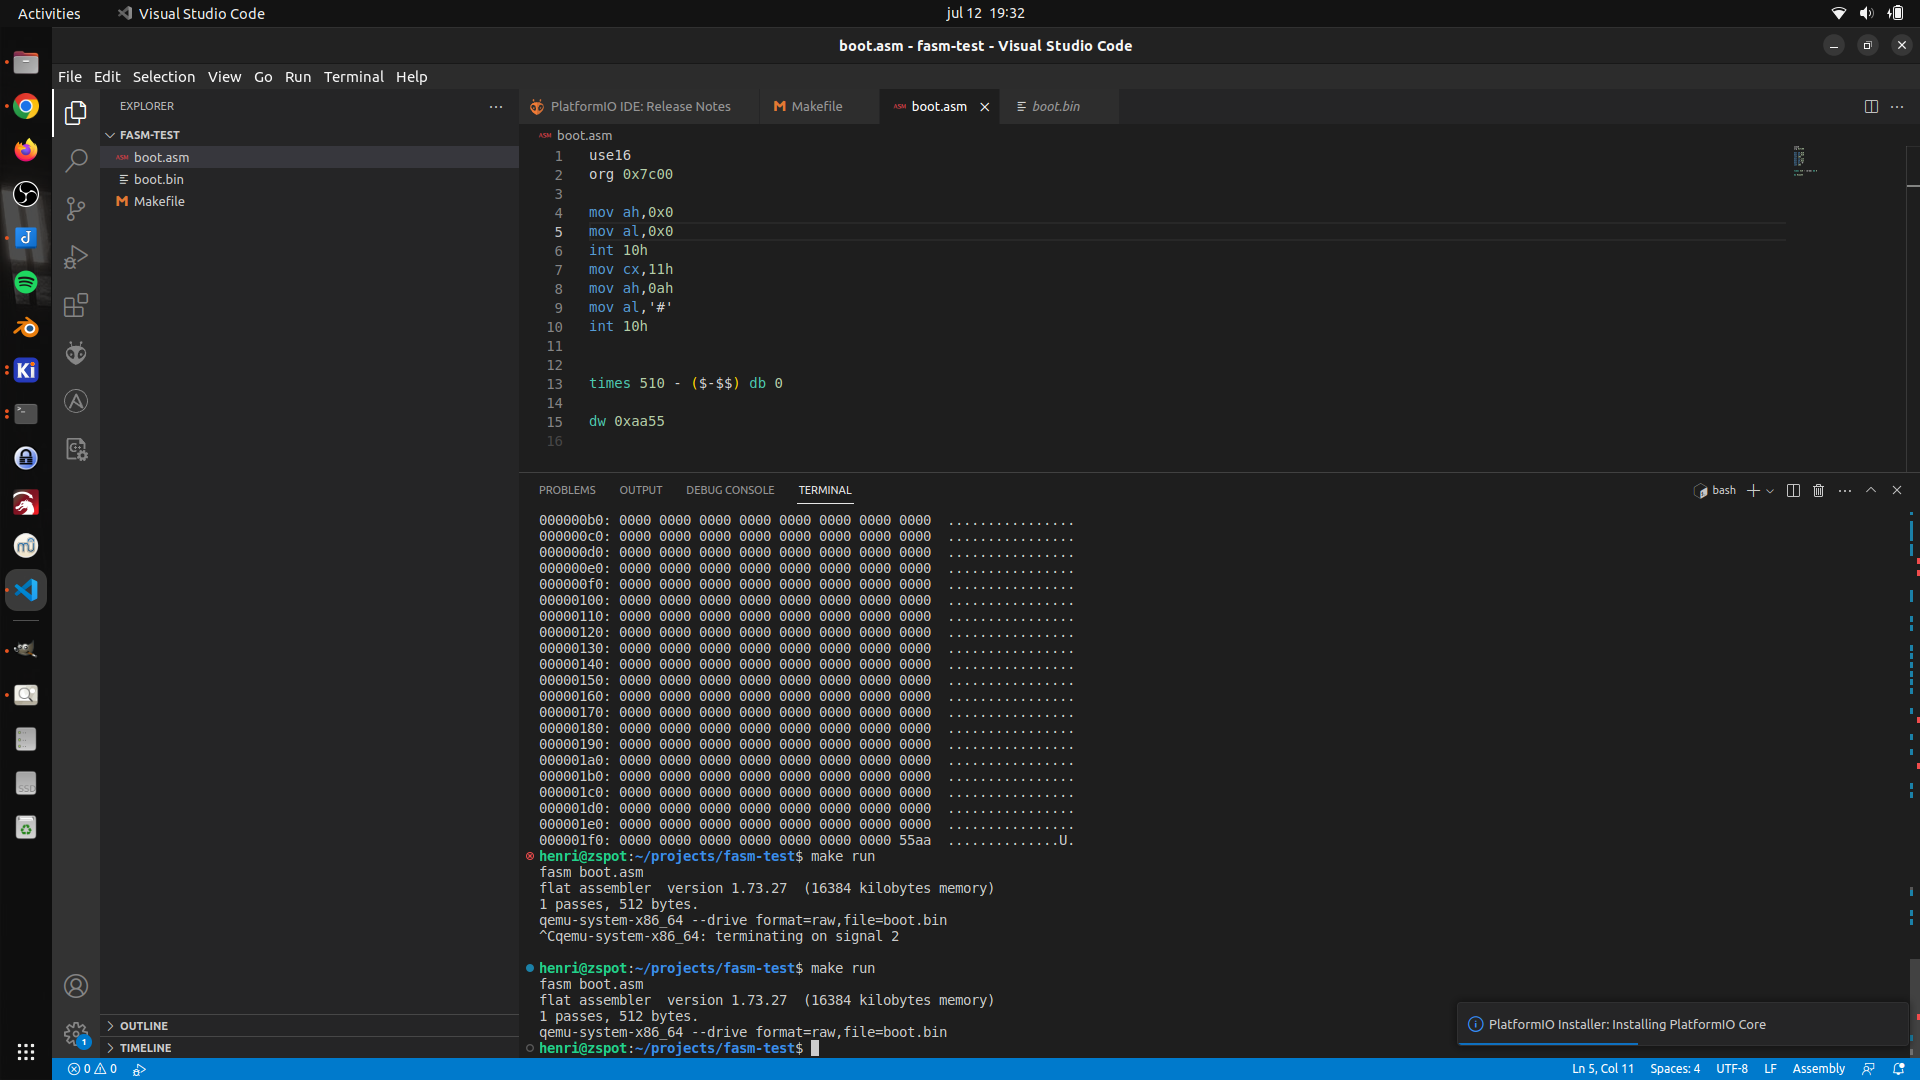
Assembly code

use16              ; 16 bits 
org 0x7c00         ; start address ( change? )

mov ah,0x0         ; ah 0h - video mode 
mov al,0x0         ; al 0h - mode 0 - 40x25 chars
int 10h            ; scree routines 
mov cx,11h         ; 11 chars
mov ah,0ah         ; ah 0ah - print char mode
mov al,'#'         ; choose char as #
int 10h            ; execute 


times 510 - ($-$$) db 0 ; fill rest 512 bytes sector

dw 0xaa55 ; magic bytes 

Upgraded my mattermost server 4 days ago.

If you are a old friend/colleage/whatever .. give me a ping to get you connected.

I’ve been using IRC a long time, we even had our own interconnected servers with our group ICE.
Lipperkerk, GMC and Pixnet.
Overkill I know, but we could so we did.

Last few years i’ve been using Mattermost. After testing many alternatives.

  • Whatsapp – not own hosted, hate it, and was not allowed for work.
  • Zulip – tested this for a long time
  • IRC at work, implemented this at 2 places i’ve worked. Once using a web gui.
  • A ajax chat server
  • ??
  • ??

After installing this in my Lab, a few colleages from work used it. After that the whole department and more.
Running for more than a year, it was time got get this running on the servers at work.
I’ve reinstalled a server for my friends.

Last update gave me a nice insights desktop. Quiet days in june.

I love the webhooks and plugins.

In the past i’ve implemented a whatsapp to mattermost bridge, i will post about this .. sometime.

Below a implementation using a arduino and a 3D printed flag.

ISA prototyping board – IO chips

Followup on

UPDATE 20230702 20230703 20230714

While working on a Lidar project, my mouser components came in.

Now I have to find a IO address decoder schematic I made a while ago.

This ISA board is going to have a Wirewrapped setup. There is a 8255 IO chip, and uses 3x 74138 for IO address decoding, OR i will use a setup i’ve made for my 6502 using an atf22v10.

What to controll using this 8255? First some Leds, later a LCD display.

Below the 3 mentioned IC’s

The 8255 is a chip like the 6522 used in my DIY 6502 elsewhere on my site.

Overview of comparable IO chips. ( Not interchangeable due to bus timing!)
Most of them have 8 data lines and 2x 8 IO bi-directional lines.

CHIPNOTES
65226502 based machines
82558088/8068 based machines
Z84C2008Z80 (called PIO)
81558085 / 8088
852068000 amiga
68216800

6821 example

UPDATE 20230702

Started wirewrapping, luckily i’ve got a big choice of colors. That makes finding the right signals a breeze.

UPDATE 20230703

Found my schematic

Above uses 3 74138 decoders, address can be “programmed” using jumpers (not used on my prototype board) . Address 0400h in above example.

A15 – 0
A14,13,12 – decodes to OUT-0
A11 – 0
A10,9,8 – decodes to OUT-4
A7 – 0
A6,5,4 – decodes to OUT-0
A3 and A2 are not used (see note)
A1 and A0 are register select on the 8255

Address 0000,0100,0000,xxrr
xx can be a 0 or 1
the 8255 can be controlled using
0400h 0401h 0402h
but also
0404h 0405h 0406h
0408h 0409h ….
040Ch ……

UPDATE 20230714 – Alternative address decode test with ATF22V10

UPDATE 20230803

UPDATE

Miswired second 74138.
Tested with below code

mov dx,503h # control register
mov al,80h # output port a,b,c as standard IO/output
out dx,al # 16 bit IO mapped IO out
mov dx,500h # data register
mov al,0  # 0/ff all on/all off
out dx,al

Micro cassettes with computer programs.

I’ve got some micro cassettes with programs for P2000 and the Microtrainer (SDK-85).

Lets try to get this into executable code again.

(I sold my Philips P2000 last year before I found these tapes)

I bought a Cassette player (voice memo recorder) from Marktplaats (dutch ebay), and a mini jack cable (2.5mm to 3.5mm)

There are two things i’m going to try.

Converting the recorded audio into executable code using python or Puredata.
And making a print to connect the tape player to the SDK-85.

Connecting the player to a soundcard gave me:
Signed 16bit 44.1 kHz

(there are simular projects like this for C64 tapes and alike)
So there will be FFT tricks involved.

While browsing though this book:

I found this schematic: (page A1-39)

So that’s next to build

Python Spotify Genre Cube v2

Spotify version

Next to do: Lasercut a wooden cube with better lettering.

Run the python part on a server

and

First export some API credentials

export SPOTIPY_CLIENT_ID=xxxxxxxxxxxxxxxxxxxxxxxxxxxxxxxxxx
export SPOTIPY_CLIENT_SECRET=xxxxxxxxxxxxxxxxxxxxxxxxxxxxxxxxxx
export SPOTIPY_REDIRECT_URI="http://localhost:8080/callback"

Code below:

from flask import Flask, request, redirect
from requests_oauthlib import OAuth2Session
from requests.auth import HTTPBasicAuth
import requests
import json
import spotipy
from spotipy.oauth2 import SpotifyOAuth
from pprint import pprint
from time import sleep
import spotipy.util as util
import sys
import paho.mqtt.client as mqttClient
import time
import os
import subprocess

Connected = False


broker_address = "MQTTSERVER"
port = 1883


def on_connect(client, userdata, flags, rc):
    if rc == 0:
        print("Connected to broker")
        global Connected
        Connected =True
    else:
        print("Connection failed")

def on_message(client, userdata, message):
    print (message.payload)
    myurl = 'spotify:playlist:' + str(message.payload.decode())

    results = sp.start_playback(context_uri=myurl, offset={"position": 1})

client = mqttClient.Client("PythonSpotifyGenreCube")
client.on_connect = on_connect
client.on_message = on_message

client.connect(broker_address, port=port,keepalive=60 )
client.loop_start()
time.sleep(4) # Wait for connection setup to complete
client.subscribe('spotify/playlist')
#client.loop_stop()    #Stop loop

#while Connected != True:
#    client.loop()
#    time.sleep(0.1)
#    print("test")
#    client.subscribe('spotify/playlist')


app = Flask(__name__)

AUTH_URL = 'https://accounts.spotify.com/authorize'
TOKEN_URL = 'https://accounts.spotify.com/api/token'
REDIRECT_URI = 'http://localhost:8080/callback'
CLIENT_ID = "xxxxxxxxxxxxxxxxxx"
CLIENT_SECRET = "xxxxxxxxxxxxxxxxxxxxx"
SCOPE = [
    "user-read-email",
    "playlist-read-collaborative"
]

@app.route("/login")
def login():
    spotify = OAuth2Session(CLIENT_ID, scope=SCOPE, redirect_uri=REDIRECT_URI)
    authorization_url, state = spotify.authorization_url(AUTH_URL)
    return redirect(authorization_url)

@app.route("/callback", methods=['GET'])
def callback():
    code = request.args.get('code')
    res = requests.post(TOKEN_URL,
        auth=HTTPBasicAuth(CLIENT_ID, CLIENT_SECRET),
        data={
            'grant_type': 'authorization_code',
            'code': code,
            'redirect_uri': REDIRECT_URI
        })
    return json.dumps(res.json())


username = "fashice"
scope = "user-read-playback-state,user-modify-playback-state,playlist-read-private"
util.prompt_for_user_token(username,scope,client_id='xxxxxxxxxxxxxxxxxxxxx',client_secret='xxxxxxxxxxxxxxxxxxxxxxxxxxxx',redirect_uri='http://localhost:8080/callback')

sp = spotipy.Spotify(client_credentials_manager=SpotifyOAuth(scope=scope))

# Shows playing devices
res = sp.devices()
pprint(res)


# Change track
#sp.start_playback(uris=['spotify:track:6gdLoMygxxxxxxxxxxxxxxx'])
#results = sp.start_playback(context_uri=myurl, offset={"position": 1})


## Change volume
#sp.volume(100)
#sleep(2)
#sp.volume(50)
#sleep(2)
#sp.volume(100)
#


playlists = sp.user_playlists(username)

#for playlist in playlists['items']:
#    print(playlist['name'])


playlists = sp.current_user_playlists()
#print (playlists)
for playlist in playlists['items']:
    print(playlist['id'] + ' ' +  playlist['name'])


#if __name__ == '__main__':
#   app.run(port=8080,debug=True)


while Connected != True:
    time.sleep(0.1)
    client.subscribe('spotify/playlist')

try:
    while True:
        time.sleep(1)


except KeyboardInterrupt:
    print ("exiting")
    client.disconnect()
    client.loop_stop()

ISA Prototyping print

Got a delivery today …
Woot .. let the 8088/v20 hardware hacking commence!

https://www.pcbway.com/project/shareproject/PC_XT_ISA_8_bit_retro_Protoboard.html

First to do: LEDs, everybody loves blinking leds.
Next: Probably a address decoder with a VIA/CIA and a LCD Display.

Now I have to wait for my mouser order to be delivered.

Machine code Monitor in ROM on real BBC Acorn Hardware

My BBC Acorn model B is working again. The original monitor is still dead.

Time to play with some machine code and ROMs.

My machine has a NFS rom installed. (NetFS)

Econet was Acorn Computers’s low-cost local area network system, intended for use by schools and small businesses. It was widely used in those areas, and was supported by a large number of different computer and server systems produced both by Acorn and by other companies.

I found a ROM online called Gremlin. It is a 16K rom file. But at the moment I only got some 28C64 (8k) or 28C256 (32k) eeproms.

32k it is. But de beeb having address line A14 floating high, I need to flash the upper 16k of the 32k ROM.

So I made the 16K rom into a 32K using cat

cp Gremlin\ v1.21\ \(1983\)\(Computer\ Concepts\).rom 16k.rom
cat Gremlin\ v1.21\ \(1983\)\(Computer\ Concepts\).rom >> 16k.rom

minipro -w 16k.rom -p AT28C256

I got the rom from this page:
https://acorn.huininga.nl/pub/unsorted/roms/Gremlin%20v1.21%20(1983)(Computer%20Concepts).rom

Below booting straight into the monitor program.

Manual:

6502 and Wozmon

Ben posted a youtube about Wozmon running on his 6502.

In 1976, Steve Wozniac wrote what’s commonly known simply as Wozmon.

Wozmon is a machine-code monitor program written by Wozniak for the Apple 1. In Only 256 bytes ! Being pure 6502 code easily adaptable.
A monitor program allows you to view/edit and run machine code using simple commands.

I’ve got a different setup as Ben’s computer.
But changing the necessary, and it will run on my 6502.

I’m not using rs232 voltage levels (-7 till -25 and +7 till +25 volts).
I’m using a usb serial uart standard 5v leveling stick …

For address decoder see other post

Simplified schematic of my UART/ACIA

Compiling the Wosmon gave me an error, DEC is not a valid opcode for a bare 6502 .. but we have a 65c02.
Solution: Add -c02 extra opcodes

error 1 in line 187 of "wozmon.s": illegal operand types
>                DEC                    ; Decrement A.

# fix .. add -c02
vasm6502_oldstyle -c02 -Fbin -dotdir wozmon.s

Below Apple I Manual with the sourcecode for Wozmon