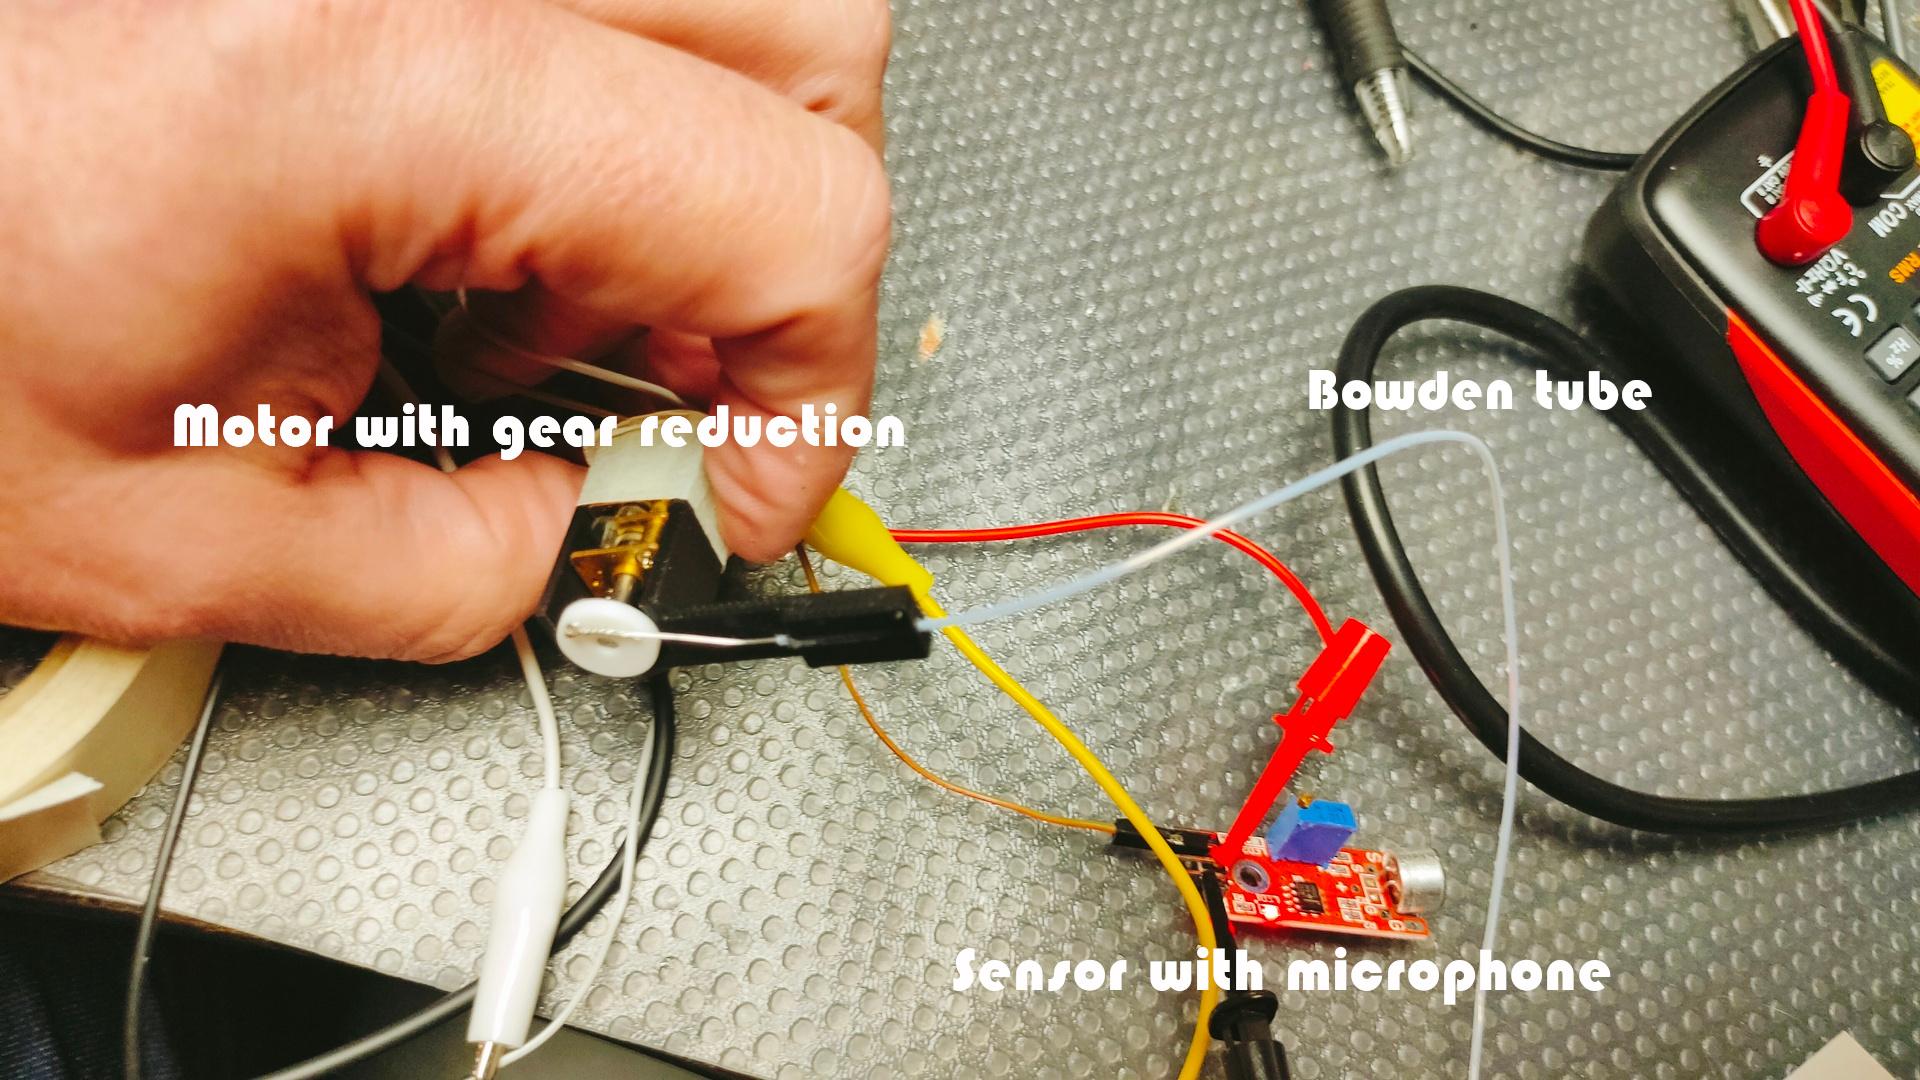
Using a bowden tube (PTFE tube 1mm) with a 3d printed holder. (ptfe is very smooth)
This is a test setup. I’ve removed arms and the flute on the bottom picture using AI. Then printed backpicture and top on sticky paper and stuck it on sturdy heavy paper.
I want to make a moving picture which moves our band members when there is sound (music). (Guitar, Harp, Bagpipes and Flute)
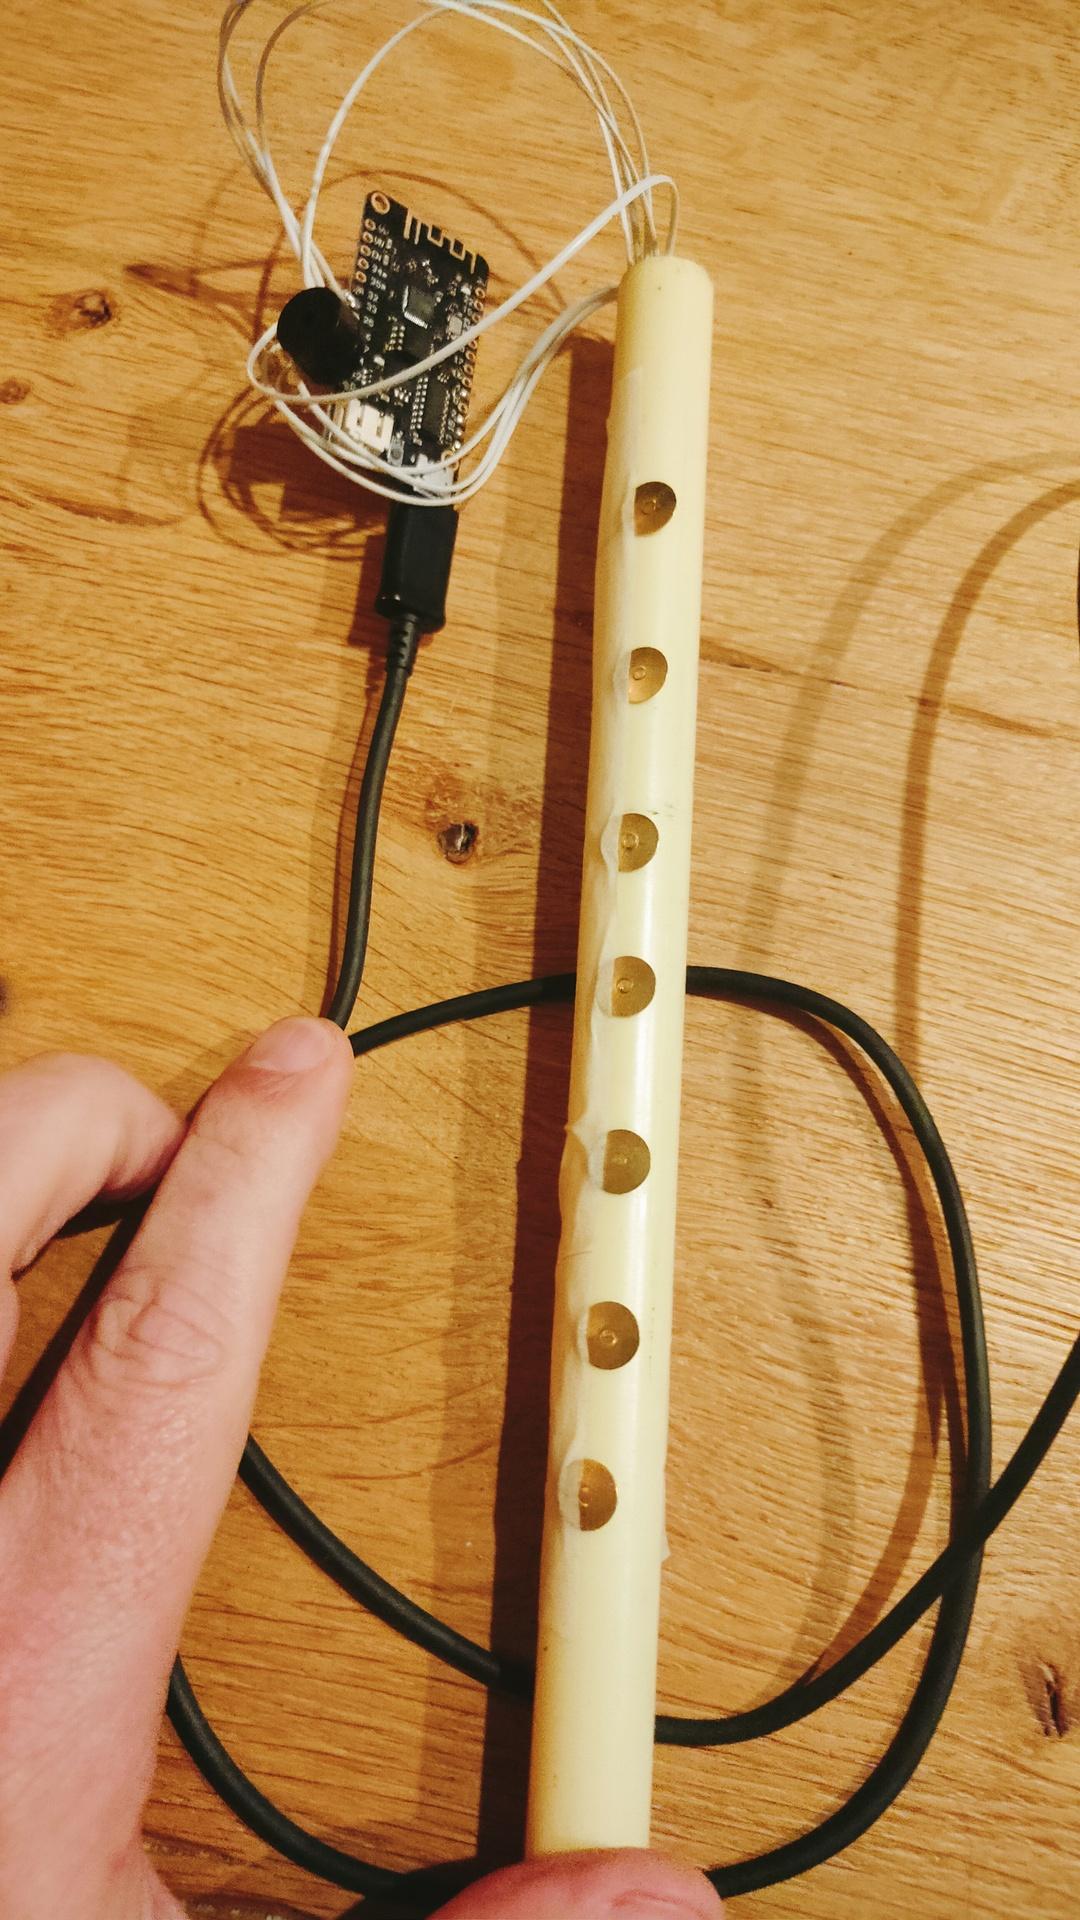
My proof of concept to build an electronic chanter for less than 4 euros.
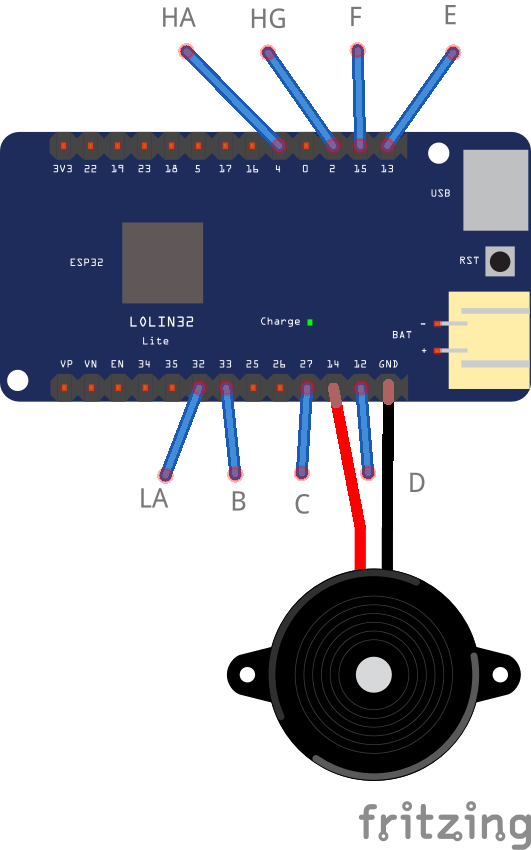
It uses a Lolin32 Lite and a buzzer. (No libraries needed) (Some wires, thumbtacks and a PVC tube.)
I still have to glue the thumbtacks
Plays accidentals (false fingering) Vibrato Has serial console debugging Need other frequencies? Just edit the source.
CODE
int prevnote = 0;

// Note freq table
int ha = 880;
int hg = 783;
int fs = 739;
int f = 698;
int e = 659;
int d = 587;
int cs = 554;
int c = 523;
int b = 493;
int as = 466;
int la = 440;
int lg = 391;
int mute = 0;

// 8 Bits to note, luckly not 9 fingers :)
// 0 (00000000) = all fingers off = mute
// bottom hand top hand
//     0111 011
//             1
// 01110111 = 119 = E
// 255 (11111111) = all fingers on = lg
// below per 10 all 255 posibilities
// Look at position 175
// custom frequency to get vibrato on D
// using bottom hand middle finger.

int data[] = {
mute,hg,ha,fs,ha,hg,ha,e,ha,hg,ha,
f,ha,hg,ha,d,ha,hg,ha,fs,ha,
hg,ha,e,ha,hg,ha,f,ha,hg,ha,
c,ha,hg,ha,f,ha,hg,ha,e,ha,
hg,ha,f,ha,hg,ha,d,ha,hg,ha,
f,ha,hg,ha,e,ha,hg,ha,f,ha,
hg,ha,b,ha,hg,ha,f,ha,hg,ha,
e,ha,hg,ha,f,ha,hg,ha,d,ha,
hg,ha,f,ha,hg,ha,e,ha,hg,ha,
e,ha,hg,ha,c,ha,hg,ha,f,ha,
hg,ha,e,ha,hg,ha,f,ha,hg,ha,
d,ha,hg,ha,fs,ha,hg,ha,e,ha,
hg,ha,f,ha,hg,ha,la,ha,hg,ha,
f,ha,hg,ha,e,ha,hg,ha,f,ha,
hg,ha,d,ha,hg,ha,f,ha,hg,ha,
e,ha,hg,ha,f,ha,hg,ha,cs,ha,
hg,ha,f,ha,hg,ha,e,ha,hg,ha,
f,ha,hg,ha,580,ha,hg,ha,f,ha,
hg,ha,e,ha,hg,ha,f,ha,hg,ha,
as,ha,hg,ha,f,ha,hg,ha,e,ha,
hg,ha,f,ha,hg,ha,d,ha,hg,ha,
f,ha,hg,ha,e,ha,hg,ha,f,ha,
hg,ha,c,ha,hg,ha,fs,ha,hg,ha,
e,ha,hg,ha,f,ha,hg,ha,d,ha,
hg,ha,fs,ha,hg,ha,e,ha,hg,ha,
fs,ha,hg,ha,lg };

void setup() {
  pinMode(14, OUTPUT);

  Serial.begin(115200);
  delay(1000);
  }

void loop() {
  int t1=touchRead(4);
  int t2=touchRead(2);
  int t3=touchRead(15);
  int t4=touchRead(13);
  int t5=touchRead(12);
  int t6=touchRead(27);
  int t7=touchRead(33);
  int t8=touchRead(32);

int note = 0;

// Debug reading
//Serial.println(t1);
// My readings are near zero and above 50
// So I chose 30 (adjust when needed)

if ( t1 < 30) {
  bitSet(note, 0);
}
if ( t2 < 30) {
  bitSet(note, 1);
}
if ( t3 < 30) {
  bitSet(note, 2);
}
if ( t4 < 30) {
  bitSet(note, 3);
}
if ( t5 < 30) {
  bitSet(note, 4);
}
if ( t6 < 30) {
  bitSet(note, 5);
}
if ( t7 < 30) {
  bitSet(note, 6);
}
if ( t8 < 30) {
  bitSet(note, 7);
}

//Serial.println(note);
  if (note == 0 && note != prevnote) {
    noTone(14);
    prevnote = 0;
  }

if (note != prevnote) {
  tone(14,data[note]);
  // debug
  //Serial.print("Note number : ");
  //Serial.println(note);
  //Serial.print("Freq : ");
  //Serial.println(data[note]);

  prevnote = note;
  }
}
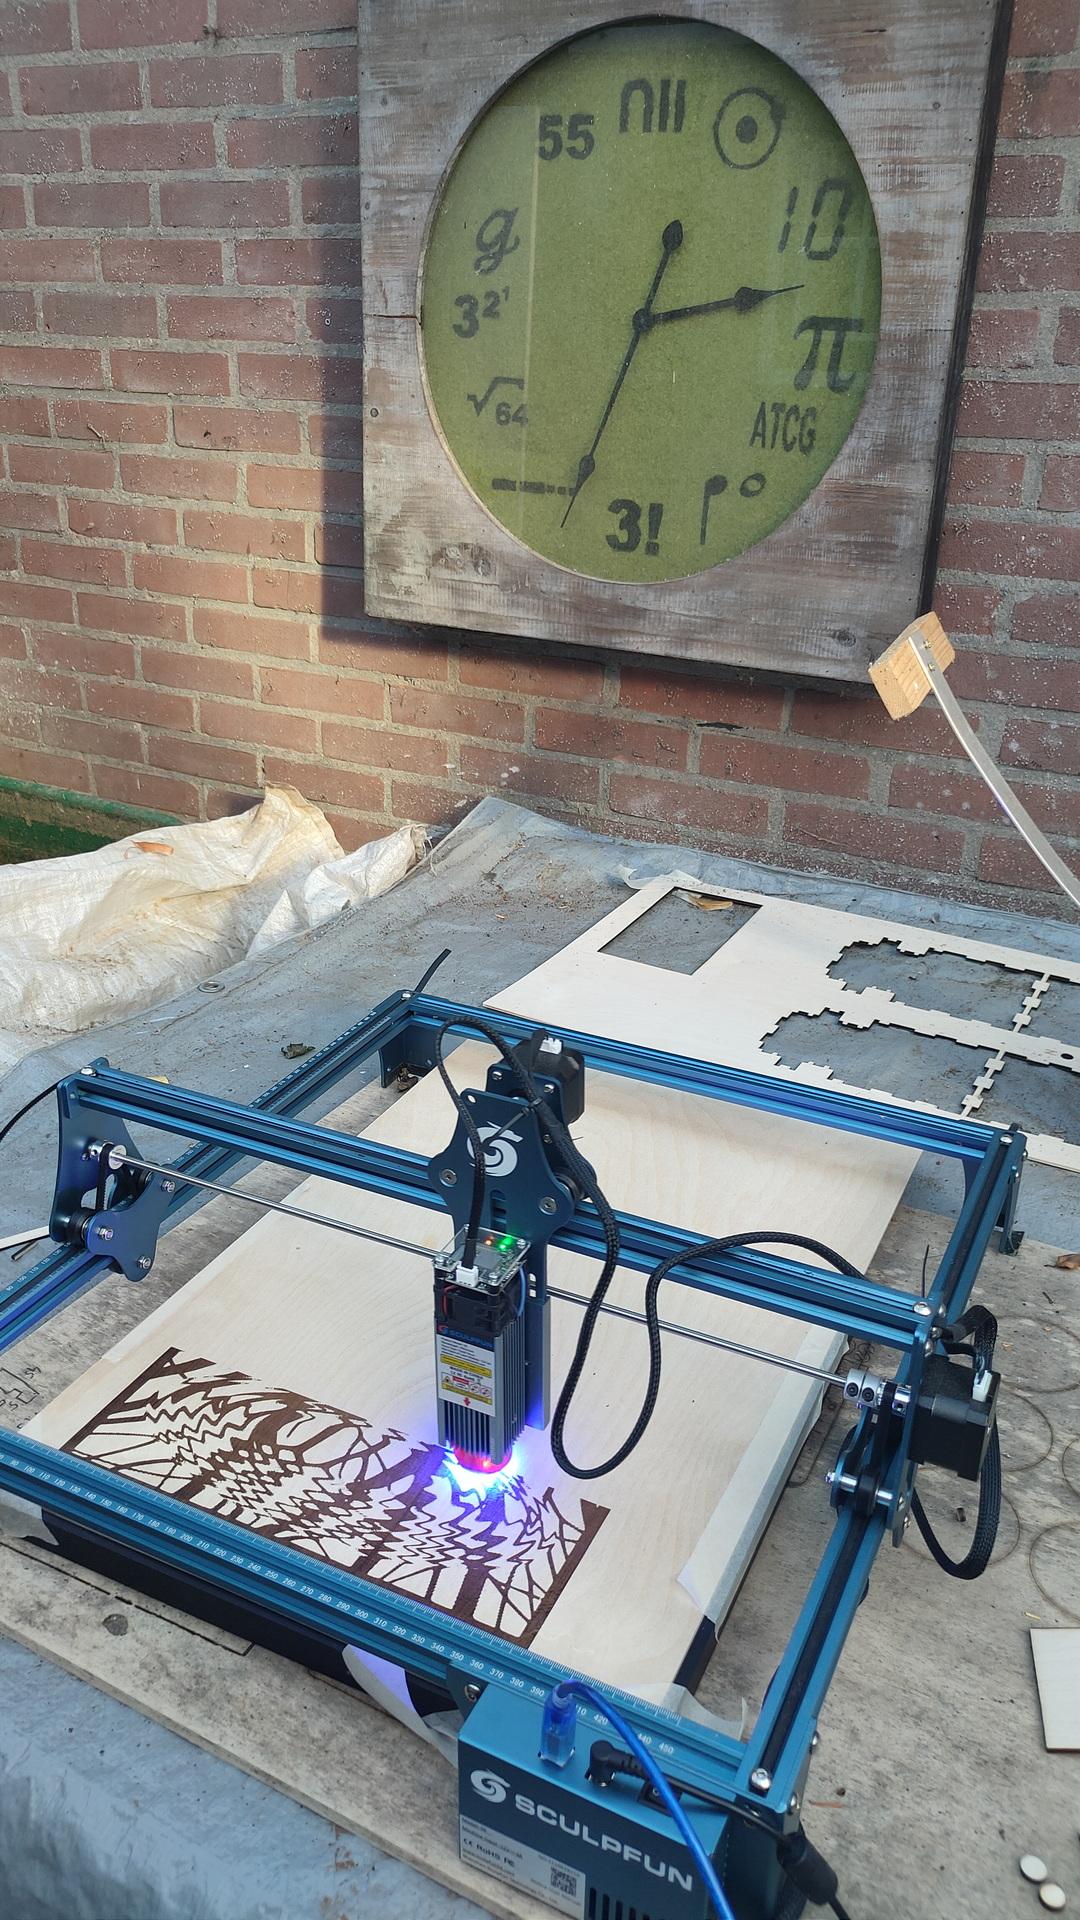
I’ve got a SculpFun Laser Cutter. I’m using this a lot … as lasercutter.
But you can also use a laser cutter as a Plotter or vinyl cutter!
Just remove the laser head, and replace it with a pen or knife! (360 swivel blade)
First : replace laserhead and make a controllable pen holder.
My Laser Cutter can be controlled using G-codes real-time. Example my etch a sketch. Now I just have to add a Z axis controller to control pen up/down.
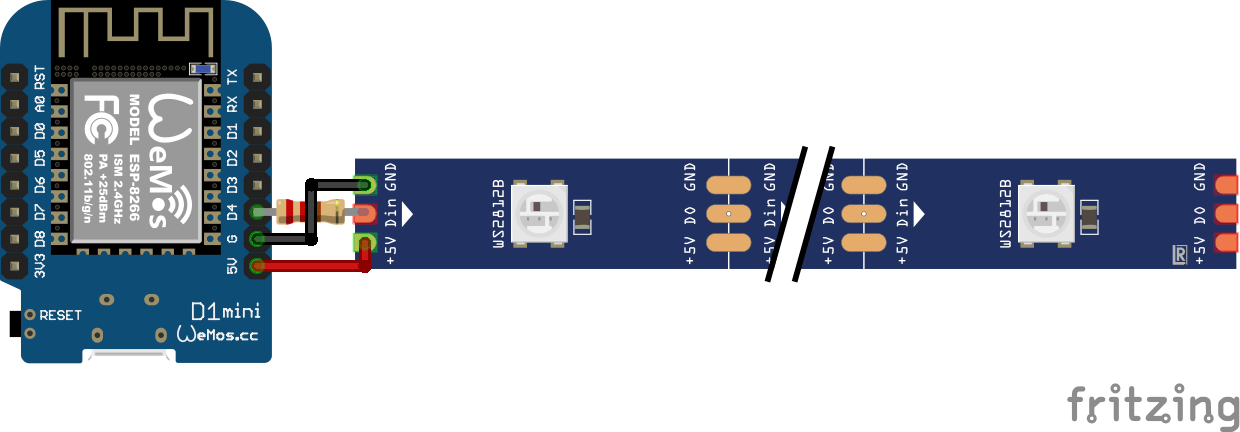
3D printed a little light case for a wemos and a piece of WS2812 led strip I had lying around.
Schematic: NOTE: The resistor is 100-500 ohm (I forgot, just try) You can only use this trick for a few leds (I used 4), else you better can use the sacrifice a led to make a level shifter trick. (Wemos logic is 3.3V and the led strip is 5V)
I flashed ESPHome on the wemos using the flasher in Home Assistant.