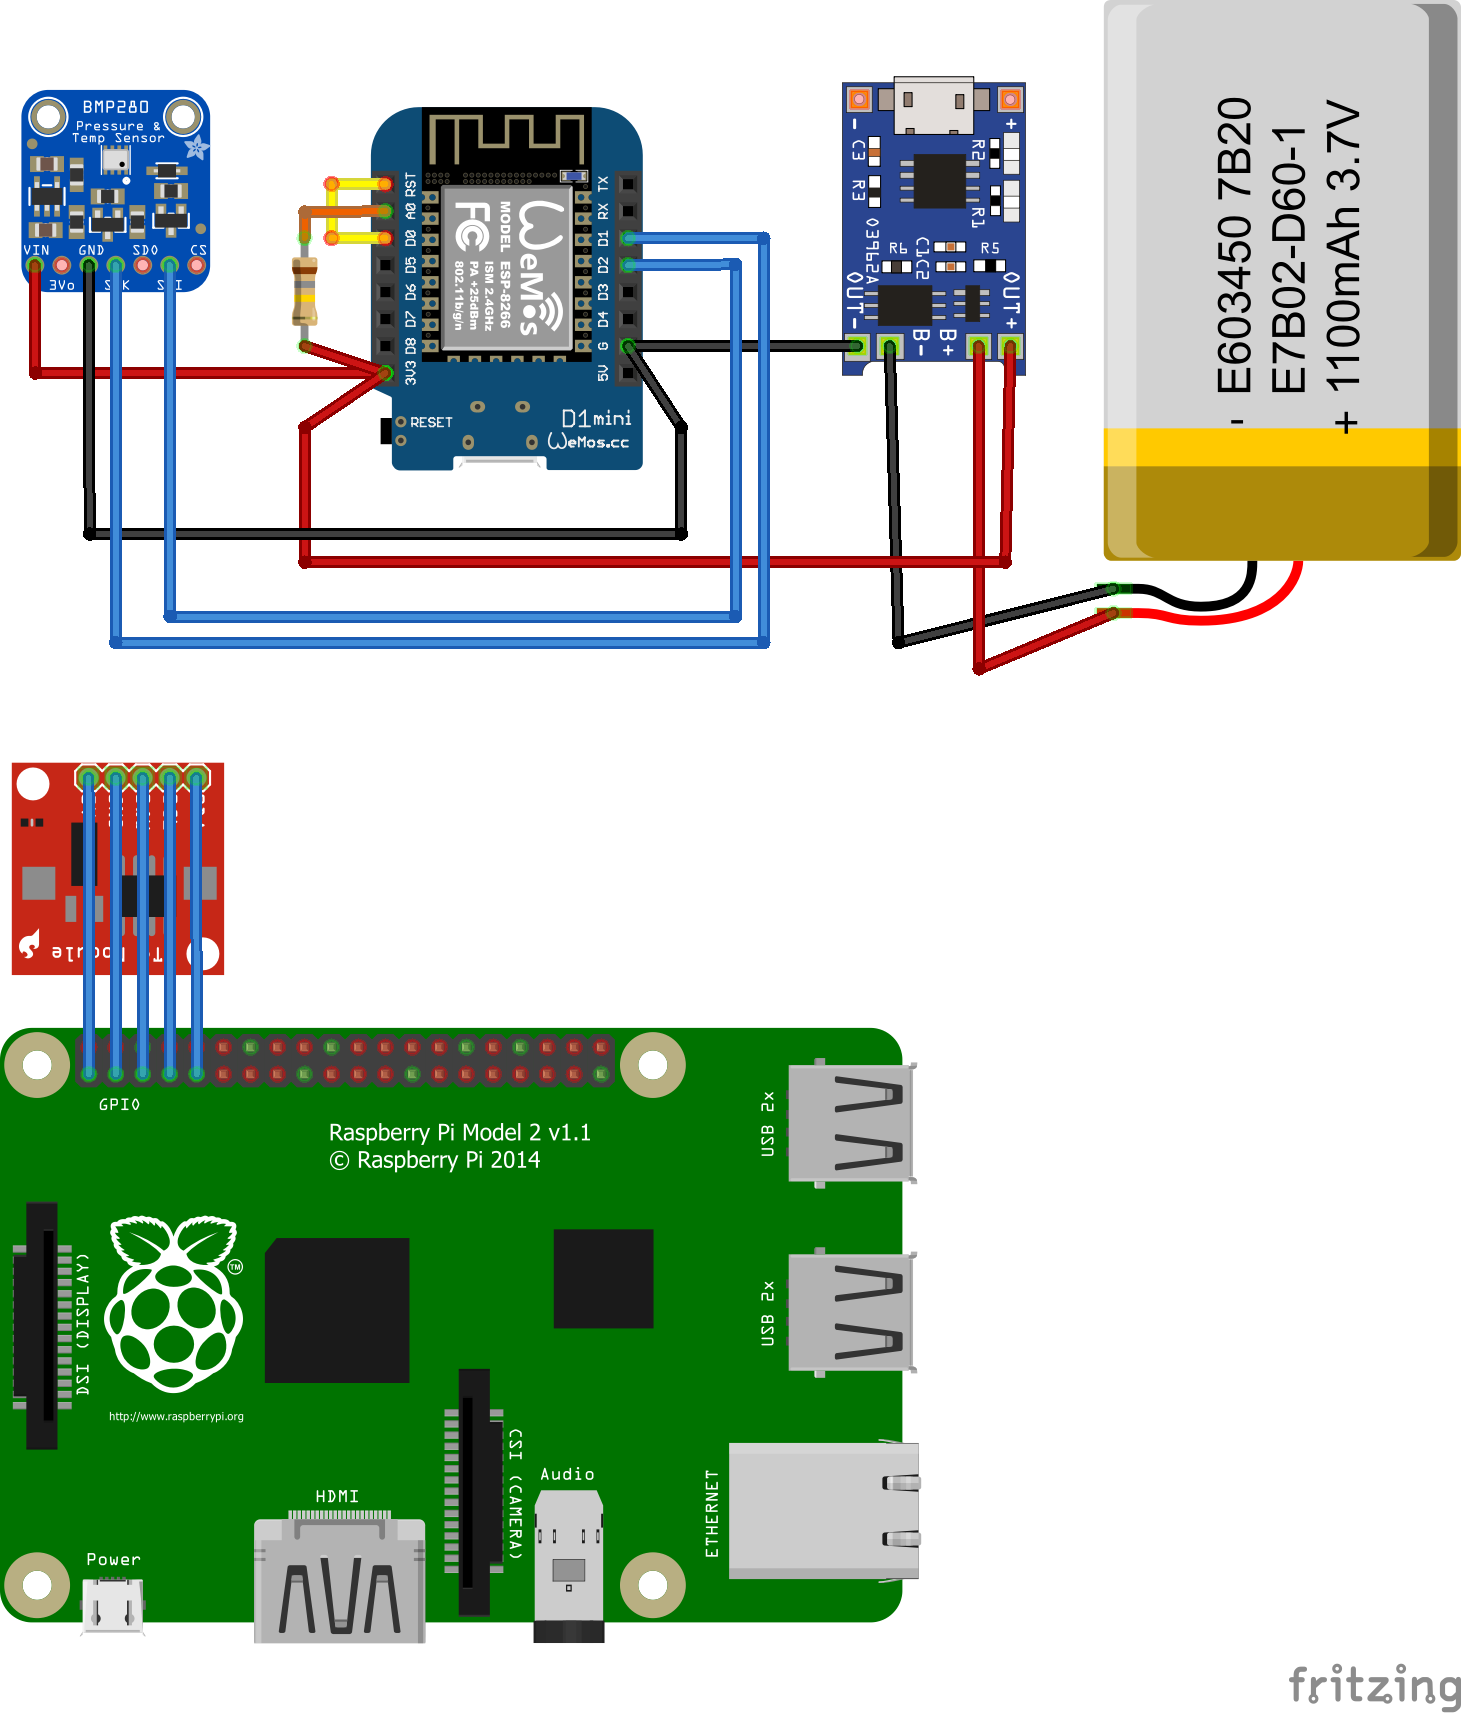
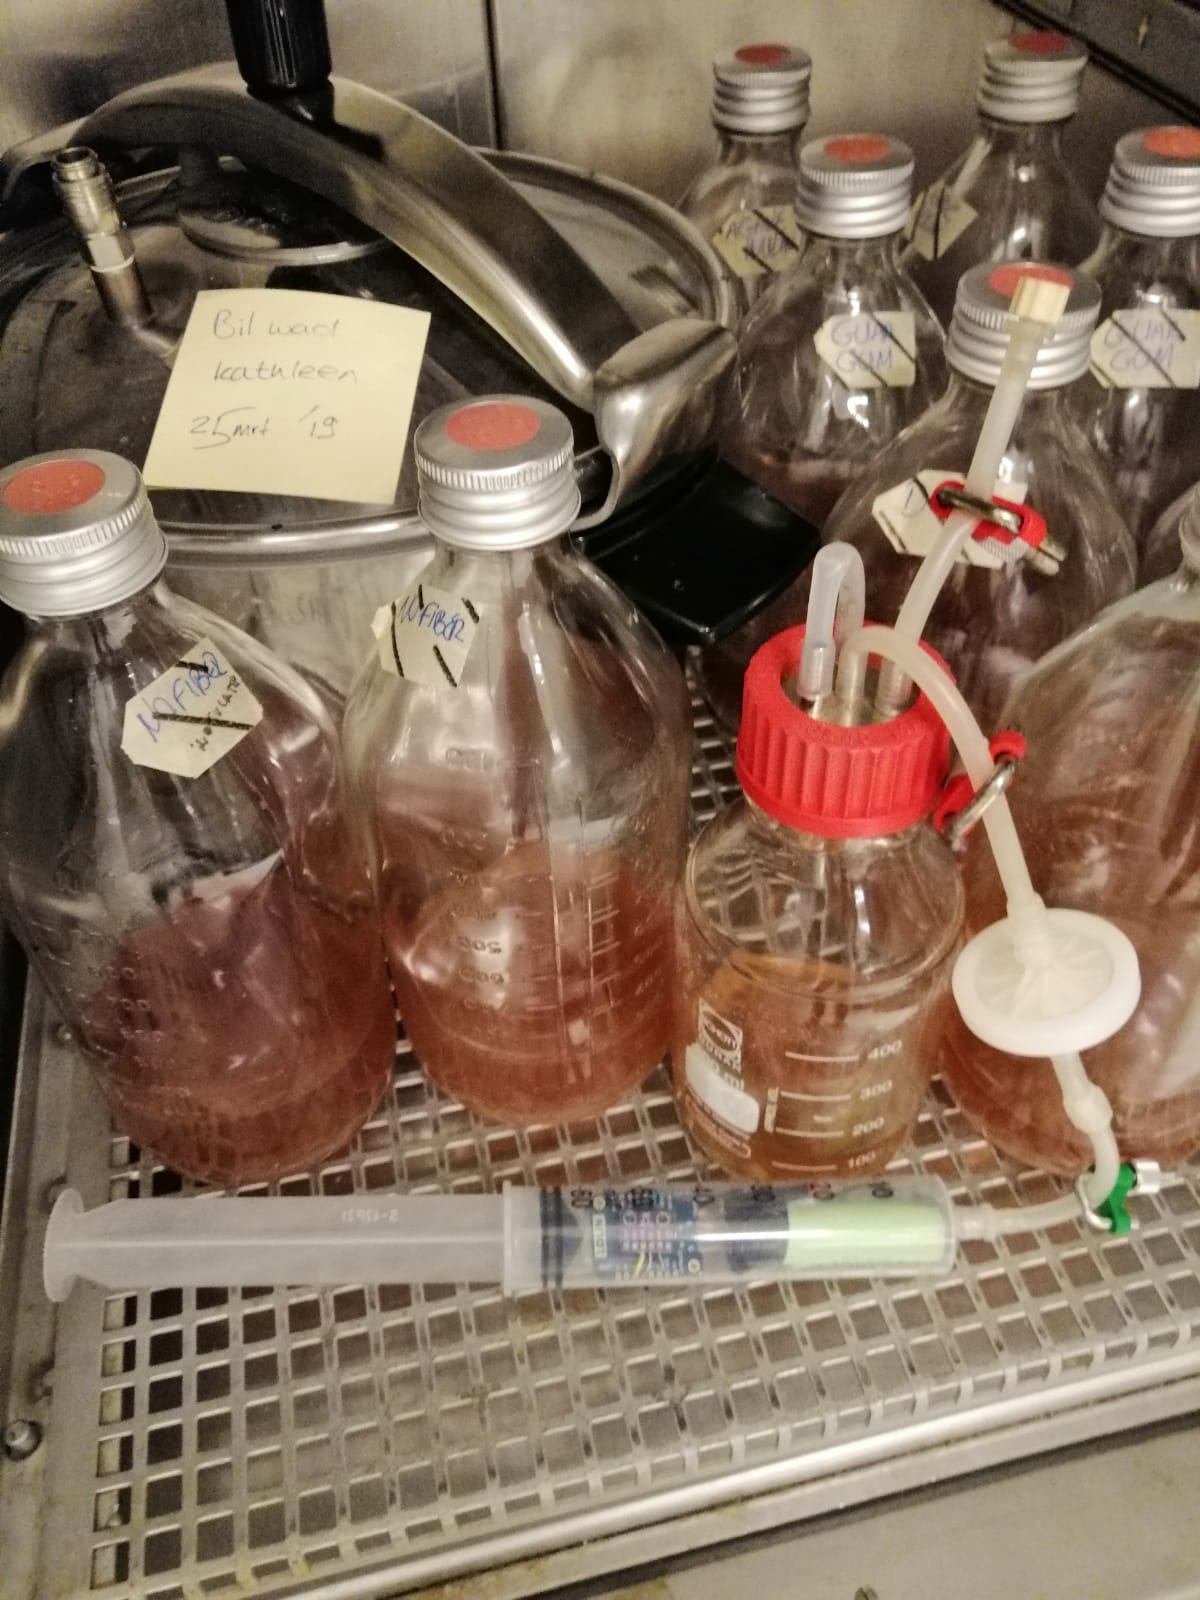
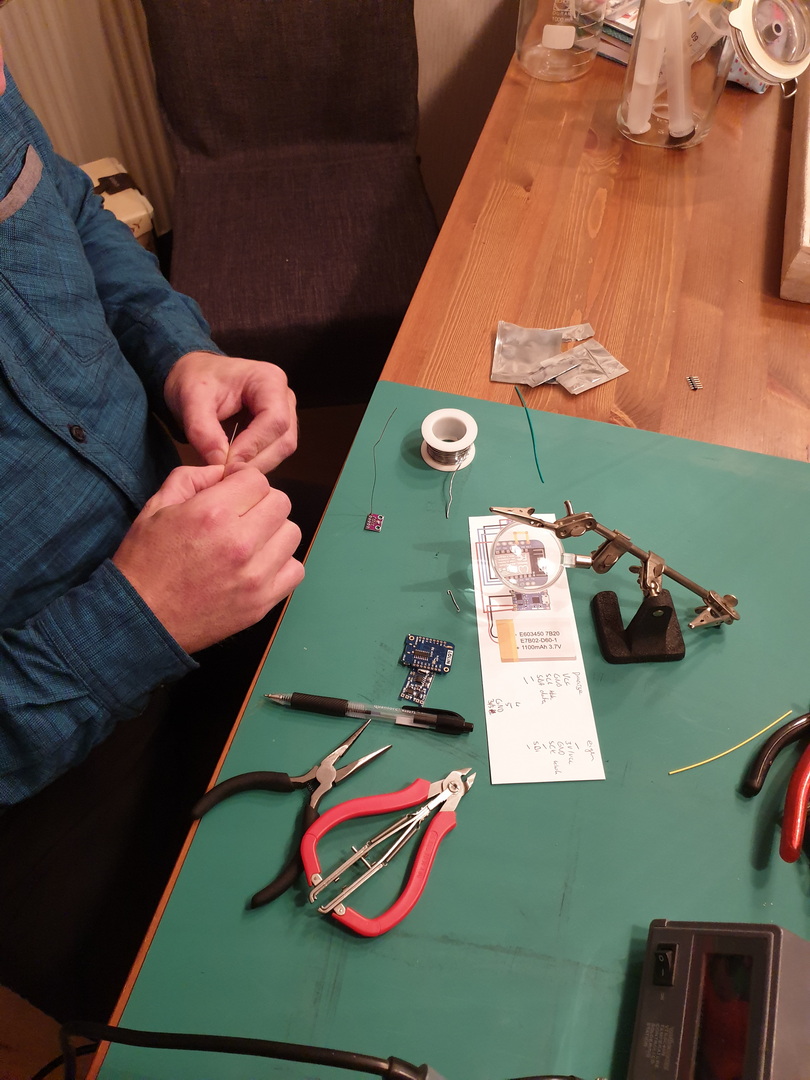
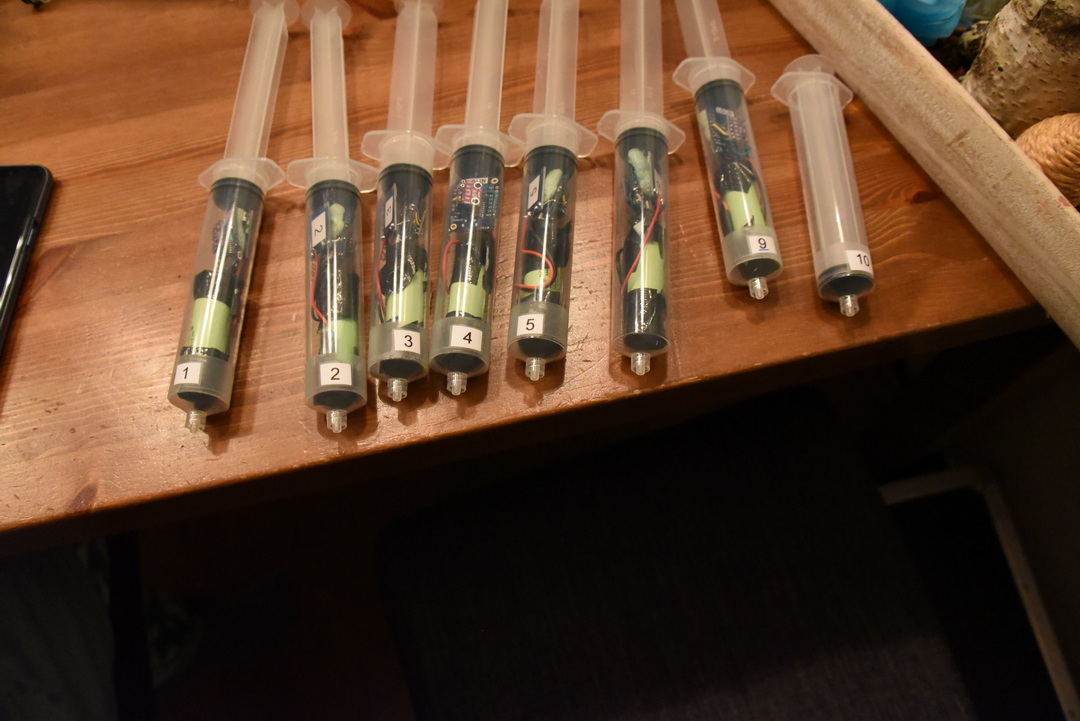
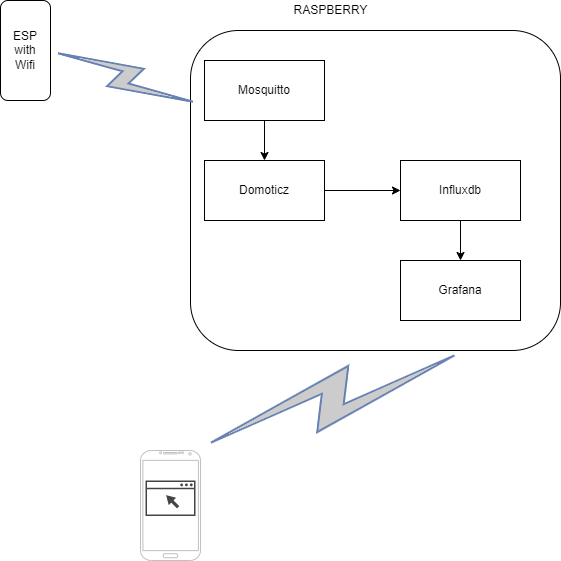
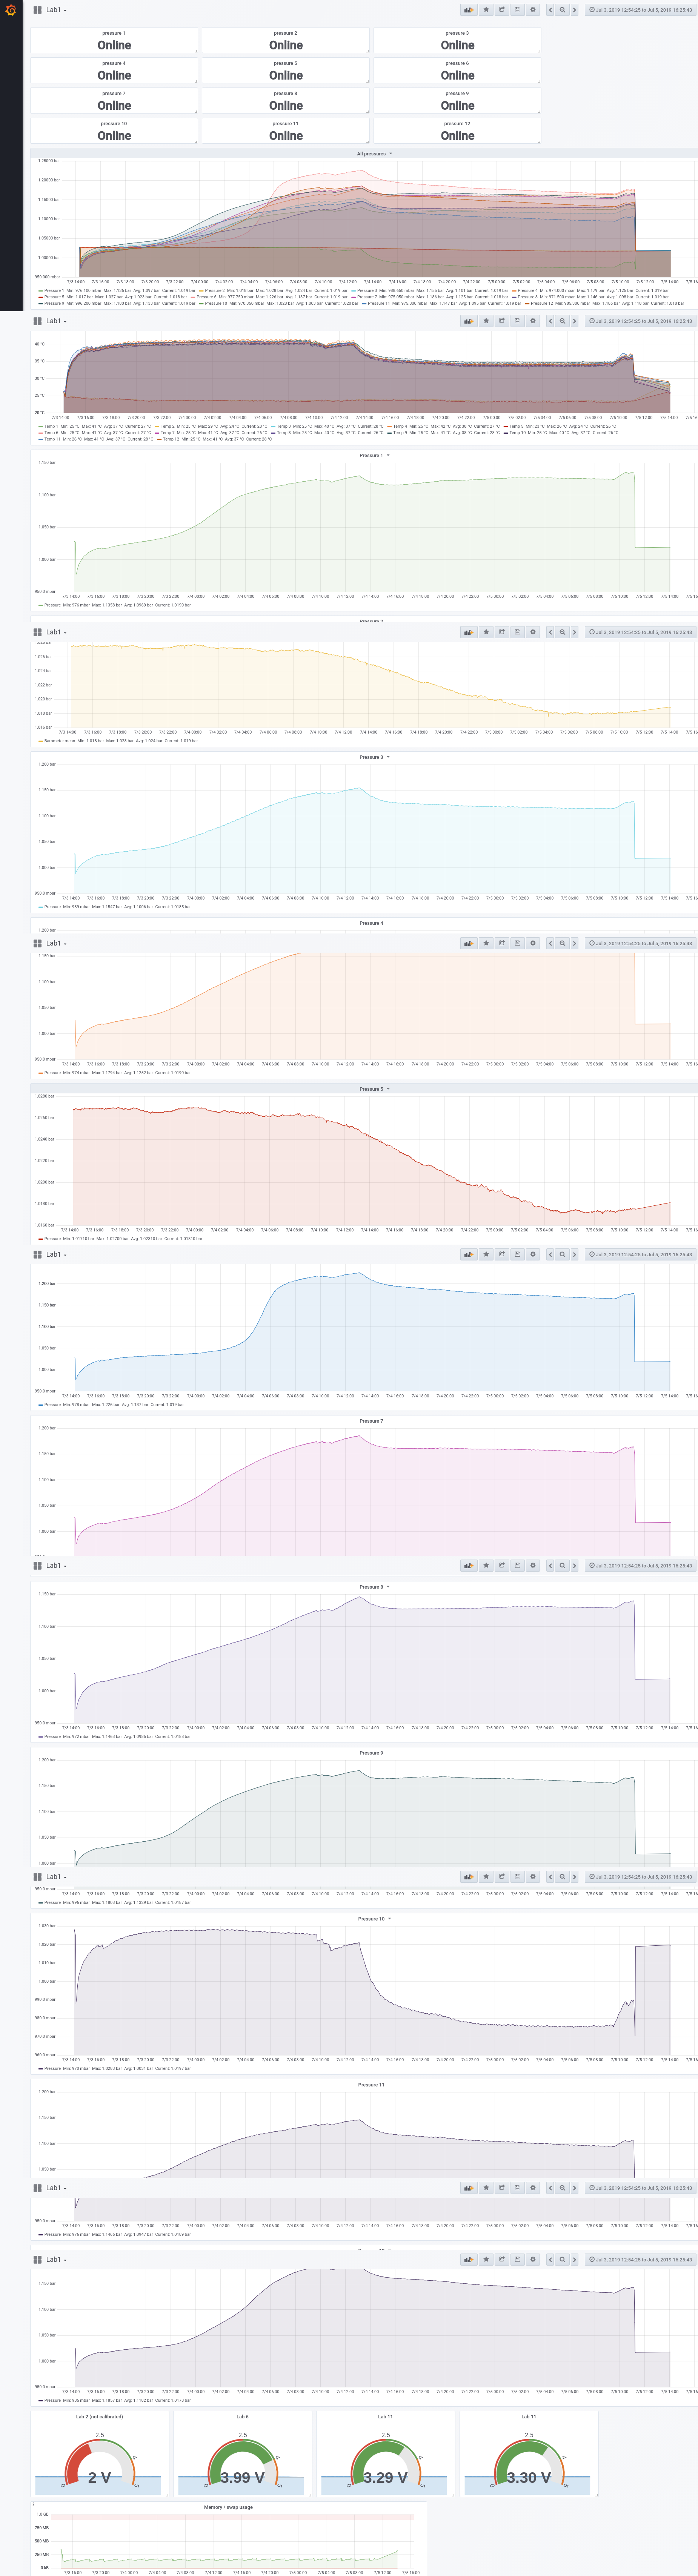
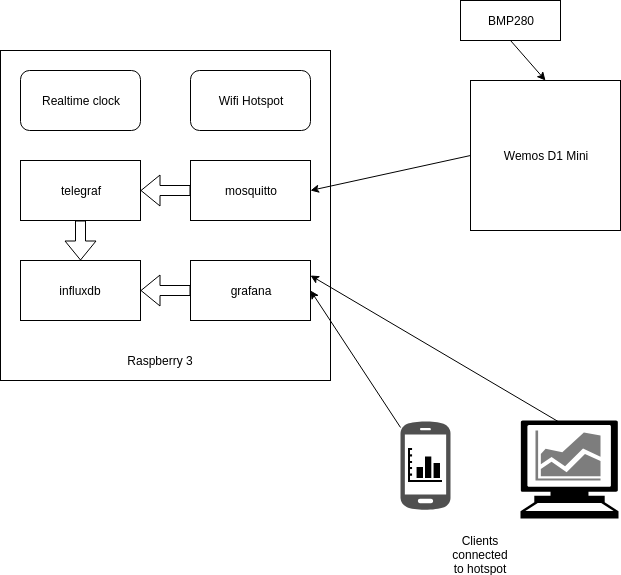
For measuring pressure in fermentation containers, I designed a pressure sensor which could be wireless connected to a fermentation container. The sensor would transmit the values to a Raspberry which was configured as a Access Point and would store the measurements and generated graphs using Grafana.
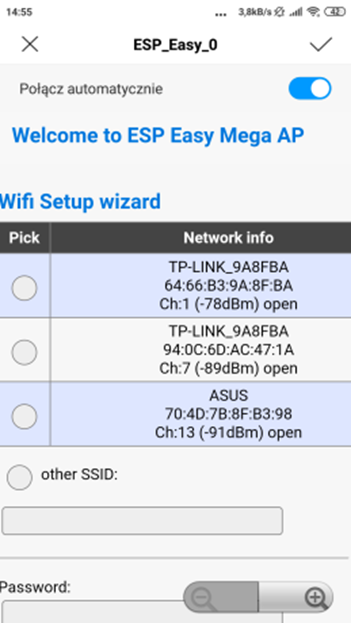
Connect esp with a power source. Look for a AP with ESP_Easy_0
Use password “configesp” to connect
Start you browser and enter http://192.168.4.1
In wifi wizard setup select “pressurespot” Enter password “pressurespot”
Press connect
Wait 20s and look in the raspberry logs which IP the ESP got.
Connect laptop/mobile to wifi “pressurespot”and connect
Enter found IP from ESP in your browser.
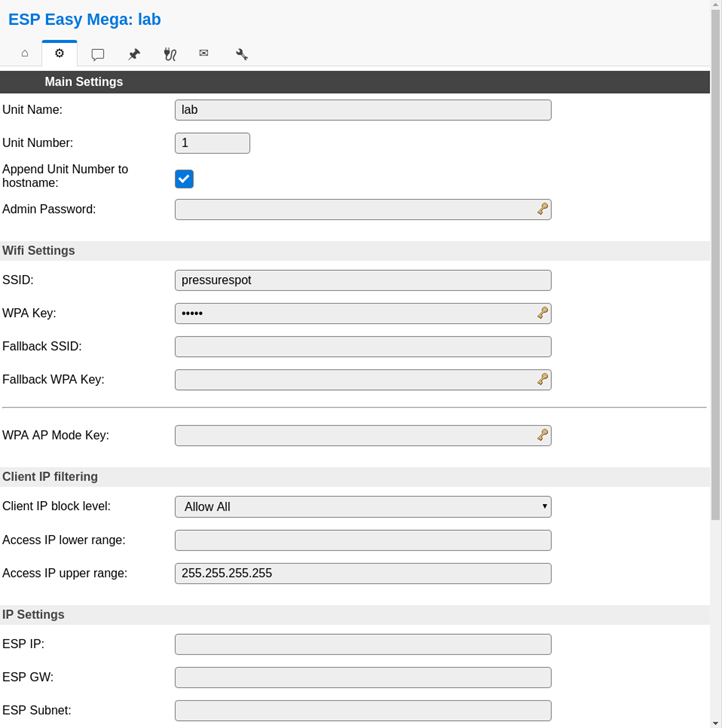
Proceed to main config
Main setting table, set the following
Unit name & number + append
SSID and WPA key pressurespot
Client IP block level allow all
Press submit
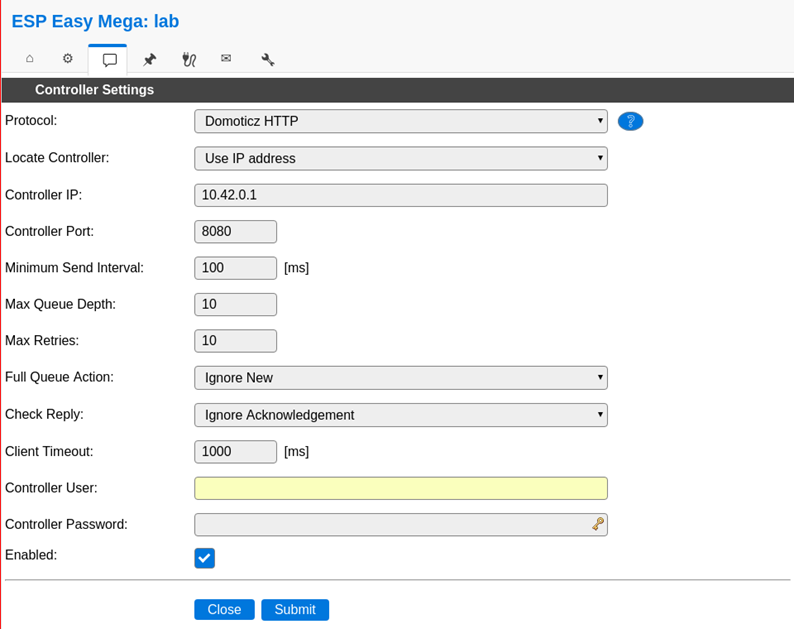
Press controller tab
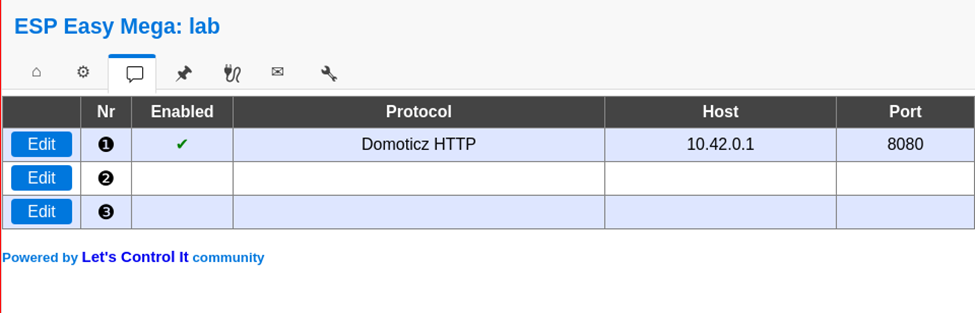
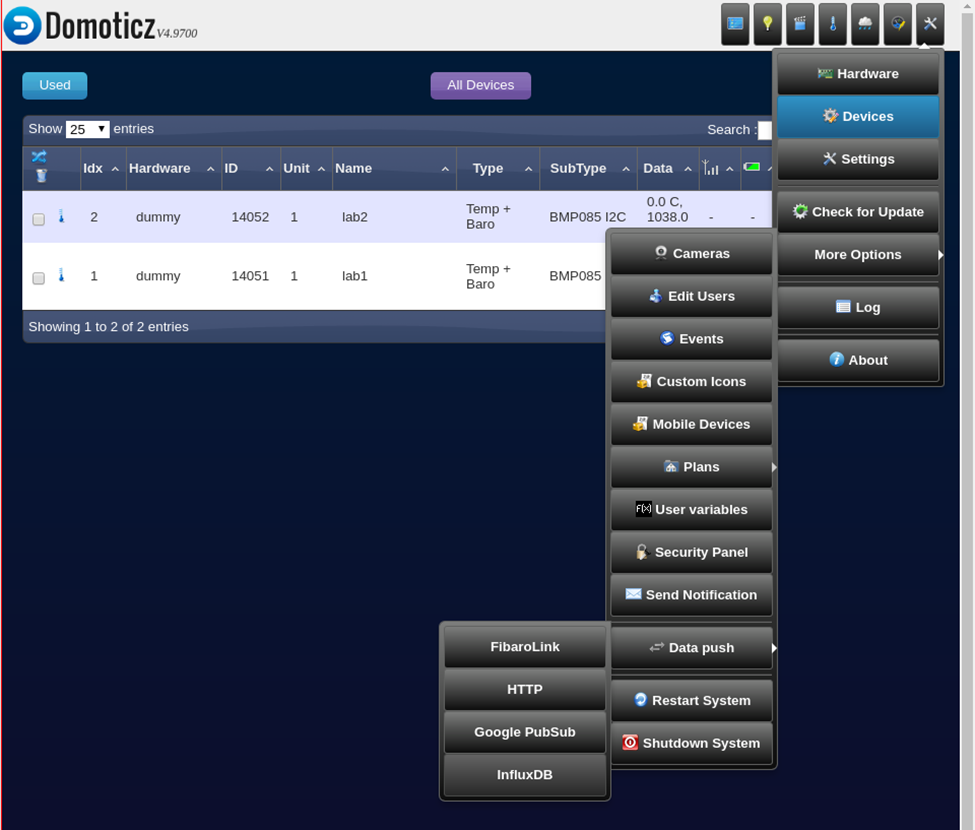
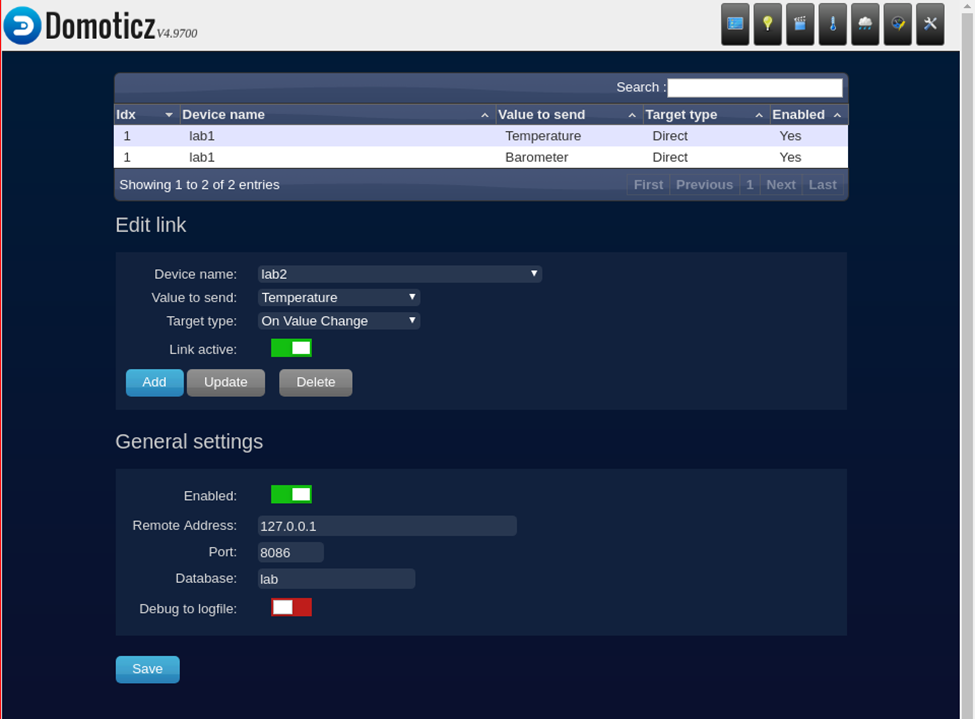
Press first edit button and set following – Protocol: domoticz http Next set – Controller IP : 10.42.0.1 – Toggle enabled and press submit
Resulting in:
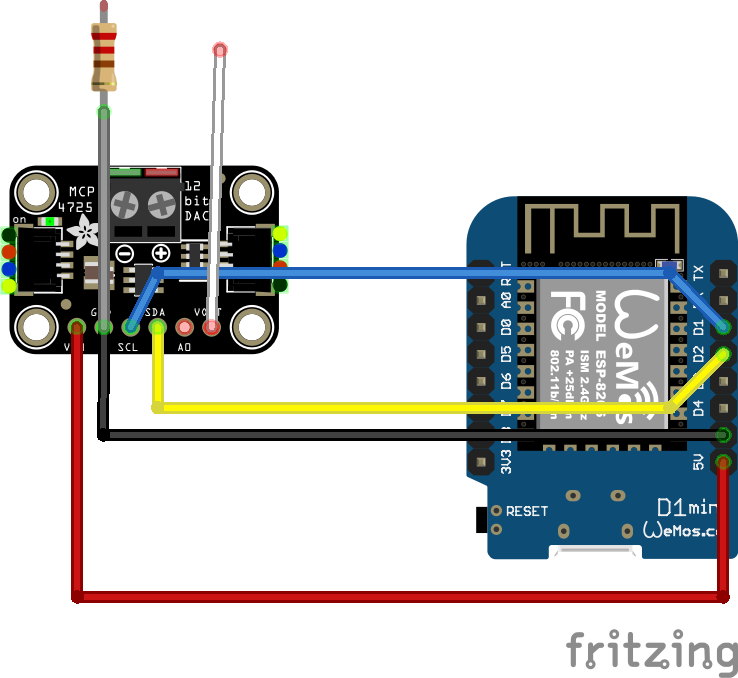
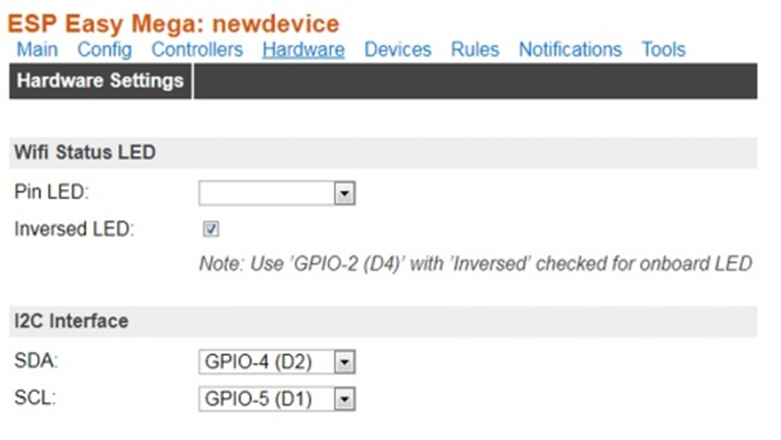
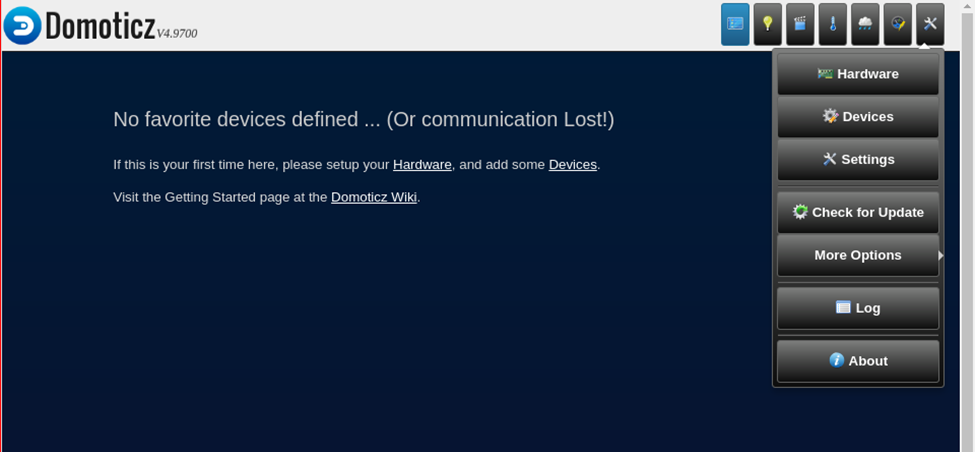
Next we got to Hardware
I2C interface switch GPIO-4 and GPIO-5
GPIO – SDA: GPIO-4 (D2) change to GPIO-5 (D1)
GPIO – SCL: GPIO-5 (D1) change to GPIO-4 (D2)
Press “Submit”
Devices TAB
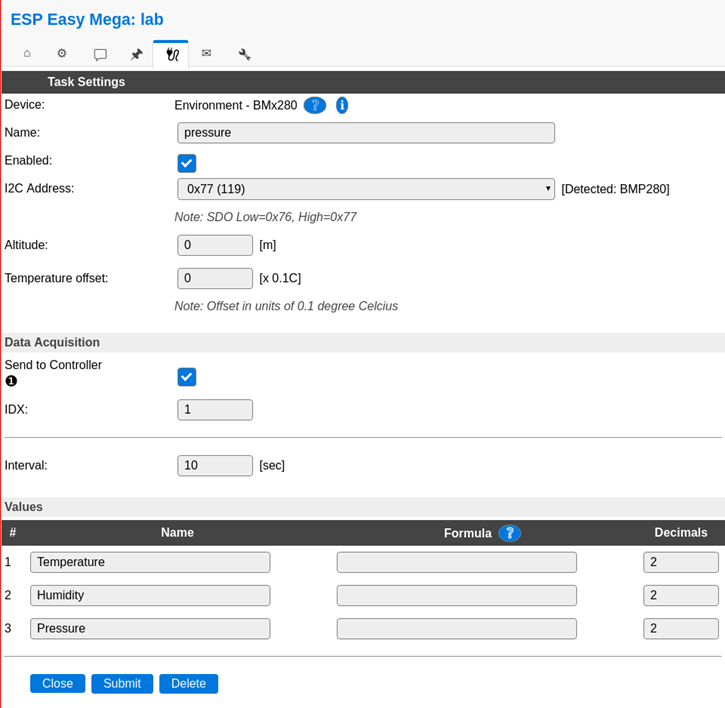
Press edit, and select device “Environment – BMx280” from the pulldown menu.
Next, set the following
Name: pressure
Enable on
I2C address : 0x76 ( Is there is no 0x76 of 0x77 .. do a i2c scan on the next tab )
Send to controller , mark this
IDX: give this the number you had given this node (this is the one you have to use in domoticz )
interval 10Seconds
and press submit
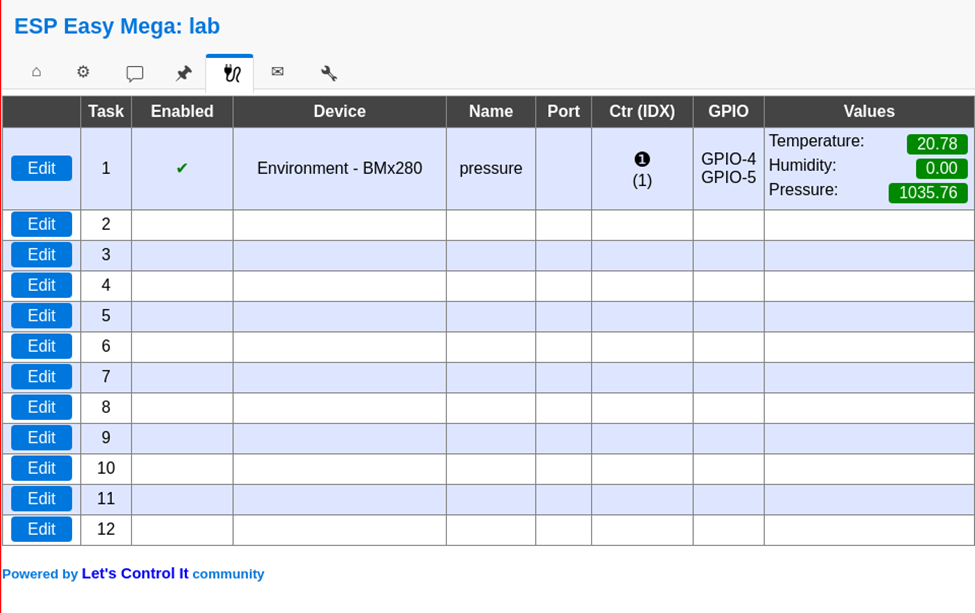
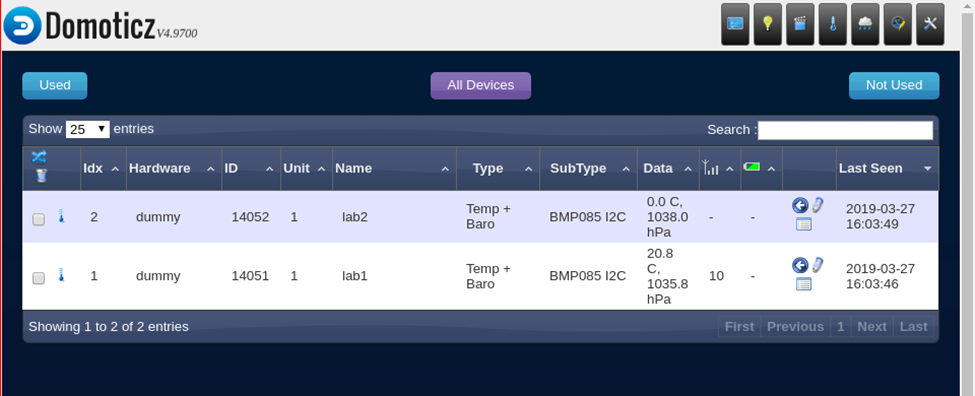
In the Devices tab, you should be able to see the sensor with the values (Temperature and pressure)
No values? Do a i2c scan and/or reboot ESP ( You can find these in the tools tab)
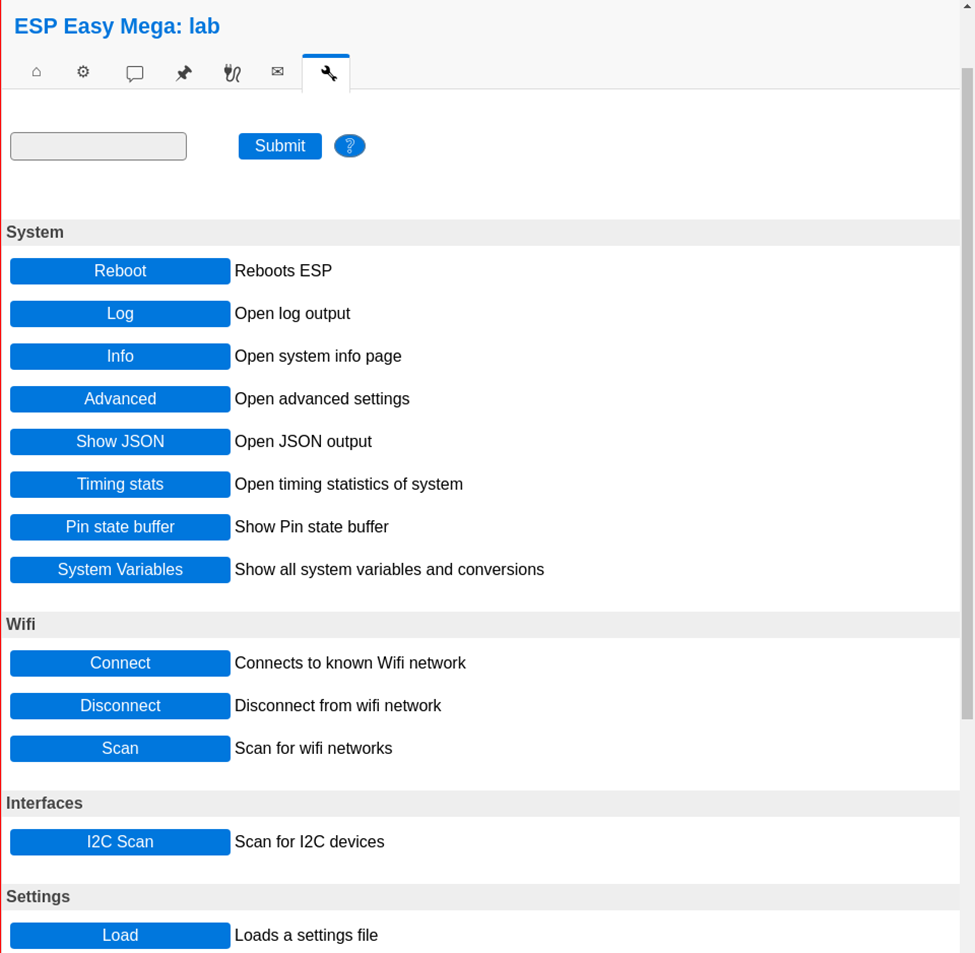
Tools TAB
Press I2C scan, when seeing a address like 0x76 or 0x77 use this in previous tabs. Still nothing, even after reboot? Maybe faulty hardware?
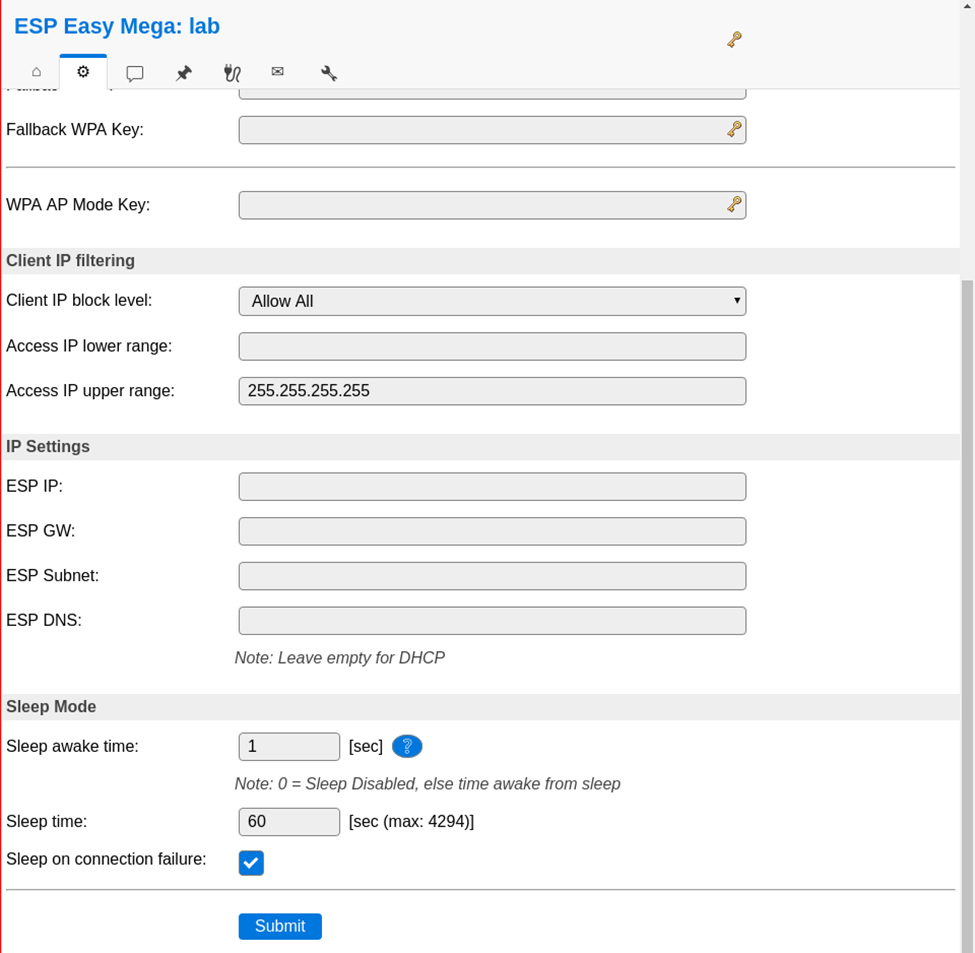
Everything okay? Back to the config tab
We are going to set the sleep mode. Warning ! .. when setting this it is hard to get into the config pages again. ESP will startup, connect to wifi, send values and goes to sleep again.
At the bottom set: Sleep awake time 1 sec
Buttons on the raspberry / pressurespot
Red button :
Less than 3 seconds is reboot
Longer than 3 seconds is shut down
Charger can be removed, when the green light is off
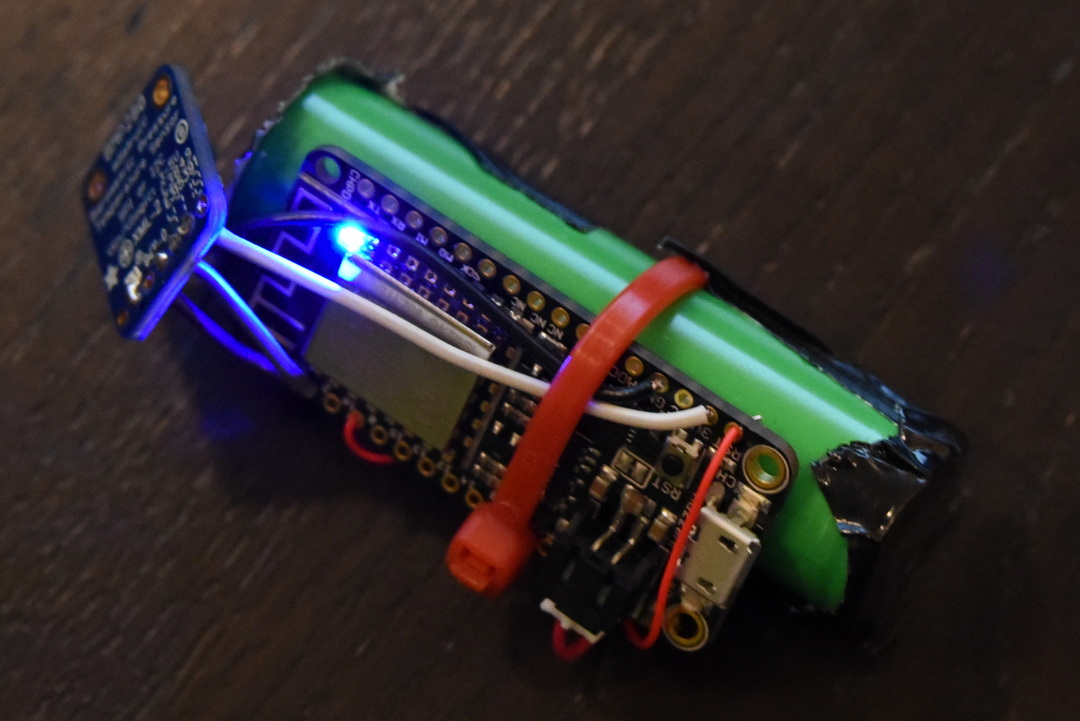
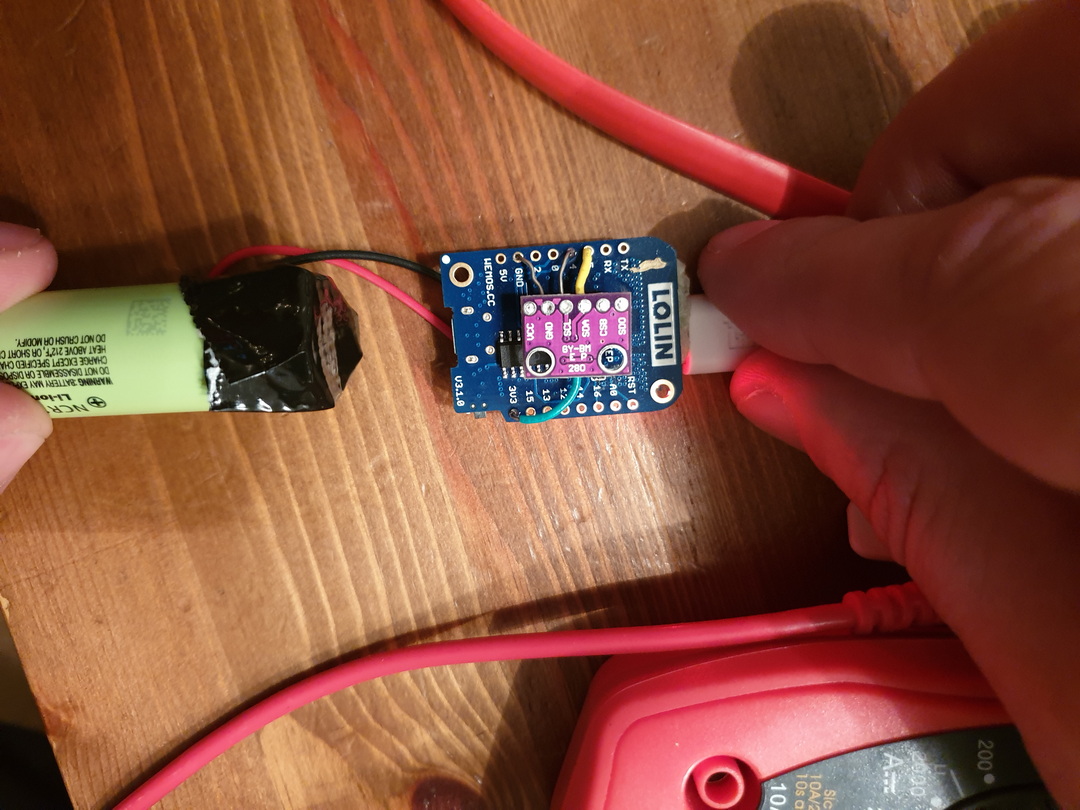
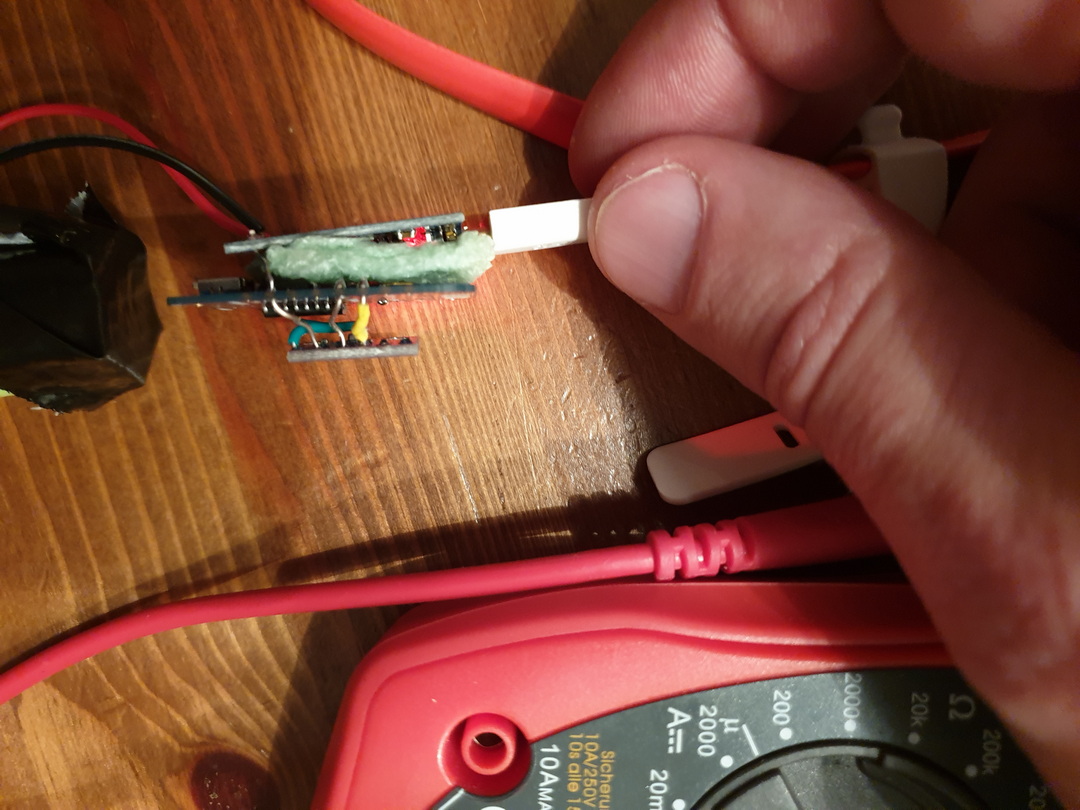
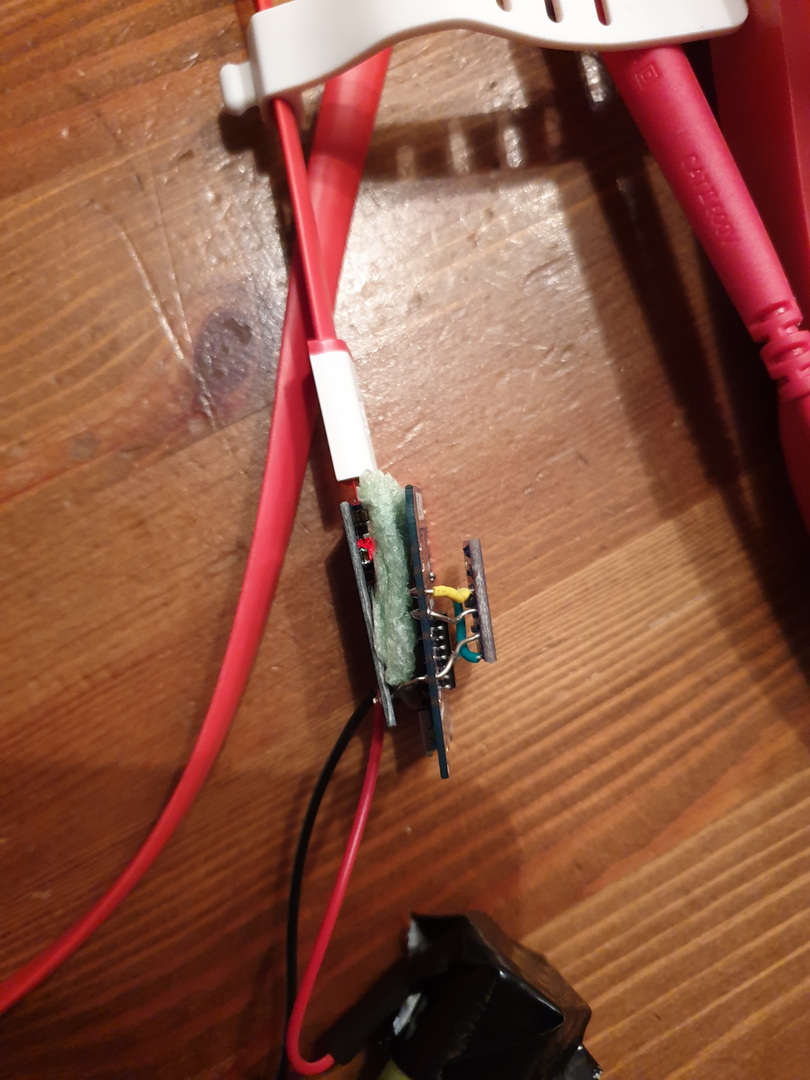
Led lights on the sensors
Red light (R2; constant): battery is charging
Blue light (R1; constant): battery is full
Blue light (R1; constant) & red light (R2; blinking): trying to charge, but no battery connected
Add shutdown script to /etc/rc.local
python /usr/local/bin/power-switch.py &
/usr/local/bin/power-switch.py
#!/usr/bin/python
import threading, subprocess
import RPi.GPIO as GPIO
def shutdown():
    subprocess.call('sudo shutdown -h now', shell=True)
def edge_detected(pin):
    if GPIO.input(pin):
        t.cancel()
        subprocess.call('sudo reboot', shell=True)
    else:
        t.start()
if __name__ == '__main__':
    try:
        GPIO.setmode(GPIO.BOARD)
        GPIO.setup(5, GPIO.IN)
        GPIO.add_event_detect(5, GPIO.BOTH, callback=edge_detected, bouncetime=10)
        t = threading.Timer(3.0, shutdown)
        while True:
            pass
    finally:
        GPIO.cleanup()
/usr/local/bin/ledoff.py
#!/usr/bin/python
import RPi.GPIO as GPIO
import time
GPIO.setmode(GPIO.BCM)
GPIO.setwarnings(False)
GPIO.setup(18,GPIO.OUT)
GPIO.output(18,GPIO.LOW)
/usr/local/bin/ledon.py
#!/usr/bin/python
import RPi.GPIO as GPIO
import time
GPIO.setmode(GPIO.BCM)
GPIO.setwarnings(False)
GPIO.setup(18,GPIO.OUT)
GPIO.output(18,GPIO.HIGH)
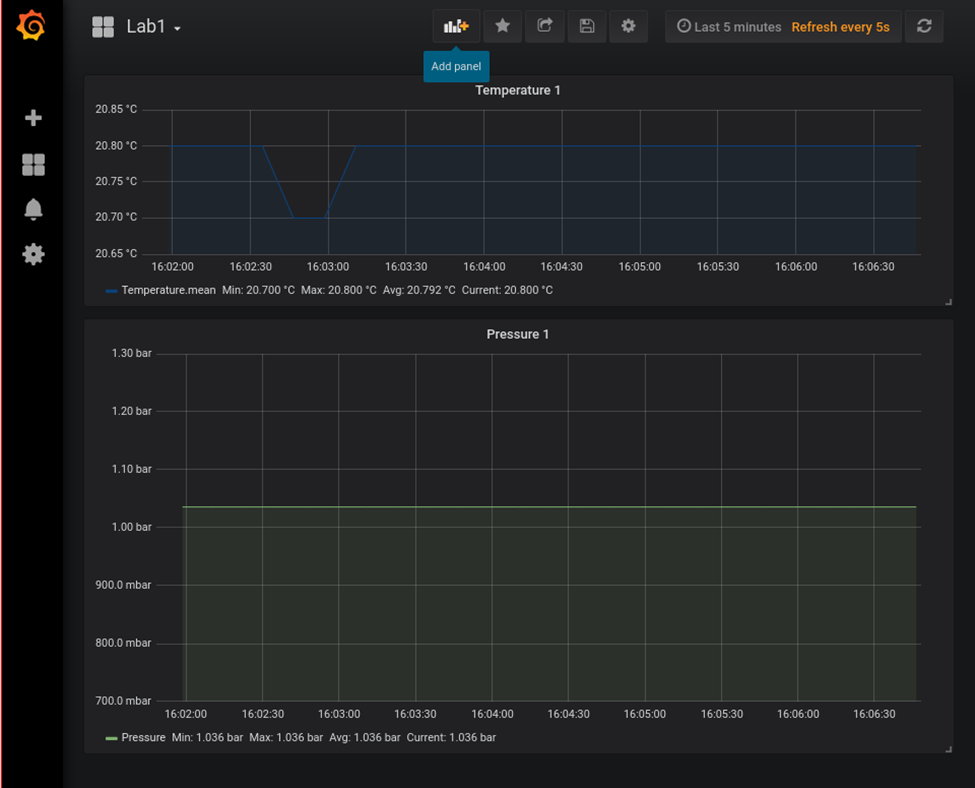
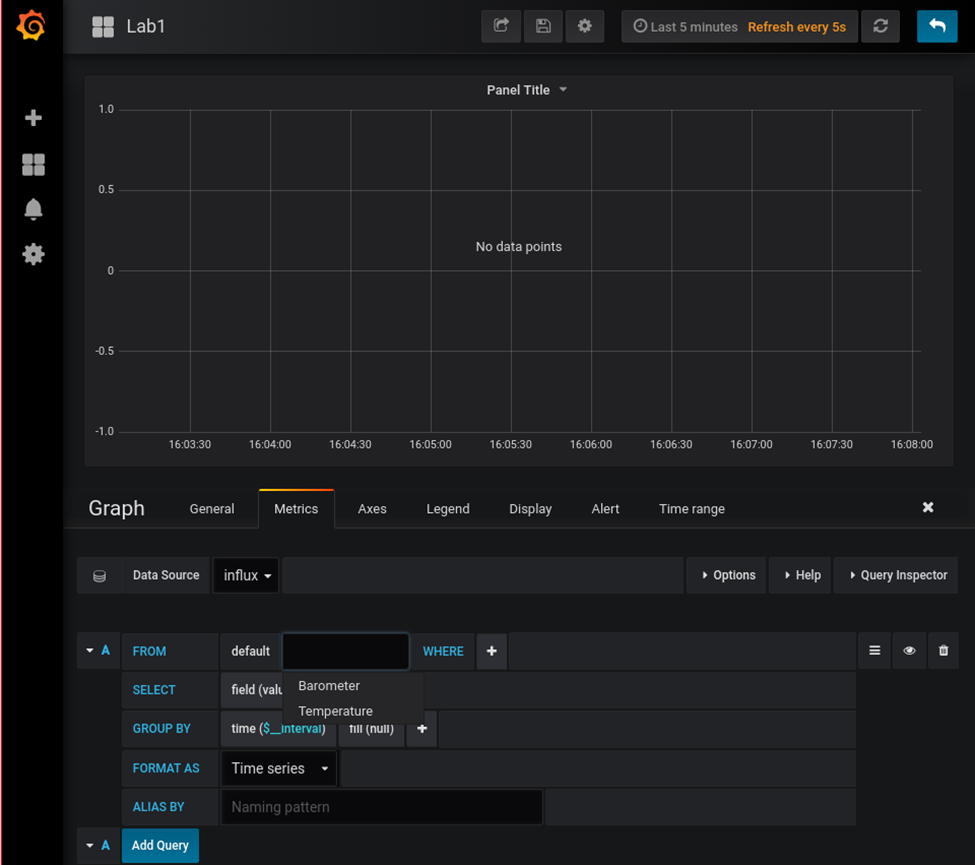
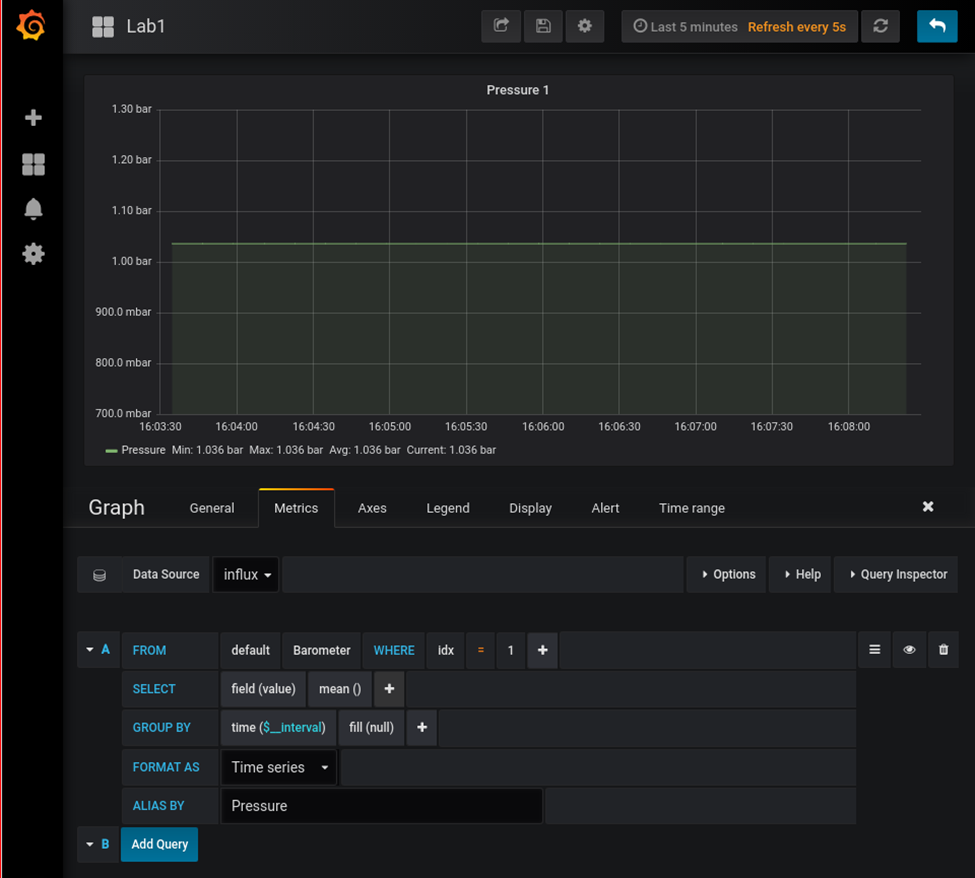
Now we can check that grafana is up by loading it in a browser: http://10.42.0.1:3000. If so, you can log in with the username and password = admin and set a new admin password.
When using Spice and VNC to virtual machine consoles, and remote consoles like idrac and ilo, it is not alway possible to copy-paste.
When doing maintenance it is a annoyance to type a super strong and long password by hand, Prone to typing errors, timeouts. And following lockouts.
So i wanted to auto type the password.
First solution was to bind a little bash script to a key combination.
#!/bin/bash
# Usage: make a keypress shortcut to this script
# activate shortcut, and the script wil give you 10 seconds to click and focus remote console window.
# It pastes the password, and you can press enter to login
# ( you can use xdotool also to press enter for you )
sleep 10
xdotool type "SUP3Rl00000ngandcompl3xpasswo0d@#@#@#%$%$%%$-you-cant-type-me-without-erors"
I’ve bound this to a key combination on my workstation.
gsettings set org.gnome.settings-daemon.plugins.media-keys custom-keybindings "['/org/gnome/settings-daemon/plugins/media-keys/custom-keybindings/custom0/']"
gsettings set org.gnome.settings-daemon.plugins.media-keys.custom-keybinding:/org/gnome/settings-daemon/plugins/media-keys/custom-keybindings/custom0/ name 'passpaste'
gsettings set org.gnome.settings-daemon.plugins.media-keys.custom-keybinding:/org/gnome/settings-daemon/plugins/media-keys/custom-keybindings/custom0/ command '~/bin/passpaste.sh'
gsettings set org.gnome.settings-daemon.plugins.media-keys.custom-keybinding:/org/gnome/settings-daemon/plugins/media-keys/custom-keybindings/custom0/ binding '<Super>p'
This works, but only where this script is installed. So not on colleagues machines, workstations with windows, and the super secret admin/root account sits in a file.
So i made a password key, which count be behind lock and key.
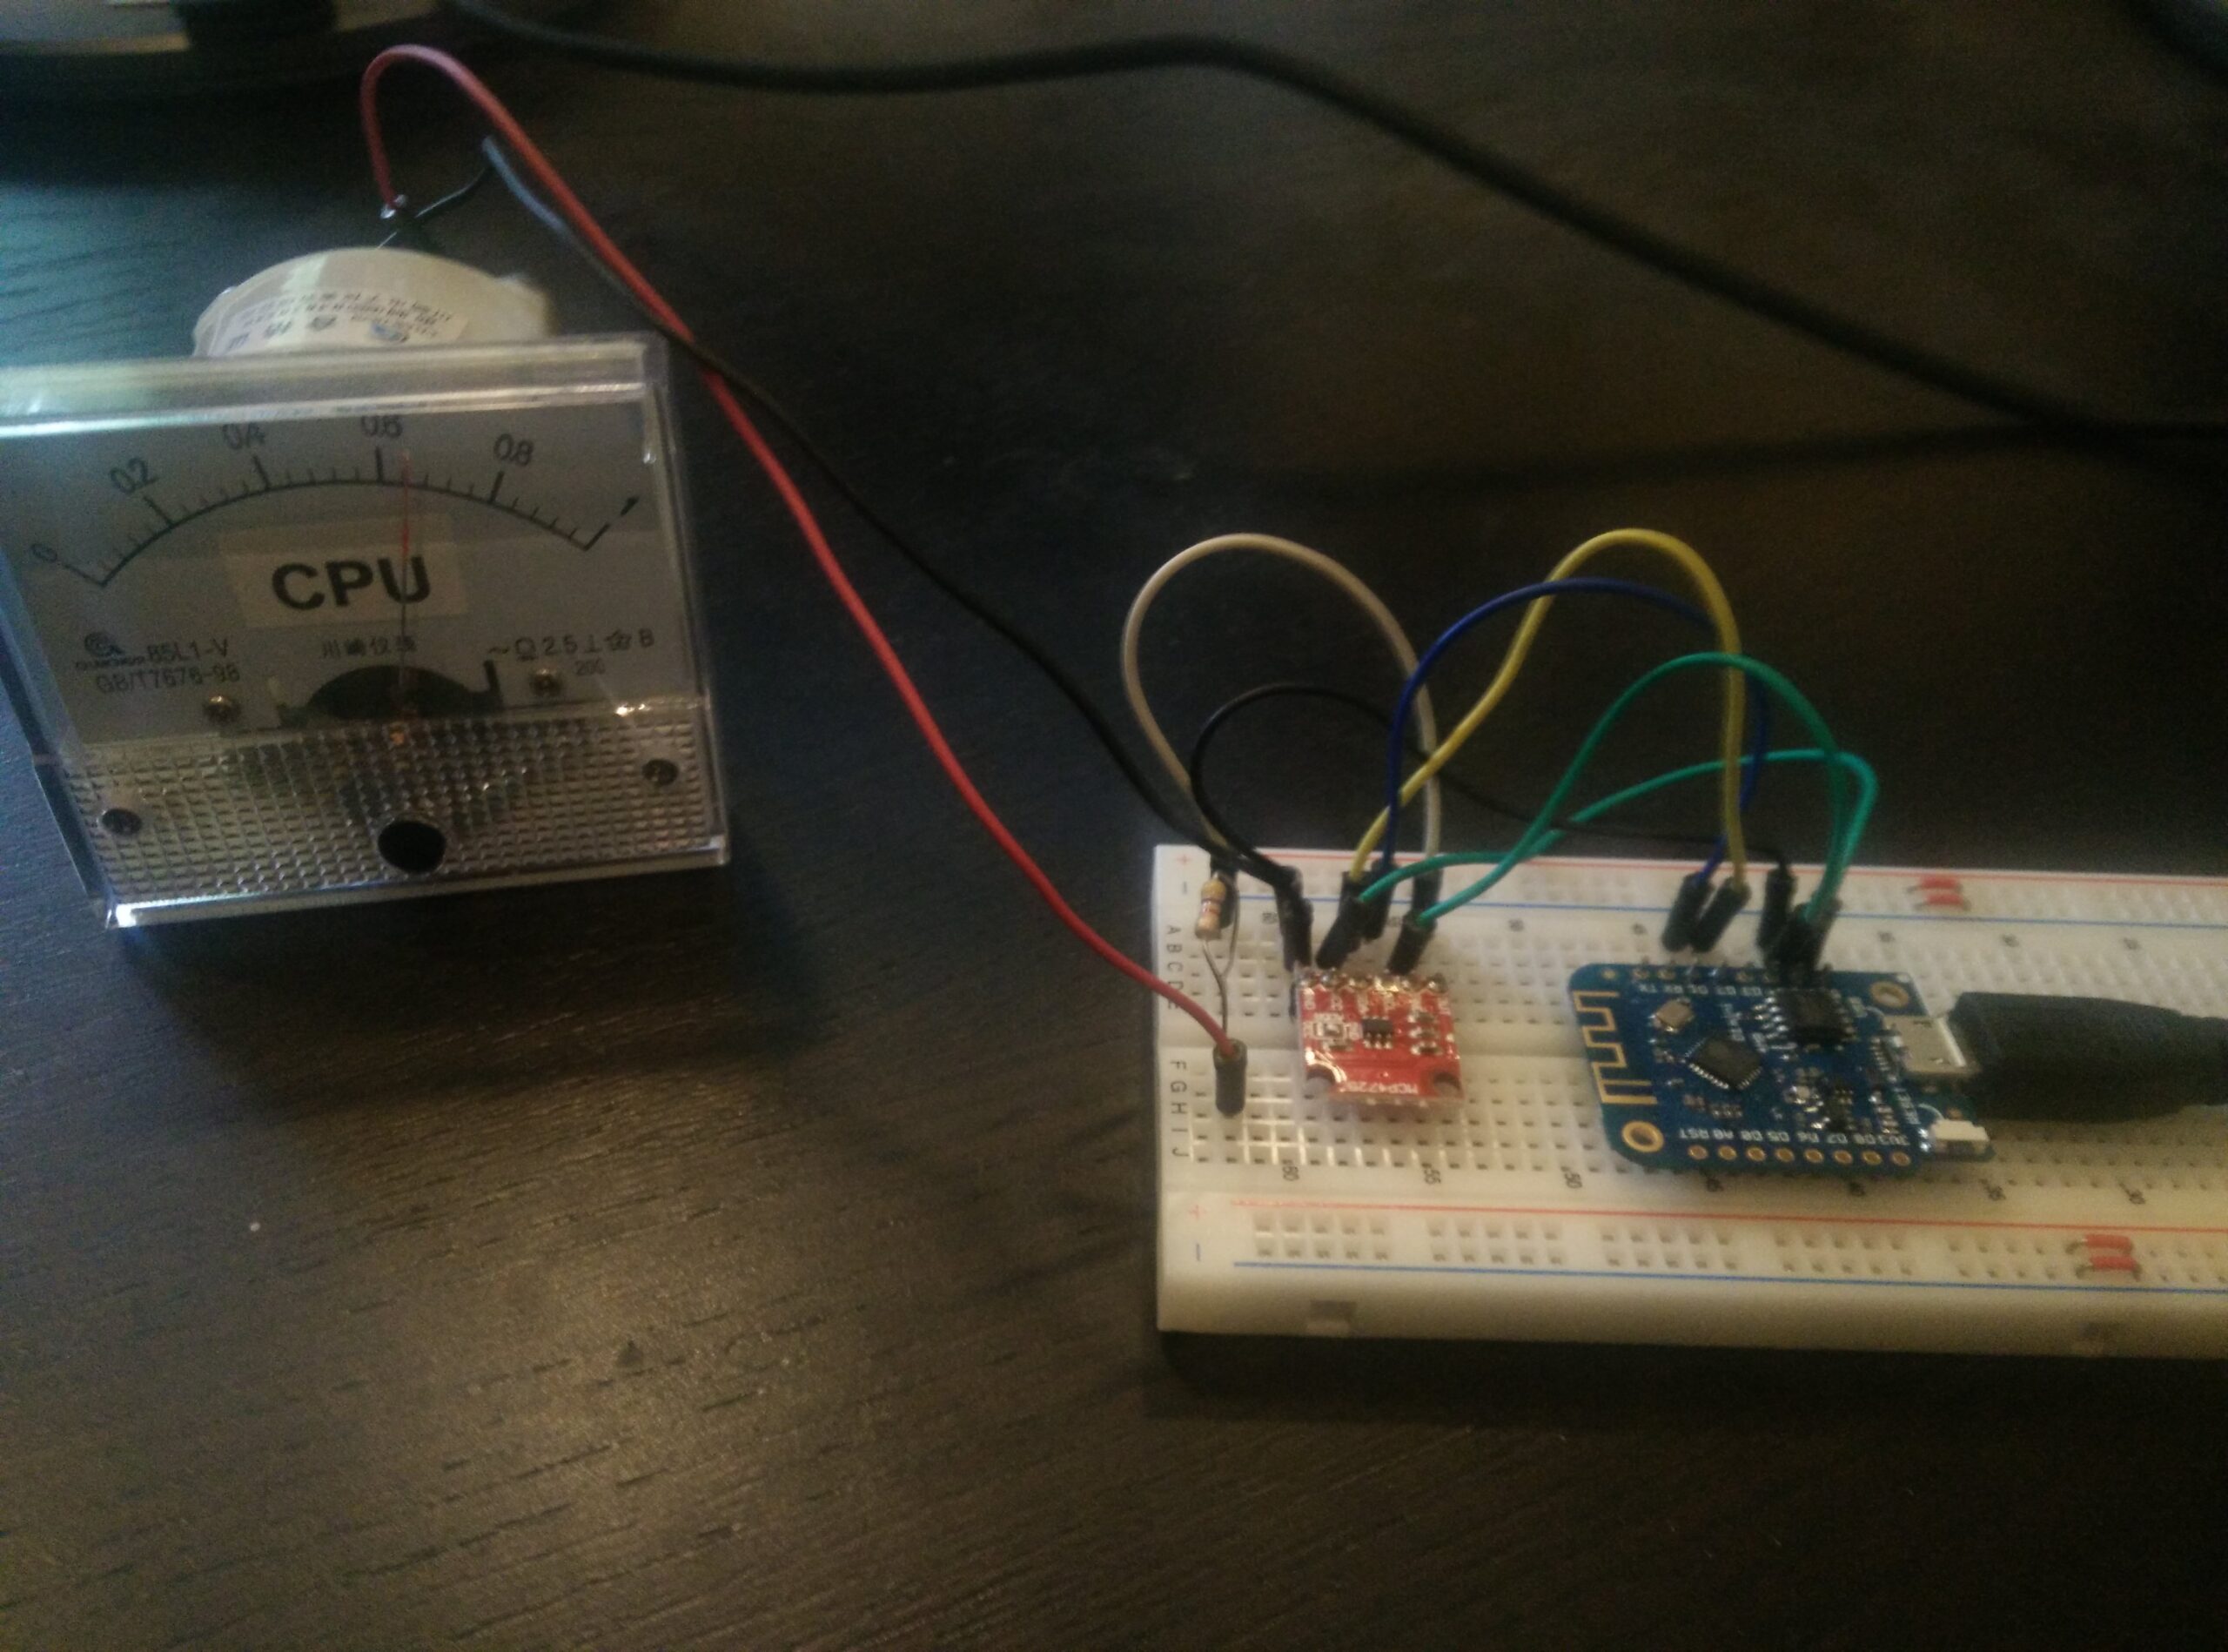
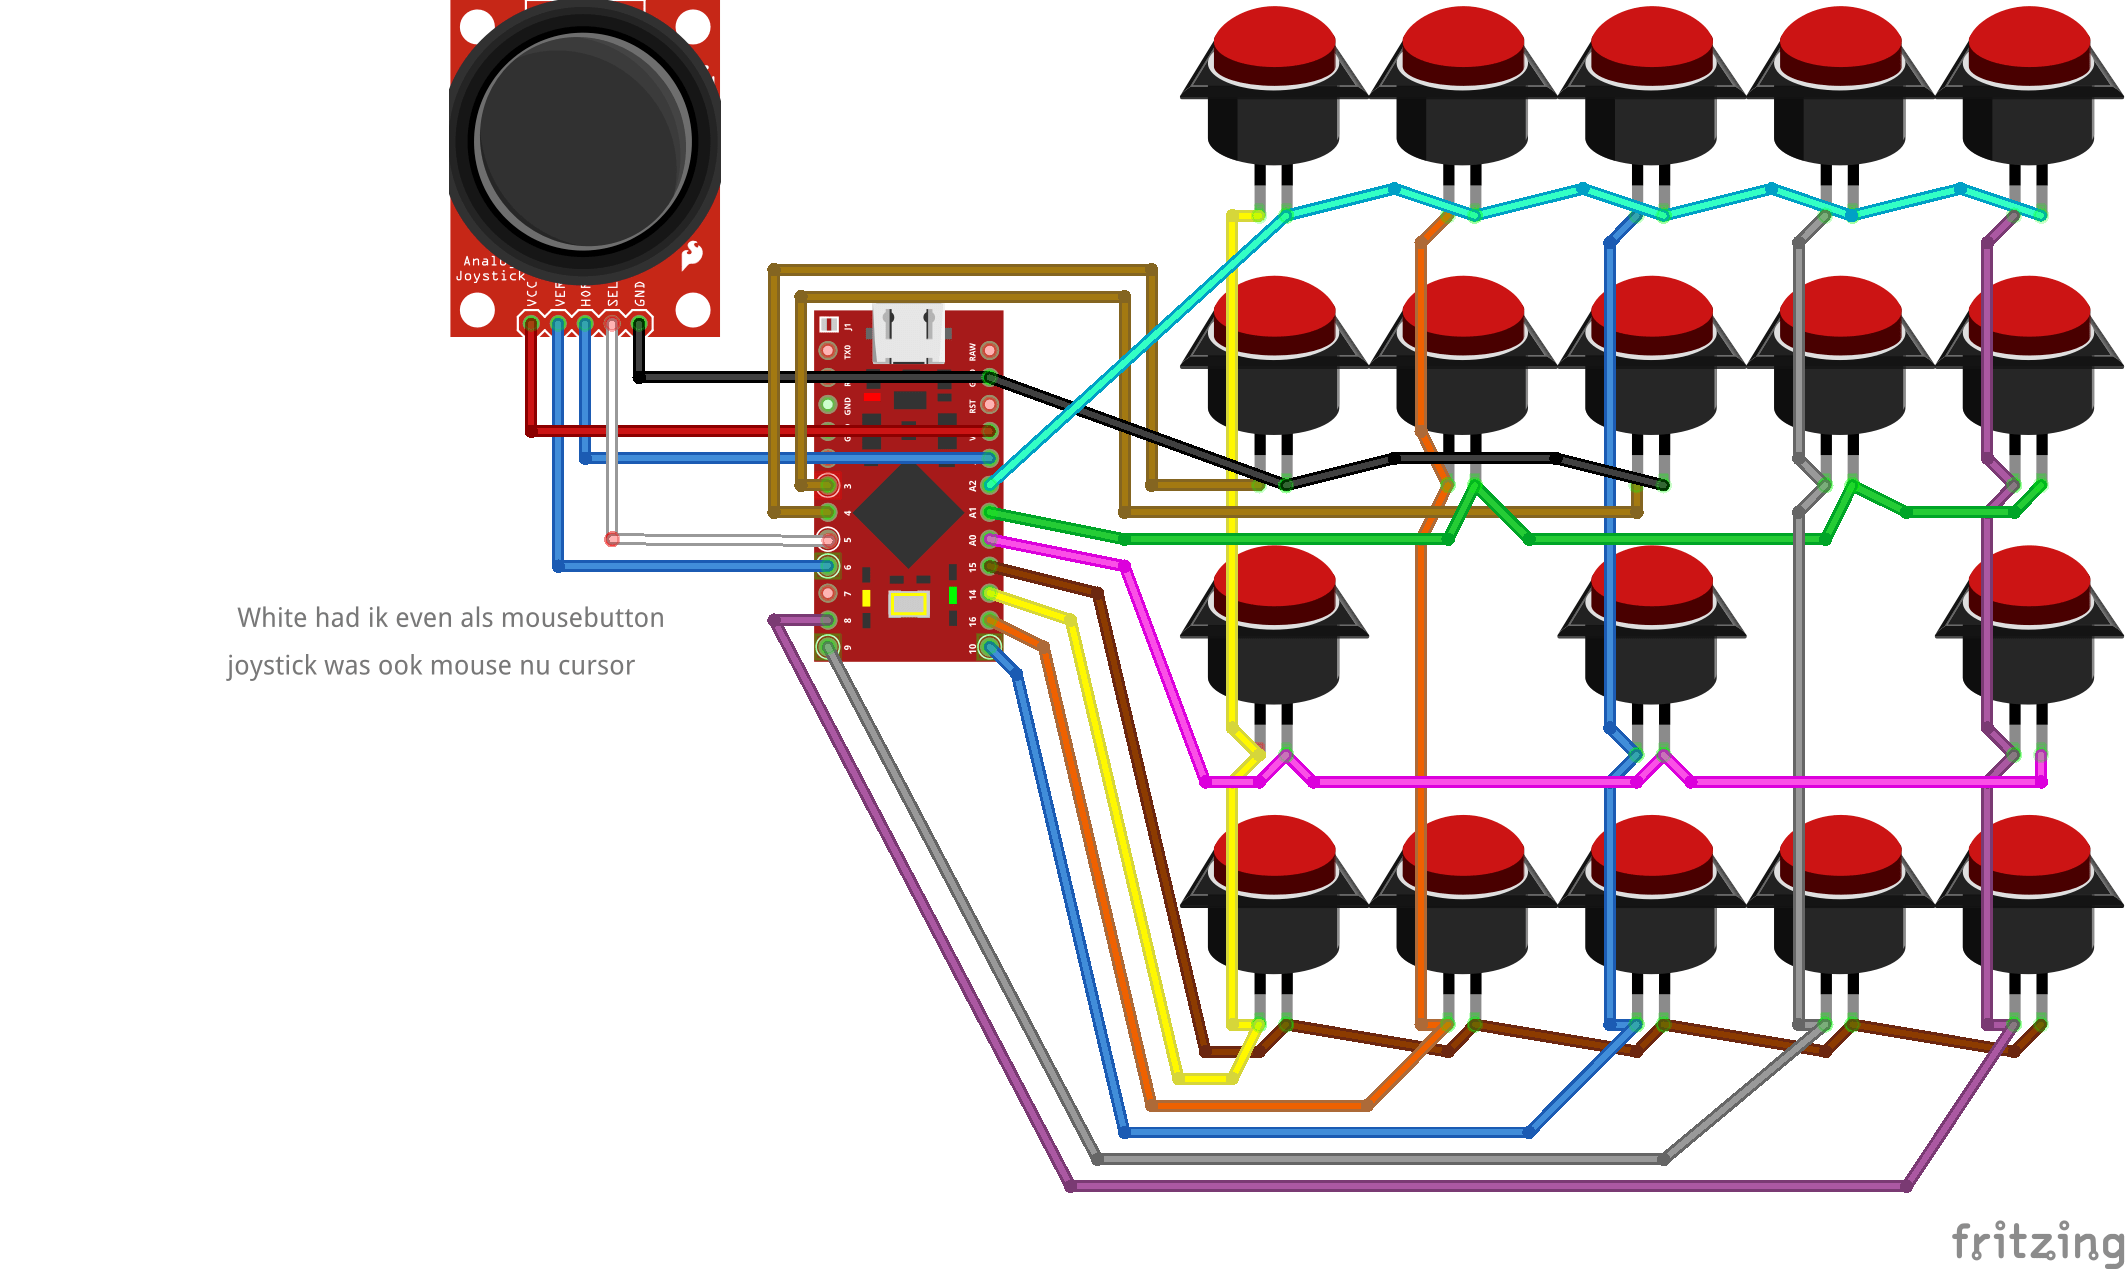
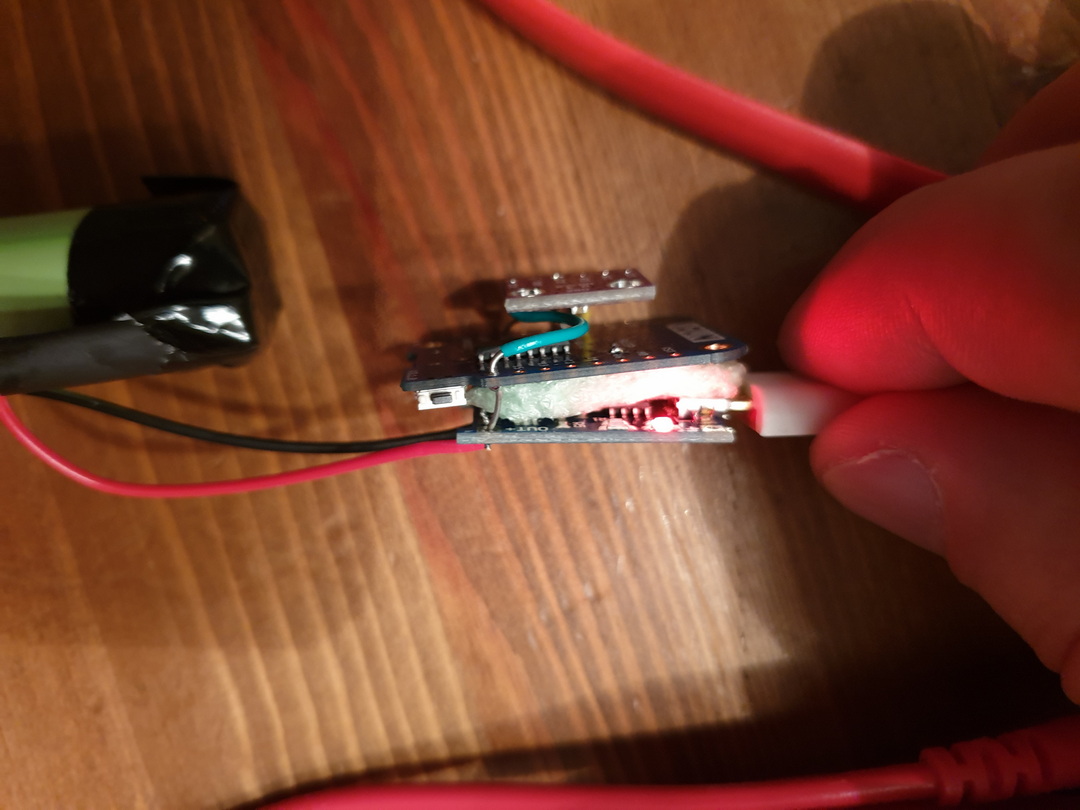
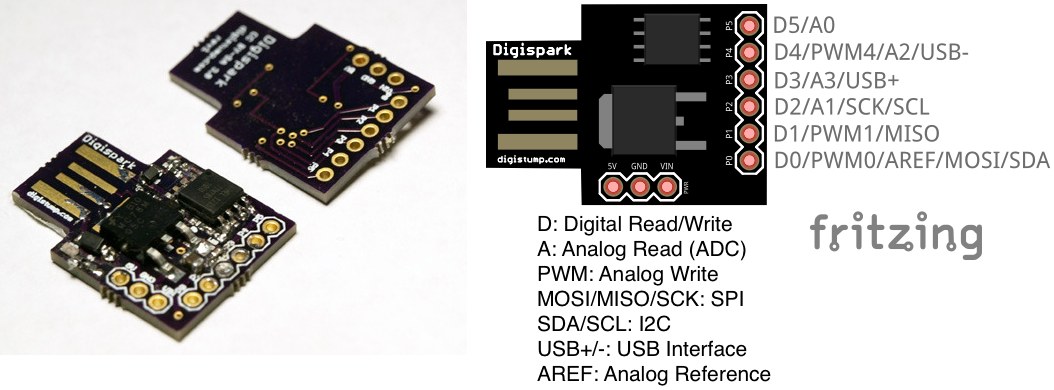
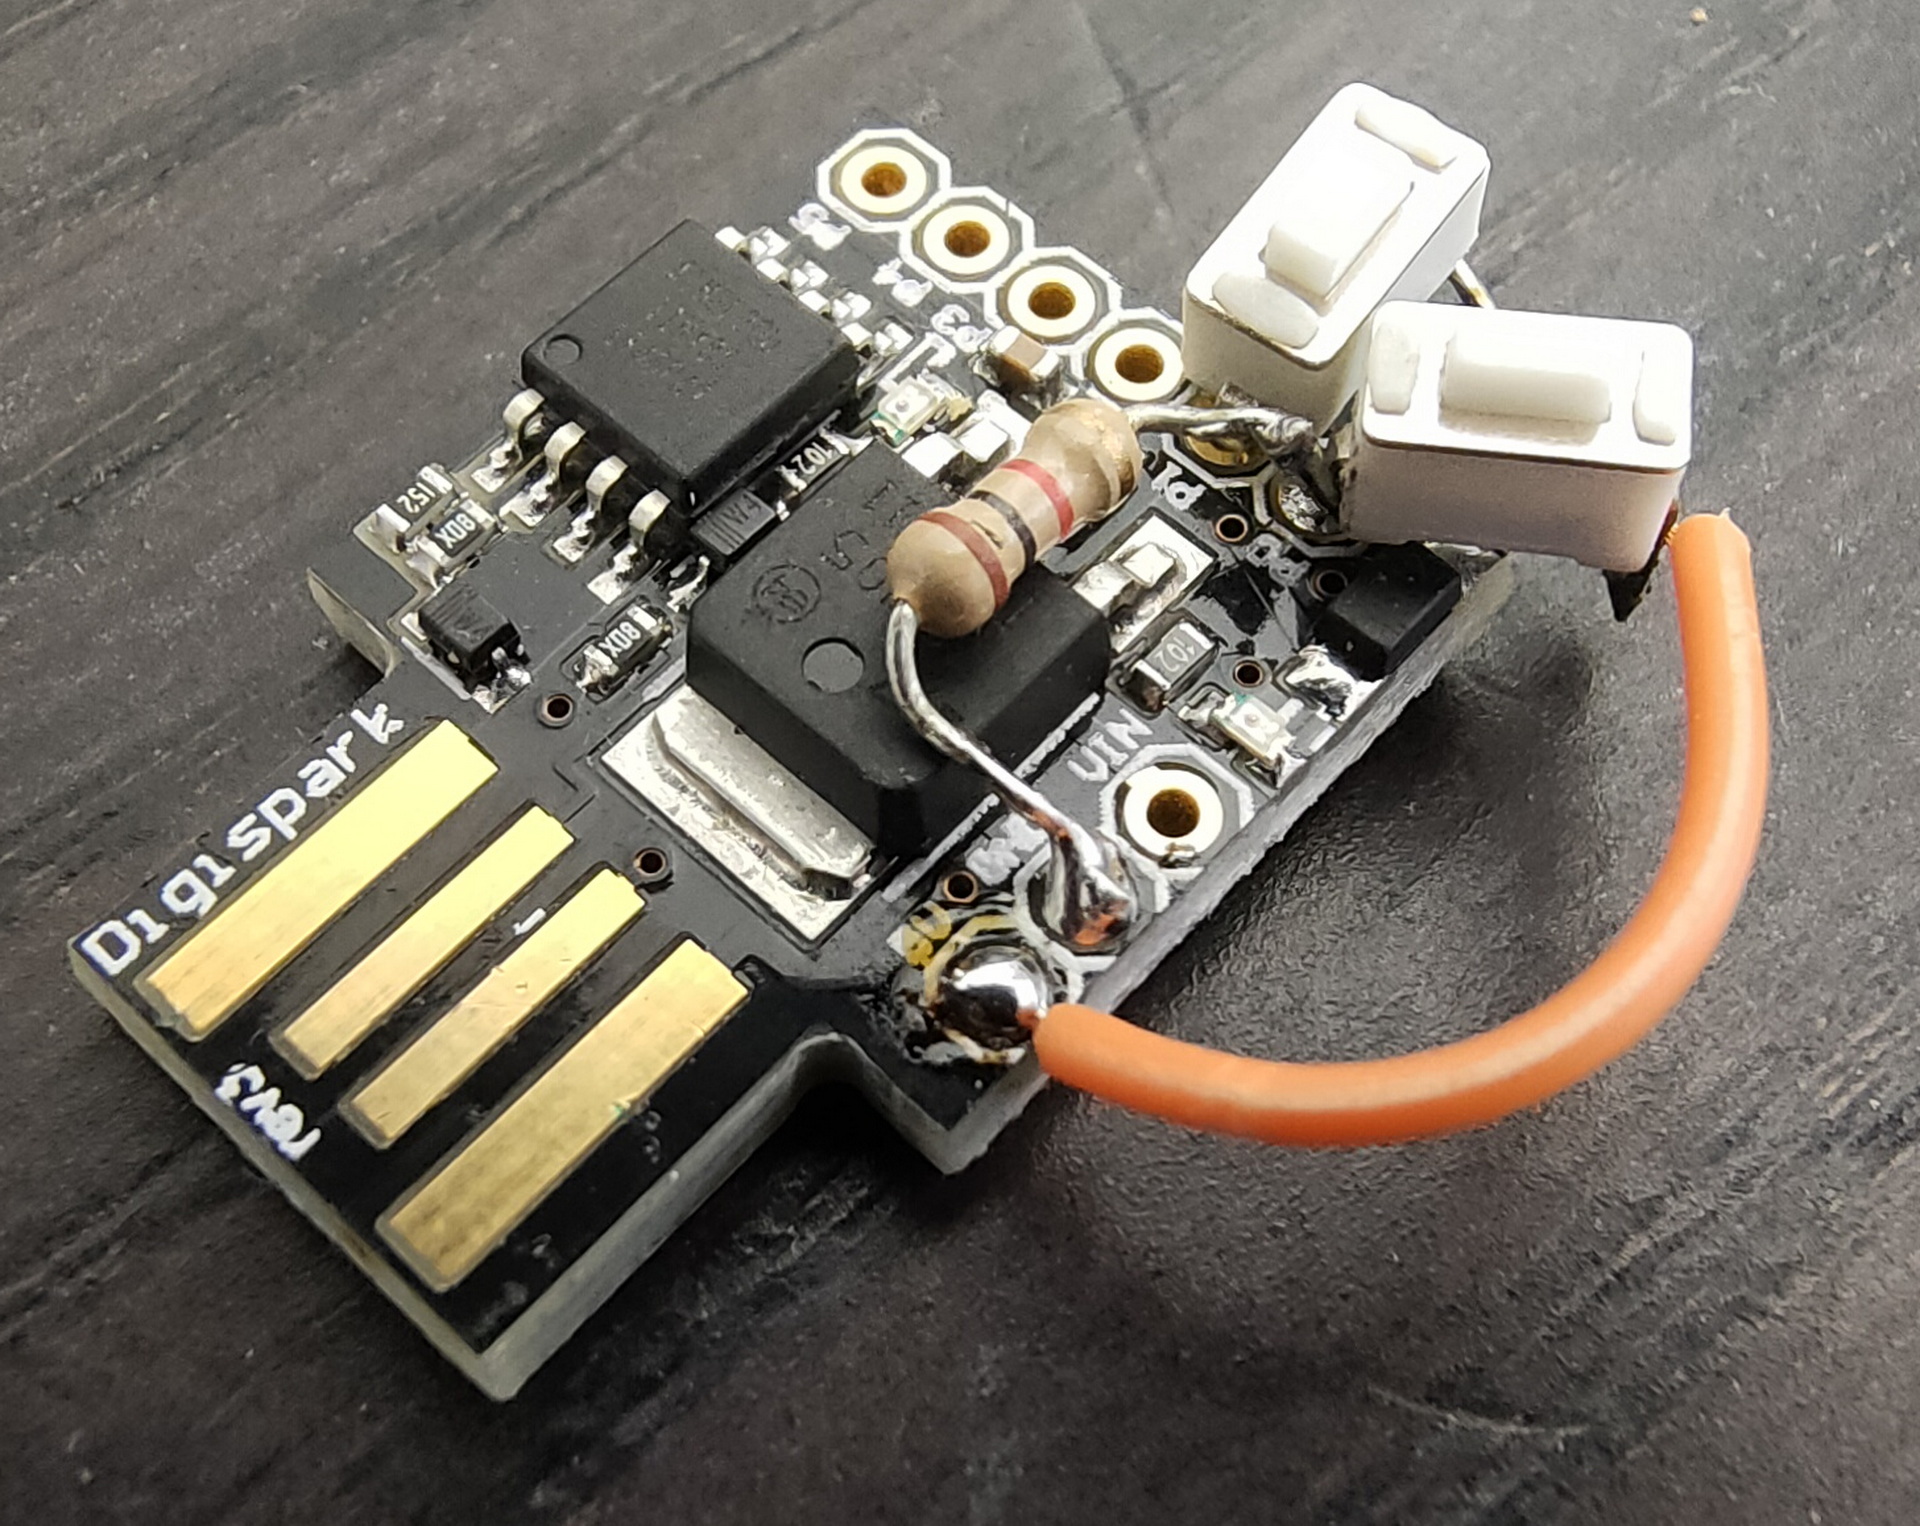
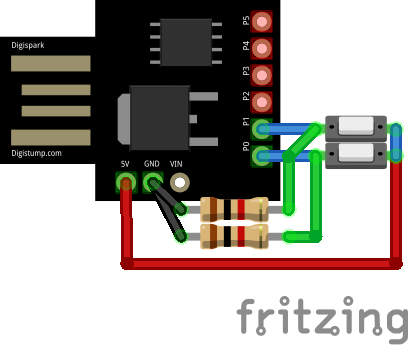
Using a digistump, a push-button and a resistor, the passpaster was born.
Plug the Digispark into you machine, it wil emulate a HID device (Keyboard). Get your remote console into focus, press button .. presto!
Missing one resistor
TODO:
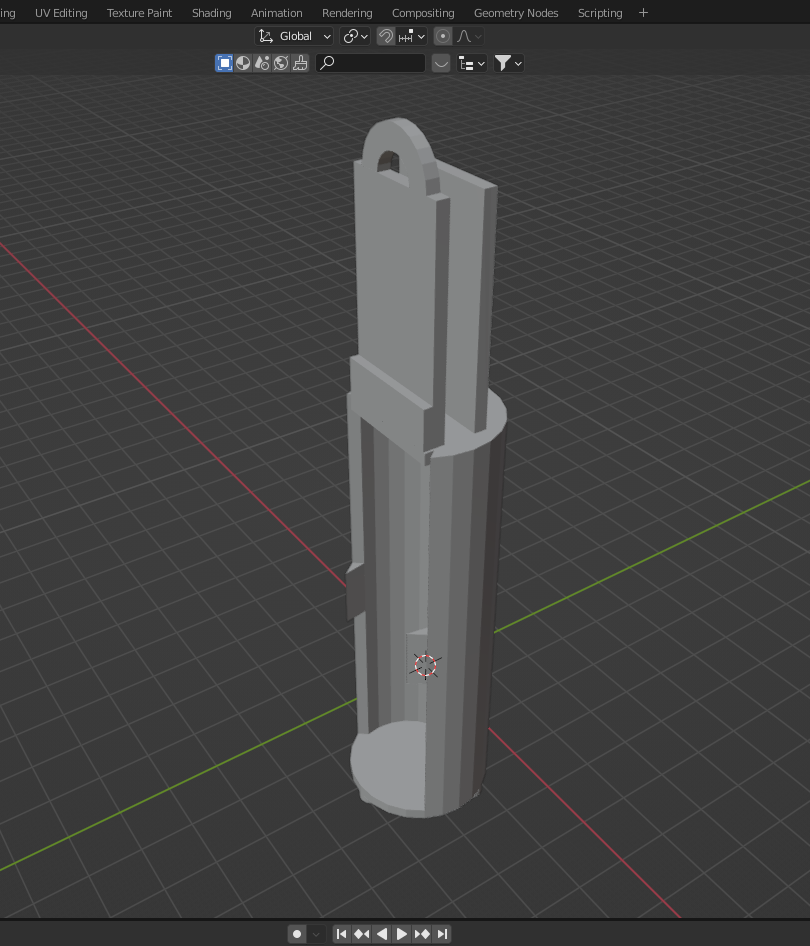
3D print a little case
pin protect?
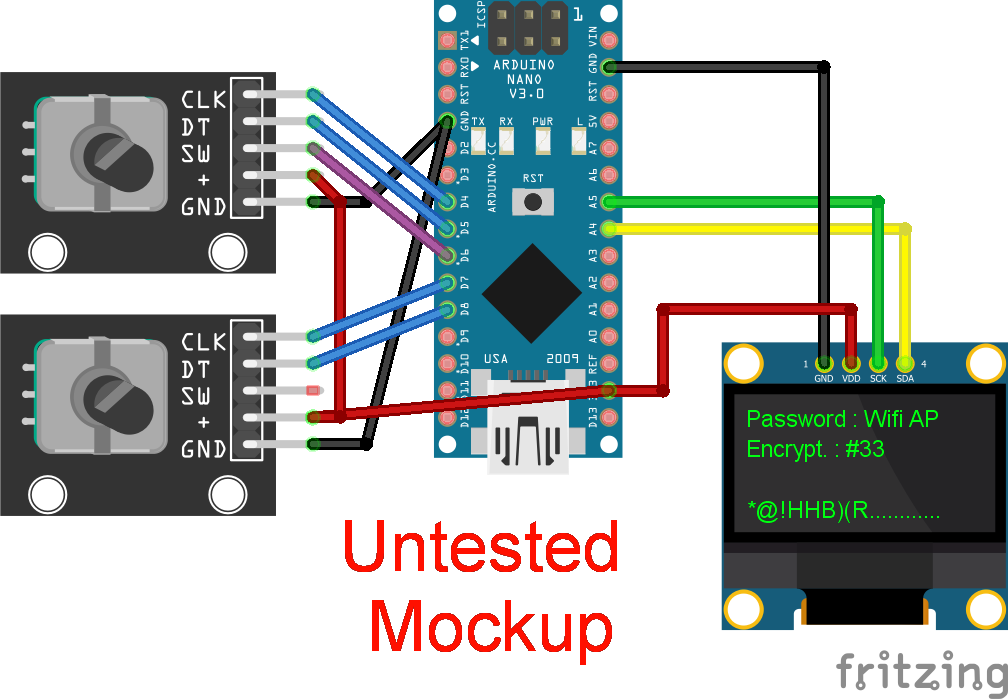
rotary + display? (Like below)
It would be nice to have something like:
Rotary encoder 1 – selects which password to paste Rotary encoder 2 – (1-255) does a encryption method on the password Display shows : Password #32 – Crypt # 88 So you can have for example 255 passwords with 255 encryptions .. which to use when? Only you know.
Above can’t be done with a Digispark, so i’ll have to use a Arduino Pro Mini or a equivalent
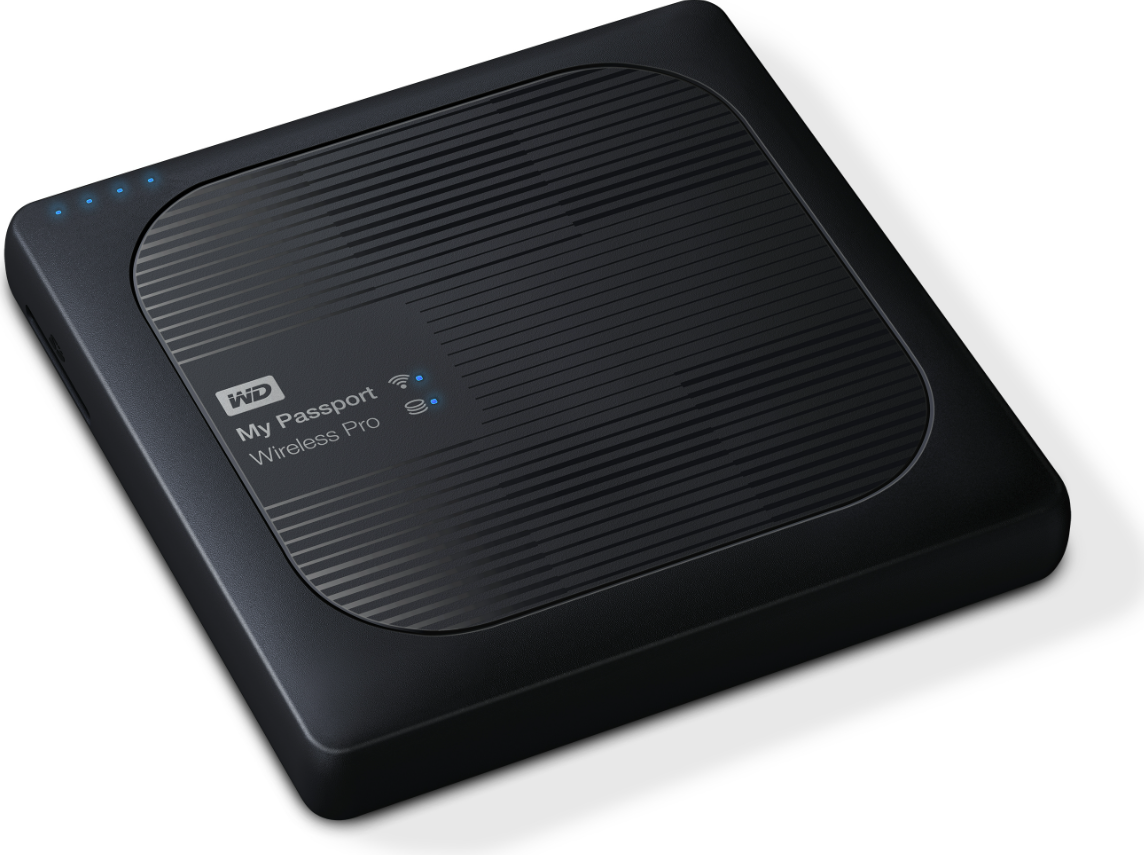
I’ve got a backup disk for my photos. You can connect it via USB and has a SDCard slot for your camera SDCards. You can also connect to is using it as a Wifi Access Point. (You can even install twonky!)
The cardreader should automatically copy a inserted card to its internal harddrive. I’ve tested this at home, but here in New Zealand it woudn’t work.
So i started investigating. (I was in the middle of nowhere, so I could not search for answers.)
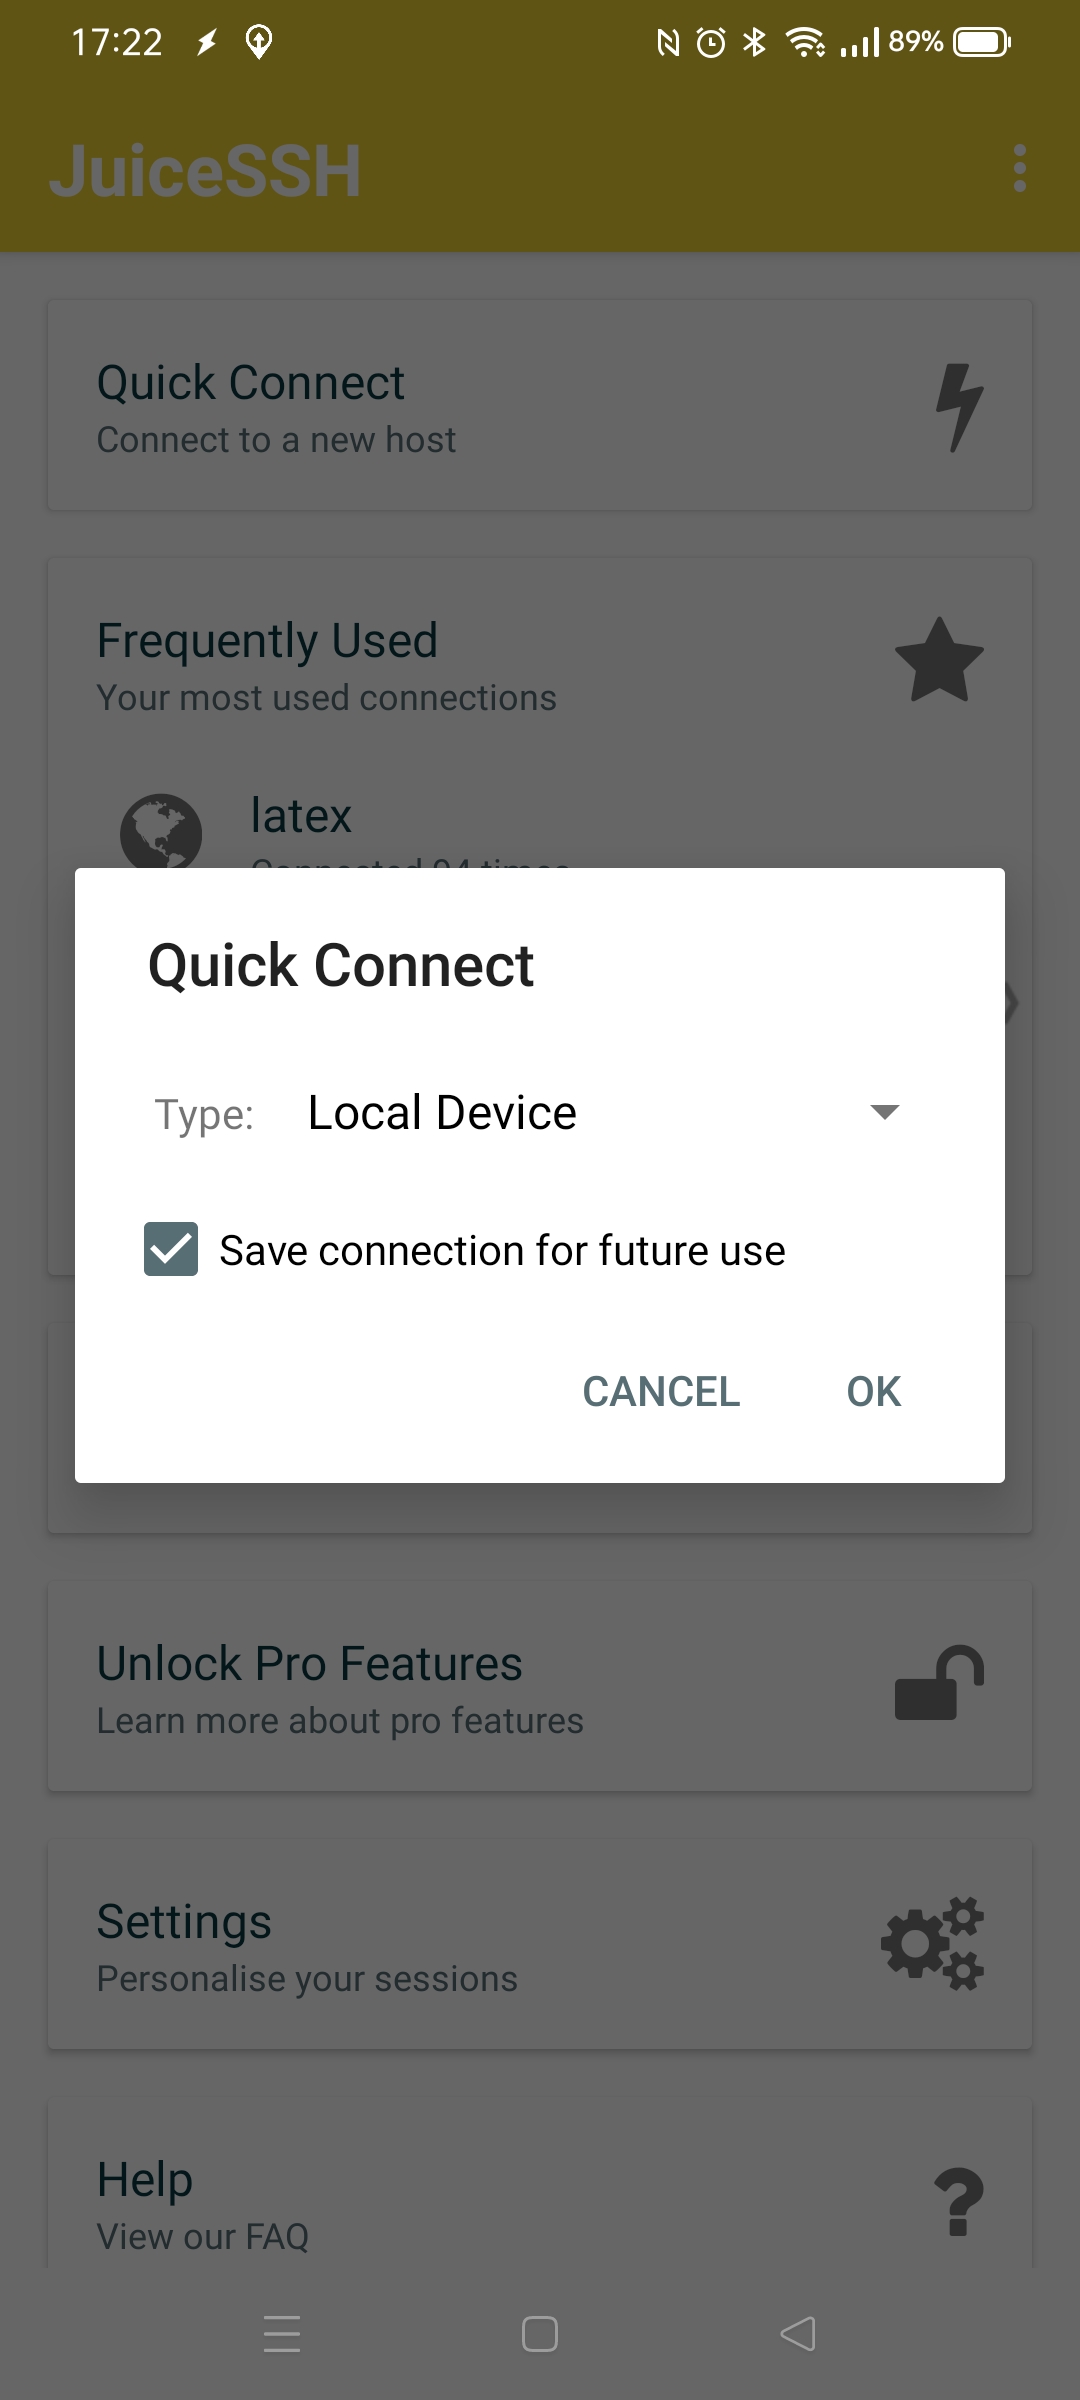
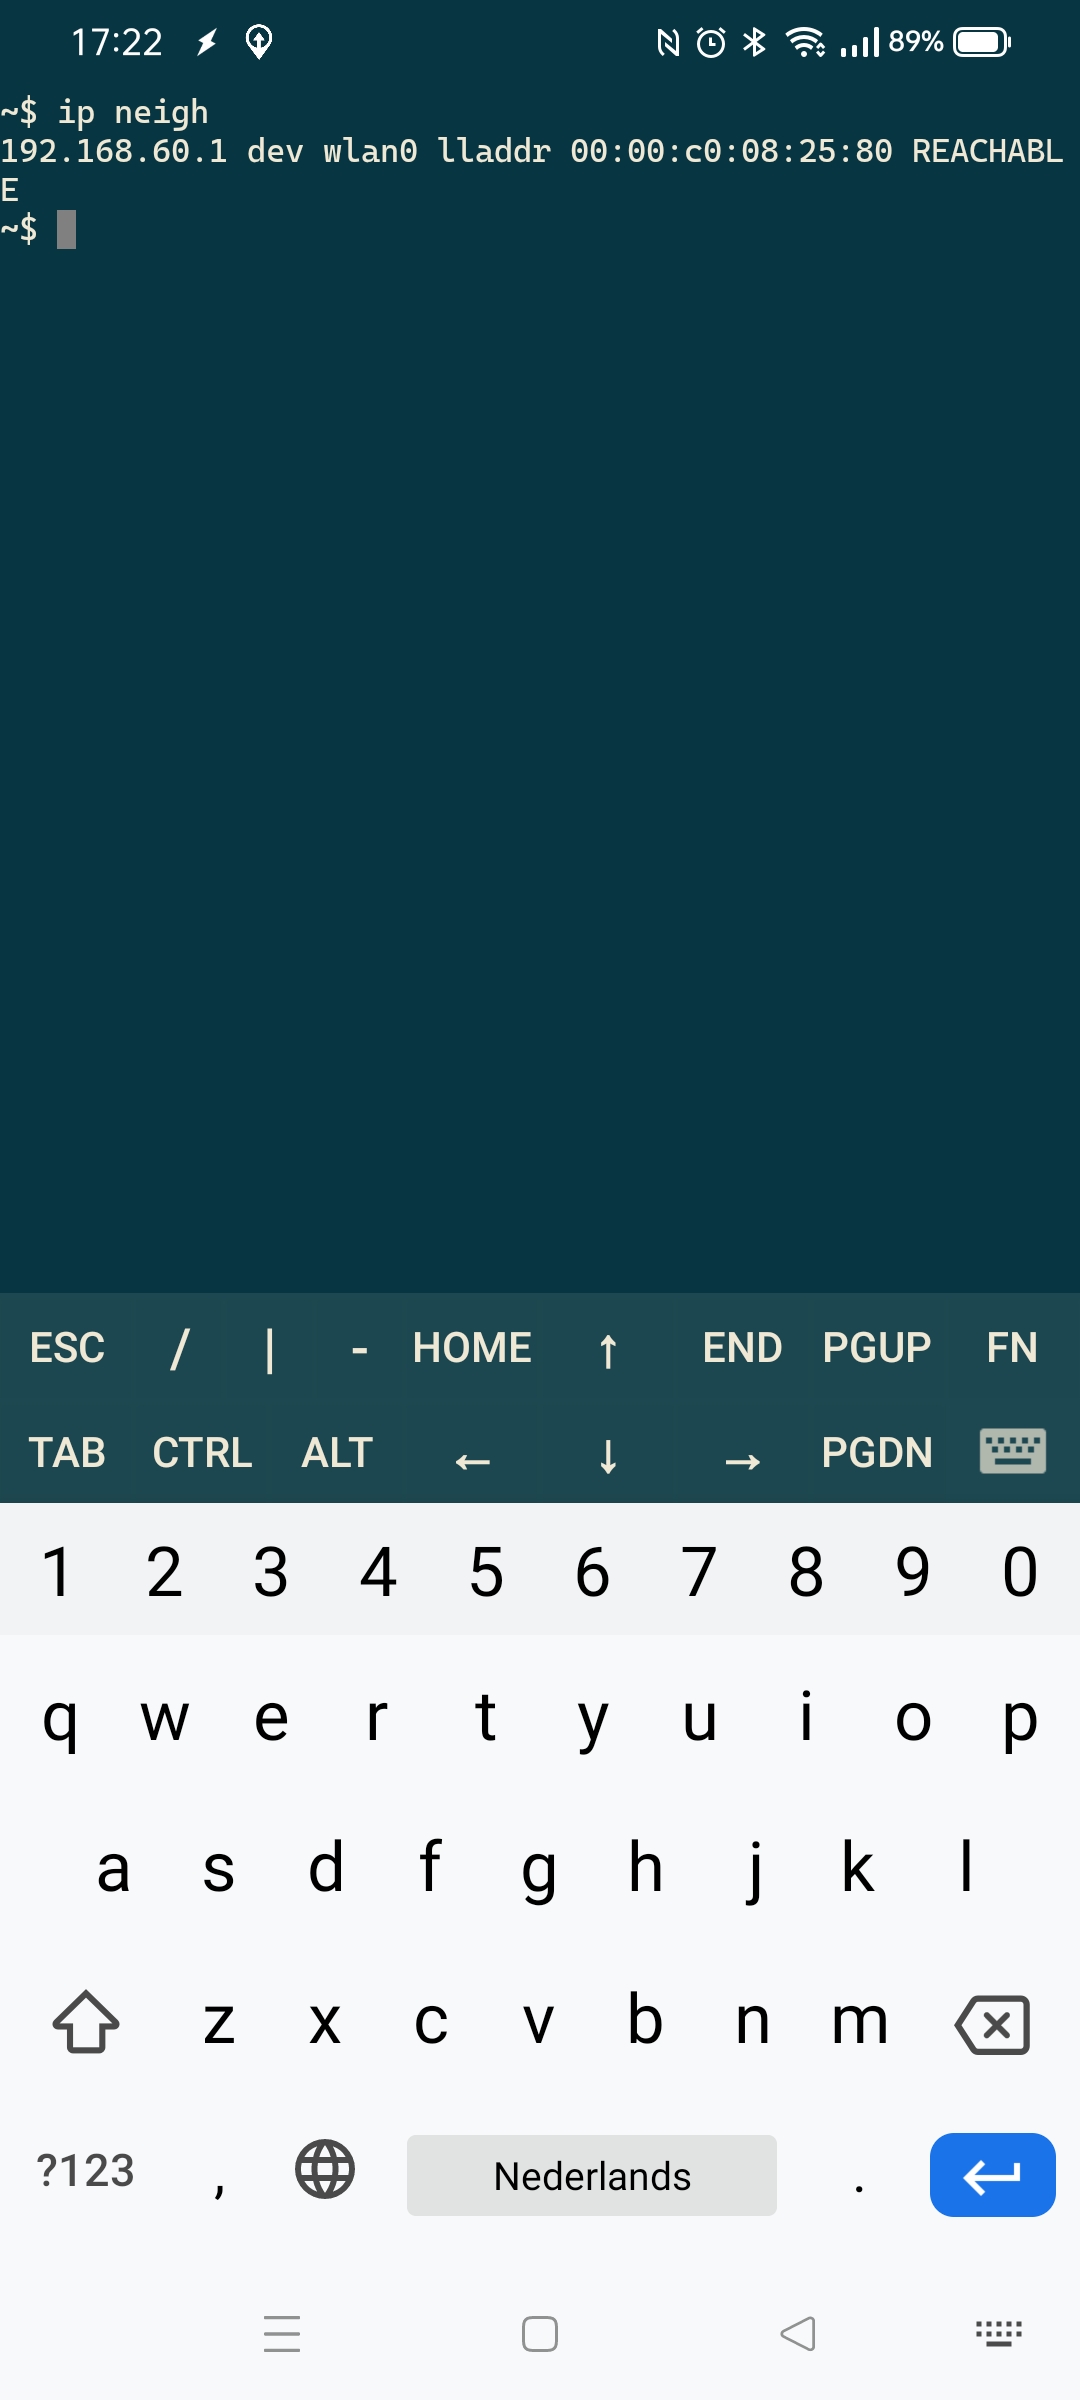
I’ve got the juice ssh client on my phone. Connecting to the AP will give you a IP, but whats the IP from de WD? Just use JuiceSSH to make a local connection (to your android) first. And type: ip neigh This will give you the ip from neighbouring devices, thats only one .. the WD.
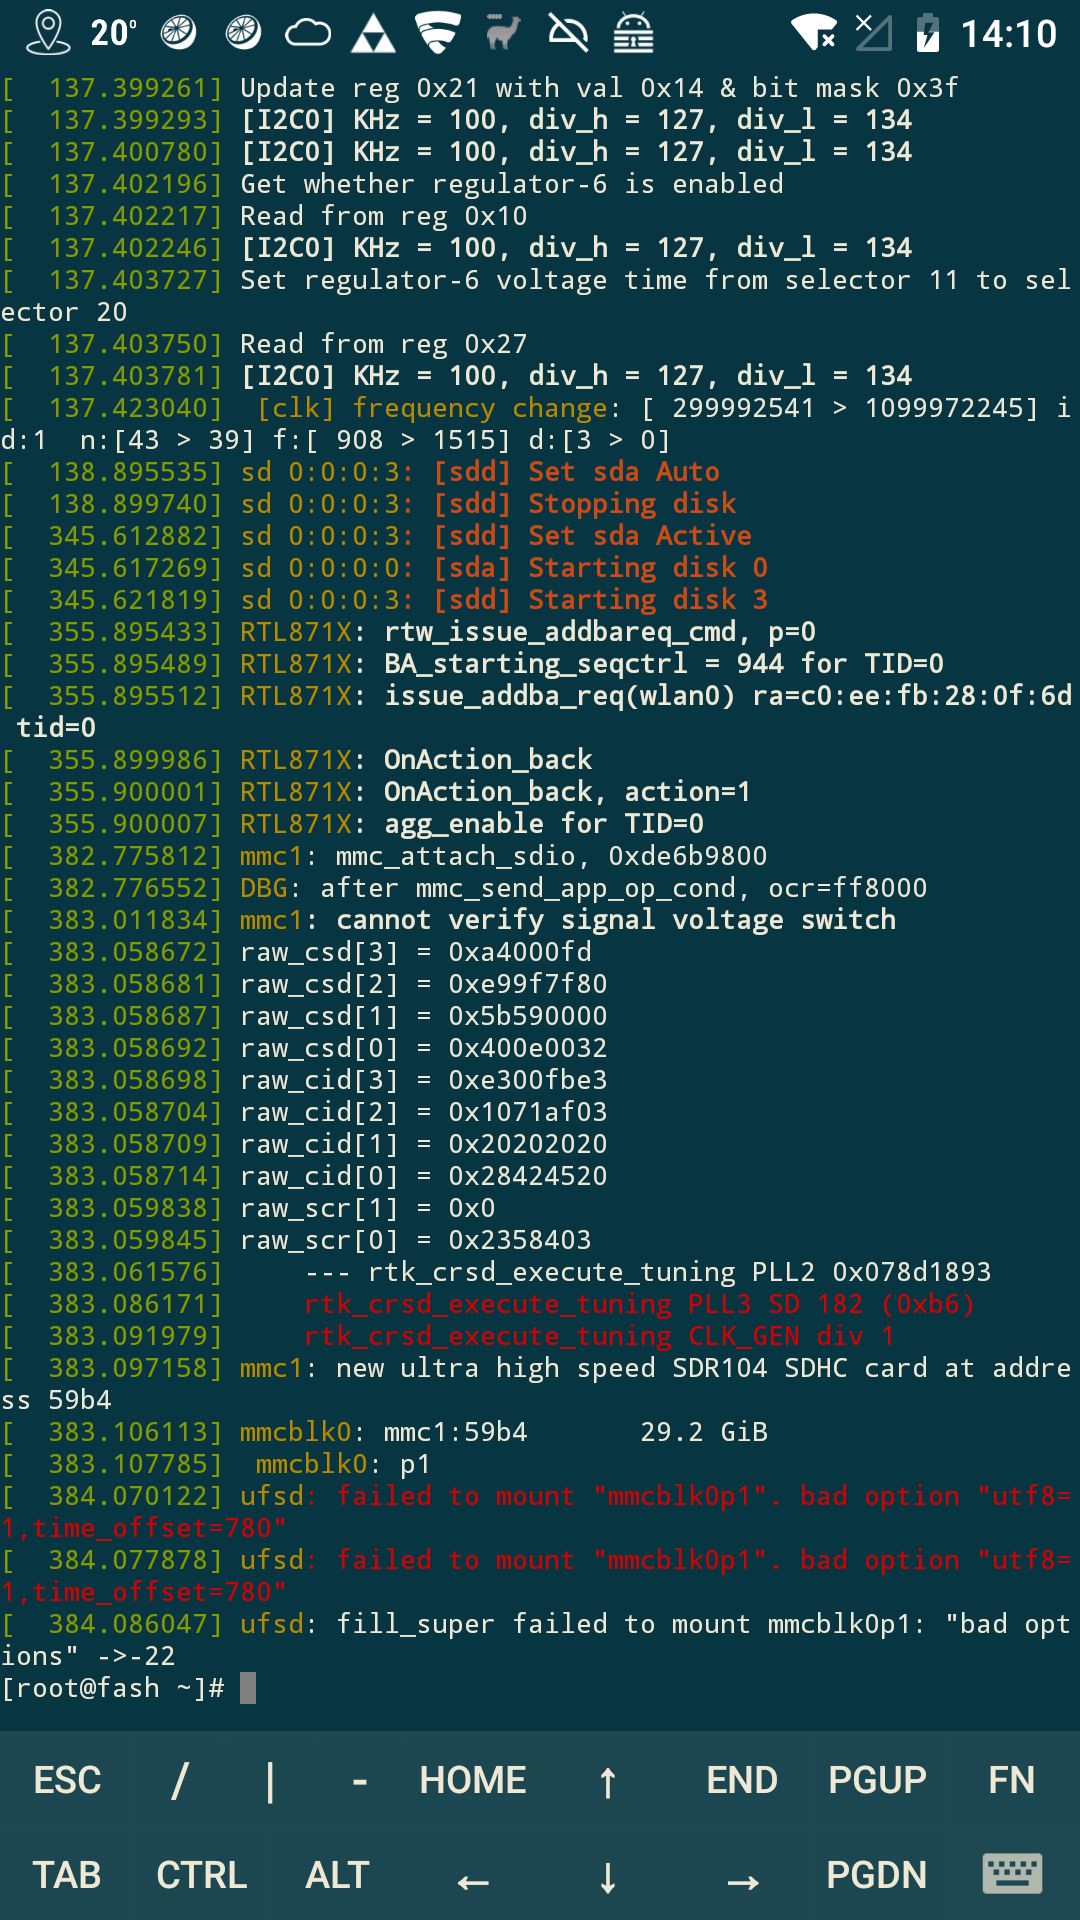
Connect to the WD with ssh using root@IPNUMMER (password should be same as you configured the device with)
Looking at the logs gave me some idea where the problem was.
It would not mount the sdcard! Why, that one is working. (In de Nikon Camera and using a cardreader with OTG on my android)
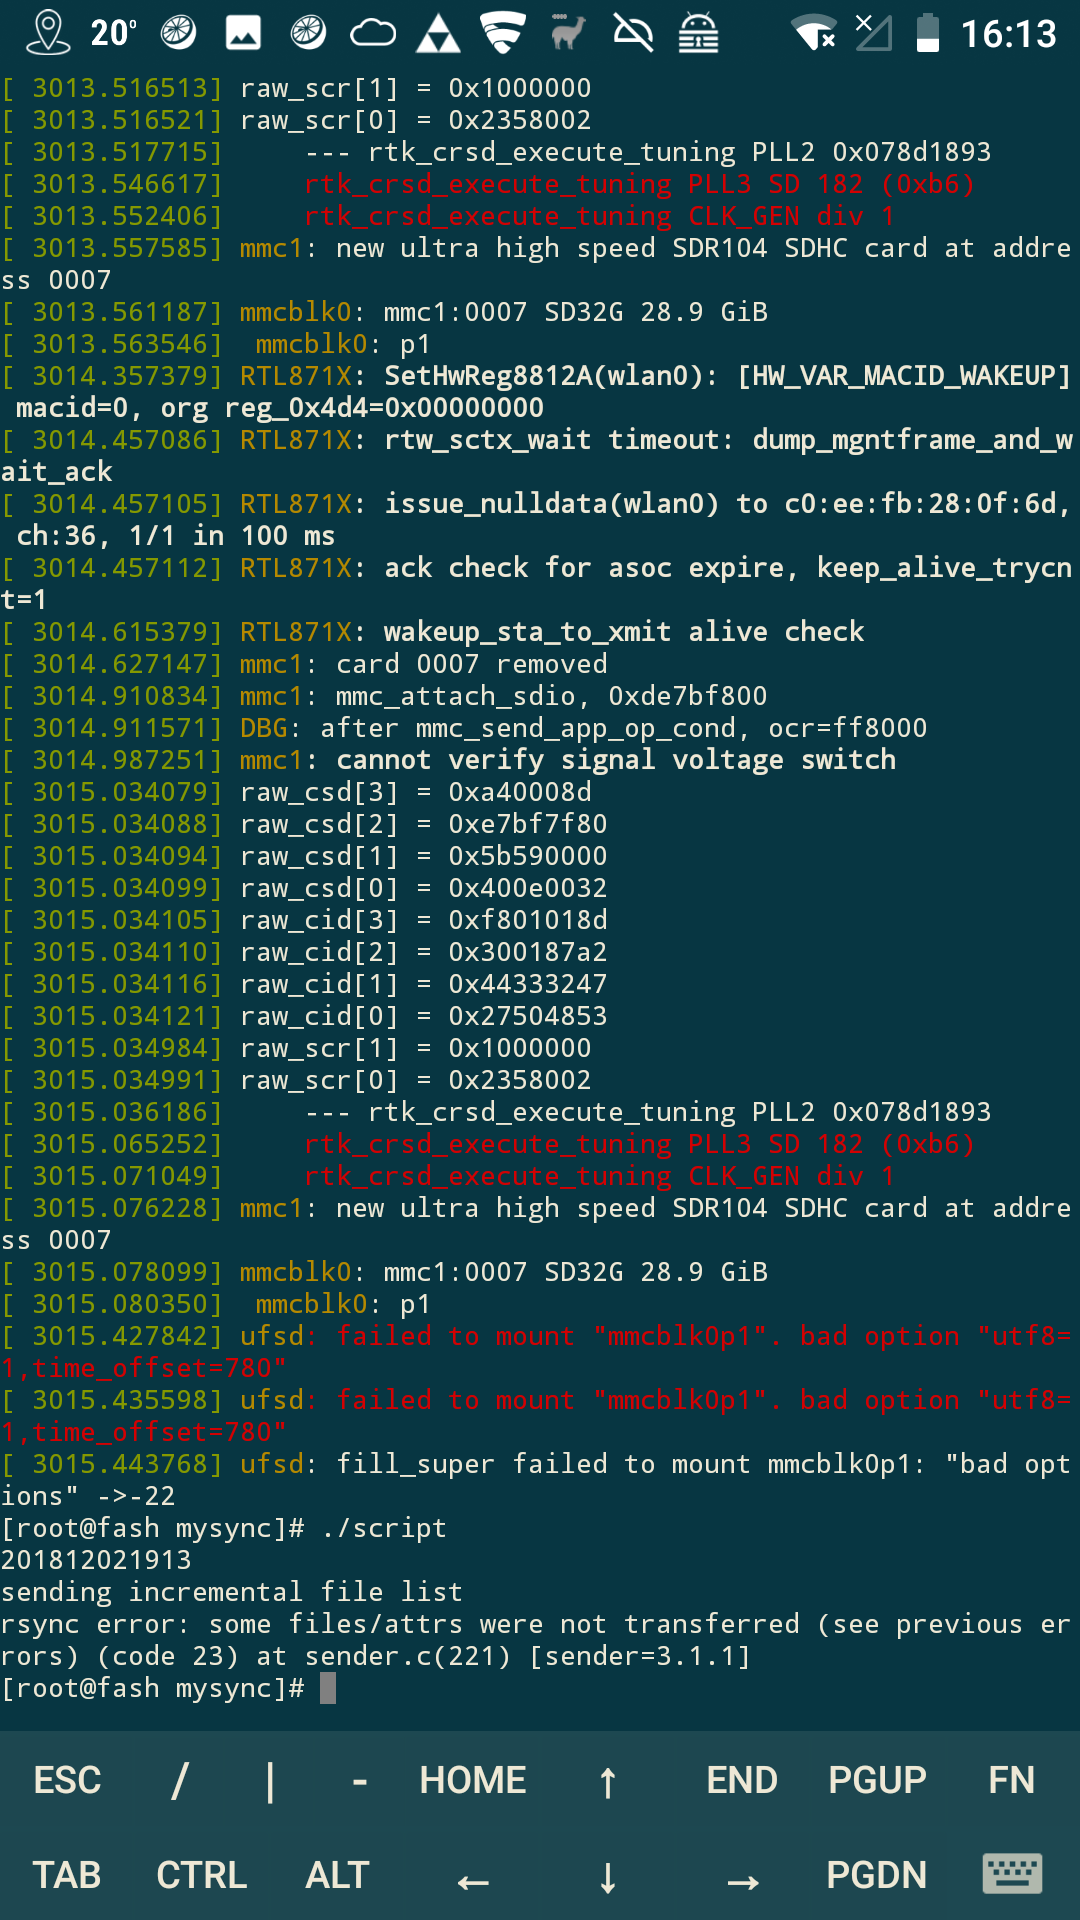
I first wrote my own mounter and copy program. That worked, so i could at least backup my photos. Now I could search for the problem.
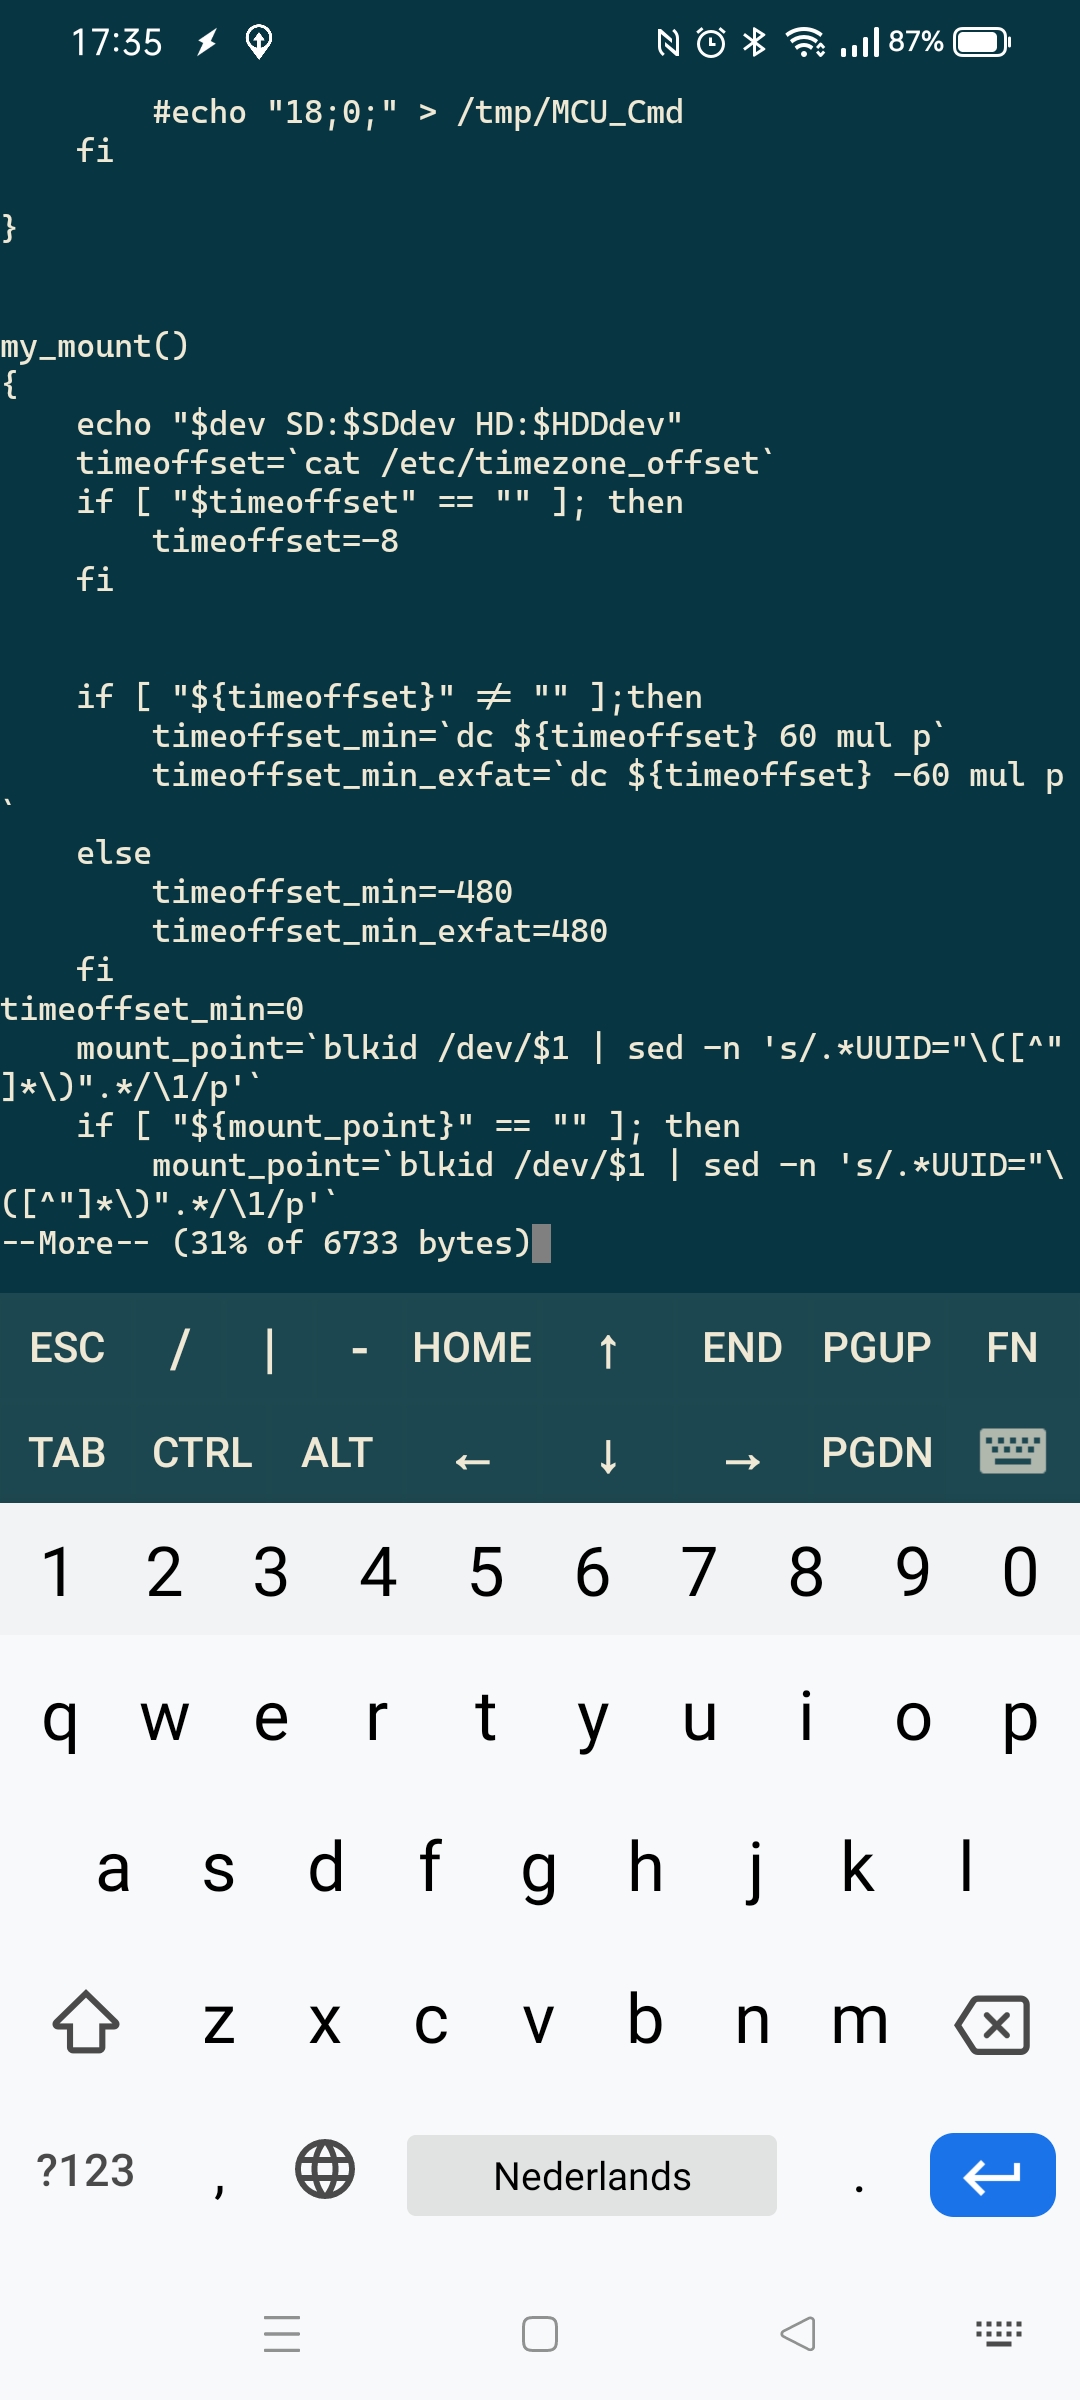
My backup script named “script”
mkdir /tmp/fash ; mount /dev/mmcblk0p1 /tmp/fash mounts okay!
The sdmount.sh has a problem, it uses the timezone in its script. This will work when in GMT+12 -> GMT-12. But we are in NZ .. thats GMT+13
Removing some checks in above script (sdmount.sh) (Adding timeoffset_min=8) Made the script work for me again. When I got home from our trip, I flashed a new firmware version on the device, which corrected the problem.
Words in list below are generated on lenght and SFW. For getting a list of words a certain lenght use:
# Words between 4 and 7 characters
grep -o -w '\w\{4,7\}' /usr/share/dict/dutch
# Didn't use wordlist above due to many not easyly to remember words.
#!/bin/bash
me=`basename "$0"`
cat $me | sed '1,/^WOORDEN$/d' | shuf | head -3 | while read ; do echo -n $REPLY ;done ; echo $(shuf -i 10-99 -n 1)
exit 0
WOORDEN
Aan
Aanbod
Aanval
Aap
Aarde
Aardig
Acht
Achter
Actief
Ademen
Afname
Afval
Alleen
Alles
Als
Altijd
Ander
Andere
Anders
Angst
Appel
Arm
Auto
Avond
Baan
Baby
Bad
Bal
Bang
Bank
Basis
Bed
Been
Beer
Beest
Beetje
Begin
Begrip
Beide
Beker
Bel
Bellen
Berg
Beroep
Best
Beter
Bezoek
Bieden
Bij
Bijna
Bijten
Binnen
Blad
Blauw
Blazen
Blij
Bloed
Bloem
Bodem
Boek
Boete
Boom
Boon
Boord
Boos
Bord
Bos
Bot
Bouwen
Boven
Breed
Breken
Brief
Broer
Broek
Brood
Brug
Bruin
Bui
Buiten
Bureau
Buren
Bus
Cadeau
Cirkel
Cool
Daar
Daarom
Dag
Dak
Dan
Dansen
Dapper
Dat
Deel
Deken
Deksel
Delen
Derde
Deze
Dienen
Diep
Dier
Dik
Ding
Dit
Doen
Dom
Donker
Dood
Door
Doos
Dorp
Draad
Dragen
Drie
Drogen
Dromen
Droog
Druk
Dubbel
Dun
Dus
Duur
Duwen
Echt
Een
Één
Eend
Eerste
Eeuw
Effect
Eigen
Eiland
Einde
Eis
Elk
Enkele
Erg
Eten
Even
Examen
Falen
Feest
Feit
Fel
Fijn
Film
Fit
Fles
Foto
Fout
Fris
Fruit
Gaan
Gat
Gebied
Gedrag
Geel
Geen
Geit
Geld
Gelijk
Geloof
Geluid
Geluk
Gemak
Gemeen
Genoeg
Genot
Geur
Gevaar
Geven
Gevolg
Gewoon
Gezond
Gif
Glad
Glas
God
Goed
Goud
Graf
Grap
Gras
Grens
Grijs
Groen
Groep
Grof
Grond
Groot
Haan
Haar
Haast
Hal
Halen
Half
Hallo
Hamer
Hand
Hard
Hart
Haten
Hebben
Heel
Heet
Helder
Helft
Help
Hem
Hemel
Hen
Herfst
Hert
Het
Heuvel
Hier
Hij
Hobby
Hoe
Hoed
Hoek
Hoewel
Hond
Honger
Hoofd
Hoog
Hoogte
Hoop
Horen
Hotel
Houden
Huilen
Huis
Hun
Huren
Hut
Huur
Idee
Ieder
Iemand
Iets
Ijs
Ijzer
Jaar
Jagen
Jas
Jij
Jong
Jongen
Jouw
Jullie
Kaars
Kaart
Kaas
Kamer
Kans
Kant
Kap
Kast
Kat
Kennen
Kennis
Keuken
Keus
Kiezen
Kijken
Kind
Kip
Kist
Klaar
Klas
Klasse
Kleden
Klein
Kleren
Kleur
Klok
Klopt
Knie
Koers
Koffer
Koffie
Kok
Koken
Kom
Komen
Koning
Koorts
Kop
Kopen
Kort
Kost
Kosten
Koud
Kraam
Kracht
Krant
Kruis
Kuil
Kunnen
Kunst
Laag
Laat
Laatst
Lach
Lachen
Ladder
Laken
Lamp
Land
Lang
Langs
Laten
Leeg
Leeuw
Leger
Leiden
Lenen
Lengte
Lepel
Leren
Les
Leuk
Leven
Lezen
Licht
Liefde
Liegen
Liggen
Lijk
Lijken
Links
Lip
List
Lomp
Lood
Lopen
Los
Lot
Lucht
Lui
Lunch
Maag
Maal
Maan
Maand
Maar
Maat
Maken
Mama
Man
Mand
Manier
Map
Markt
Meel
Meer
Meest
Meisje
Melk
Meneer
Mensen
Mes
Met
Meubel
Middel
Midden
Mij
Mijn
Min
Minder
Minuut
Mis
Missen
Mits
Model
Modern
Moeder
Moeten
Mogen
Moment
Mond
Mooi
Moord
Morgen
Munt
Muziek
Naald
Naam
Naar
Naast
Nacht
Nat
Natuur
Nee
Neer
Negen
Nek
Nemen
Net
Netjes
Neus
Niet
Niets
Nieuw
Nieuws
Nobel
Noch
Nodig
Noemen
Nog
Nood
Nooit
Noord
Noot
Nul
Nummer
Object
Oceaan
Offer
Olie
Oma
Onder
Oneven
Ons
Onze
Oog
Ooit
Ook
Oom
Oor
Oorlog
Oost
Opa
Opeens
Open
Oranje
Orde
Oud
Ouder
Over
Overal
Paar
Paard
Pad
Pagina
Pan
Papa
Papier
Park
Pas
Pen
Peper
Per
Piano
Pijn
Plaat
Plaats
Plank
Plant
Plat
Plein
Plus
Poes
Poort
Praten
Prijs
Prins
Privé
Punt
Raak
Raam
Radio
Raken
Recht
Rechts
Redden
Reeds
Regen
Reiken
Reizen
Rennen
Rest
Rijk
Rijst
Rijzen
Ring
Rok
Rond
Rood
Rook
Rots
Roze
Rubber
Ruiken
Ruimte
Samen
Sap
Schaap
Schaar
Scherp
Schip
School
Schoon
Sex
Simpel
Sinds
Slapen
Slecht
Slim
Slot
Smaak
Smal
Sneeuw
Snel
Soep
Sok
Soms
Soort
Sorry
Spel
Spelen
Sport
Staal
Stad
Stap
Start
Steen
Stelen
Stem
Ster
Sterk
Steun
Stil
Stilte
Stoel
Stof
Stom
Stop
Storm
Straat
Studie
Stuk
Succes
Suiker
Taal
Taart
Tafel
Tak
Tand
Tante
Tas
Taxi
Team
Teen
Tegen
Teken
Tellen
Tennis
Terug
Test
Thee
Thuis
Tien
Tijd
Titel
Toen
Totaal
Traan
Tram
Trein
Trui
Tuin
Tussen
Tweede
Uit
Uur
Vaak
Vader
Vak
Vallen
Vals
Van
Vangen
Varken
Vast
Veel
Veer
Veilig
Ver
Verder
Verf
Vers
Vet
Vier
Vies
Vijand
Vijf
Vijver
Vinden
Vinger
Vis
Vlag
Vlees
Vlieg
Vloer
Voeden
Voelen
Voet
Vogel
Vol
Voor
Vork
Vorm
Vos
Vouwen
Vraag
Vragen
Vrede
Vreemd
Vriend
Vrij
Vroeg
Vrouw
Vullen
Vuur
Waar
Waarom
Wakker
Want
Wapen
Warm
Wassen
Wat
Water
Week
Weer
Weg
Welke
Welkom
Wens
Wereld
Werk
West
Wie
Wiel
Wij
Wijn
Wijs
Wild
Willen
Wind
Winkel
Winnen
Winter
Wissen
Wit
Wolf
Wolk
Wonder
Woord
Woud
Wreed
Zaak
Zacht
Zak
Zand
Zee
Zeep
Zeer
Zeggen
Zeil
Zeker
Zelfde
Zes
Zetten
Zeven
Ziek
Ziel
Zien
Zij
Zijn
Zilver
Zingen
Zinken
Zitten
Zoals
Zoeken
Zoet
Zomer
Zon
Zonder
Zonnig
Zoon
Zorg
Zorgen
Zou
Zout
Zuid
Zulke
Zullen
Zus
Zwaar
Zwak

