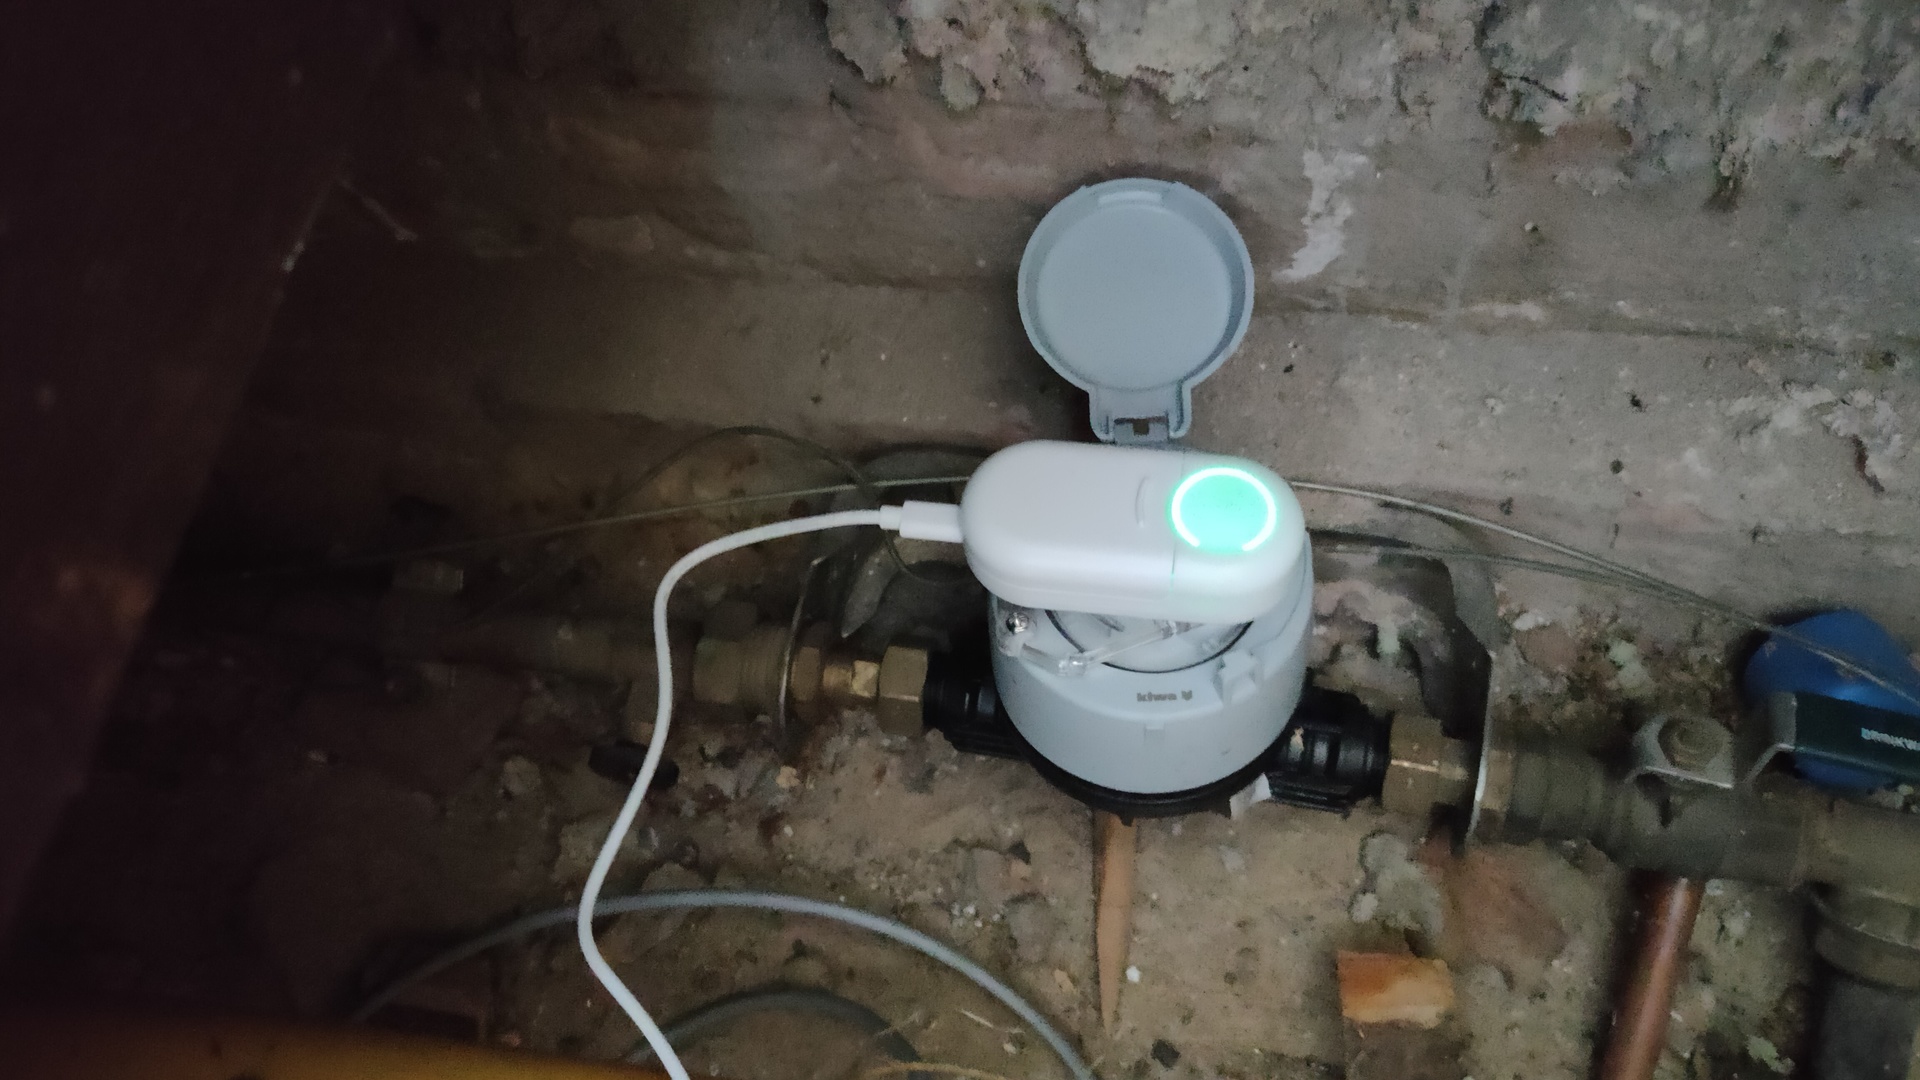
It’s a little device you can place on your watermeter.
You get a plastic clip/holder which you can use to place the device on your watermeter. You can easily remove the device to read the values.
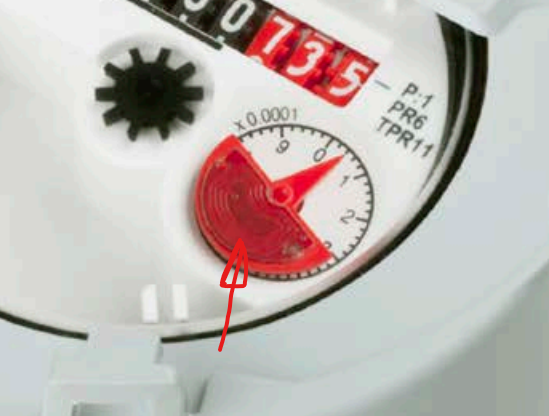
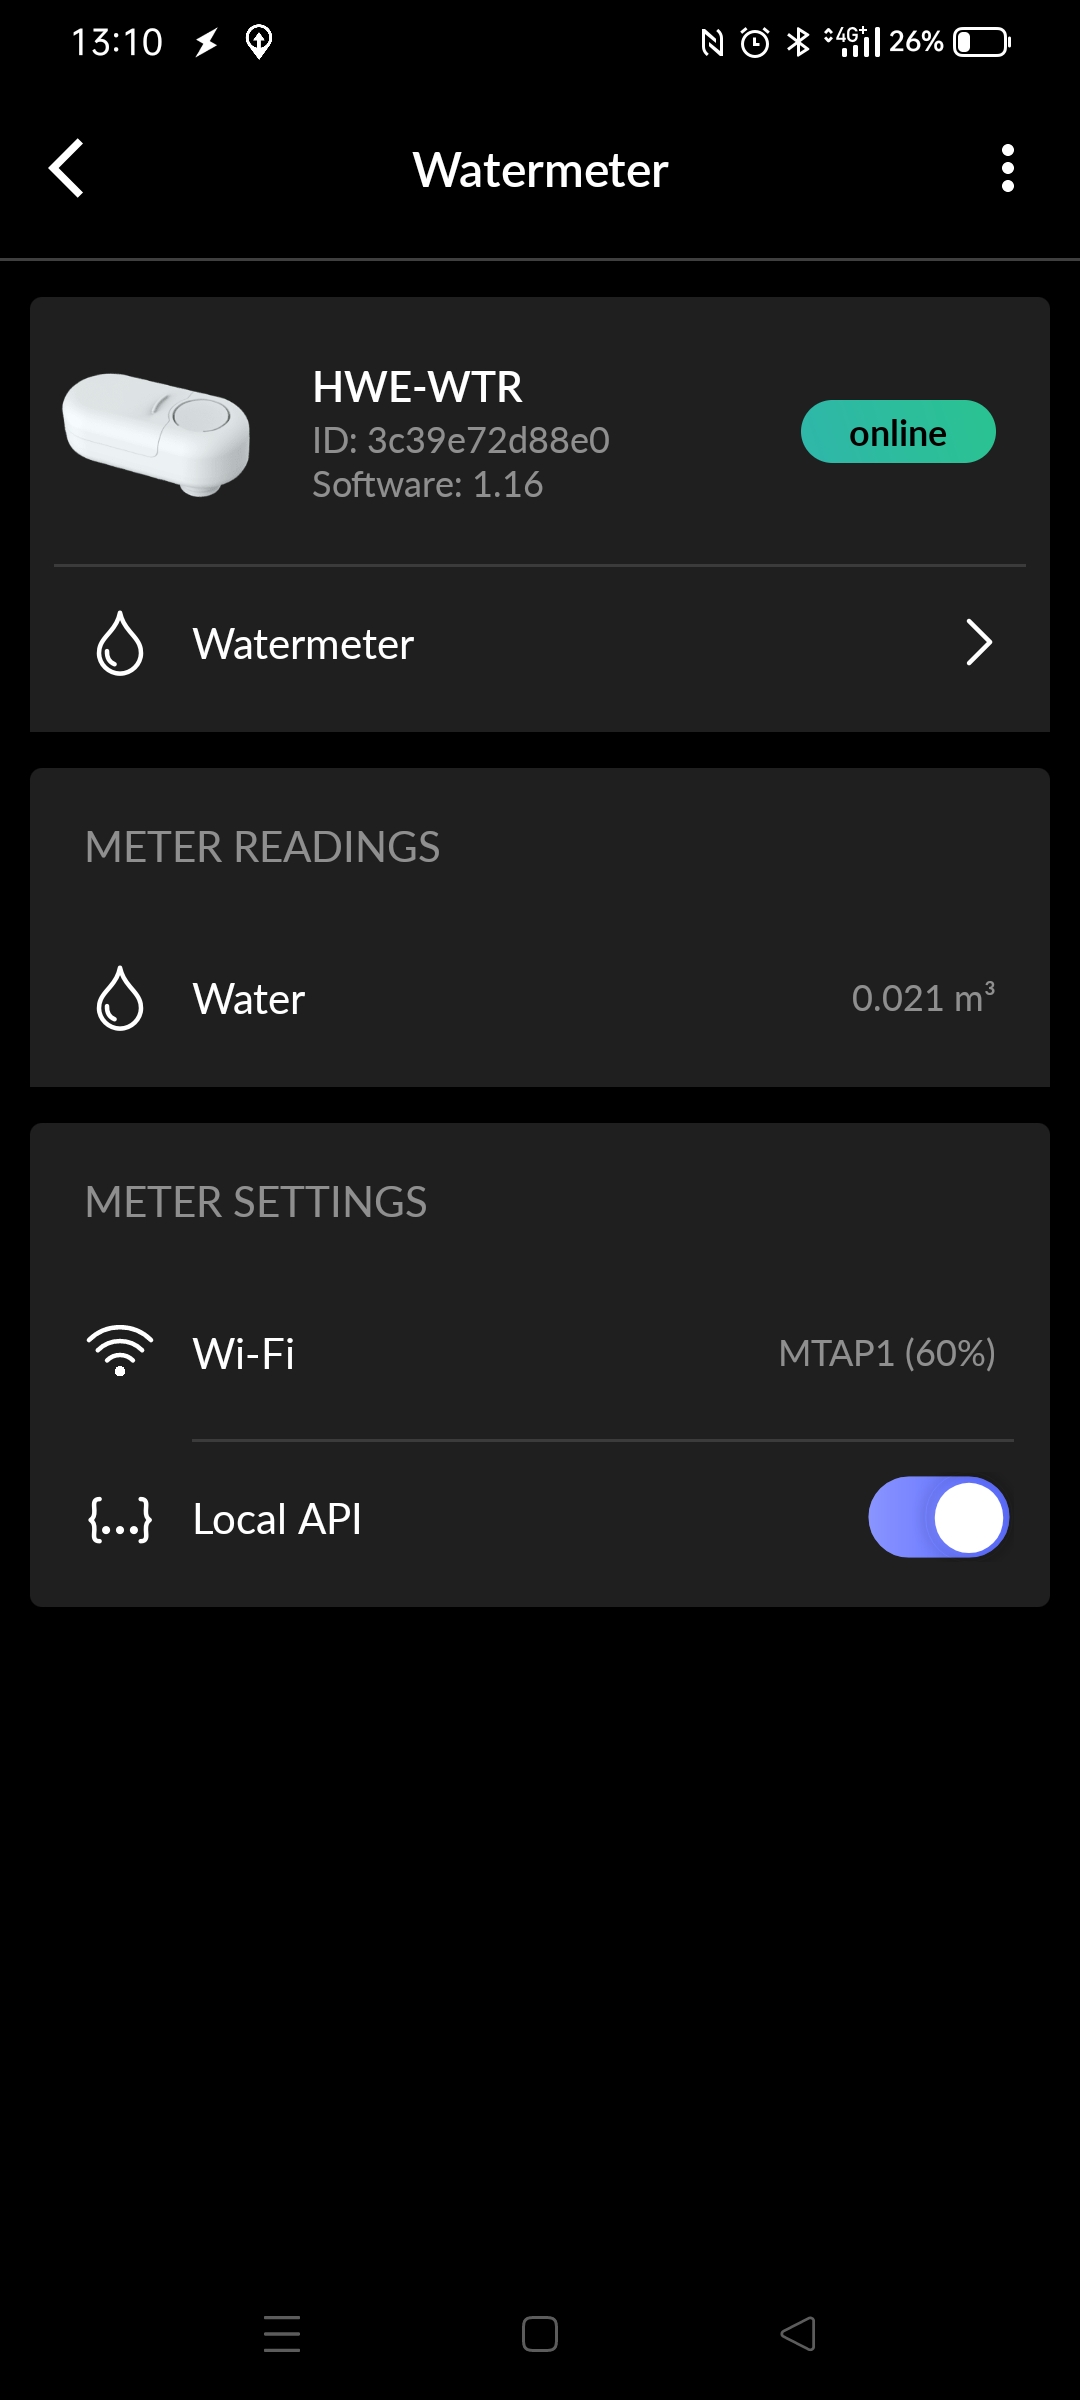
The device measures the little round gauge, so it has no idea what the current values are. Add the current values of your meter to the output of the device.
The device works by measuring the rotation of the red part.
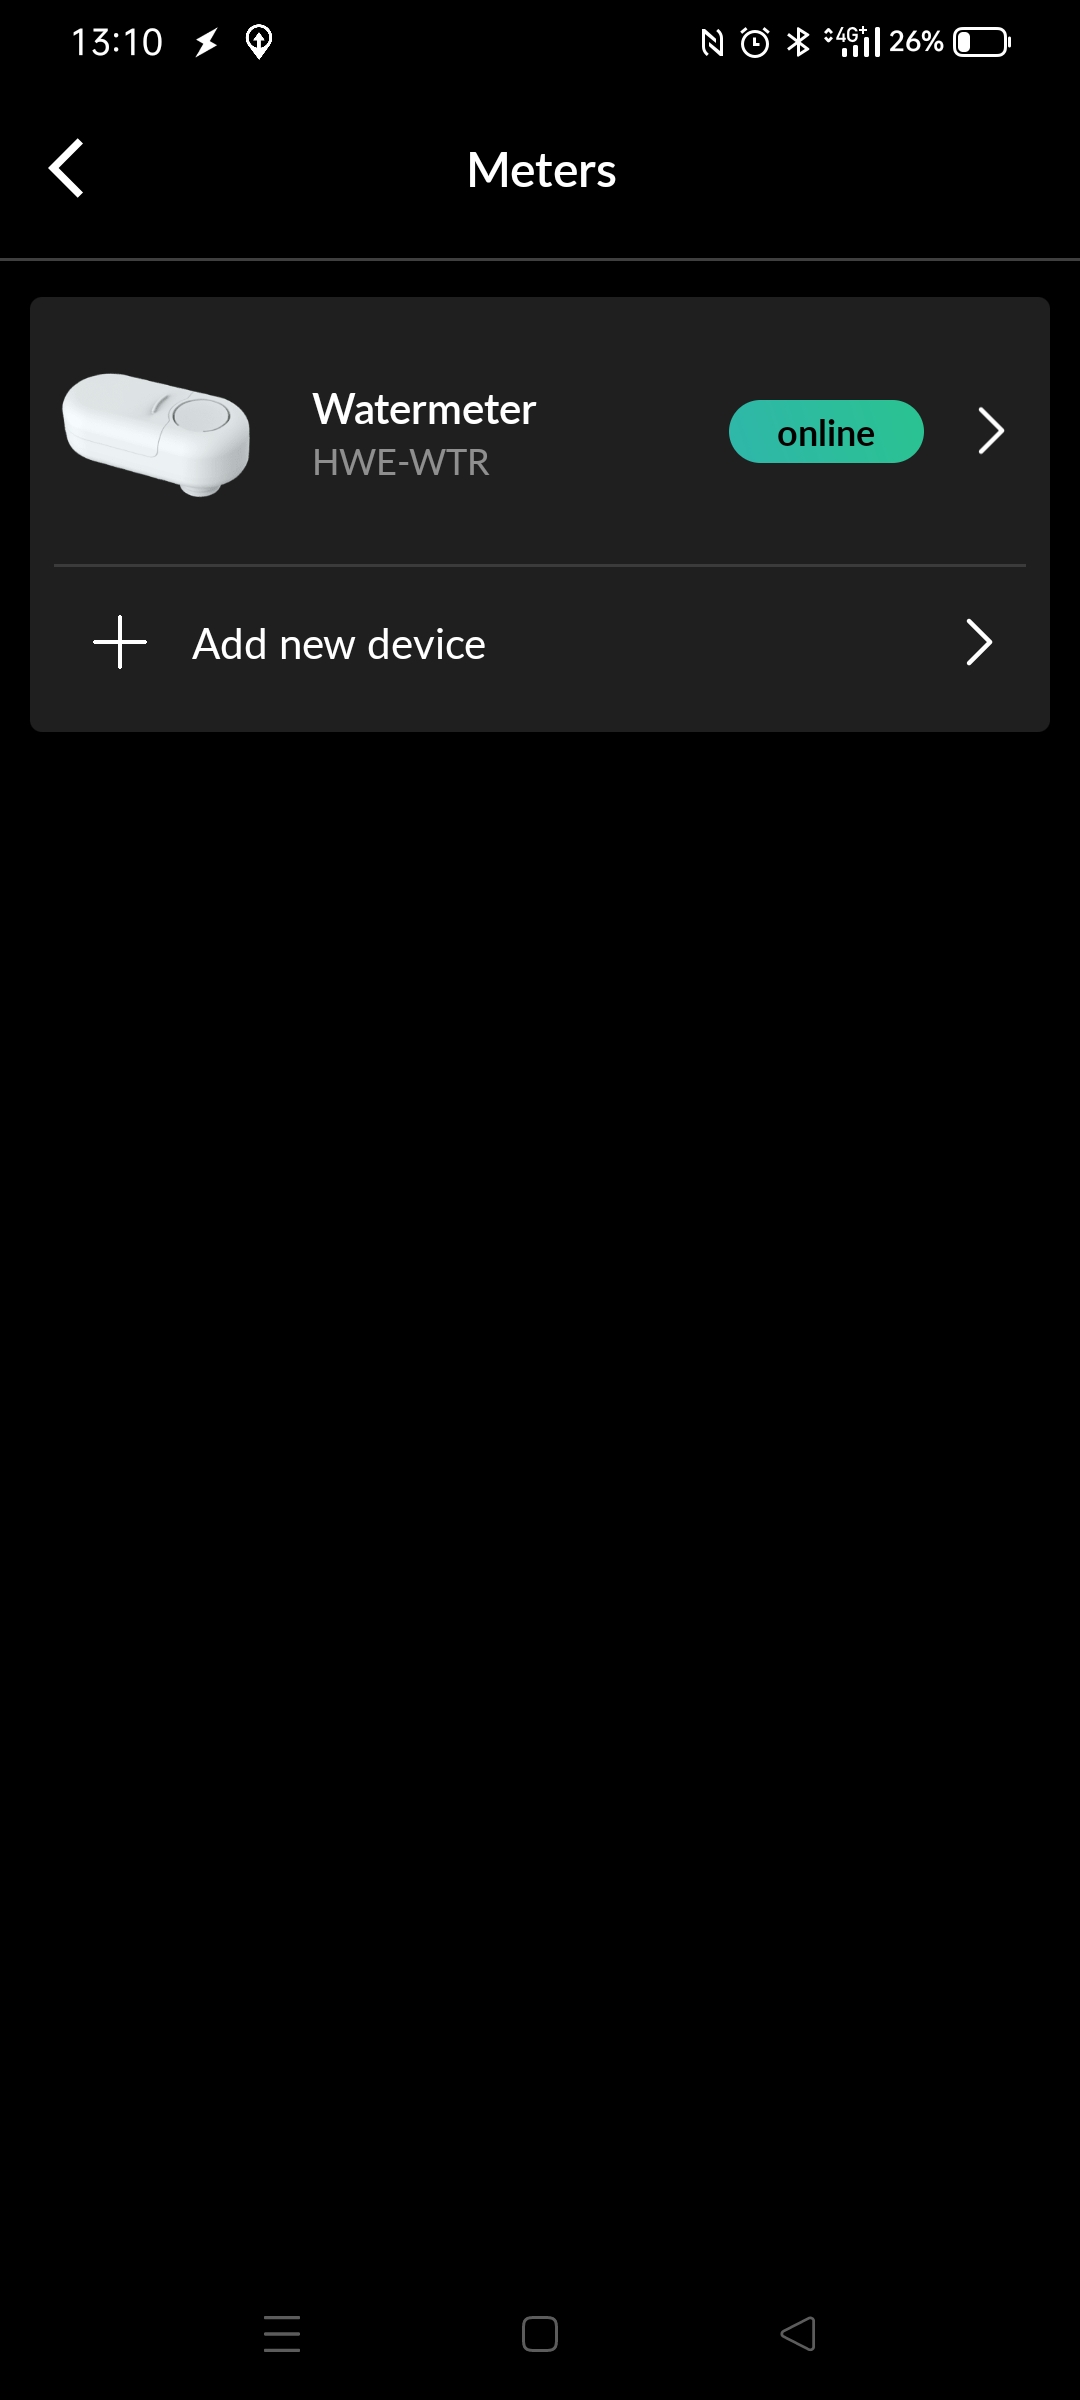
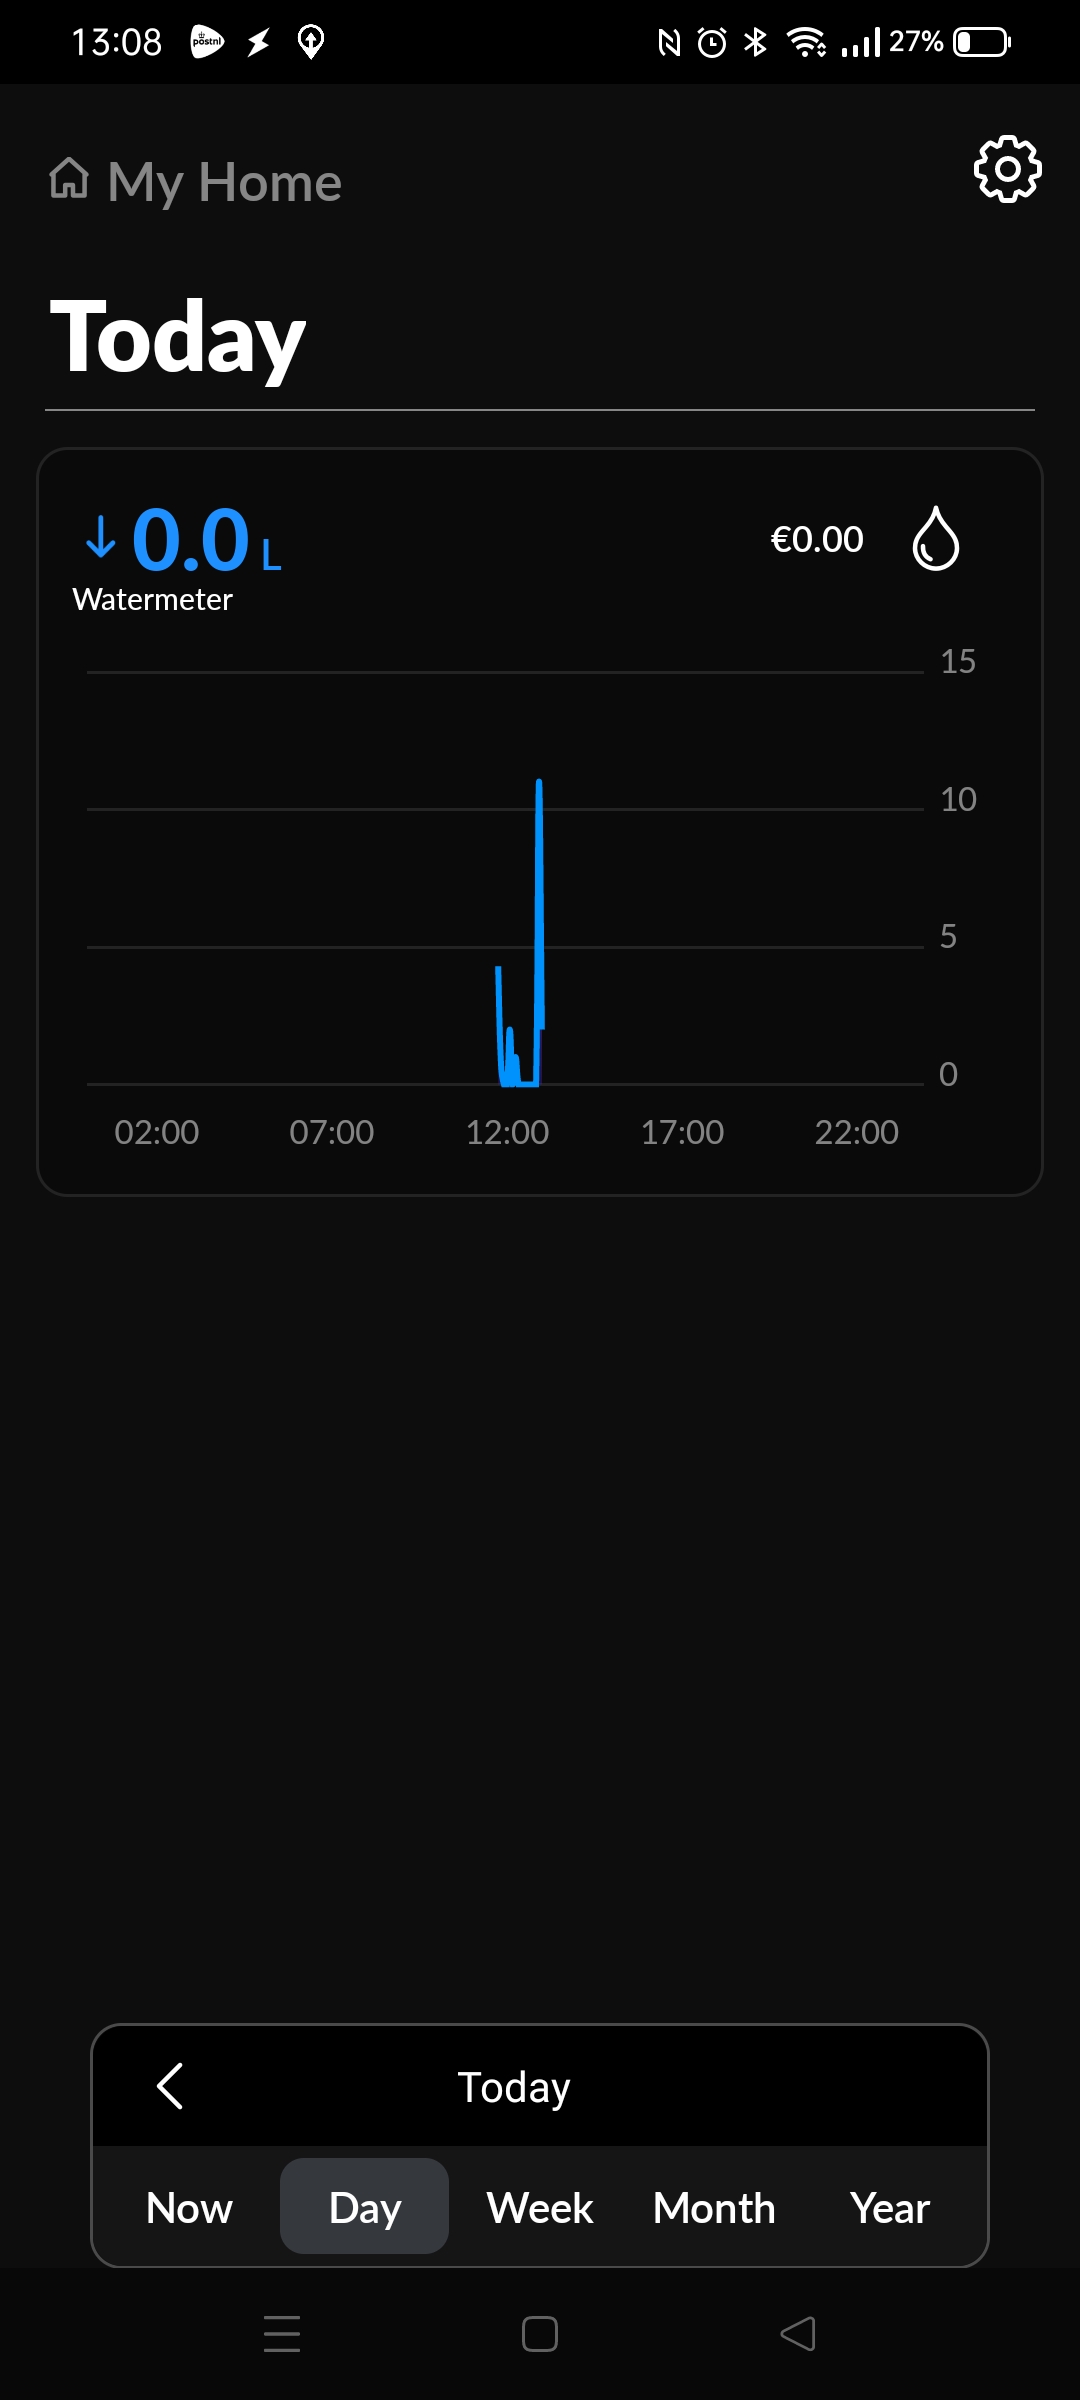
By default it sends the information over the internet to a server. Your phone connects to this server and the app wil give you the graphs.
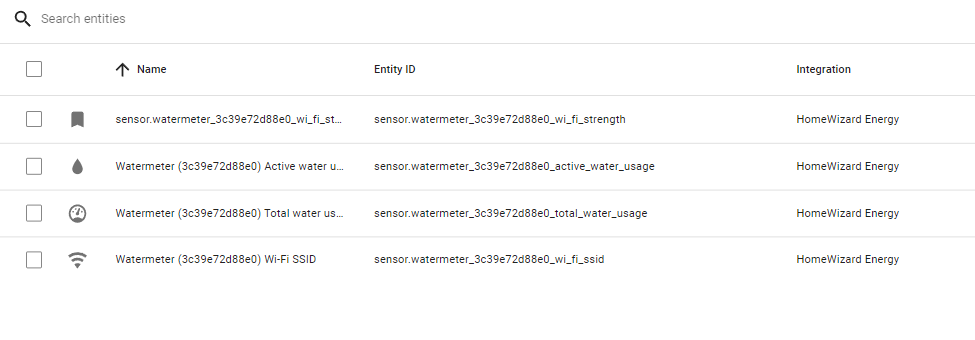
If you want your own intergration, you have to enable “local api” See image on the right. When you want realtime data, you have to connect a usb-c power supply. When using batteries, the device wil only connect to wifi once per 5 minutes, and you can’t use the API.
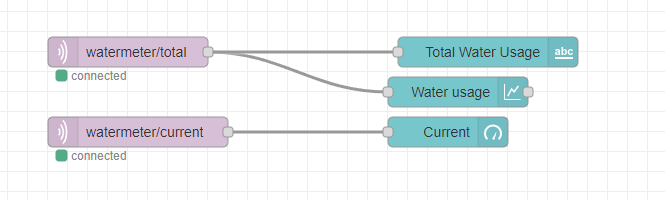
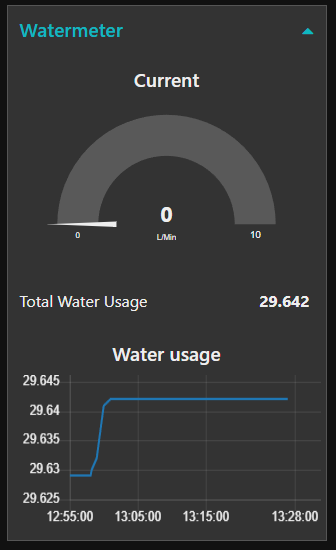
I wrote a little test script in bash to draw graphs using mqtt and Nodered.
When i play around with Arduino’s which i have flashed and start with their own access points. It’s sometimes not clear which remote IP is connected.
Applications like Tasmota,Wled and Easyesp startup with their own Access Point, which you can use to connect to and configure them to your real accesspoint. So you connect to this temporary AP, and want to remote access it with your phone’s browser. Not all apps (certainly not my apps) have a captive portal. Most won’t .. Which ip to use to connect?
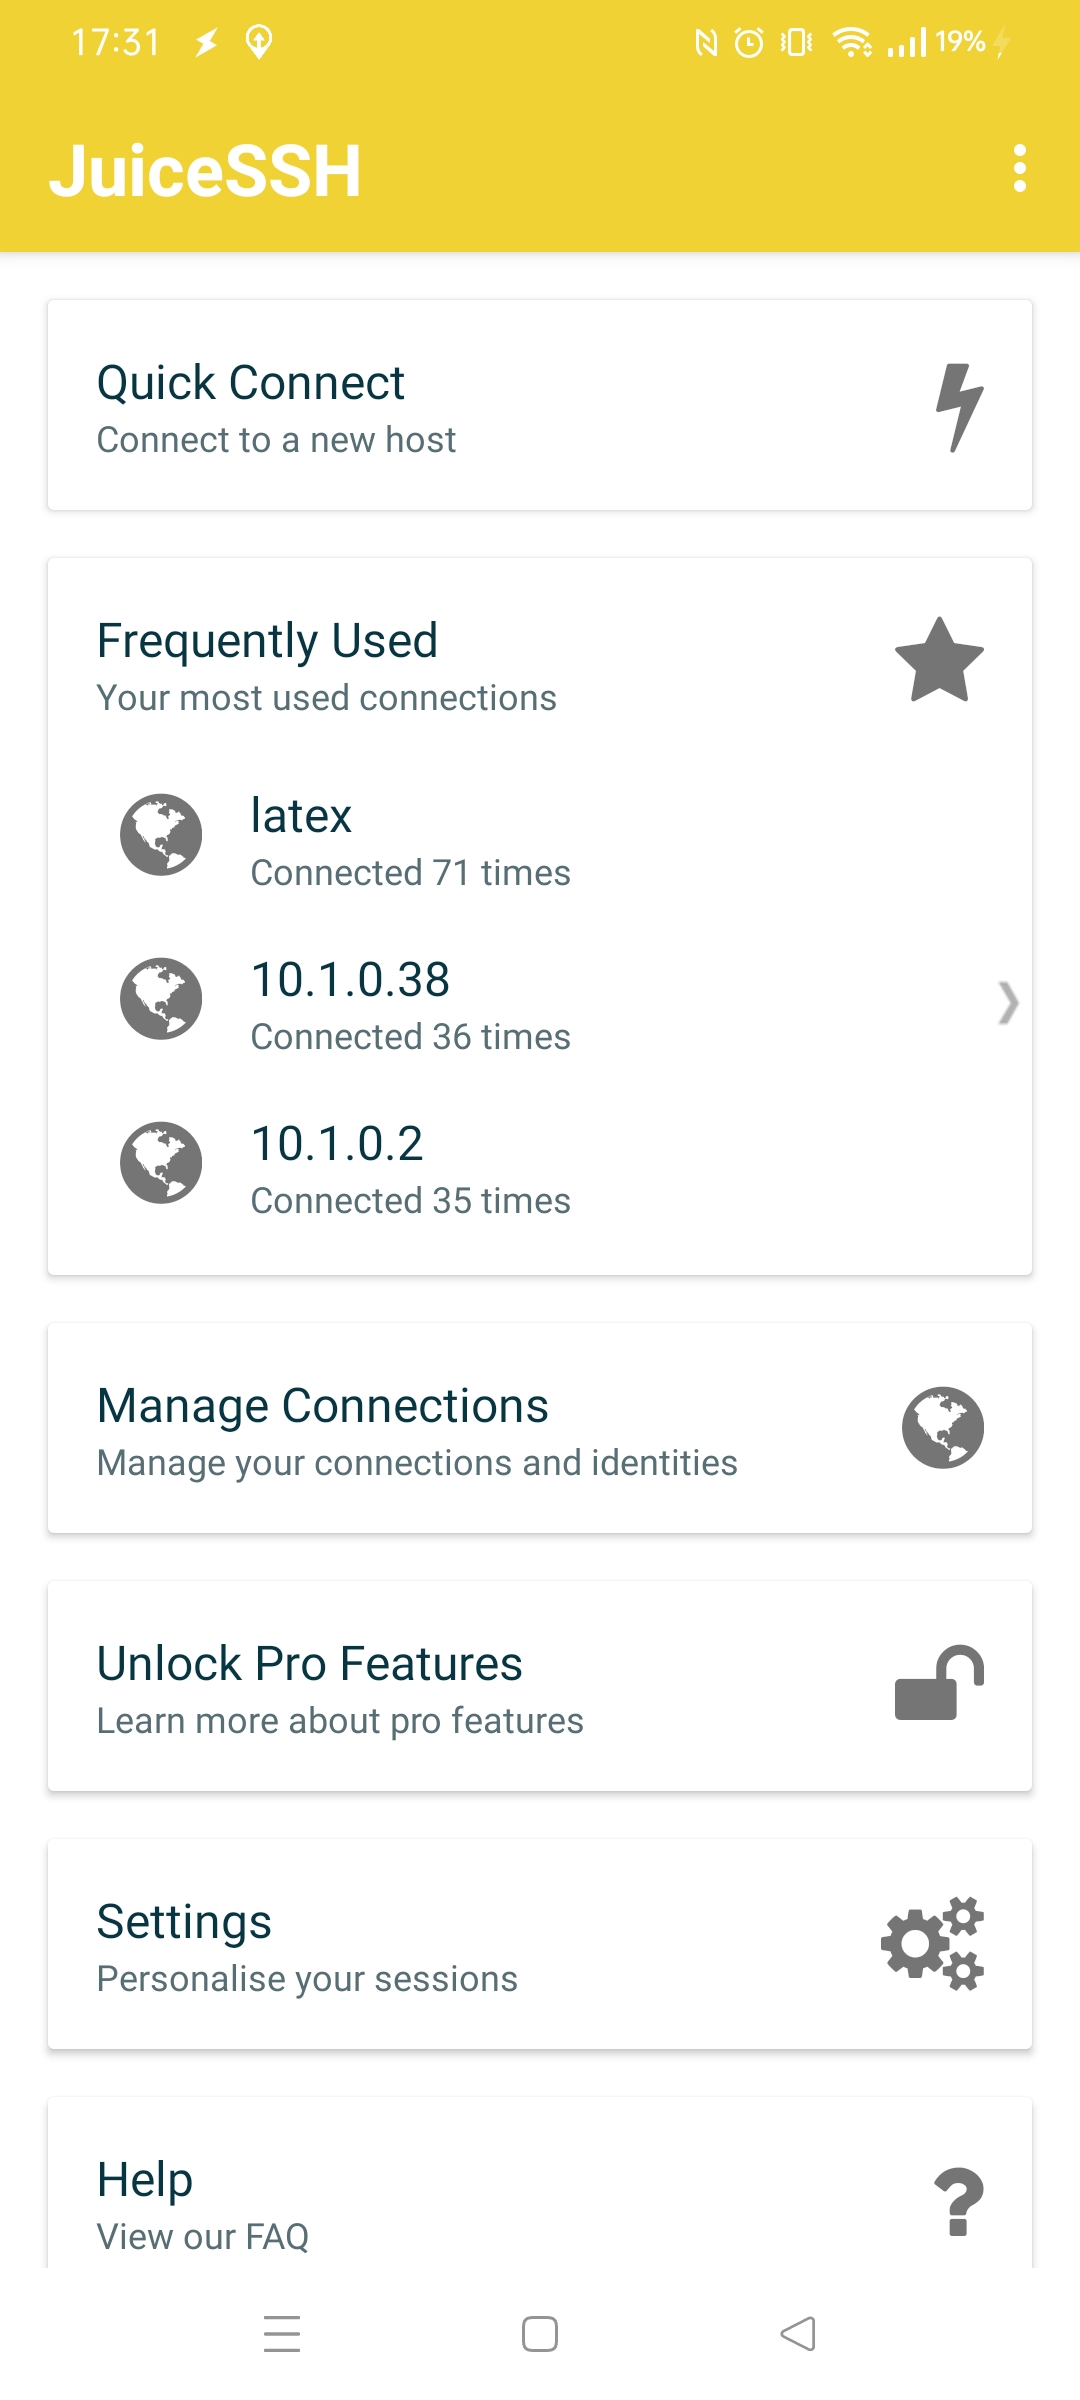
Install JuiceSSH of you don’t have it .. it’s a must have really
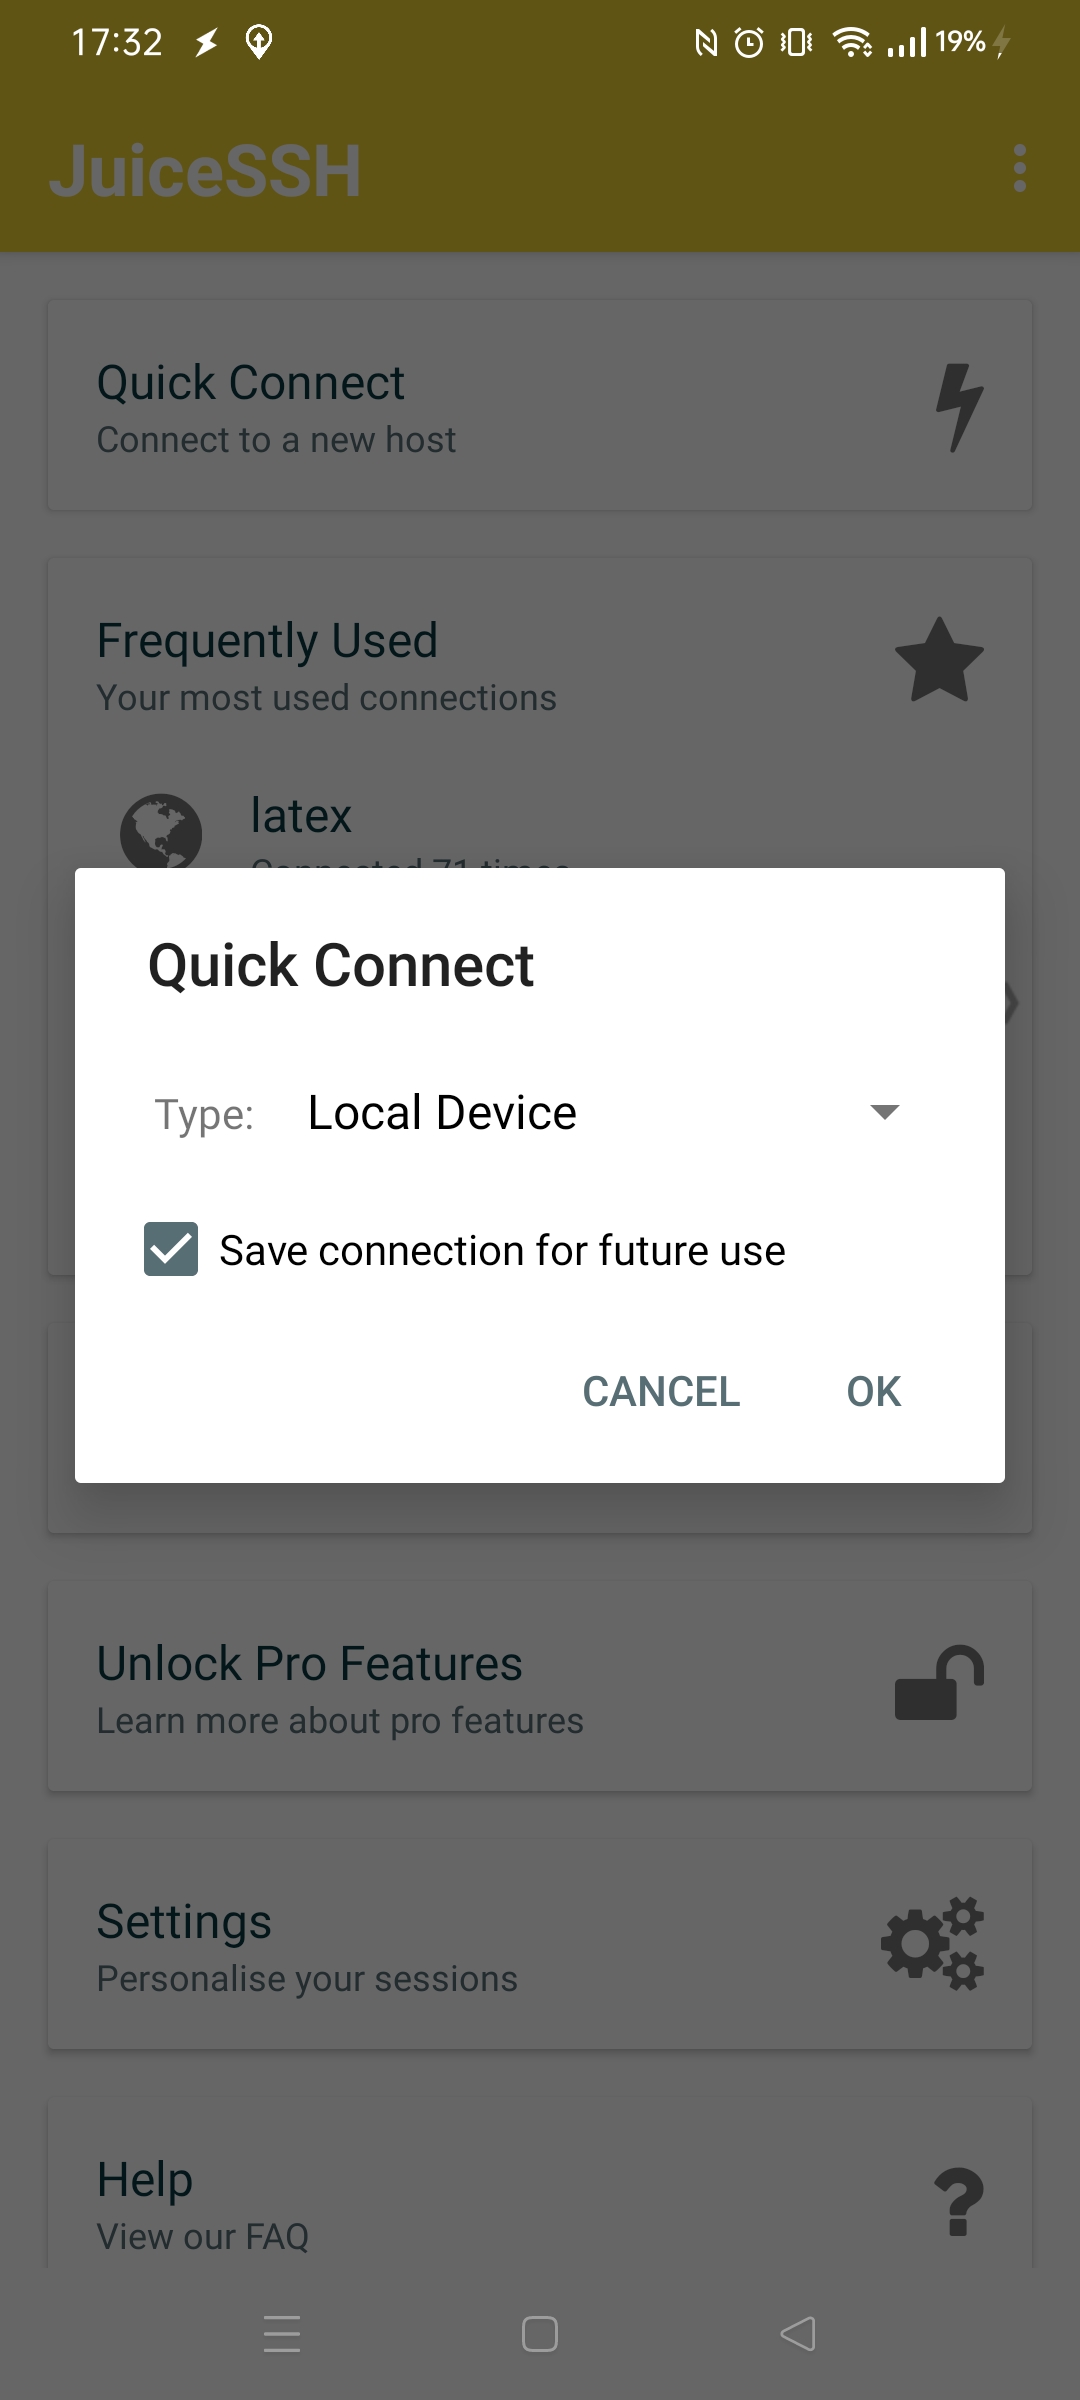
Select quick connect – local device
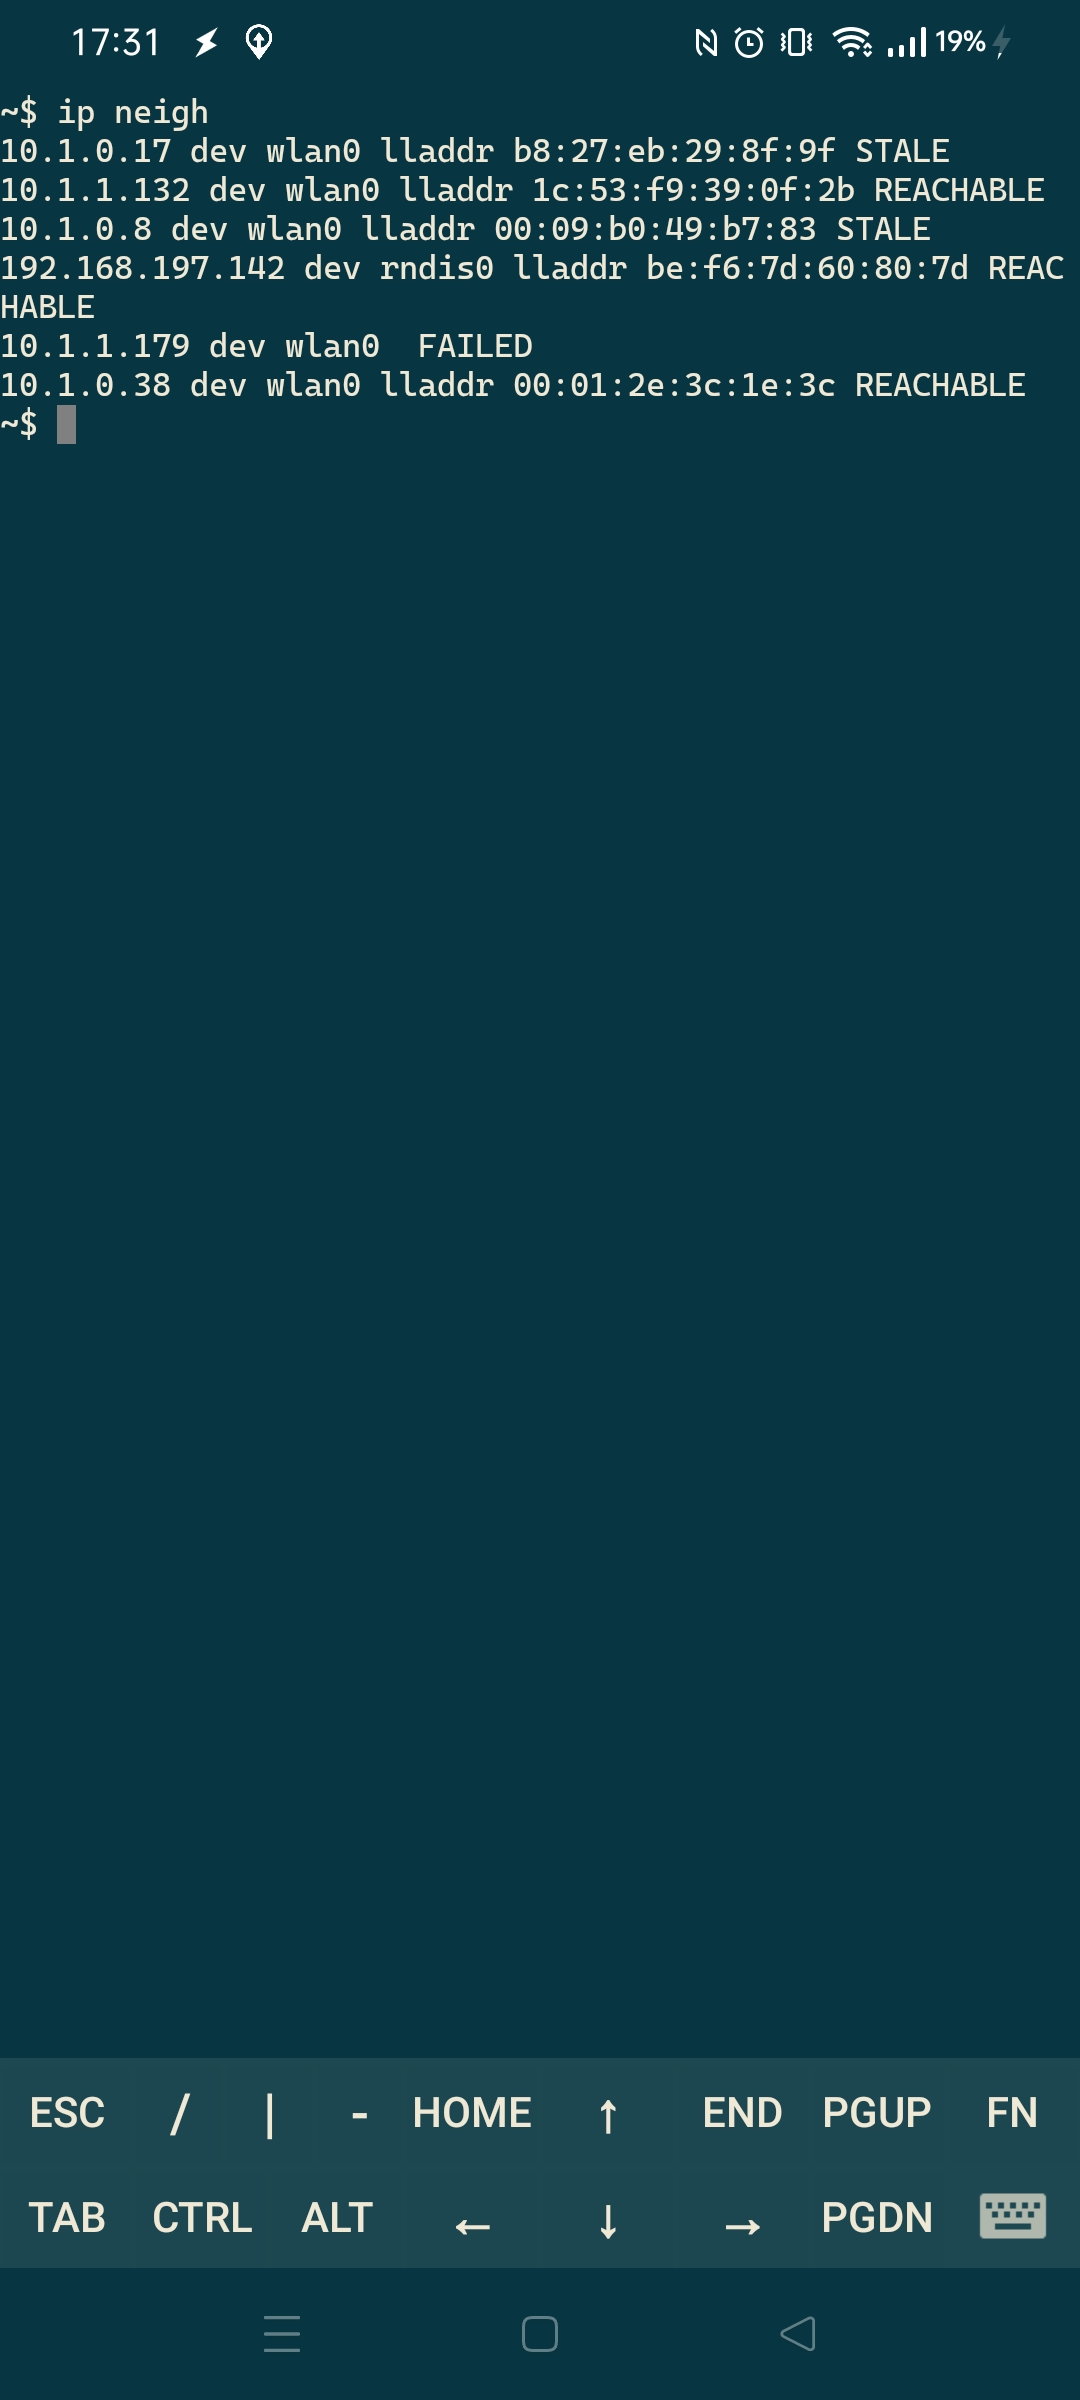
Enter command “ip neigh”, It wil show devices connected to your android phone or which where broadcasting in your network-neighbourhood
Most of the times it also your default gw .. which can be found in settings. But above gives you more information.
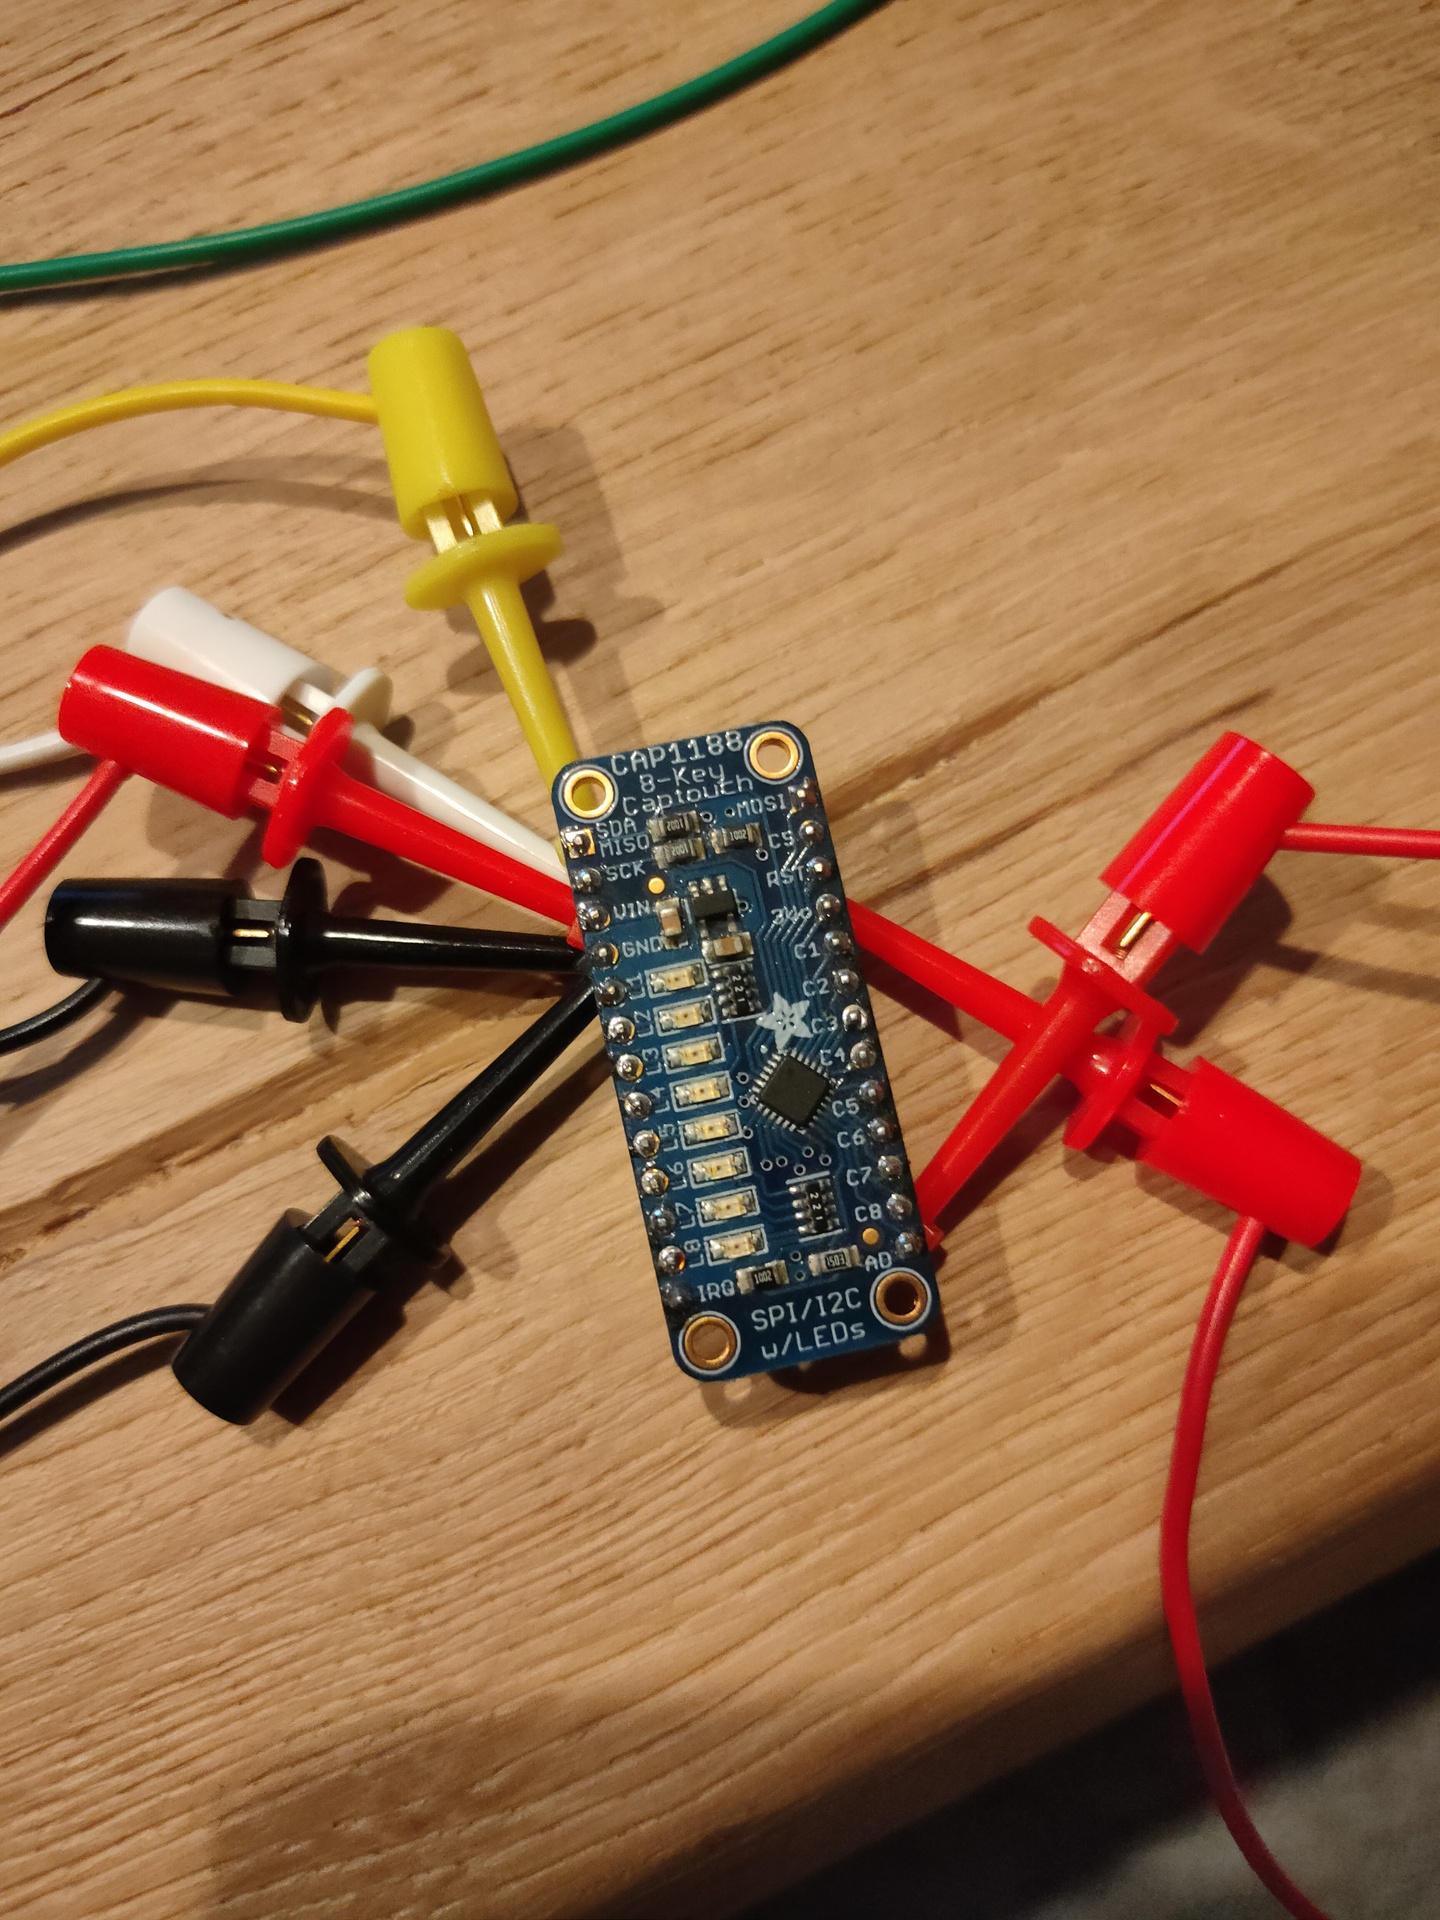
Way back in 2018 i was playing around with i2c and touch.
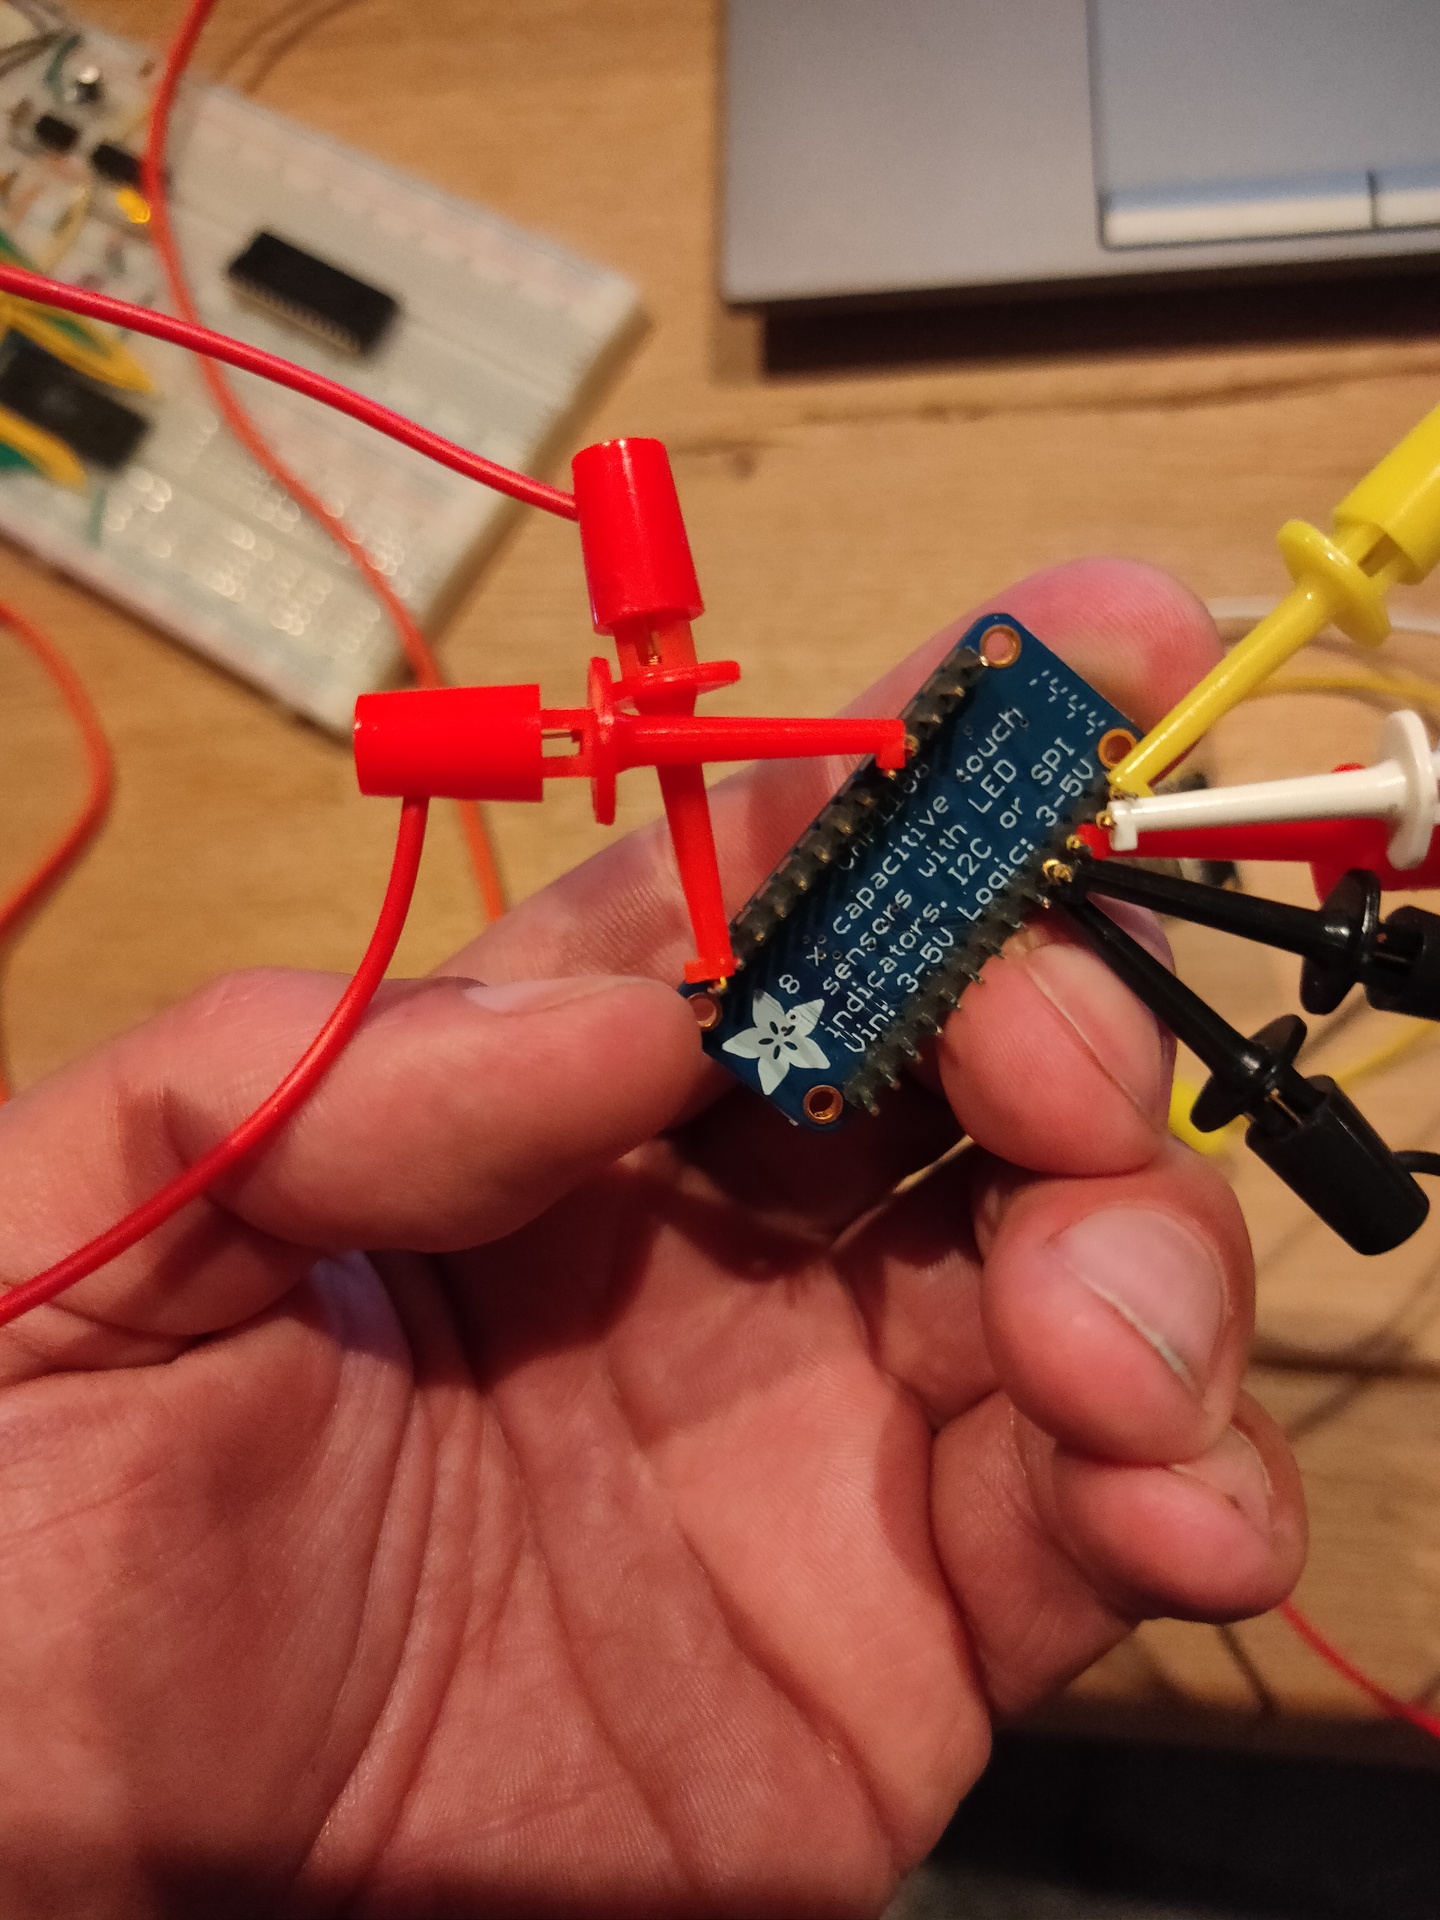
CAP1188 Multi touch sensor
I remembered that VGA was using i2c to get information from monitors like brand/type and connection information.
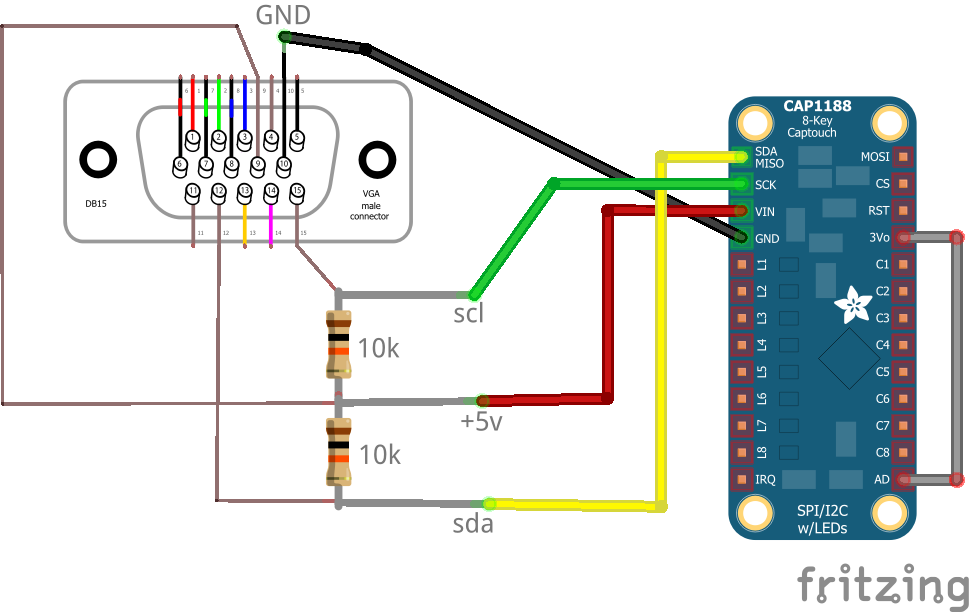
I managed to access the cap1188 up to my Laptop via VGA.
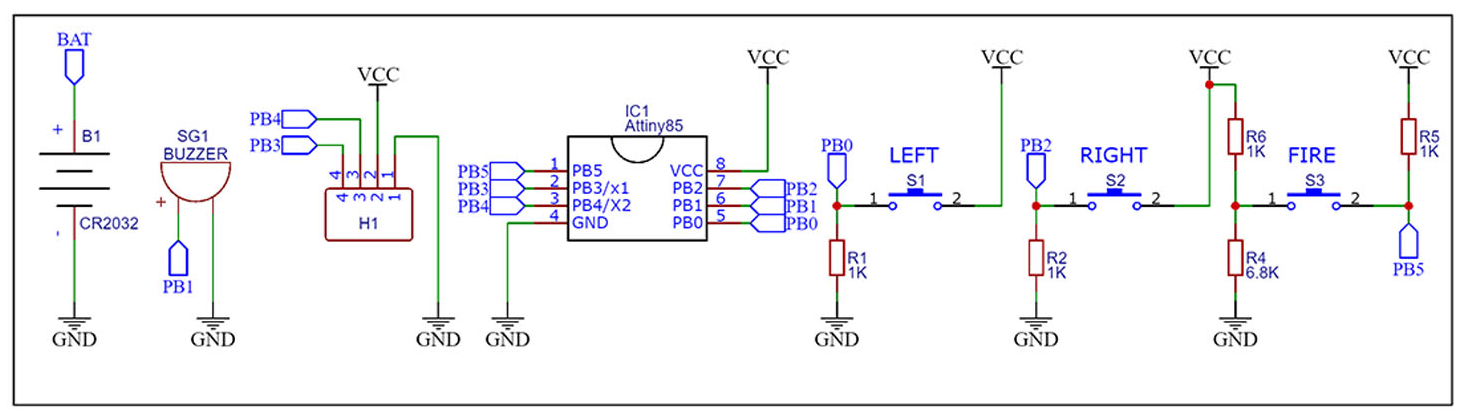
2018 Schematic i used to abuse vga …
The final python code i used to play with the variables and playing sound i can’t find. But below is the test code
#!/usr/bin/python

# NOTE: i did a address scan, now i have 3v3 connected to AD, so probably the address is 0x28 !!

import smbus

bus = smbus.SMBus(1)    # 0 = /dev/i2c-0 (port I2C0), 1 = /dev/i2c-1 (port I2C1)

DEVICE_ADDRESS = 0x29
DEVICEx = 0x10
DEVICE_REG_MODE1 = 0x00
DEVICE_REG_LEDOUT0 = 0x1d

#Write a single register
bus.write_byte_data(DEVICE_ADDRESS, 0x1f, 0x3F)

#Write an array of registers
#ledout_values = [0xff, 0xff, 0xff, 0xff, 0xff, 0xff]
#bus.write_i2c_block_data(DEVICE_ADDRESS, DEVICE_REG_LEDOUT0, ledout_values)
while True:

        print bus.read_byte_data(DEVICE_ADDRESS,0x10), bus.read_byte_data(DEVICE_ADDRESS,0x11) , bus.read_byte_data(DEVICE_ADDRESS,0x12), bus.read_byte_data(DEVICE_ADDRESS,0x13), bus.read_byte_data(DEVICE_ADDRESS,0x14), bus.read_byte_dat
a(DEVICE_ADDRESS,0x15), bus.read_byte_data(DEVICE_ADDRESS,0x16), bus.read_byte_data(DEVICE_ADDRESS,0x17)
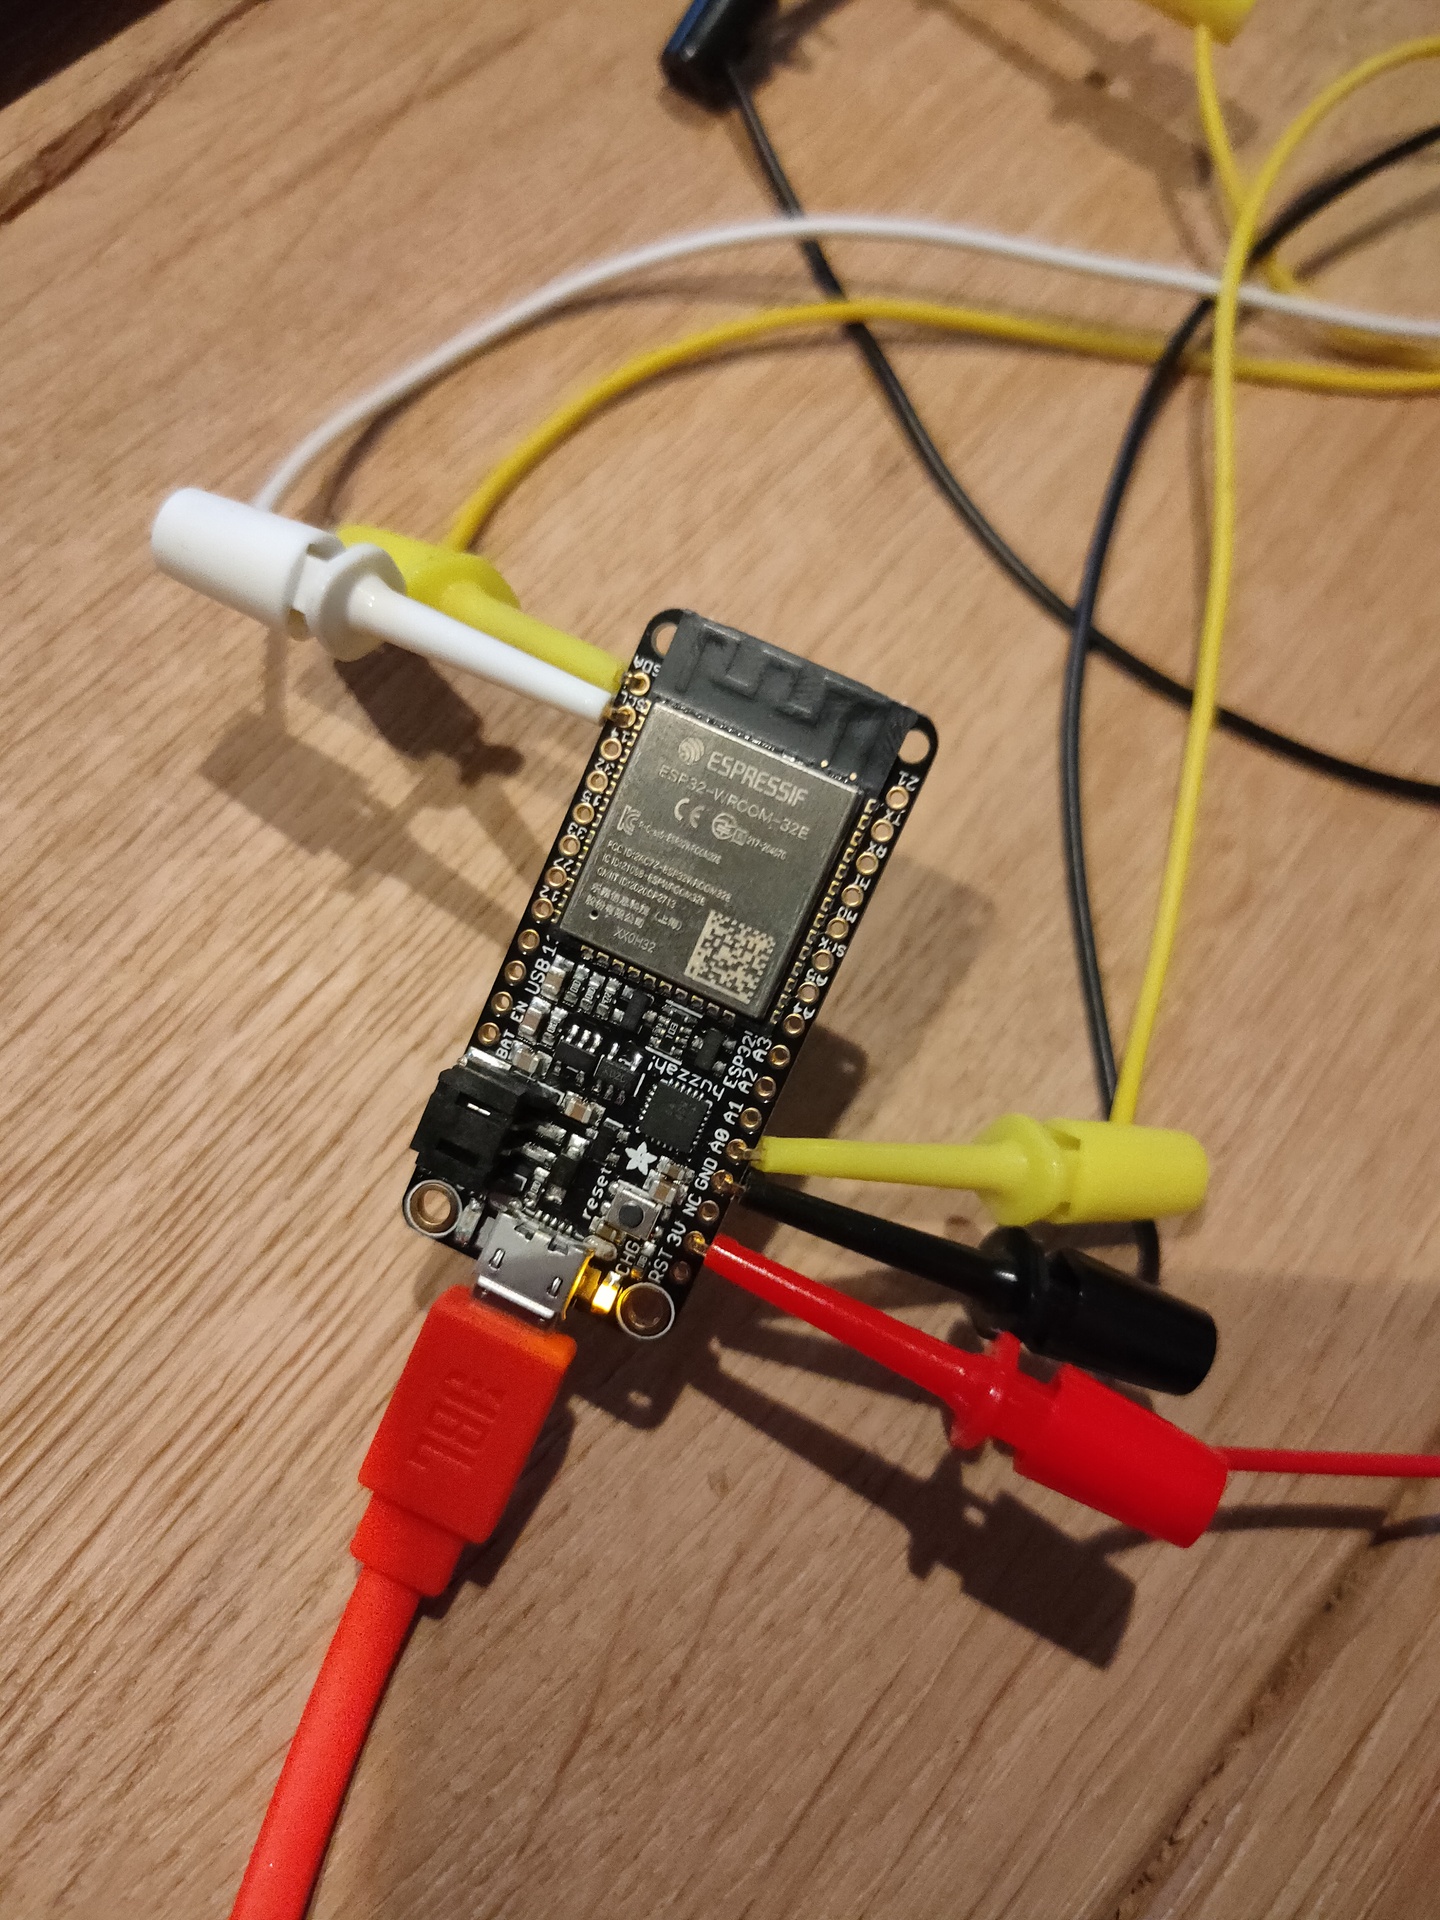
Today i connected the cap1188 to a ESP32 and a piezo buzzer.
ESP FuzzahBuzzerCAP1188CAP1188
/*** Based on below library ***/
/*** Changed pins and added sound ***/

/***************************************************
  This is a library for the CAP1188 I2C/SPI 8-chan Capacitive Sensor

  Designed specifically to work with the CAP1188 sensor from Adafruit
  ----> https://www.adafruit.com/products/1602

  These sensors use I2C/SPI to communicate, 2+ pins are required to
  interface
  Adafruit invests time and resources providing this open source code,
  please support Adafruit and open-source hardware by purchasing
  products from Adafruit!

  Written by Limor Fried/Ladyada for Adafruit Industries.
  BSD license, all text above must be included in any redistribution
 ****************************************************/

#include <Wire.h>
#include <SPI.h>
#include <Adafruit_CAP1188.h>

const int TONE_OUTPUT_PIN = 26;
const int TONE_PWM_CHANNEL = 0;
int freq = 0;


// Reset Pin is used for I2C or SPI
#define CAP1188_RESET  9

// CS pin is used for software or hardware SPI
#define CAP1188_CS  10

// These are defined for software SPI, for hardware SPI, check your
// board's SPI pins in the Arduino documentation
#define CAP1188_MOSI  11
#define CAP1188_MISO  12
#define CAP1188_CLK  13

// For I2C, connect SDA to your Arduino's SDA pin, SCL to SCL pin
// On UNO/Duemilanove/etc, SDA == Analog 4, SCL == Analog 5
// On Leonardo/Micro, SDA == Digital 2, SCL == Digital 3
// On Mega/ADK/Due, SDA == Digital 20, SCL == Digital 21

// Use I2C, no reset pin!
Adafruit_CAP1188 cap = Adafruit_CAP1188();

// Or...Use I2C, with reset pin
//Adafruit_CAP1188 cap = Adafruit_CAP1188(CAP1188_RESET);

// Or... Hardware SPI, CS pin & reset pin
// Adafruit_CAP1188 cap = Adafruit_CAP1188(CAP1188_CS, CAP1188_RESET);

// Or.. Software SPI: clock, miso, mosi, cs, reset
//Adafruit_CAP1188 cap = Adafruit_CAP1188(CAP1188_CLK, CAP1188_MISO, CAP1188_MOSI, CAP1188_CS, CAP1188_RESET);

void setup() {
  Serial.begin(9600);
  Serial.println("CAP1188 test!");
  ledcAttachPin(TONE_OUTPUT_PIN, TONE_PWM_CHANNEL);


  // Initialize the sensor, if using i2c you can pass in the i2c address
  if (!cap.begin(0x28)){
  //if (!cap.begin()) {
    Serial.println("CAP1188 not found");
    while (1);
  }
  Serial.println("CAP1188 found!");
}

void loop() {
  uint8_t touched = cap.touched();

  if (touched == 0) {
    // No touch detected
    return;
  }

  for (uint8_t i=0; i<8; i++) {
    if (touched & (1 << i)) {
      Serial.print(touched); Serial.print("\t");
      freq = (i * 100);
      ledcWriteTone(TONE_PWM_CHANNEL, freq);
      delay(100);
    }
  }

  Serial.println();
  delay(50);
}
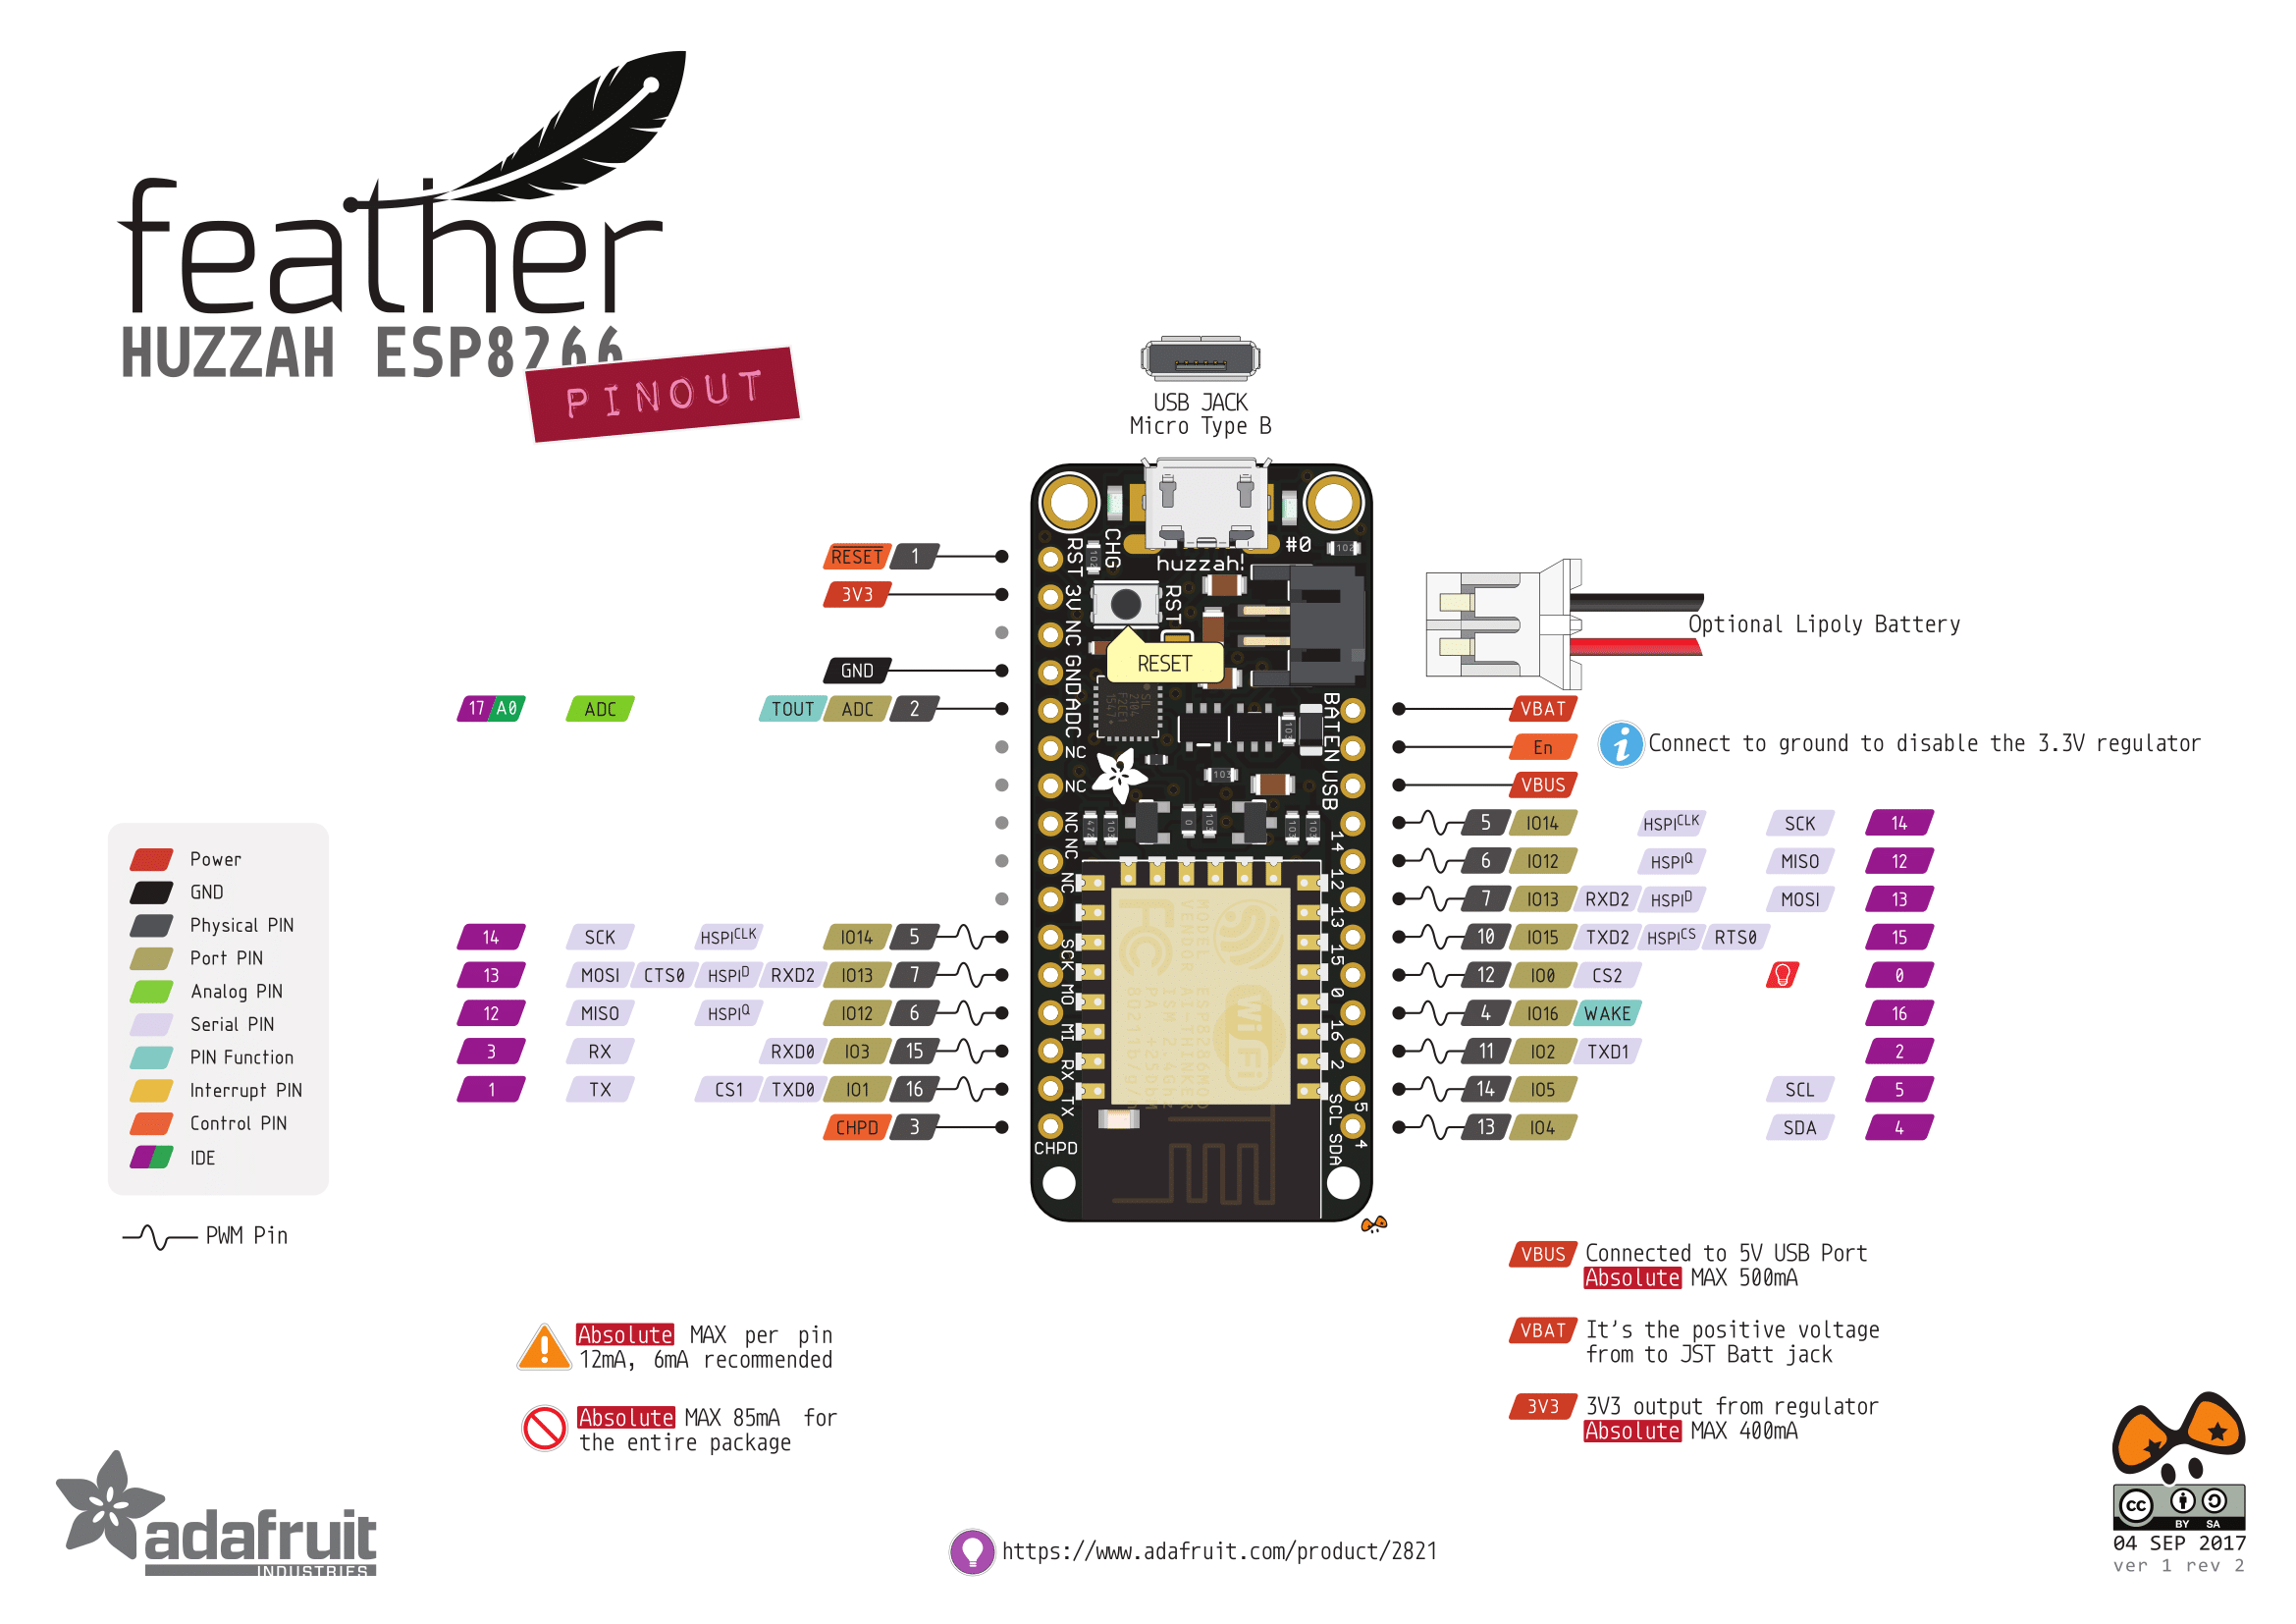
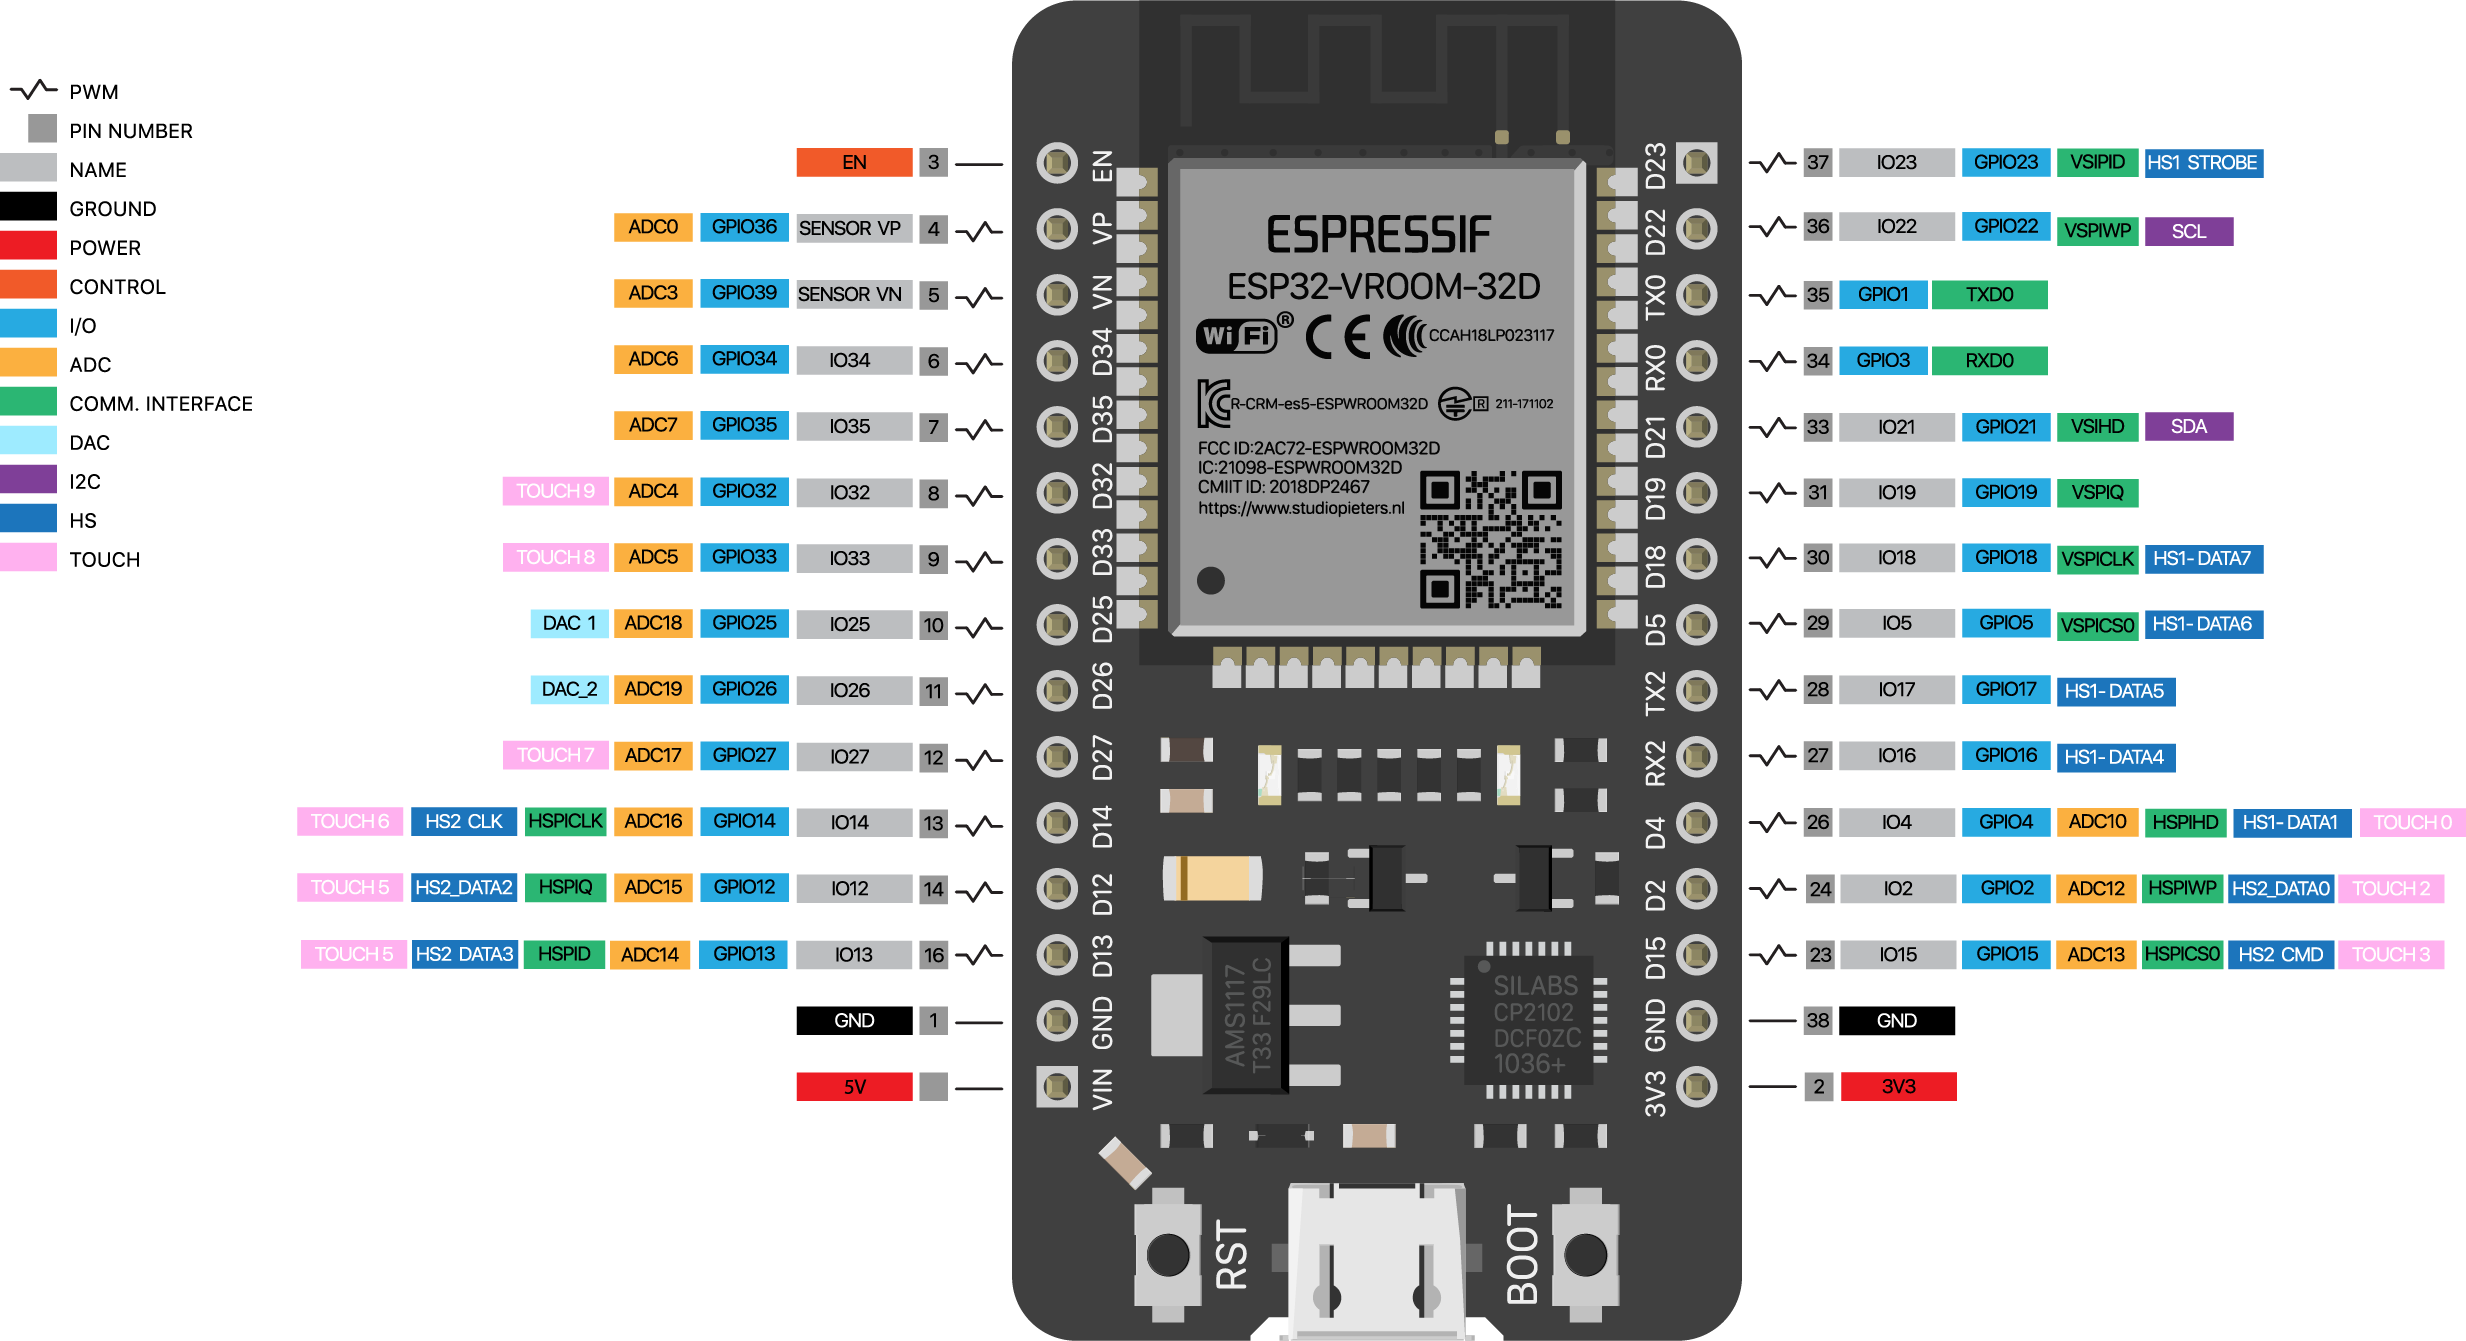
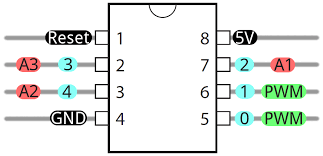
Finding the right pins or above pinout was the hardest part. The sketch reads the pins binary so value 129 is first and last bit.
Now i have to get the sound sounding a little better and add frequencies and fingersettings to the sketch to get a minimal electronic bagpipe. (V3 it is .. )
Download from https://micropython.org/resources/firmware/esp32-20220618-v1.19.1.bin
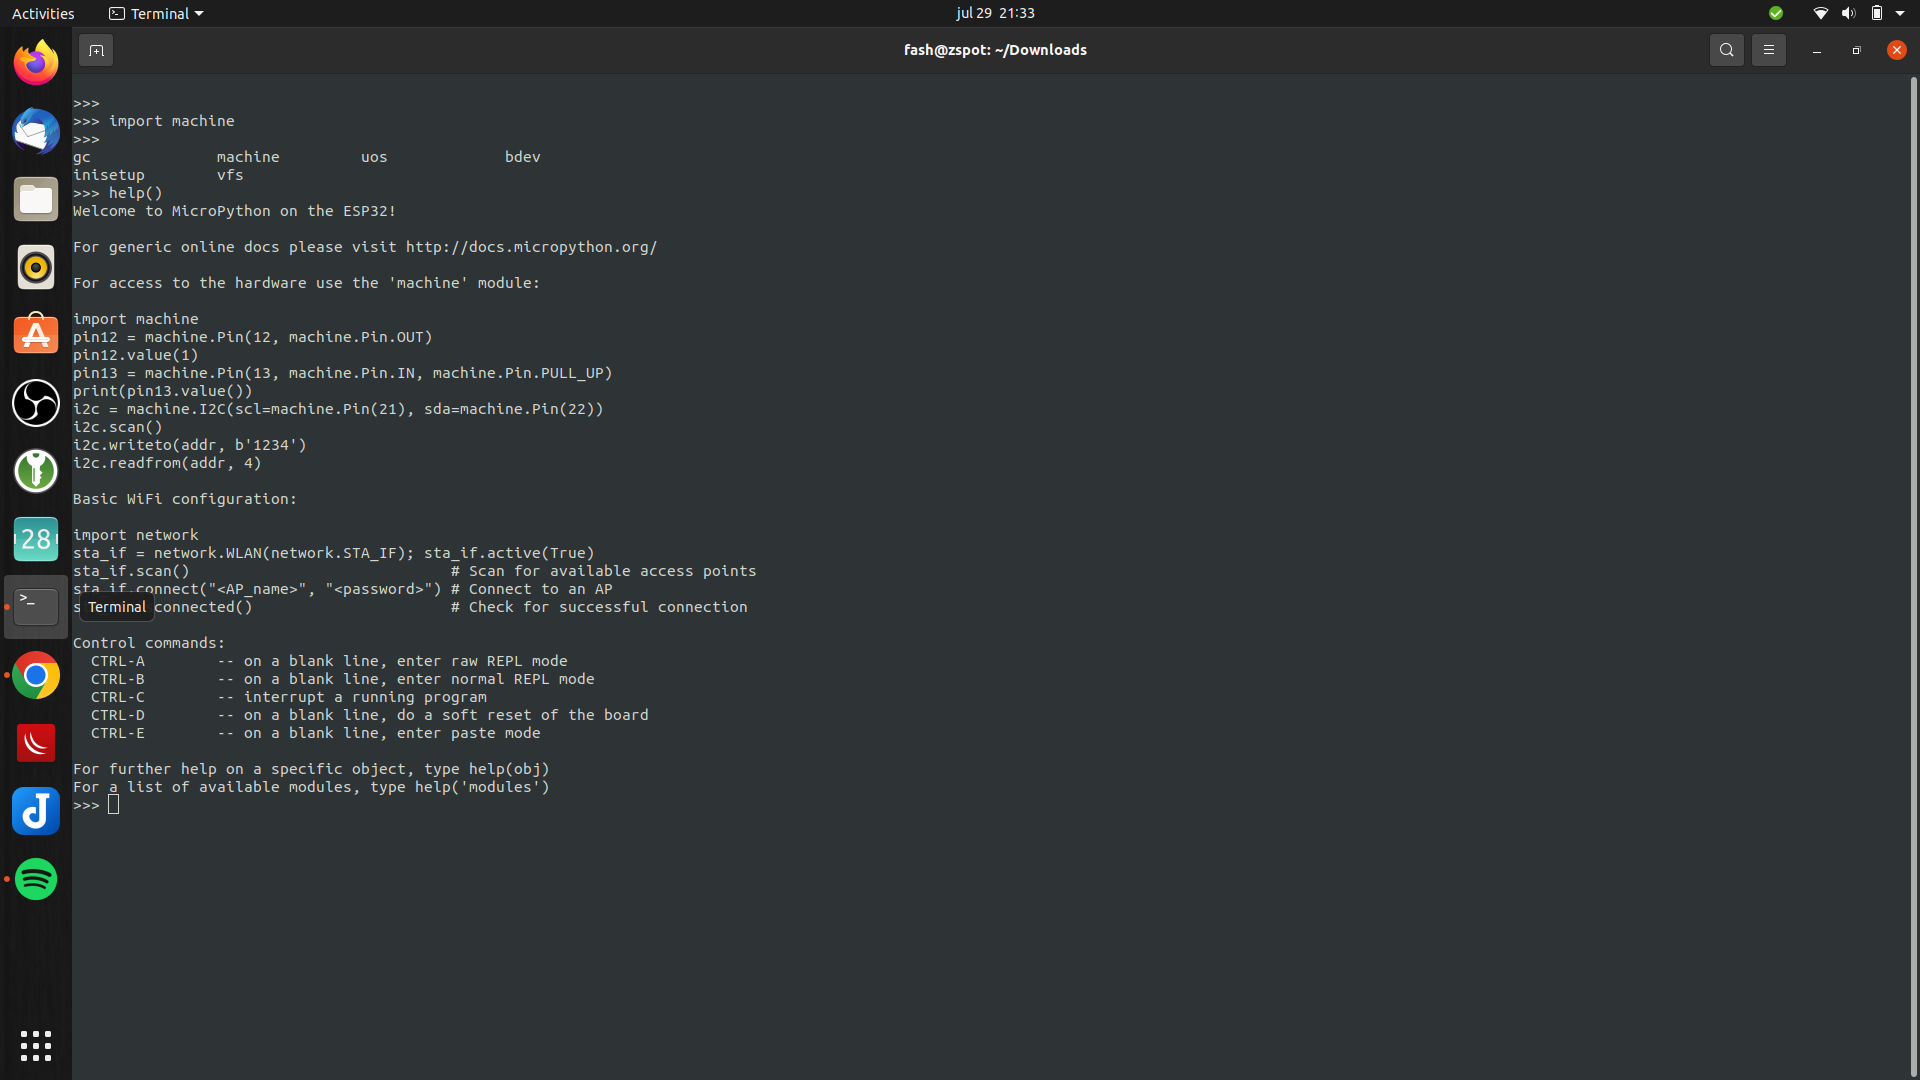
Test with
screen /dev/ttyUSB0 115200
Enter import machine or help()
Great up and running
Now we have to install a boot loader Use ampy to list files
#list boot
ampy -p /dev/ttyUSB0 ls
/boot.py

#get boot.py
ampy -p /dev/ttyUSB0 get boot.py
vi boot.py (create new)
#import esp
#esp.osdebug(None)
#import webrepl
#webrepl.start()

def connect():
    import network
    sta_if = network.WLAN(network.STA_IF)
    if not sta_if.isconnected():
        print('connecting to network...')
        sta_if.active(True)
        sta_if.connect('WIFISSID', 'WIFIPASS')
        while not sta_if.isconnected():
            pass
    print('network config:', sta_if.ifconfig())
Push the file
ampy -p /dev/ttyUSB0 put boot.py
Usage: ampy [OPTIONS] COMMAND [ARGS]...

  ampy - Adafruit MicroPython Tool

  Ampy is a tool to control MicroPython boards over a serial connection.
  Using ampy you can manipulate files on the board's internal filesystem and
  even run scripts.

Options:
  -p, --port PORT    Name of serial port for connected board.  Can optionally
                     specify with AMPY_PORT environment variable.  [required]
  -b, --baud BAUD    Baud rate for the serial connection (default 115200).
                     Can optionally specify with AMPY_BAUD environment
                     variable.
  -d, --delay DELAY  Delay in seconds before entering RAW MODE (default 0).
                     Can optionally specify with AMPY_DELAY environment
                     variable.
  --version          Show the version and exit.
  --help             Show this message and exit.

Commands:
  get    Retrieve a file from the board.
  ls     List contents of a directory on the board.
  mkdir  Create a directory on the board.
  put    Put a file or folder and its contents on the board.
  reset  Perform soft reset/reboot of the board.
  rm     Remove a file from the board.
  rmdir  Forcefully remove a folder and all its children from the board.
  run    Run a script and print its output.
Connect to serial console using screen
sudo screen /dev/ttyUSB0 115200
(use CTRL-A \ to exit)
Connect to wifi
import boot
connect()
Led blinky test, with below file named ledtest.py
import time
from machine import Pin
led=Pin(2,Pin.OUT)        #Internal led pin

while True:
  led.value(1)            #Set led turn on
  time.sleep(0.5)
  led.value(0)            #Set led turn off
  time.sleep(0.5)
Upload and run script
ampy -p /dev/ttyUSB0 put ledtest.py
import ledtest (without .py!)
Next todo: boot.py @boot ?!? Run custom python after booting. Connect display and play with drawing.
Tip: Install rshell !
sudo pip3 install rshell
fash@zspot:~$ rshell
Welcome to rshell. Use Control-D (or the exit command) to exit rshell.

No MicroPython boards connected - use the connect command to add one

/home/fash> autoconnect: /dev/ttyUSB0 action: add

/home/fash> ?

Documented commands (type help <topic>):
========================================
args    cat  connect  date  edit  filesize  help  mkdir  rm     shell
boards  cd   cp       echo  exit  filetype  ls    repl   rsync

Use Control-D (or the exit command) to exit rshell.
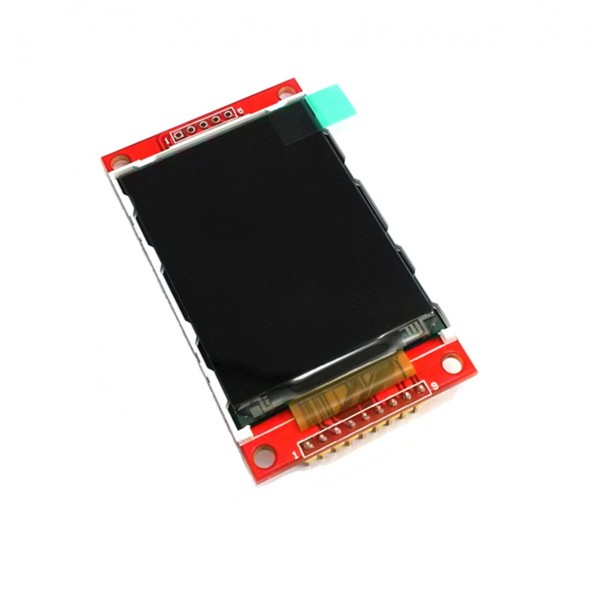
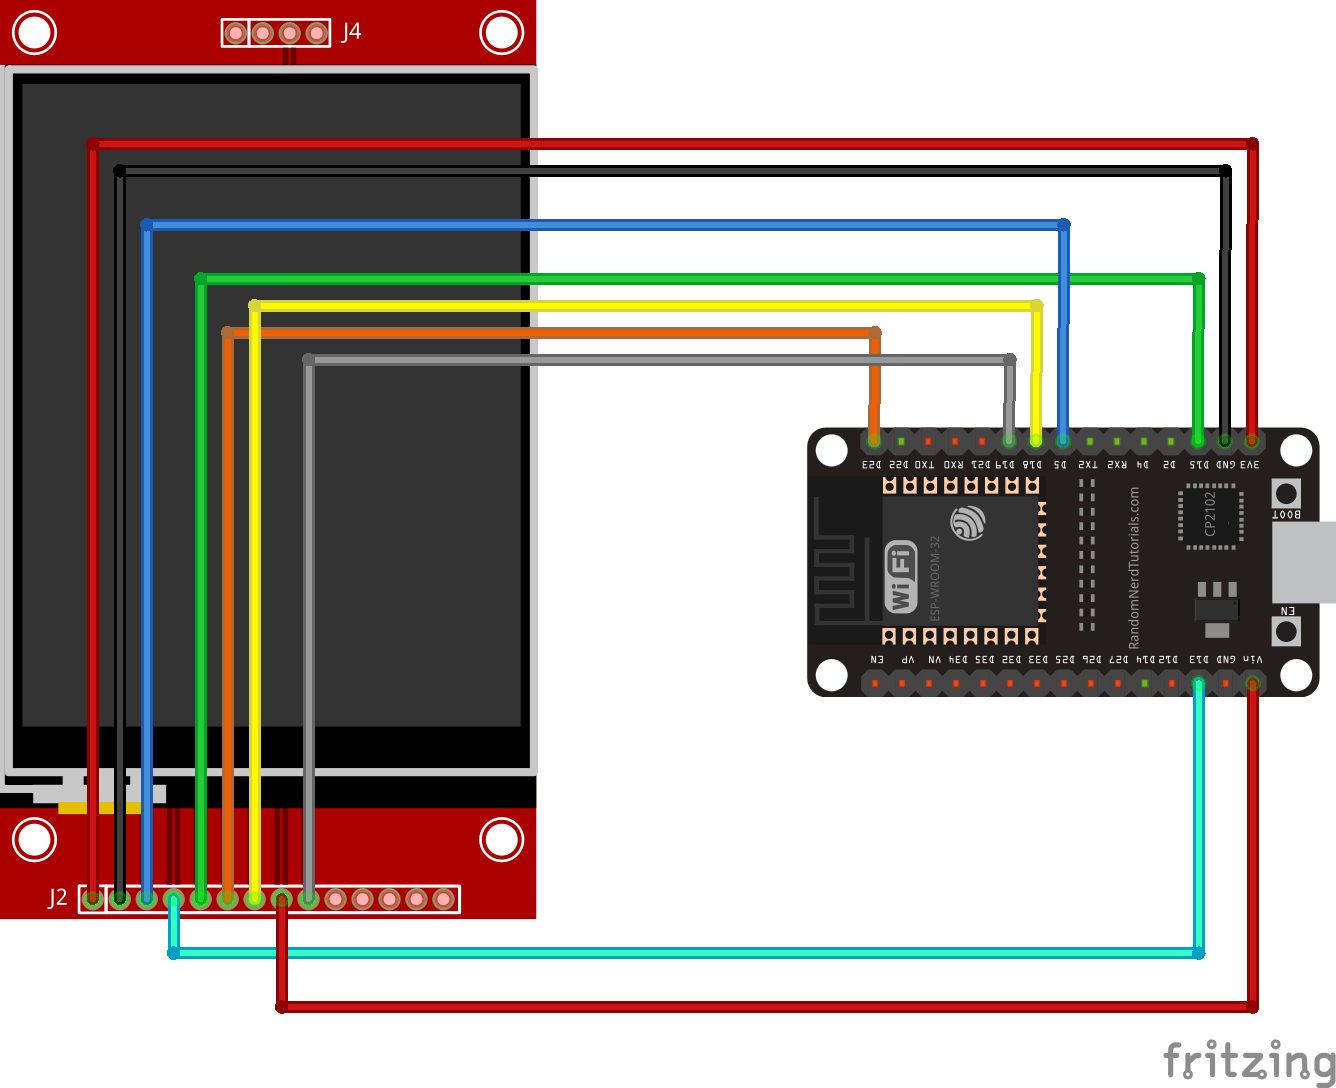
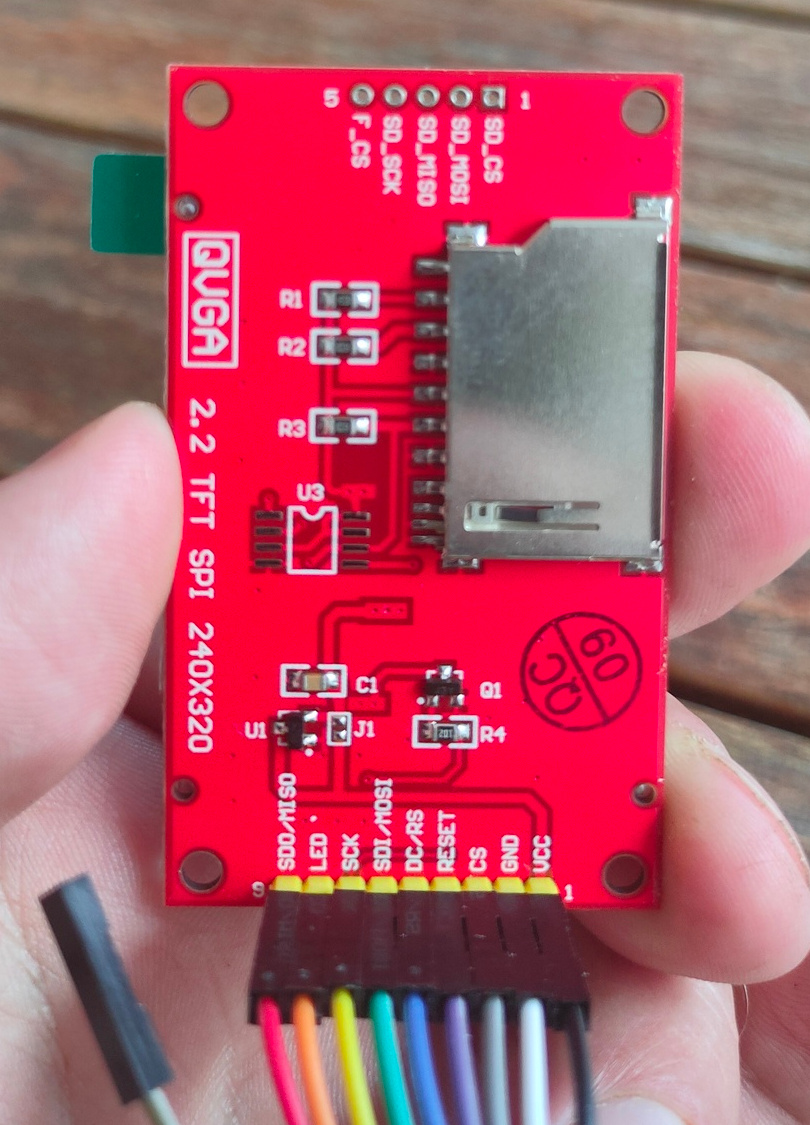
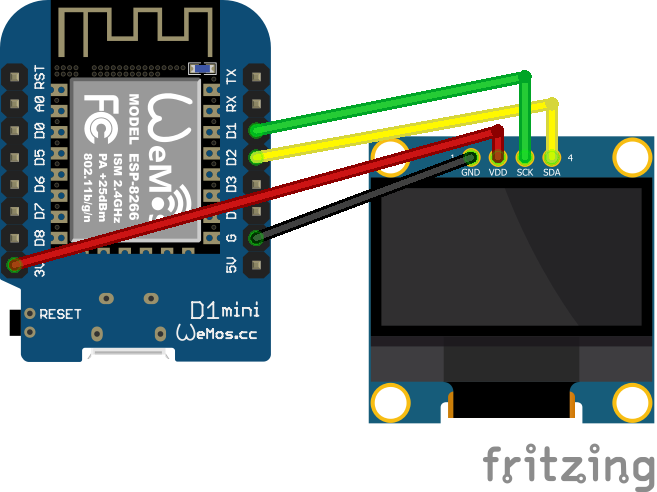
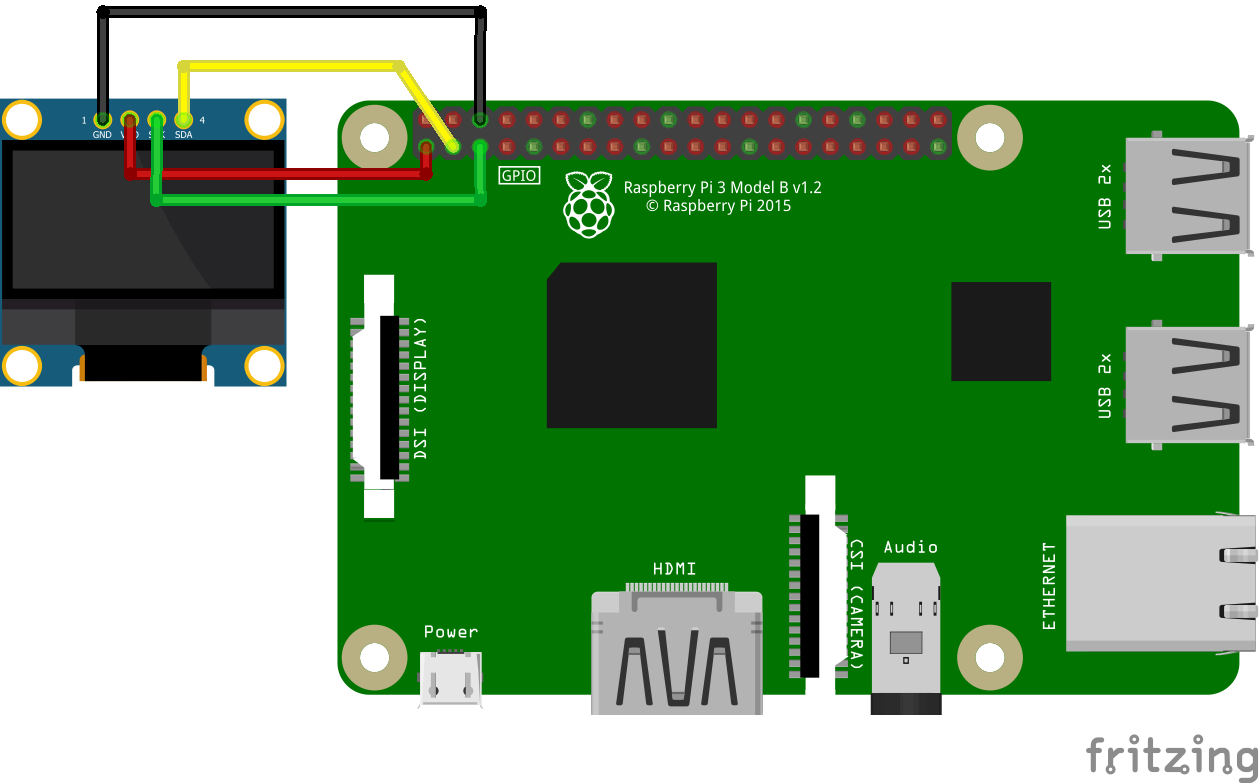
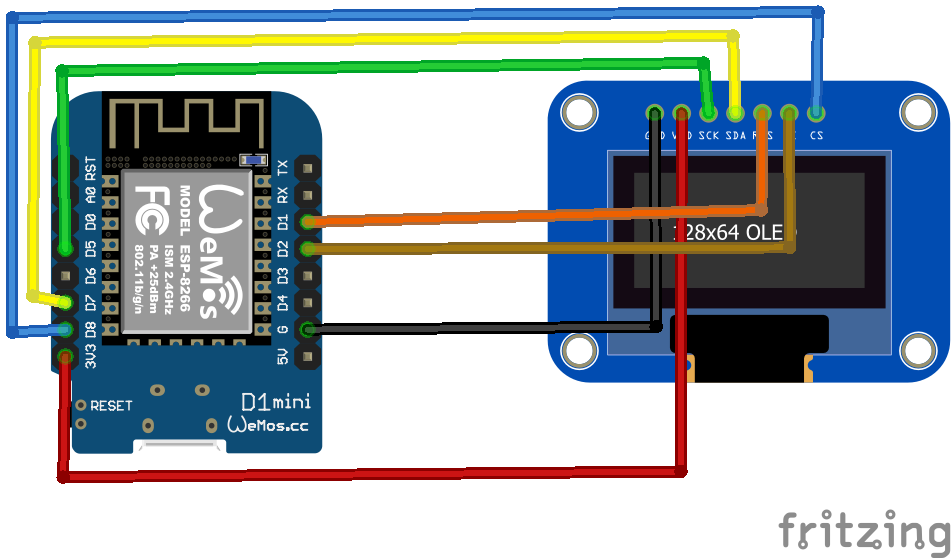
Connecting the display
I’ve connected the display as above. Note the different connections on the display. Above fritzing part has connections for touch screen! The 4 or 5 pins on the other side are for sdcard functionallity.
Now you can use the library by editing a example like demo_bouncing_boxes.py
Add and change
# At the beginning of the file
import setupmydisplay.py

Futher down comment two lines and add your own setup

        # Baud rate of 40000000 seems about the max
        #spi = SPI(1, baudrate=40000000, sck=Pin(14), mosi=Pin(13))
        #display = Display(spi, dc=Pin(4), cs=Pin(16), rst=Pin(17))
        display = setup.createMyDisplay()
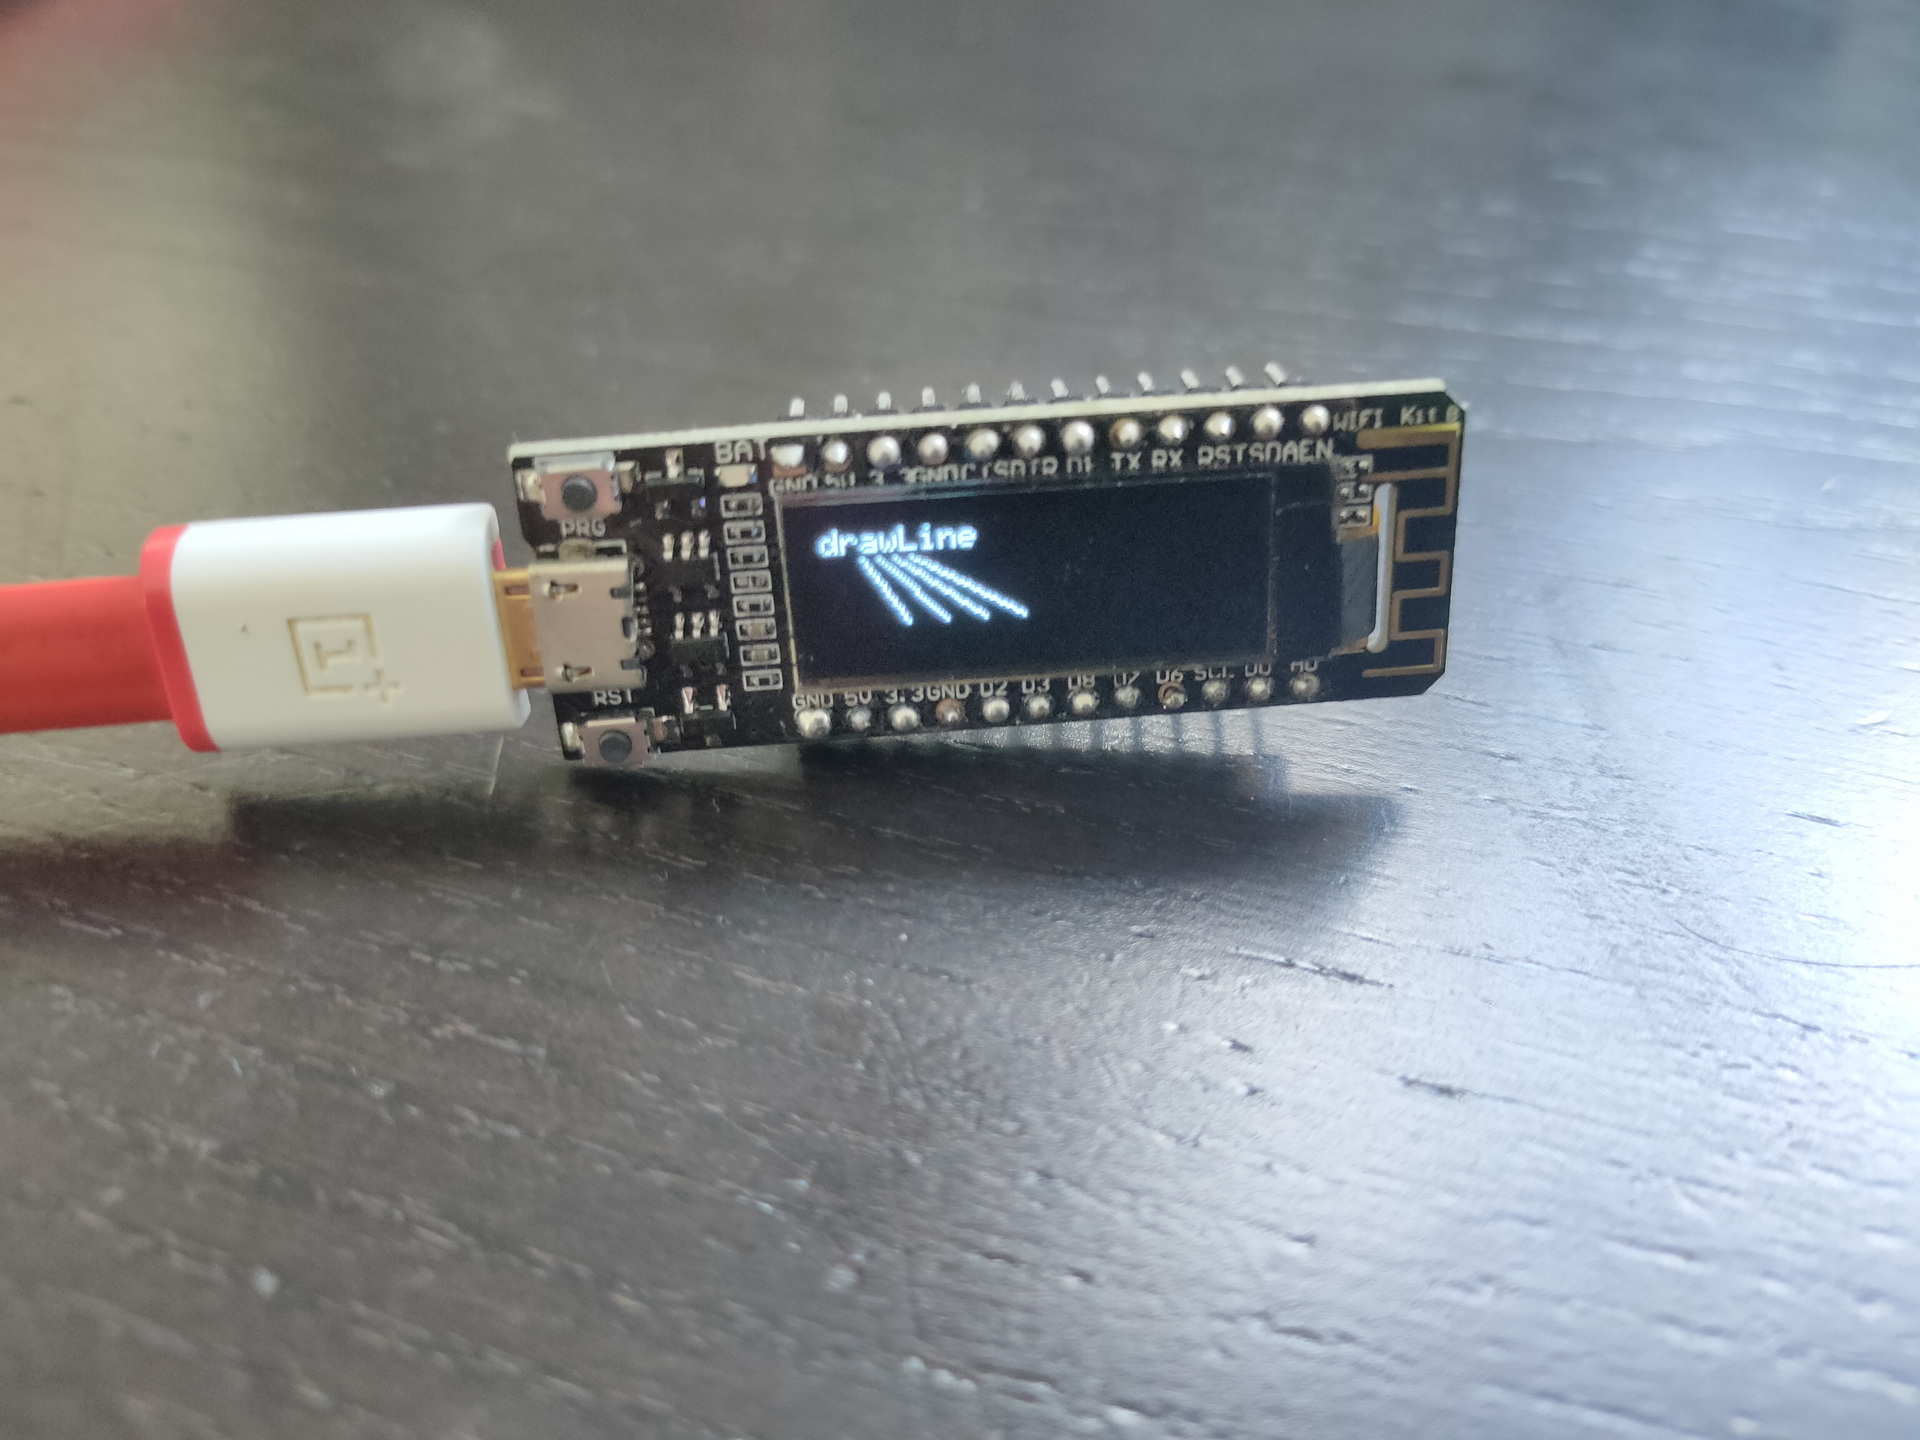
Upload to ESP32 and testing!
ampy -p /dev/ttyUSB0 put demo_bouncing_boxes.py
ampy -p /dev/ttyUSB0 put setupmydisplay.py
# connect and start
sudo screen /dev/ttyUSB0 115200
import demo_bouncing_boxes.py
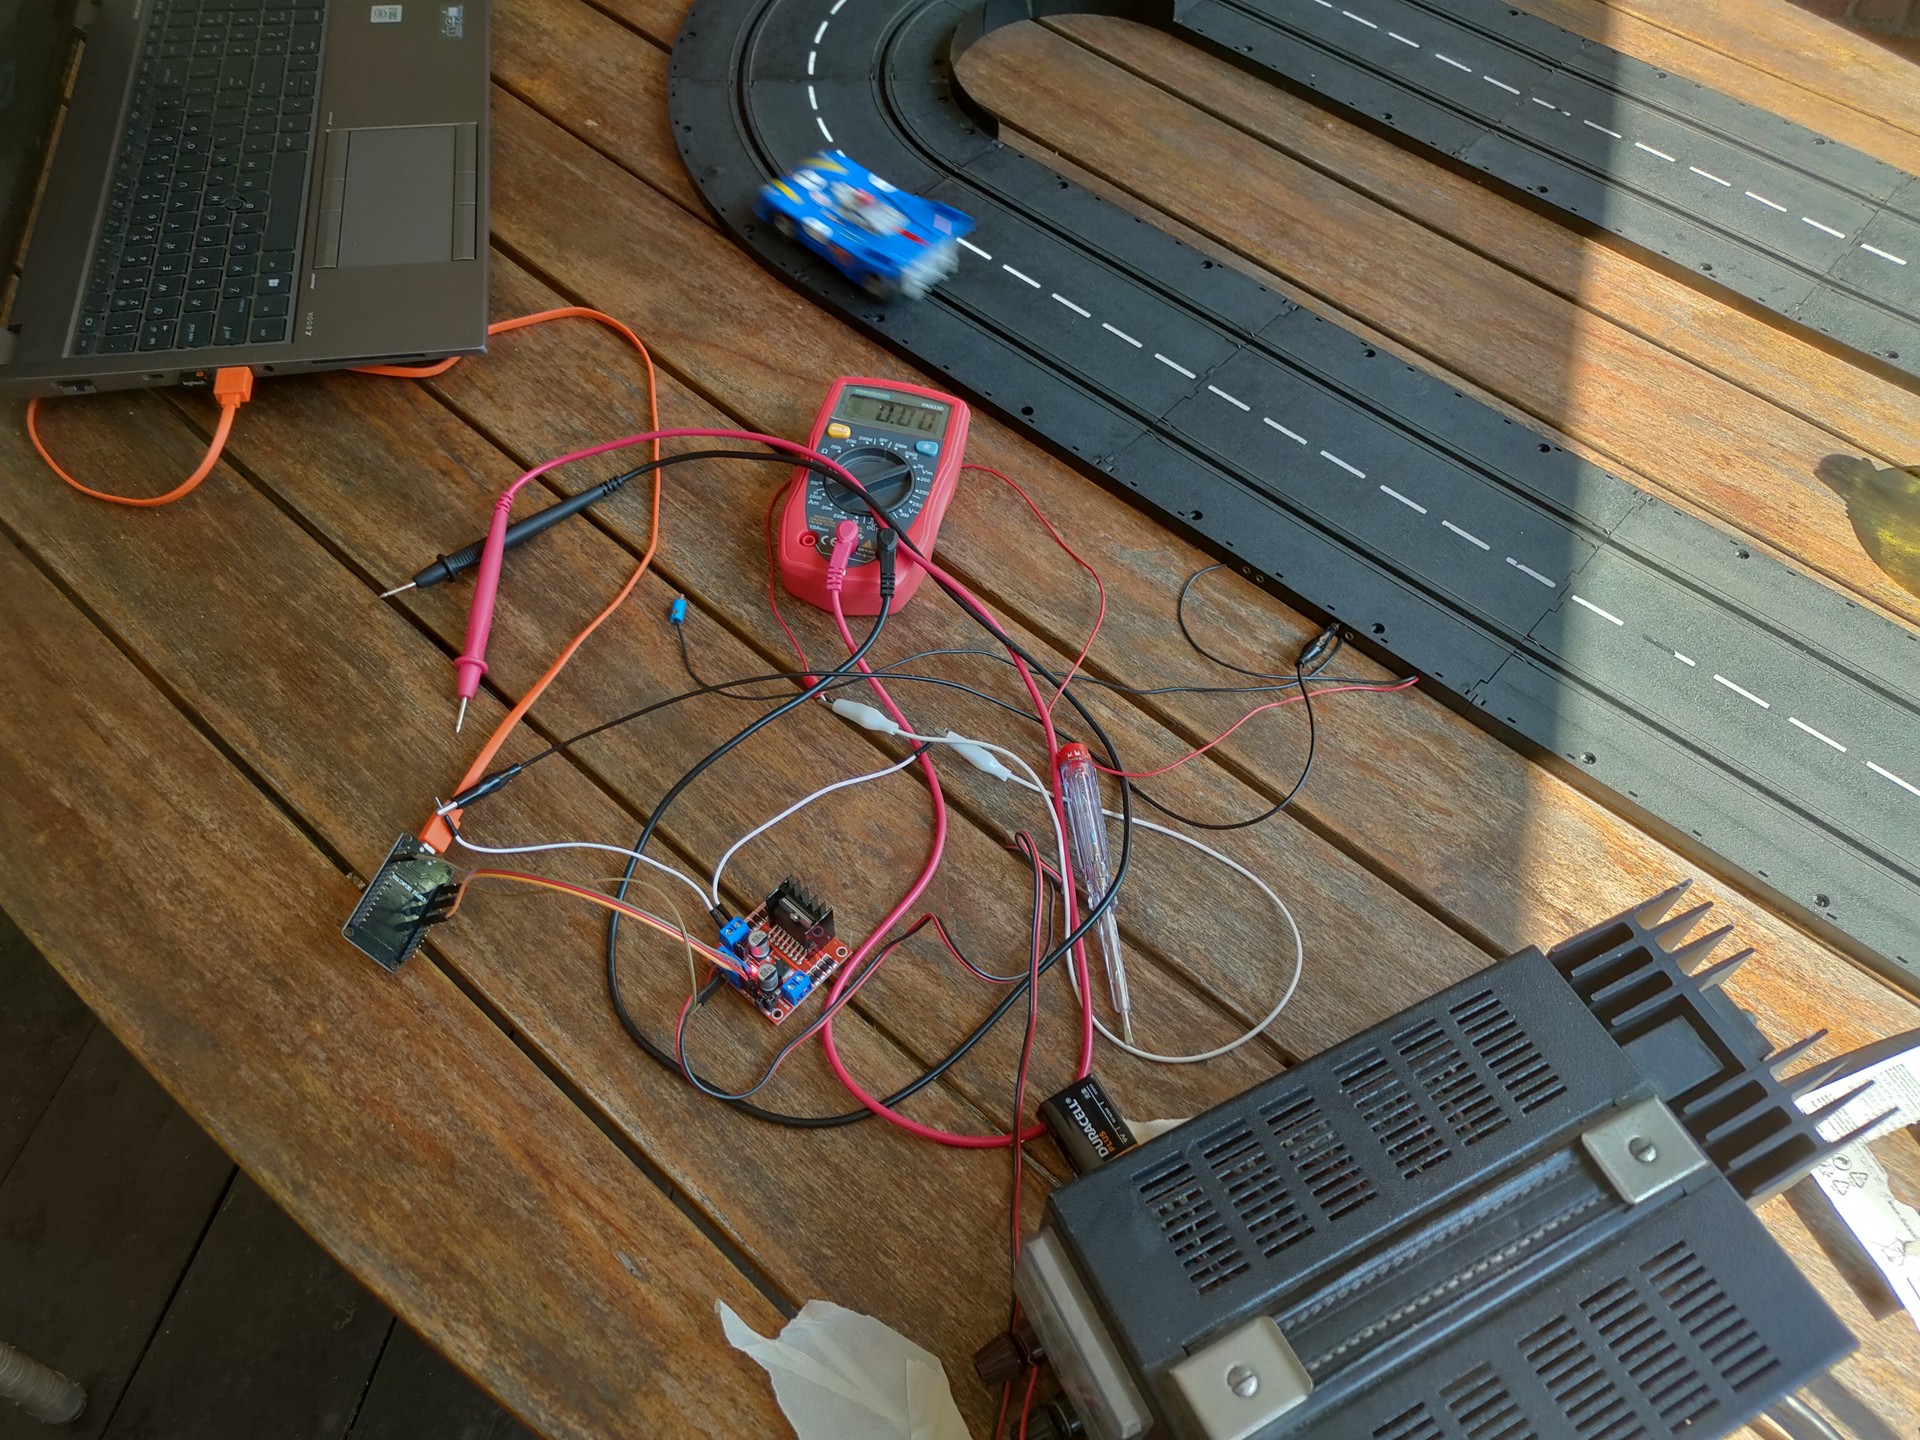
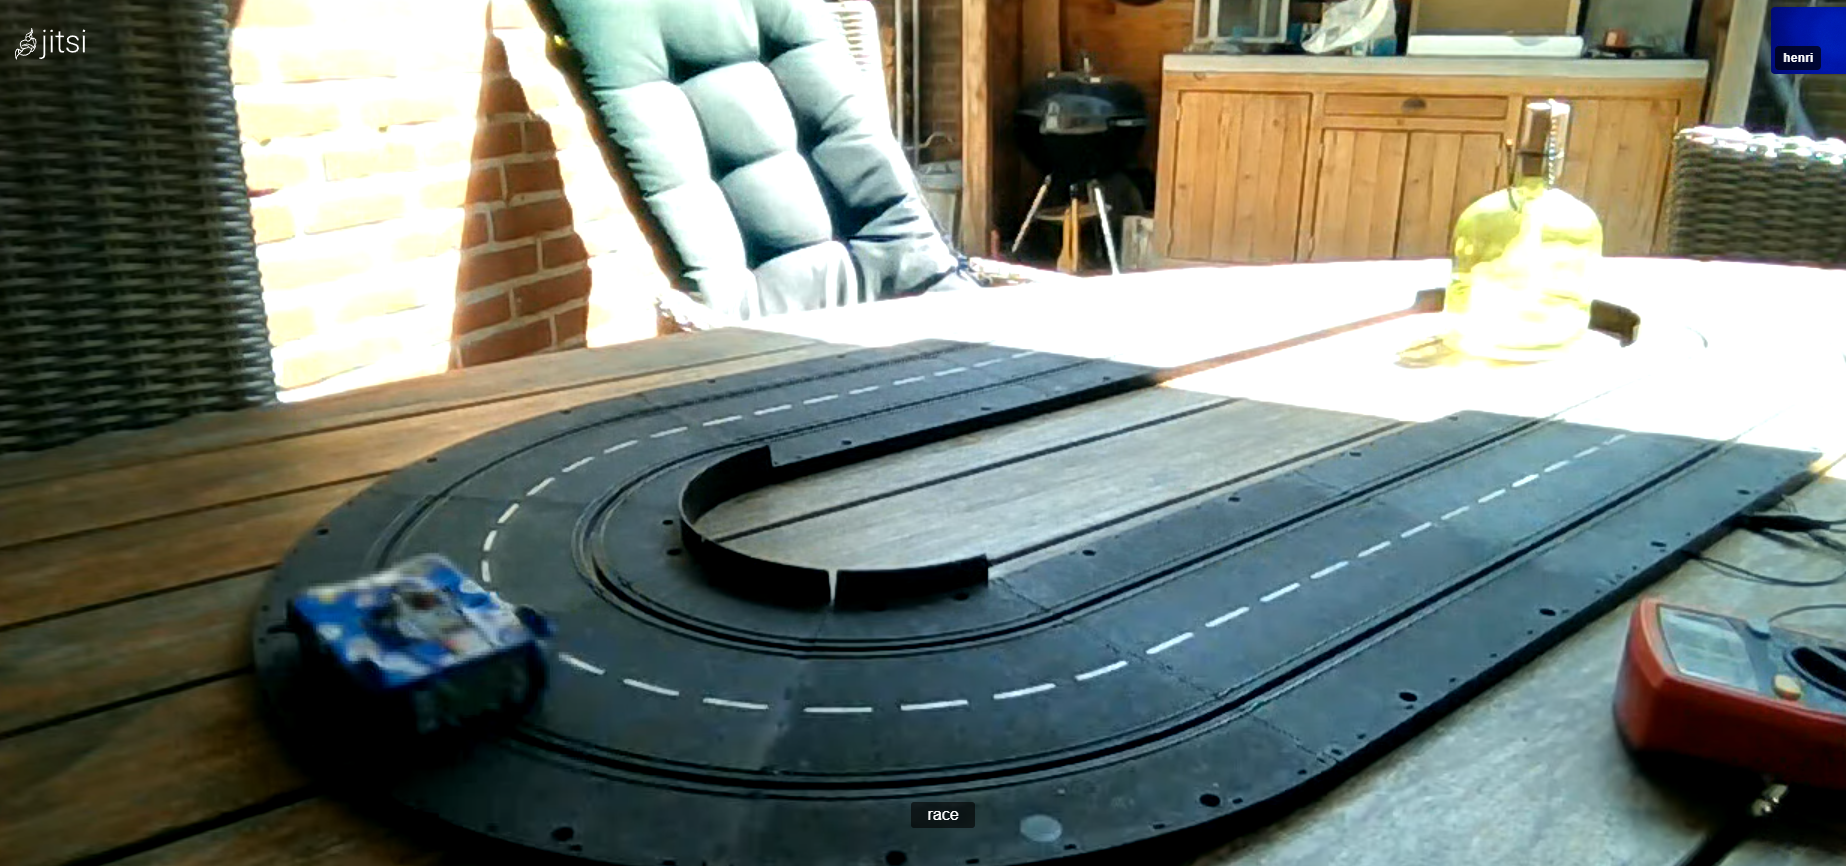
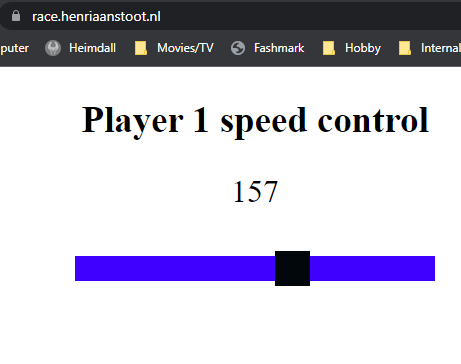
I got a vintage racetrack from a colleage a while back.
In the past i had some ideas controlling train or race tracks. For train tracks i wanted to write intelligent maneuver software. For a racetrack a web controllable race. Maybe with a webcam mounted on the car??
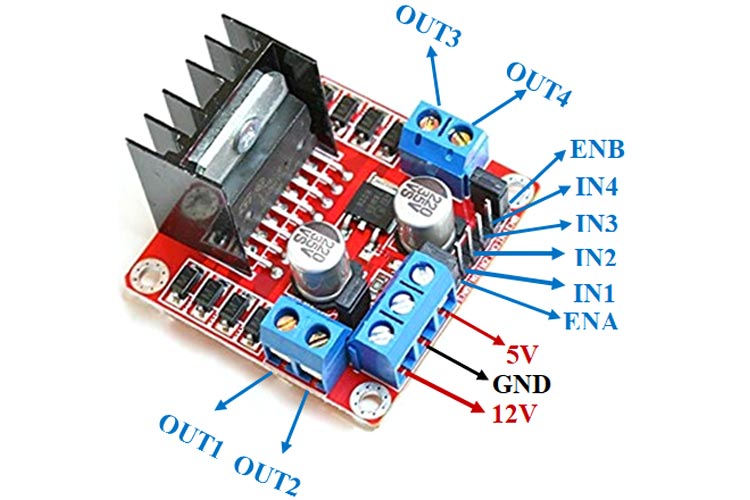
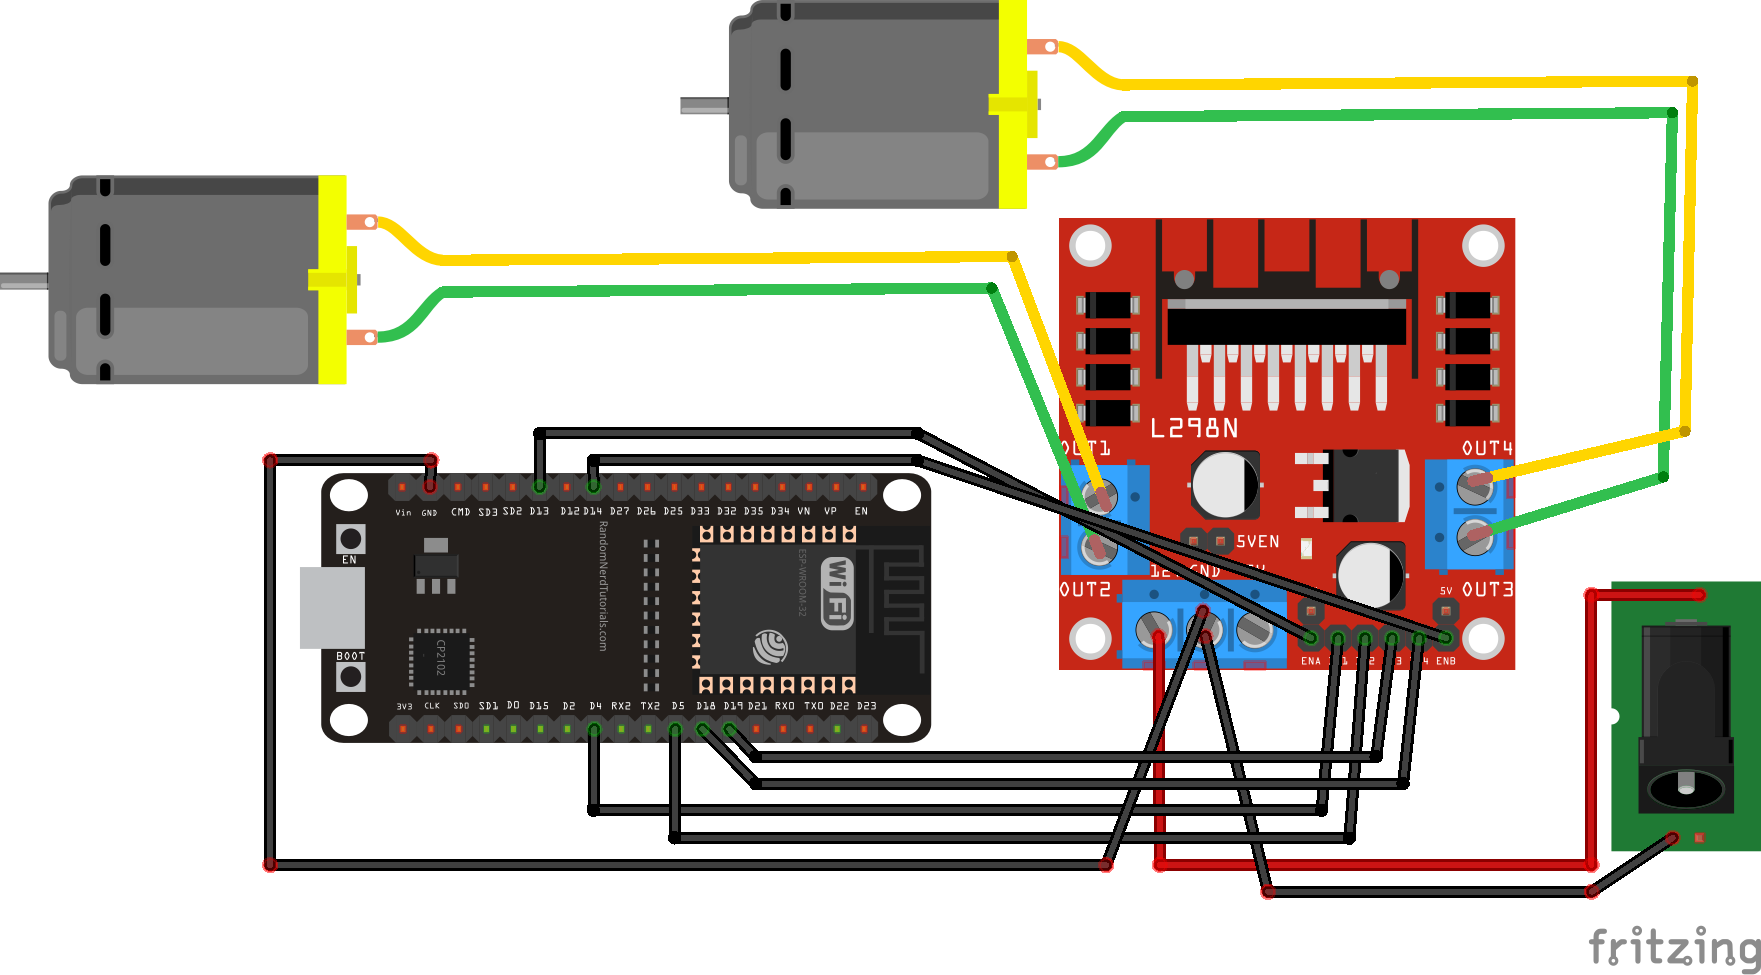
L298N – DC motor controller
So i bought a little DC motor controller (2 channels) and took a esp32.
https://arduino.esp8266.com/stable/package_esp8266com_index.json,https://raw.githubusercontent.com/damellis/attiny/ide-1.6.x-boards-manager/package_damellis_attiny_index.json
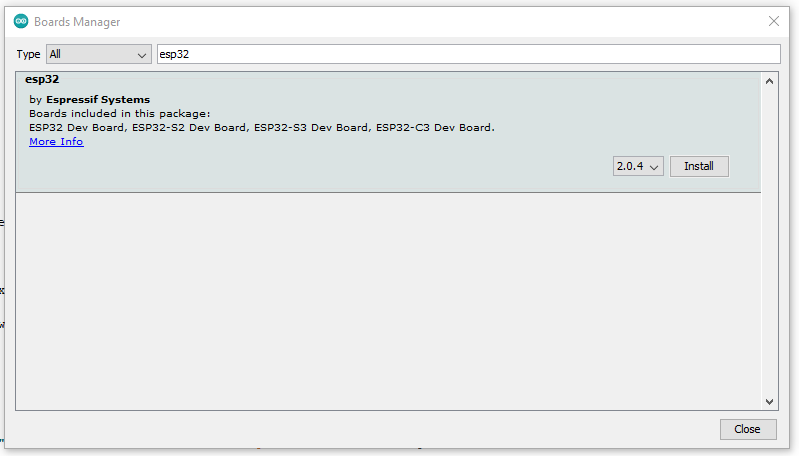
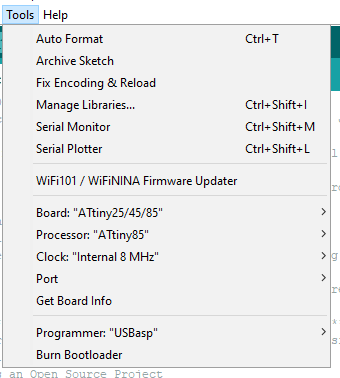
After that go to the Board manager.
Tools > Board: ..... > Board Manager
Search board, click and install.
NOTE: Some sketches require a specific version!
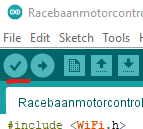
Select your board, and write/open you sketch.
First thing to do is test compiling your sketch
Press the little button on the left
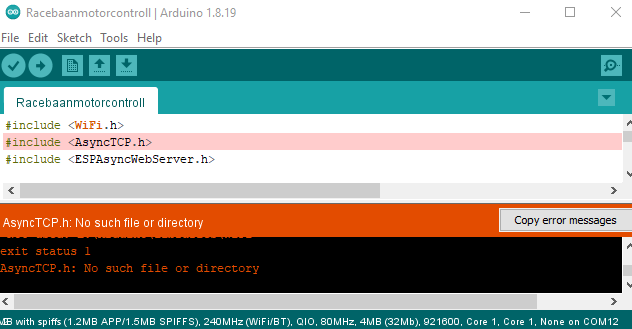
Libraries:
When you get a compile error like below, you are missing those libraries
Goto tools > Manage libraries
Search for your needed library, sometimes there are multiple which look alike. This is a trial and error approach. Sometimes it doesn’t exists and you need to upload a zip containing the library. (Sketch > Include Library > Add .zip library
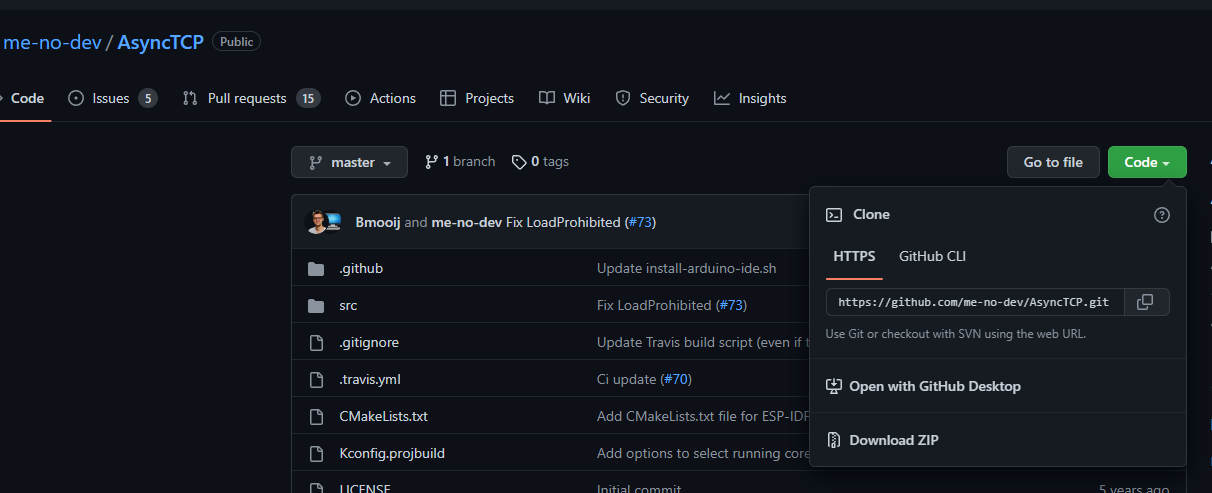
Downloading a zip containing the library
Adding the library zip file
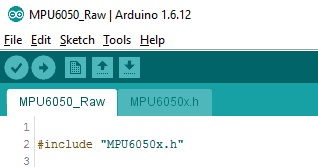
When looking at the first lines of you sketch, there are include statements like:
But sometimes there are statements without the < > characters. Then it will be a included file just for your sketch.
Note the second tab MPU6050x.h which contains specific code only for this sketch.
Redo a test recompile using the tic icon again.
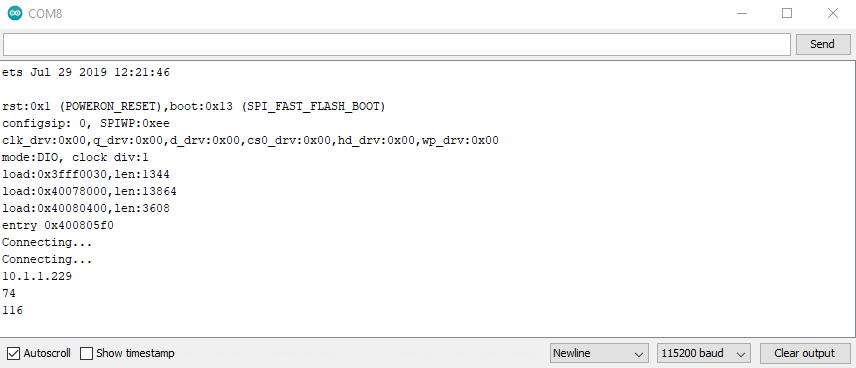
Everything okay? .. Select the correct port in Tools > Port And press the Arrowright icon to upload/flash. Note: sometimes you have to hold a button or press a little flash button on your device to flash.
esptool.py v3.3
Serial port COM8
Connecting.....
Chip is ESP32-D0WDQ6-V3 (revision 3)
Features: WiFi, BT, Dual Core, 240MHz, VRef calibration in efuse, Coding Scheme None
Crystal is 40MHz
MAC: c8:c9:a3:f9:02:d0
Uploading stub...
Running stub...
Stub running...
Changing baud rate to 921600
Changed.
Configuring flash size...
Flash will be erased from 0x00001000 to 0x00005fff...
Flash will be erased from 0x00008000 to 0x00008fff...
Flash will be erased from 0x0000e000 to 0x0000ffff...
Flash will be erased from 0x00010000 to 0x000c7fff...
Flash params set to 0x022f
Compressed 18880 bytes to 12992...
Writing at 0x00001000... (100 %)
Wrote 18880 bytes (12992 compressed) at 0x00001000 in 0.3 seconds (effective 482.8 kbit/s)...
Hash of data verified.
Compressed 3072 bytes to 128...
Writing at 0x00008000... (100 %)
Wrote 3072 bytes (128 compressed) at 0x00008000 in 0.0 seconds (effective 627.7 kbit/s)...
Hash of data verified.
Compressed 8192 bytes to 47...
Writing at 0x0000e000... (100 %)
Wrote 8192 bytes (47 compressed) at 0x0000e000 in 0.1 seconds (effective 1087.9 kbit/s)...
Hash of data verified.
Compressed 750976 bytes to 477779...
Writing at 0x00010000... (3 %)
...
...
...
Writing at 0x000bb633... (93 %)
Writing at 0x000c0acd... (96 %)
Writing at 0x000c6649... (100 %)
Wrote 750976 bytes (477779 compressed) at 0x00010000 in 6.3 seconds (effective 947.4 kbit/s)...
Hash of data verified.

Leaving...
Hard resetting via RTS pin...
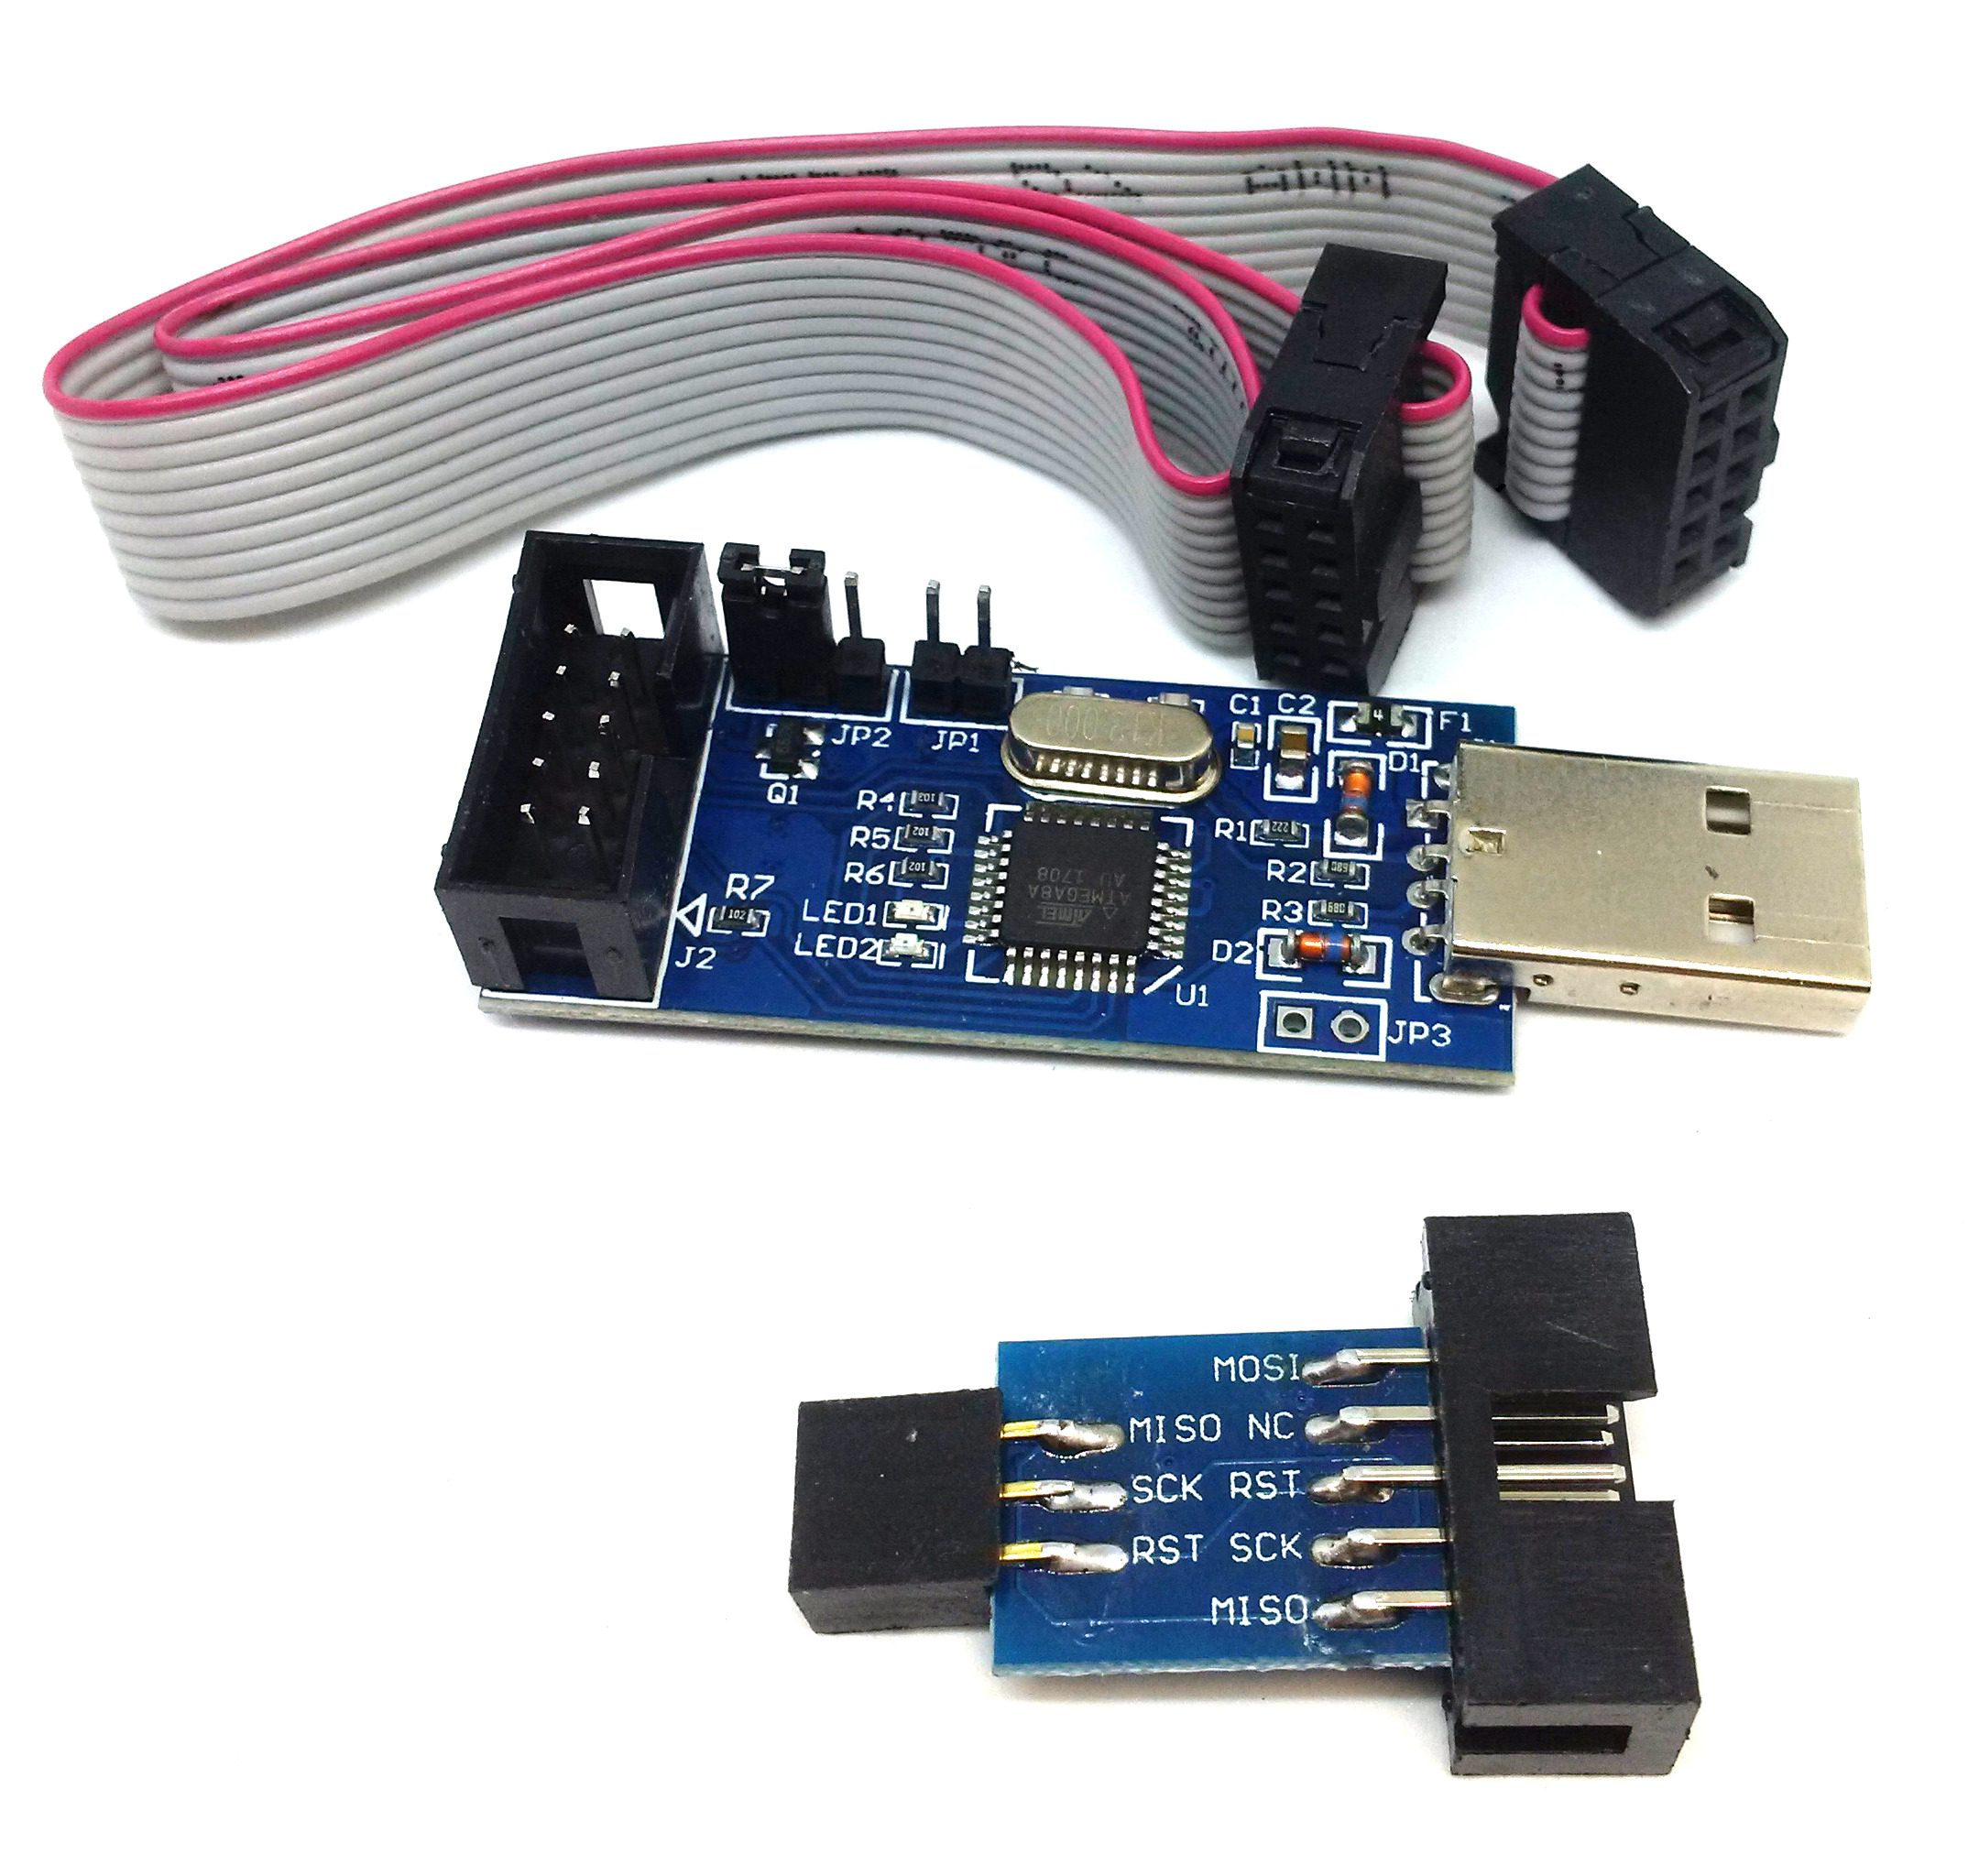
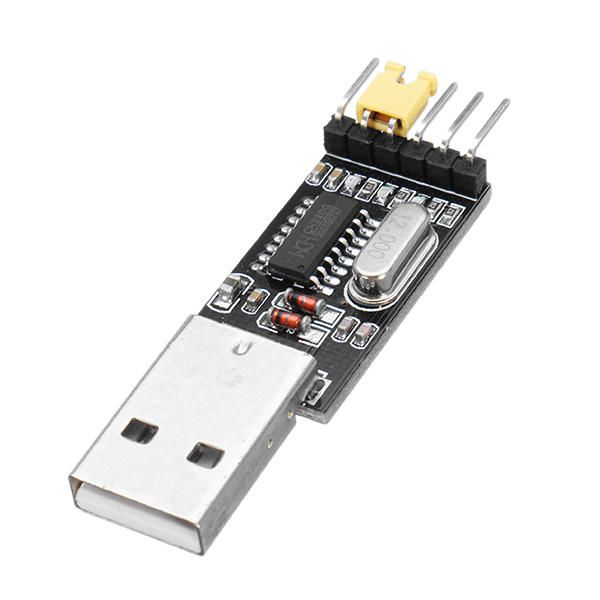
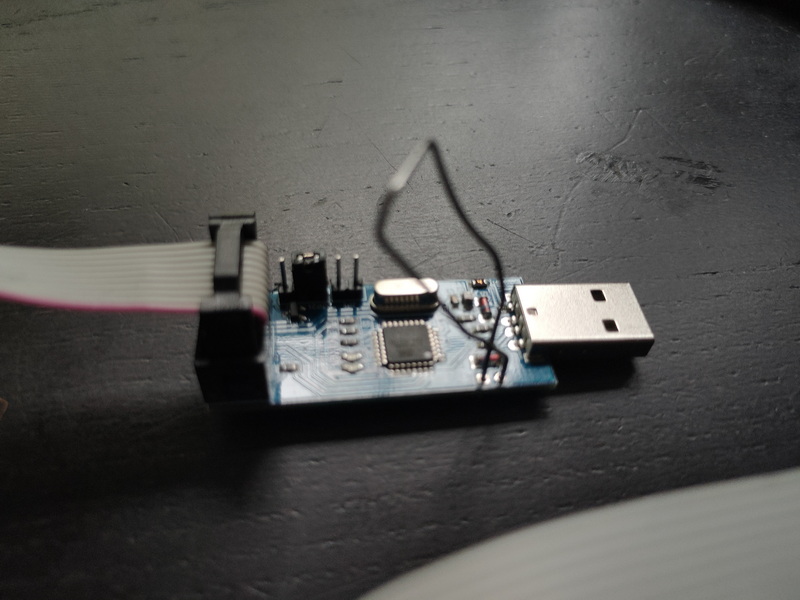
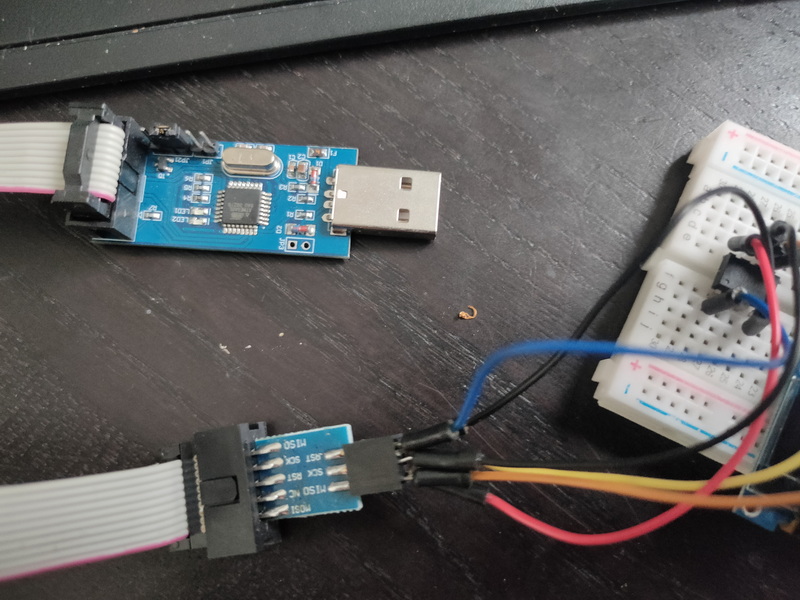
Most of the boards you can connect via micro-usb. Sometimes you need adaptors like:
Attiny programmerttl uart interface
TIPS ‘n tricks:
Open same file in another editor, so you can compare for example the top (declarations) and futher down the code. Else you could be ending up scolling up/down all day long. And probably forgetting how a variablename was exacly spelled.
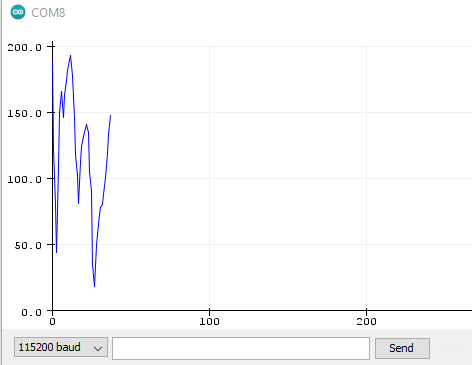
Use serial monitor! When debugging this is a valuable tool. Enter statements into you code, which prints debugging info to a serial monitoring window when your device is still hookedup to your PC.
Example printing connected IP and values registered
Other obvious tips: Add comment lines (documentation) Use variable names which make sense! ( Hard to find what aaaa() does, or what tmp-a is, but LastTempValue says a lot more)
Almost … friday will be the day i’ll attend May Contain Hackers. Besides the awesome villages and talks.
UPDATE: 20220727 UPDATE: 20220812
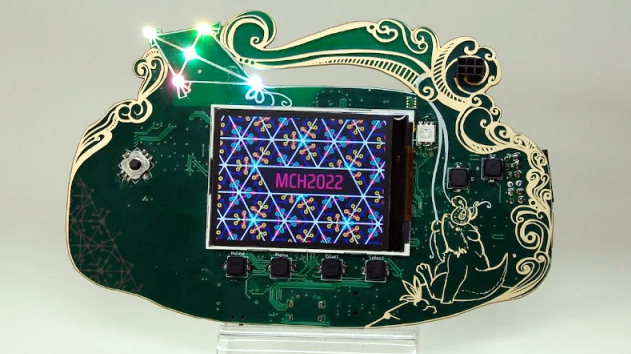
You get a hackable badge, this one is more amazing as previous versions.
I can’t wait to have a go at this cool gadget. I personally could do without the pcb fancy design.
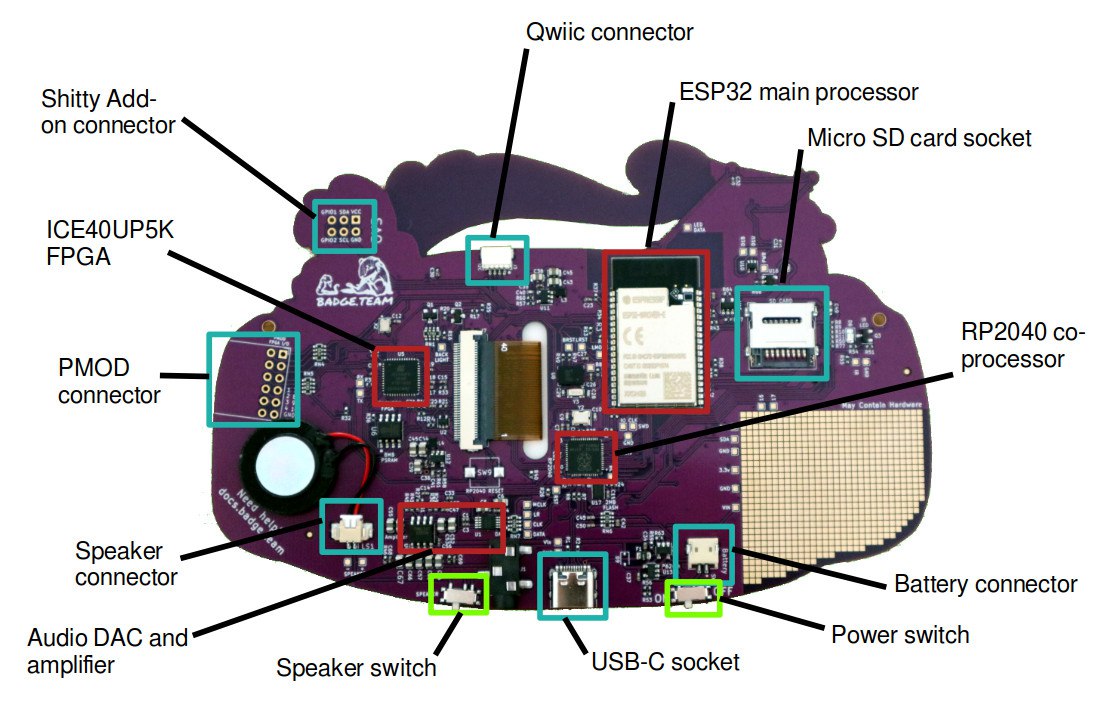
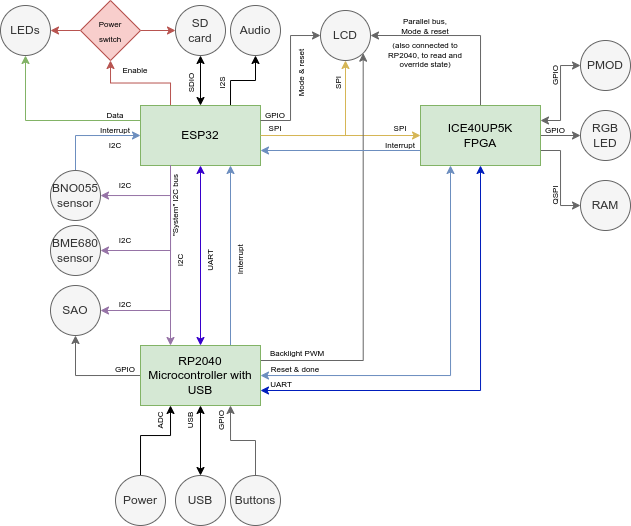
Espressif ESP32 Wrover-E with 16MB of flash storage and paired with 8MB of PSRAM, for front-end badge computing and compatibility with the badge.team ecosystem back to the 2017 SHA badge.
Lattice ICE40UP5K FPGA for hardware-accelerated graphics and user FPGA hardware designs.
Raspberry Pi RP2040 for advanced USB communication and board management.
2Ah LiPo battery to give you a full day of fun on a charge.
16-bit DAC with stereo output to headphone socket, onboard mono speaker.
ILI9341 2.2 inch TFT display with a 240 by 320 pixel resolution.
Bosch BNO055 orientation sensor.
Bosch BME680 environmental sensor.
The usual array of addressable LEDs.
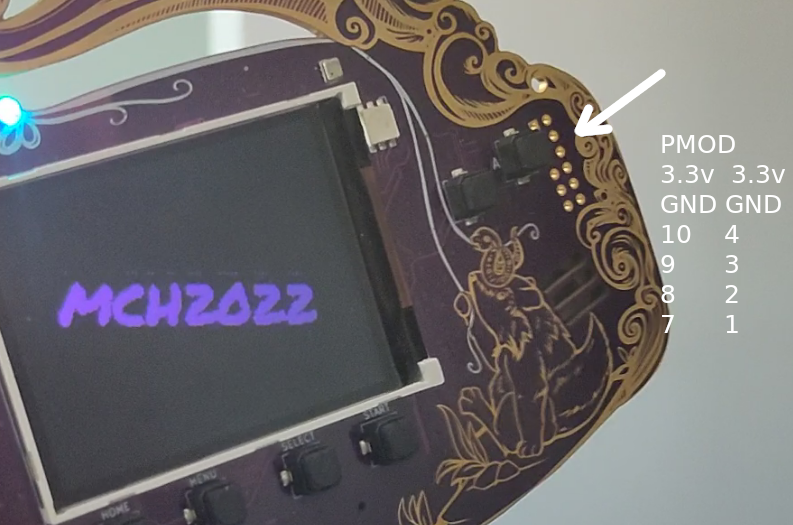
SAO and Qwiic expansion connectors, FPGA PMOD expansion, plus onboard prototyping area.
Downloadable apps, micro python, Arduino ide programming. All kinds of GPIO pins, leds buttons, sound. Check out https://hatchery.badge.team/
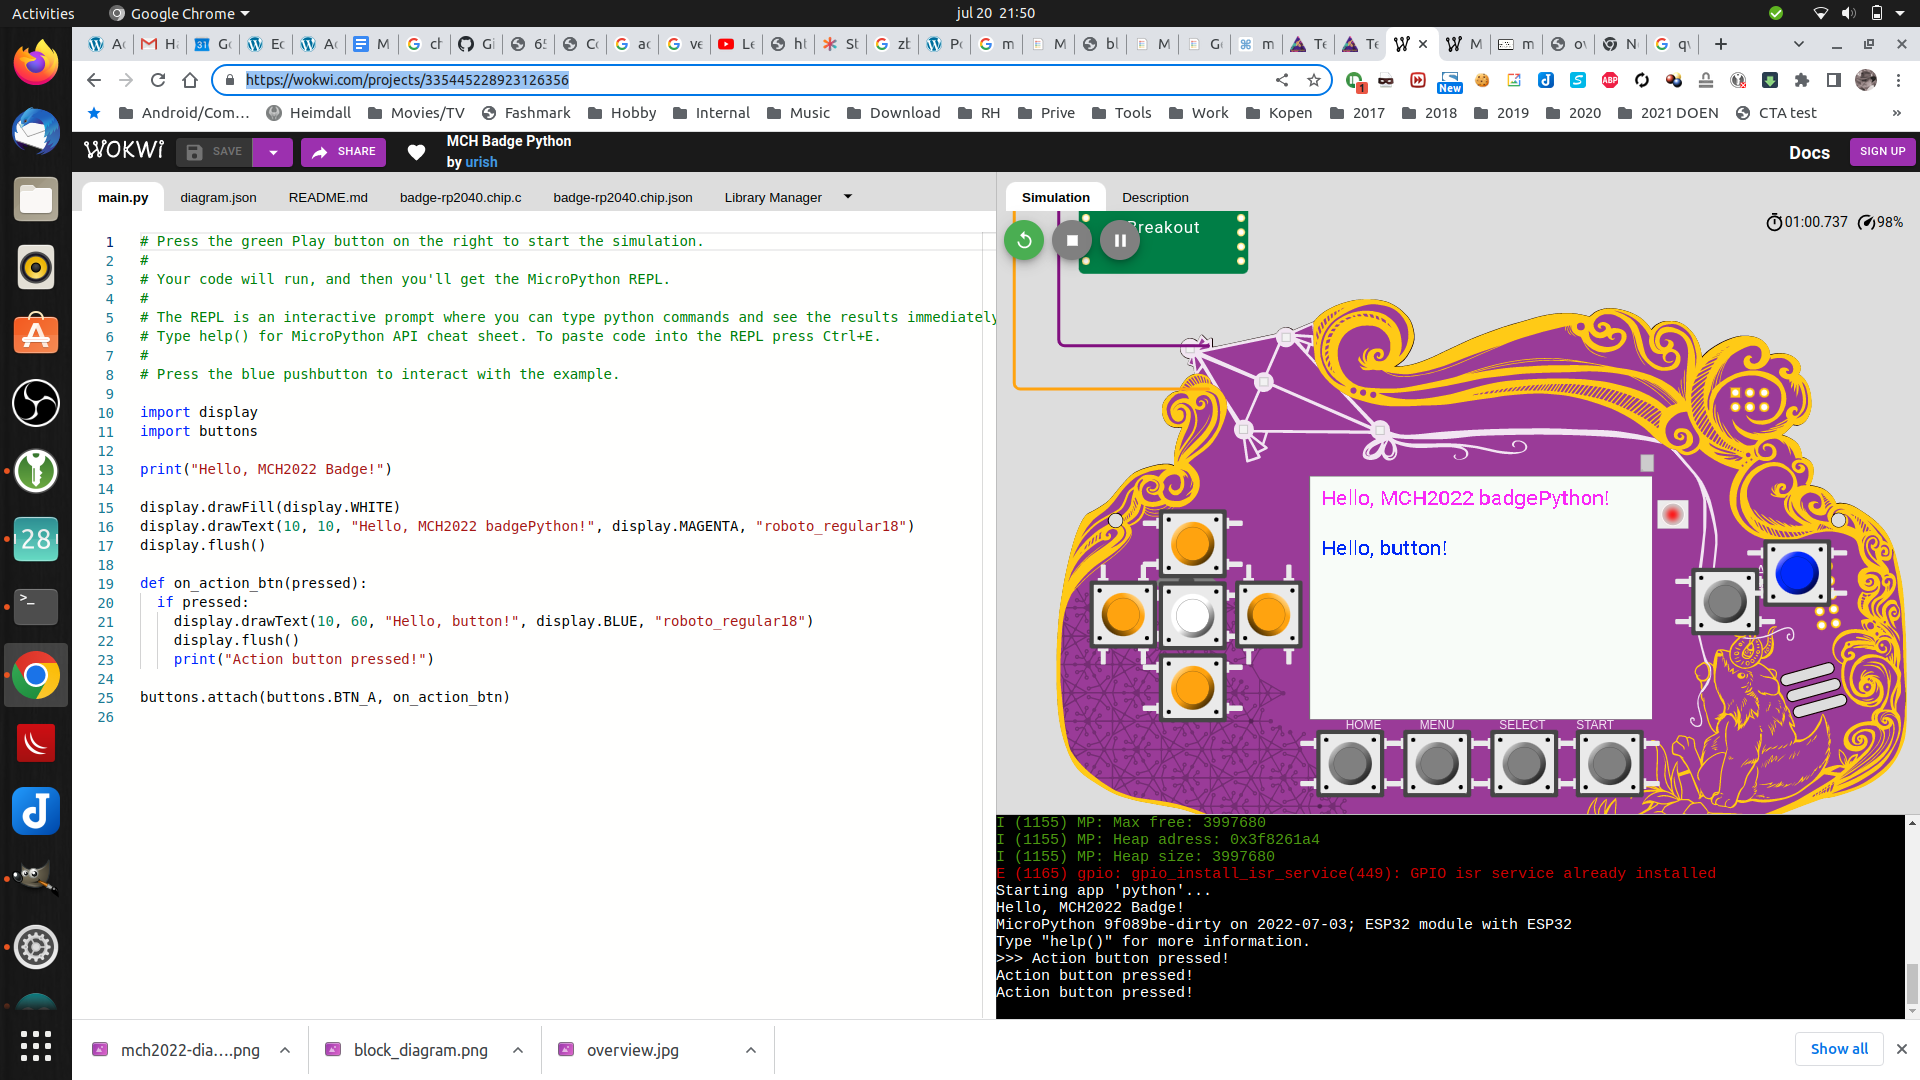
You can play with this virtually here! https://wokwi.com/projects/335445228923126356
So much potential! Great start for a DIY project.
I won’t post about the workings, thats all well documented online. I shall post about the hacks/findings i personally did.
UPDATE: 20220727 Made a micropython program to keep your NameTag level to the ground (Better version)
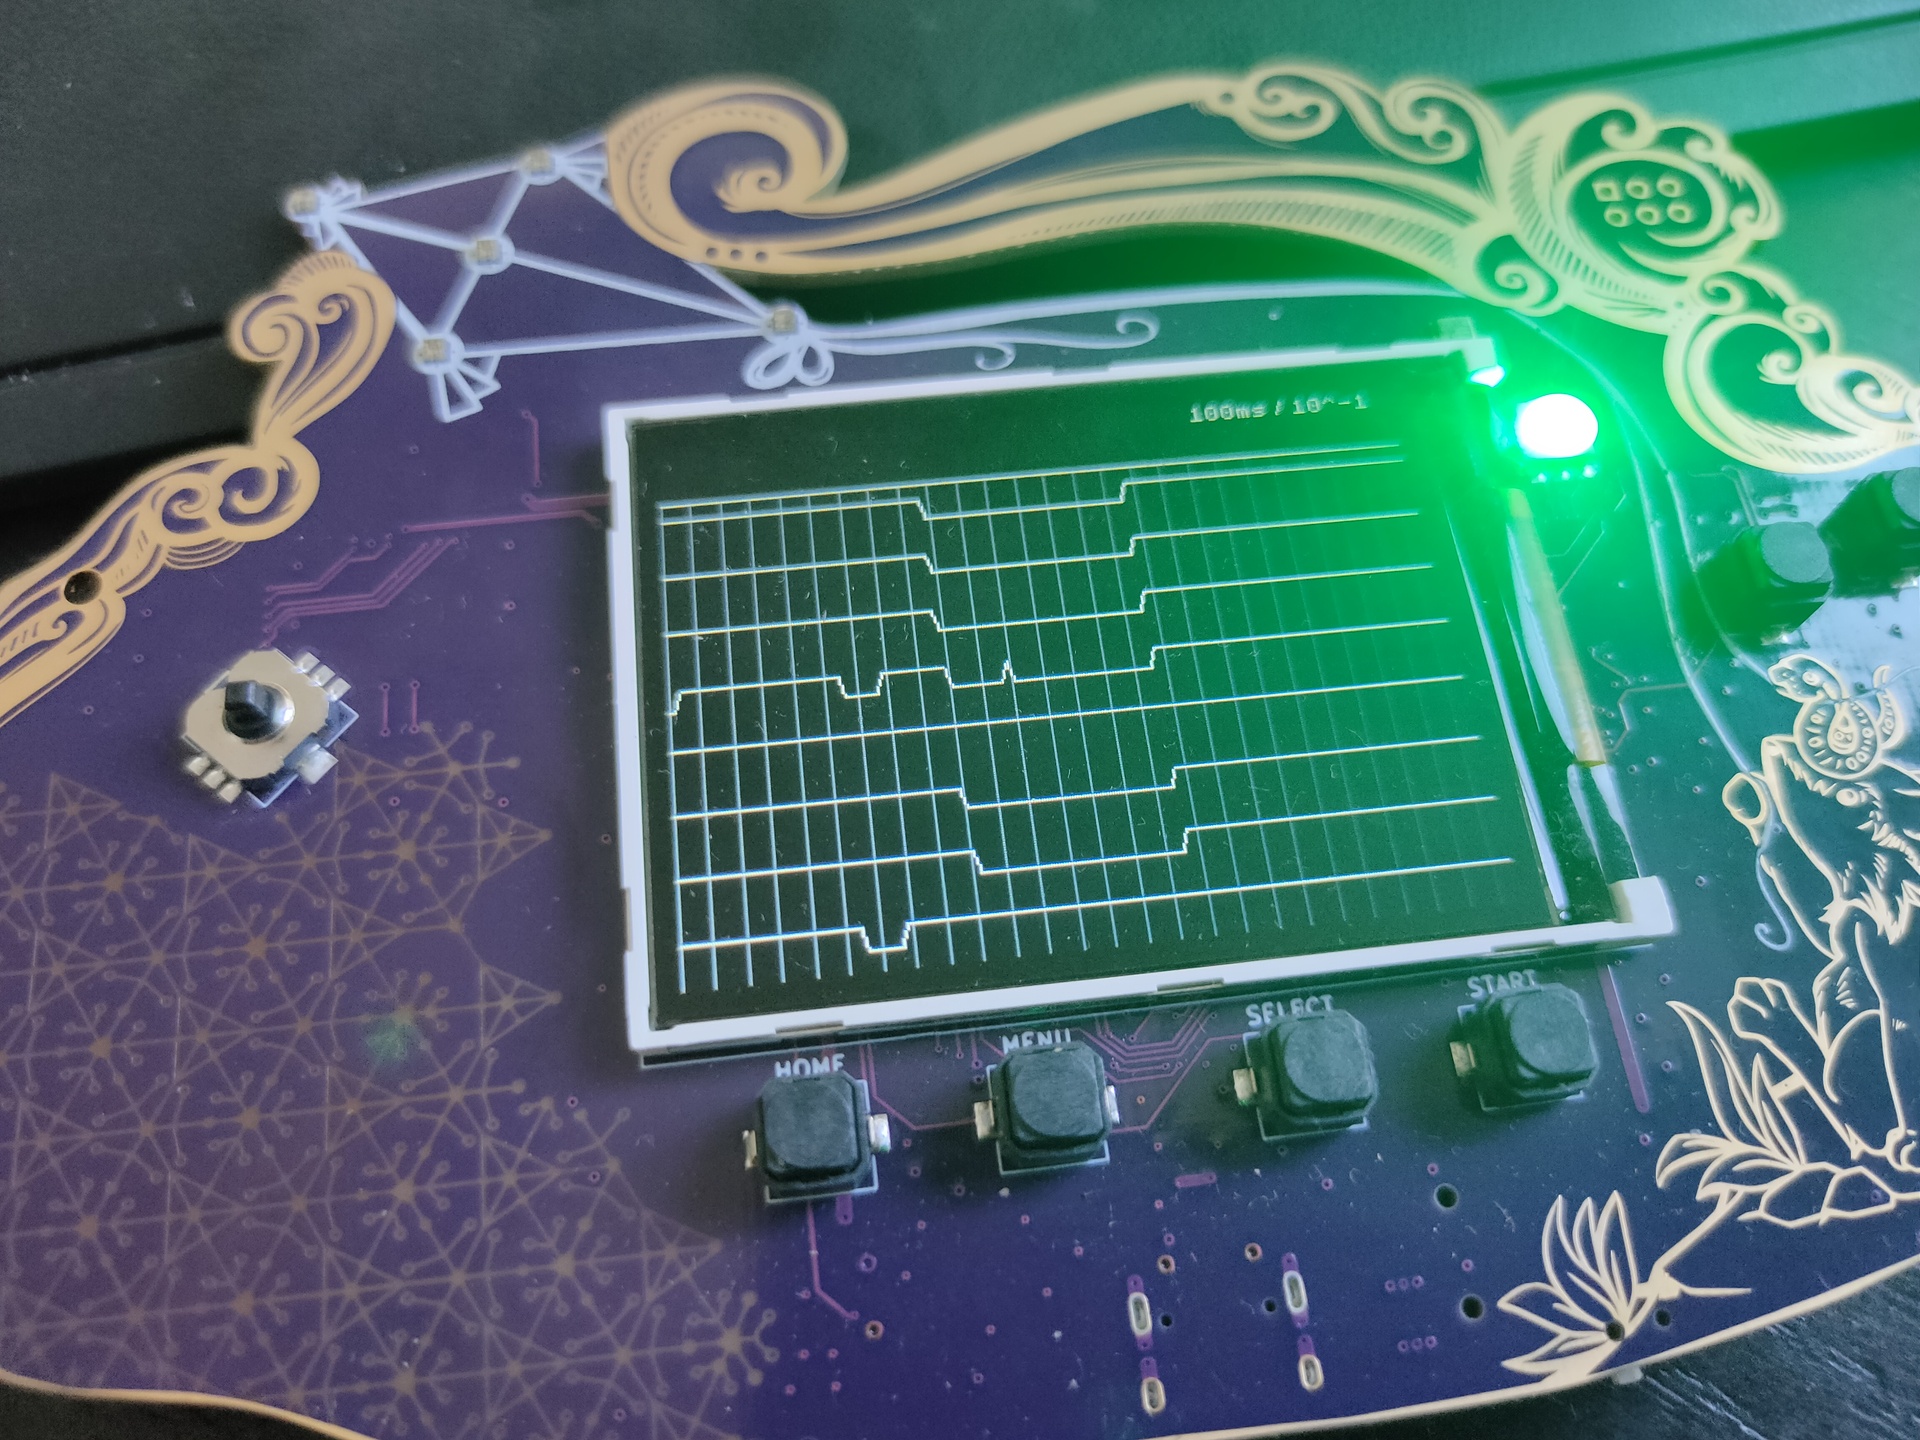
UPDATE: 20220812
Someone made a 8bit logic analyser using the pmod connector !
Below some examples and connection diagrams to control displays. More code and complete schematics will be added on this page or on a separate projects page.
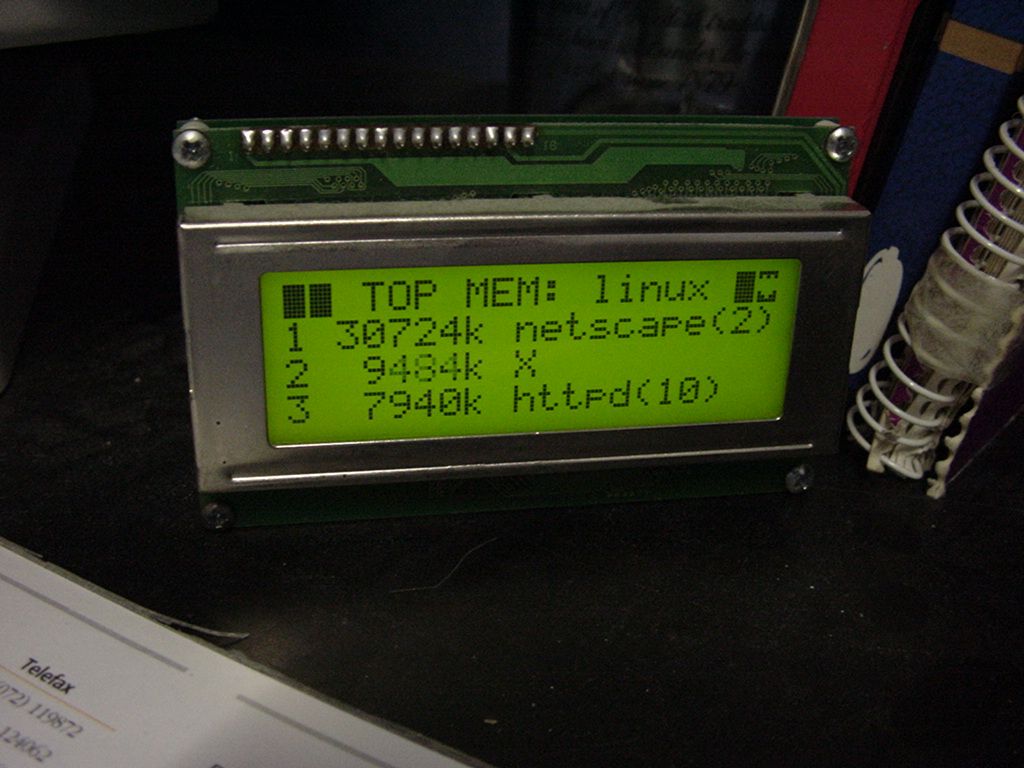
UPDATE 20230119 Cost of 20×4 display in 1998
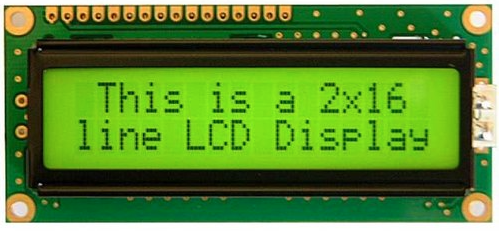
LCD
I’ve used a LCD display like this (HITACHI HD44780) on my PC in the 90s, and also written code to use this as a monitoring device on my amiga.
On Linux i used LcdProc – This module also was equiped with a serial connector
Now (2023) it is 8 euros! When bought now fl to euro 98 Euro or 107 $
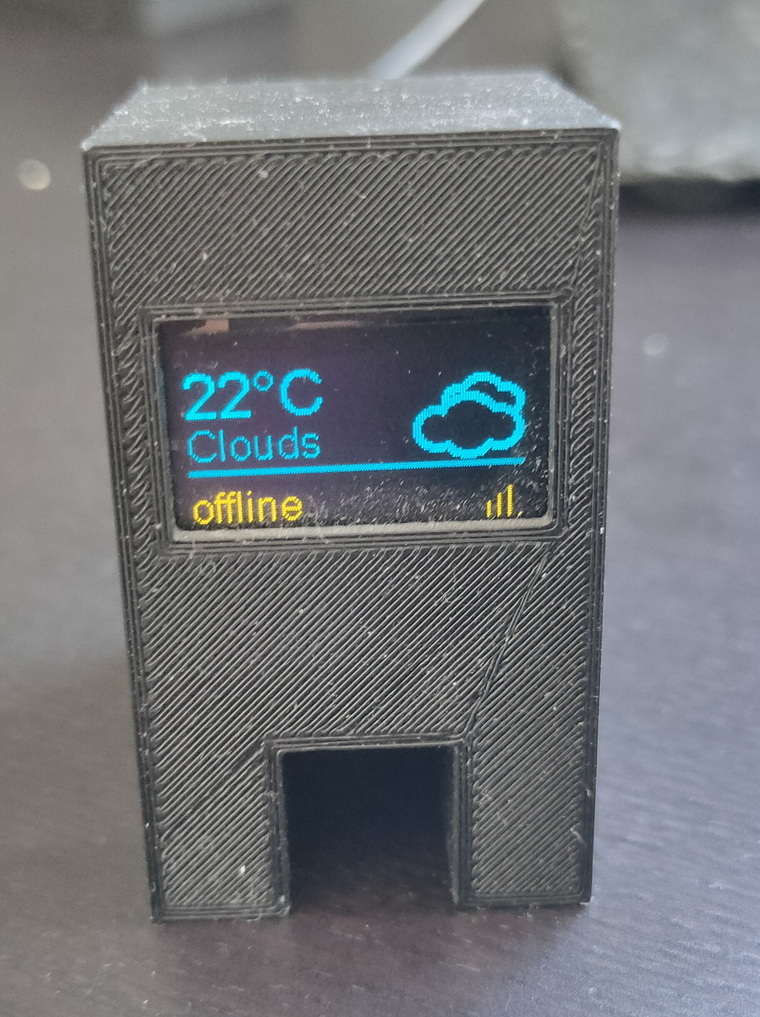
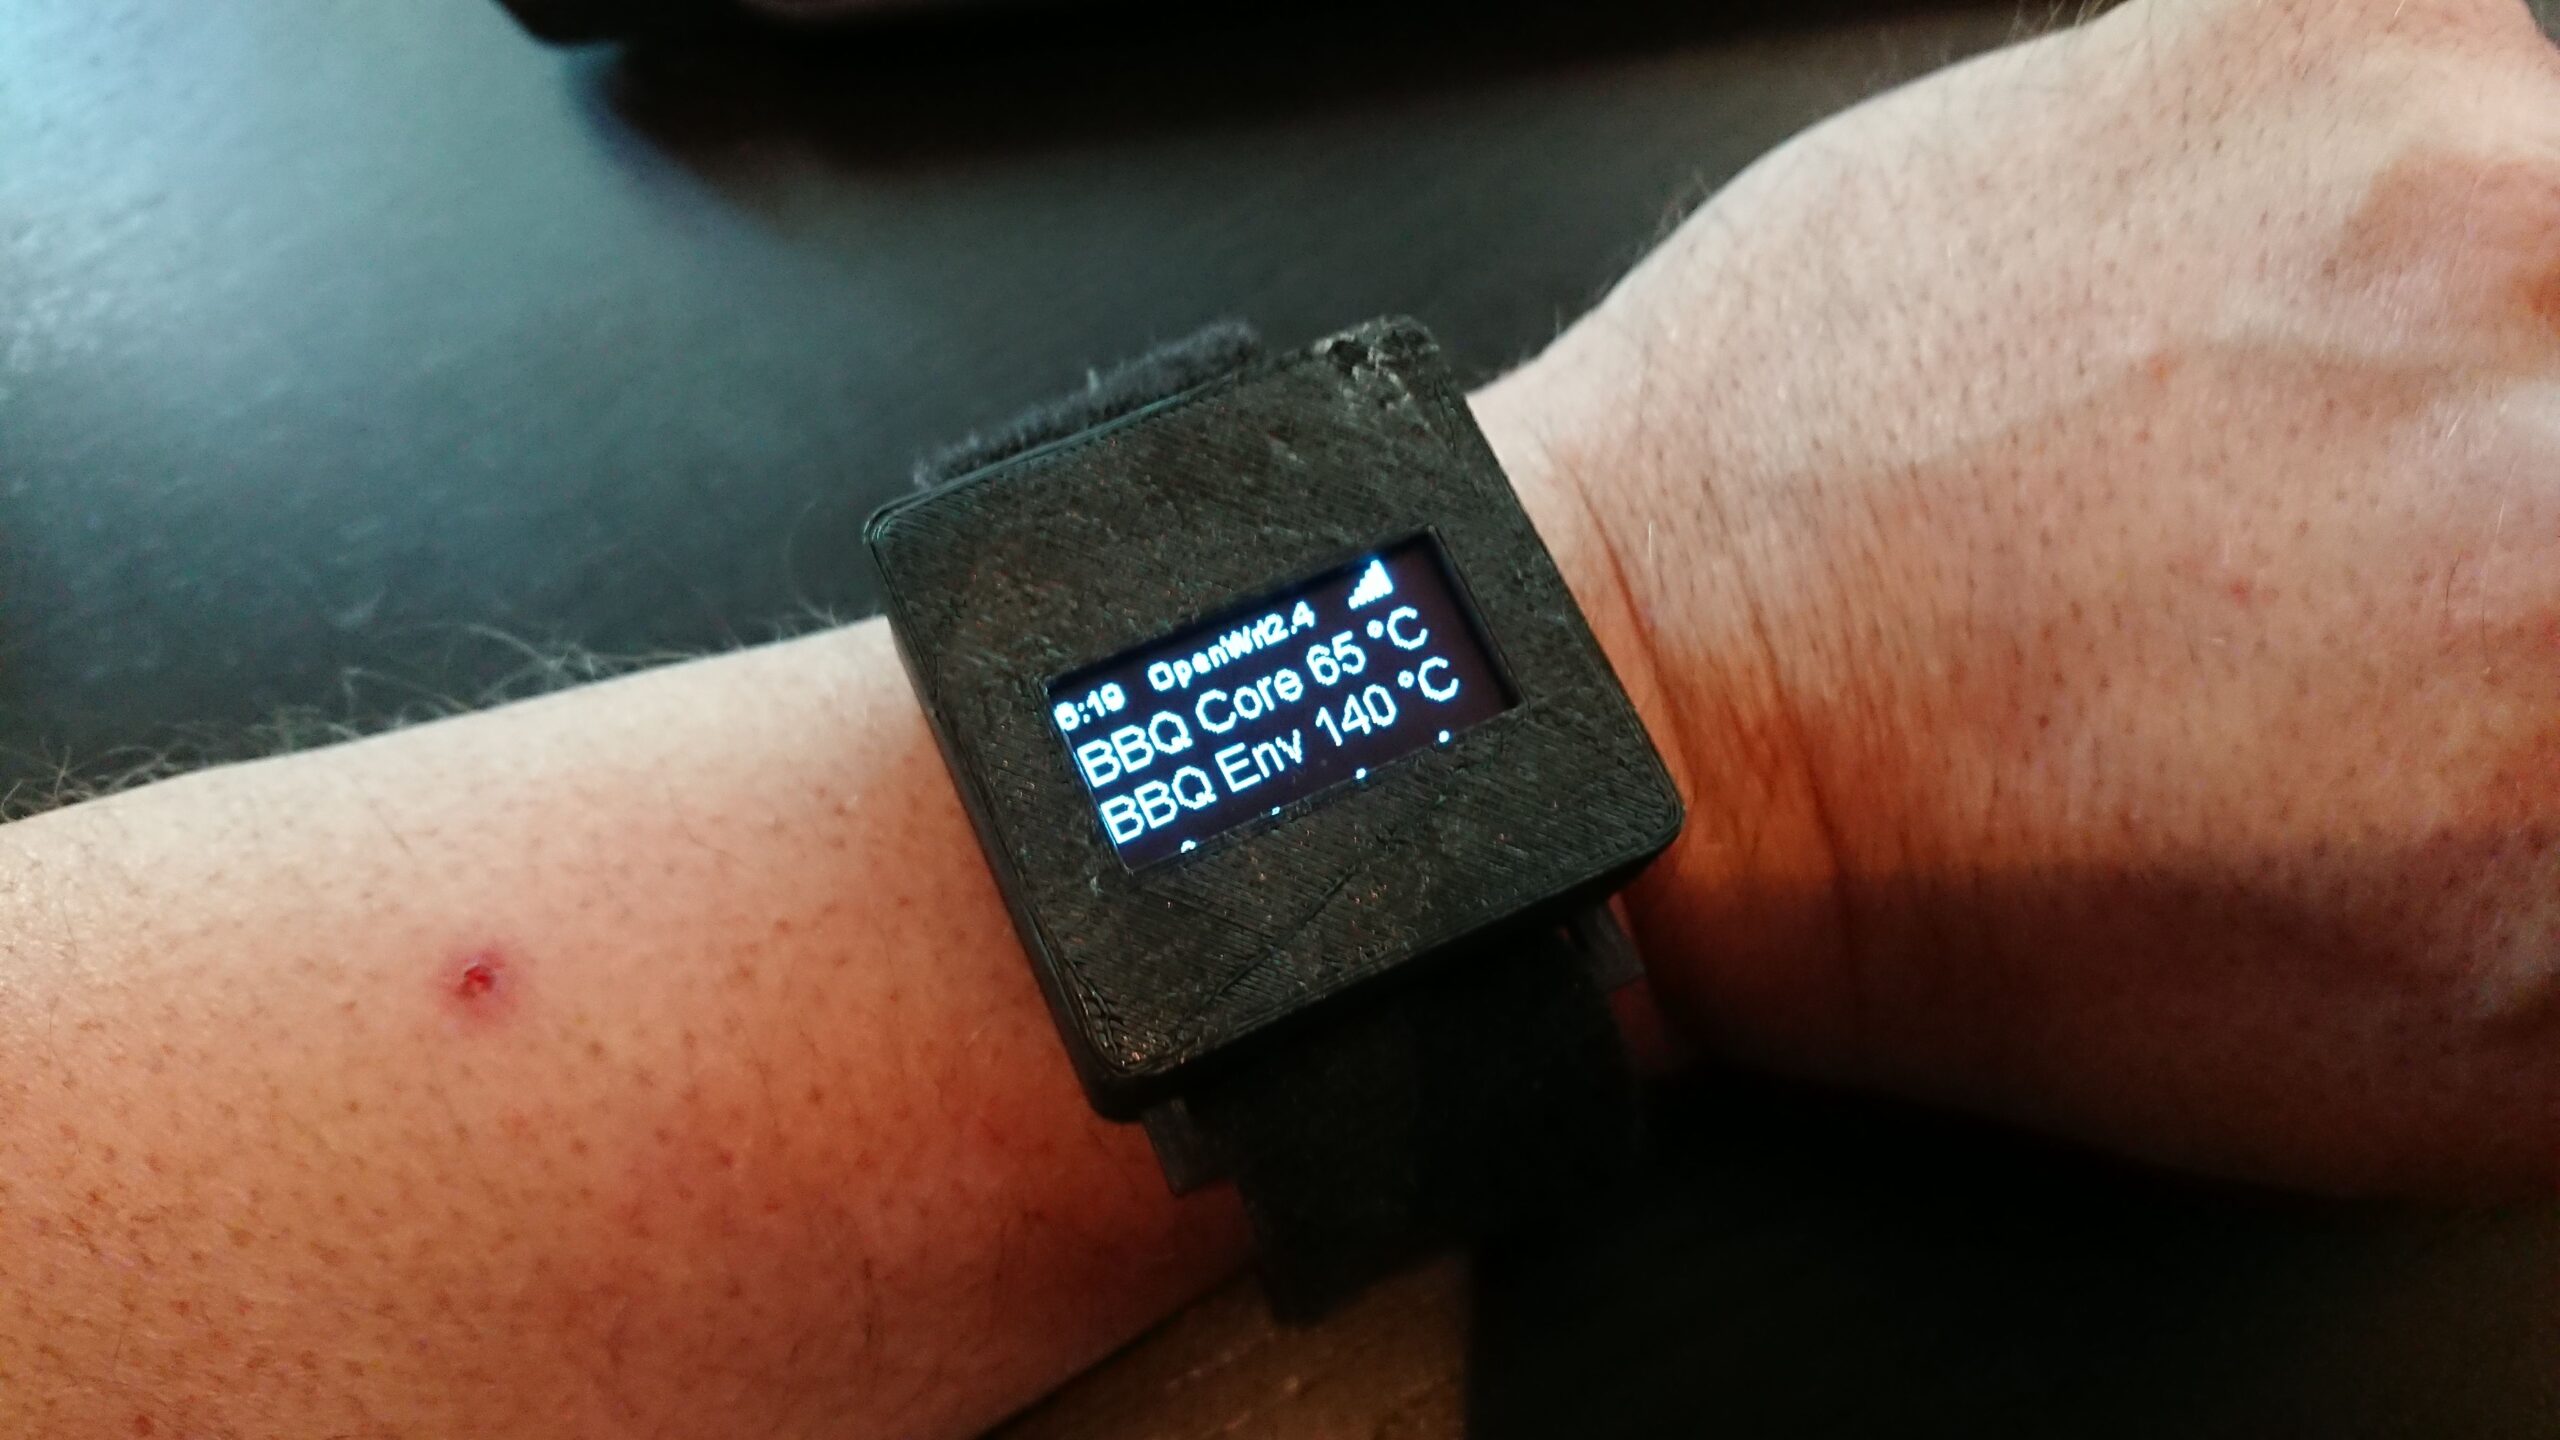
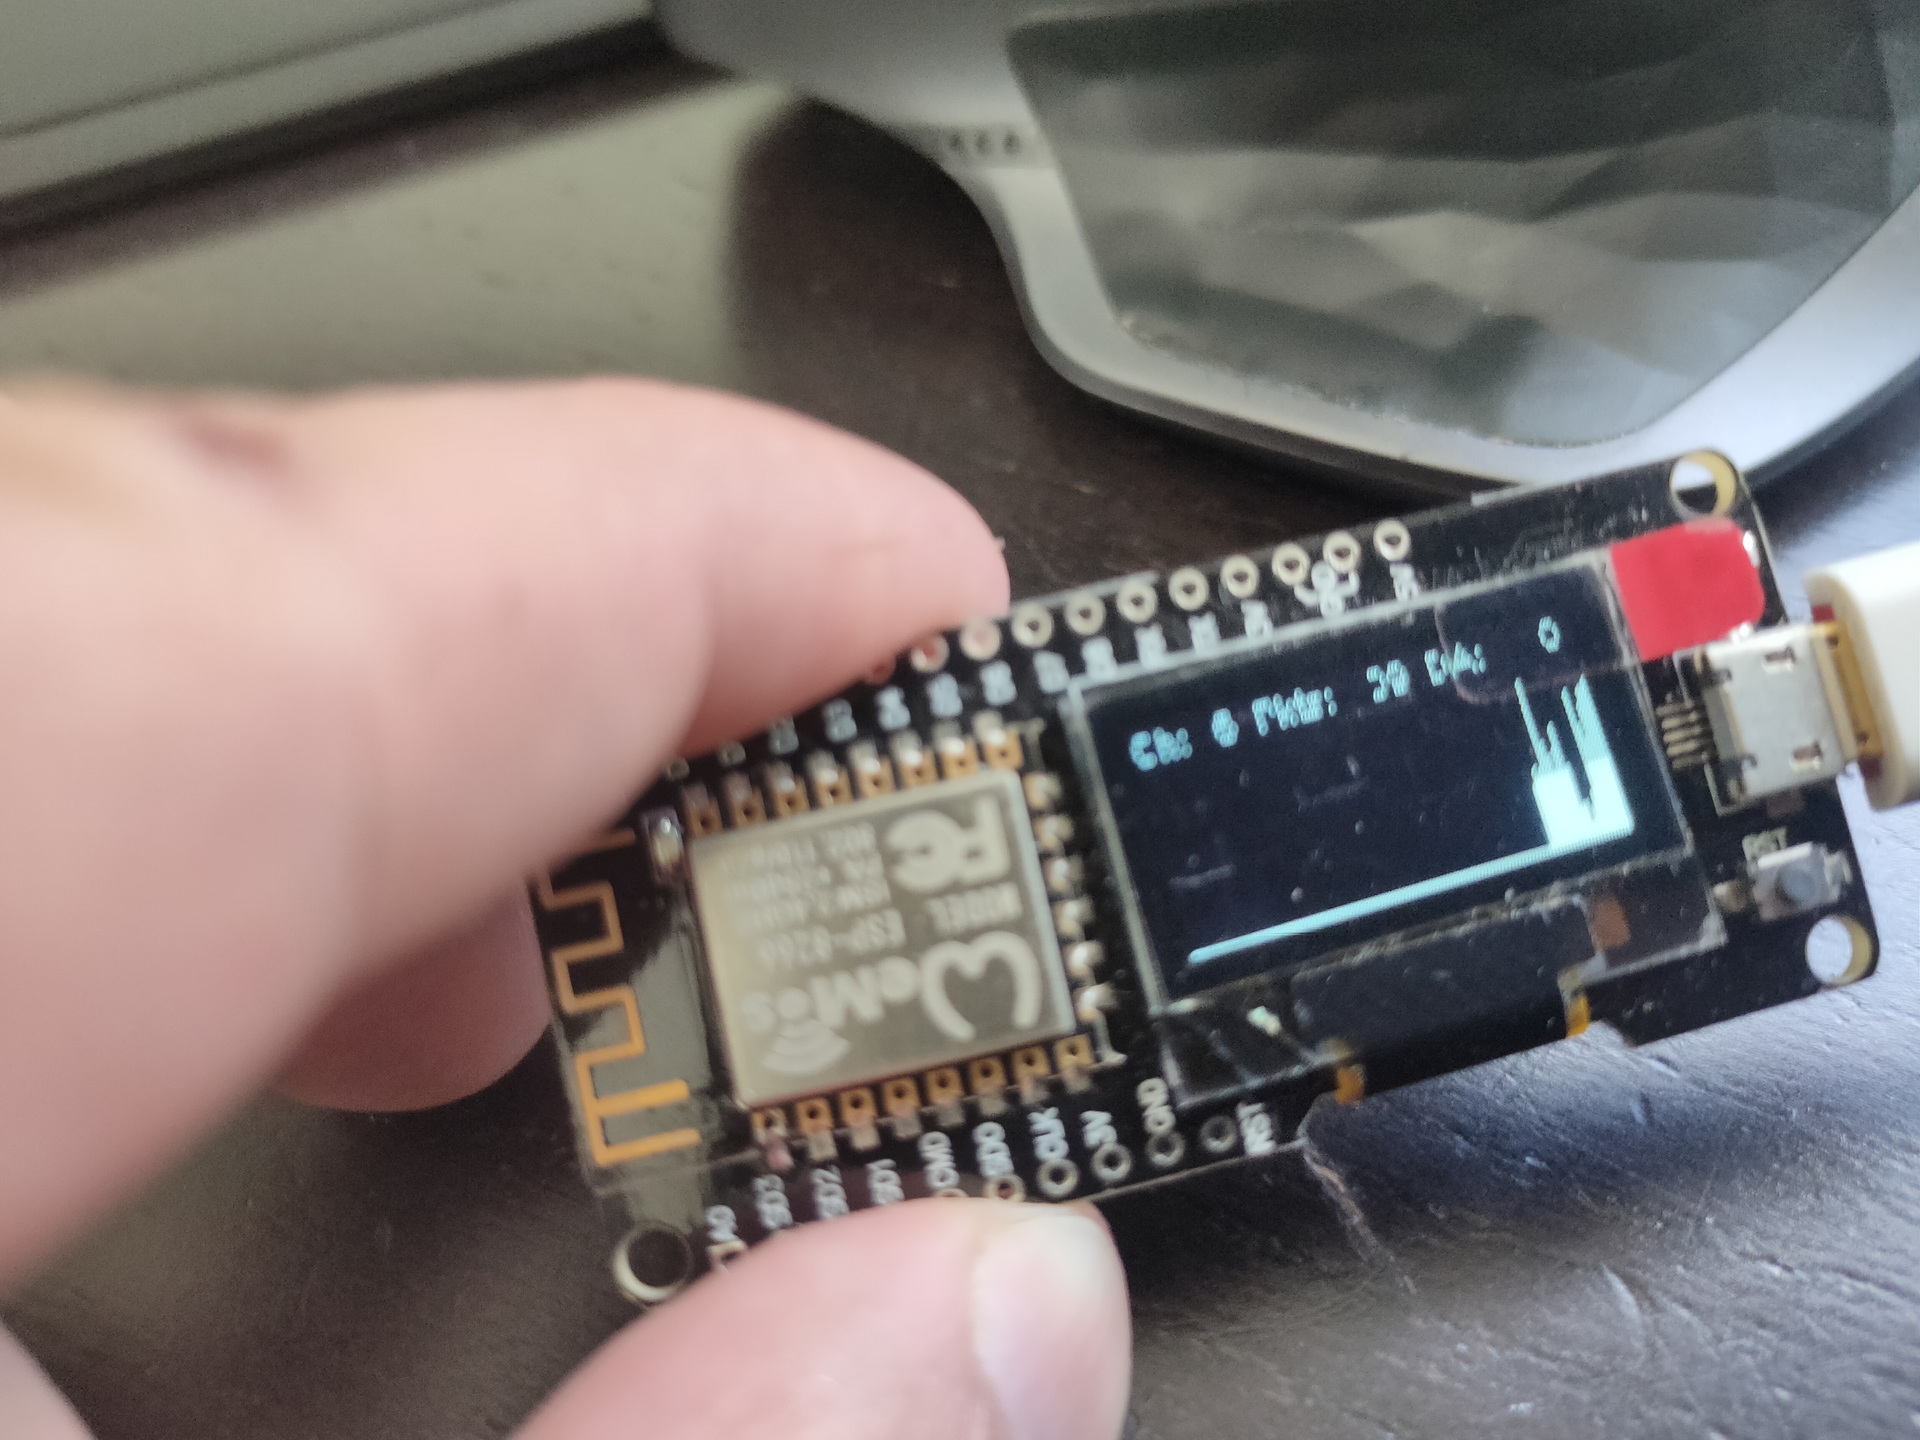
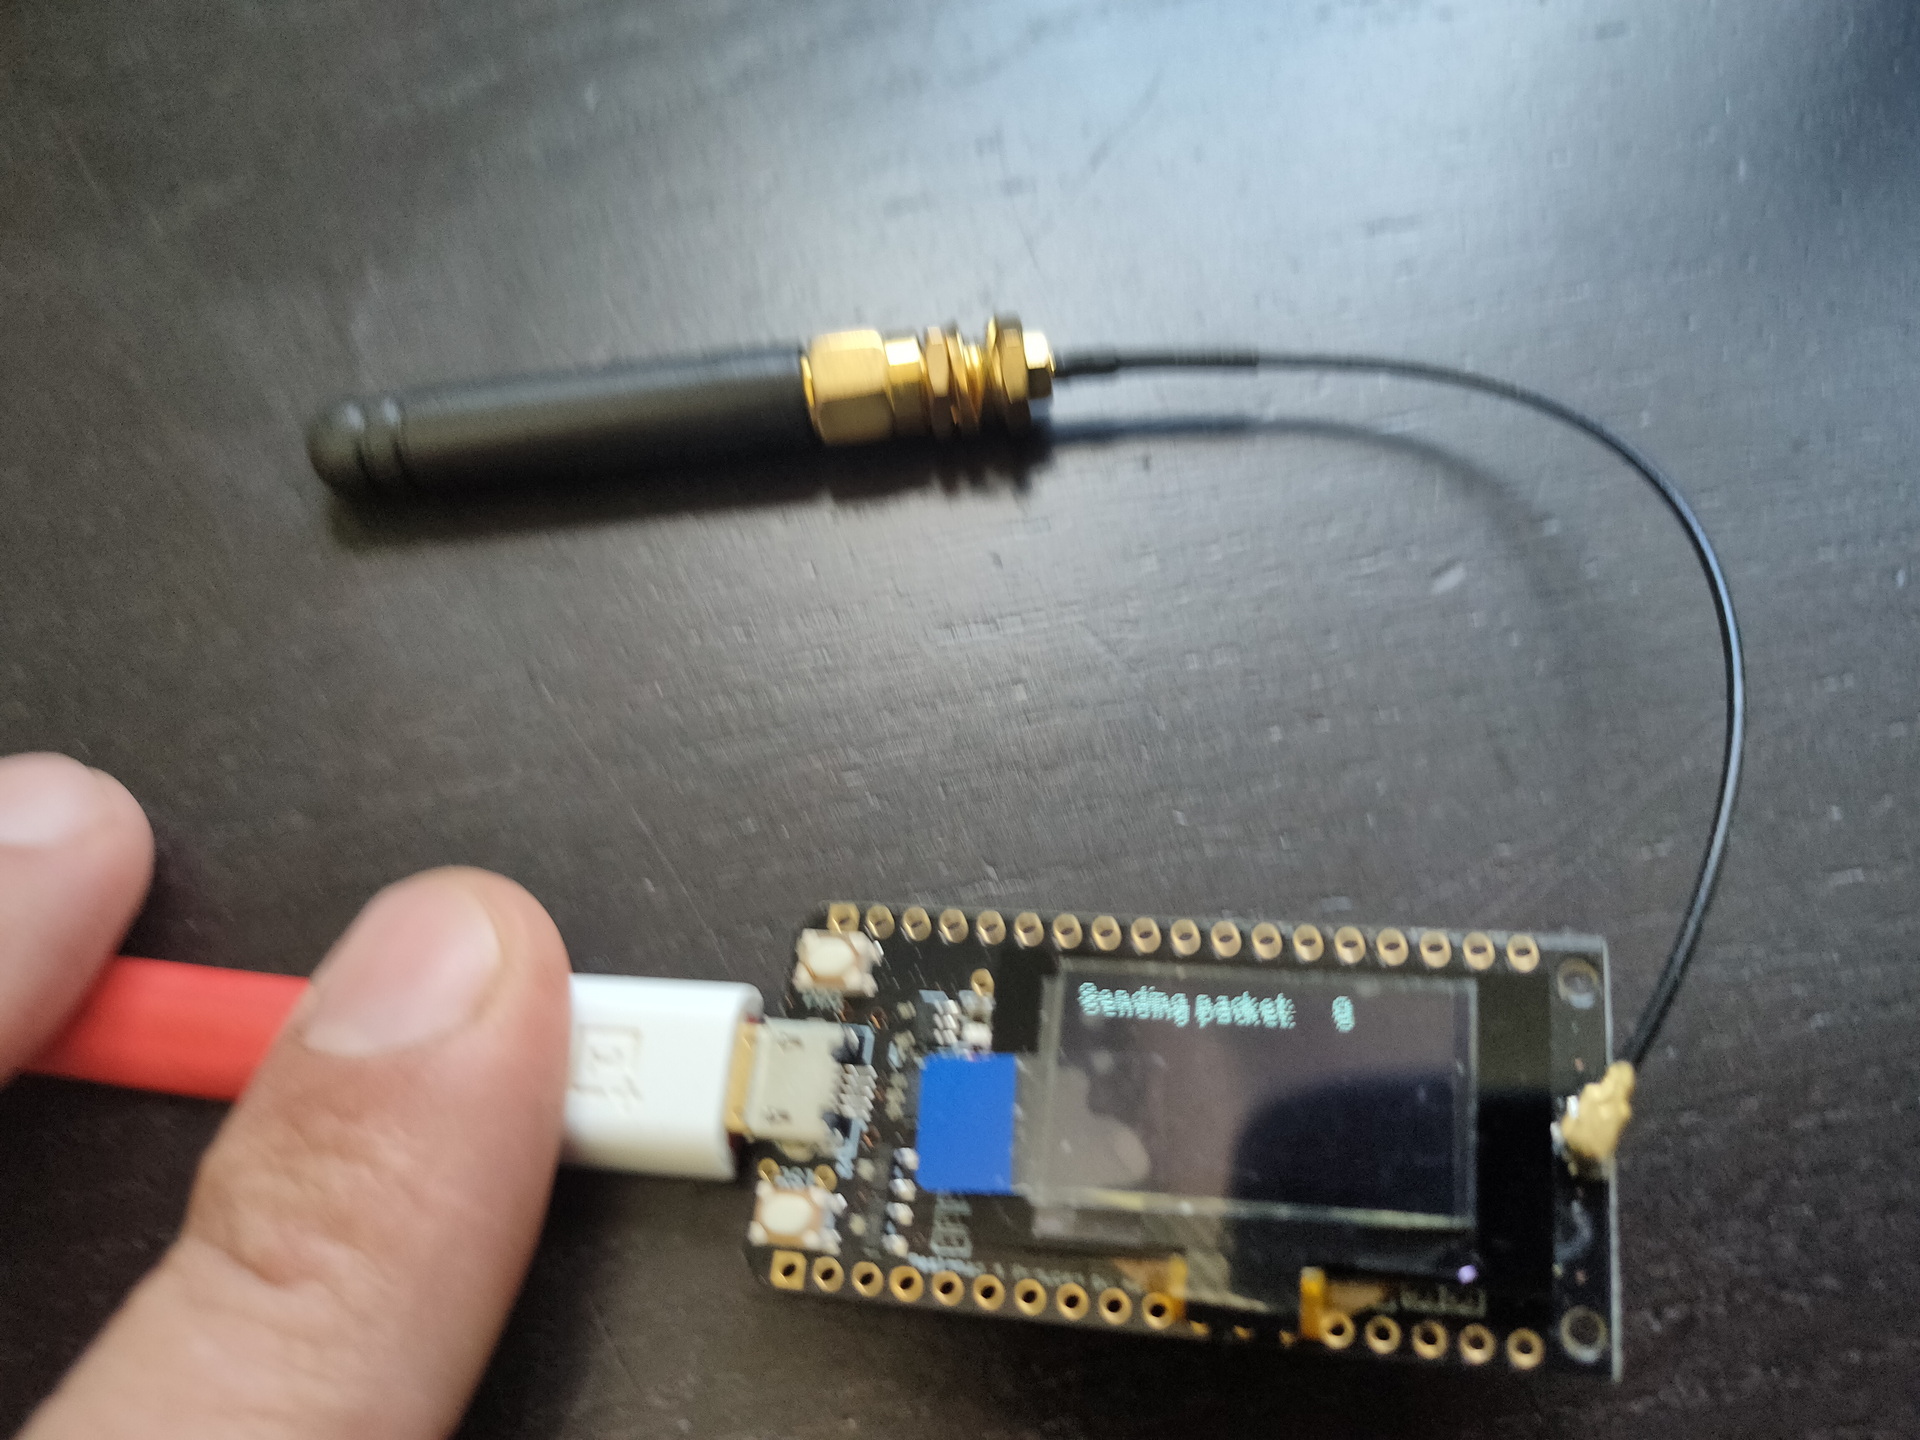
Some arduino’s have embedded displays like those i’ve used for a Lora project.
No usedWifi packet monitorLora test
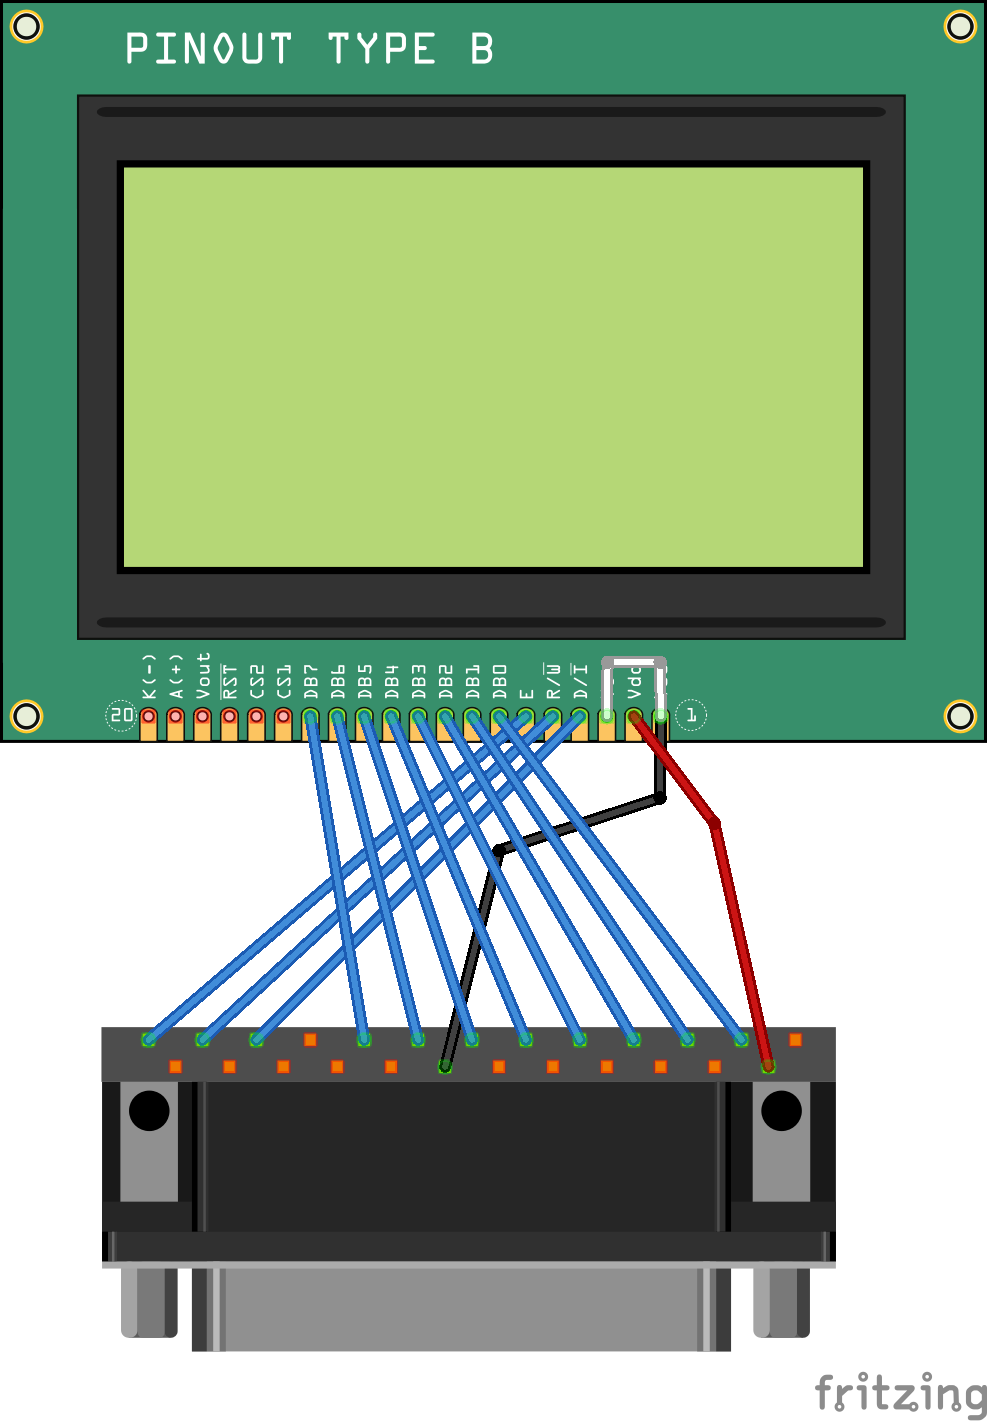
Other means of connecting : SPI
SPI connected display
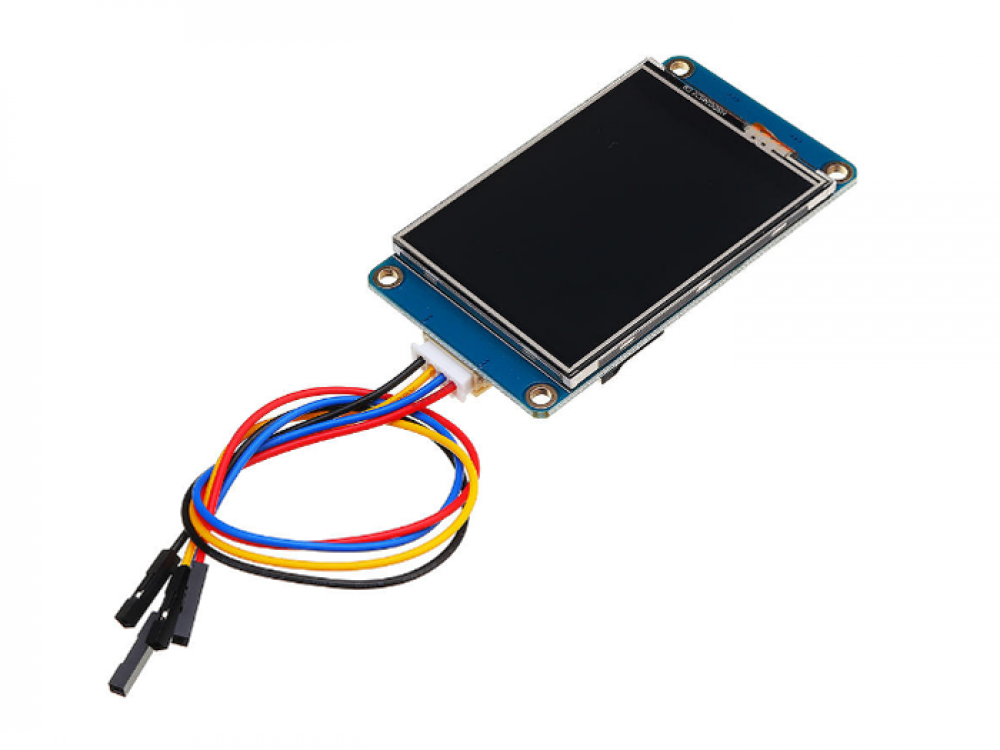
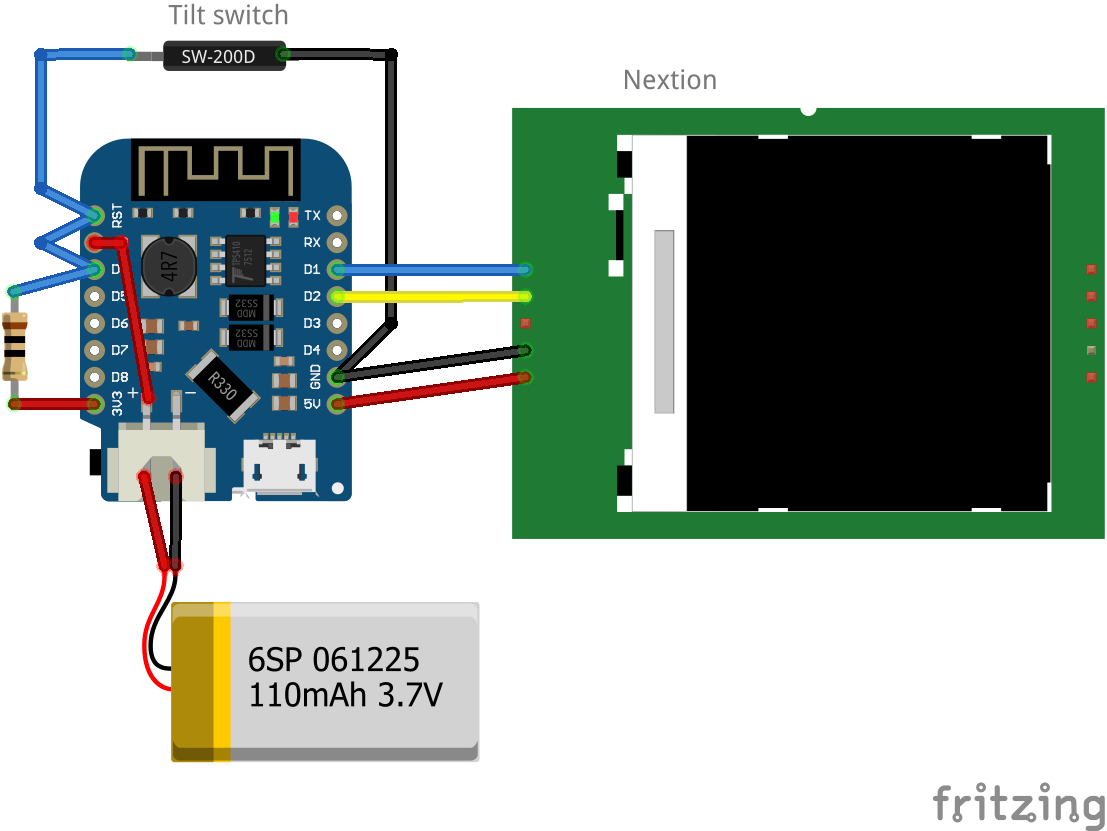
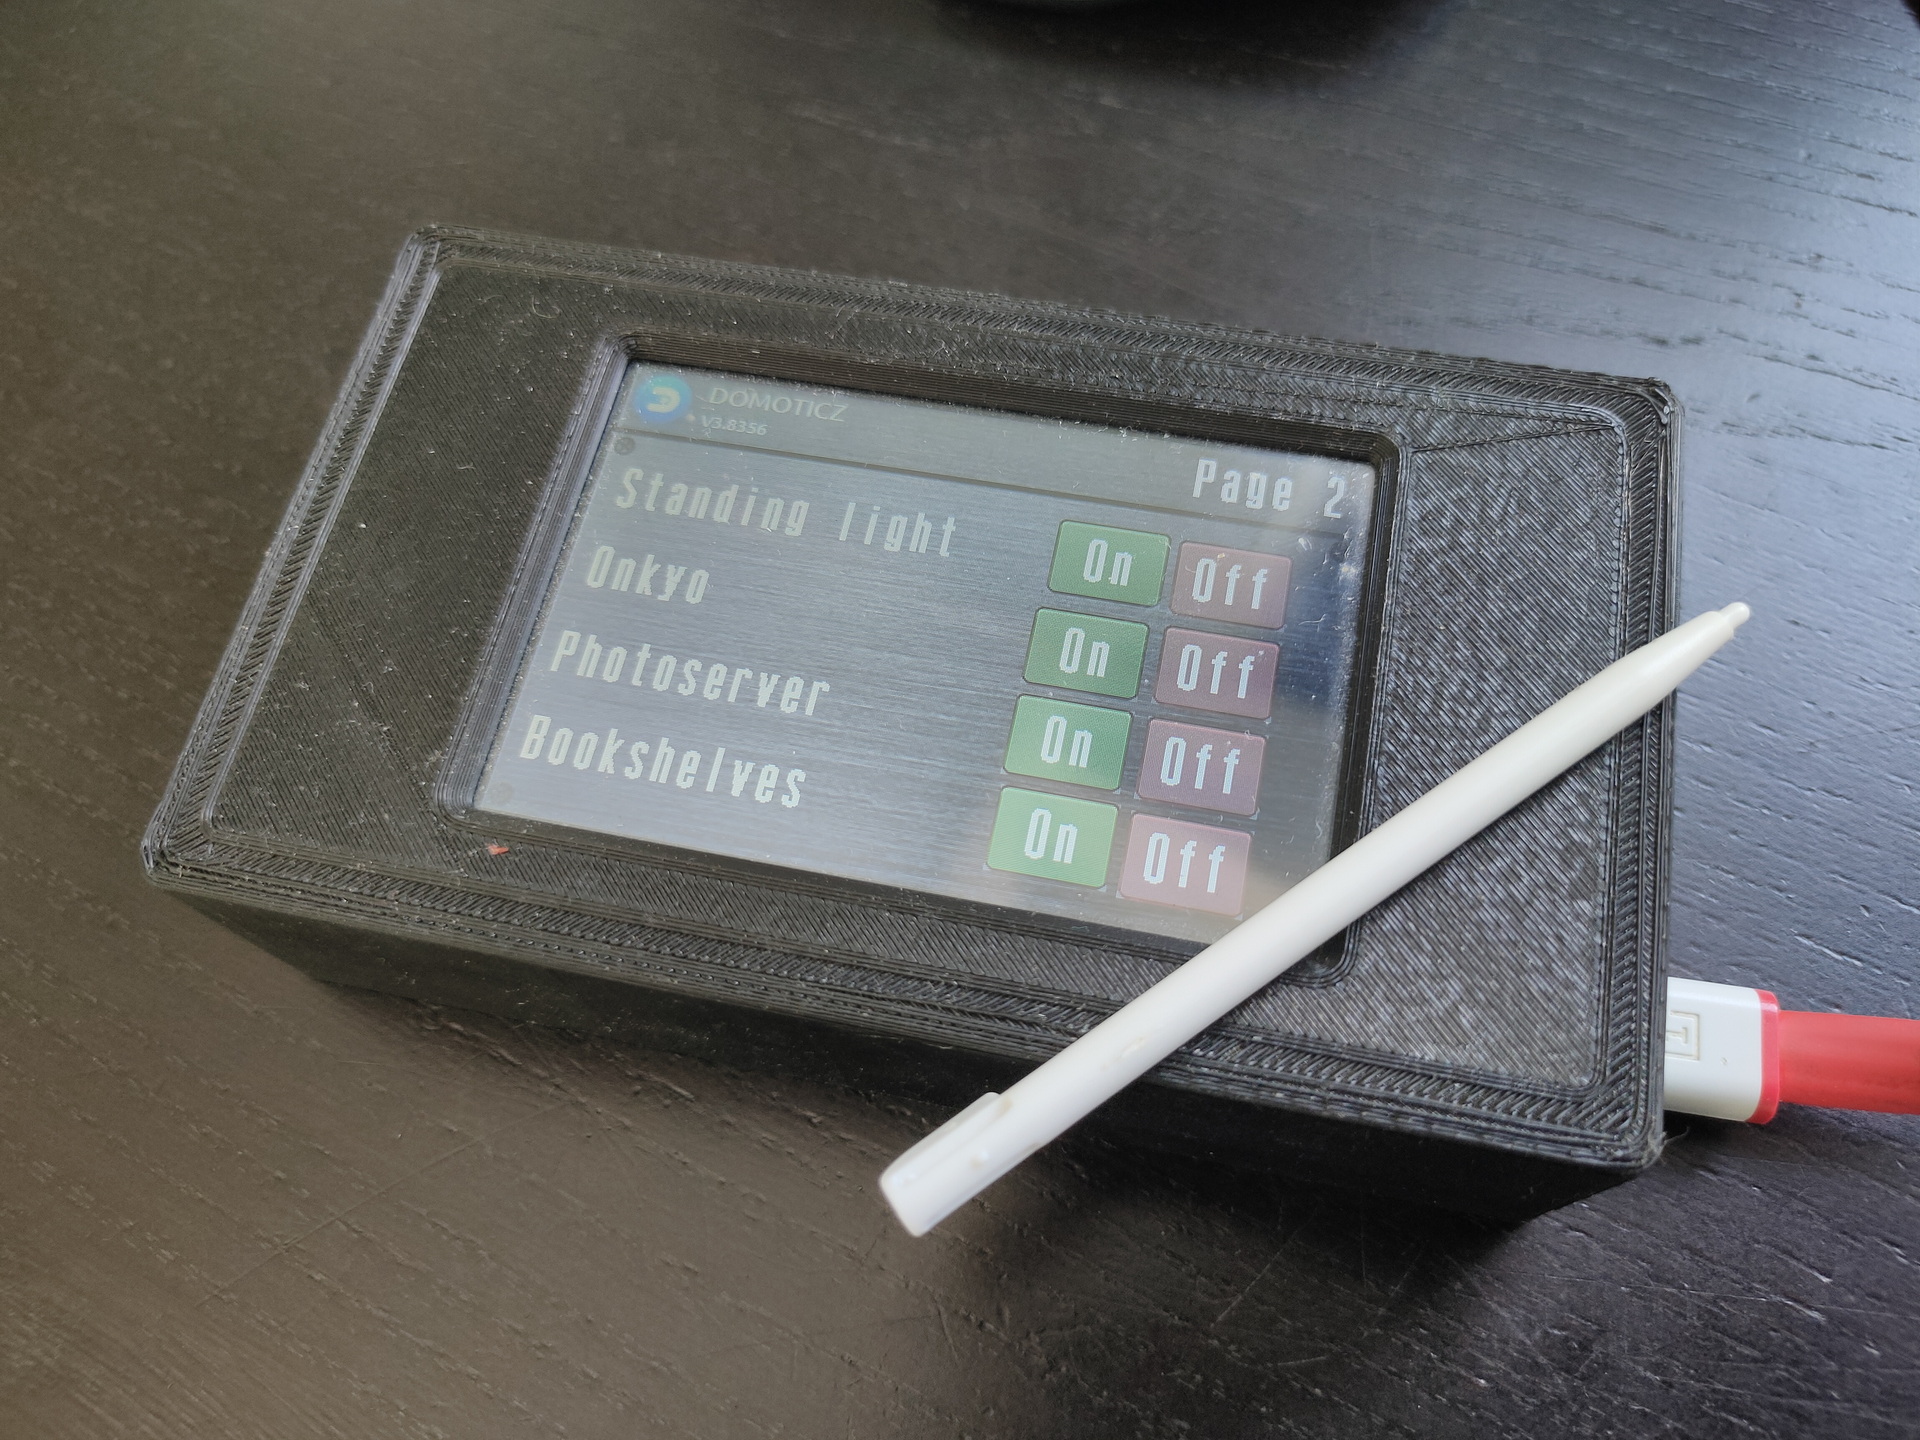
Nextion
Nextion is a Human Machine Interface (HMI) solution combining an onboard processor and memory touch display with Nextion Editor software for HMI GUI project development.
Using the Nextion Editor software, you can quickly develop the HMI GUI by drag-and-drop components (graphics, text, button, slider, etc.) and ASCII text-based instructions for coding how components interact on the display side.
Nextion HMI display connects to peripheral MCU via TTL Serial (5V, TX, RX, GND) to provide event notifications that peripheral MCU can act on, the peripheral MCU can easily update progress, and status back to Nextion display utilizing simple ASCII text-based instructions.
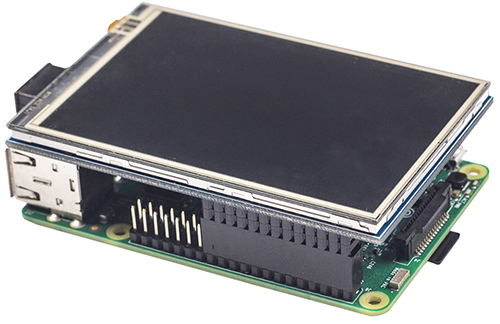
edit cmdline.txt
add "fbcon=map:10 fbcon=font:ProFont6x11 logo.nologo"
at the end
edit config.txt
add between custom comments at the bottom
dtoverlay=piscreen,speed=24000000,rotate=90
# Or check http://www.lcdwiki.com/3.5inch_RPi_Display
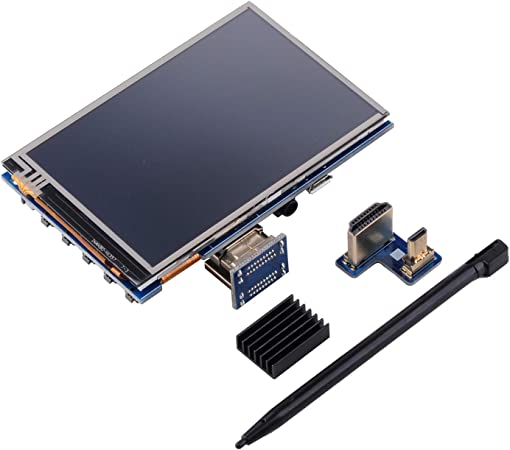
Above display’s i’ve used for Picore Players and the Lidar POC
To try: Getting above display running with a arduino https://github.com/PaulStoffregen/XPT2046_Touchscreen
Raspberry HDMI display
Easiest of them all, just connect with HDMI, there is a adaptor for hdmi-hdmi (versions 1,2,3) and hdmi-mini-hdmi for RPi4 variants.
Epaper and 7-Segment displays
Other means of displaying information are for example
Epaper
ESP with epaper module, disconnected power for a while, artifacts appear.
7 Segment displays
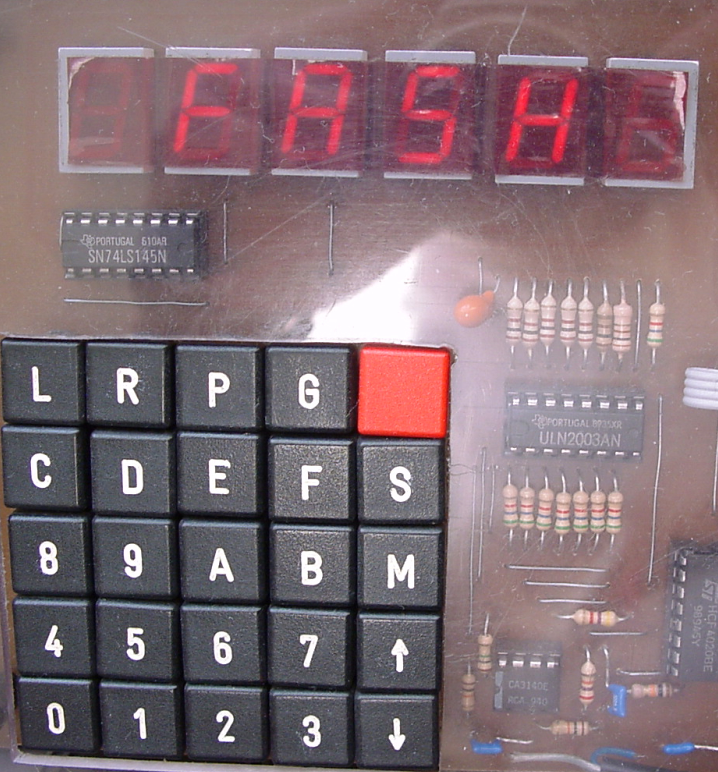
I used a lot of 7-Segment display’s in the past. They look cool and are hardcore.
My homebrew computer uses this
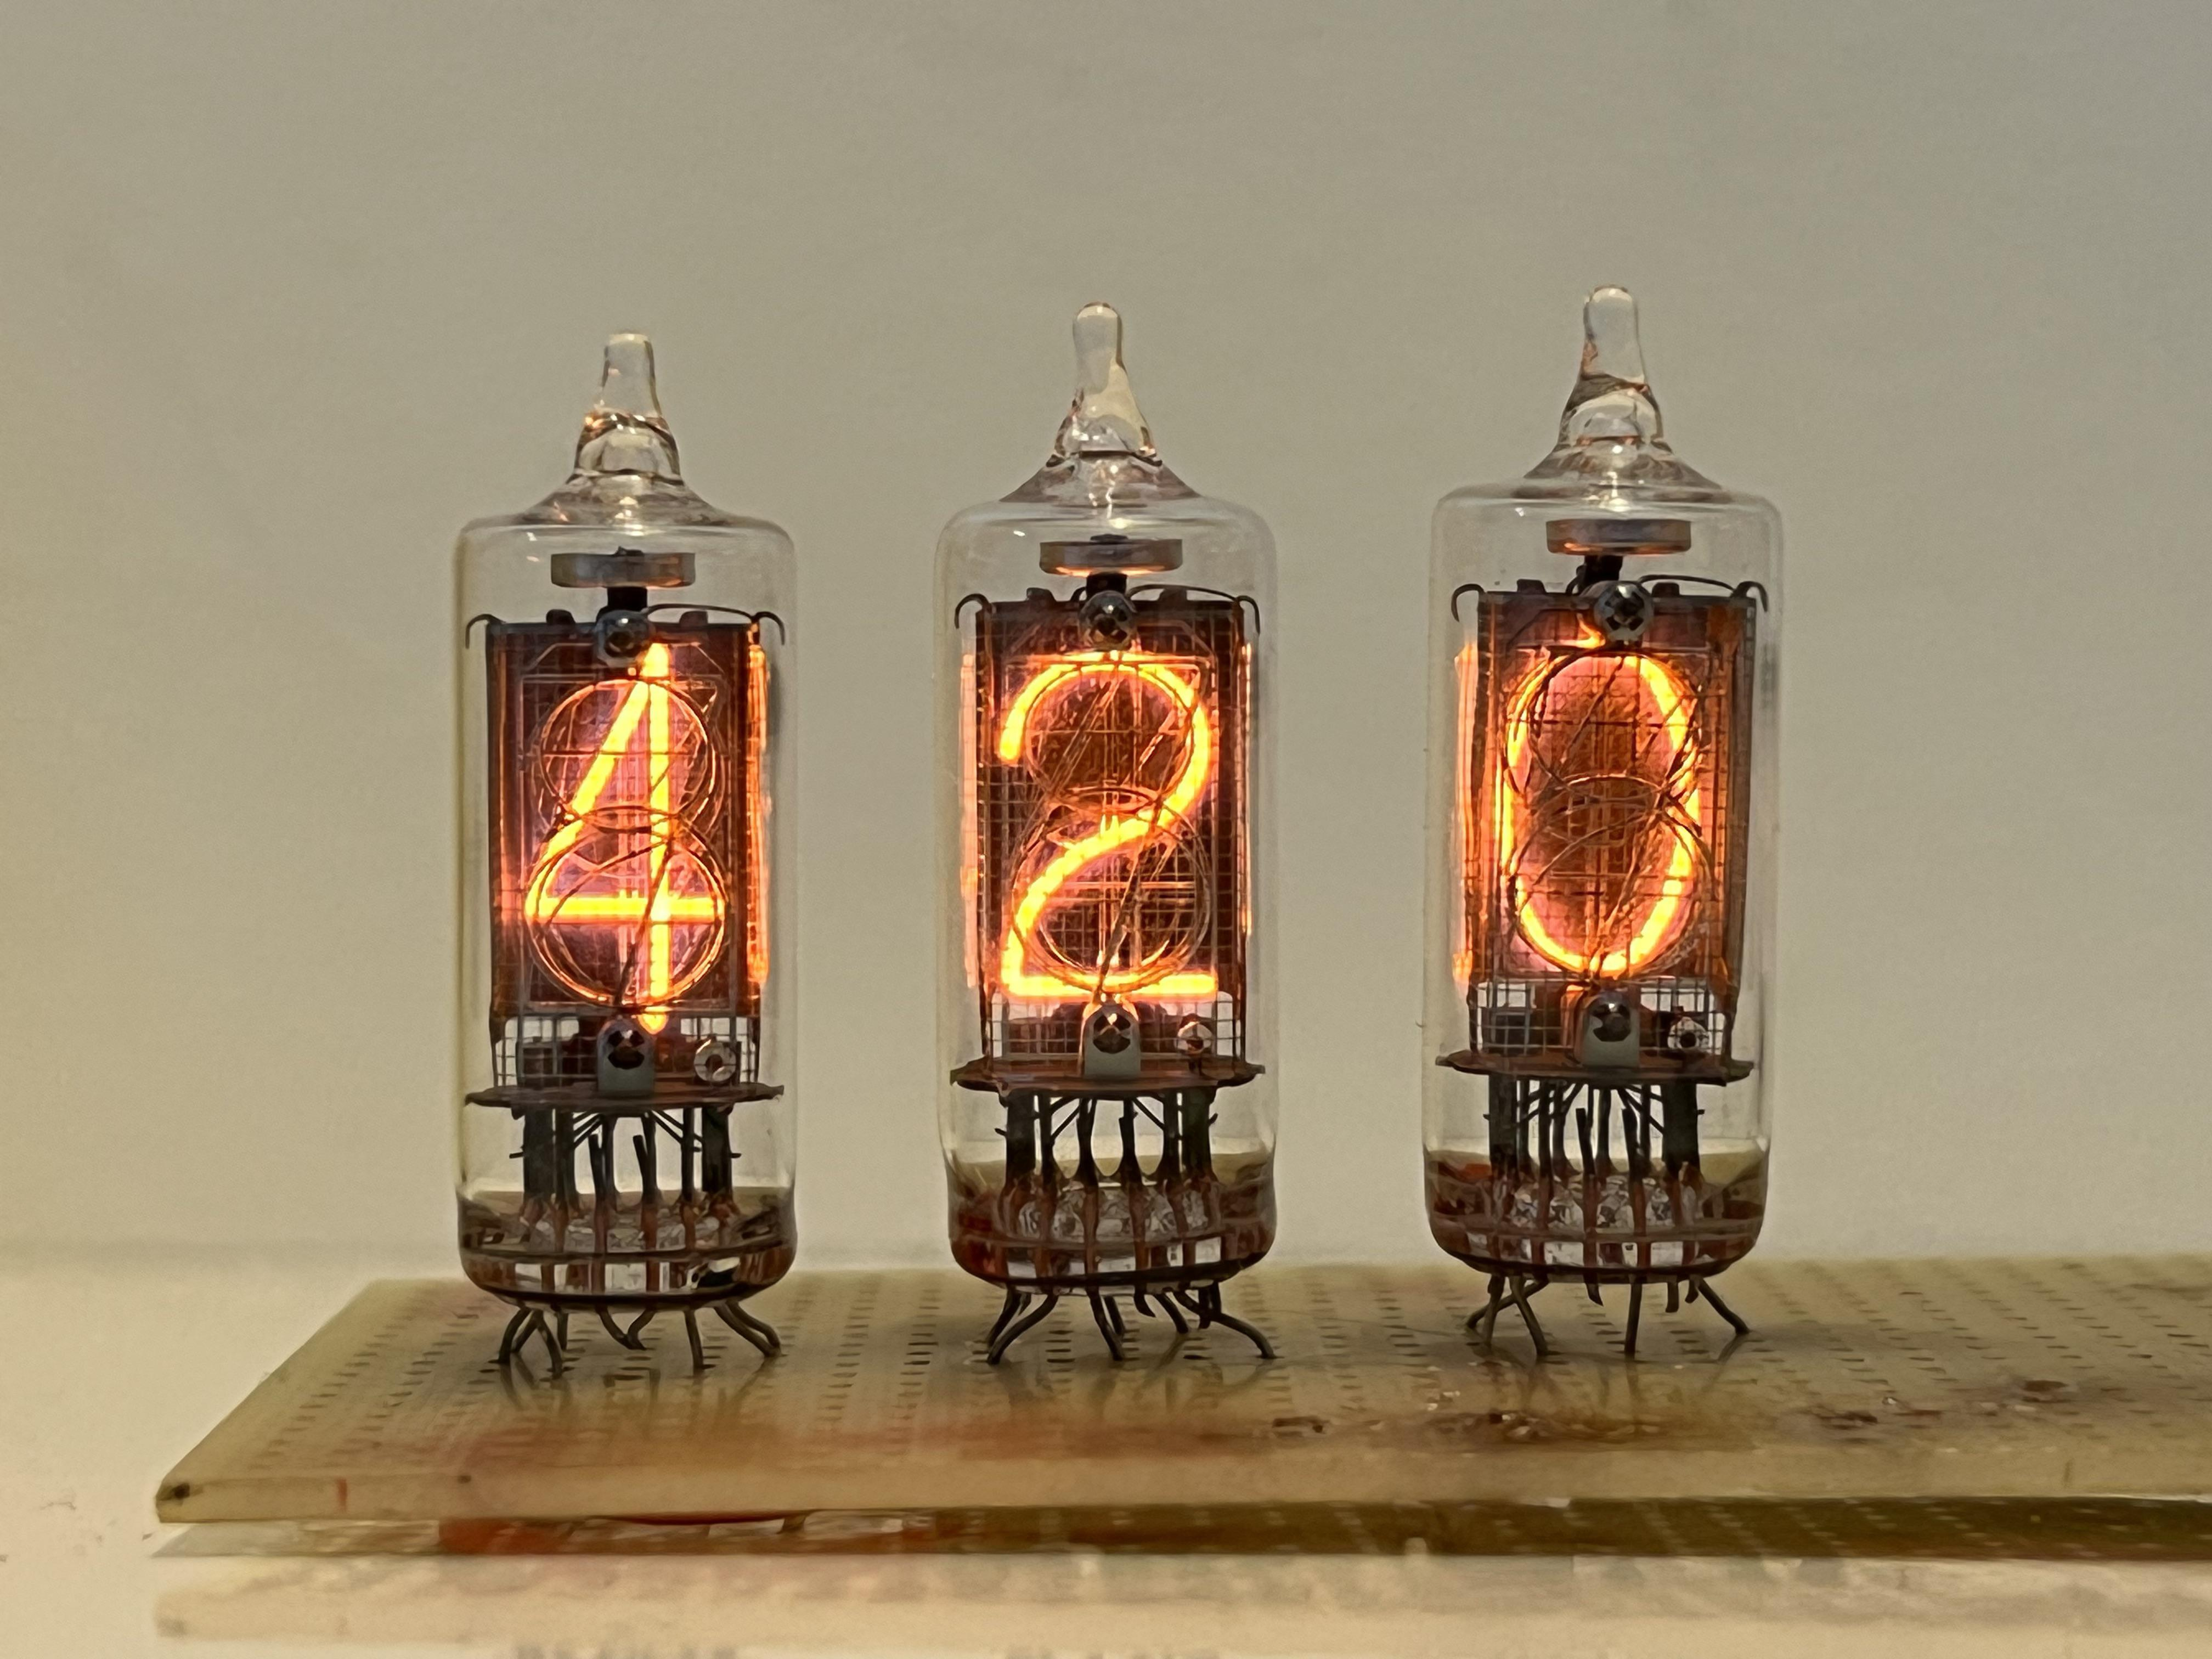
Nixie tubes!
And there are https://en.wikipedia.org/wiki/Nixie_tube .. I’ve never had those
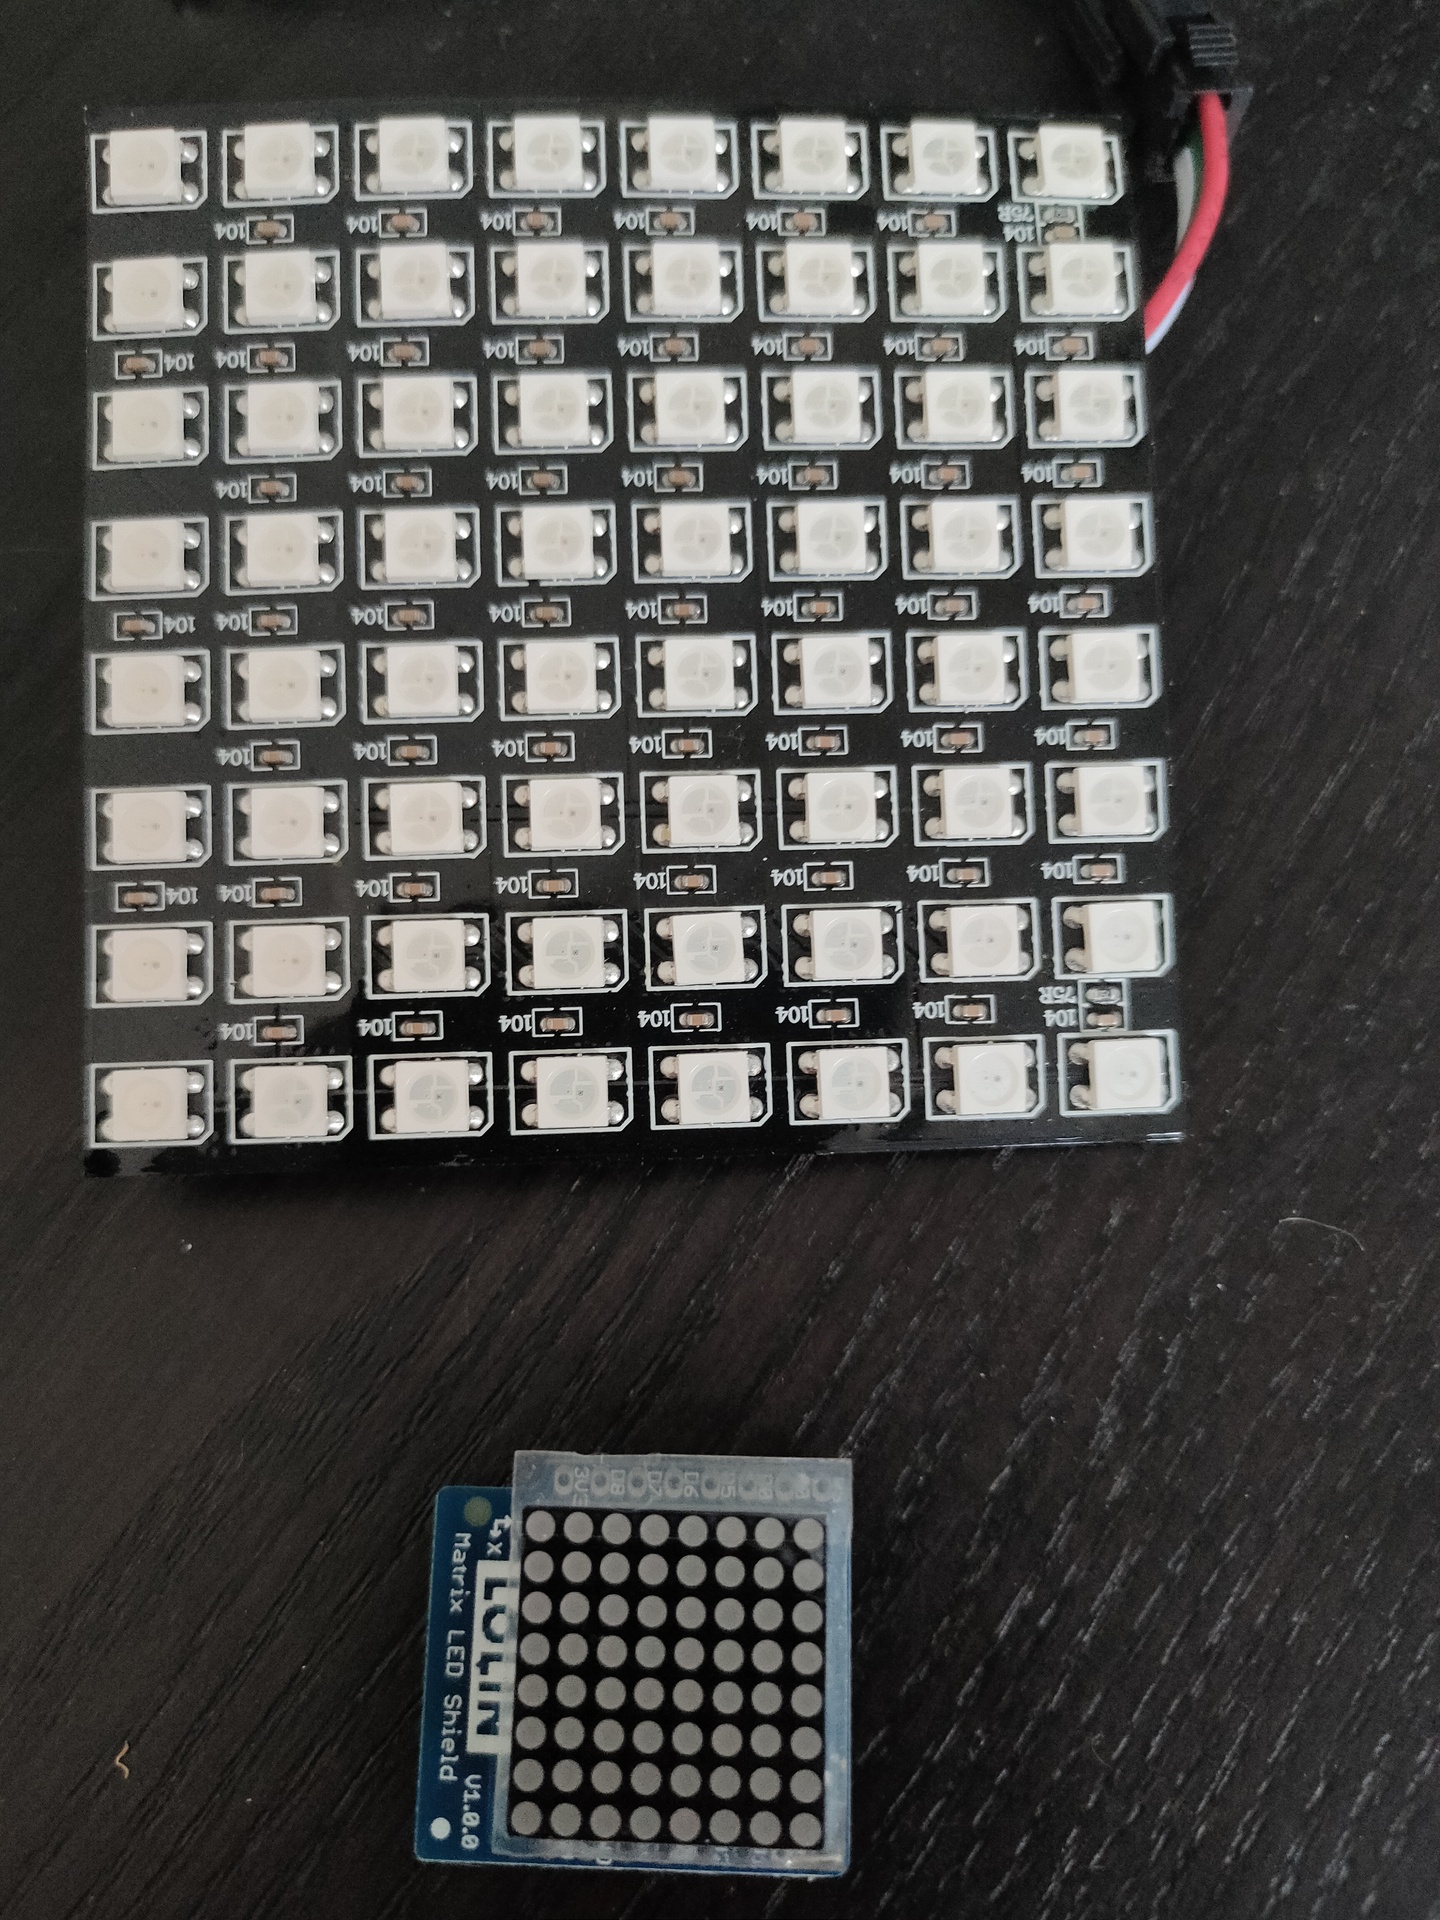
Above bigger 2D display i used with Wled and a digital microphone, so its sound reactive. The lower part i got in recently .
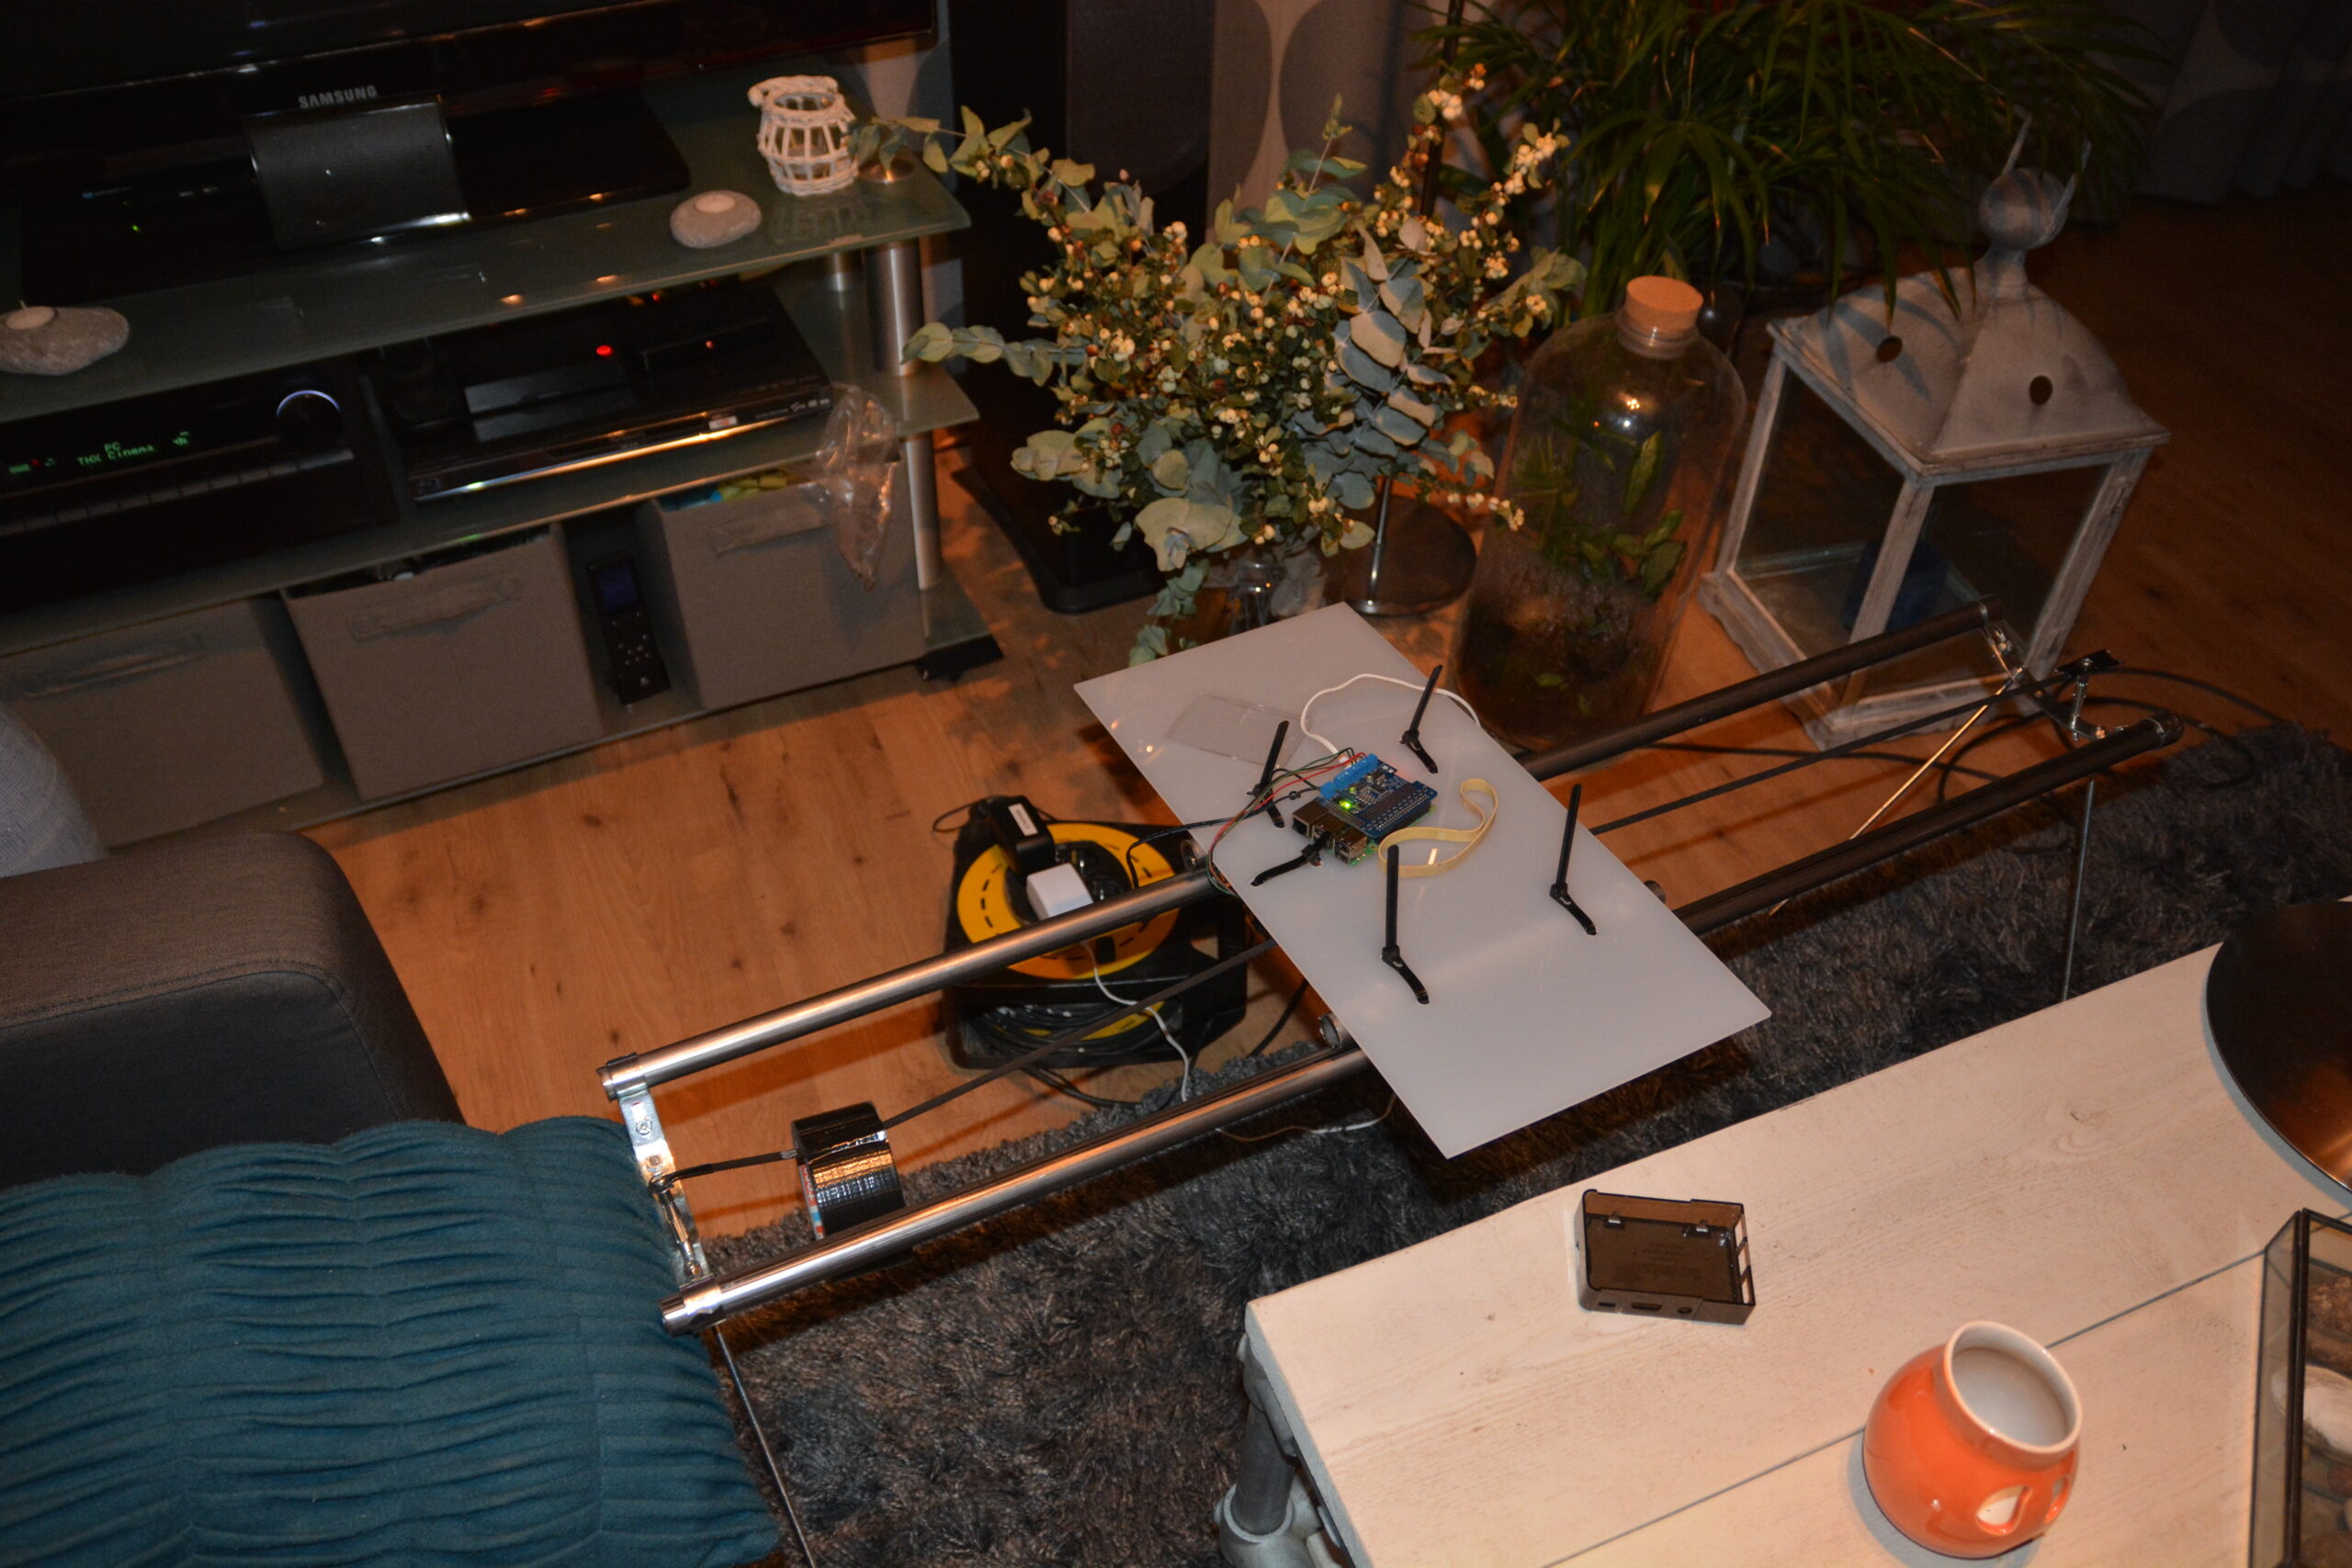
I got my DIY timelapse slider out of storage, and notished it wasn’t working any more. I’t was a quick and dirty build, using minimal components and could be build with minimal effort. We could not take a lot of stuff with us to New Zealand. Camera and powerbanks, those we always take with us. So i only needed:
Raspberry Pi
Steppermotor and a plastic sheet where it was mounted on (using tiewraps you can undo)
Timingbeld
Two metal feet it was mounted on
It had to be build strong enough to hold a Nikon 750, and didn’t get out of balance when moving the camera on two metal tubes i bought in NZ.
The RPI would not start anymore, just a red power smd led. SO it didn’t boot. Taking the mini sdcard out of the raspberry trying to put it in my cardreader .. note the trying part. The damn thing broke into two parts, never seen anything like it. Damn, did i backup the latest version? No, i used my mobile and wifi in NZ to modify the scripts. Well .. “We can rebuild him, we have the technology”
How does it work?
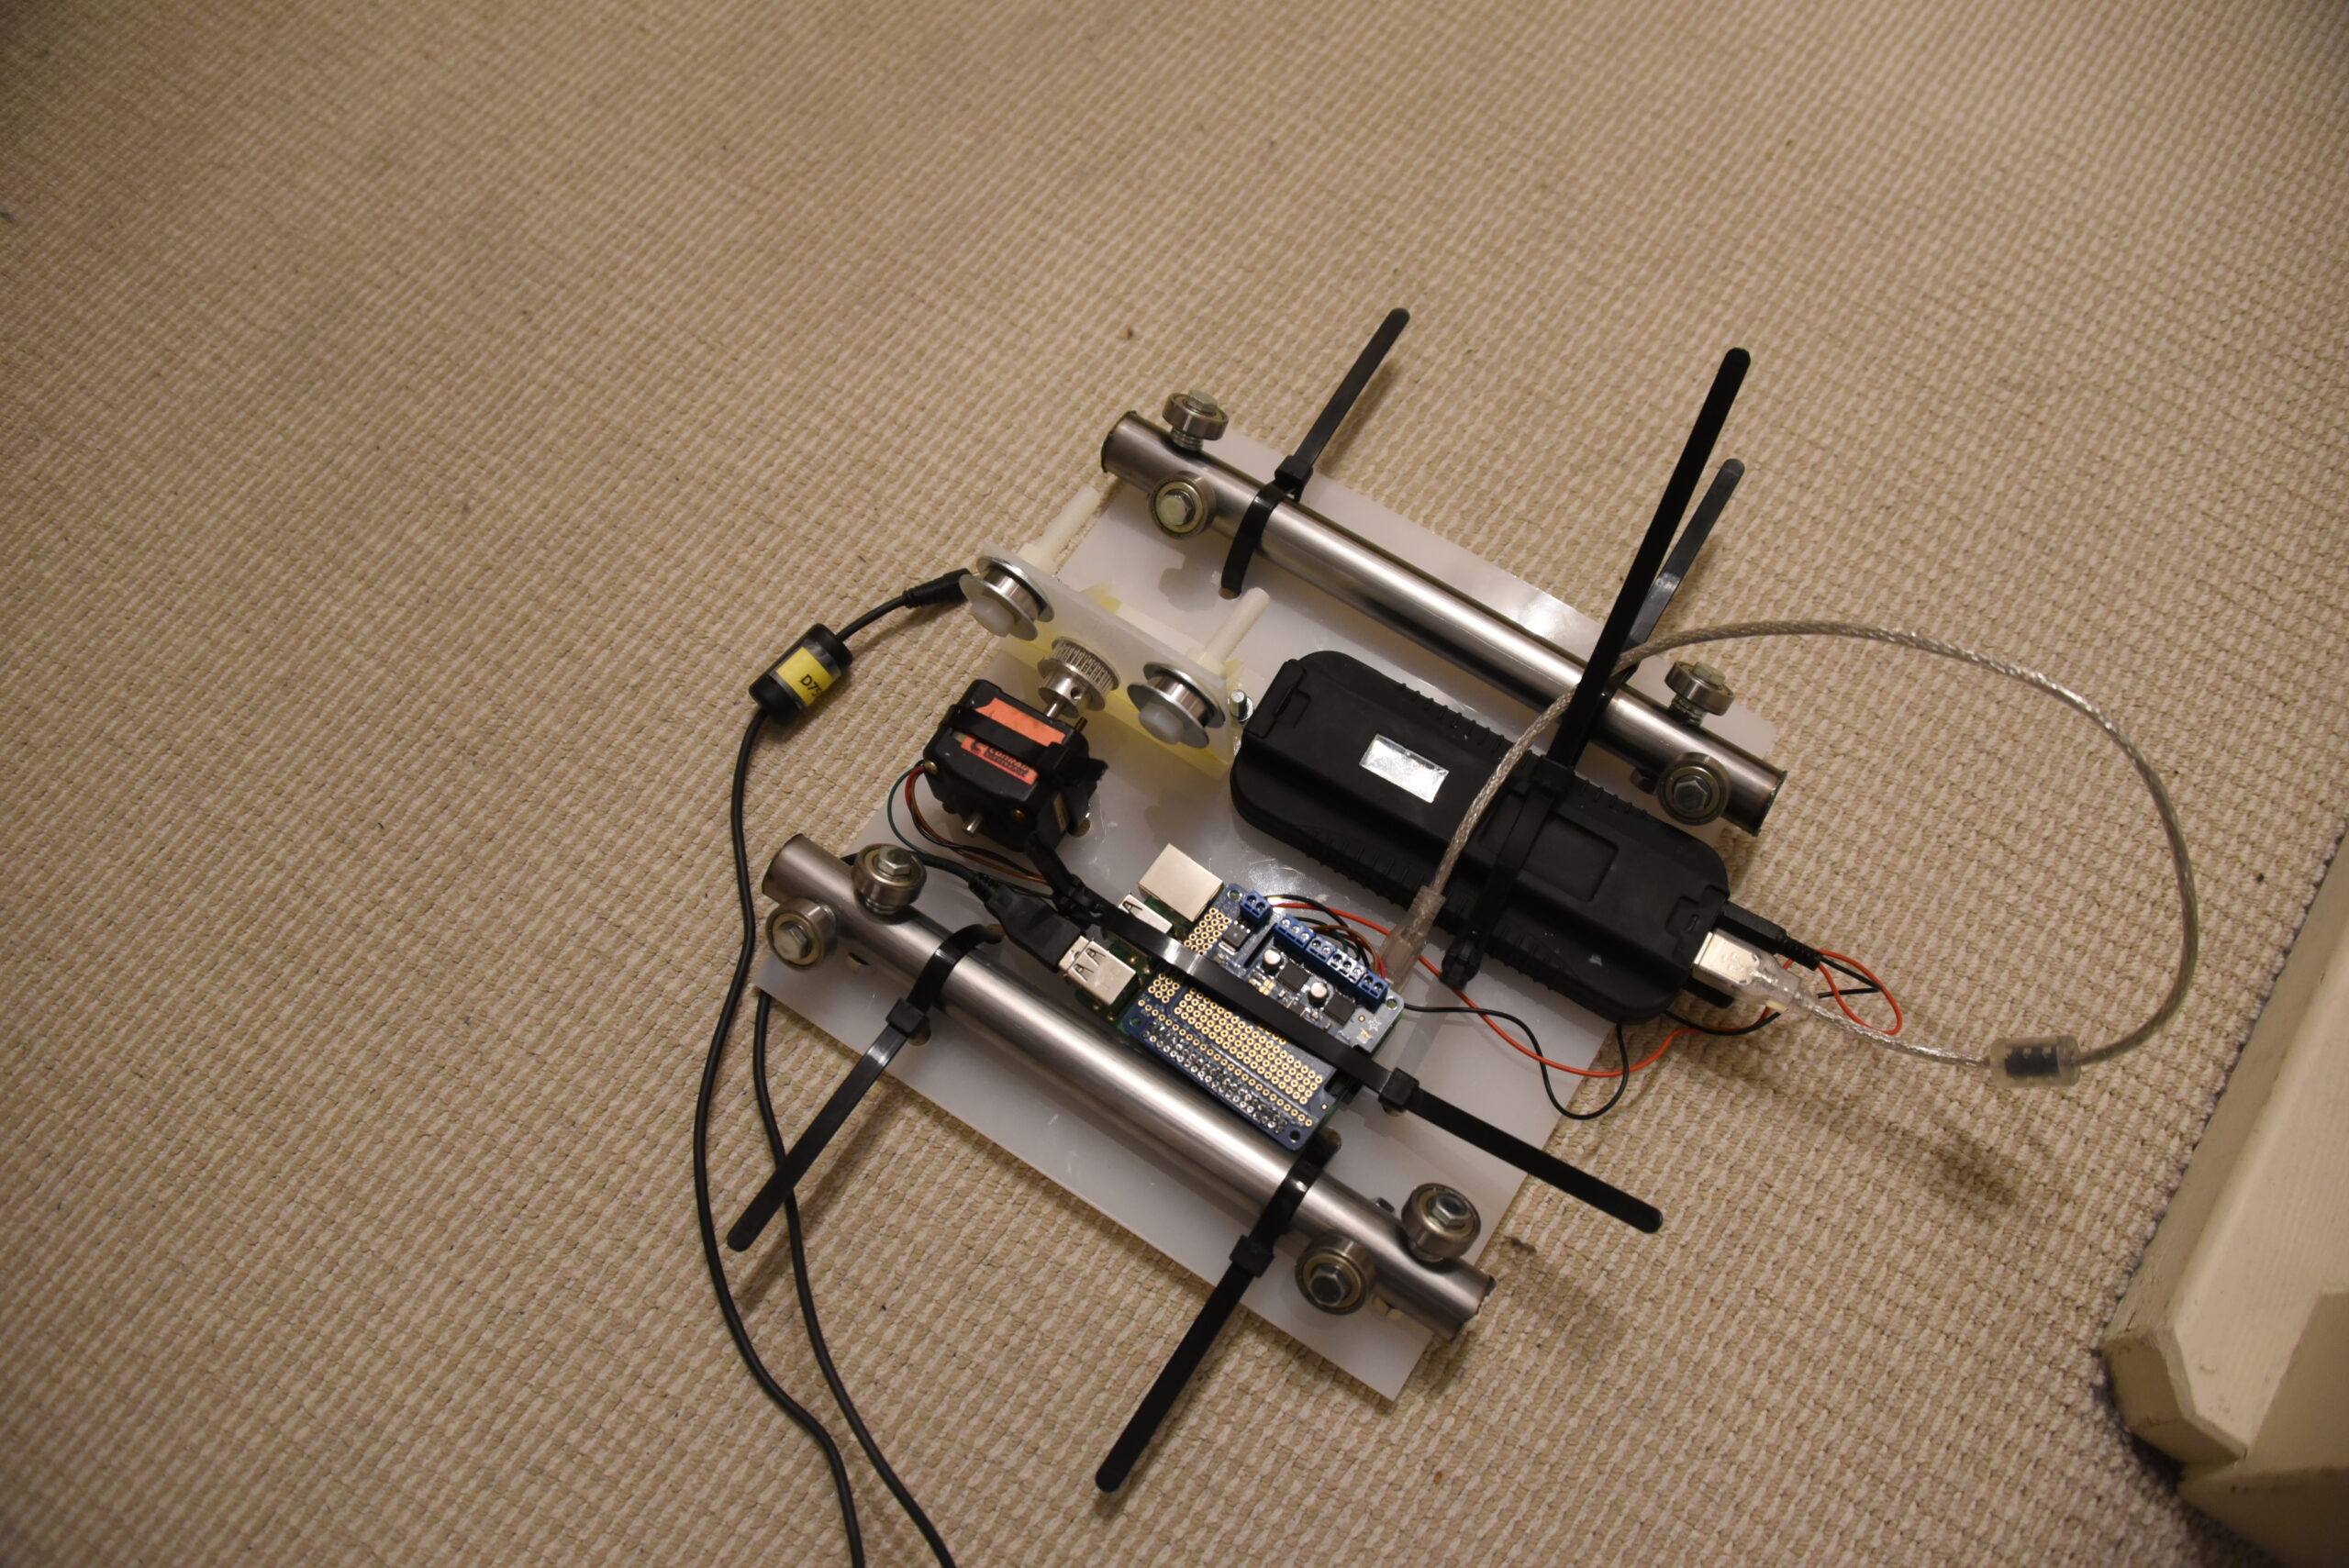
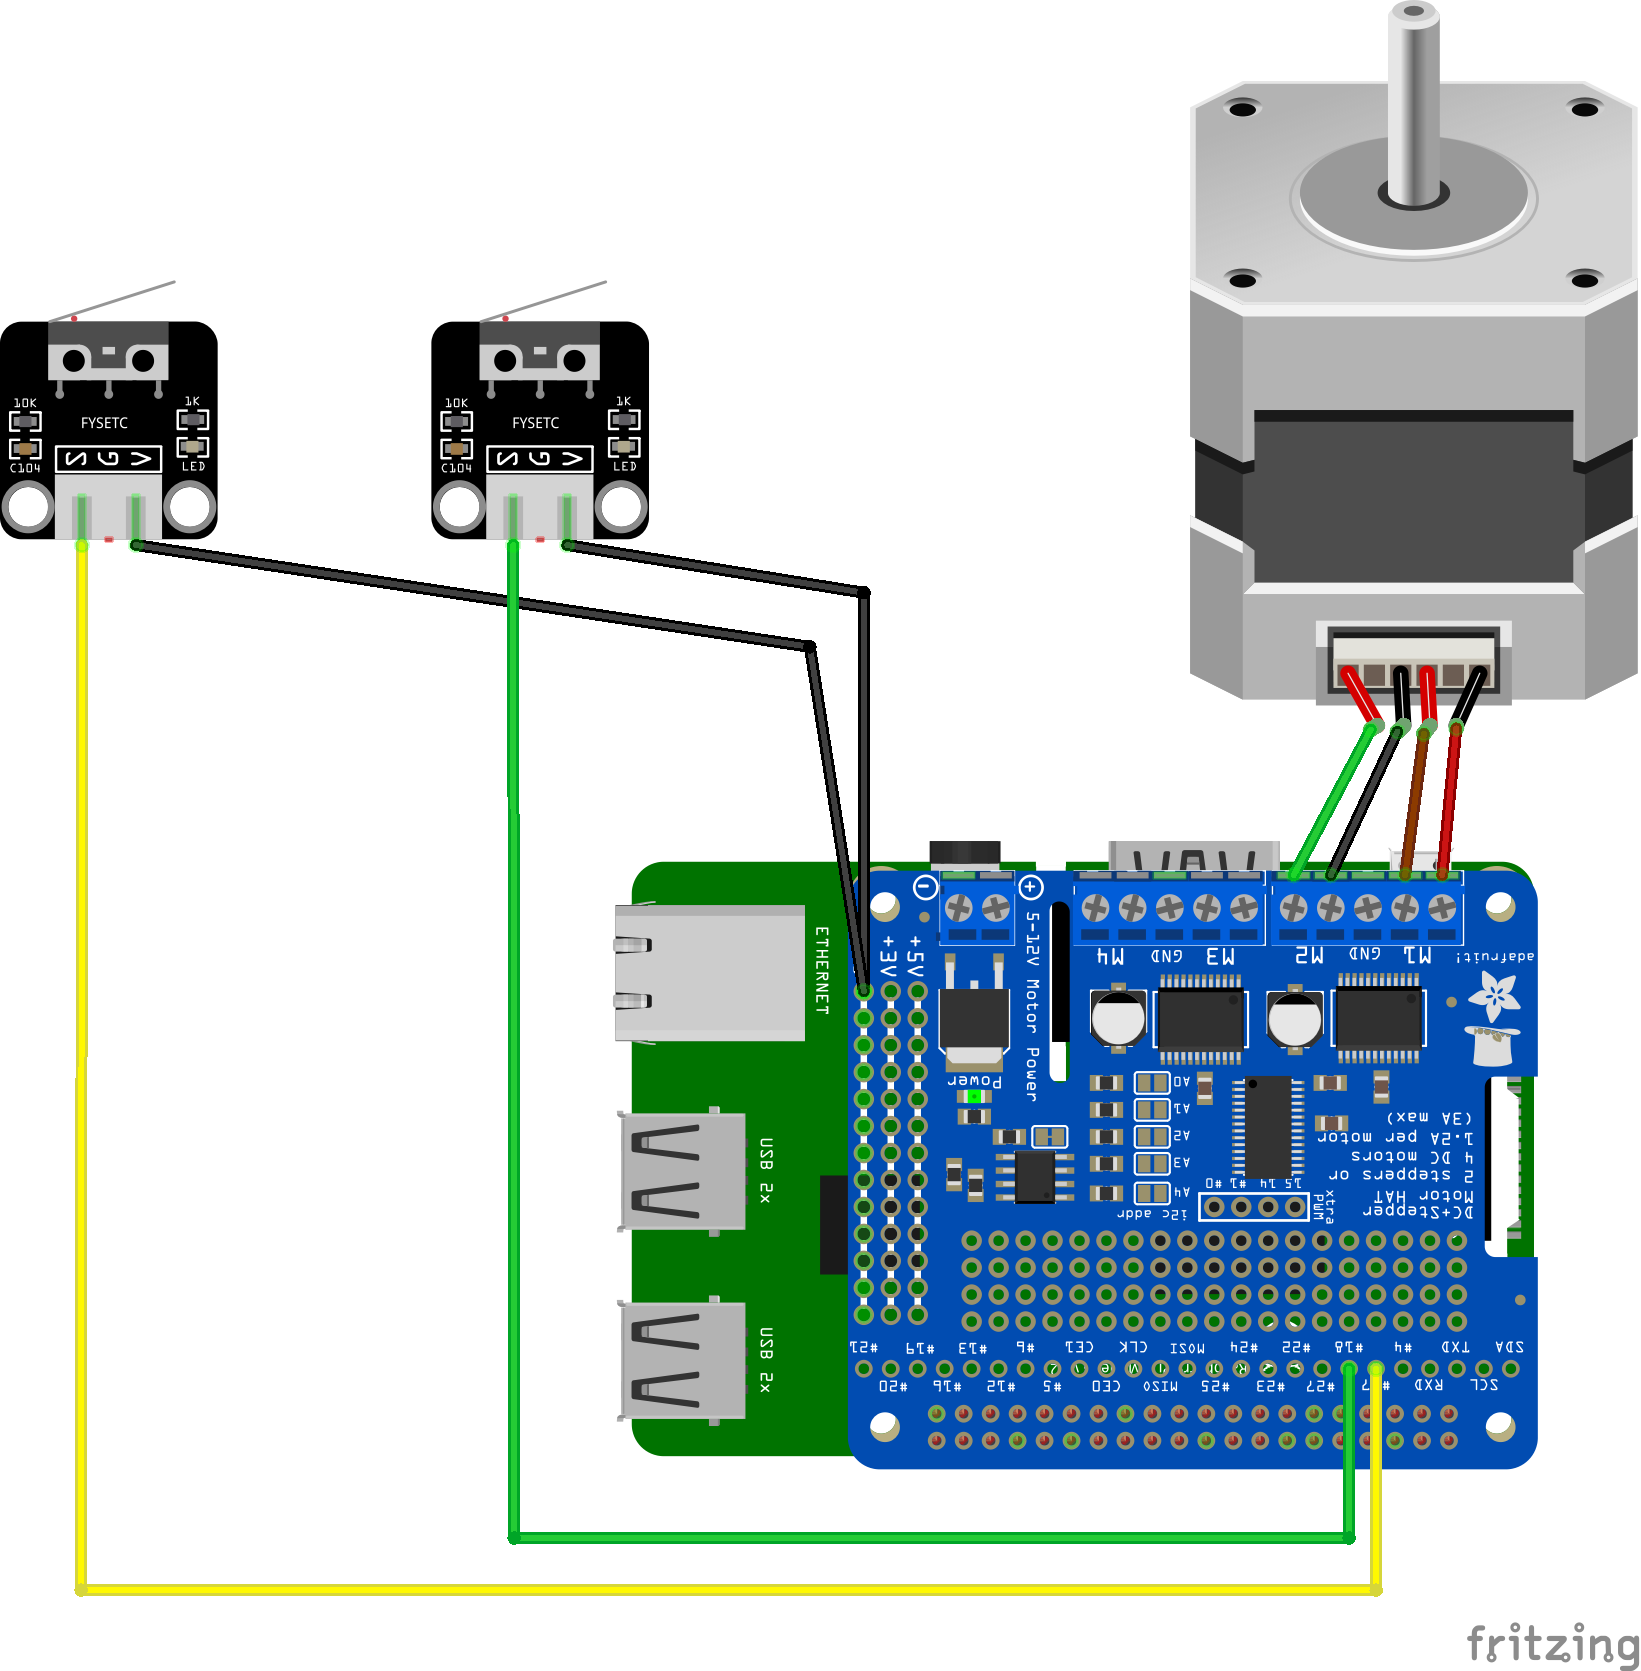
Stepper motors move my camera over two metal rods, with ball bearing wheels. The raspberry controls my nikon using a usb cable. Mounted on the raspberry is a steppermotor hat (adafruit) which can control DC motors and stepper motors. ( In this project i used only one stepper ) The stepper motor carries the platform containing itself, a raspberry and my nikon over the “rails” Two switches on each side sends a signal to the program to stop. All timing are set via the Webgui.
Steps
At reboot, python script wil be started
Moving platform to the left, until switch detects the edge
Waiting for in structions
Entering for example timer 30, speed 10 and r
Platform wil move distance 10 to the right
Wait 30 seconds
Grab a picture
And loops until end of rod reached, then it wil move to left again.
Notes:
Gphoto works with other camera’s also
When placing the camera on the platform, focus once. Disable autofocus, also put your camera in manual mode, setting Apeture, ISO and shutterspeed same as your test photo. (bear in mind: when doing sundown shots maybe start with a little light over compensation)
Below old 2018 version
At home testingVersion i can take appartDrinking beer in NewZealand
New Sdcard. Format, put lite on this
# install gphoto2
apt-get install photo2
# connect nikon with usb, capture test with
gphoto2 --capture-image-and-download --interval 5
# Next steppers
apt-get install python3-pip
pip3 install adafruit-circuitpython-motorkit
# enable I2C
raspi-config -> enable i2c
reboot

# Test python script
import time
import board
from adafruit_motorkit import MotorKit

kit = MotorKit(i2c=board.I2C())

for i in range(100):
    kit.stepper1.onestep()
    time.sleep(0.01)

# Create a API
apt-get install python3-flask python3-flaskext.wtf
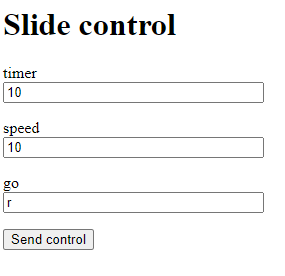
I’m using my phone in Hotspot mode, Timelapser will connect to my phone. Open a browser and enter : http://<ip of timelapser>:8080/form
timer in seconds to shoot pictures speed is the movement on the rail go = r(ight) or l(eft) go + timer 0, move until you reach the end (switch detect)
Todo: Need to change CSS to mobile responsive gui .. like my quizzer
import time
import subprocess
from flask import Flask, jsonify
from multiprocessing import Process, Value
from flask_wtf import FlaskForm
from wtforms import StringField, PasswordField, BooleanField, SubmitField, TextAreaField
from wtforms.validators import DataRequired
from flask import Flask, render_template, request
from flask import render_template
import board
from adafruit_motor import stepper
from adafruit_motorkit import MotorKit
import RPi.GPIO as GPIO
import os; myenv = os.environ.copy(); myenv["LANG"] = "C"


# NOTE:
# timer = seconds between shots
# speed = distance stepper travel

# Using gpio pins to detect max left/right with switches
# BCM Numbering
GPIO.setmode(GPIO.BCM)
# pullup to 17 & 18
GPIO.setup(17, GPIO.IN, pull_up_down=GPIO.PUD_UP)
GPIO.setup(18, GPIO.IN, pull_up_down=GPIO.PUD_UP)

# Stepper HAT is i2c
kit = MotorKit(i2c=board.I2C())

kit.stepper1.release()

global timer
global speed
timer=0
speed=0
go="nix"

app = Flask(__name__)
app.config['SECRET_KEY'] = 'you-will-never-guess'

class FormForm(FlaskForm):
    timer = StringField('timer', validators=[DataRequired()])
    speed = StringField('speed', validators=[DataRequired()])
    go = StringField('go', validators=[DataRequired()])
    submit = SubmitField('Send control')

# Make below in something like : nikon record .. slowly 10s to the right and recording stop?
# Or bounch left/right using gpio sensors
@app.route("/control/<time>/<speed>")
def action(number, message):

    time.sleep(1)

# Print form on: http://<IP>:8080/form = start page
@app.route("/form")
def form():
    form = FormForm()
    return render_template('web.html', title='Web slide control', form=form)


# process form
@app.route('/data', methods = ['POST', 'GET'])
def data():
    if request.method == 'GET':
        return "The URL /data is accessed directly. Try going to '/form' to submit form"
    if request.method == 'POST':

        timer = request.form['timer']
        speed = request.form['speed']
        go = request.form['go']
        timer = int(timer)
        speed = int(speed)
        if timer == 0:
            print("Turn off")
            p = Process(target=record_loop, args=(False,speed,timer,go))
            p.start()
            if str(go) == "l":
               while GPIO.input(17) == True:
                kit.stepper1.onestep(direction=stepper.FORWARD)
                time.sleep(0.01)
            if str(go) == "r":
               while GPIO.input(18) == True:
                kit.stepper1.onestep(direction=stepper.BACKWARD, style=stepper.DOUBLE)
                time.sleep(0.01)

        else:
            print("Turn on")
            p = Process(target=record_loop, args=(True,speed,timer,go))
            p.start()
# print form again
        form = FormForm()
        return render_template('web.html', title='Web slide control', form=form)


# main loop, controls stepper and camera
def record_loop(loop_on,myspeed,mytimer,mygo):
   while True:
      if loop_on == True:
# test if switch hit yet, else move
         print('timer' + str(mytimer))
         print('speed' + str(myspeed))
         time.sleep(2)
         if str(mygo) == "l":
             if GPIO.input(17):
                print("Pin 17 is HIGH")
                for i in range(myspeed):
                        kit.stepper1.onestep(direction=stepper.FORWARD, style=stepper.DOUBLE)
                        time.sleep(0.01)
                kit.stepper1.release()
             else:
                print("Pin 17 is LOW")
         if str(mygo) == "r":
             if GPIO.input(18):
                print("Pin 18 is HIGH")
                for i in range(myspeed):
                        kit.stepper1.onestep(direction=stepper.BACKWARD, style=stepper.DOUBLE)
                        time.sleep(0.01)
                kit.stepper1.release()
             else:
                print("Pin 18 is LOW")
         time.sleep(mytimer)
         subprocess.run(['/root/mycapture'])
         subprocess.Popen([
        "gphoto2",
        "--capture-image"],stdout=subprocess.PIPE)

# Main loop
if __name__ == "__main__":
   while GPIO.input(17) == True:
         kit.stepper1.onestep(direction=stepper.FORWARD, style=stepper.DOUBLE)
         time.sleep(0.01)
   kit.stepper1.release()
   p = Process(target=record_loop, args=(False,0,0,go))
   p.start()
   app.run(host='0.0.0.0', port=8080, debug=False)
   p.join()
Other files
cat templates/web.html
{% block content %}
    <h1>Slide control</h1>
	    <form action="/data" method = "POST">

        {{ form.hidden_tag() }}
        <p>
            {{ form.timer.label }}<br>
            {{ form.timer(size=32) }}
        </p>
        <p>
            {{ form.speed.label }}<br>
            {{ form.speed(size=32) }}
        </p>
        <p>
            {{ form.speed.go }}<br>
            {{ form.go(size=32) }}
        </p>
        <p>{{ form.submit() }}</p>
    </form>
{% endblock %}

gphoto running from cron/python is a b*tch, had to rewrite subprocess and running from screen

Start screen @reboot, just crontab -e