Got a delivery today …
Woot .. let the 8088/v20 hardware hacking commence!
First to do: LEDs, everybody loves blinking leds.
Next: Probably a address decoder with a VIA/CIA and a LCD Display.
Now I have to wait for my mouser order to be delivered.
Got a delivery today …
Woot .. let the 8088/v20 hardware hacking commence!
First to do: LEDs, everybody loves blinking leds.
Next: Probably a address decoder with a VIA/CIA and a LCD Display.
Now I have to wait for my mouser order to be delivered.
See what I did?
Part x in my .. in don’t like series haha
Post topic: My life changed when changing this one setting.
Answer: Congratulations, you have a boring life.
Post topic: You are using this and that wrong!
Answer: No I don’t
Post topic: Only 1% see this optical illusion/What you see first tells you what kind of person you are./You are a genius when you find the numbers in this illusion.
Answer: No it doesn’t
Post topic: This setting is ruining your experience.
Answer: No I like it in the current setting
Post topic: Creepy HIDDEN map tracks .. blah blah.
Answer: No its not hidden, and it there by default and can be toggled using the settings menu.
Post topic: Do this now! You will be happy you did.
Answer: No I don’t, didn´t and never will
Post topic: Expect has cracked the code for a happy life.
Answer: Suuure..
Post topic: The BEST recipe for …
Answer: Depends what you like, maybe its a GOOD recipe, liked by more people.
Post topic: The top 10/best .. you have to own.
Answer: My top 10 is different, shutup.
Also .. this Popup over popup ….
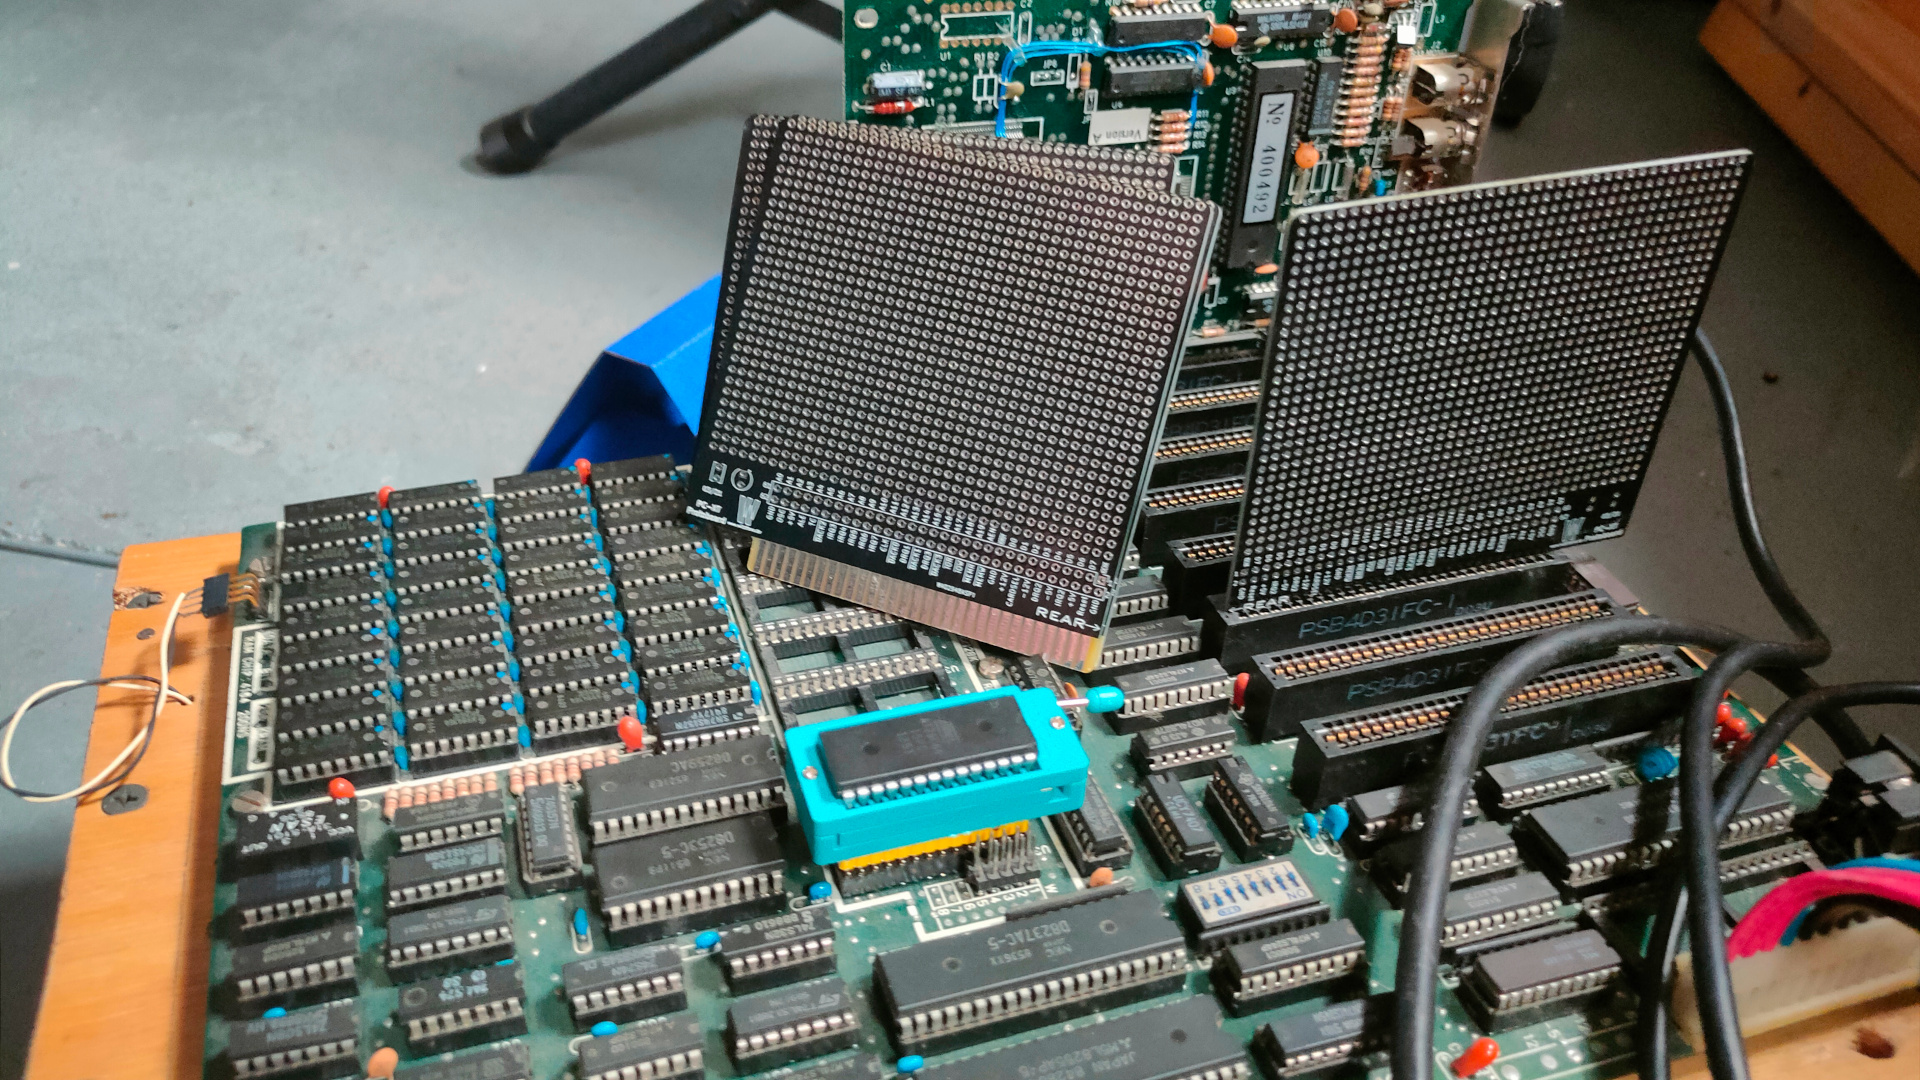
My BBC Acorn model B is working again. The original monitor is still dead.
Time to play with some machine code and ROMs.
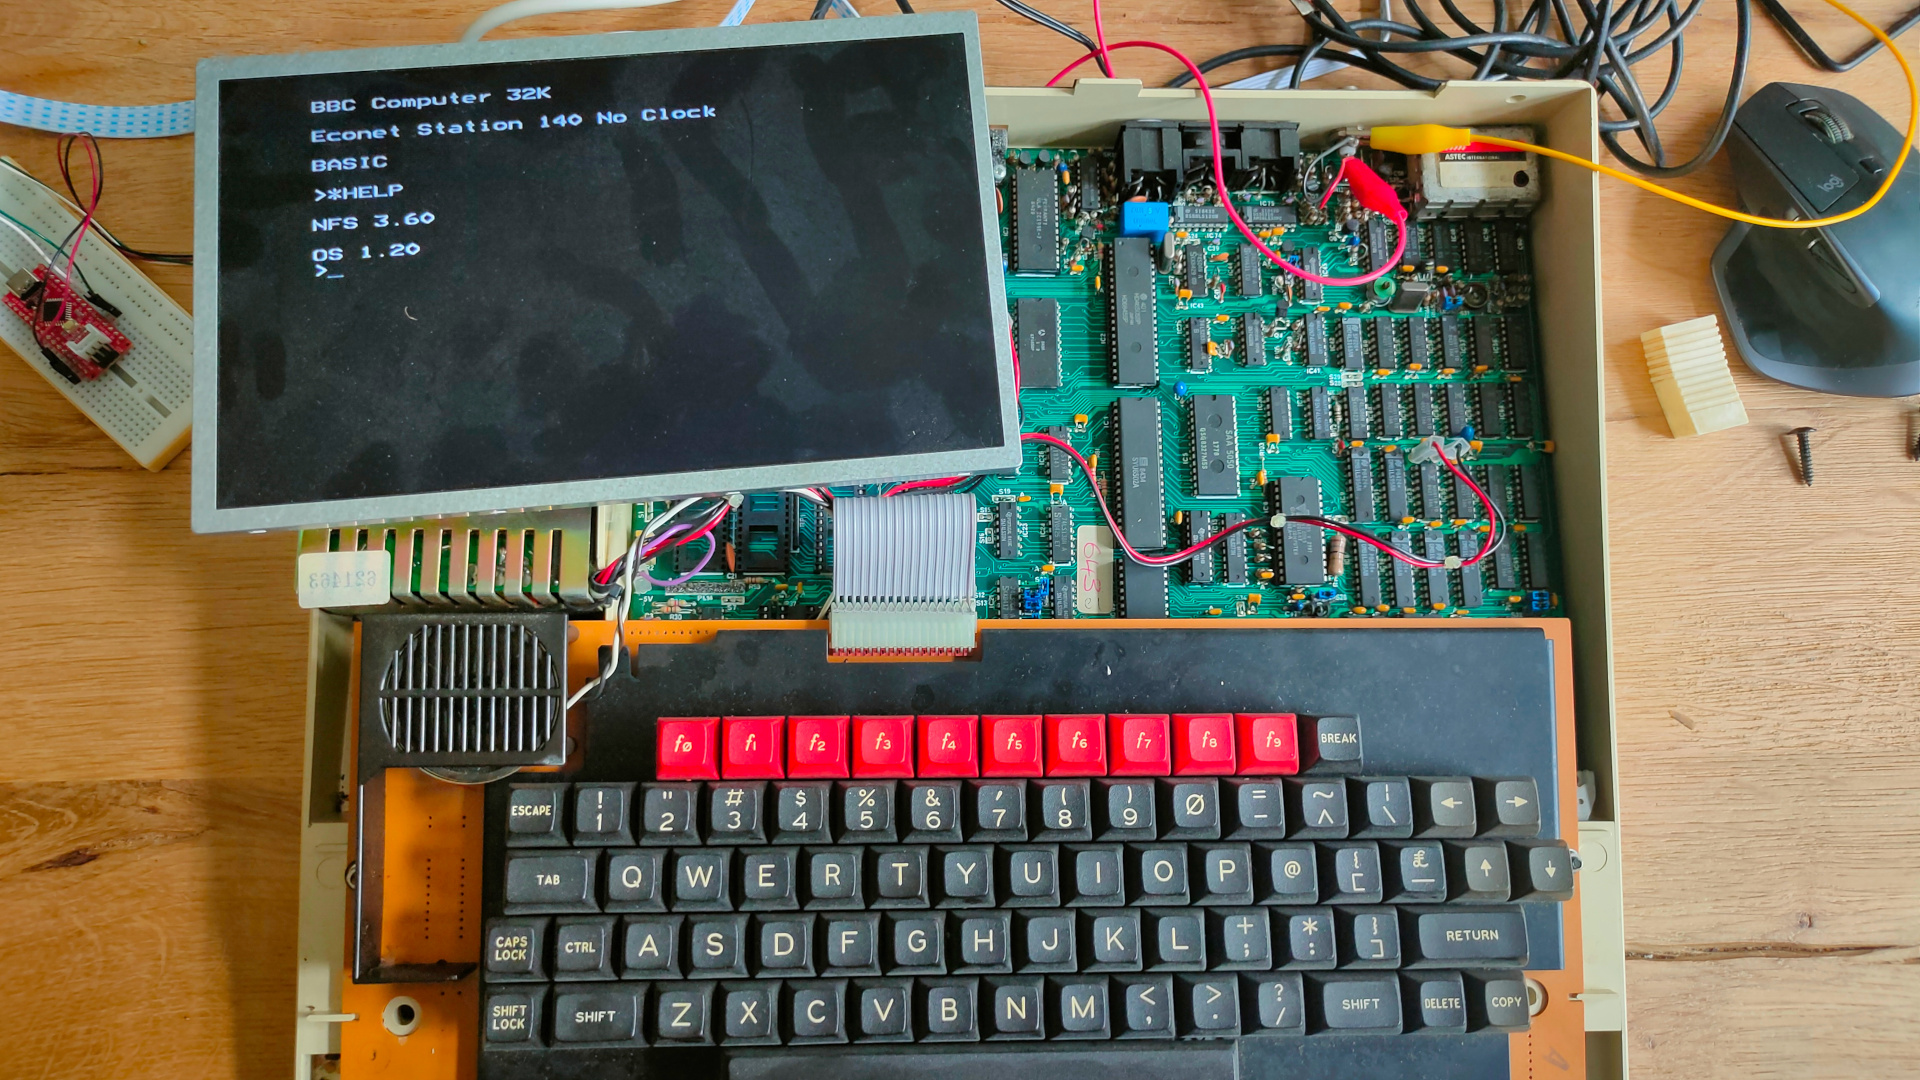
My machine has a NFS rom installed. (NetFS)
Econet was Acorn Computers’s low-cost local area network system, intended for use by schools and small businesses. It was widely used in those areas, and was supported by a large number of different computer and server systems produced both by Acorn and by other companies.
I found a ROM online called Gremlin. It is a 16K rom file. But at the moment I only got some 28C64 (8k) or 28C256 (32k) eeproms.
32k it is. But de beeb having address line A14 floating high, I need to flash the upper 16k of the 32k ROM.
So I made the 16K rom into a 32K using cat
cp Gremlin\ v1.21\ \(1983\)\(Computer\ Concepts\).rom 16k.rom
cat Gremlin\ v1.21\ \(1983\)\(Computer\ Concepts\).rom >> 16k.rom

minipro -w 16k.rom -p AT28C256
I got the rom from this page:
https://acorn.huininga.nl/pub/unsorted/roms/Gremlin%20v1.21%20(1983)(Computer%20Concepts).rom
Below booting straight into the monitor program.
Manual:
Ben posted a youtube about Wozmon running on his 6502.
In 1976, Steve Wozniac wrote what’s commonly known simply as Wozmon.
Wozmon is a machine-code monitor program written by Wozniak for the Apple 1. In Only 256 bytes ! Being pure 6502 code easily adaptable.
A monitor program allows you to view/edit and run machine code using simple commands.
I’ve got a different setup as Ben’s computer.
But changing the necessary, and it will run on my 6502.
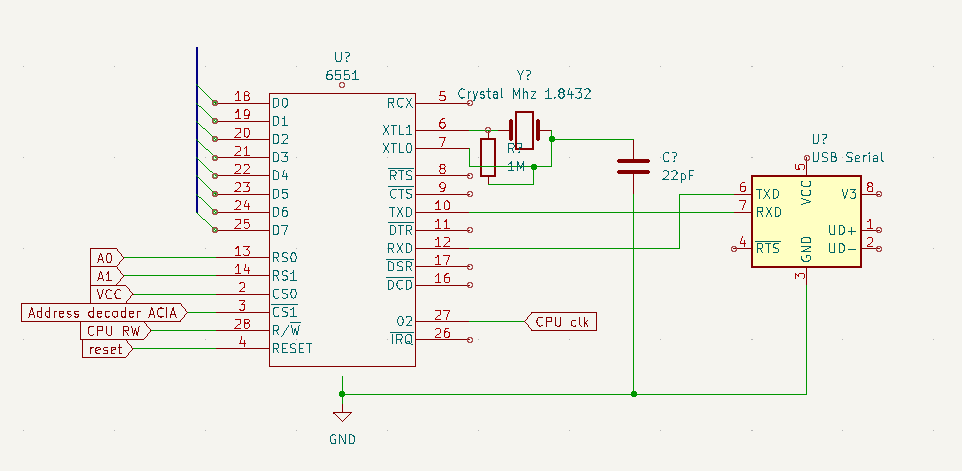
I’m not using rs232 voltage levels (-7 till -25 and +7 till +25 volts).
I’m using a usb serial uart standard 5v leveling stick …
For address decoder see other post
Compiling the Wosmon gave me an error, DEC is not a valid opcode for a bare 6502 .. but we have a 65c02.
Solution: Add -c02 extra opcodes
error 1 in line 187 of "wozmon.s": illegal operand types
>                DEC                    ; Decrement A.

# fix .. add -c02
vasm6502_oldstyle -c02 -Fbin -dotdir wozmon.s
Below Apple I Manual with the sourcecode for Wozmon
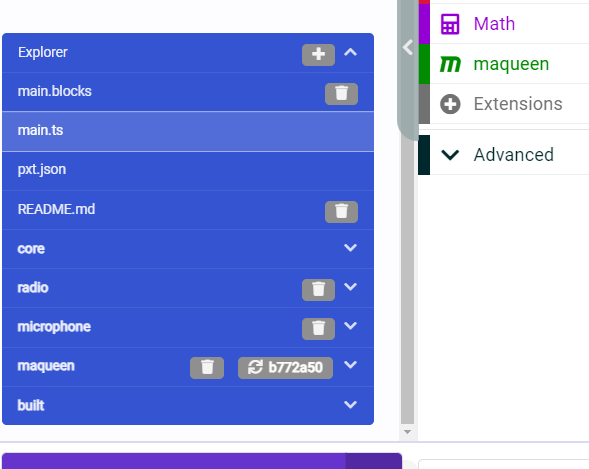
A friend bought a mini robot for his son.
But it didn’t work as it should.
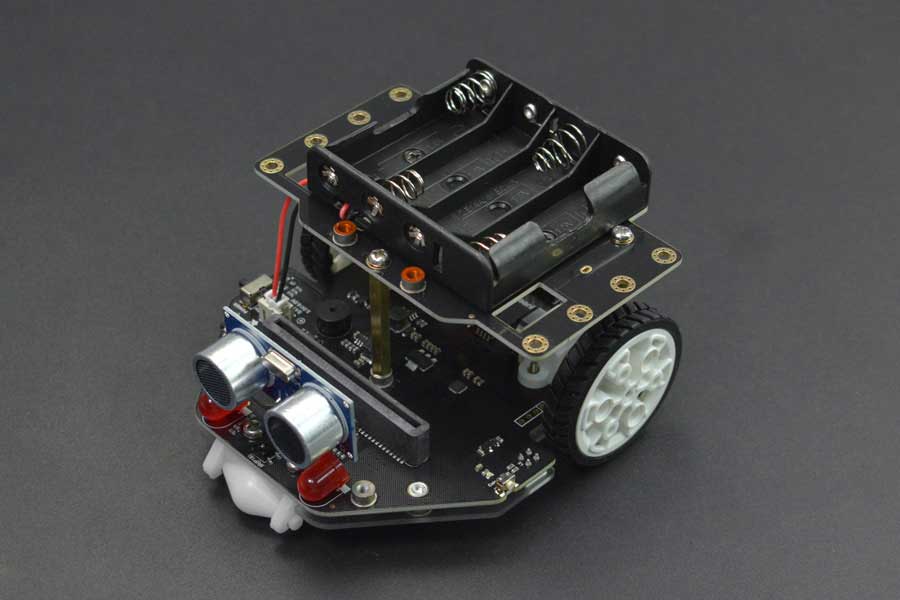
No way i let this opportunity pass to play with it!
This is the one:
https://elektronicavoorjou.nl/product/maqueen-plus-v2/
Maqueen Plus V2 – Geavanceerde STEM Educatie Robot voor micro:bit
https://wiki.dfrobot.com/SKU_MBT0021-EN_Maqueen_Plus_STEAM_Programming_Educational_Robot#target_0
So you can program this in a blockly like manner.

Problems we encountered:
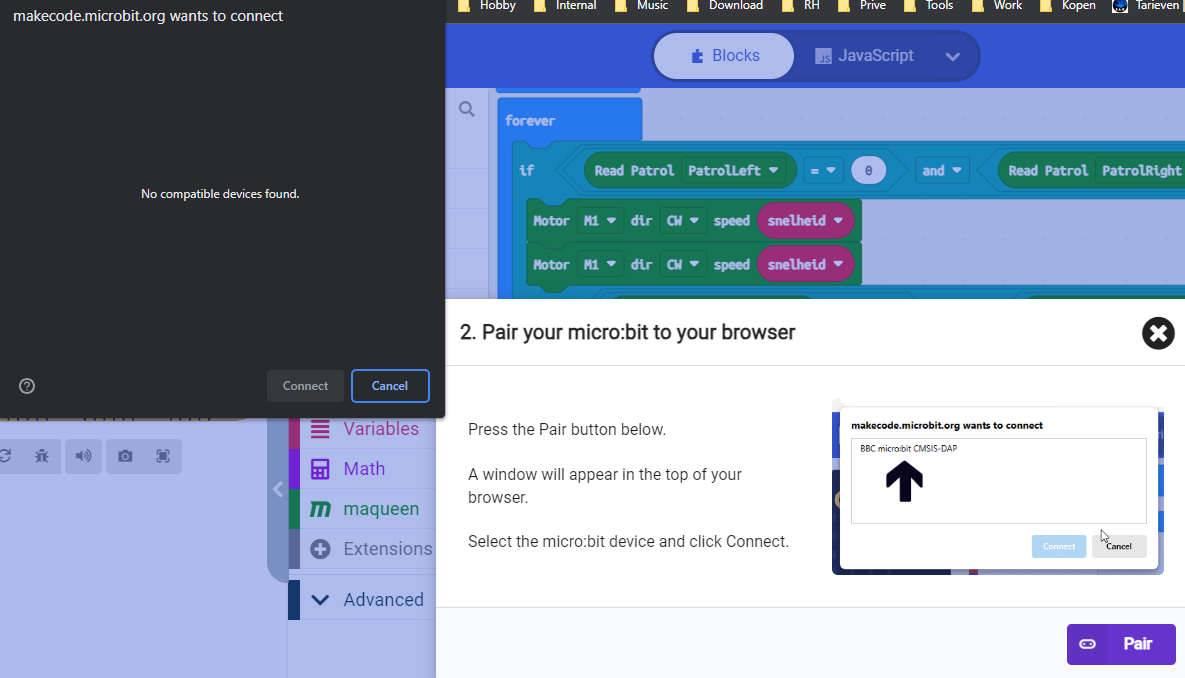
Apparently my AI camera can be connected to this robot!
Altered glabios to run code at F600:0000 instead of basic rom.
(Needs to have code to check if rom exists)
My test code and generating rom is below:
It should set leds on the keyboard to on .. we will see tomorrow.
NAME mycode
.model small
ORG 0h

.code
start:	mov al, 11000000b
        out 80h, al
loop1:  nop
	jmp loop1
ORG 1fffh ; end of rom
	db 0
END
makefile is:
@ECHO OFF
MASM /DARCH_TYPE="T" /DCPU_TYPE="V" MYROM;
LINK MYROM;
EXE2COM MYROM.EXE
REN MYROM.COM MYROM.ROM
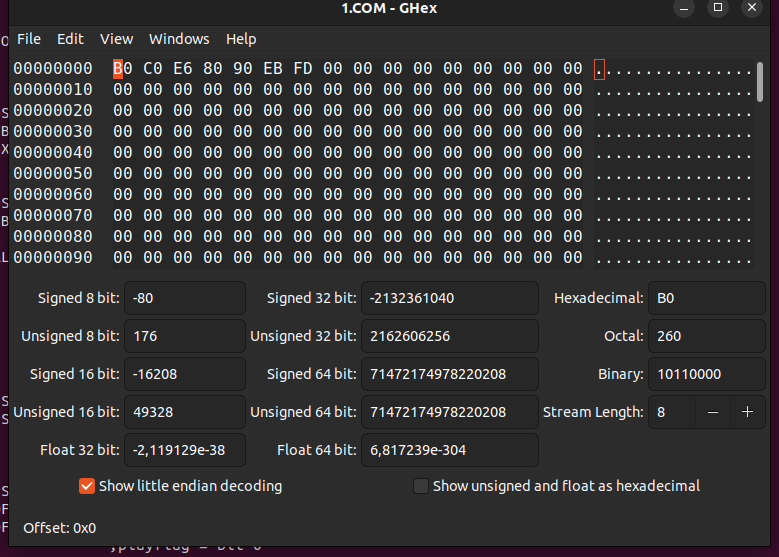
That looks okay!
MOV AL = B0
C0 = 11000000
OUT = E6
80h = 80h
90 = NOP
EB = relative jump
FD = -3 to NOP instruction
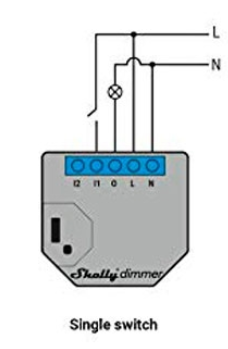
Our bedroom has a shelly dimmer, this one is connected with a wall switch and is being controlled by Domoticz, Home Assistant and NodeRed.
I had to fix some stuff, so this was a perfect time to jot down some notes.
I’ve wired it up like this:
(I’ve got a Line wire in my ceiling socket, so i placed the module there instead of the wall socket)
Configure the Shelly as mentioned in the manual. After that do the following:
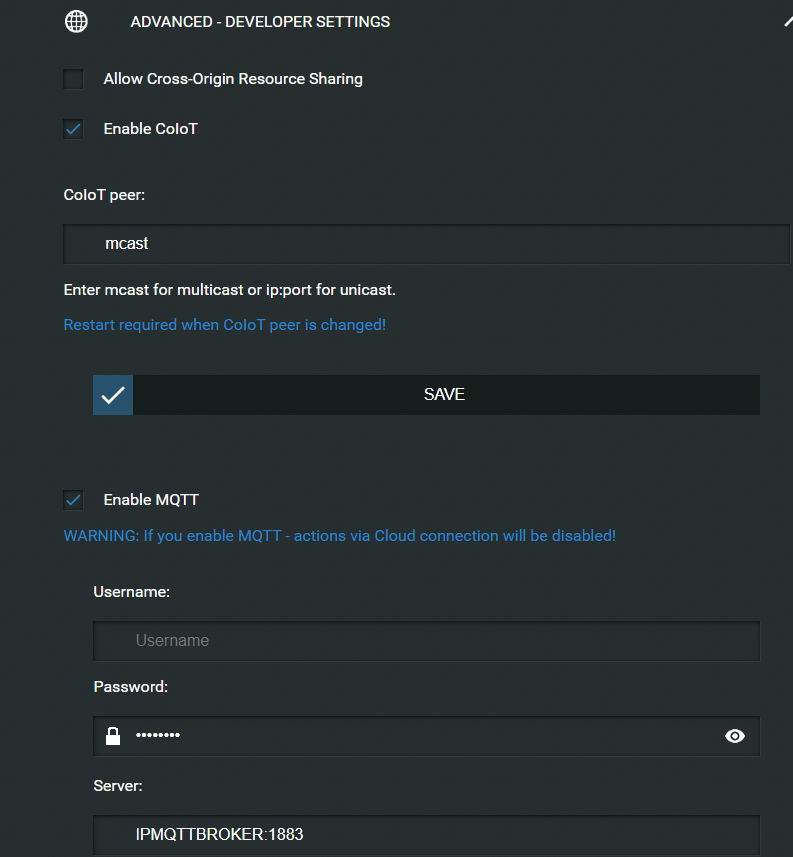
Advance > Developer settings :
(Enable CoIot if you want a easy auto detect for Home Assistant)
Enable MQTT (This will DISABLE cloud ! )
Server: the ip number of your Mqtt Broker
Next I did was:
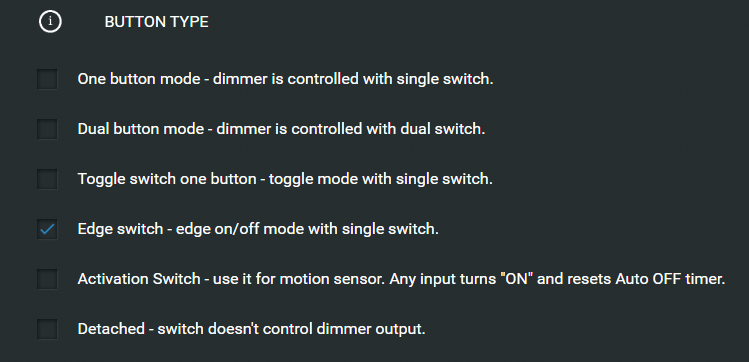
Now the wall switch will change/toggle what the current state is.
(If the light is off, and you switch it on using Mqtt, you probably needed to hit the switch two times to turn it off again. Not so with this setting.)
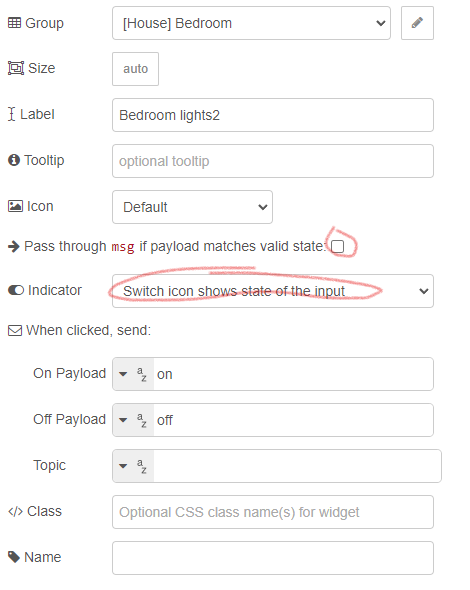
My Nodered Flow ( Not using the Shelly palette nodes in this example)
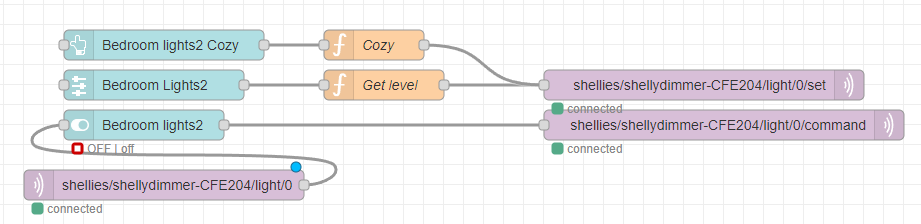
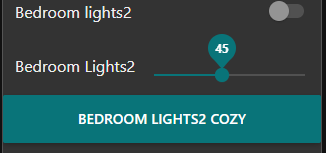
The Mqtt IN node sets the state of the switch when you use the wall switch!
Cozy turns light on at a specific level.
The slider send an off command when 0% selected, else an on command and the sliders value.
# Cozy function
msg.payload = {};
msg.payload.turn="on";
msg.payload.brightness=30;
return msg;

# Slider function
var varlevel = msg.payload;
msg.payload = {};
if(varlevel == 0){
msg.payload.turn="off";
} else
{
    msg.payload.turn="on";
}
msg.payload.brightness=varlevel;
return msg;
DashBoard
The Flow
[
    {
        "id": "32d1c58277d38408",
        "type": "ui_switch",
        "z": "746c372deb597681",
        "name": "",
        "label": "Bedroom lights2",
        "tooltip": "",
        "group": "c387df0cfc06c60e",
        "order": 3,
        "width": 0,
        "height": 0,
        "passthru": false,
        "decouple": "true",
        "topic": "",
        "topicType": "str",
        "style": "",
        "onvalue": "on",
        "onvalueType": "str",
        "onicon": "",
        "oncolor": "",
        "offvalue": "off",
        "offvalueType": "str",
        "officon": "",
        "offcolor": "",
        "animate": true,
        "className": "",
        "x": 220,
        "y": 940,
        "wires": [
            [
                "df432d3faea35f38"
            ]
        ]
    },
    {
        "id": "fb12eddd50d3013e",
        "type": "ui_slider",
        "z": "746c372deb597681",
        "name": "",
        "label": "Bedroom Lights2",
        "tooltip": "",
        "group": "c387df0cfc06c60e",
        "order": 4,
        "width": 0,
        "height": 0,
        "passthru": true,
        "outs": "end",
        "topic": "",
        "topicType": "str",
        "min": 0,
        "max": "100",
        "step": 1,
        "className": "",
        "x": 230,
        "y": 900,
        "wires": [
            [
                "d9c299ec7c0c82b0"
            ]
        ]
    },
    {
        "id": "d9c299ec7c0c82b0",
        "type": "function",
        "z": "746c372deb597681",
        "name": "Get level",
        "func": "var varlevel = msg.payload;\nmsg.payload = {};\n\nif(varlevel == 0){ \nmsg.payload.turn=\"off\";\n} else\n{\n    msg.payload.turn=\"on\";\n}\n\nmsg.payload.brightness=varlevel;\nreturn msg;",
        "outputs": 1,
        "noerr": 0,
        "initialize": "",
        "finalize": "",
        "libs": [],
        "x": 460,
        "y": 900,
        "wires": [
            [
                "315ffbe441467c10"
            ]
        ]
    },
    {
        "id": "df432d3faea35f38",
        "type": "mqtt out",
        "z": "746c372deb597681",
        "name": "",
        "topic": "shellies/shellydimmer-CFE204/light/0/command",
        "qos": "",
        "retain": "",
        "respTopic": "",
        "contentType": "",
        "userProps": "",
        "correl": "",
        "expiry": "",
        "broker": "8c74c5f6.9a7a48",
        "x": 800,
        "y": 940,
        "wires": []
    },
    {
        "id": "315ffbe441467c10",
        "type": "mqtt out",
        "z": "746c372deb597681",
        "name": "",
        "topic": "shellies/shellydimmer-CFE204/light/0/set",
        "qos": "",
        "retain": "",
        "respTopic": "",
        "contentType": "",
        "userProps": "",
        "correl": "",
        "expiry": "",
        "broker": "8c74c5f6.9a7a48",
        "x": 780,
        "y": 900,
        "wires": []
    },
    {
        "id": "15f1c904607a0adc",
        "type": "function",
        "z": "746c372deb597681",
        "name": "Cozy",
        "func": "msg.payload = {};\n\nmsg.payload.turn=\"on\";\n\nmsg.payload.brightness=30;\nreturn msg;",
        "outputs": 1,
        "noerr": 0,
        "initialize": "",
        "finalize": "",
        "libs": [],
        "x": 450,
        "y": 860,
        "wires": [
            [
                "315ffbe441467c10"
            ]
        ]
    },
    {
        "id": "57fb1210d37e5325",
        "type": "ui_button",
        "z": "746c372deb597681",
        "name": "",
        "group": "c387df0cfc06c60e",
        "order": 5,
        "width": 0,
        "height": 0,
        "passthru": false,
        "label": "Bedroom lights2 Cozy",
        "tooltip": "",
        "color": "",
        "bgcolor": "",
        "className": "",
        "icon": "",
        "payload": "",
        "payloadType": "str",
        "topic": "topic",
        "topicType": "msg",
        "x": 240,
        "y": 860,
        "wires": [
            [
                "15f1c904607a0adc"
            ]
        ]
    },
    {
        "id": "30cba96b08f3b830",
        "type": "mqtt in",
        "z": "746c372deb597681",
        "name": "",
        "topic": "shellies/shellydimmer-CFE204/light/0",
        "qos": "2",
        "datatype": "auto-detect",
        "broker": "8c74c5f6.9a7a48",
        "nl": false,
        "rap": true,
        "rh": 0,
        "inputs": 0,
        "x": 240,
        "y": 1000,
        "wires": [
            [
                "32d1c58277d38408"
            ]
        ]
    },
    {
        "id": "c387df0cfc06c60e",
        "type": "ui_group",
        "name": "Bedroom",
        "tab": "f177532a78f3f1d2",
        "order": 3,
        "disp": true,
        "width": "6",
        "collapse": true,
        "className": ""
    },
    {
        "id": "8c74c5f6.9a7a48",
        "type": "mqtt-broker",
        "name": "IPBROKER",
        "broker": "IPBROKER",
        "port": "1883",
        "clientid": "",
        "usetls": false,
        "compatmode": true,
        "keepalive": "15",
        "cleansession": true,
        "birthTopic": "",
        "birthQos": "0",
        "birthPayload": "",
        "closeTopic": "",
        "closePayload": "",
        "willTopic": "",
        "willQos": "0",
        "willPayload": ""
    },
    {
        "id": "f177532a78f3f1d2",
        "type": "ui_tab",
        "name": "House",
        "icon": "dashboard",
        "order": 1,
        "disabled": false,
        "hidden": false
    }
]
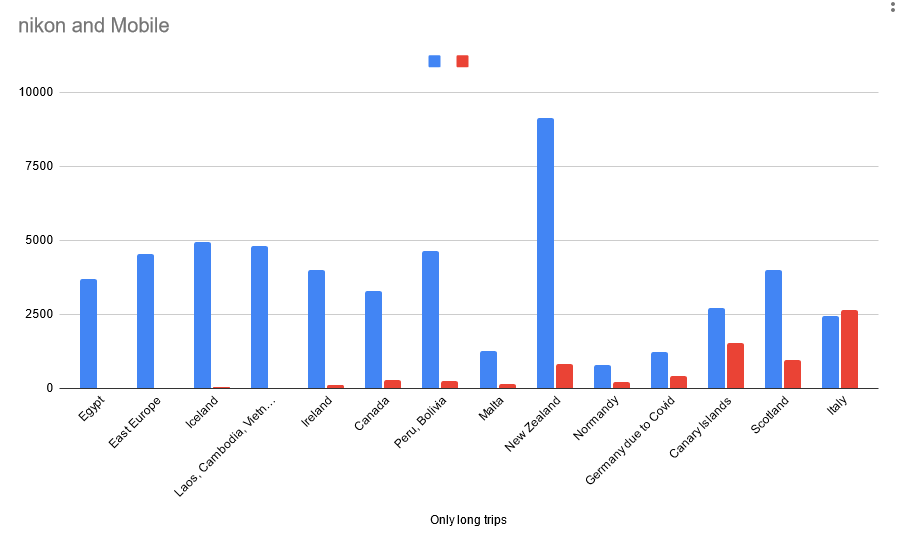
Italy 2023
Pictures : 2633 mobile + 2425 dslr
Movies : 52
Highest point: 1214m (Vesuvius)
Lowest: -40m
Pizza’s eaten:
Too many ( sometimes 2 times a day), it was hard to get something else to eat besides Pizza and Pasta.
Oldest building : 500BC
Km walked: 220Km
Km driven: ? (calculating) Will update when i post something about unwritten traffic rules in Italy.
Types of transport: Plane, train, metro/subway, bus, scooter, bike, car, walking
Temperature high: 32
Temperature low: 16
About the photos .. it finally happened.
More mobile photos where taken than with our trusty Nikon!
(Read our New Zealand post, why trusty .. rain damage on both Mobile and Nikon D750)
This has multiple reasons:
Why still use dlsr?
Followup on :
I wrote a little python script which checks the checksum of a Bios.
In a previous post i used hexedit to play around changing a Bios dump.
Below posted python script calculates the checkum using the following:
Add all bytes in the file and do a modulo 256 on this number. The output should be 0.
My previous edit gave me a output of C2, so I changed an unused byte FF into (FF-C2) 3D.
No more checksum errors when booting!
Next to do, get a Bios like Glabios or PcXtBios to start my own code from a secondary Eeprom.
import sys

# Bios sum modulo should be 0
# edit  last or unused byte to fix
# python bios-checksum-test.py MYROM.edit.checksum
# 0

f = open(sys.argv[1],'rb')
m = f.read()
print  '%x' % ( ( sum(ord(c) for c in m) & 0xFFFFFFFF ) % 256 )
Python3
import sys

# Bios sum modulo should be 0
# edit  last or unused byte to fix
# python bios-checksum-test.py MYROM.edit.checksum
# 0

f = open(sys.argv[1],'rb')
m = f.read()
checksum =  ( ( sum((c) for c in m) & 0xFFFFFFFF ) % 256 )
print(checksum, 'in hex =', hex(checksum))
Just back from my 3 week trip to Italy.
Made 5000-odd photos.
Using my posted scripts they are easily sorted.
But some are crooked, lets fix them.
Not a straight horizon:
Lets open this photo in Gimp
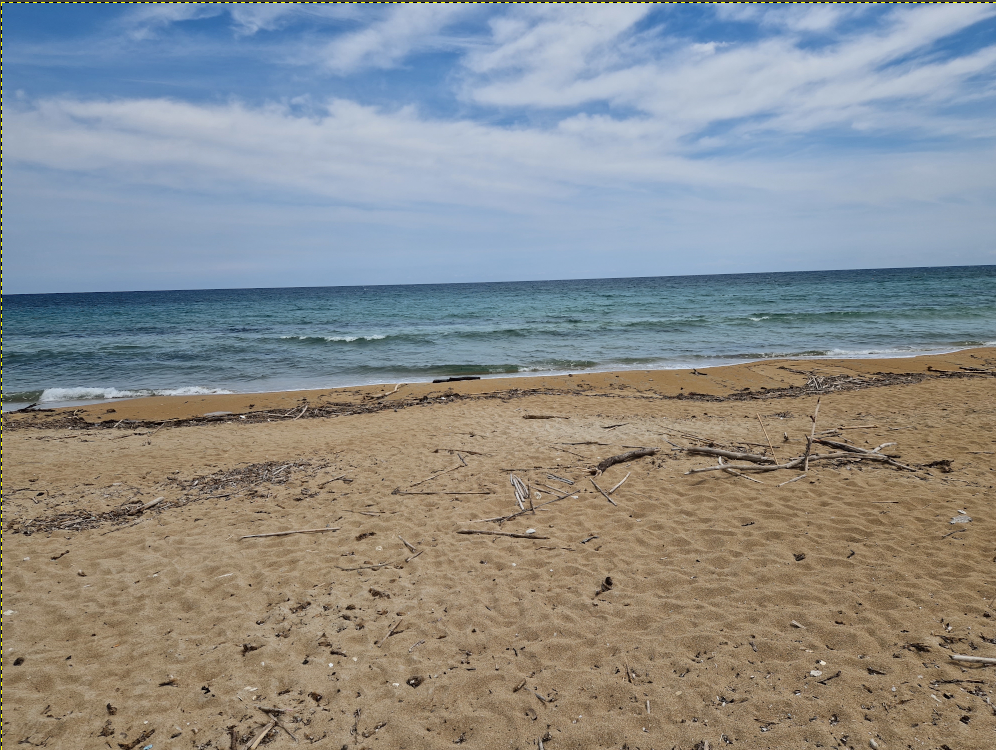
Easy to fix:
Easy ..
Another fix below : Perspective
Sometimes you want to look straight at a picture, but when taking a picture there is something preventing this.