I was working on a MCUME proof of concept, with my own compiled version. But my combination of a Pico and an ILI9341 display didn’t work.
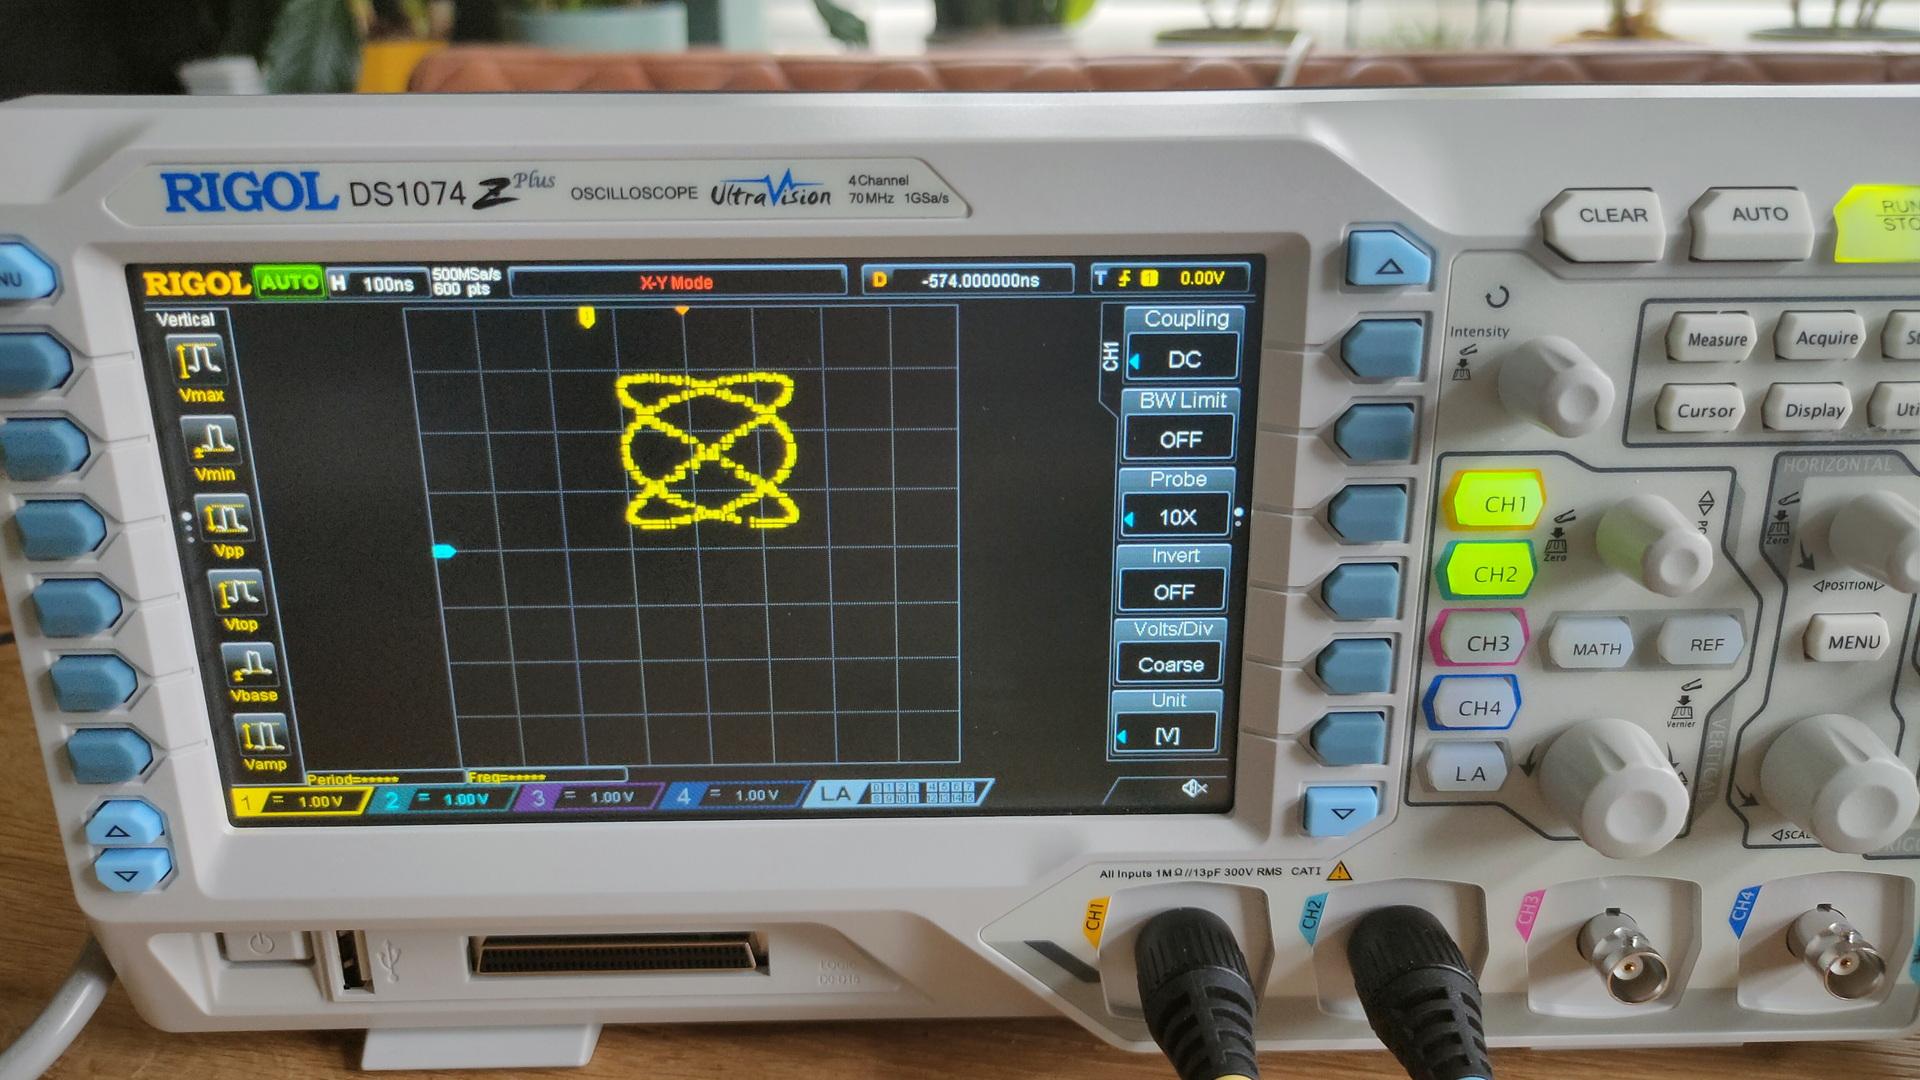
Luckily, a package arrived. My new scope!
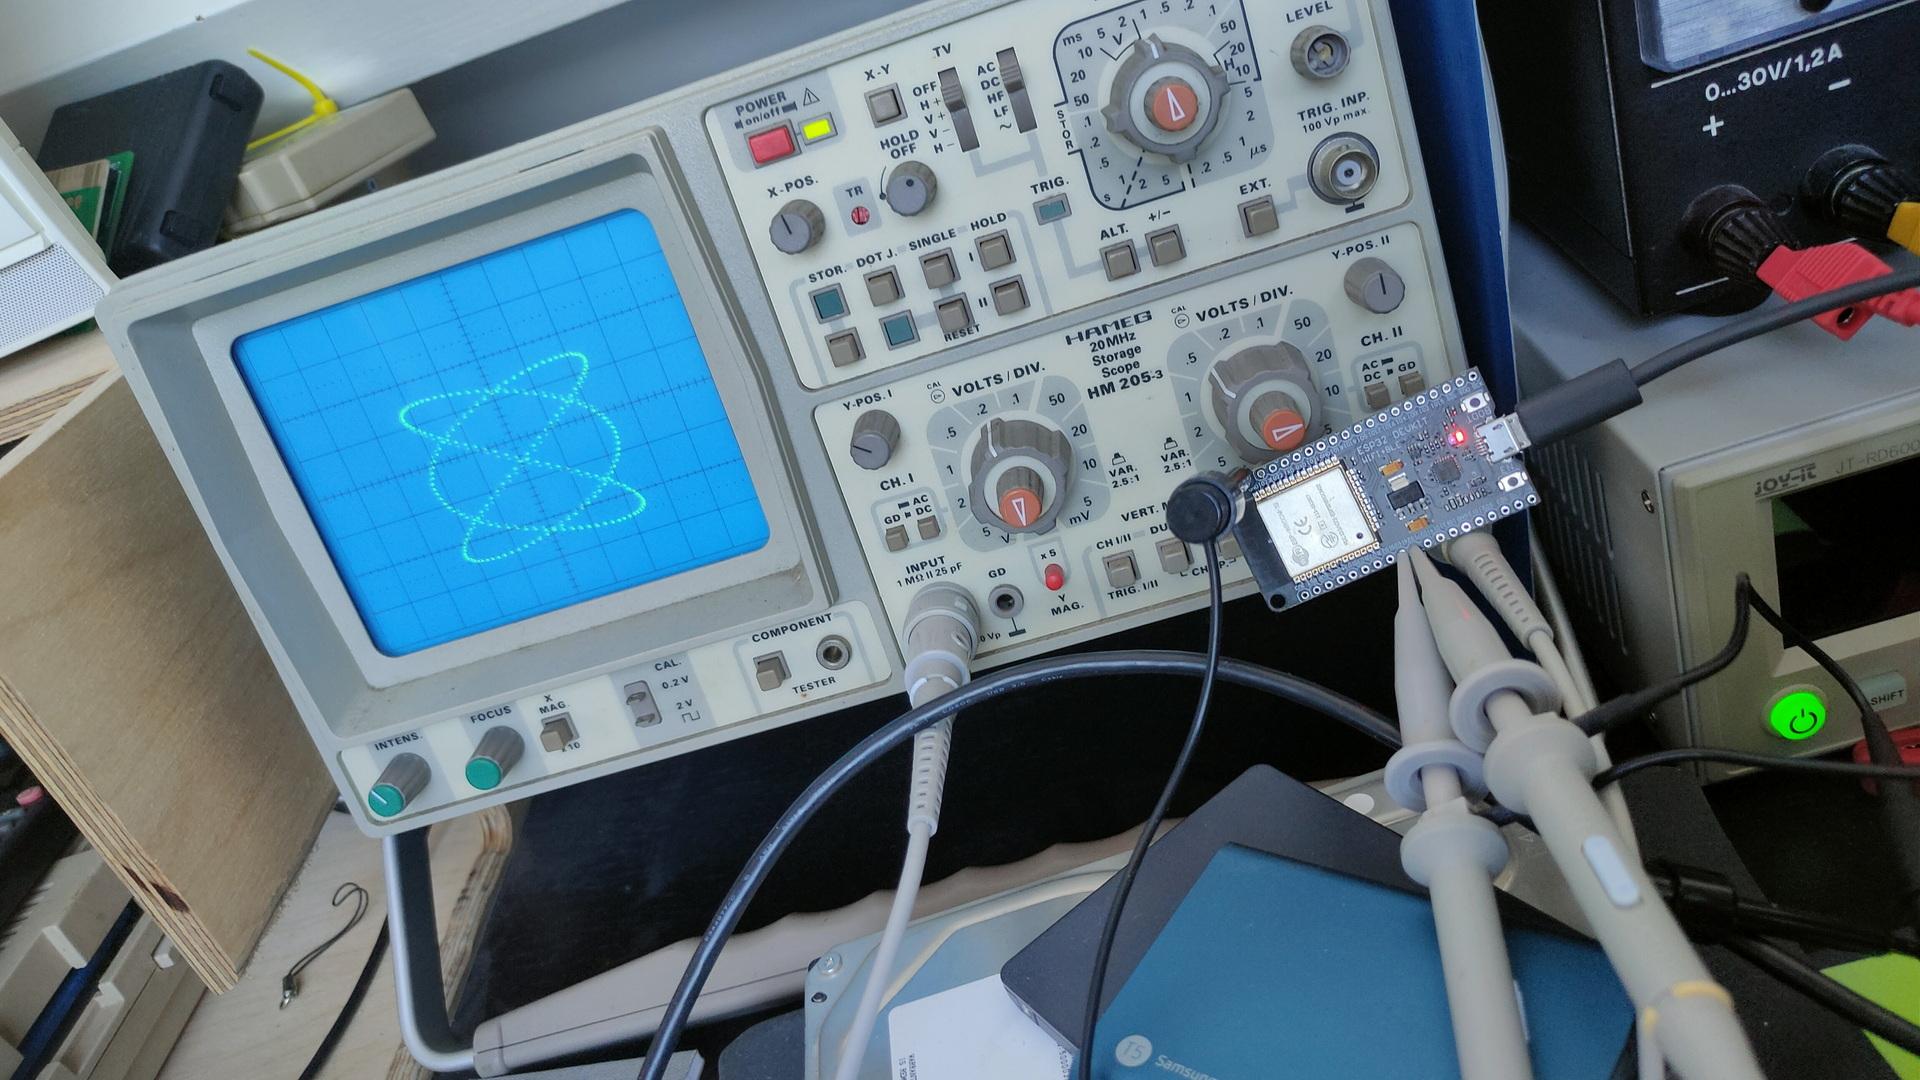
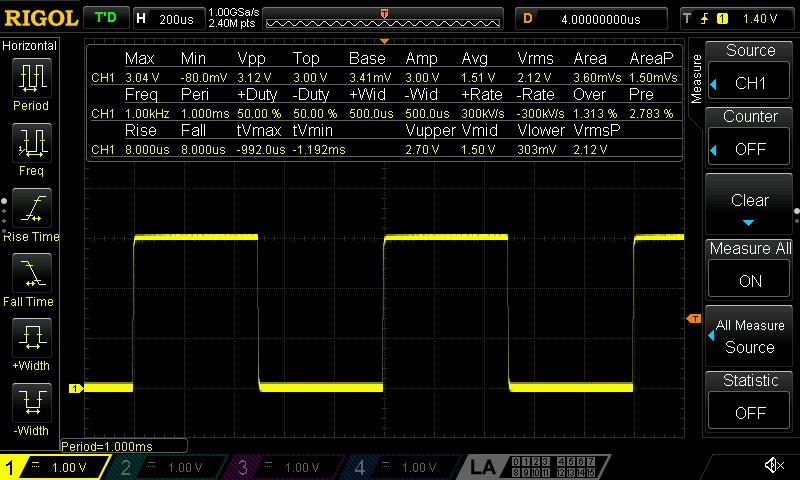
A Rigol DS1074Z+ oscilloscope! The replacement of my CRT version.
My new RigolThe old Crt versionNew and old, both with the ESP dual sine demo i’ve posted about.
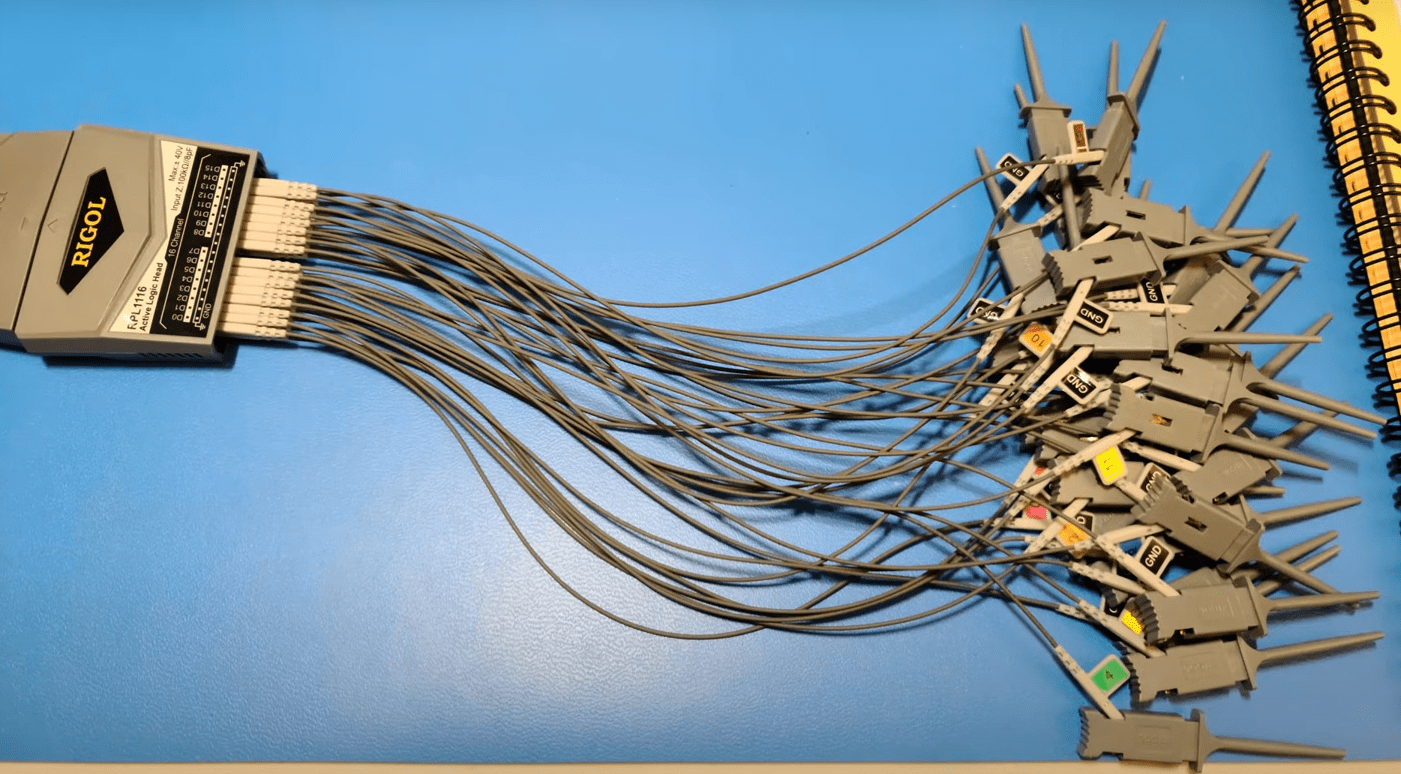
This new oscilloscope has 4 channels AND there is a add-on for a 16channel logic analyser.
For my next birthday?!? 🙂
The Rigol can be connected to a wired network. So that’s one of the first things I did. (It came with all software options enabled, so no need to ‘fix’ those)
#!/bin/bash
#set -x
f=MAE
numba=$(ls *png | wc -l)
numbastart=$(( $numba - 10))
numbapadding=$( printf "%04d\n" $numba)
numbapaddingstart=$( printf "%04d\n" $numbastart)
echo "$f "
mkdir -p images/$f
mkdir -p metric/$f
for x in $(seq -w 1 $numbapaddingstart) ; do
	a=$(( $x + 10))
	for y in $(seq -w $a $numbapadding) ; do

	compare -fuzz 20% -verbose -metric $f  $x.png $y.png images/$f/$x-$y.png  2> metric/$f/$x-$y.txt
	echo -n "."

	done
done
echo ""
Step 3 : There are metric stats in a subdirectory, let’s find the most matching parts (top 10)
orgpwd=$PWD
: > /tmp/top10
more metric/MAE/* | grep all   | awk '{ print $2 }' | cut -f1 -d. | sort -n |head | while read ; do
grep -H all metric/MAE/* | cut -f1,2 -d.  | grep " $REPLY" >> /tmp/top10
done
cat /tmp/top10 | cut -f3 -d/ | cut -f1 -d. | while read part ; do
	echo mkdir -p "$part"
	startpart=$(echo $part | cut -f1 -d-)
	endpart=$(echo $part | cut -f2 -d-)
	for file in $(seq -w $startpart $endpart) ; do
		echo cp 0${file}.png $part/
	done
	echo cd "$part"
	echo ffmpeg -y -framerate 30 -pattern_type glob -i \'*.png\'  -c:v libx264 -pix_fmt yuv420p out.mp4
	echo cd $orgpwd
done
Run above script as ./script.sh > mybash.sh
This generates a bash file, check the contents and run using
“bash mybash.sh”
Last step : There are 10 movies in subdirs which should contain the best looping parts. check these with: (use CTRL-Q in vlc to stop looping and go to the next file
ls */out.mp4 | while read movie ; do vlc -L $movie ; done
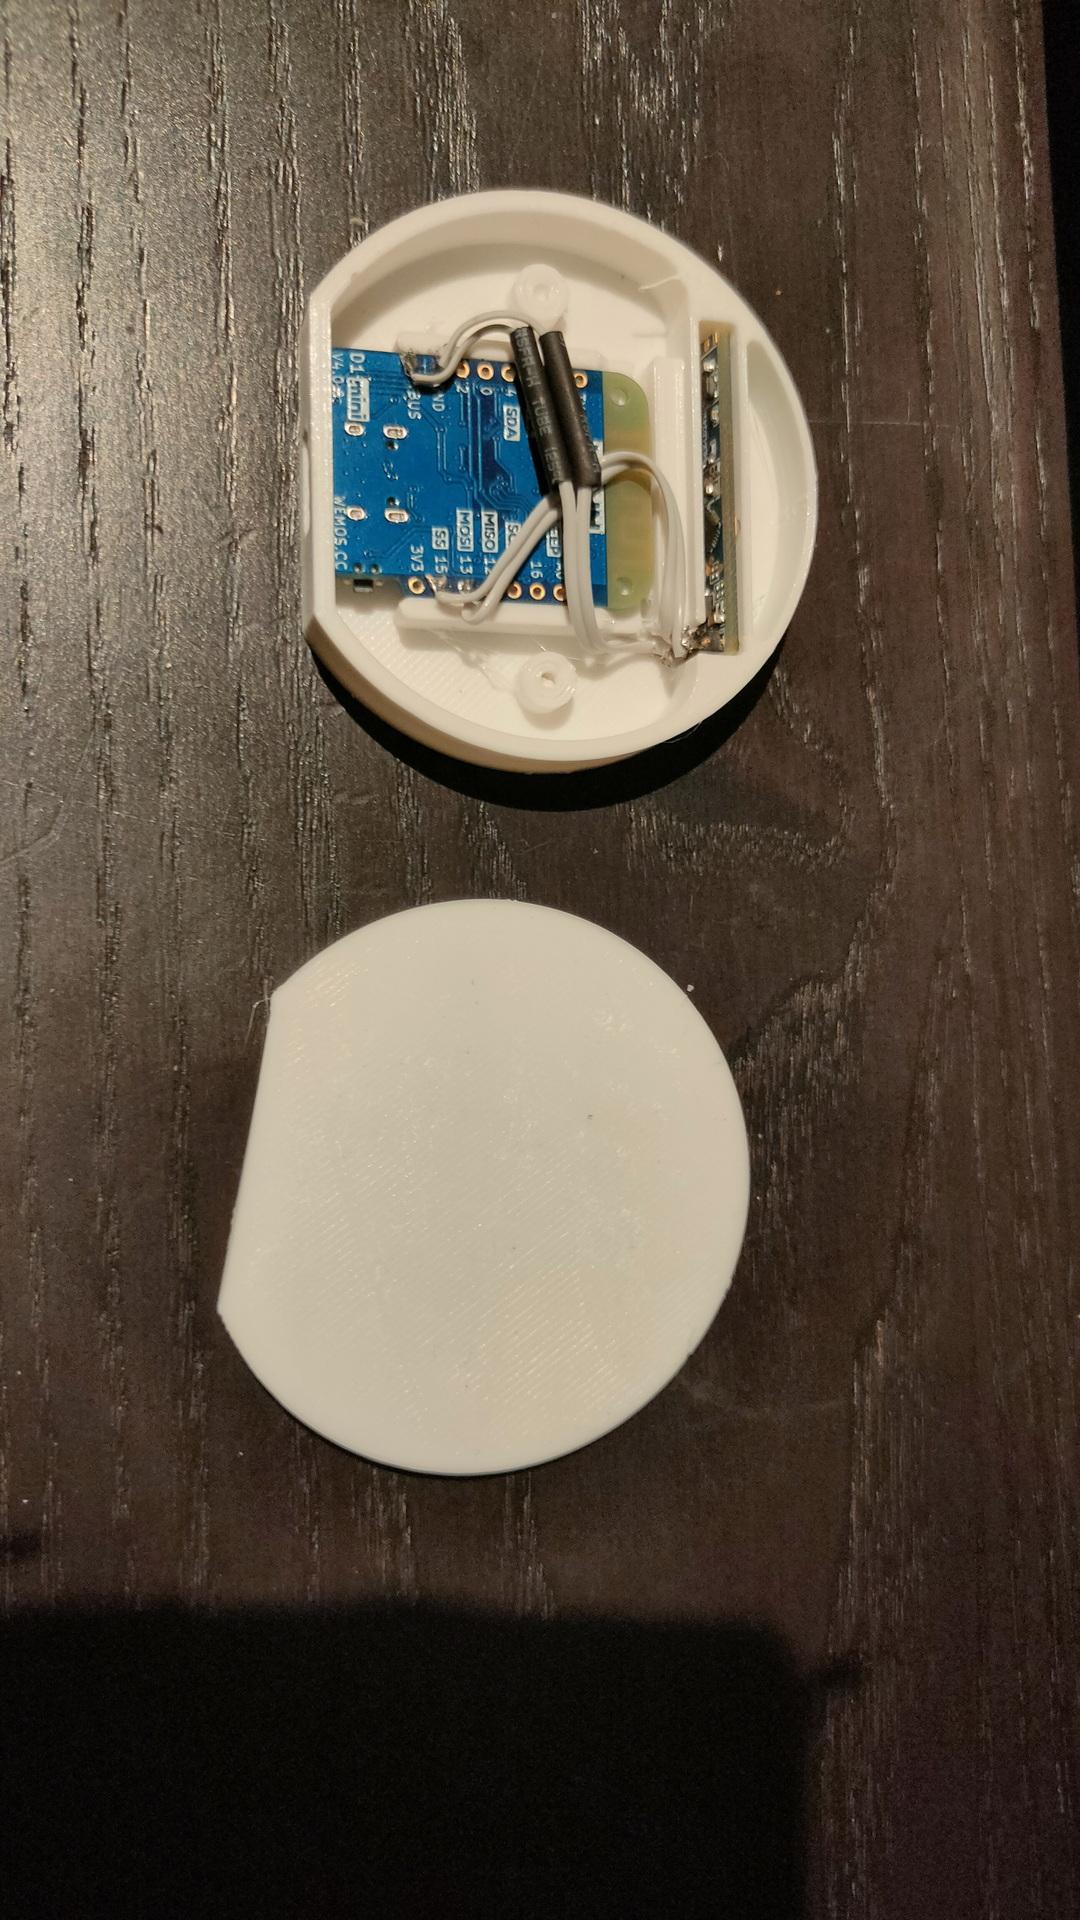
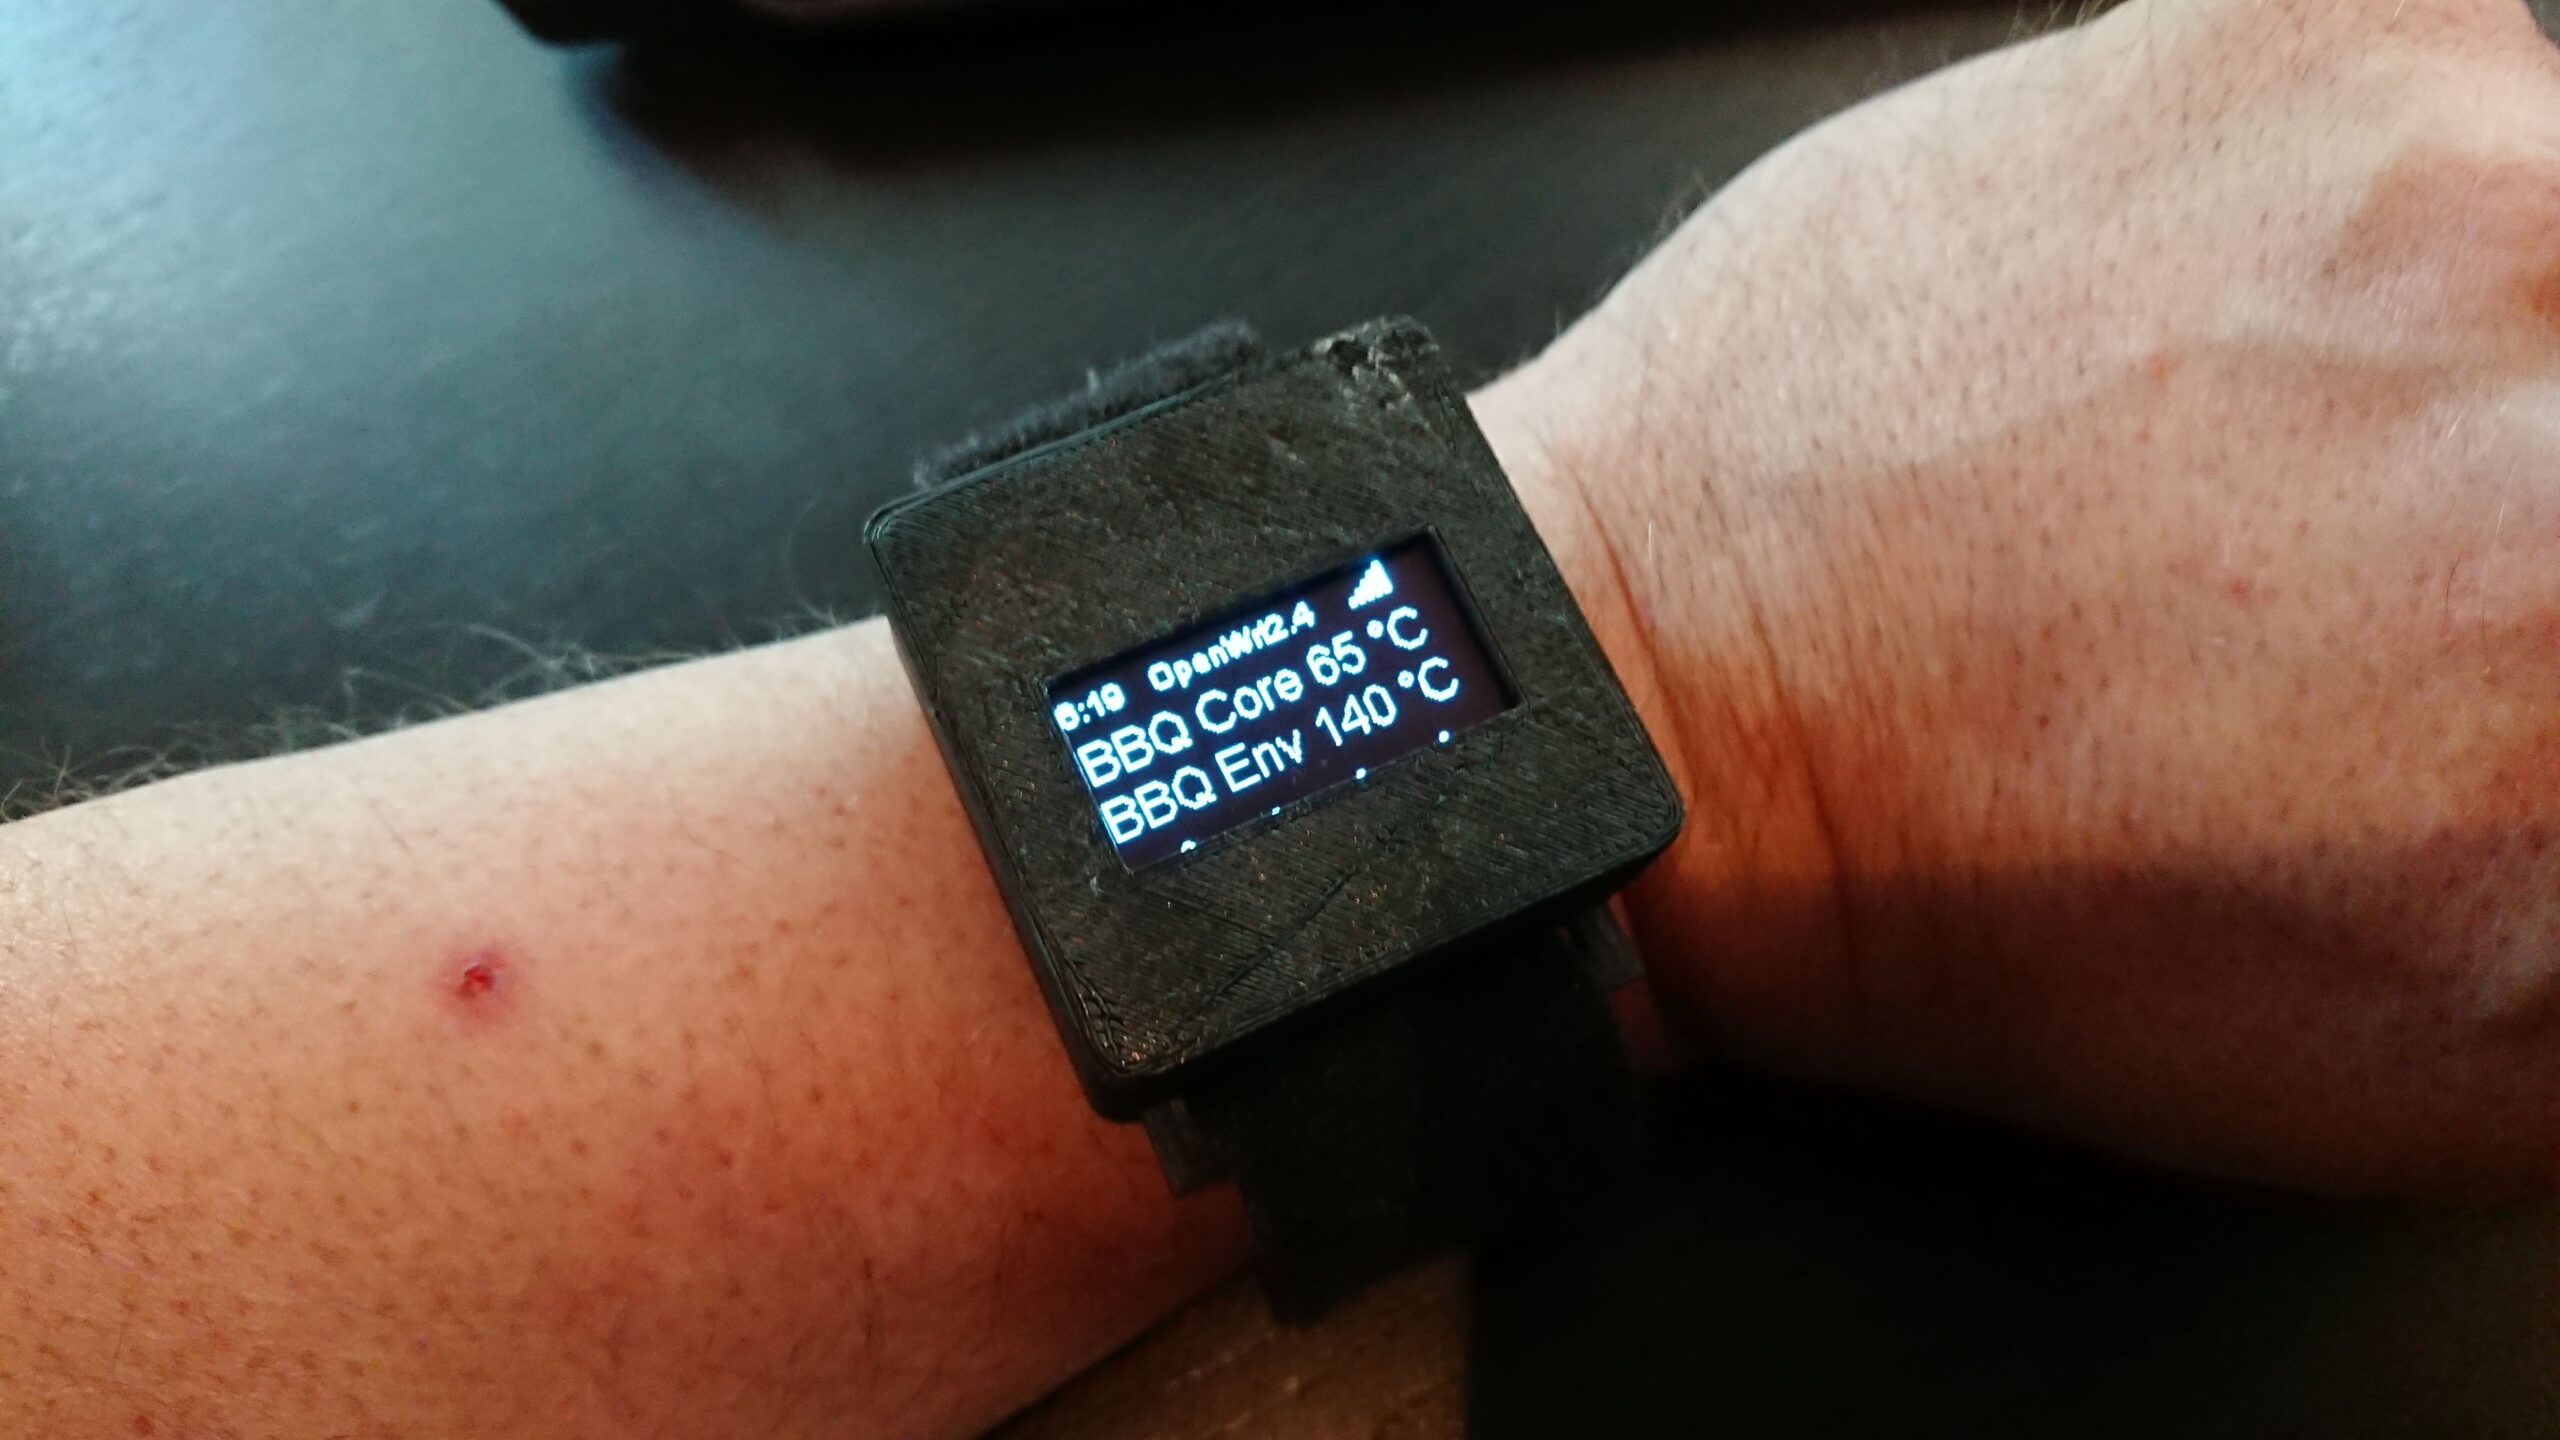
Not posted in the past, new version using ESPHOME and a m5stickc
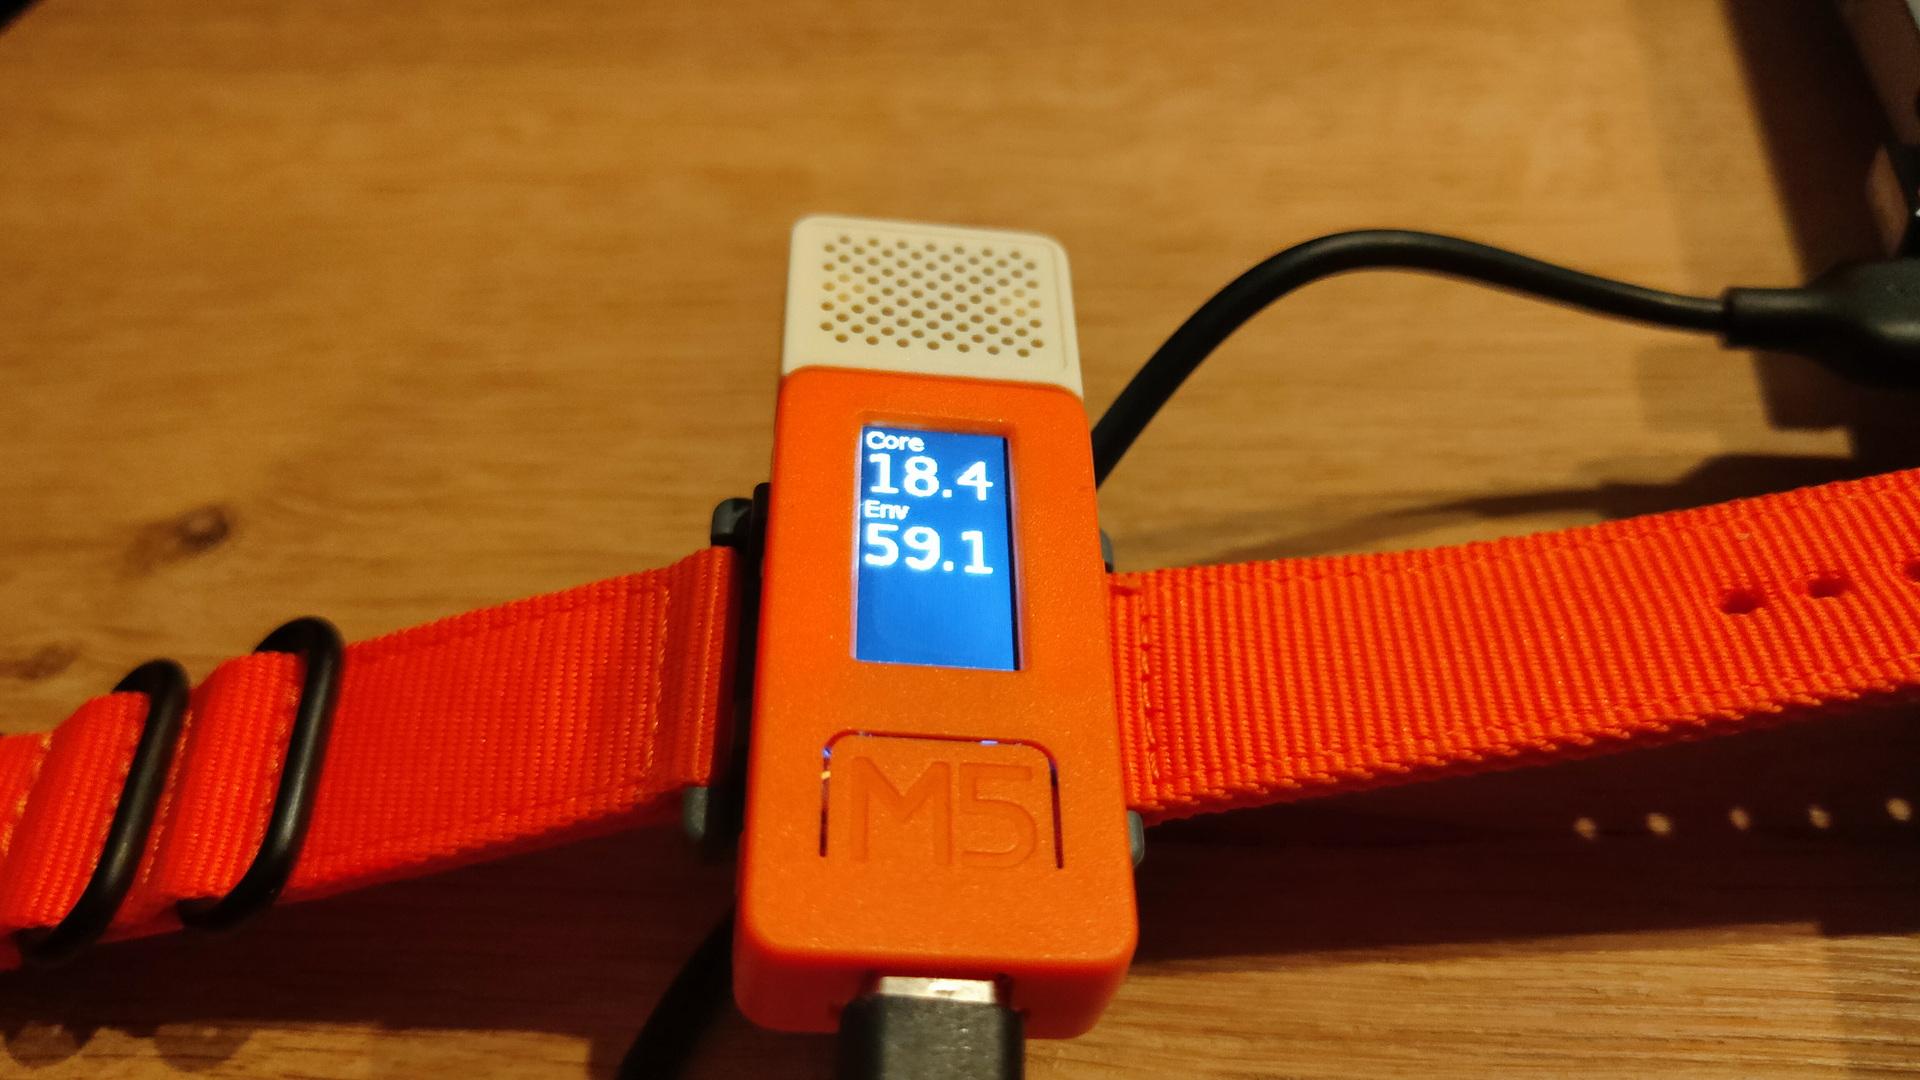
Previous version using a ESP12
A “watch” with core and environment temperature of my smoker with a alarm, and button for timers.
ESP32 dac’s drawing on oscilloscope ( no additional components)
ESP32 in front of scope, two clips for x and y
For above i used sin/cos functions 2:3, which creates Lissajous figures. See: https://www.henriaanstoot.nl/1992/01/01/oscilloscope-graphics-using-a-amiga-bonus-vectrex/
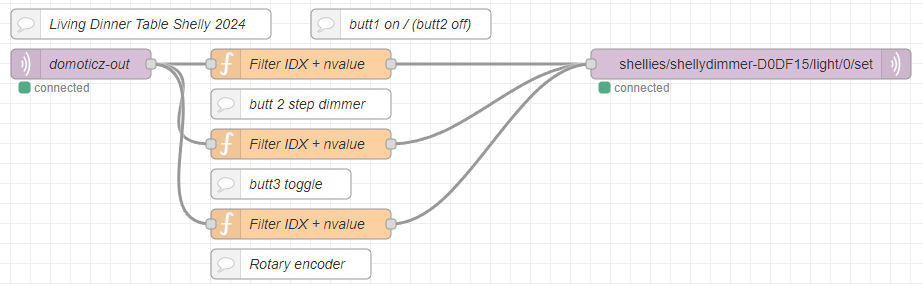
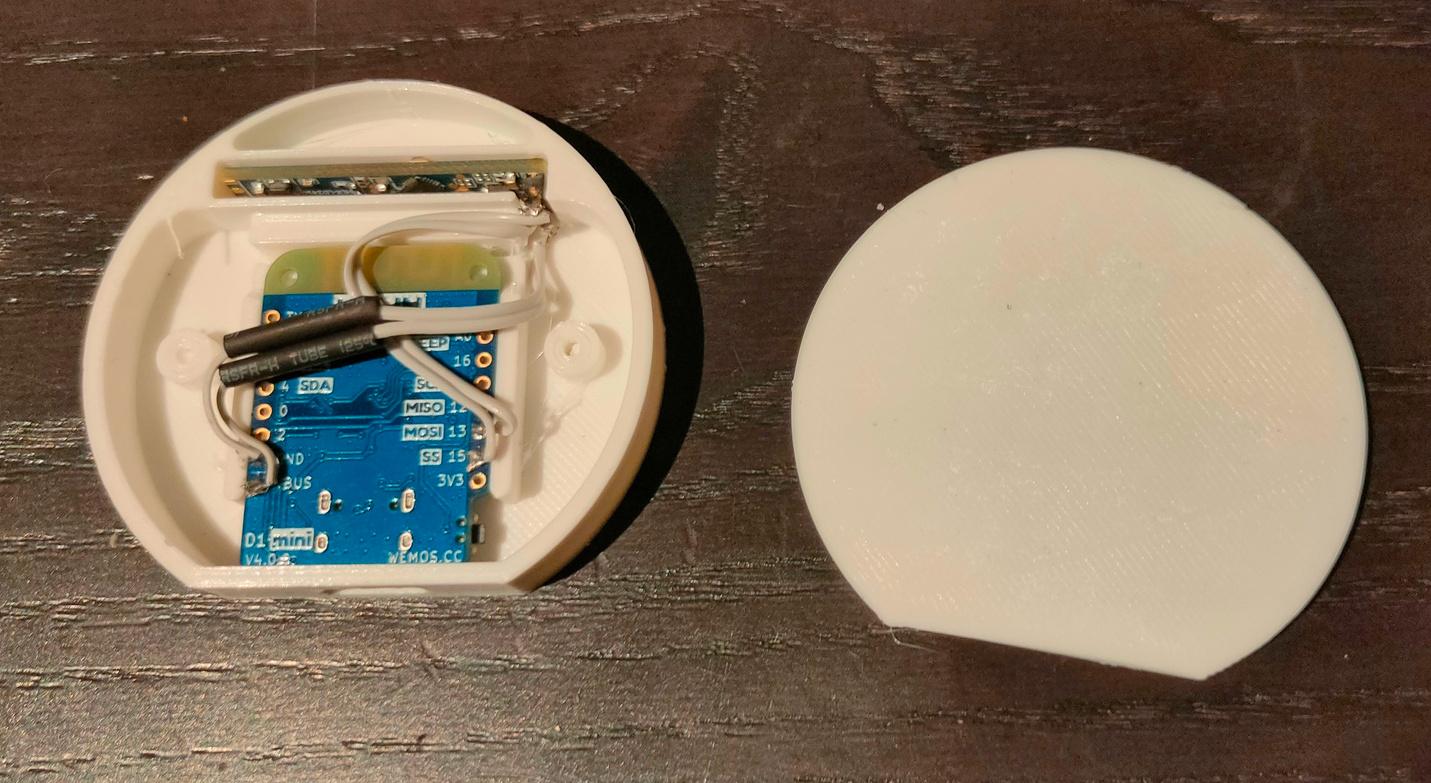
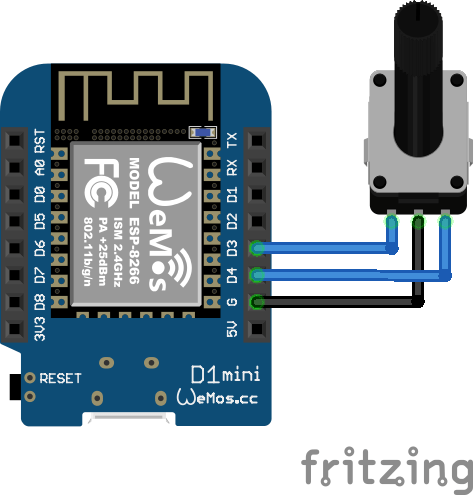
3 battery operated buttons (no wires needed) to control my shelly dimmer at the dinner table.
left button on, middle steps per 20% and 3rd button off. (This cheapass button only sends ON commands)
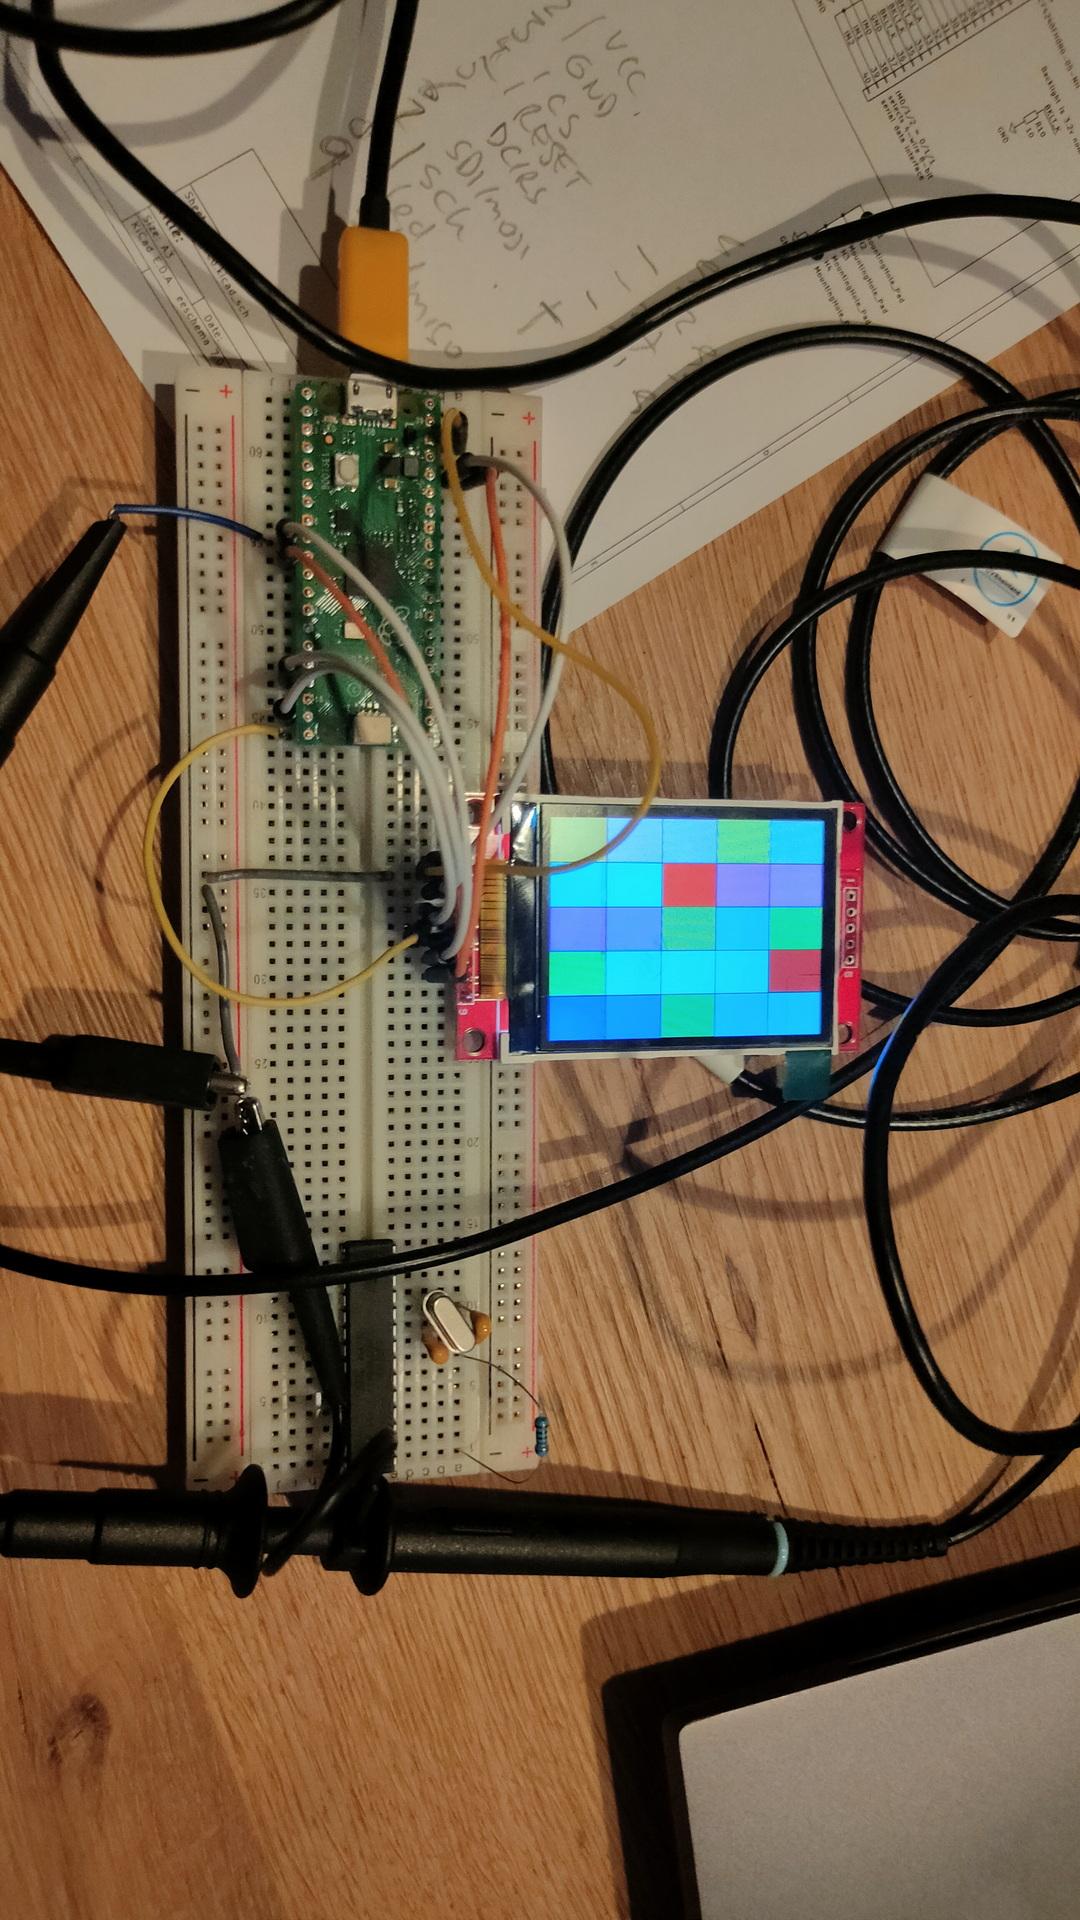
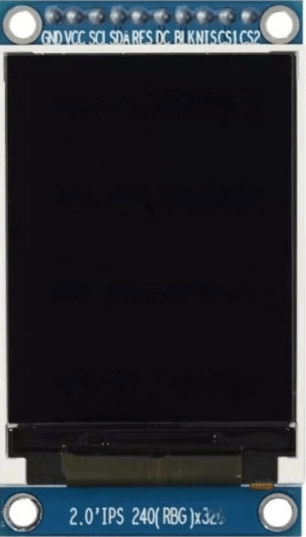
While ordering components for a mini C64 project I’m doing with my friend Bigred, I ordered a cheap ST7789-v2 display.
I want to make a generic pico gadget with a display, buttons and sound. This to make a mini device for writing micropython demos.
The 3 tactical buttons are controlling the X,Y and Z axis of the rotating Cube.
Pinout:
PICO
DISPLAY
GP2
Tactical switch (other side to 3v3)
GP3
Tactical switch (other side to 3v3)
GP4
Tactical switch (other side to 3v3)
GP9
CS1
GND
GND
3v3
VCC
GP18
SCL (SPI clock)
GP19
SDA (MOSI / SPI Data)
GP20
RES (reset)
GP17
DC (data command)
GP16
BLK (backlight)
I know it says SCL/SDA (i2c) but it’s SPI controlled.
Used library : https://github.com/russhughes/st7789_mpy/tree/master
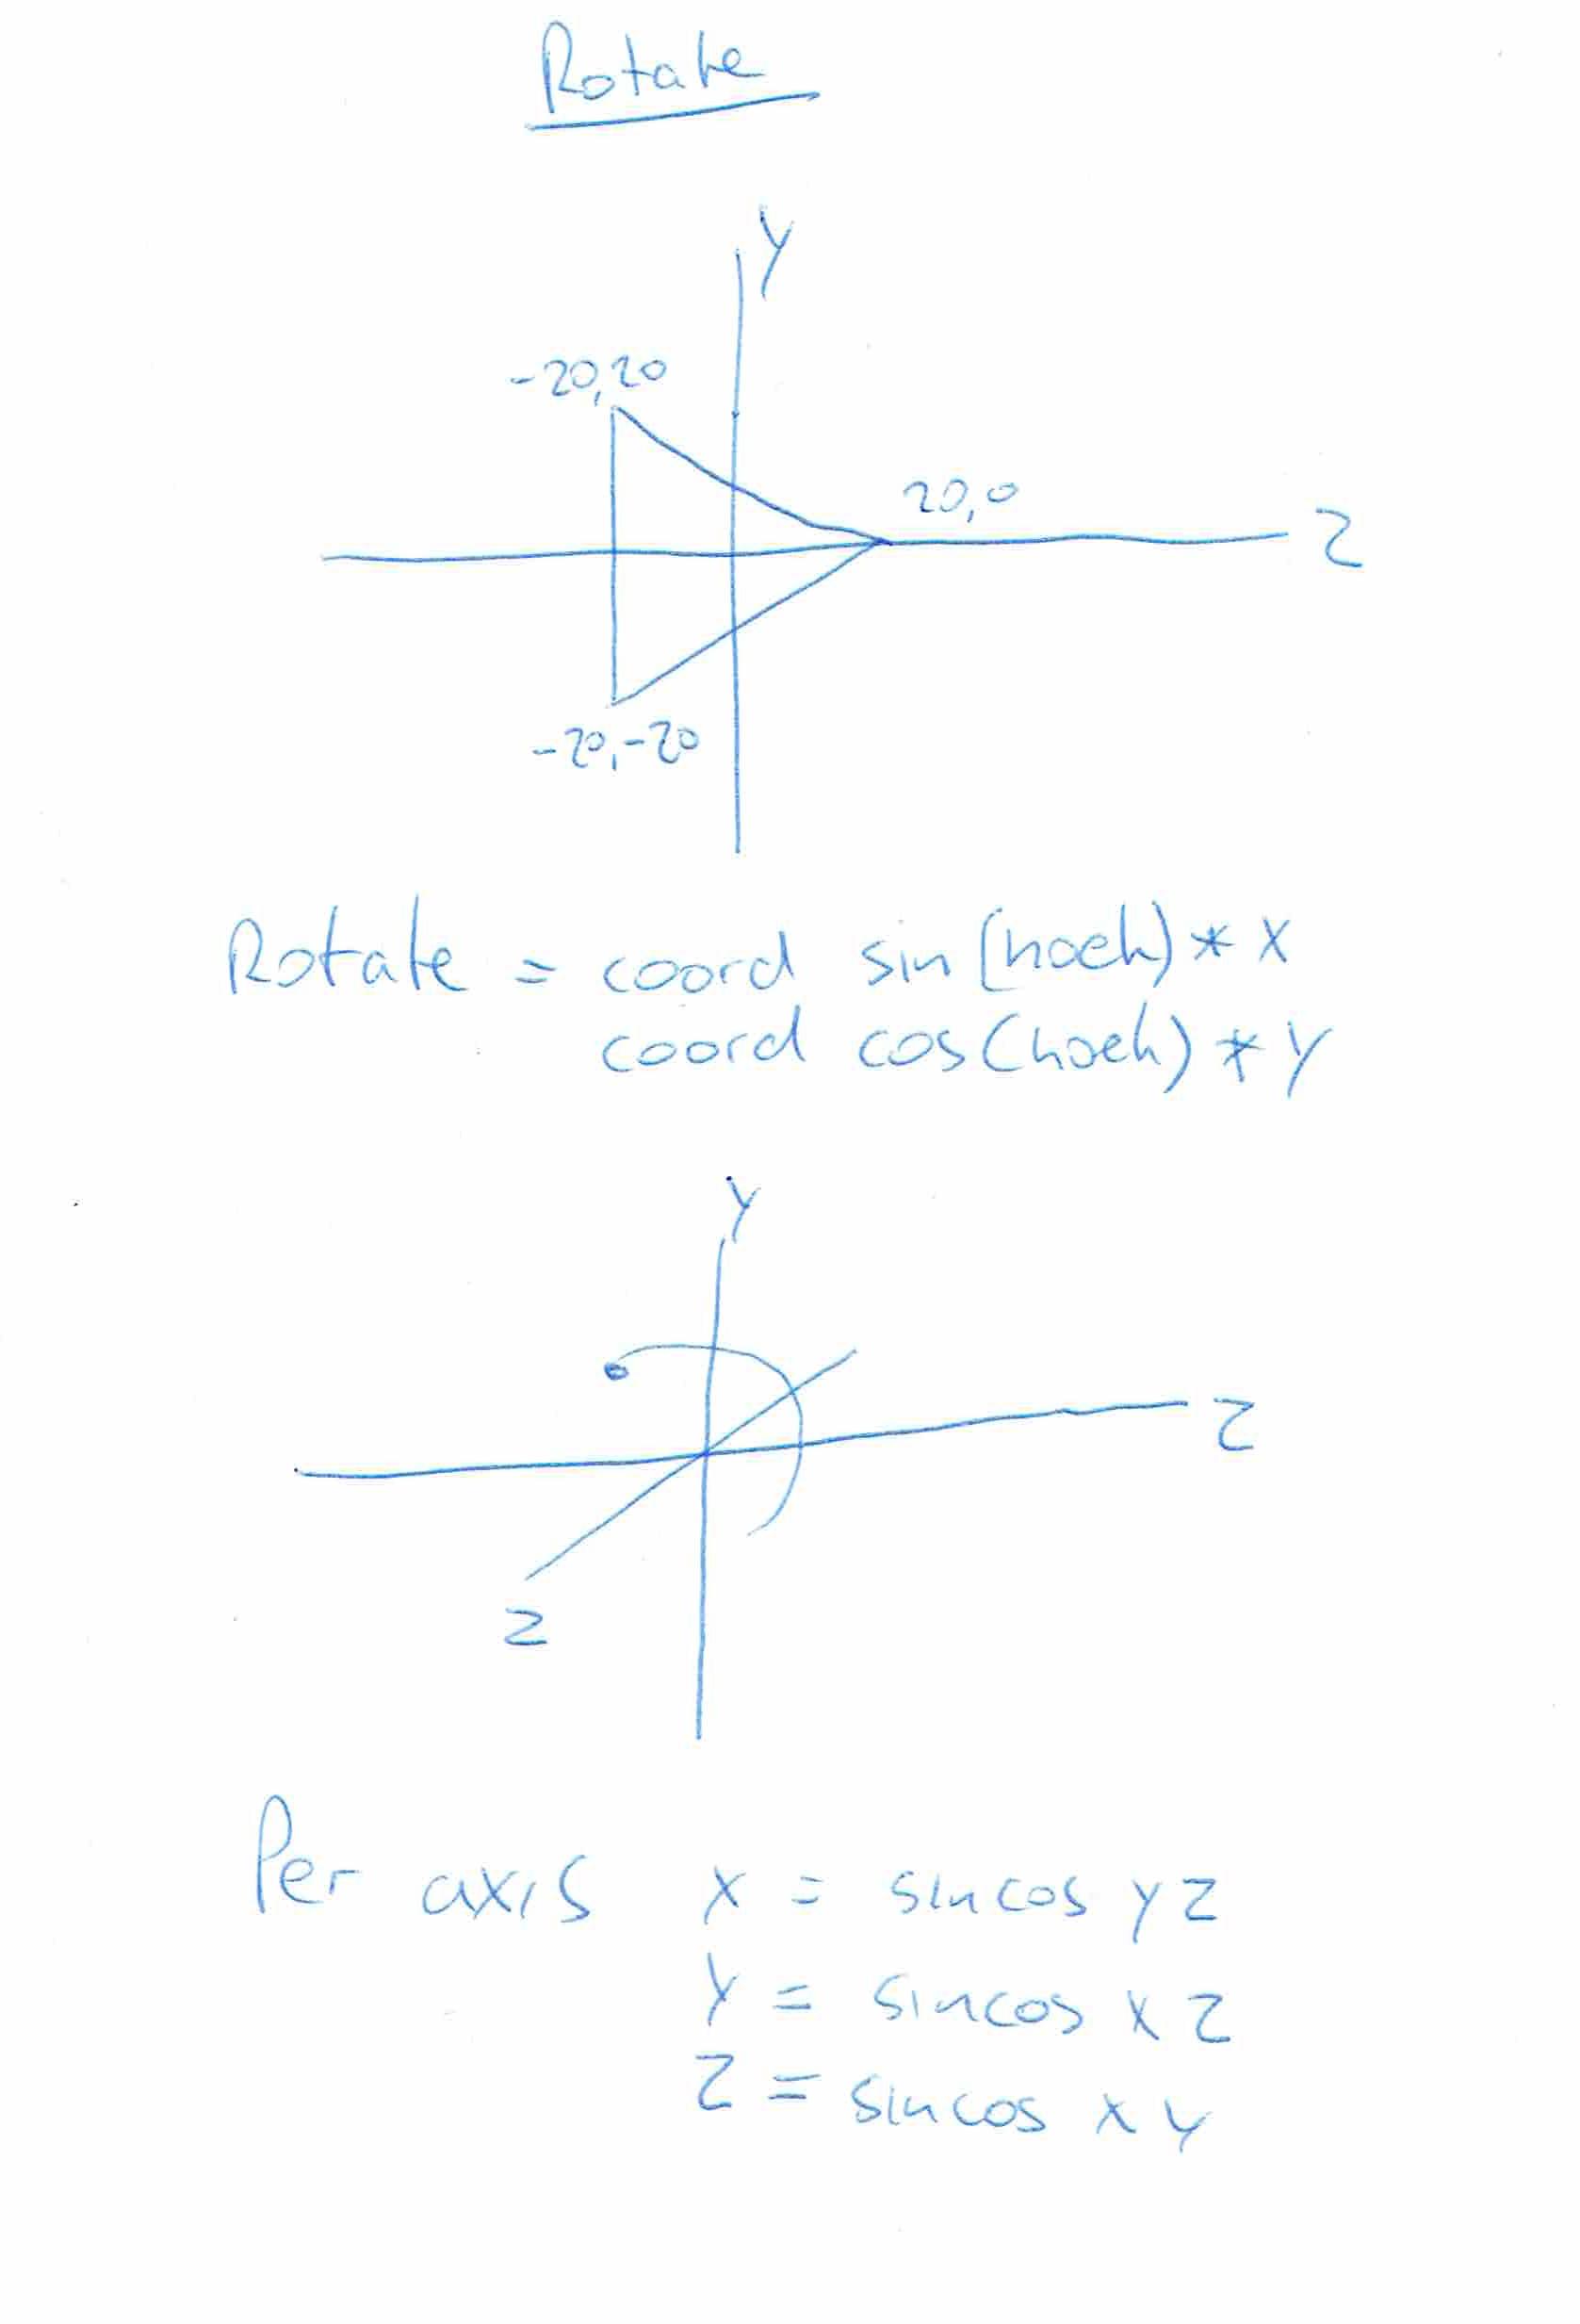
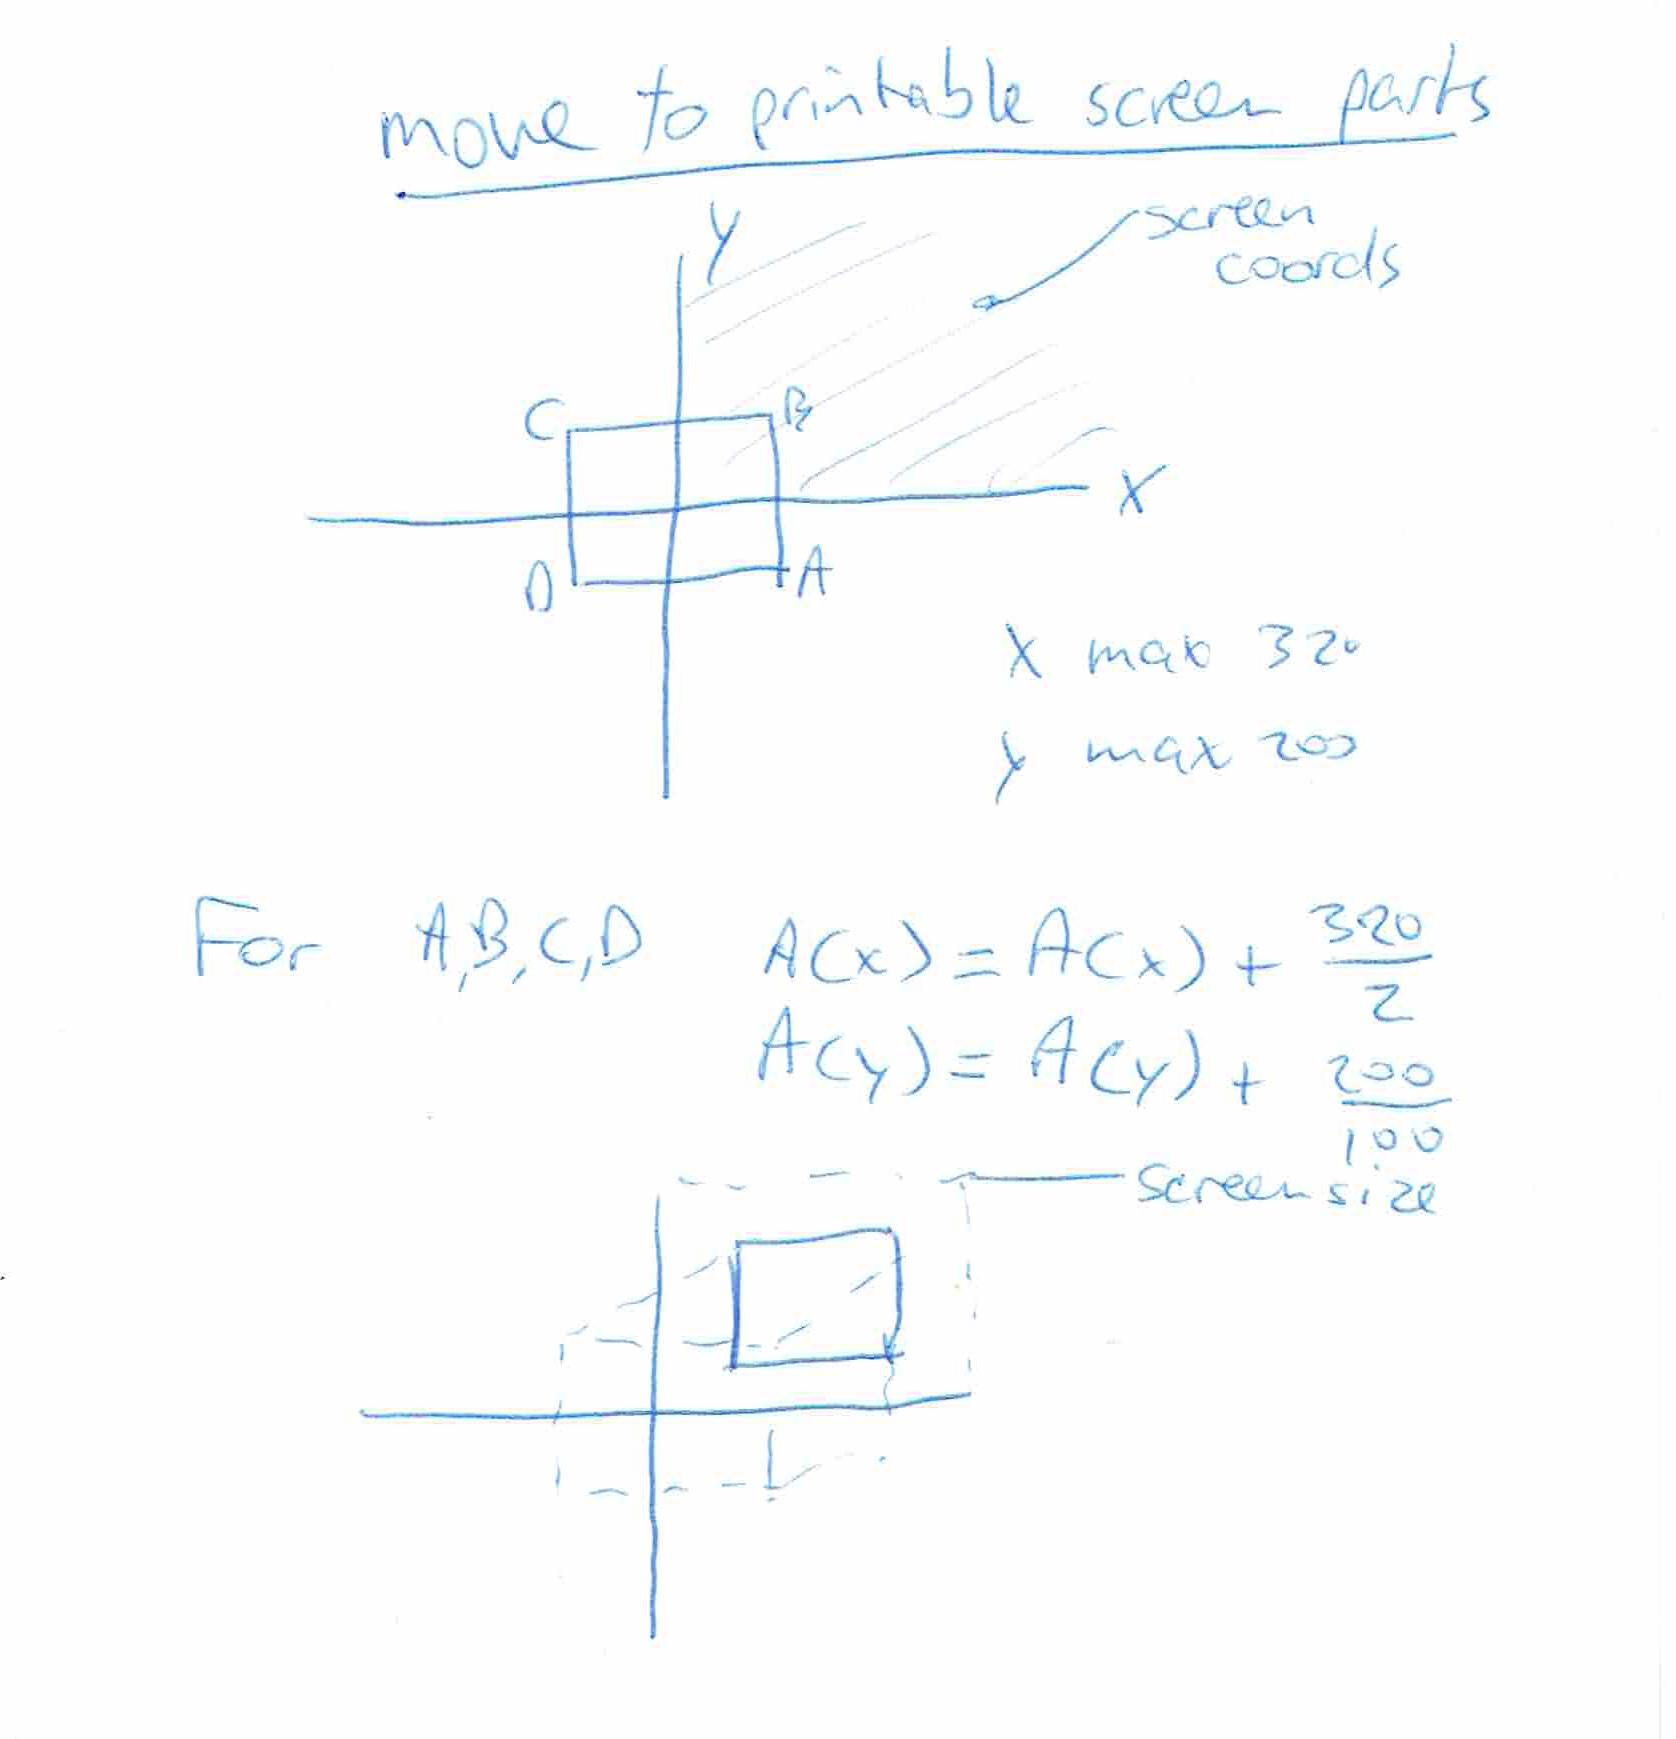
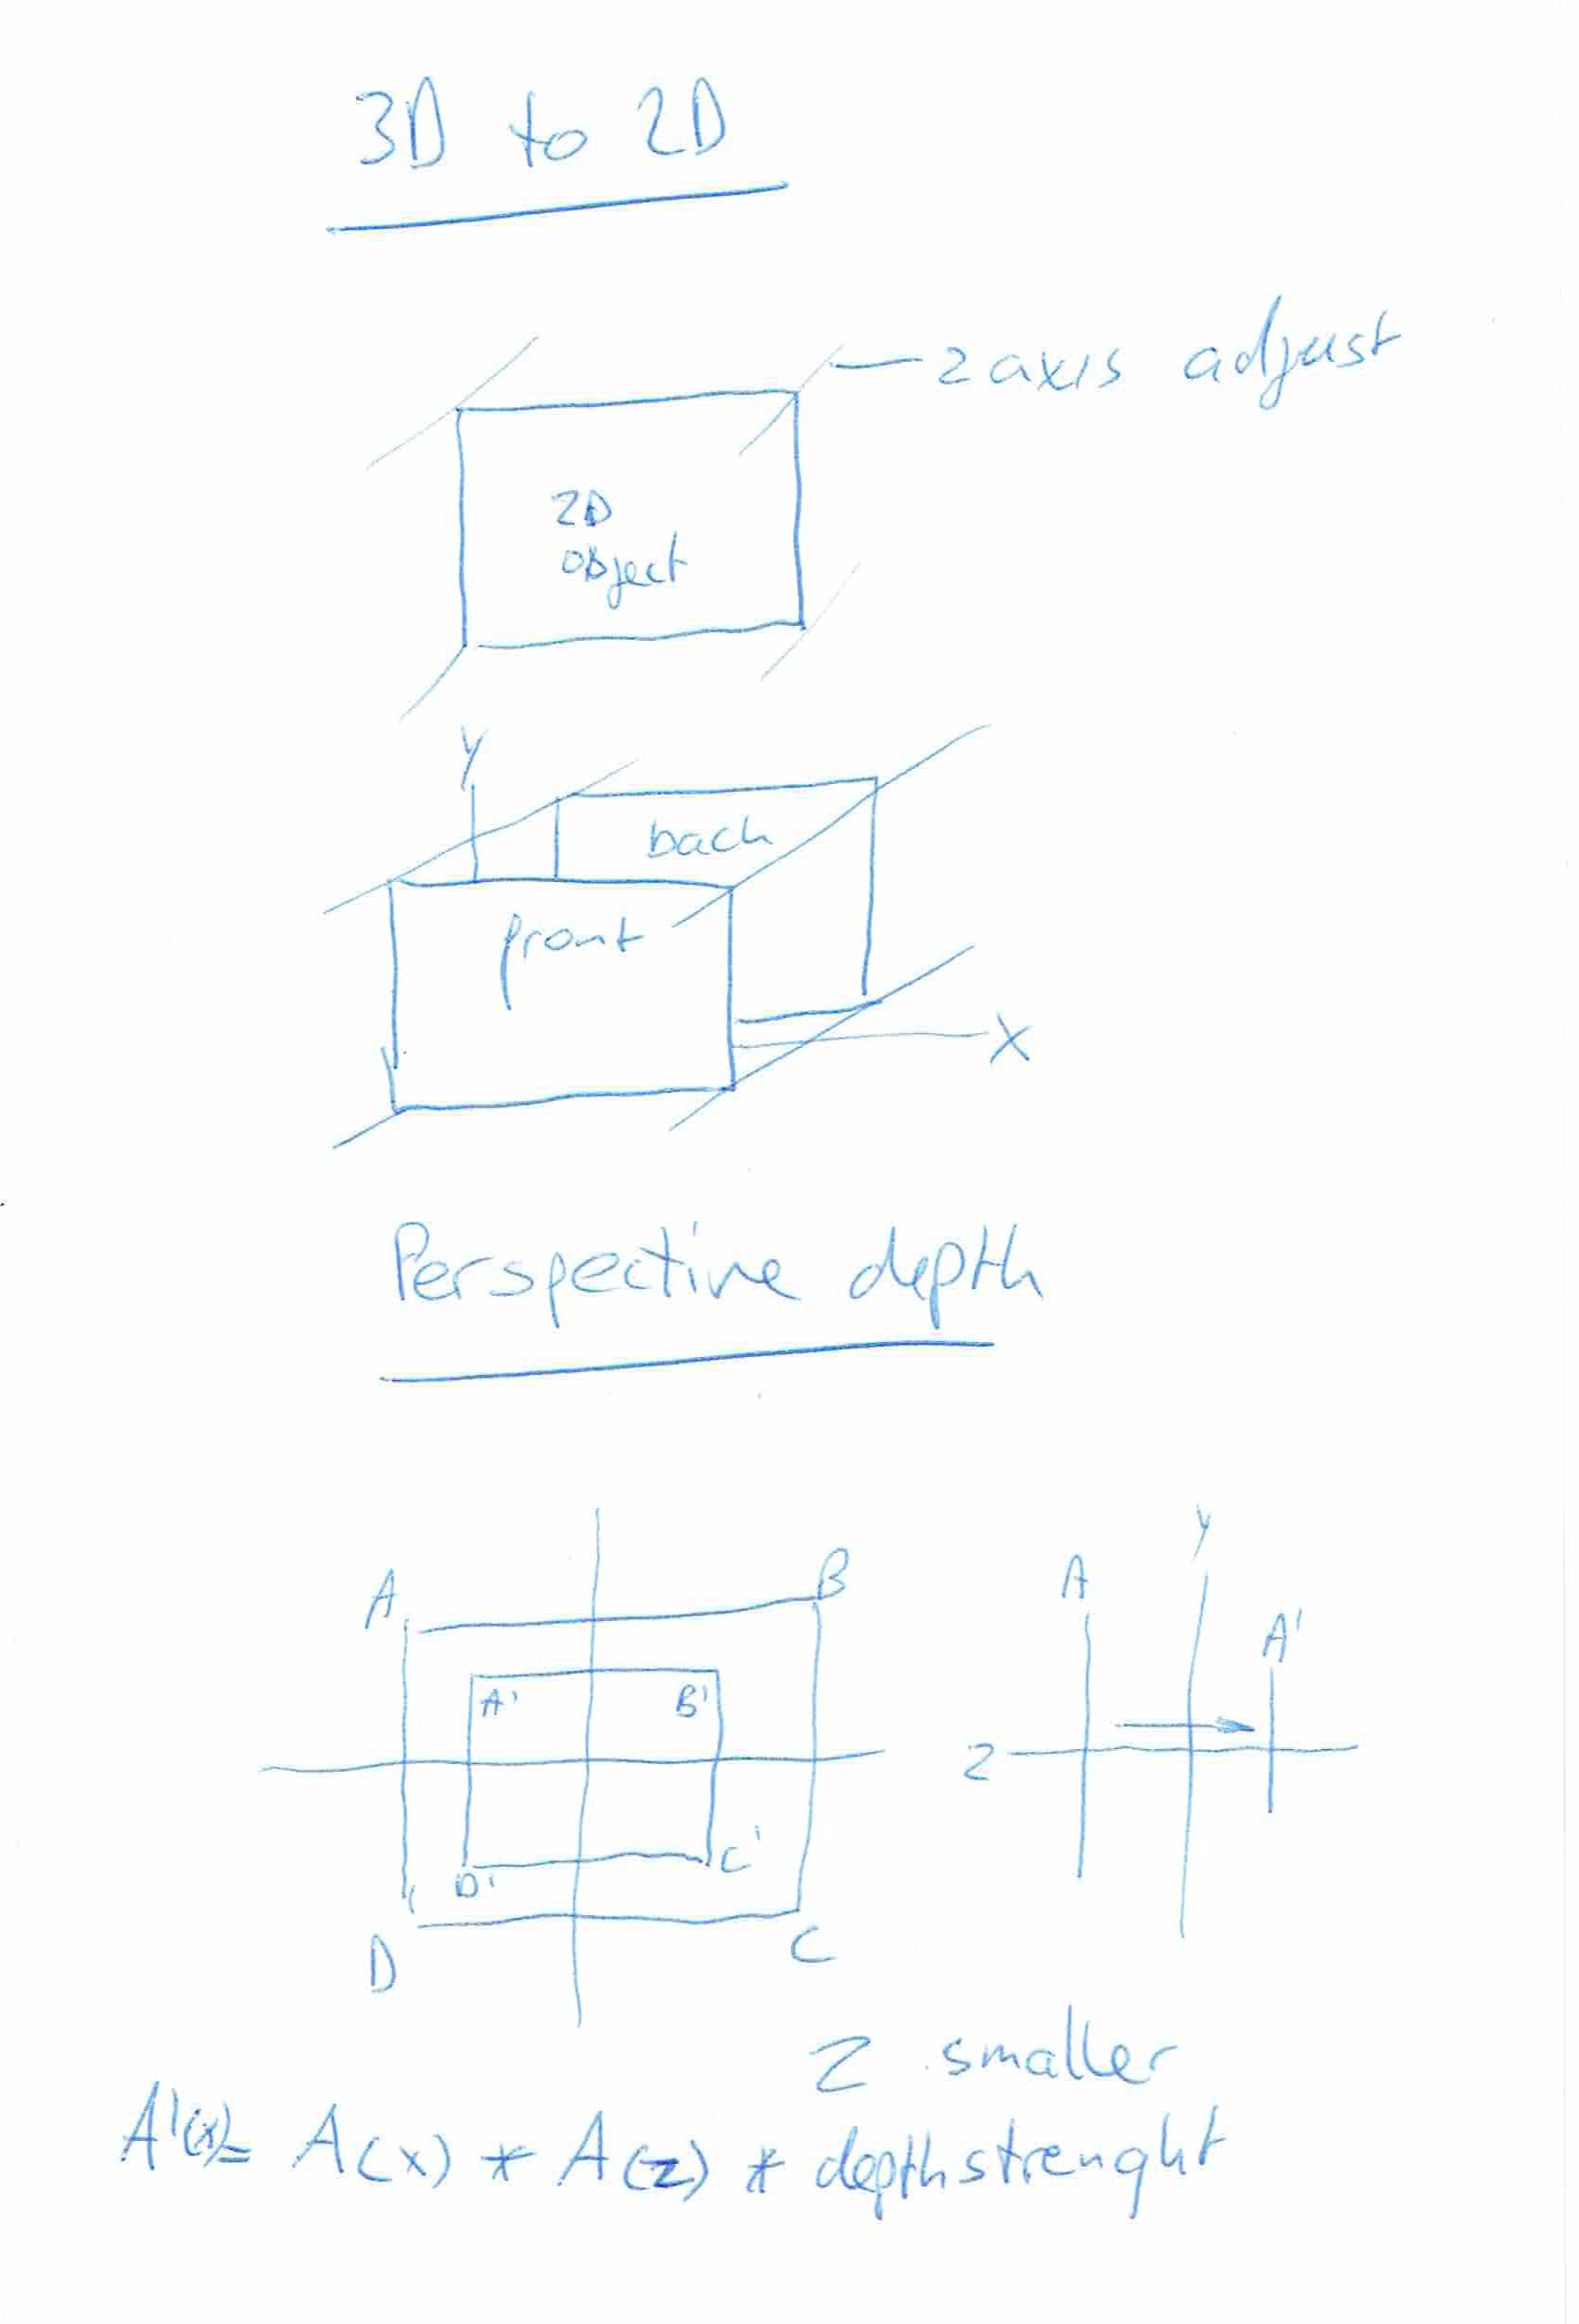
Some 3D explanation I drew a long time ago.
Using python you can use the Math funtions. (sin/cos) Note: these are in radians! print(math.sin(math.radians(30))) # 30 degrees
When using MachineCode you can use lookup tables. These are generated tables which hold precalculated sin data for every degree. You don’t have to use both cos and sin! (these are just 90 degrees shifted!)
Erik and I used a little basic program to generate an ASM include file like this
Costab LABEL BYTE
DB 0B4h,0B4h,0B4h,0B4h,0B4h,0B3h,0B3h,0B3h,0B2h,0B2h,0B1h,0B1h,0B0h,0AFh,0AFh
DB 0AEh
DB 0ADh,0ACh,0ABh,0AAh,0A9h,0A8h,0A7h,0A6h,0A5h,0A4h,0A2h,0A1h,0A0h,9Eh,9Dh,9Bh
DB 9Ah,98h,96h,95h,93h,91h,90h,8Eh,8Ch,8Ah,88h,86h,84h,82h,80h,7Eh
DB 7Ch,7Ah,78h,76h,74h,72h,70h,6Eh,6Ch,69h,67h,65h,63h,61h,5Eh,5Ch
DB 5Ah,58h,56h,53h,51h,4Fh,4Dh,4Bh,48h,46h,44h,42h,40h,3Eh,3Ch,3Ah
DB 38h,36h,34h,32h,30h,2Eh,2Ch,2Ah,28h,26h,24h,23h,21h,1Fh,1Eh,1Ch
DB 1Ah,19h,17h,16h,14h,13h,12h,10h,0Fh,0Eh,0Dh,0Ch,0Bh,0Ah,09h,08h
DB 07h,06h,05h,05h,04h,03h,03h,02h,02h,01h,01h,01h,00h,00h,00h,00h
DB 00h,00h,00h,00h,00h,01h,01h,01h,02h,02h,03h,03h,04h,05h,05h,06h
DB 07h,08h,09h,0Ah,0Bh,0Ch,0Dh,0Eh,0Fh,10h,12h,13h,14h,16h,17h,19h
DB 1Ah,1Ch,1Eh,1Fh,21h,23h,24h,26h,28h,2Ah,2Ch,2Eh,30h,32h,34h,36h
DB 38h,3Ah,3Ch,3Eh,40h,42h,44h,46h,48h,4Bh,4Dh,4Fh,51h,53h,56h,58h
DB 5Ah,5Ch,5Eh,61h,63h,65h,67h,69h,6Ch,6Eh,70h,72h,74h,76h,78h,7Ah
DB 7Ch,7Eh,80h,82h,84h,86h,88h,8Ah,8Ch,8Eh,90h,91h,93h,95h,96h,98h
DB 9Ah,9Bh,9Dh,9Eh,0A0h,0A1h,0A2h,0A4h,0A5h,0A6h,0A7h,0A8h,0A9h,0AAh,0ABh,0ACh
DB 0ADh,0AEh,0AFh,0AFh,0B0h,0B1h,0B1h,0B2h,0B2h,0B3h,0B3h,0B3h,0B4h,0B4h,0B4h
CosTabE LABEL BYTE


Basic:
0 DEF SEG = &H7000: c = 0
1 pi = 3.14159265#
2 FOR x = 0 TO 2 * pi STEP 2 * pi / 256
3 d = COS(x) * 127 + 127
4 POKE c, d: c = c + 1: NEXT
Most i learned from a book called “Art of Graphics” (This is image of the book from the internet, i don’t think I still got my copy somewhere.
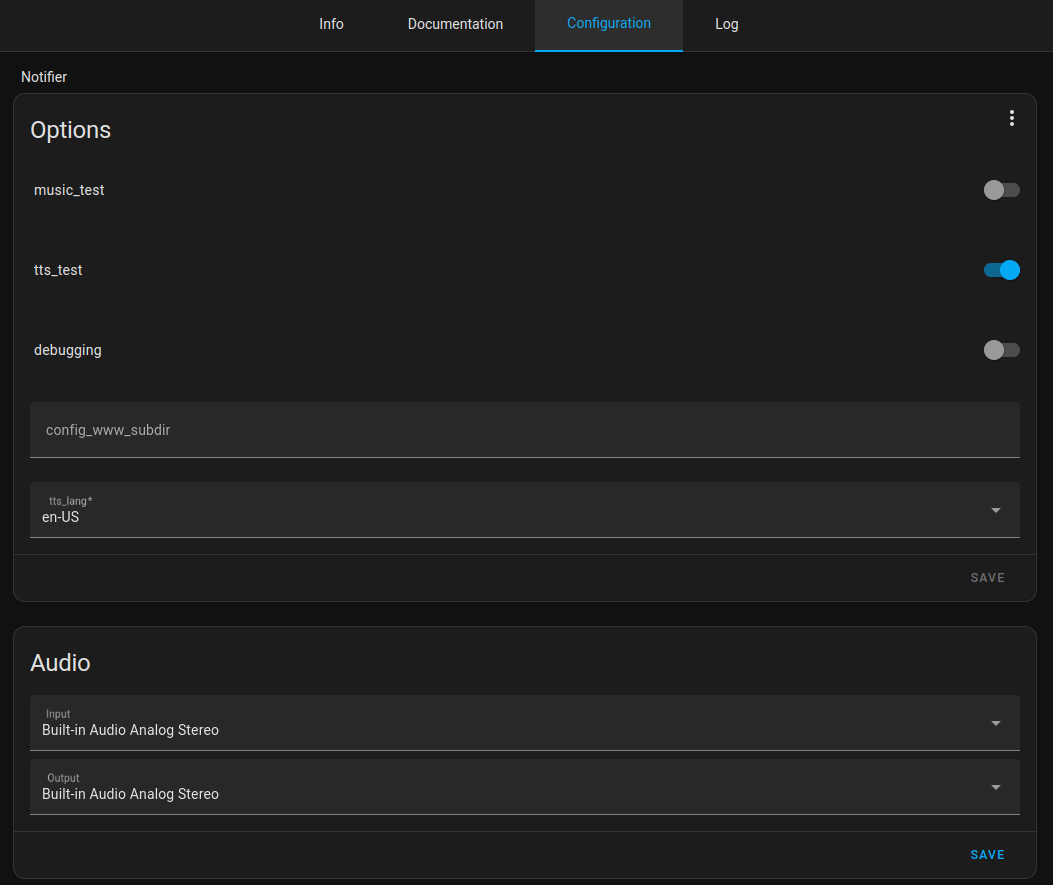
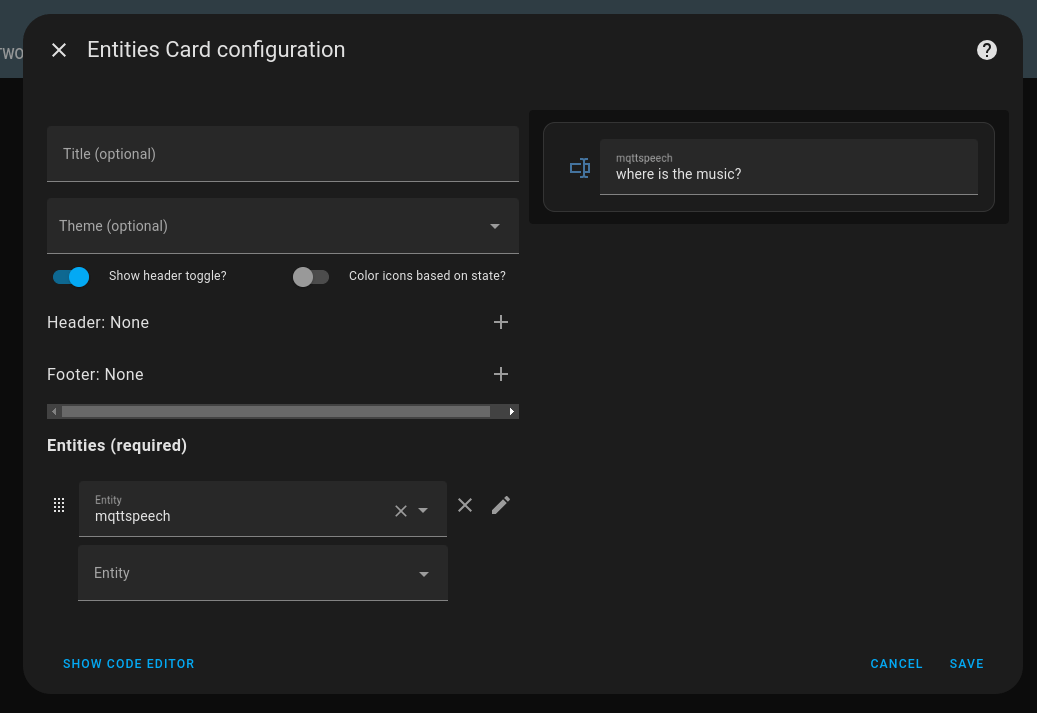
I made my own Mqtt to speech thingy in the past. Sending a text to a mqtt topic would be picked up by my domoticz raspberry and using a bash script the topic payload was converted to speech and being played on a connected speaker.
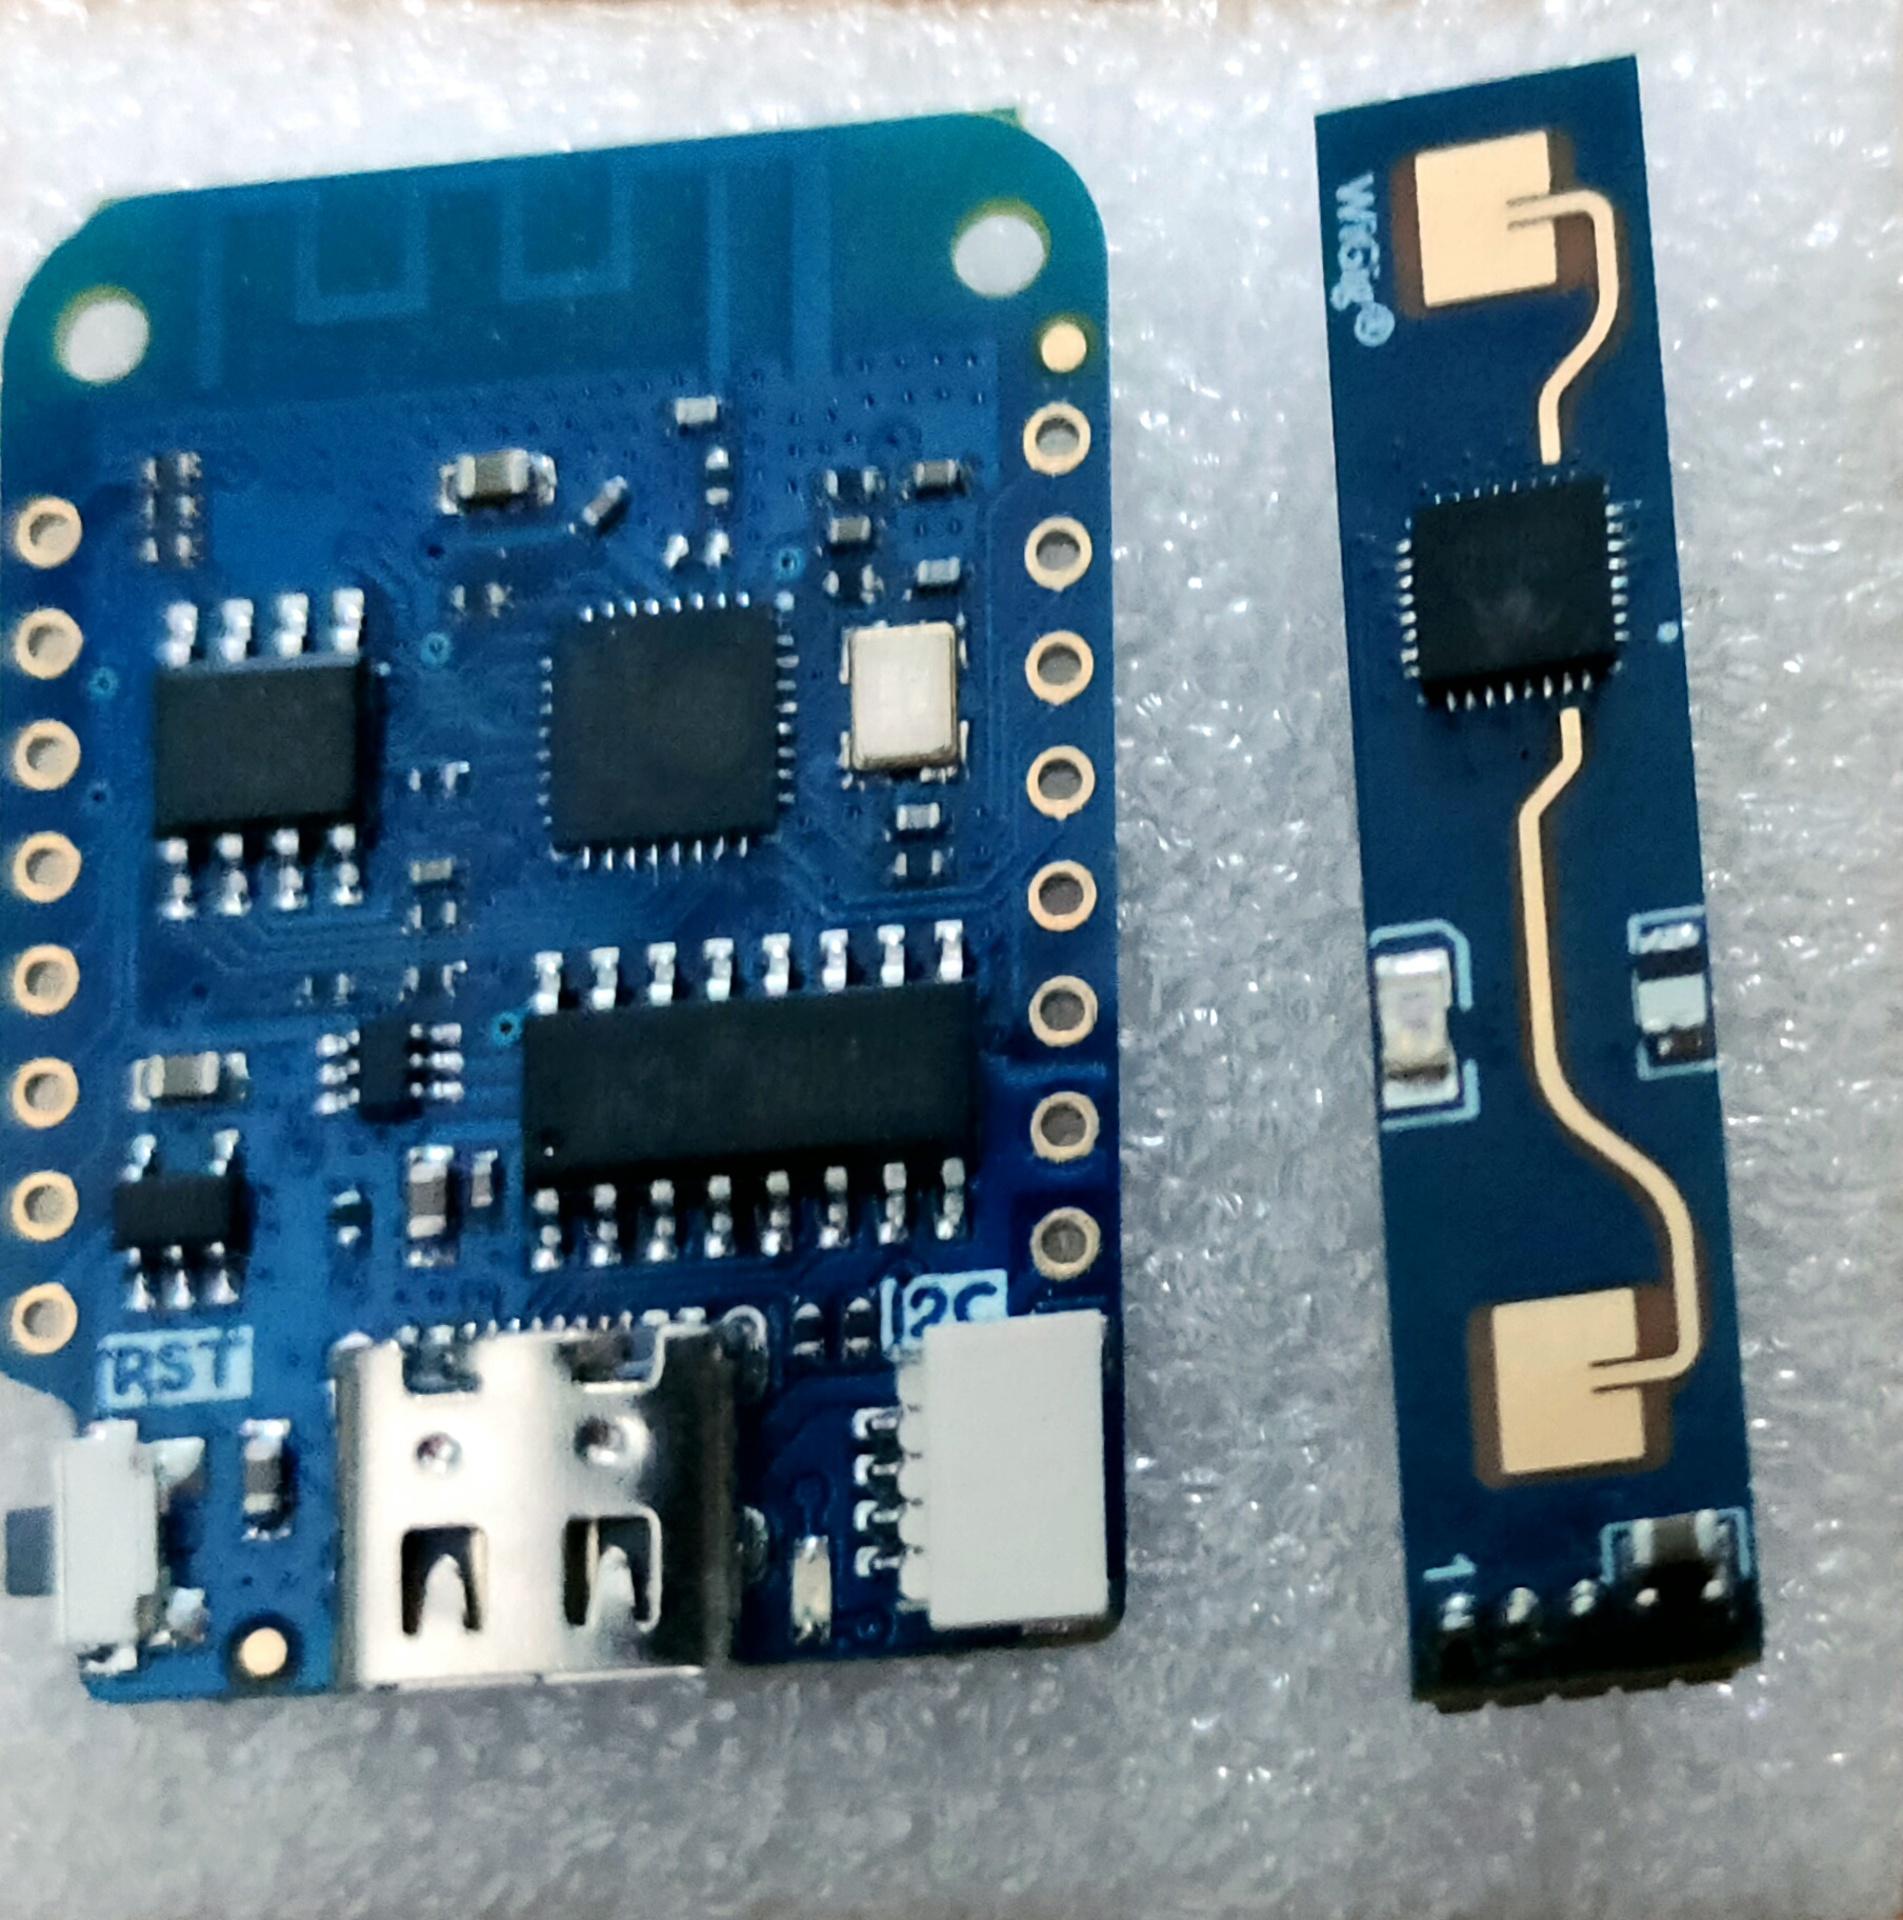
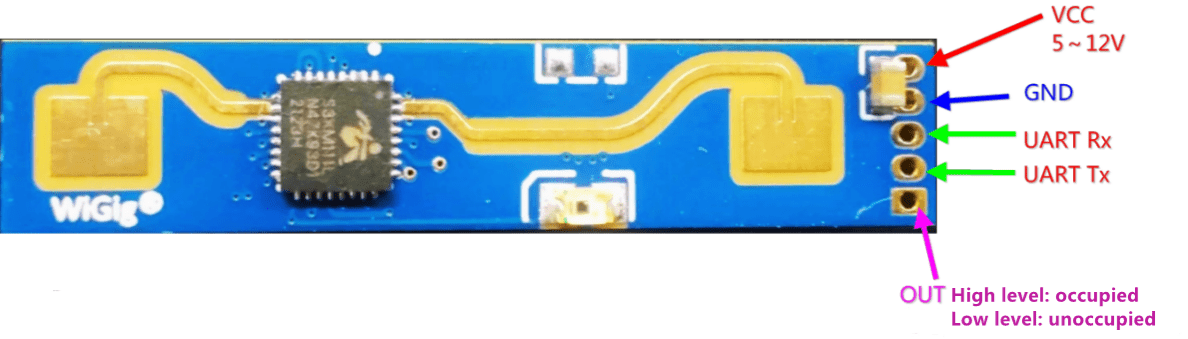
LD2410 is a high-sensitivity 24GHz human presence status sensing module developed by Hi-link. Its working principle is to use FMCW frequency-modulated continuous waves to detect human targets in the set space. Combined with radar signal processing and precise human body sensing algorithms, it realizes high-sensitivity human presence status sensing, and can identify human bodies in motion and stationary states. And auxiliary information such as the distance of the target can be calculated.
This product is mainly used in indoor scenes to sense whether there is a moving or micro-moving human body in the area, and output the detection results in real time. The farthest sensing distance can reach 5 meters, and the distance resolution is 0.75m. Provides a visual configuration tool, which can easily configure the sensing distance range, sensing sensitivity in different intervals and unmanned delay time, etc., to adapt to different specific application needs.
Support GPIO and UART output, plug and play, and can be flexibly applied to different smart scenarios and terminal products.
There are 3 versions: Without Bluetooth, with Bluetooth (B version) and a C version which uses the standard pin distance. The other ones are a pain in the *ss to solder!
Got a Bluetooth version? See end of post!
When searching for examples, I noticed that many had issues getting this working. Let me be clear, it wasn’t working for me the first time. Things i’ve learned:
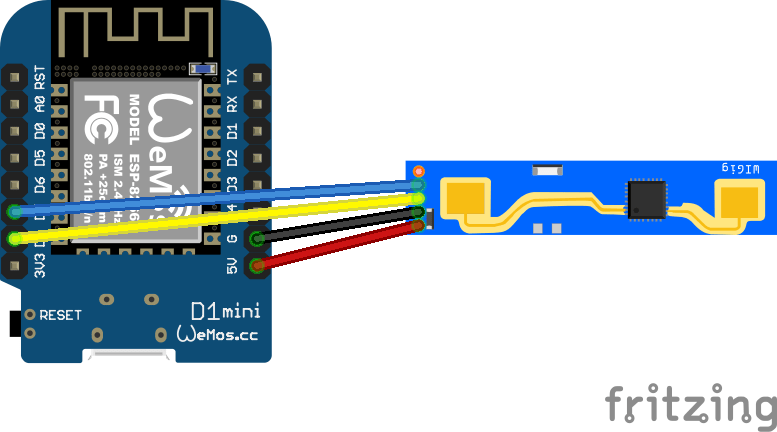
Flash the first initial ESPHome using a USB cable, after that you can connect the module and flash OTA
Do not use the standard Uart RX/TX, it didn’t work for me. And messes-up the logging over USB (See baudrate: 0 to turn this off)
When connecting D7/D8 and this signal gets pulled down, the wemos won’t boot. (Running wifi connections gets interrupted) This is also a sign that RX/TX is switched around!
Measure and make sure you have a good, stable 5V power to your LD2410
Here is a post about the RCWL-0516, a similar project, but this one can’t measure distances and person detection won’t work when a person is not moving.
Parts i’ve changed: board: Changed from esp-1?? to d1_mini logger: baud_rate: 0 tx_pin and rx_pin
esphome:
name: ld2410-1
friendly_name: ld2410-1
esp8266:
board: d1_mini
# Enable logging
logger:
baud_rate: 0
# Enable Home Assistant API
api:
encryption:
key: "xxxxxxxxxxxxxxxxxxxxxxxxxxxxxxxxxxxx="
ota:
password: "xxxxxxxxxxxxxxxxxxxxxxxxxxxxxxxxxxxx"
wifi:
ssid: !secret wifi_ssid
password: !secret wifi_password
# Enable fallback hotspot (captive portal) in case wifi connection fails
ap:
ssid: "Ld2410-1 Fallback Hotspot"
password: "xxxxxxxxxxxxxxxxxxxxxxxxxxxxxxxxxxxx"
captive_portal:
ld2410:
id: ld2410_radar
uart:
tx_pin: GPIO15
rx_pin: GPIO13
baud_rate: 256000
parity: NONE
stop_bits: 1
number:
- platform: ld2410
timeout:
name: Radar Timeout
max_move_distance_gate:
name: Radar Max Move Distance
max_still_distance_gate:
name: Radar Max Still Distance
g0:
move_threshold:
name: g0 move threshold
still_threshold:
name: g0 still threshold
g1:
move_threshold:
name: g1 move threshold
still_threshold:
name: g1 still threshold
g2:
move_threshold:
name: g2 move threshold
still_threshold:
name: g2 still threshold
g3:
move_threshold:
name: g3 move threshold
still_threshold:
name: g3 still threshold
g4:
move_threshold:
name: g4 move threshold
still_threshold:
name: g4 still threshold
g5:
move_threshold:
name: g5 move threshold
still_threshold:
name: g5 still threshold
g6:
move_threshold:
name: g6 move threshold
still_threshold:
name: g6 still threshold
g7:
move_threshold:
name: g7 move threshold
still_threshold:
name: g7 still threshold
g8:
move_threshold:
name: g8 move threshold
still_threshold:
name: g8 still threshold
binary_sensor:
- platform: ld2410
has_target:
name: Radar Target
id: radar_has_target
has_moving_target:
name: Radar Moving Target
has_still_target:
name: Radar Still Target
button:
- platform: ld2410
factory_reset:
name: "factory reset"
restart:
name: "restart"
query_params:
name: query params
sensor:
- platform: ld2410
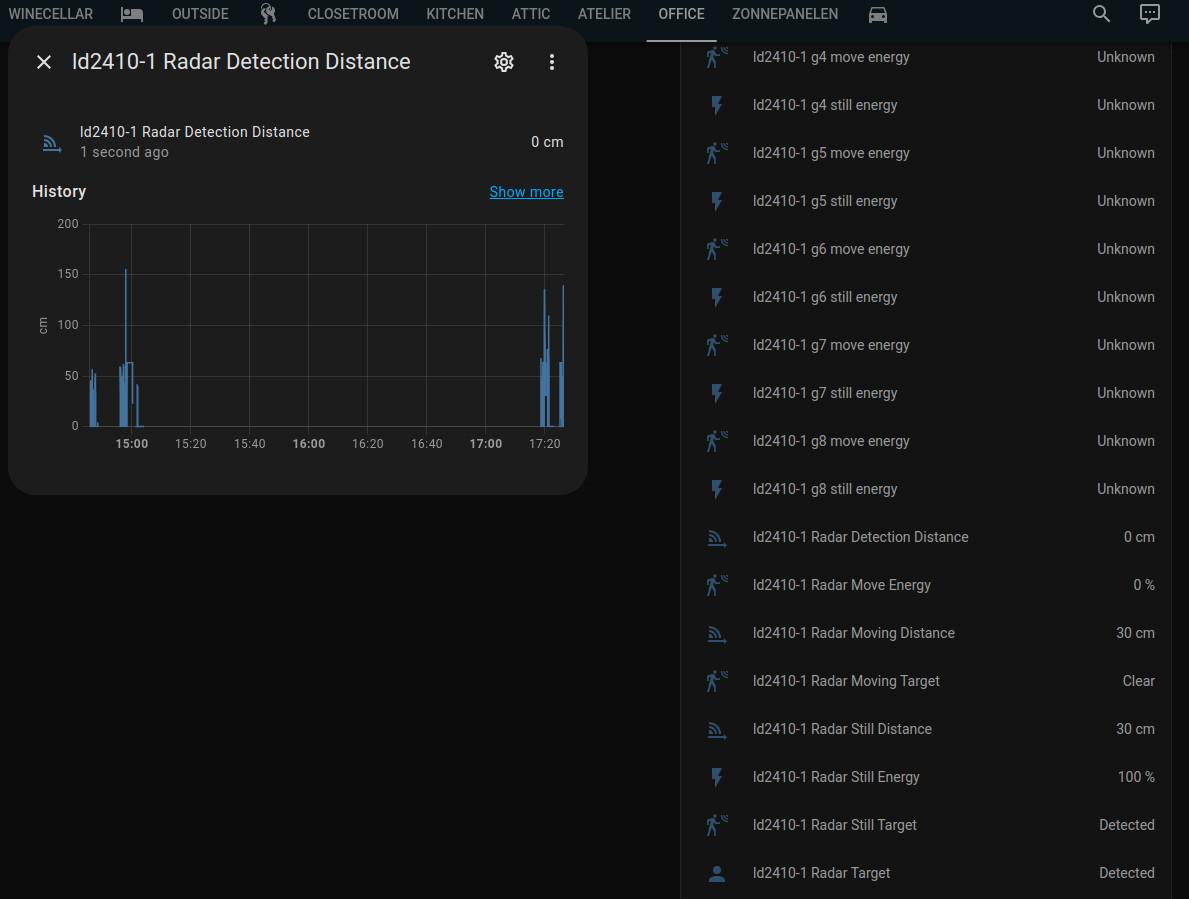
moving_distance:
name: Radar Moving Distance
id: moving_distance
still_distance:
name: Radar Still Distance
id: still_distance
moving_energy:
name: Radar Move Energy
still_energy:
name: Radar Still Energy
detection_distance:
name: Radar Detection Distance
id: radar_detection_distance
g0:
move_energy:
name: g0 move energy
still_energy:
name: g0 still energy
g1:
move_energy:
name: g1 move energy
still_energy:
name: g1 still energy
g2:
move_energy:
name: g2 move energy
still_energy:
name: g2 still energy
g3:
move_energy:
name: g3 move energy
still_energy:
name: g3 still energy
g4:
move_energy:
name: g4 move energy
still_energy:
name: g4 still energy
g5:
move_energy:
name: g5 move energy
still_energy:
name: g5 still energy
g6:
move_energy:
name: g6 move energy
still_energy:
name: g6 still energy
g7:
move_energy:
name: g7 move energy
still_energy:
name: g7 still energy
g8:
move_energy:
name: g8 move energy
still_energy:
name: g8 still energy
Bluetooth:
I’ve connected this HLK-DL2410B to Home Assistant before using Bluetooth. But I wanted to get them connected using Wifi.
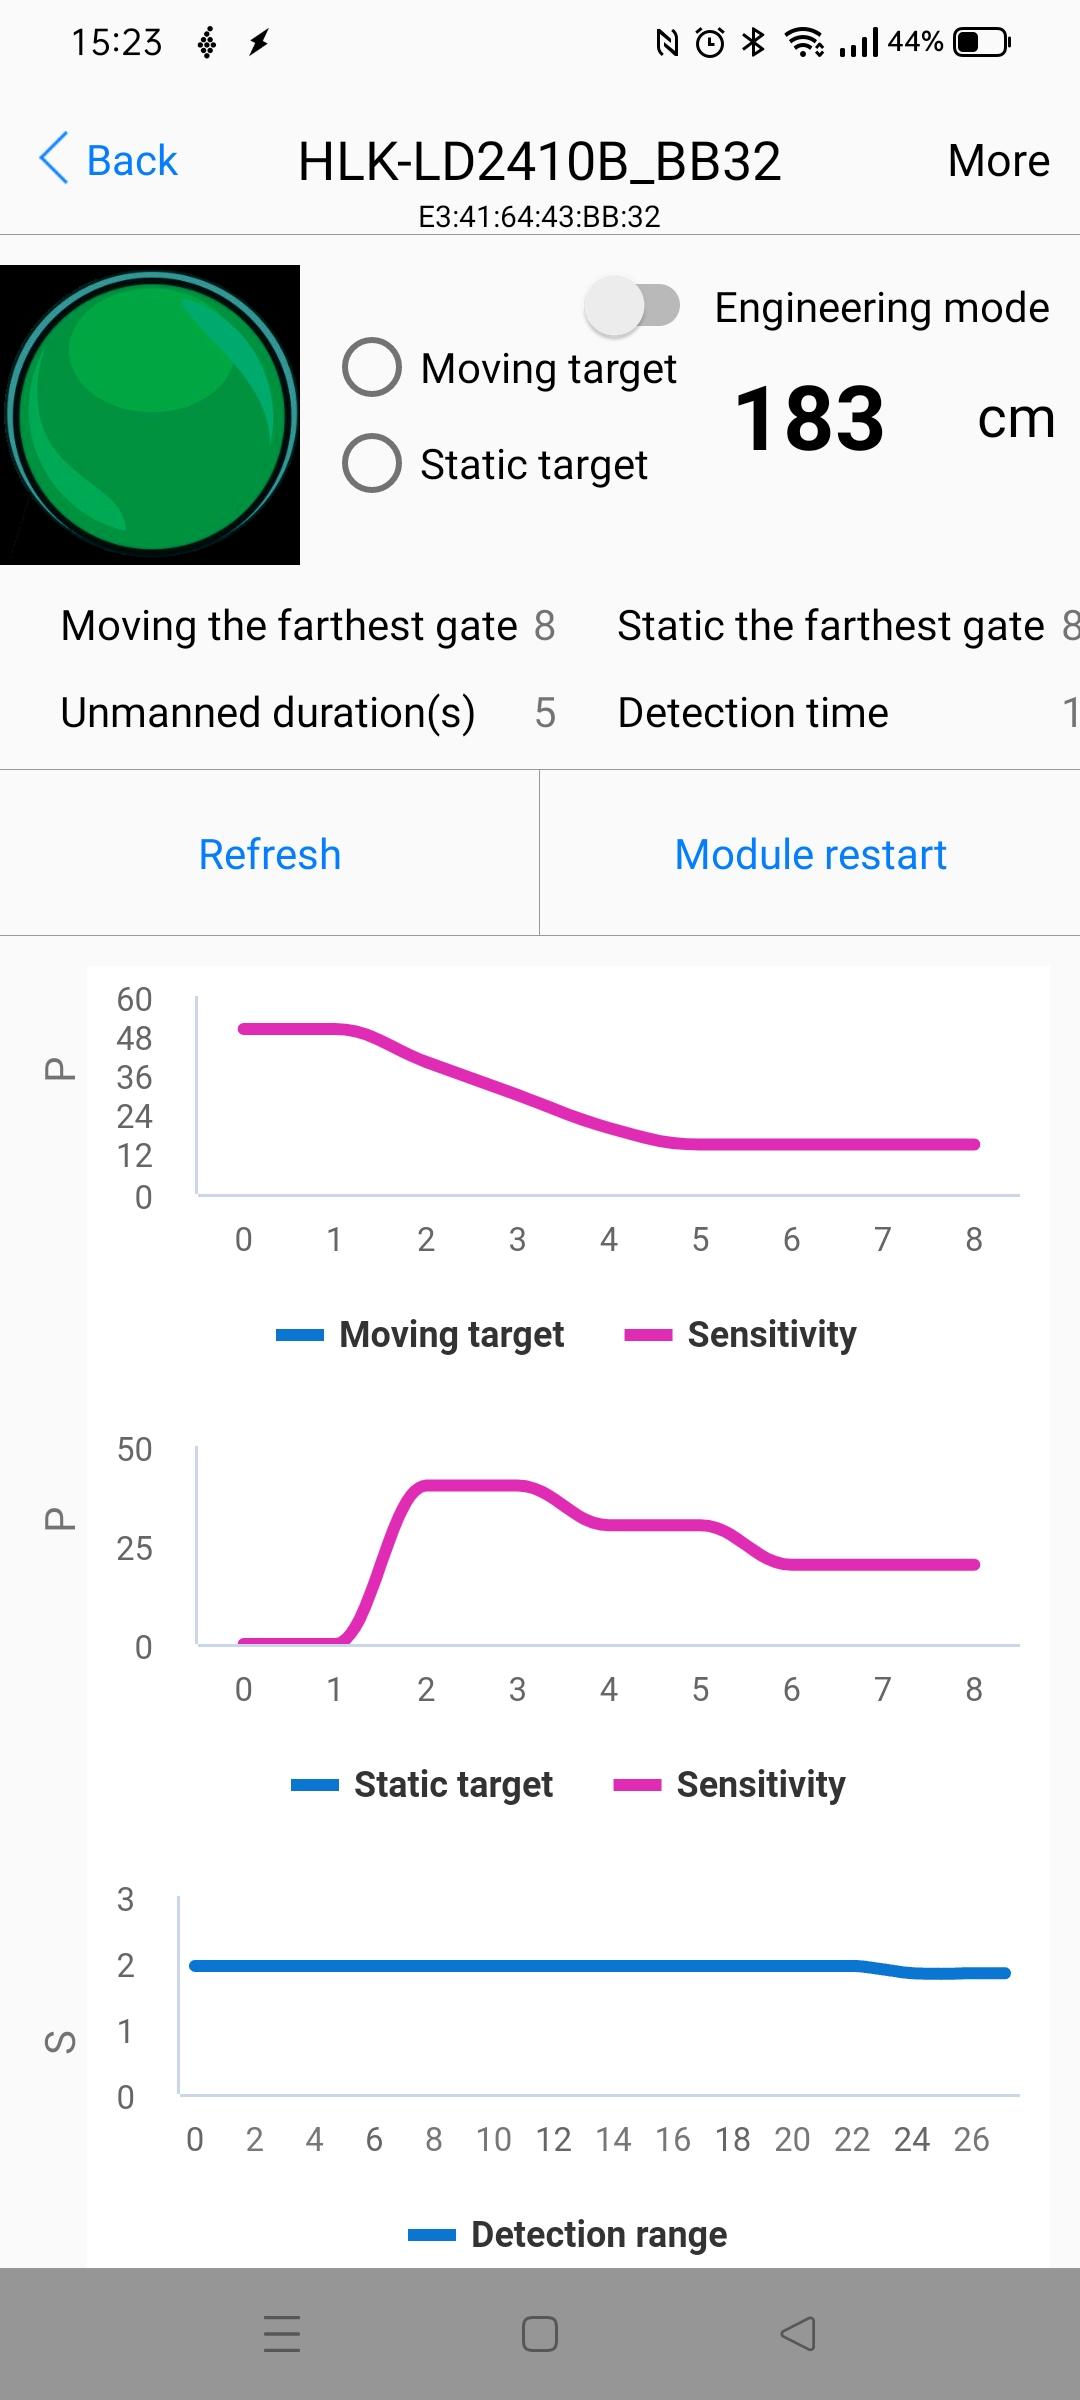
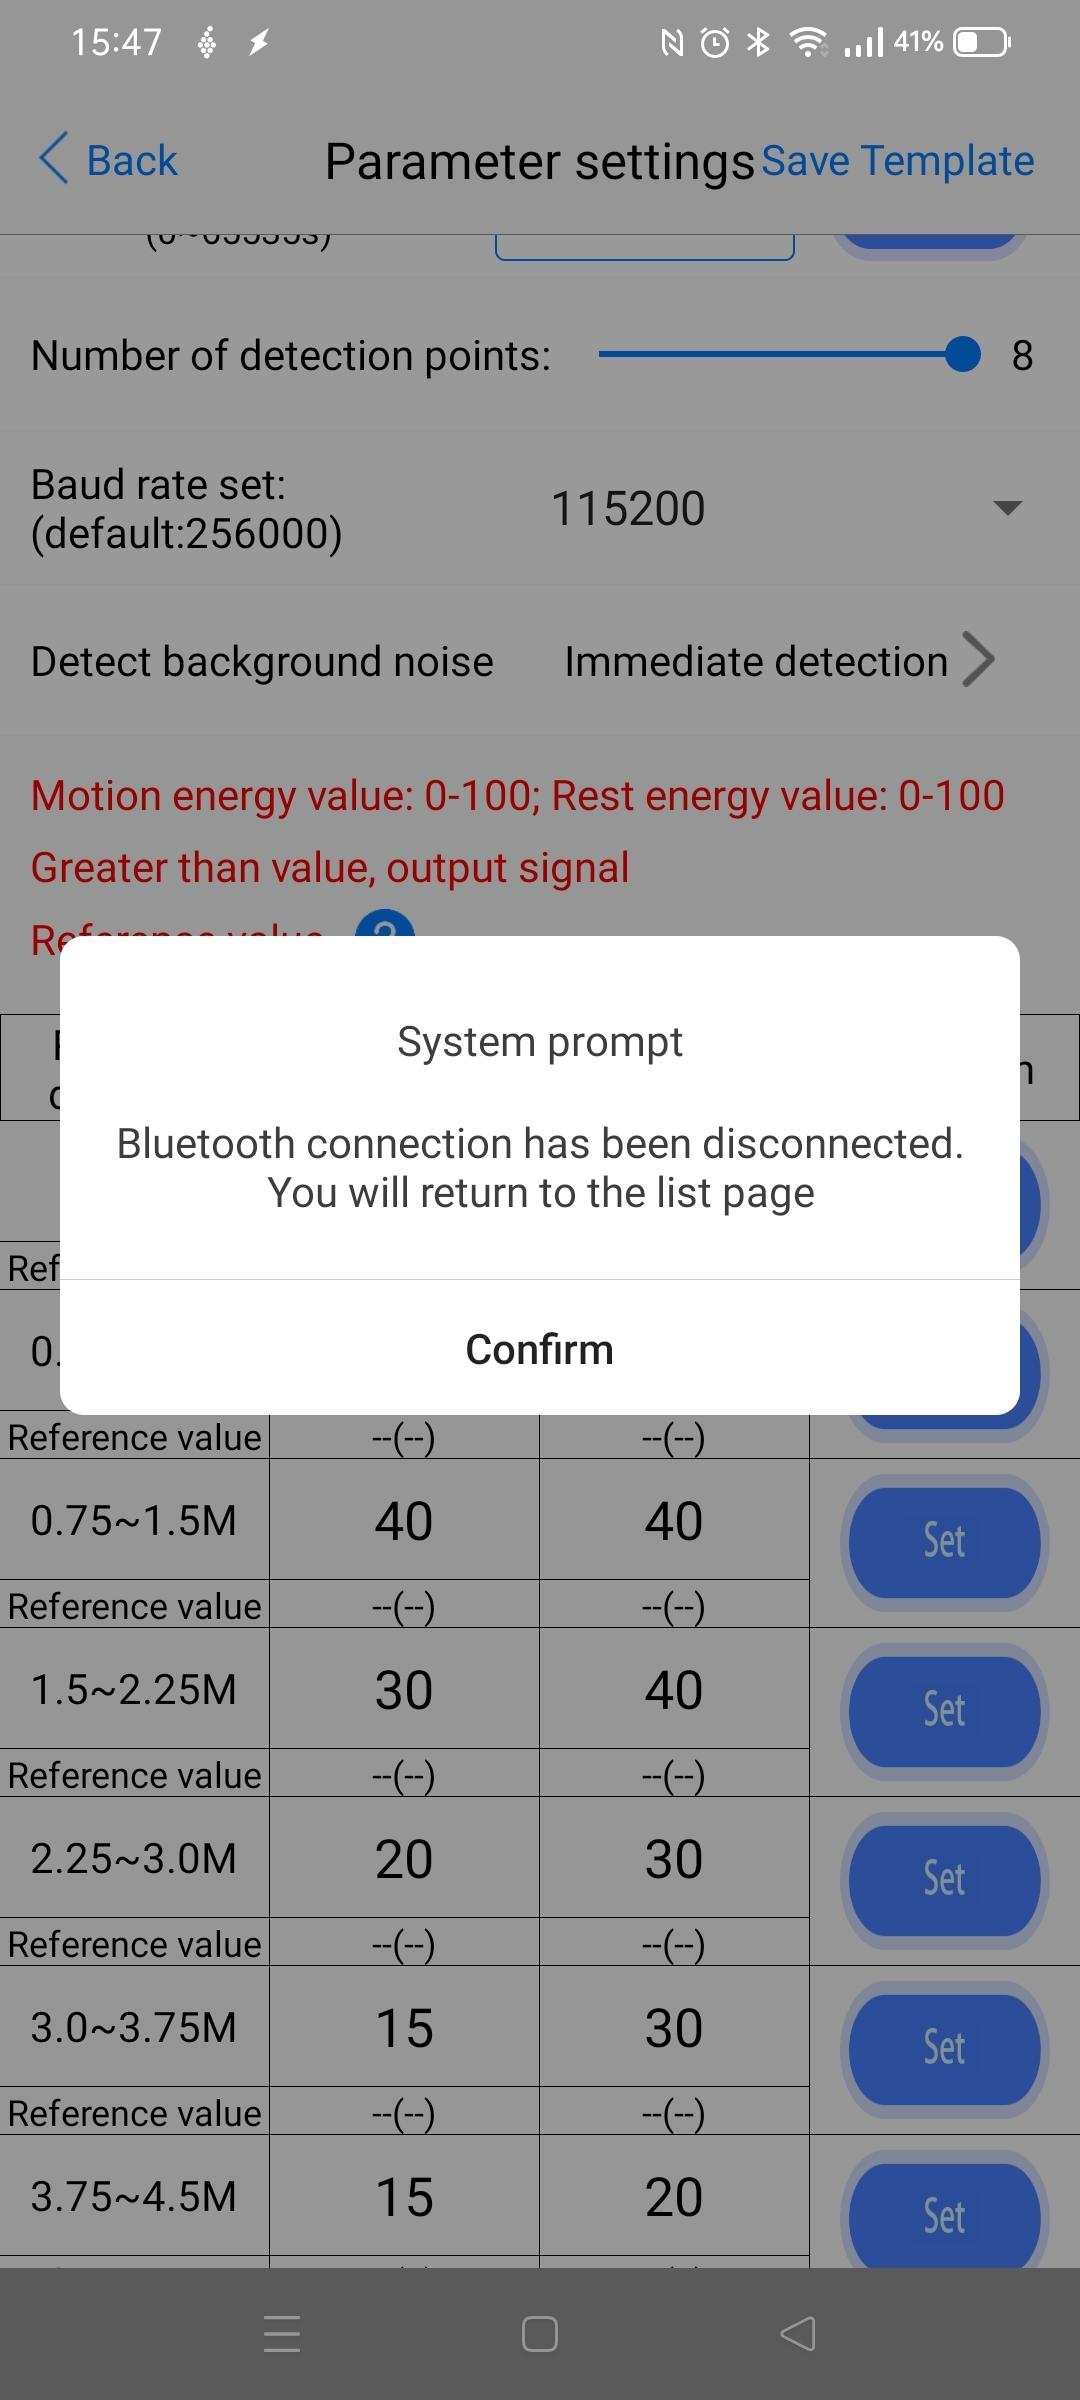
You can install an App on your phone to connect to the sensor when powered on. This way you can test the device, but also upgrade the firmware and make adjustments!
Just enable engineering mode and click more.
Testing another baud rate and upgrading the firmware:
Posted because I could not find a good example on the interwebs.
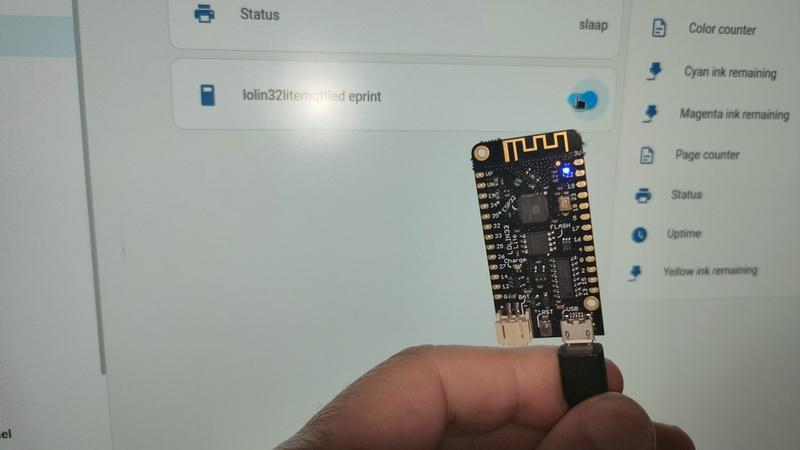
Below creates a virtual HA button which toggles a blinking led. (button and variables are called eprint for another function, change to something meaningful. )
Home Assistant virtual mqtt switch (configuration.yml)
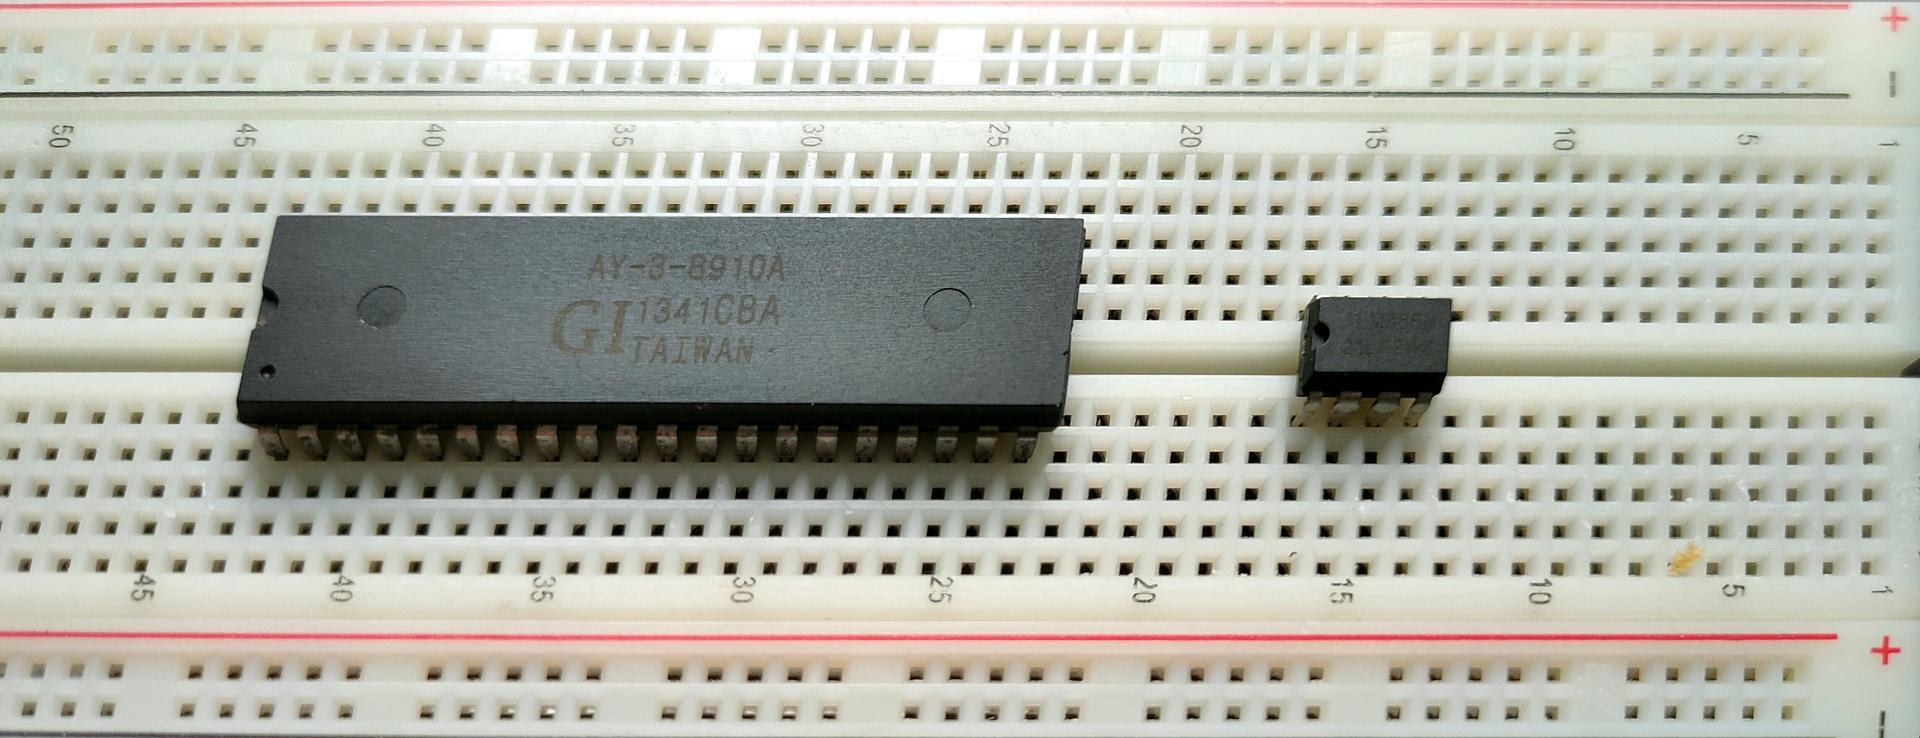
I’ve written about General Instrument AY-3-8910 before, here is some work I did today.
This sound chip i wanted to implement in my amiga, and now it’s a alternative for my 6502 computer. ( As an alternative setup for the SID chip. ) Btw this is the same kind of chip used in the Atari ST.
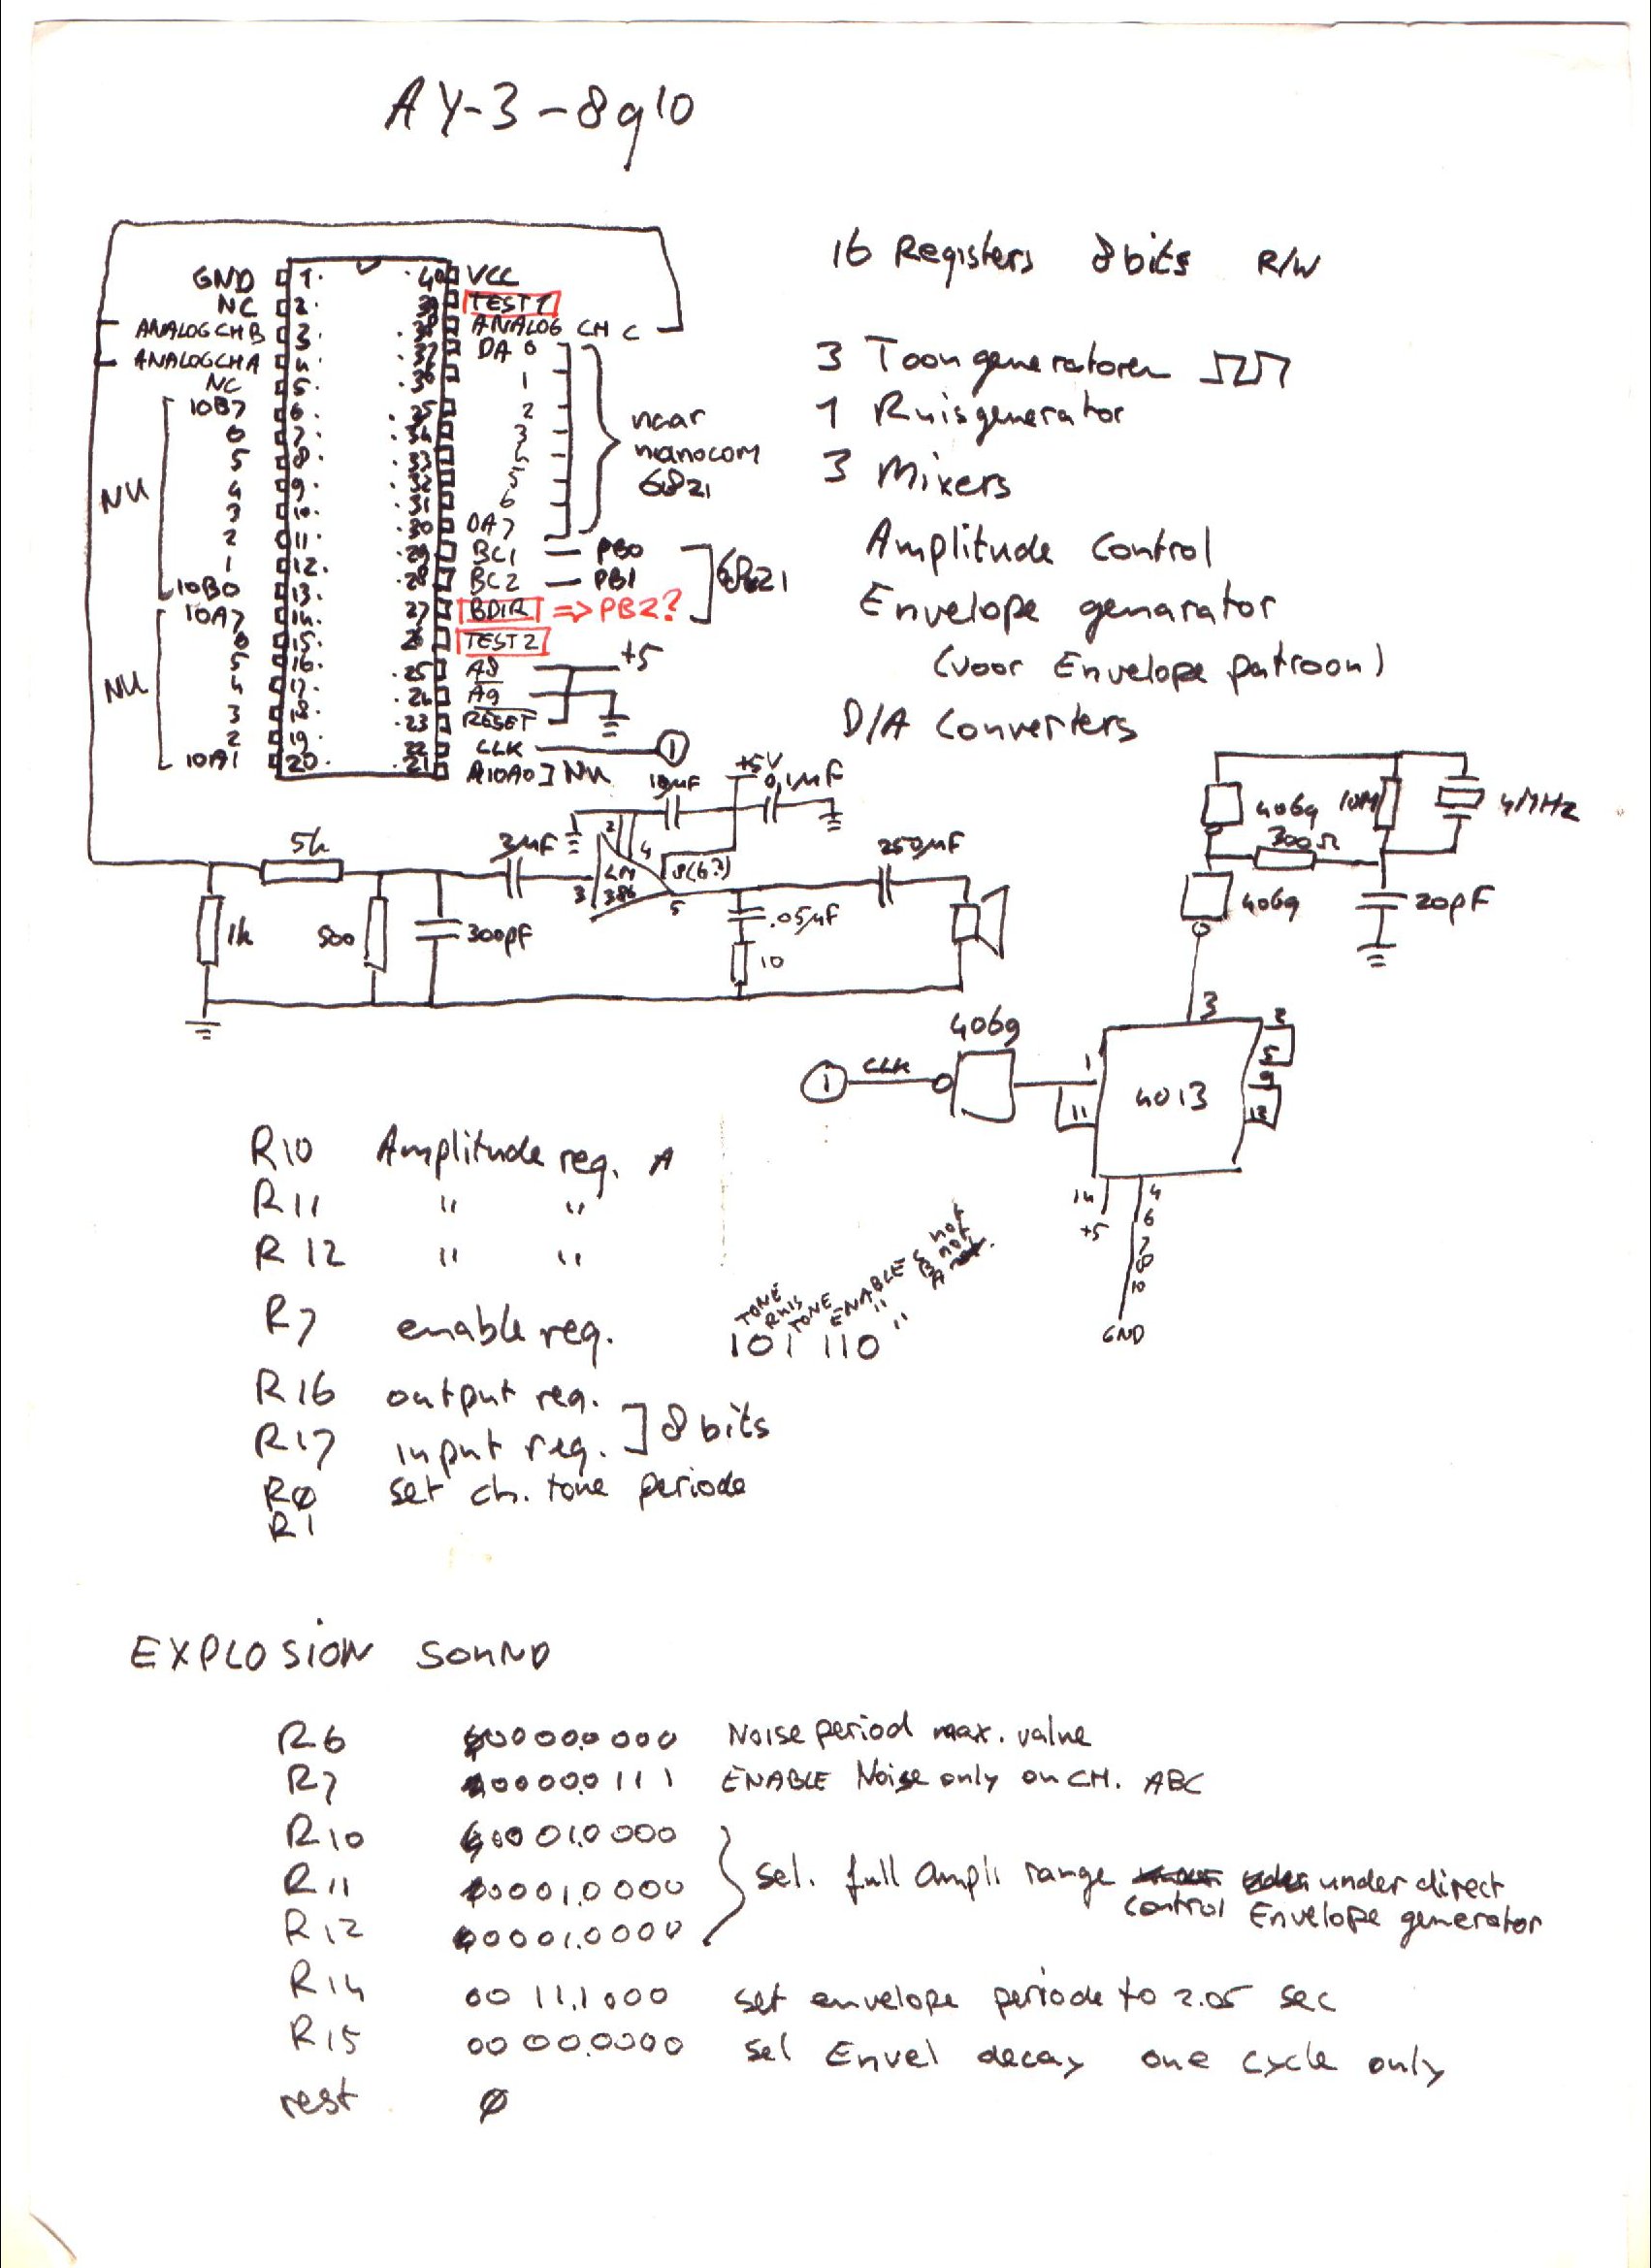
Above a Kicad drawing I made today, a little different from my design from the 90’s.
Below a movie clip I recorded today. Running a test setup using an Arduino nano and a sdcard reader. The sound is bad, this is due to clipping and the absence of multiple resistors and capacitors. Music is a register dump from a YM music file. Amplifier is a bare LM386.
UPDATE: 20240225
I don’t like tying those three outputs together, and amplifying those.
So I’m going to use a LM324 i’ve got left from my 8085 interface, and make a 3-channel amplifier.
Something like this
"If something is worth doing, it's worth overdoing."