Pizza’s eaten: Too many ( sometimes 2 times a day), it was hard to get something else to eat besides Pizza and Pasta.
Oldest building : 500BC
Km walked: 220Km Km driven: ? (calculating) Will update when i post something about unwritten traffic rules in Italy.
Types of transport: Plane, train, metro/subway, bus, scooter, bike, car, walking
Temperature high: 32 Temperature low: 16
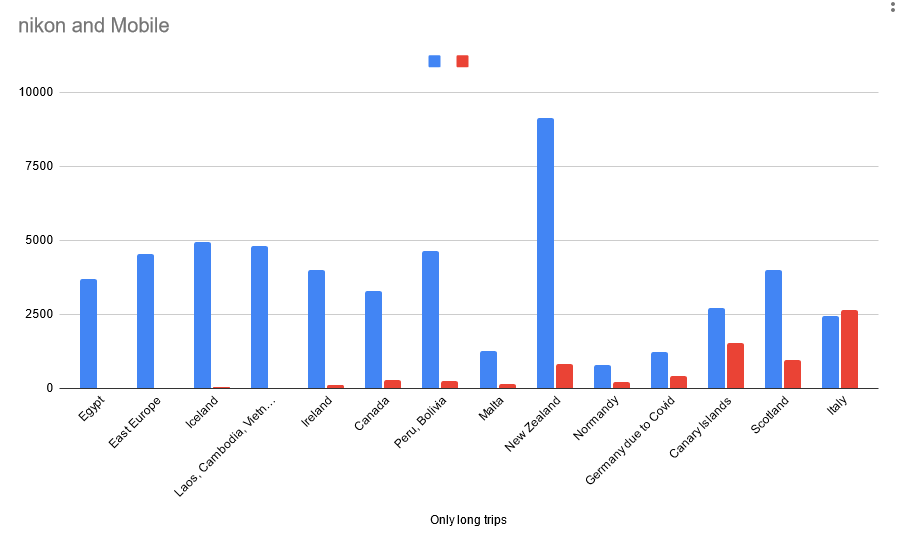
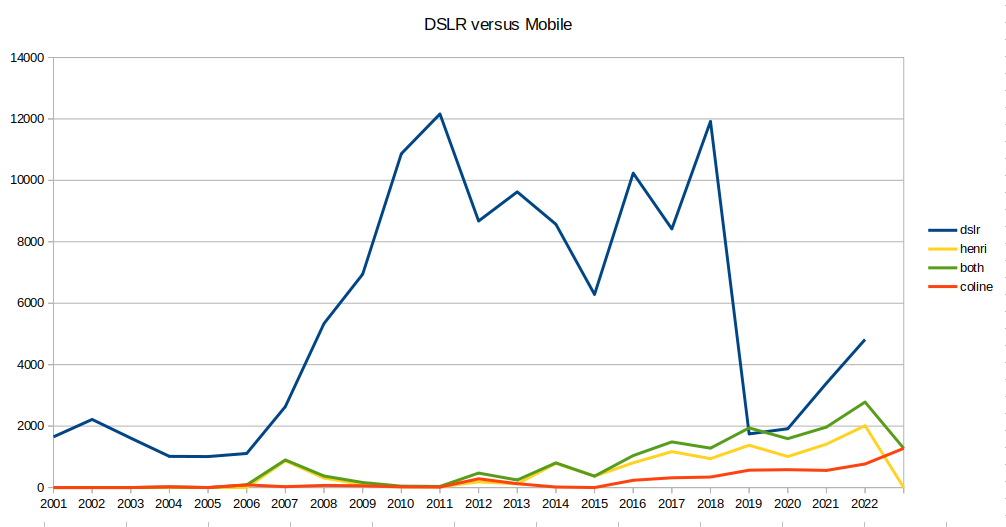
About the photos .. it finally happened. More mobile photos where taken than with our trusty Nikon! (Read our New Zealand post, why trusty .. rain damage on both Mobile and Nikon D750)
Some data about longer trips since 2010
This has multiple reasons:
Coline took loads of mobile phone pictures. (I was mostly in charge of the Nikon) She is trigger happy ..
We didn’t take the big camera always with us at night, going for dinner.
Sometimes it was too hot for me to focus on taking good pictures.
I didn’t make panoramic and time-lapse photos.
Why still use dlsr?
Better sensors (larger image chip) Small image ICs give more cross noise due to the image pixelsensors being to close to each other) So more pixels does NOT equal better images!
More control over your settings.
Better lenses and faster. Better aperture equals better DOF!! (Depth of field)
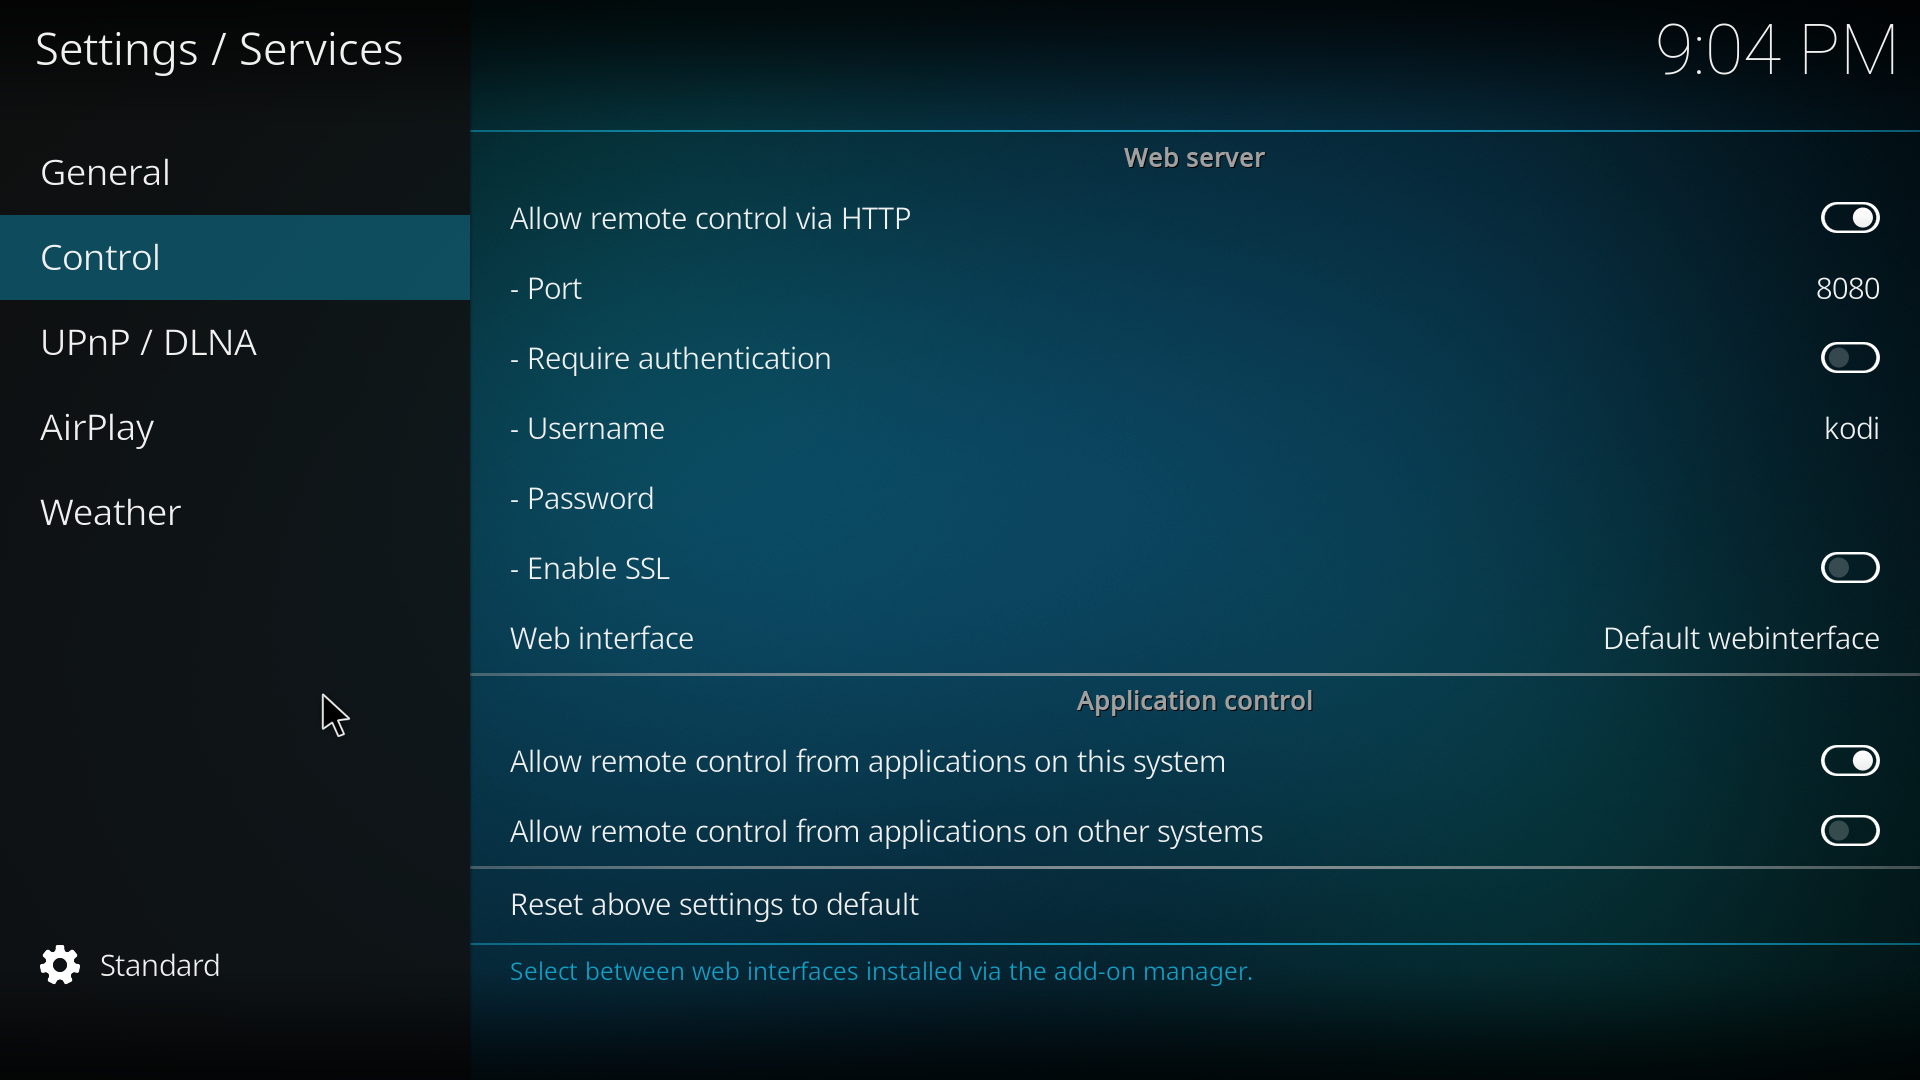
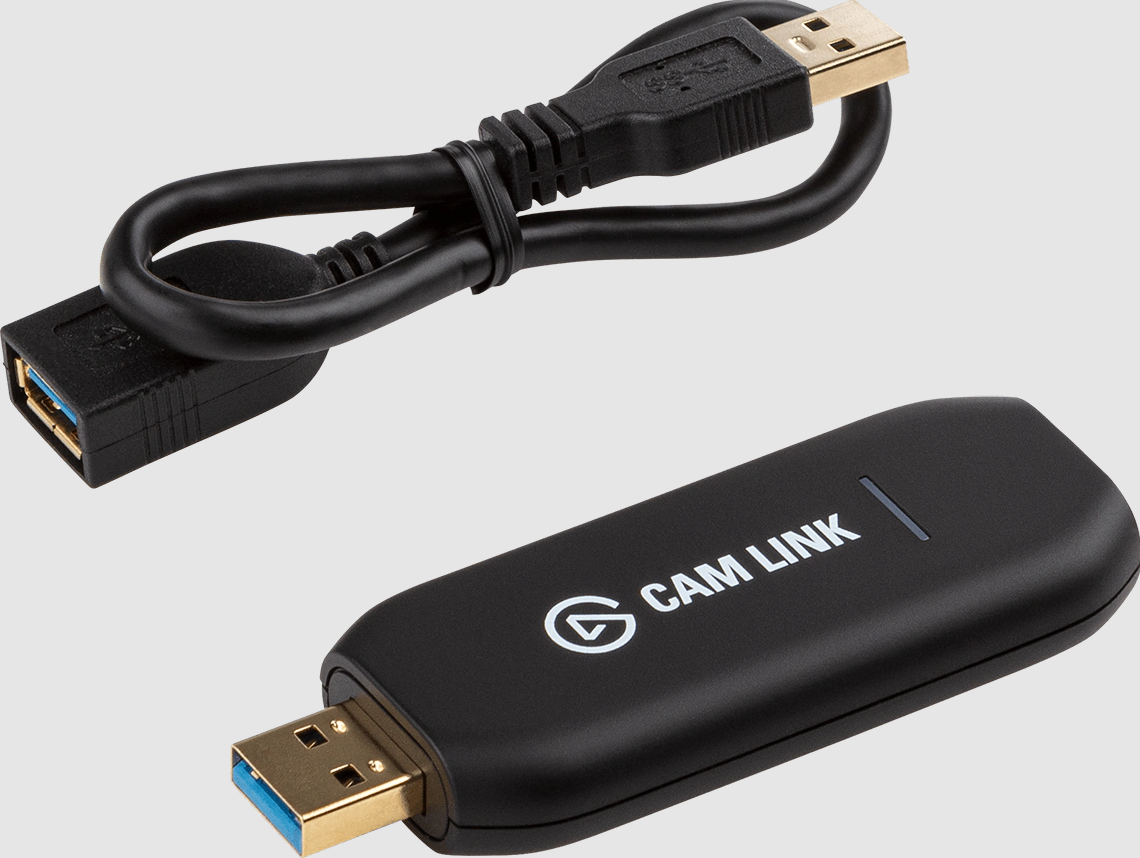
Drag and drop image for displaying on a kodi instance
Button to start slideshow of a directory
Open image in browser with obfuscated image url (not shown in movie)
Stop image playing
Json RPC used:
# Playing a single file
curl -H "content-type:application/json" -i -X POST -d '{"jsonrpc":"2.0","id":1,"method":"Player.Open","params":{"item":{"file":"'.$dir2.'"}}}' http://KODI-IP:8080/jsonrpc &';

# Playing a directory
curl -H "content-type:application/json" -i -X POST -d '{"jsonrpc":"2.0","id":1,"method":"Player.Open","params":{"item":{"directory":"/path/'.$dir.'"}}}' http://KODI-IP:8080/jsonrpc &';

# Stop playing (i'm stopping player 1 and 2) You can query which player is active, this works also
curl -H "content-type:application/json" -i -X POST -d '{"jsonrpc": "2.0", "method": "Player.Stop", "params": { "playerid": 1 }, "id": 1}' http://10.1.0.73:8080/jsonrpc';
Kodi enable http control and disable authentication (if you want to use authentication, change the curl commands accordingly)
Below the multiple PHP files, i’ve removed a lot of code specific for my manager.
By the way, I love this trick:
header("HTTP/1.1 204 NO CONTENT");
I’ve you put this in the top of your php script which is linked from the first page, you won’t open this link in your browser, but it gets executed nevertheless!
::::::::::::::
push.php
::::::::::::::
<!DOCTYPE html>
<html>
<head>
</head>
<body>

<div id="dropbox">Drop Image</div><br>
<a href="playpush.php?dir=TEMP/Sake">playdir</a>
<a href="stoppush.php">stop</a>

# Here i have a generated part to list my photoalbum photos in this format

<a href='getimg.php?imagepath=/mnt/fileserver/TEMP/1.jpg'><img src='getimg2.php?imagepath=/mnt/fileserver/TEMP/1.jpg' width=300 title='1.jpg'></a>
<a href='getimg.php?imagepath=/mnt/fileserver/TEMP/2.jpg'><img src='getimg2.php?imagepath=/mnt/fileserver/TEMP/2.jpg' width=300 title='2.jpg'></a>

<script
    type="text/javascript"
    src="javascript2.js"

  ></script>
</body></html>
::::::::::::::
getimg.php - Displays photo in browser (forgotten in movie)
::::::::::::::
<?php
Header("Content-Type: image/jpeg");
$file = $_GET['imagepath'];
$file = str_replace("%20", "\ ", $file);
$file = str_replace("(", "\(", $file);
$file = str_replace(")", "\)", $file);
$log =  'imggetlog';
file_put_contents($log, $file, FILE_APPEND);
file_put_contents($log, "\n\r", FILE_APPEND);
header('Content-Length: ' . filesize($file));
readfile($file);
?>

::::::::::::::
getimg2.php - makes a caching thumbnail
/long/image/path/to/photo.jpg -> cachedir/longimagepathtophoto.jpg
::::::::::::::
<?php
Header("Content-Type: image/jpeg");
$file = $_GET['imagepath'];
$file = str_replace("%28", "\(", $file);
$file = str_replace("%29", "\)", $file);
$file = str_replace("%20", "\ ", $file);

$cachename = str_replace("/", "", $file);
$cachename = str_replace(" ", "", $cachename);
$cachename = "cachedir/$cachename";
$log =  'imggetlog';
file_put_contents($log, $file, FILE_APPEND);
file_put_contents($log, "\n\r", FILE_APPEND);
if (!file_exists("$cachename")) {

exec("convert -resize 300x300 \"$file\" \"$cachename\"");
}
header('Content-Length: ' . filesize("$cachename"));
readfile("$cachename");
?>

::::::::::::::
playpush.php - Pushes DIRECTORY play to Kodi
::::::::::::::
<?PHP
header("HTTP/1.1 204 NO CONTENT");

header("Cache-Control: no-cache, no-store, must-revalidate"); // HTTP 1.1.
header("Pragma: no-cache"); // HTTP 1.0.
header("Expires: 0"); // Proxies.

$dir=$_GET['dir'];

$command='nohup curl -H "content-type:application/json" -i -X POST -d \'{"jsonrpc":"2.0","id":1,"method":"Player.Open","params":{"item":{"directory":"/mnt/fileserver/'.$dir.'"}}}\' http://IPKODI:8080/jso
nrpc &';
exec($command, $output, $retval);
?>

::::::::::::::
stoppush.php - stops displaying
::::::::::::::
<?PHP
header("HTTP/1.1 204 NO CONTENT");

header("Cache-Control: no-cache, no-store, must-revalidate"); // HTTP 1.1.
header("Pragma: no-cache"); // HTTP 1.0.
header("Expires: 0"); // Proxies.

$command='curl -H "content-type:application/json" -i -X POST -d \'{"jsonrpc": "2.0", "method": "Player.Stop", "params": { "playerid": 1 }, "id": 1}\' http://IPKODI:8080/jsonrpc';
exec($command, $output, $retval);
$command='curl -H "content-type:application/json" -i -X POST -d \'{"jsonrpc": "2.0", "method": "Player.Stop", "params": { "playerid": 2 }, "id": 1}\' http://IPKODI:8080/jsonrpc';
exec($command, $output, $retval);
?>
::::::::::::::
javascript2.js
::::::::::::::
function getAllElementsWith(tag, attribute, value)
{
  var matchingElements = [];
  var allElements = document.getElementsByTagName(tag);
  for (var i = 0; i < allElements.length; i++)
  {
    if (value.indexOf(allElements[i].getAttribute(attribute)) != -1)
    {
      // Element exists with attribute. Add to array.
      matchingElements.push(allElements[i]);
    }
  }
  return matchingElements;
}

// onDrop
function onDrop(evt) {
    evt.stopPropagation();
    evt.preventDefault();
    var imageUrl = evt.dataTransfer.getData("URL");
    var links = getAllElementsWith("a", "href", imageUrl);
    var image;
     console.log(links, evt);

    if(links.length){
        image = links[0].getElementsByTagName("img");
        if(image.length)
            imageUrl = image[0].getAttribute("src");
        else
            imageUrl = "#no-image";
    }

///    alert(imageUrl);
var res = imageUrl.replace(/getimg/, "pushplay2");

location.href = (res);

};

// onDragOver
function onDragOver(evt){
    evt.preventDefault();
}

var dropbox = document.getElementById('dropbox');
dropbox.addEventListener('drop', onDrop);
dropbox.addEventListener("dragover", onDragOver, false);
Random picture push
file=$(find /mnt/fileserver/examples -type f  | shuf | head -1)
post_data="{\"jsonrpc\":\"2.0\",\"id\":1,\"method\":\"Player.Open\",\"params\":{\"item\":{\"file\":\"$file\"}}}"
curl --user user:pass  -H "content-type:application/json" -i -X POST --data "${post_data}" http://KODI-IP:8080/jsonrpc
Below a example of what your can do with the code above
We take a lot of pictures, with our Nikon camera and our mobile phones.
(Apparently in 2019 5544 pictures)
Some stats

757 20190803 - on a single day (Holiday)

Average pictures per month
locate "/2019/" | egrep -i "photoalbum|gsm" | egrep -i "mp4$|jpg$" | grep -Eo '2[[:digit:]]{3}[[:digit:]]{2}[[:digit:]]{2}' | cut -c-6 |sort | uniq -c | sort -n | awk '{ sum += $1; n++ } END { if (n > 0) print sum / n; }'
461
Besides android pictures being automatically uploaded to our nextcloud, I’m using some apps and scripts to get pictures and movies stored on my fileserver. (bash scripts/andftp)
For sorting those media files, i made a sorting script. (Today I added a location sorting addition using GPS information stored in the exif information.
jpg and jpeg (add your own extentions)
mp4 and mov (for mobile and nikon)
Sorts by camera model/year/date/location
tries to extract date from filename when not found in exifinfo
Sorts whatsapp media
Sorts Raw
INSTALLING
pip3 install reverse_geocoder You need python3, exiftool, exiftime and mediainfo
copy below python script in ~/bin/reverse2.py
( need more info? change last print entry admin1/admin2) [{‘lat’: ‘-39.45556’, ‘lon’: ‘173.85833’, ‘name’: ‘Opunake’, ‘admin1’: ‘Taranaki’, ‘admin2’: ‘South Taranaki District’, ‘cc’: ‘NZ’}]
#!/bin/bash
#set -x

reversepath=/home/henri/projects/reversegeo/reverse2.py

#RAW
rawcnt=`ls | grep -i  nef$ | wc -l`
if [ "$rawcnt" = "0" ] ; then
echo "no raw"
else
mkdir raw 2>/dev/null
ls | grep -i nef$ | while read ; do mv $REPLY raw ; done
fi


ls | egrep -i "jpg$|jpeg" | while read ; do
 	location=""
	getmodel=$(exiftool "$REPLY" |grep "Make " | awk '{ print $3 }')
	if [ "$getmodel" != "" ] ; then
		getmodel=$getmodel/
	fi
	echo "$REPLY" | grep WA0 >/dev/null && getmodel=whatsapp/

	gpsinfo=$(exiftool -c "%+.6f" "$REPLY" |grep "GPS Position" | cut -d":" -f2 | tr -d ' ' | sed s/,/\ /g)
	if [ "$gpsinfo" != "" ] ; then
		location=$(python3 $reversepath $gpsinfo | grep -vi load | sed s/\(NL\)//g)
	fi
	dater=$(exiftime "$REPLY" 2>/dev/null | egrep "Created|Digitized" | sed s/Digitized/Created/g | tail -1  | cut -c 16-19,21,22,24,25)
	if [ "$dater" = "" ] ; then
#		echo "Trying from filename"
		dater=$(echo $REPLY | grep -Eo '2[[:digit:]]{3}-[[:digit:]]{2}-[[:digit:]]{2}')

		if [ "$dater" = "" ] ; then
#			echo "Trying from filename - maybe without dashes"
			dater=$(echo $REPLY | grep -Eo '2[[:digit:]]{3}[[:digit:]]{2}[[:digit:]]{2}')

		fi
	fi
	if [ "$dater" != "" ] ; then
		year=$(echo $dater | cut -c-4)
		mkdir -p "${getmodel}$year/${dater}/$location"
		mv "$REPLY" "${getmodel}${year}/${dater}/$location"
	else
		mkdir -p "${getmodel}unknowndate/$location"
		mv "$REPLY" "${getmodel}unknowndate/$location"
      	fi
done

ls | egrep -i "mov$|mp4$" | while read ; do

 	location=""
	getmodel=$(exiftool "$REPLY" |grep "Make " | awk '{ print $3 }')
	if [ "$getmodel" != "" ] ; then
		getmodel=$getmodel/
	fi

	echo "$REPLY" | grep WA0 >/dev/null && getmodel=whatsapp/
	gpsinfo=$(exiftool -c "%+.6f" "$REPLY" |grep "GPS Position" | cut -d":" -f2 | tr -d ' ' | sed s/,/\ /g)
	if [ "$gpsinfo" != "" ] ; then
		location=$(python3 $reversepath $gpsinfo | grep -vi load | sed s/\(NL\)//g)
	fi
	dater=$(mediainfo "$REPLY" | grep Encode | tail -1 | cut -f2- -d:  | cut -f3 -d" " | sed s/-//g)
	if [ "$dater" = "" ] ; then
#		echo "Trying from filename"
		dater=$(echo $REPLY | grep -Eo '2[[:digit:]]{3}-[[:digit:]]{2}-[[:digit:]]{2}')

		if [ "$dater" = "" ] ; then
#			echo "Trying from filename - maybe without dashes"
			dater=$(echo $REPLY | grep -Eo '2[[:digit:]]{3}[[:digit:]]{2}[[:digit:]]{2}')

		fi
	fi
	if [ "$dater" != "" ] ; then
		year=$(echo $dater | cut -c-4)
		mkdir -p "${getmodel}$year/${dater}/$location"
		mv "$REPLY" "${getmodel}${year}/${dater}/$location"
	else
		mkdir -p "${getmodel}unknowndate/$location"
		mv "$REPLY" "${getmodel}unknowndate/$location"
      	fi
done
Example running in a directory with mixed media
# Raw images get moved into a RAW directory
no raw

# Samsung phone detected with date and GPS location
mkdir -p samsung/20220717/Hilversum
mv 20220717_133453.jpg samsung/20220717/Hilversum

# OnePlus phone
mkdir -p OnePlus/20021208/Voorburg
mv IMG_20190109_091825.jpg OnePlus/20021208/Voorburg

# Realme (Added country when not NL)
mkdir -p realme/20220607/Isle of Islay(GB)
mv IMG20220607213630.jpg realme/20220607/Isle of Islay(GB)

# Whatsapp has no date embedded so it gets it from filename
Trying from filename
Trying from filename - maybe without dashes
mkdir -p whatsapp/20221021/
mv IMG-20221021-WA0000.jpg whatsapp/20221021/

# Nikon without GPS
mkdir -p NIKON/20220613/
mv DSC_1423.MOV NIKON/20220613/

# Whatsapp video without exif
mkdir -p whatsapp/20170528/
mv VID-20170528-WA0006.mp4 whatsapp/20170528/

# No camera name detected in exif from mobile movie
mkdir -p 20190114/Maarssen
mv VID_20190114_142455.mp4 20190114/Maarssen

# Location in mp4
mkdir -p 20220607/Lamlash(GB)
mv VID20220607155044.mp4 20220607/Lamlash(GB)
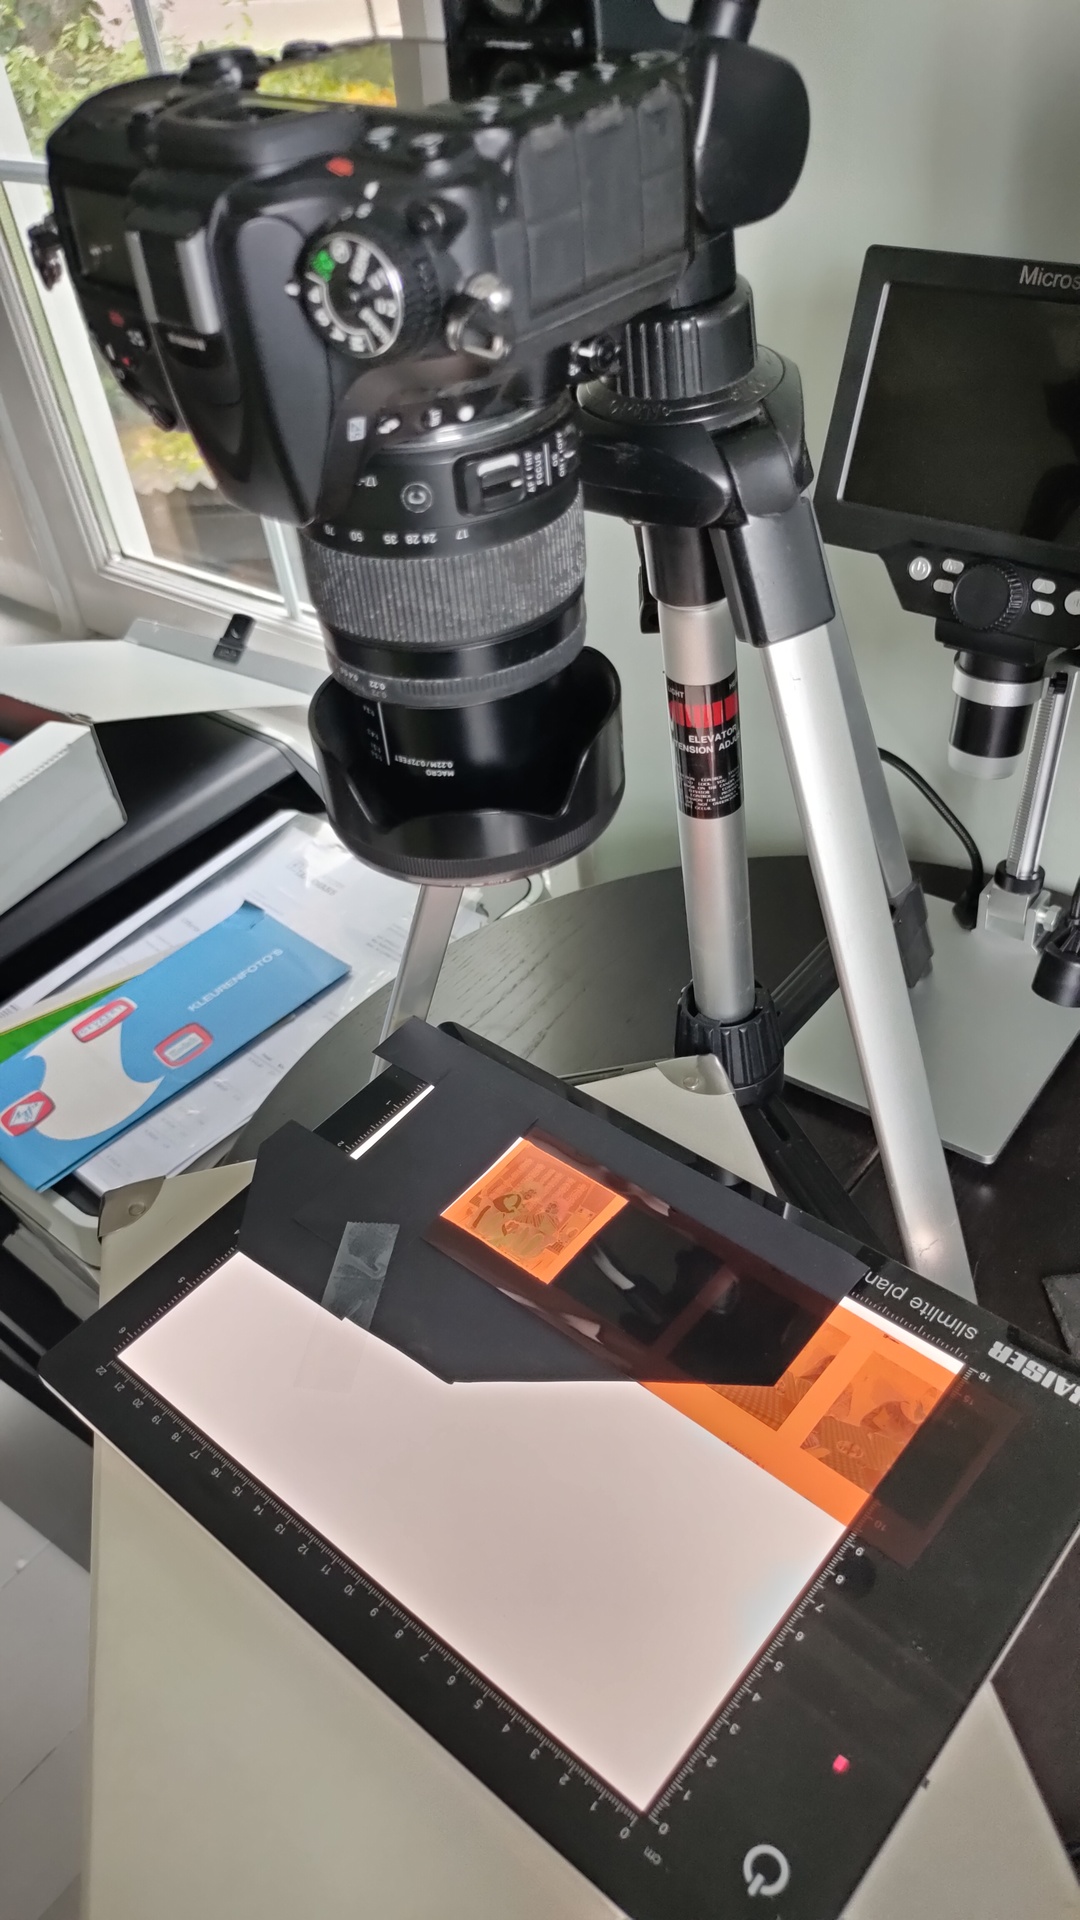
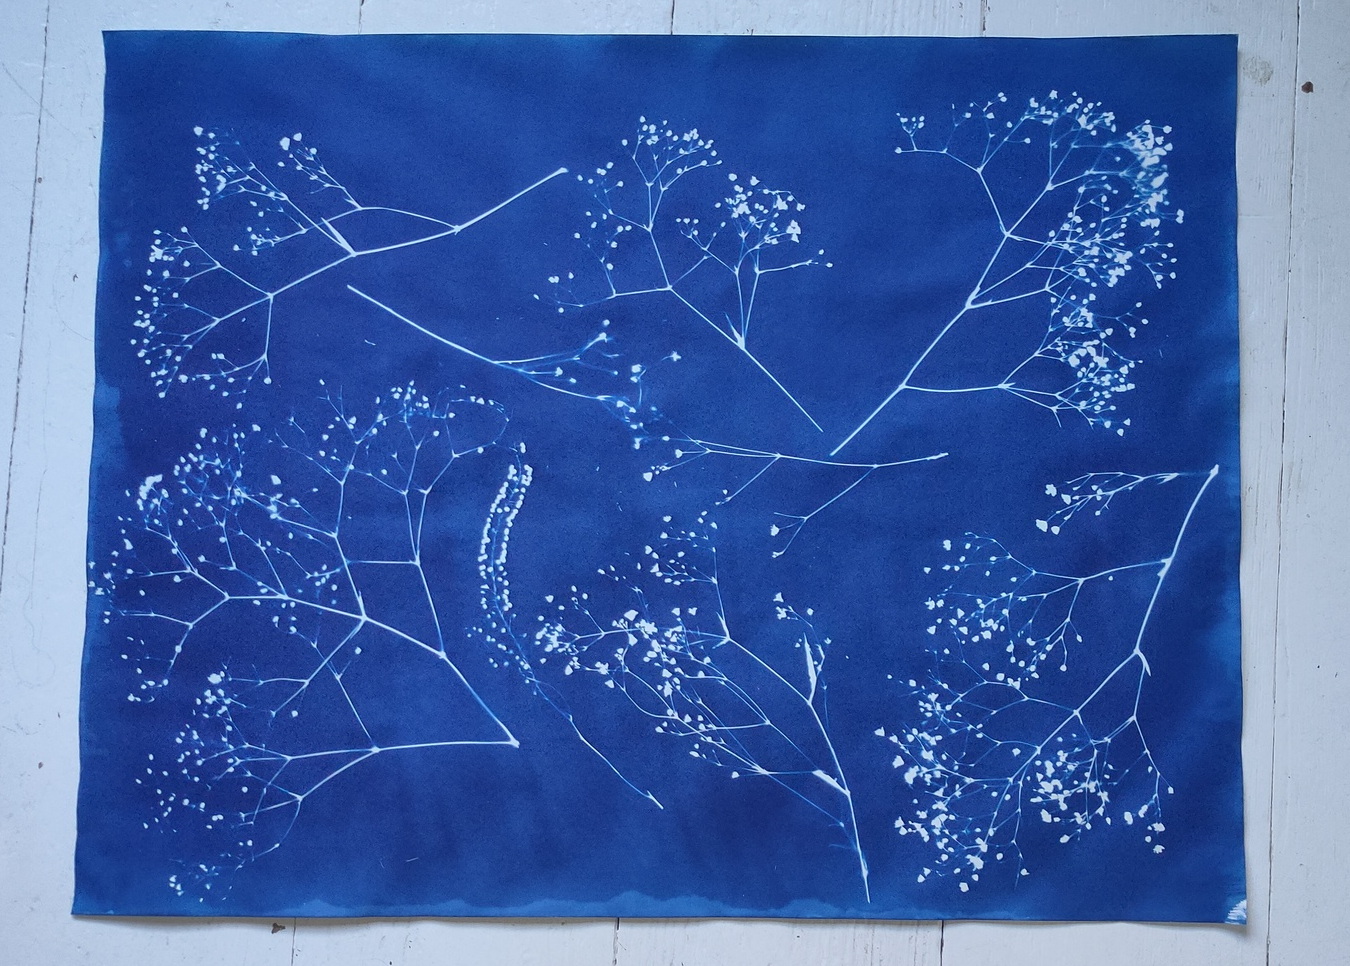
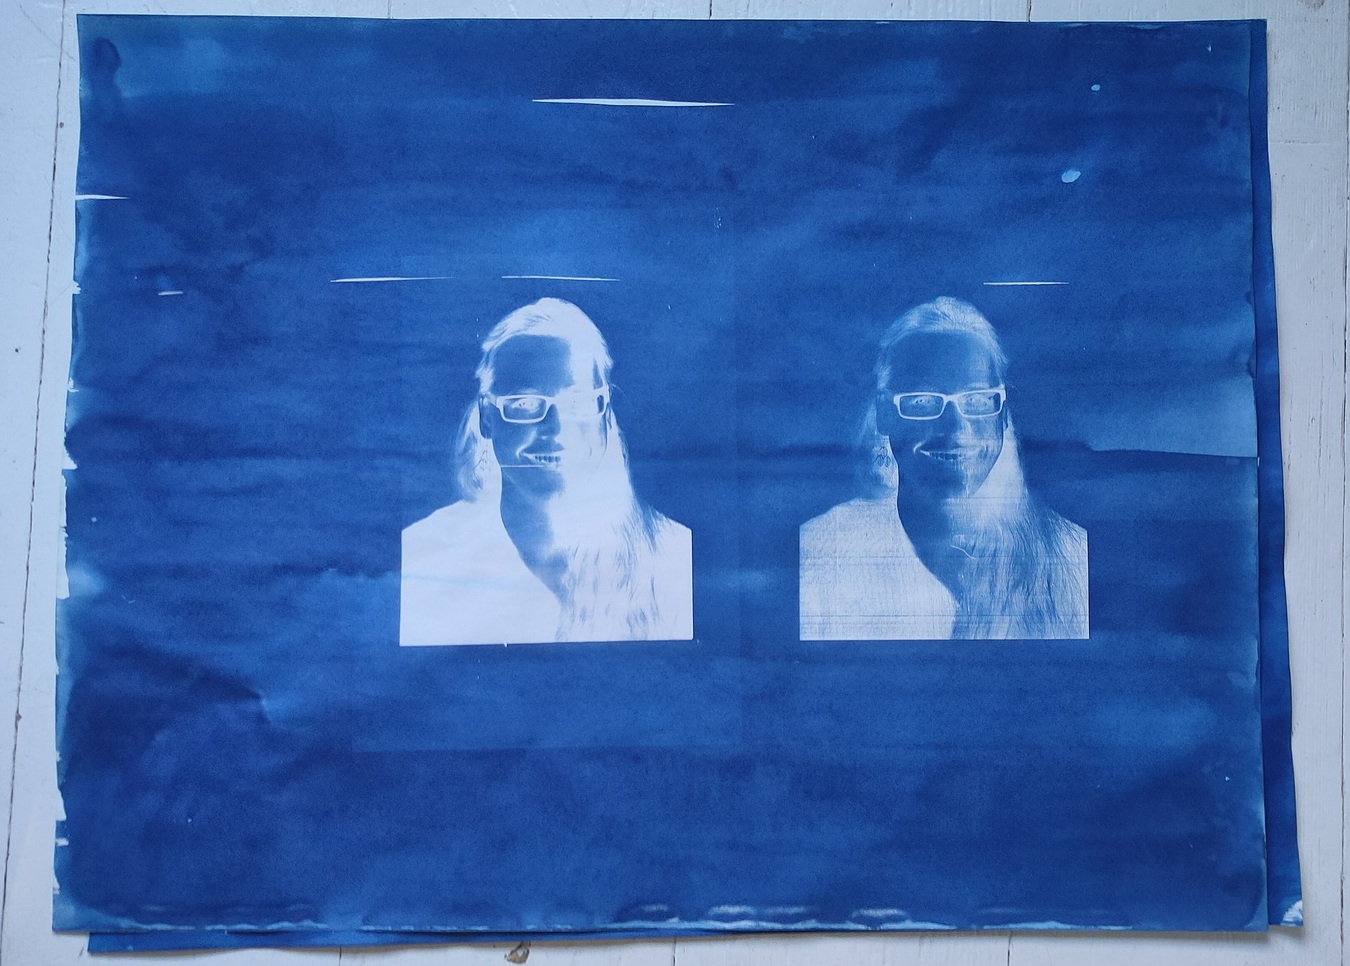
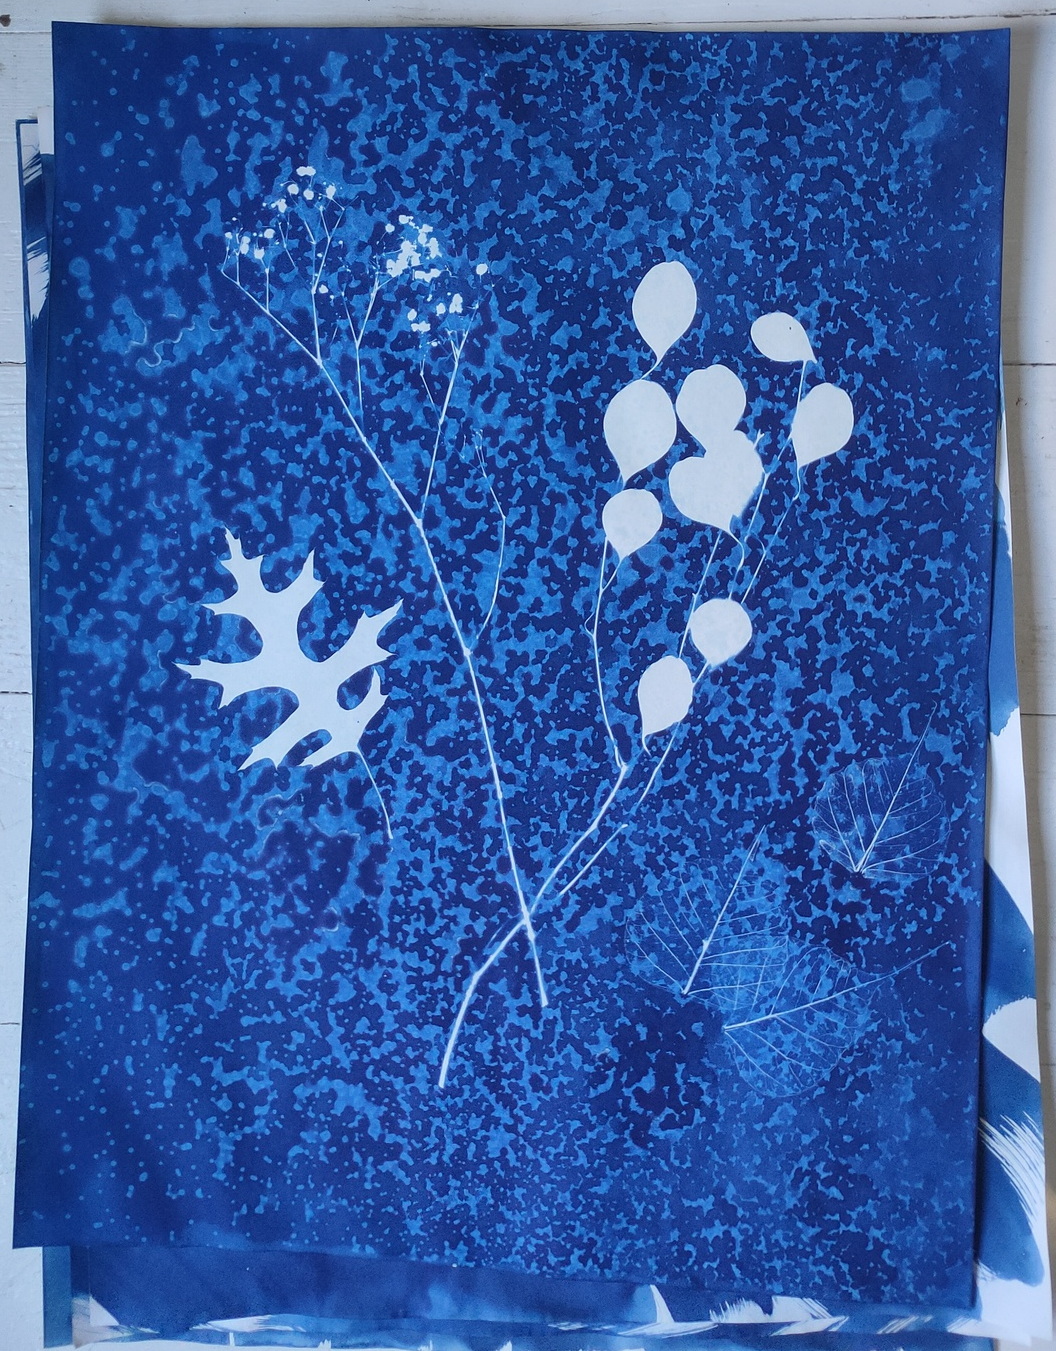
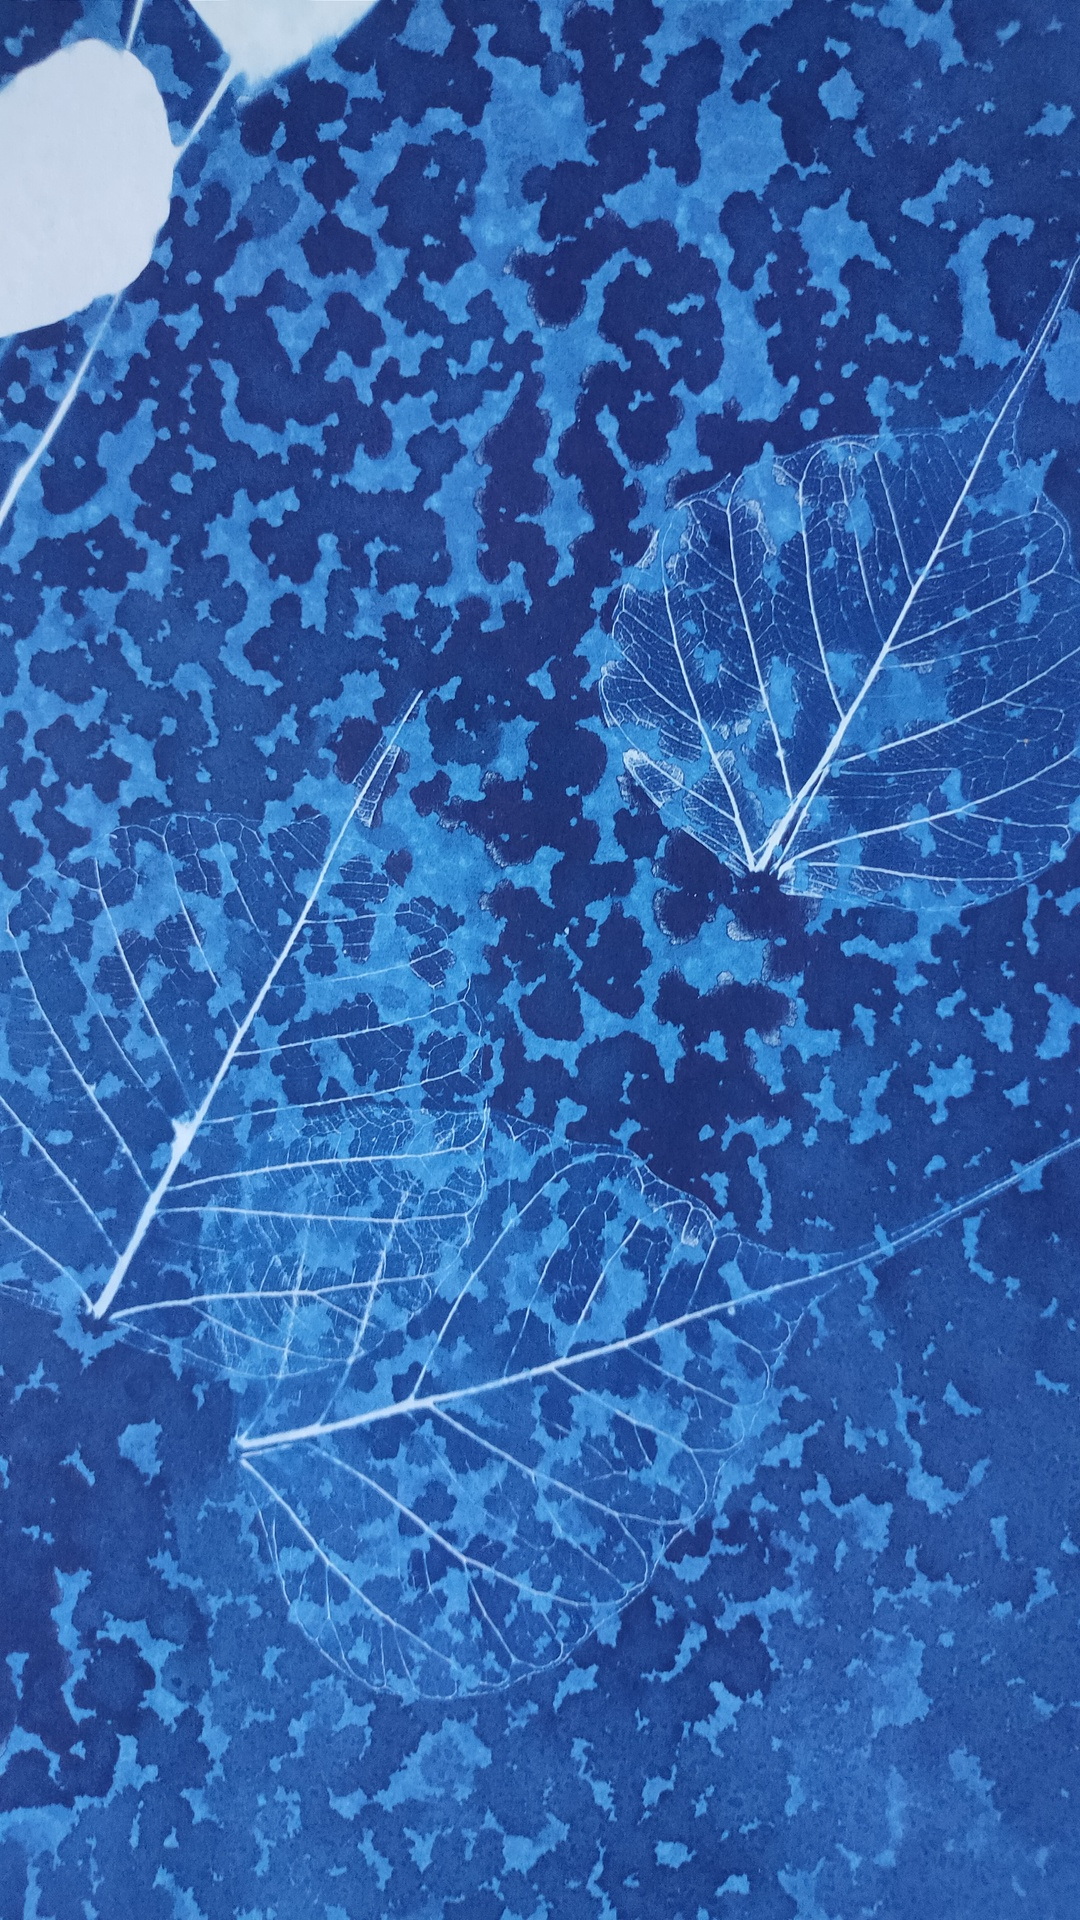
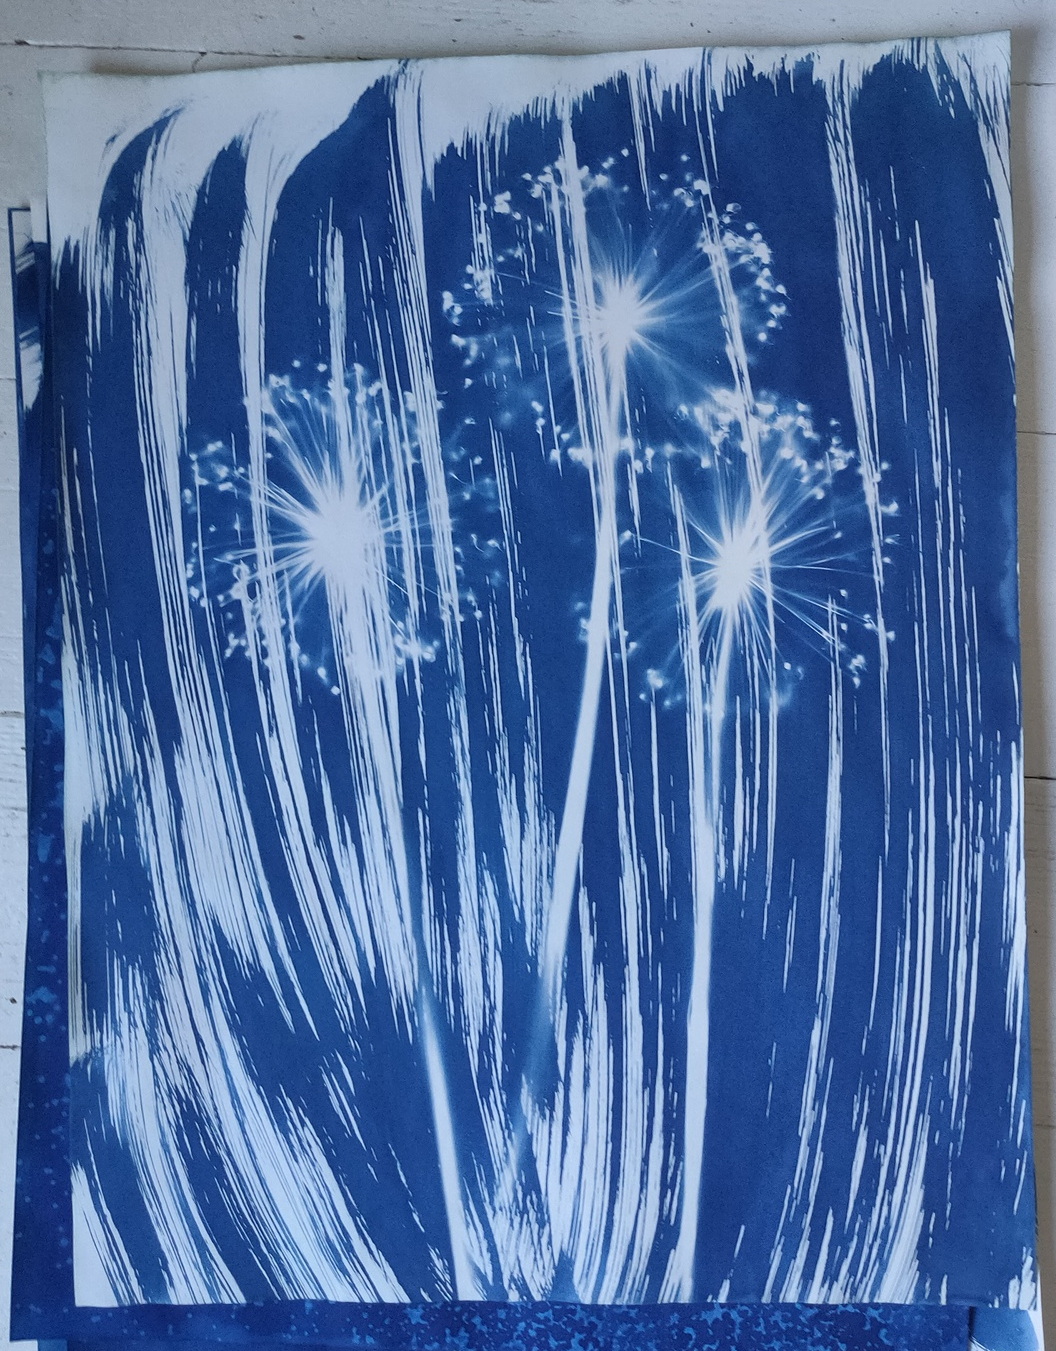
The cyanotype (from Ancient Greek kuáneos, “dark blue” and túpos, “mark, impression, type”) is a slow-reacting, photographic printing technique. It produces a cyan-blue print used for art as monochrome imagery applicable on a range of supports, and for reprography in the form of blueprints. For any purpose, the process usually uses two chemicals: ferric ammonium citrate or ferric ammonium oxalate, and potassium ferricyanide, and only water to develop and fix. Announced in 1842, it is still in use.
This technique was also used as a method of copying drawings. For example buildings and schematics. While making copies of drawings with the exact dimensions of the original, making the result untemperable was another big plus. ( You could not move/redraw walls for example on the copy)
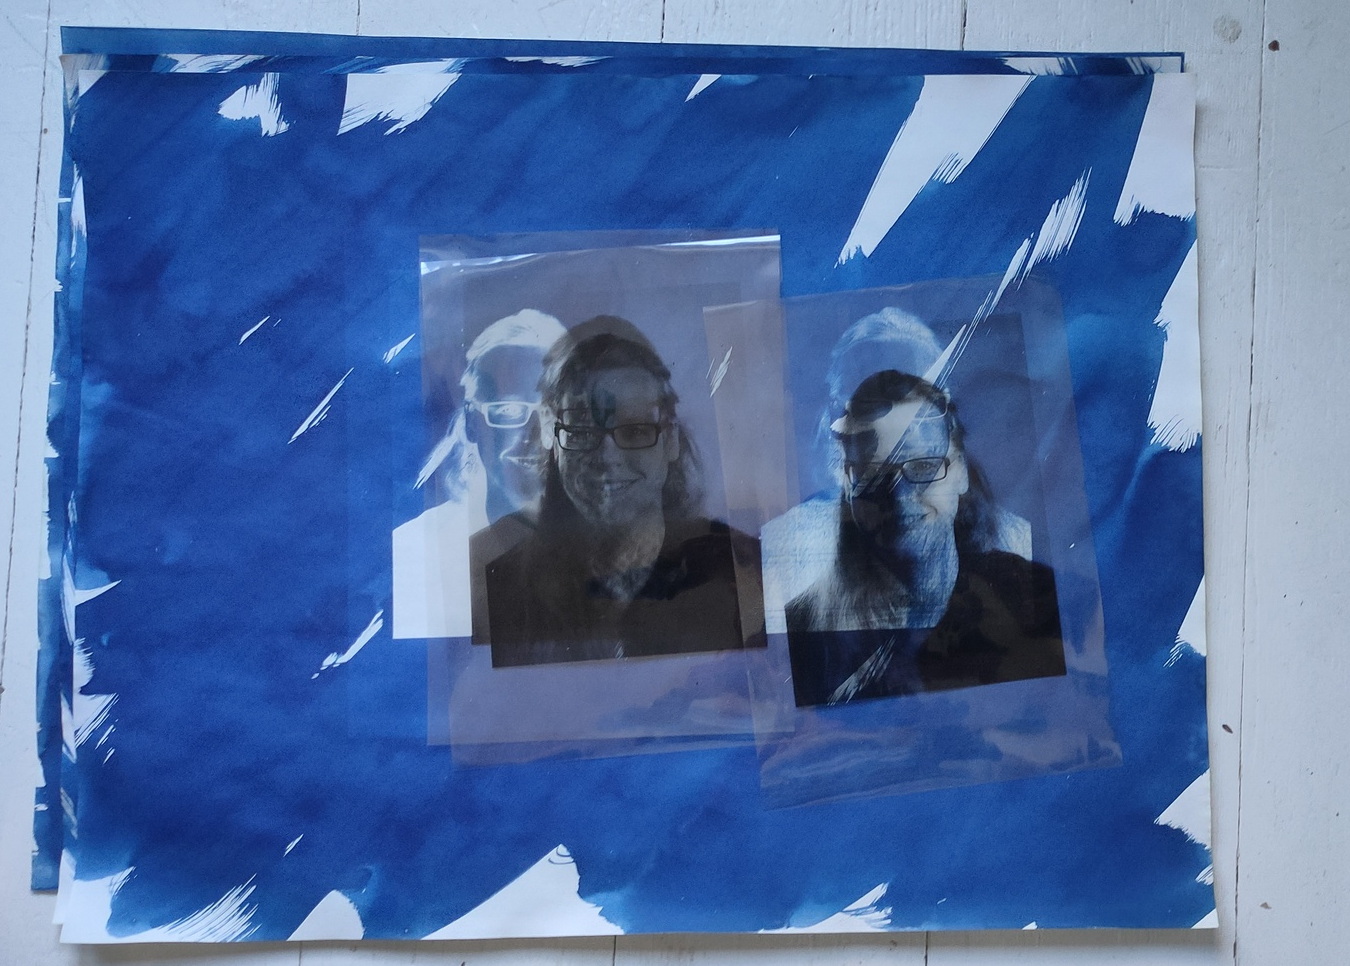
I’ve printed a photo on transparant sheets to experiment with. (Next time, i’ll take a larger size, and fix the contrast.
The most interesting ones i’ve made today:
Transparant sheetsDots are made by spraying alcoholDetail of picture left
How about a quess the picture from our photo collection?? (123580 photos .. ) So i show a random picture, and when i press ESC it will show some information about the picture … Quess the year and the event
Well i gave myself 15 minutes to program something ..
I was watching a tv show meanwhile .. but i managed to come up with this …
This script is showing a picture, when you press ESC it wil show some details.After that it will select another random picture.
Improvements : reading tags and other metadata from my photo database, to give more information.