New version of :
New schematic using ESPHOME and has reset button (pressing the lid).
(Resets the LED when you’ve put the trash at the street curb.)
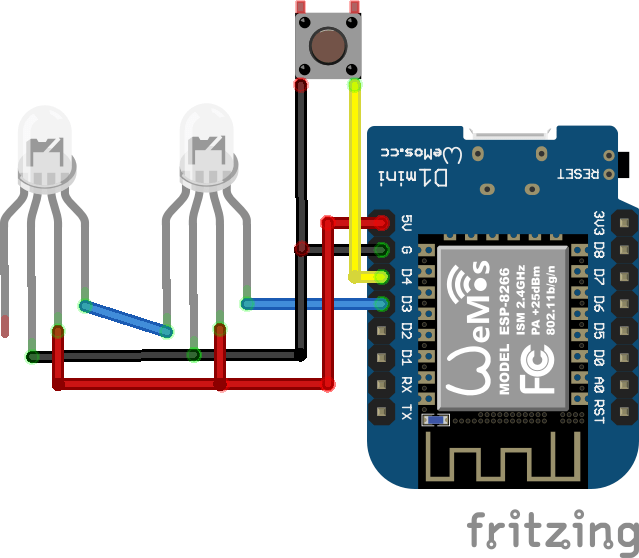
Above, a simplified version. I’m using 4 ws2812 leds now.
ESPHOME code:
esphome:
  name: afvalwemos
  friendly_name: AfvalWemos
  on_boot:
    priority: 800
    then:
    - delay: 1s
    - light.turn_off: main_leds

esp8266:
  board: d1_mini

# Enable logging
logger:

# Enable Home Assistant API
api:
  encryption:
    key: "bT76oR8vOxxxxxxxxxxxxxxxxxxxxxxxxQbyjY6M="

ota:
  - platform: esphome
    password: "c1dbxxxxxxxxxxxxxxxxxxxxxxxxxx36e75"

wifi:
  ssid: !secret wifi_ssid
  password: !secret wifi_password

  # Enable fallback hotspot (captive portal) in case wifi connection fails
  ap:
    ssid: "Afvalwemos Fallback Hotspot"
    password: "vVxxxxxxxxxxxxxxaw"

captive_portal:

# LED strip definition
light:
  - platform: neopixelbus
    type: RGB
    variant: WS2812
    pin: D5
    num_leds: 4
    name: "All LEDs"
    id: main_leds
    restore_mode: ALWAYS_OFF   # ensures all LEDs start off


  # Individual LED partitions
  - platform: partition
    name: "LED 1"
    segments:
      - id: main_leds
        from: 0
        to: 0

  - platform: partition
    name: "LED 2"
    segments:
      - id: main_leds
        from: 1
        to: 1

  - platform: partition
    name: "LED 3"
    segments:
      - id: main_leds
        from: 2
        to: 2

  - platform: partition
    name: "LED 4"
    segments:
      - id: main_leds
        from: 3
        to: 3


# Physical button on D6 to turn off all LEDs
binary_sensor:
  - platform: gpio
    pin:
      number: D6
      mode: INPUT_PULLUP
      inverted: True
    name: "All Off Button"
    on_press:
      - logger.log: "Button pressed — turning all LEDs OFF"
      - light.turn_off: main_leds
Home Assistant automation:
alias: Afvalwijzer Plastic
description: Afvalwijzer leds
triggers:
  - at: "18:00:00"
    trigger: time
conditions:
  - condition: template
    value_template: >
      {% set raw = states('sensor.gad_pmd') %} {% if raw not in ['unknown',
      'unavailable', 'none', ''] %}
        {% set clean = raw.replace('Tomorrow, ', '').replace('Today, ', '').strip() %}
        {% set parts = clean.split(', ') %}
        {% set date_part = parts[-1] if parts|length > 1 else clean %}
        {% set pmd_date = strptime(date_part, '%d-%m-%Y').date() %}
        {% set tomorrow = (now().date() + timedelta(days=1)) %}
        {{ pmd_date == tomorrow }}
      {% else %}
        false
      {% endif %}
actions:
  - action: light.turn_on
    target:
      entity_id: light.afvalwemos_led_3
    data:
      rgb_color:
        - 236
        - 199
        - 14
mode: single