Created this for usage with Kodi, for our own personal movies, which can’t be scraped by movie scrapers obviously.
(dvd-rip,digital video, mobile movies, OBS, Vuze and Nikon movies for example)
UPDATE V2 added functions
This is a followup on:
Works on Windows also!
Needed libraries: (install with pip)
pathlib, Pillow, pymediainfo,PySimpleGUI,python-vlc
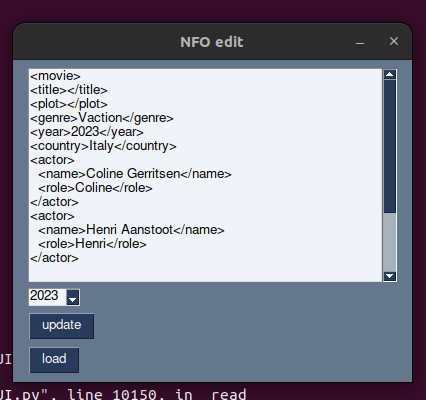
NFO created
Title – editable (generated from filename)
Duration – mediainfo data in seconds
Plot – Single line type it yourself
Actors – Predefined
Tags – Predefined checkboxes
Country – Pulldown ( I use this as location, Scotland, Asia, Garden)
Year – default 2023, copy button from mobile phone metadata year
Genre – Pulldown
Works
- File select and loaded
- Play movie, scrub thretro movie
- Create snapshot
- Play/Mute/Pause
- Playtimer
- Auto update NFO text field with selectable options
- Poster art – rotate
- Poster art – brightness
- Reload Thumb after snapshotting
- Year extracted from filename
- add tag field
- Next file (button AND functionality)
- checkboxes from text list
- Read NFO from file into fields
- Poster art – aspect ratio
Needs work
Wish list
- Poster art – contrast?
- Low – more mediainfo?
- Low – Media rotate??
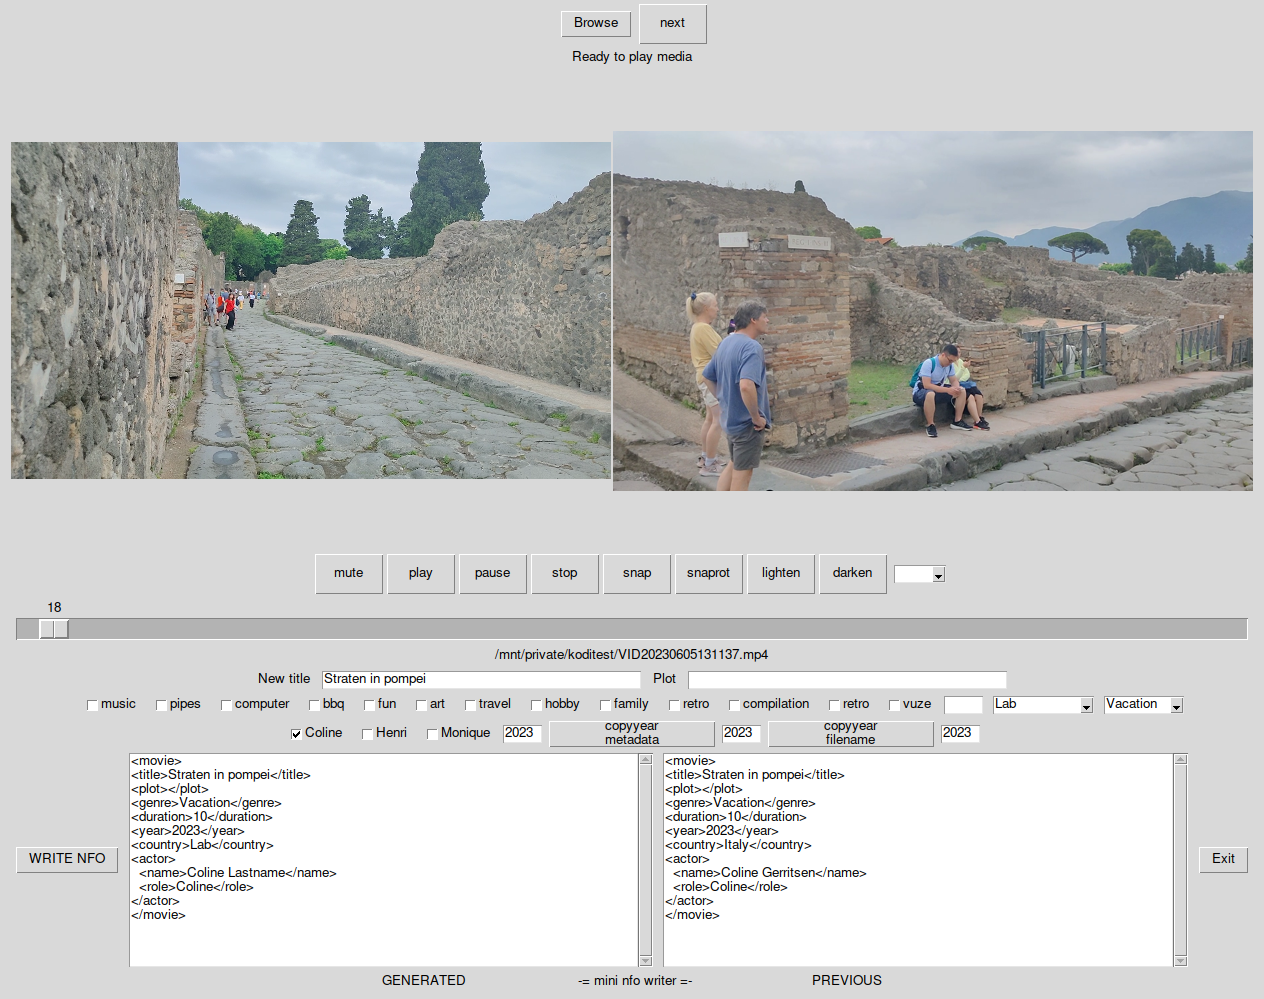
The GUI in action (V1)
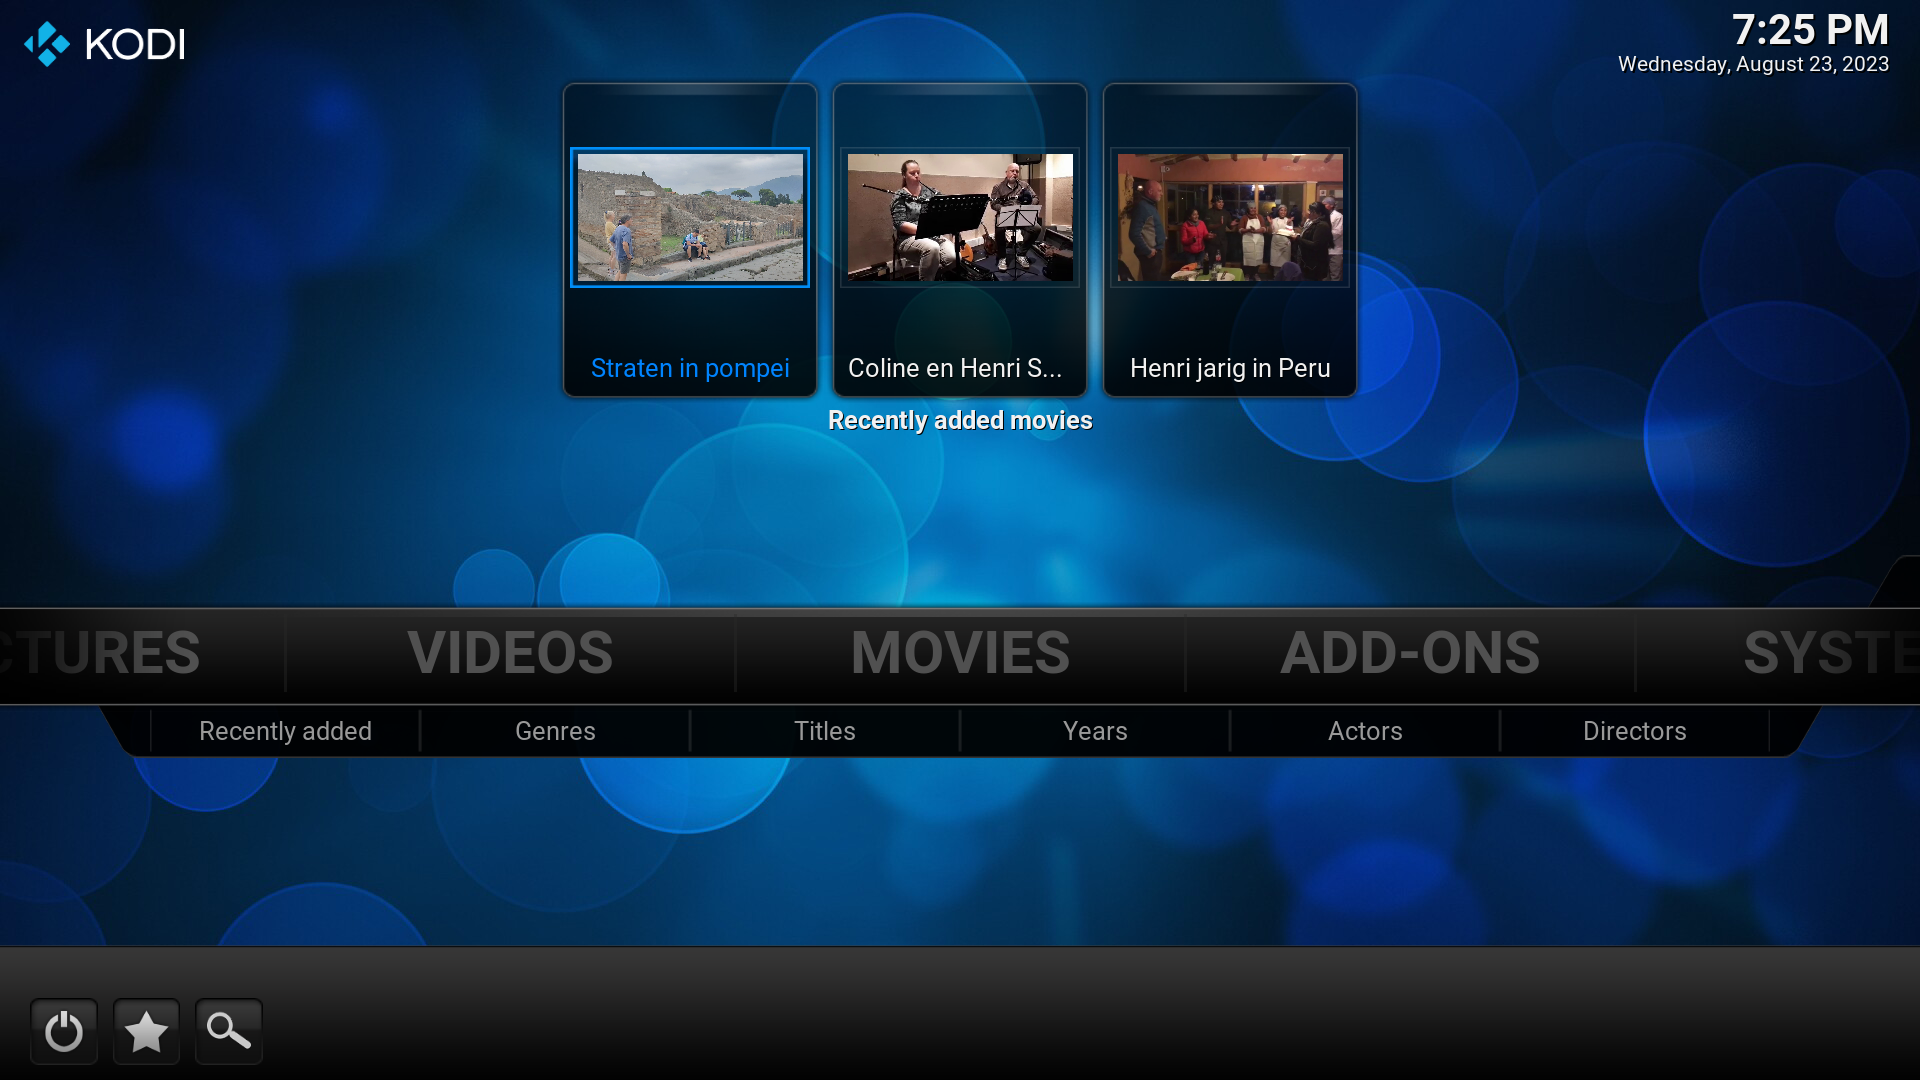
Kodi example
CODE ( WIP ) V2
I place this python script in every library directory. So i can change the checkboxes and the NFO being generated.
I fill the directory with symlinks for every movie I want to have included in this directory, but this is not needed. (thats the way I like to do things)
(This is the directory I scrape into Kodi)
from pathlib import Path
from sys import platform as PLATFORM
import os
import re
import PySimpleGUI as sg
import vlc
from pymediainfo import MediaInfo
from PIL import Image, ImageEnhance, ImageTk, ImageOps, ImageFilter
from xml.etree import ElementTree as ET


'''
WARNING, NFO overwrites previous!!


'''

alltags = ["music", "pipes", "computer","bbq","fun","art","travel","hobby","family","retro","compilation","retro","vuze"]

#------- WINDOWS FIX --------#
if PLATFORM.startswith('linux'):
    print("yeah linux baby!")
else:
    os.add_dll_directory(r'E:\VLC')

duration=0
tmptag=""

def nextFile(currentfile,dir):
        newfile=""
        dirpath = os.path.dirname(dir)
        fileList = []
        for f in os.listdir(dirpath):
            #fpath = os.path.join(dirpath, f)
            fpath = f
            if os.path.isfile(fpath) and f.endswith(('.mp4', '.mov', '.mpg','.avi','.mkv','.3gp')):
                fileList.append(fpath)
        fileList.sort()
        for i in range(len(fileList)):
#            print("fileList[i] " + fileList[i])
            try:
                if (fileList[i]) == currentfile:
                    newfile=fileList[i+1]
                    break
            except:
                newfile=fileList
        return newfile

def loadthumb(thumbfile):
    # IF exists
    path_to_file = thumbfile
    path = Path(path_to_file)

    if path.is_file():
        im = Image.open(thumbfile)
        im=ImageOps.contain(im, (640,640))
        thumbimage = ImageTk.PhotoImage(image=im)
        window['thumb'].update(data=thumbimage)
    else:
        window['thumb'].update("")

def loadnfo(file):

    #LOAD NFO
    nfo=file + ".nfo"
    path = Path(nfo)

    if path.is_file():
            f = open(nfo, "r")
            innfo=f.read()
            f.close()
#            print ("file : " + nfo)
            innfo="".join([s for s in innfo.strip().splitlines(True) if s.strip()])

# Clear some fields
            window['year'].update("")
            window['plot'].update("")

            # Update fields test
            if ET.fromstring(innfo).find('country') is not None:
                nfolocation = ET.fromstring(innfo).find('country')
                window['location'].update(value=nfolocation.text)
            if ET.fromstring(innfo).find('year') is not None:
                nfoyear = ET.fromstring(innfo).find('year')
                window['year'].update(nfoyear.text)
            if ET.fromstring(innfo).find('plot') is not None:
                nfoplot = ET.fromstring(innfo).find('plot')
                window['plot'].update(nfoplot.text)
            if ET.fromstring(innfo).find('title') is not None:
                nfotitle = ET.fromstring(innfo).find('title')
                window['-NM-'].update(nfotitle.text)
            if ET.fromstring(innfo).find('genre') is not None:
                nfogenre = ET.fromstring(innfo).find('genre')
                window['genre'].update(value=nfogenre.text)

            window['coline'].update(False)
            window['henri'].update(False)
            window['monique'].update(False)
            for actor in ET.fromstring(innfo).findall('actor'):
                name = actor.find('role').text
                if name == "Coline":
                    window['coline'].update(True)
                if name == "Henri":
                    window['henri'].update(True)
                if name == "Monique":
                    window['monique'].update(True)
            for alltag in alltags:
                window[alltag].update(False)

            if ET.fromstring(innfo).find('tag') is not None:
                for tag in ET.fromstring(innfo).findall('tag'):
                    if tag.text in window.AllKeysDict:
                        window[tag.text].update(True)

            window['coline'].update(False)
            window['henri'].update(False)
            window['monique'].update(False)
            for actor in ET.fromstring(innfo).findall('actor'):
                name = actor.find('role').text
                if name == "Coline":
                    window['coline'].update(True)
                if name == "Henri":
                    window['henri'].update(True)
                if name == "Monique":
                    window['monique'].update(True)
            for alltag in alltags:
                window[alltag].update(False)

            if ET.fromstring(innfo).find('tag') is not None:
                for tag in ET.fromstring(innfo).find('tag'):
                    window[tag.text].update(True)

    else:
        innfo=""
    window['LOADNFO'].update(innfo)


#------- Button definition --------#
def btn(name):
    return sg.Button(name, size=(6, 2), pad=(1, 1))

#def tag(name):
#    return sg.Checkbox(name, enable_events=True)

#------- GUI definition & setup --------#
sg.theme('SystemDefaultForReal')


l1=sg.Text("New title")
l2=sg.Multiline(" ", expand_x=True, key='-OUT-', expand_y=True,justification='left', size=(20,15))
l3=sg.Multiline(" ", expand_x=True, key='LOADNFO', expand_y=True,justification='left', size=(20,15))
l4=sg.Text("Plot")
t1=sg.Input("", key='-NM-')
t2=sg.Input("", key='plot',enable_events=True)
cb=[]

for alltag in alltags:
    cb.append(sg.Checkbox(alltag, key=alltag, enable_events=True))


cb.append(sg.Input("", key='addtag',size=(5, 1), enable_events=True))
cb.append(sg.Combo(["Lab","Datacenter","home","Outside","Outside","Lloydwebber","Steenweg","Enschede","Netherlands","Germany","Italy","Scotland","Canada","Egypt","Belgium","Sweden","Ireland","Asia","NewZealand","Hilversum"],default_value='Lab',key='location'))
cb.append(sg.Combo(["Storage","Funny","Vacation","Music","Relation"],default_value='Storage',key='genre'))
nameyear=[]
nameyear.append(sg.Checkbox("Coline", key='coline', enable_events=True,default=True))
nameyear.append(sg.Checkbox("Henri", key='henri', enable_events=True,default=True))
nameyear.append(sg.Checkbox("Monique", key='monique', enable_events=True,default=False))
nameyear.append(sg.Input("2023",key='year',size=(5, 1), enable_events=True))
nameyear.append(sg.Button("copyyear\nmetadata", key='copymeta', size=(20, 1), pad=(1, 1), enable_events=True))
nameyear.append(sg.Input("",key='metayear',size=(5, 1), enable_events=True))
nameyear.append(sg.Button("copyyear\nfilename", key='copyname', size=(20, 1), pad=(1, 1), enable_events=True))
nameyear.append(sg.Input("",key='fileyear',size=(5, 1), enable_events=True))
b1=sg.Button("WRITE NFO", key='write', enable_events=True)
b2=sg.Button("Exit", key='exit', enable_events=True)

#------- Layout total --------#

layout = [[sg.Input(key='-VIDEO_LOCATION-', visible=False, enable_events=True),
          sg.FileBrowse(file_types=(("Video files", "*.mkv *.mov *.mp4 *3gp *avi *mpg"),)),btn('next')],
          [sg.Text('Load media to start', key='-MESSAGE_AREA-')],
          [sg.Image('', size=(600, 480), key='-VID_OUT-', pad=(1, 1)),sg.Image('', size=(600, 480), key='thumb', pad=(1, 1))],
          [btn('mute'), btn('play'), btn('pause'), btn('stop'), btn('snap'), btn('snaprot'), btn('lighten'), btn('darken'), sg.Combo(["4:3","16:9","9:16"],key='aspect',enable_events=True)],
          [sg.Slider(range=(0, 1000), default_value=1, expand_x=True, enable_events=True, orientation='horizontal', key='-SL-')],
          [sg.Text('org title', key='orgtitle')],
          [l1, t1, l4, t2],[cb],[nameyear],[b1, l2, l3, b2],
          [sg.Text('GENERATED                            -= mini nfo writer =-                              PREVIOUS', key='footer')]
          ]

#------- Set window --------#
window = sg.Window('Mini NFO generator', layout, element_justification='center', finalize=True, resizable=True)
#------- VID out window --------#
window['-VID_OUT-'].expand(True, True)
#------------ Media Player Setup ---------#
inst = vlc.Instance()
list_player = inst.media_list_player_new()
media_list = inst.media_list_new([])
list_player.set_media_list(media_list)
player = list_player.get_media_player()
if PLATFORM.startswith('linux'):
    player.set_xwindow(window['-VID_OUT-'].Widget.winfo_id())
else:
    player.set_hwnd(window['-VID_OUT-'].Widget.winfo_id())

#------------ I Want default mute ---------#
player.audio_set_mute(True)

#------------ The Event Loop ------------#
while True:
    event, values = window.read(timeout=1000)       # run with a timeout so that current location can be updated
    if event == sg.WIN_CLOSED:
        break


    if event == 'mute':
        mutevalue = player.audio_get_mute()
        if mutevalue==0:
            player.audio_set_mute(True)
        if mutevalue==1:
            player.audio_set_mute(False)
    if event == 'play':
        list_player.play()
    if event == 'pause':
        list_player.pause()
    if event == 'stop':
        list_player.stop()
    if event == 'snap':
        list_player.pause()
        filename = values['-VIDEO_LOCATION-']
        shortfilename = filename.rsplit( ".", 1 )[ 0 ]
        newname = shortfilename + "-poster.png"
        player.video_take_snapshot(0, newname, 0, 0)
        loadthumb(newname)
    if event == 'snaprot':
        list_player.pause()
        filename = values['-VIDEO_LOCATION-']
        shortfilename = filename.rsplit( ".", 1 )[ 0 ]
        newname = shortfilename + "-poster.png"
        im1 = Image.open(newname)
        im1 = im1.rotate(90, Image.NEAREST, expand = 1)
        im1 = im1.save(newname)
        loadthumb(newname)

    if event == 'lighten':
        list_player.pause()
        filename = values['-VIDEO_LOCATION-']
        shortfilename = filename.rsplit( ".", 1 )[ 0 ]
        newname = shortfilename + "-poster.png"
        im1 = Image.open(newname)
        im1 = ImageEnhance.Brightness(im1)
        im1 = im1.enhance(1.2)
        im1 = im1.save(newname)
        loadthumb(newname)

    if event == 'darken':
        list_player.pause()
        filename = values['-VIDEO_LOCATION-']
        shortfilename = filename.rsplit( ".", 1 )[ 0 ]
        newname = shortfilename + "-poster.png"
        im1 = Image.open(newname)
        im1 = ImageEnhance.Brightness(im1)
        im1 = im1.enhance(0.8)
        im1 = im1.save(newname)
        loadthumb(newname)

    if event == 'aspect':
        filename = values['-VIDEO_LOCATION-']
        shortfilename = filename.rsplit( ".", 1 )[ 0 ]
        newname = shortfilename + "-poster.png"
        if values['aspect'] == "4:3":
            im1 = Image.open(newname)
            im1 = im1.resize((1920 ,int(1920/4*3)), Image.ANTIALIAS)
            im1 = im1.save(newname)
            loadthumb(newname)
        if values['aspect'] == "16:9":
            im1 = Image.open(newname)
            im1 = im1.resize((1920 ,int(1920/16*9)), Image.ANTIALIAS)
            im1 = im1.save(newname)
            loadthumb(newname)
        if values['aspect'] == "9:16":
            im1 = Image.open(newname)
            im1 = im1.resize((int(1920/16*9),1080), Image.ANTIALIAS)
            im1 = im1.save(newname)
            loadthumb(newname)


    if event == 'write':
        filename = values['-VIDEO_LOCATION-']
        shortfilename = filename.rsplit( ".", 1 )[ 0 ]
        newname = shortfilename + ".nfo"
        f = open(newname, "w")
        f.write(out)
        f.close()
        loadnfo(shortfilename)

    if event == 'copymeta':
        if datefromfile is not None:
            window['year'].update(datefromfile)

    if event == 'copyname':
        if fileyear is not None:
            window['year'].update(fileyear)


    if event == '-SL-':
        pos=int(values['-SL-'])
        player.set_position(pos/ 1000.0)


    if values['coline'] == False:
         colinetext = ""
    if values['coline'] == True:
        colinetext = """<actor>
  <name>Coline Lastname</name>
  <role>Coline</role>
</actor>"""
    if values['henri'] == False:
         henritext = ""
    if values['henri'] == True:
        henritext = """<actor>
  <name>Henri Aanstoot</name>
  <role>Henri</role>
</actor>"""
    if values['monique'] == False:
            moniquetext = ""
    if values['monique'] == True:
        moniquetext = """<actor>
  <name>Monique Lastname</name>
  <role>Monique</role>
</actor>"""


    if event == '-VIDEO_LOCATION-':
        if values['-VIDEO_LOCATION-'] and not 'Video URL' in values['-VIDEO_LOCATION-']:
            media_list.remove_index(0)
            media_list.add_media(values['-VIDEO_LOCATION-'])
            list_player.set_media_list(media_list)
            shortname = values['-VIDEO_LOCATION-']
            shortname = shortname.rsplit( "/", 1 )[ 1 ]
            nextfile=nextFile(shortname,"./")
            shortname = shortname.rsplit( ".", 1 )[ 0 ]
            window['-NM-'].update(shortname) # only add a legit submit
            list_player.stop()
            list_player.next()
            thumbname=shortname + "-poster.png"
            loadthumb(thumbname)

            #Print org title
            window['orgtitle'].update(values['-VIDEO_LOCATION-'])


            loadnfo(shortname)


            #DURATION
            mi = MediaInfo.parse(values['-VIDEO_LOCATION-'])
            duration=int(mi.tracks[0].duration/1000)

            #DATE FROM media
            metadate=mi.tracks[0].encoded_date
            if metadate is not None:
                datefromfile=next(iter(re.findall(r"[1][9][8-9][0-9]|[2][0][0-9]{2}", metadate)), None)
                window['metayear'].update(datefromfile)

            # YEAR FROM FILENAME
            fileyear=next(iter(re.findall(r"[1][9][8-9][0-9]|[2][0][0-9]{2}", shortname)), None)
            # year from filename
            if fileyear is not None:
                window['fileyear'].update(fileyear)


    if event == 'next':

        values['-VIDEO_LOCATION-'] = nextfile
        window['-VIDEO_LOCATION-'].update(nextfile)

        if values['-VIDEO_LOCATION-'] and not 'Video URL' in values['-VIDEO_LOCATION-']:
            media_list.remove_index(0)
            media_list.add_media(values['-VIDEO_LOCATION-'])
            list_player.set_media_list(media_list)
            shortname = values['-VIDEO_LOCATION-']
 #           shortname = shortname.rsplit( "/", 1 )[ 1 ]
            nextfile=nextFile(shortname,"./")
            #print(nextfile)
            shortname = shortname.rsplit( ".", 1 )[ 0 ]
            window['-NM-'].update(shortname) # only add a legit submit
            list_player.stop()
            list_player.next()
            thumbname=shortname + "-poster.png"
            loadthumb(thumbname)

            #Print org title
            window['orgtitle'].update(values['-VIDEO_LOCATION-'])


            loadnfo(shortname)

            #DURATION
            mi = MediaInfo.parse(values['-VIDEO_LOCATION-'])
            duration=int(mi.tracks[0].duration/1000)

            #DATE FROM media
            metadate=mi.tracks[0].encoded_date
            if metadate is not None:
                datefromfile=next(iter(re.findall(r"[1][9][8-9][0-9]|[2][0][0-9]{2}", metadate)), None)
                window['metayear'].update(datefromfile)

            # YEAR FROM FILENAME
            fileyear=next(iter(re.findall(r"[1][9][8-9][0-9]|[2][0][0-9]{2}", shortname)), None)
            # year from filename
            if fileyear is not None:
                window['fileyear'].update(fileyear)
#        media_list.add_media(nextfile)
##        shortname = nextfile.rsplit( ".", 1 )[ 0 ]
##        window['-NM-'].update(shortname) # only add a legit submit
#        print(nextfile)
#        window['-VIDEO_LOCATION-'].update(nextfile)
#        list_player.next()
# hier moeten wat update dingen bij!


    # Add tag
    if event == 'addtag':
        tmptag="<tag>" + values['addtag'] + "</tag>"

#------------ exit ---------#

    if event=='exit':
         exit()
#------------ TAGS ---------#

    subs=[x.Text for x in cb if x.get()==True]
    for idx, x in enumerate(subs):
        subs[idx]="<tag>" + subs[idx] + "</tag>"


    if values['year'] == False:
        year=str(2023)
    else:
        year=values['year']
    if values['location'] == False:
        location="Lab"
    else:
        location=values['location']
    if values['plot'] == False:
        plot=""
    else:
        plot=values['plot']
    if values['genre'] == False:
        genre="Storage"
    else:
        genre=values['genre']
#------------ NFO TEXT FIELD ---------#

    out="""<movie>
<title>{}</title>
<plot>{}</plot>
<genre>{}</genre>
<duration>{}</duration>
<year>{}</year>
<country>{}</country>
{}
{}
{}
{}
{}
</movie>
""".format(values['-NM-'],plot,genre,duration,year,location,colinetext,henritext,moniquetext,tmptag, "\n".join(subs))
    out="".join([s for s in out.strip().splitlines(True) if s.strip()])
    window['-OUT-'].update(out)

#------------ Messages and timer ---------#

    # update elapsed time if there is a video loaded and the player is playing
    if player.is_playing():
        window['-MESSAGE_AREA-'].update("{:02d}:{:02d} / {:02d}:{:02d}".format(*divmod(player.get_time()//1000, 60),
                                                                     *divmod(player.get_length()//1000, 60)))
    else:
        window['-MESSAGE_AREA-'].update('Load media to start' if media_list.count() == 0 else 'Ready to play media' )

window.close()