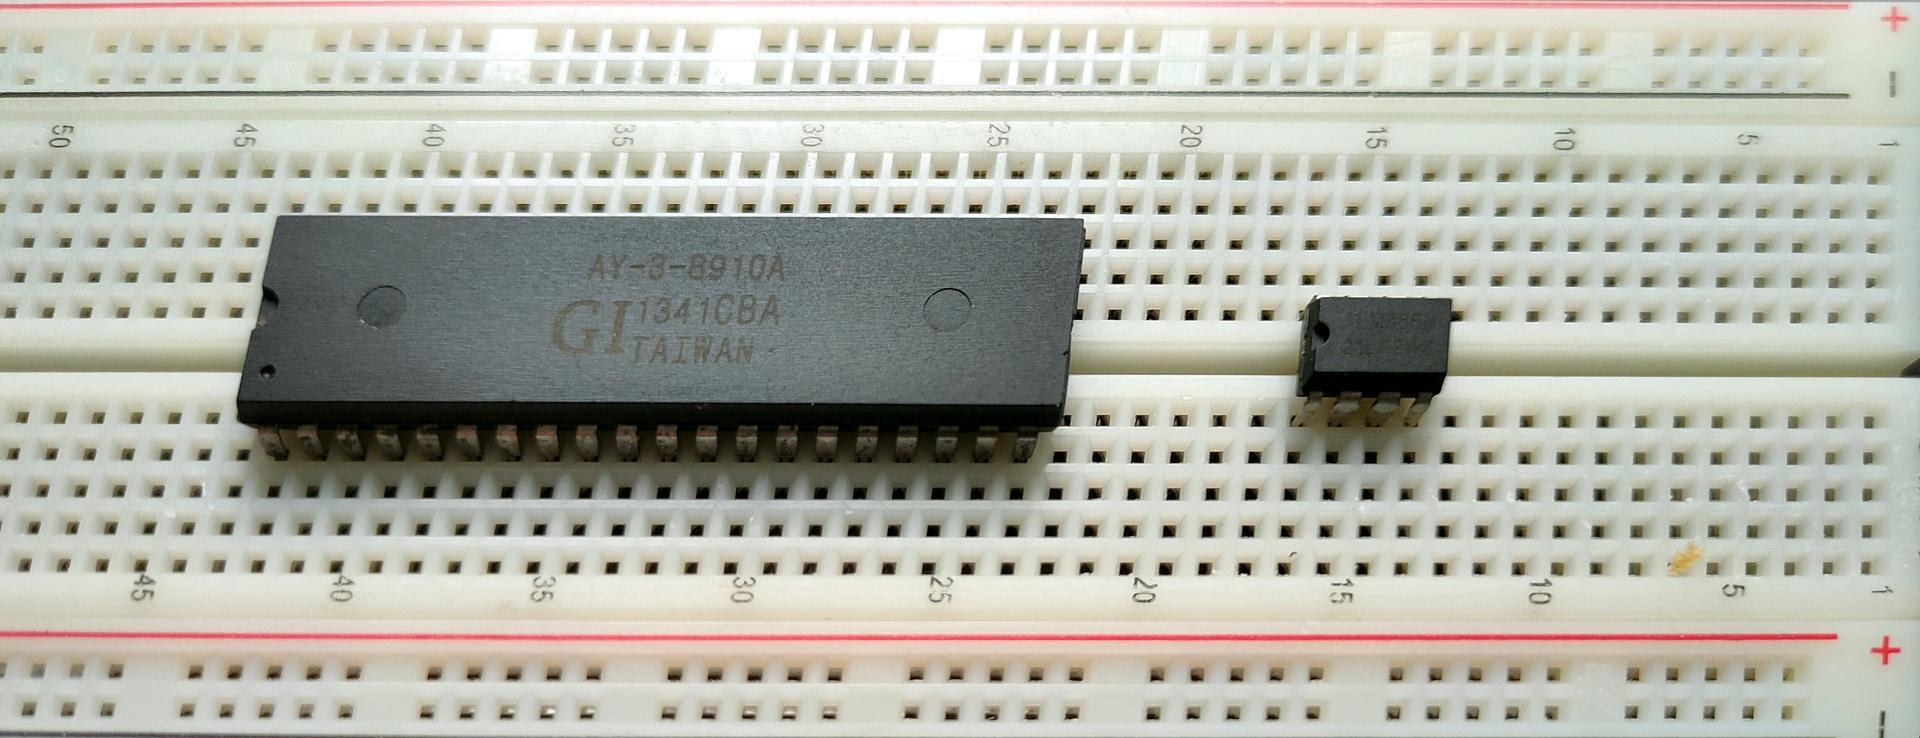
I’ve written about General Instrument AY-3-8910 before, here is some work I did today.
This sound chip i wanted to implement in my amiga, and now it’s a alternative for my 6502 computer. ( As an alternative setup for the SID chip. ) Btw this is the same kind of chip used in the Atari ST.
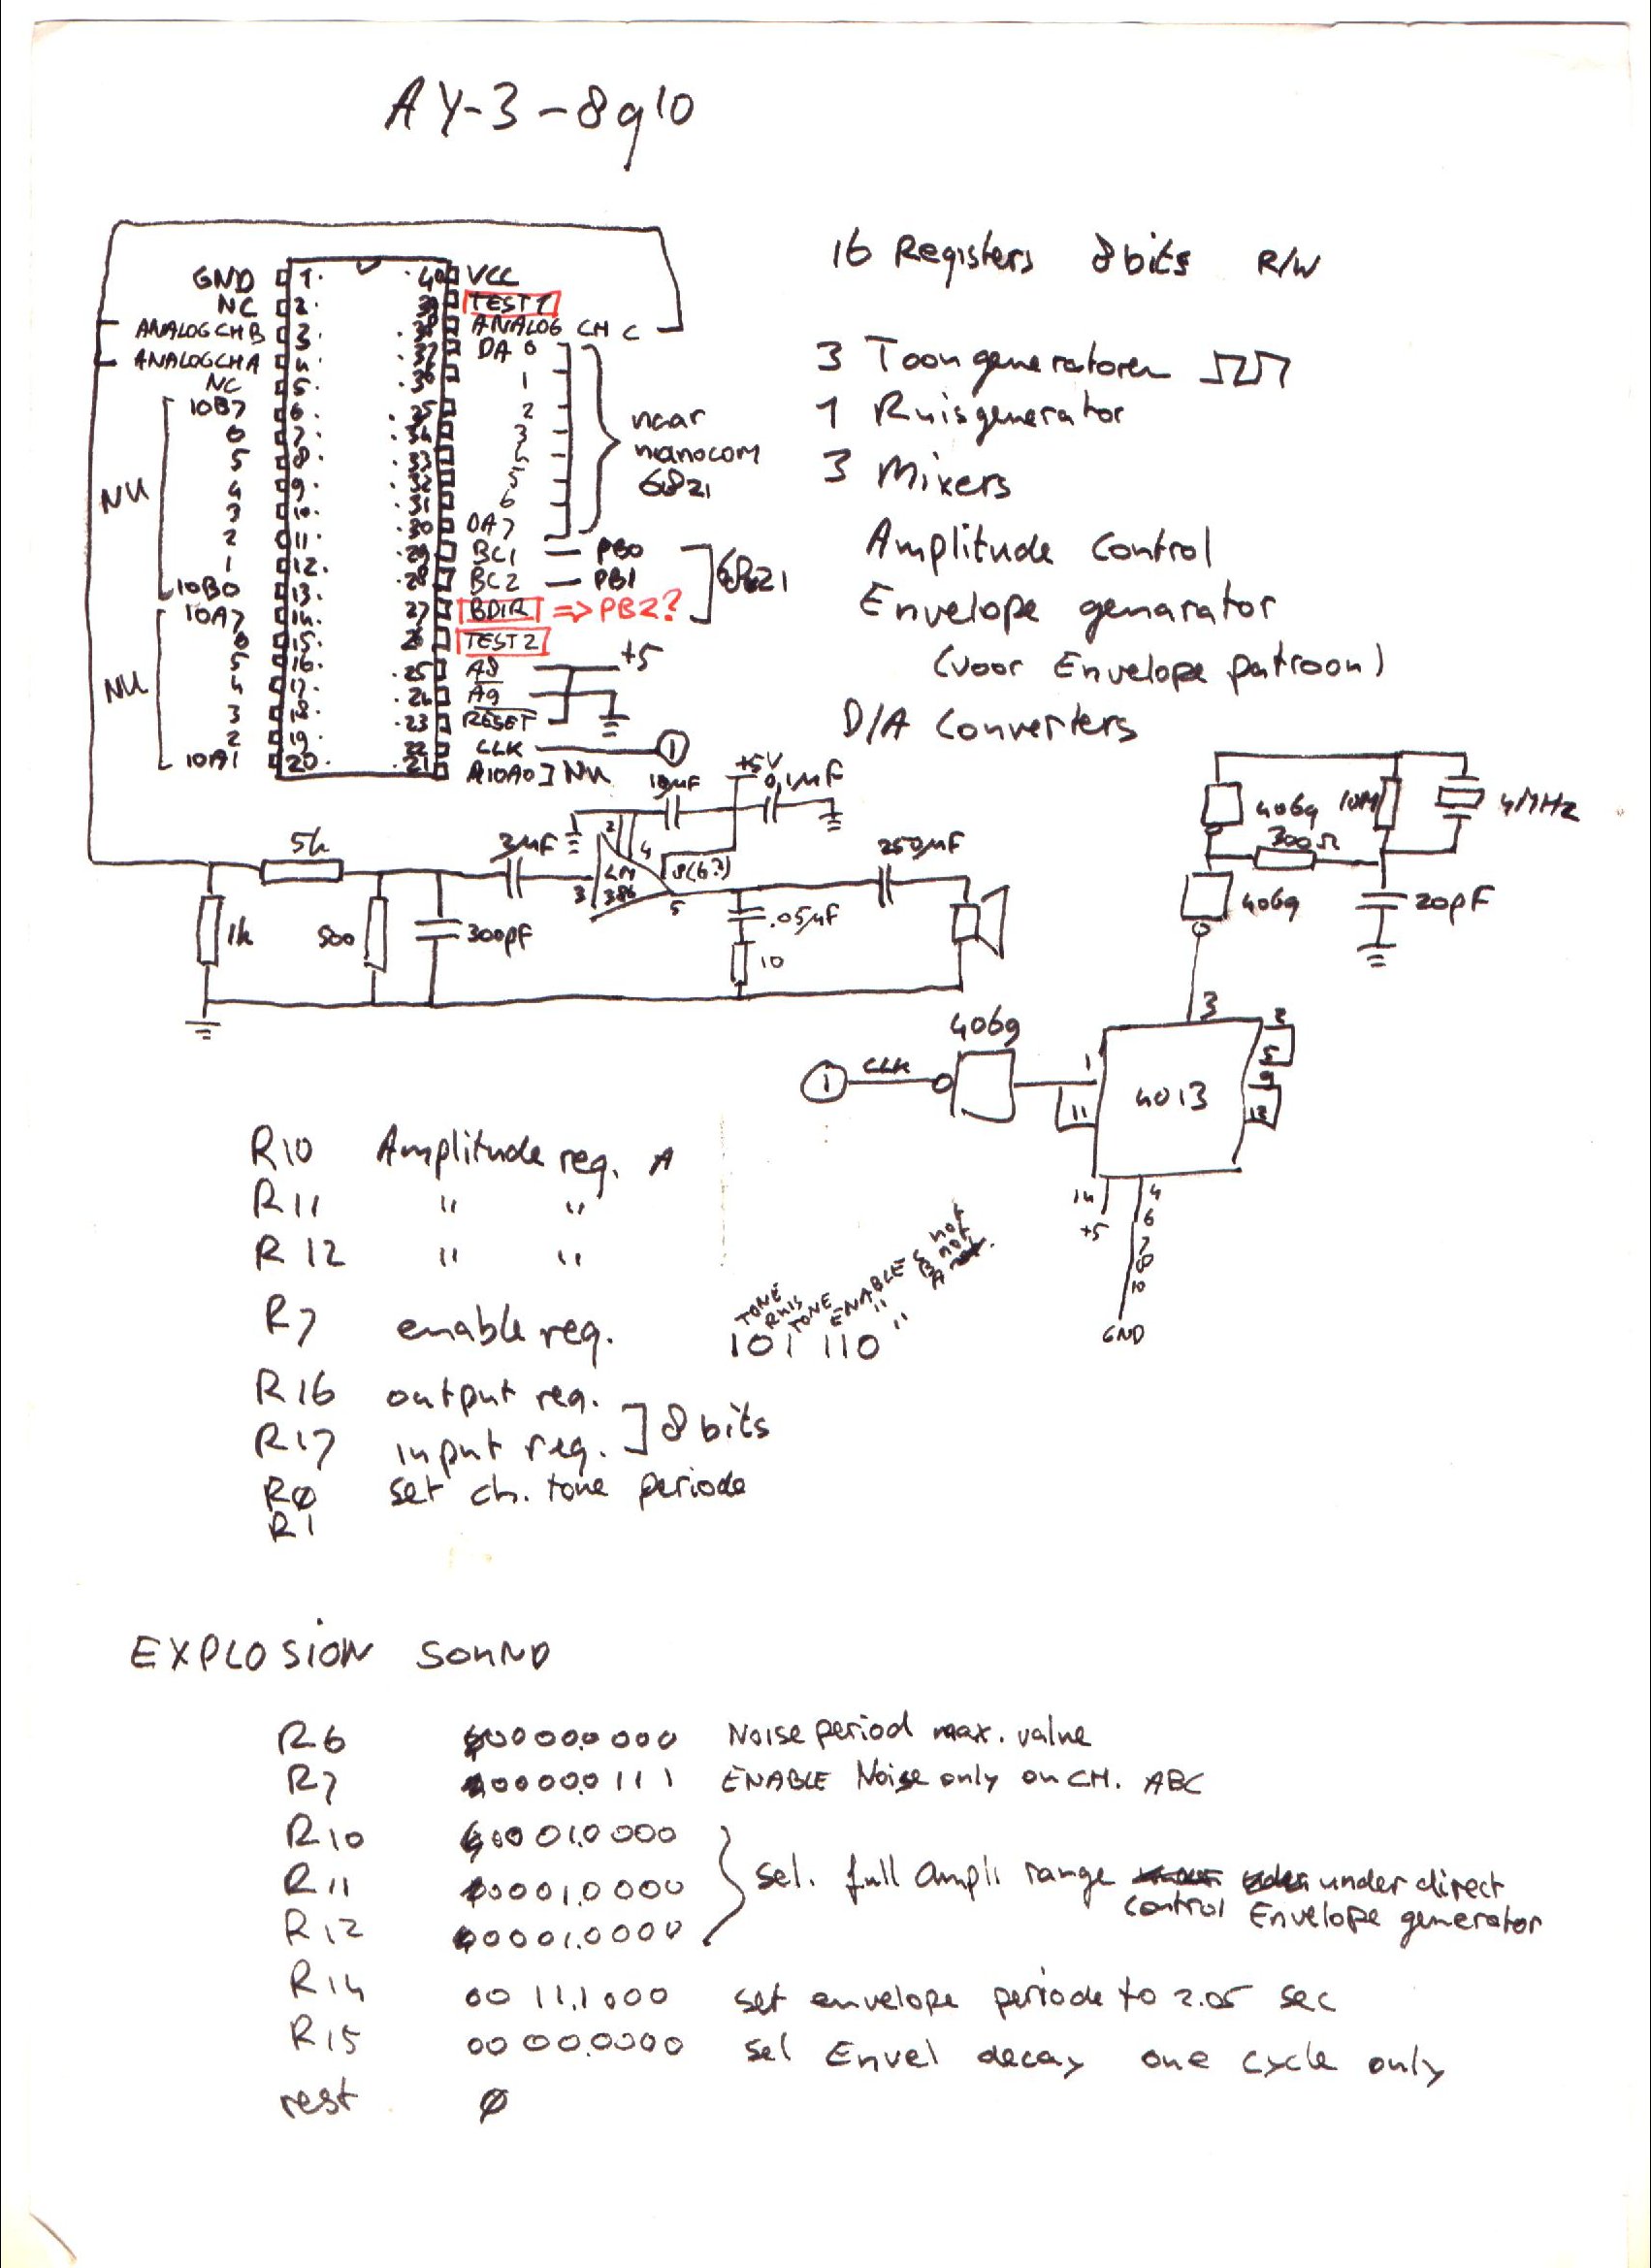
Above a Kicad drawing I made today, a little different from my design from the 90’s.
Below a movie clip I recorded today. Running a test setup using an Arduino nano and a sdcard reader. The sound is bad, this is due to clipping and the absence of multiple resistors and capacitors. Music is a register dump from a YM music file. Amplifier is a bare LM386.
UPDATE: 20240225
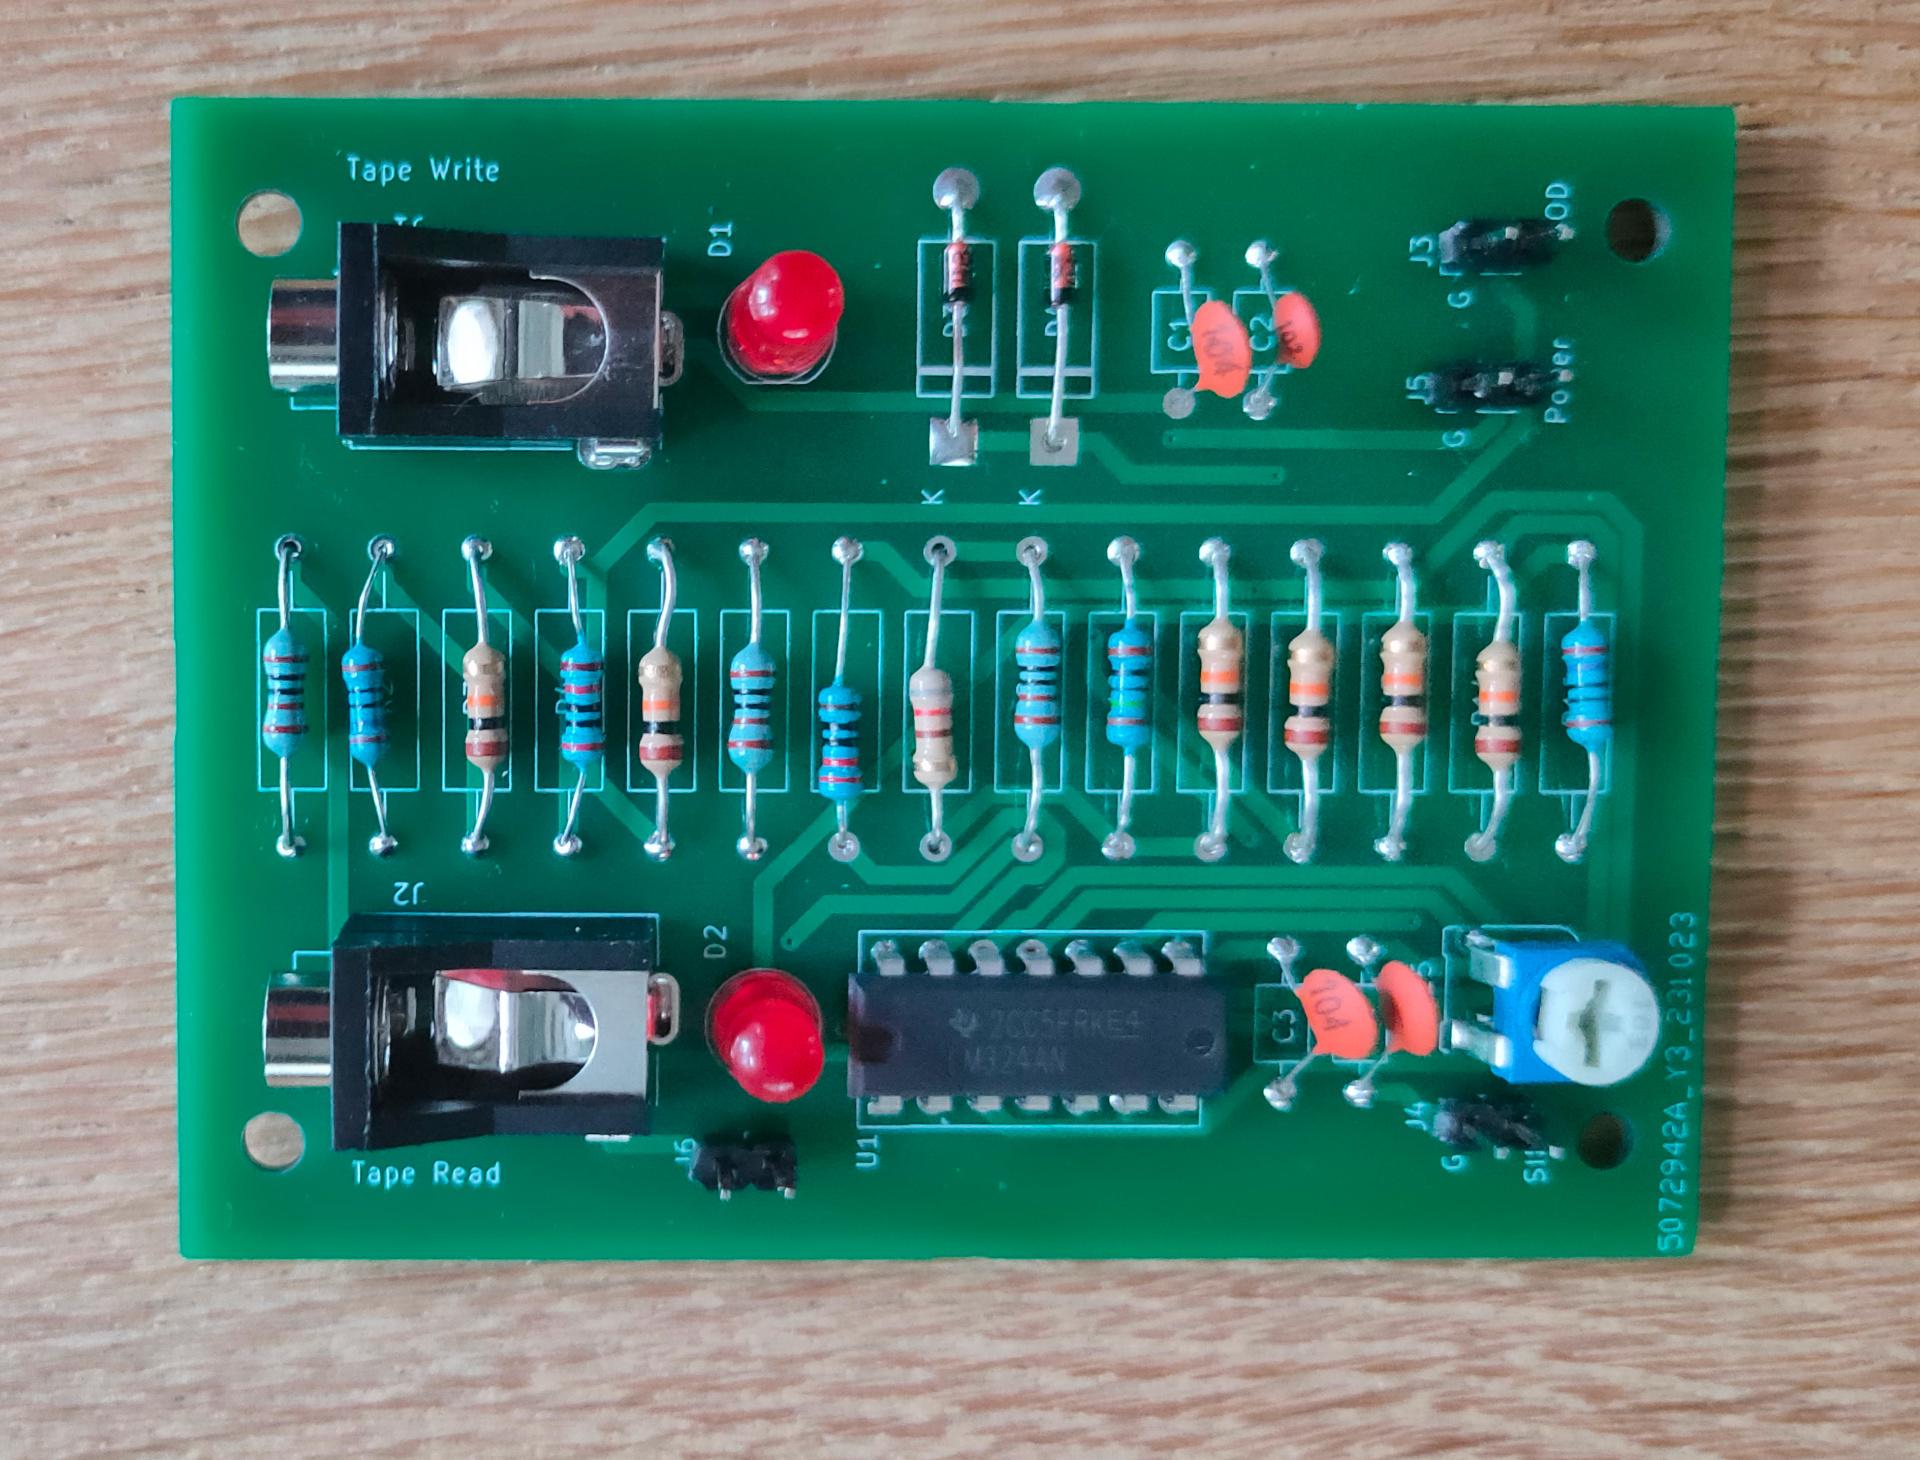
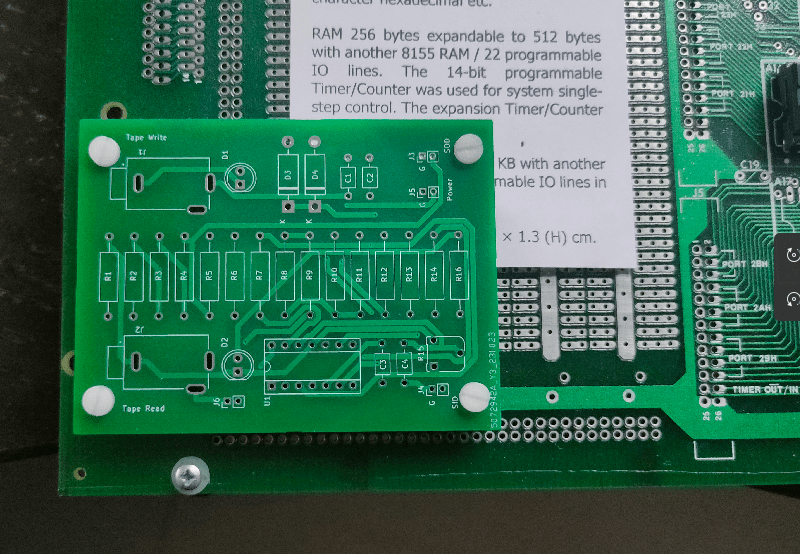
I don’t like tying those three outputs together, and amplifying those.
So I’m going to use a LM324 i’ve got left from my 8085 interface, and make a 3-channel amplifier.
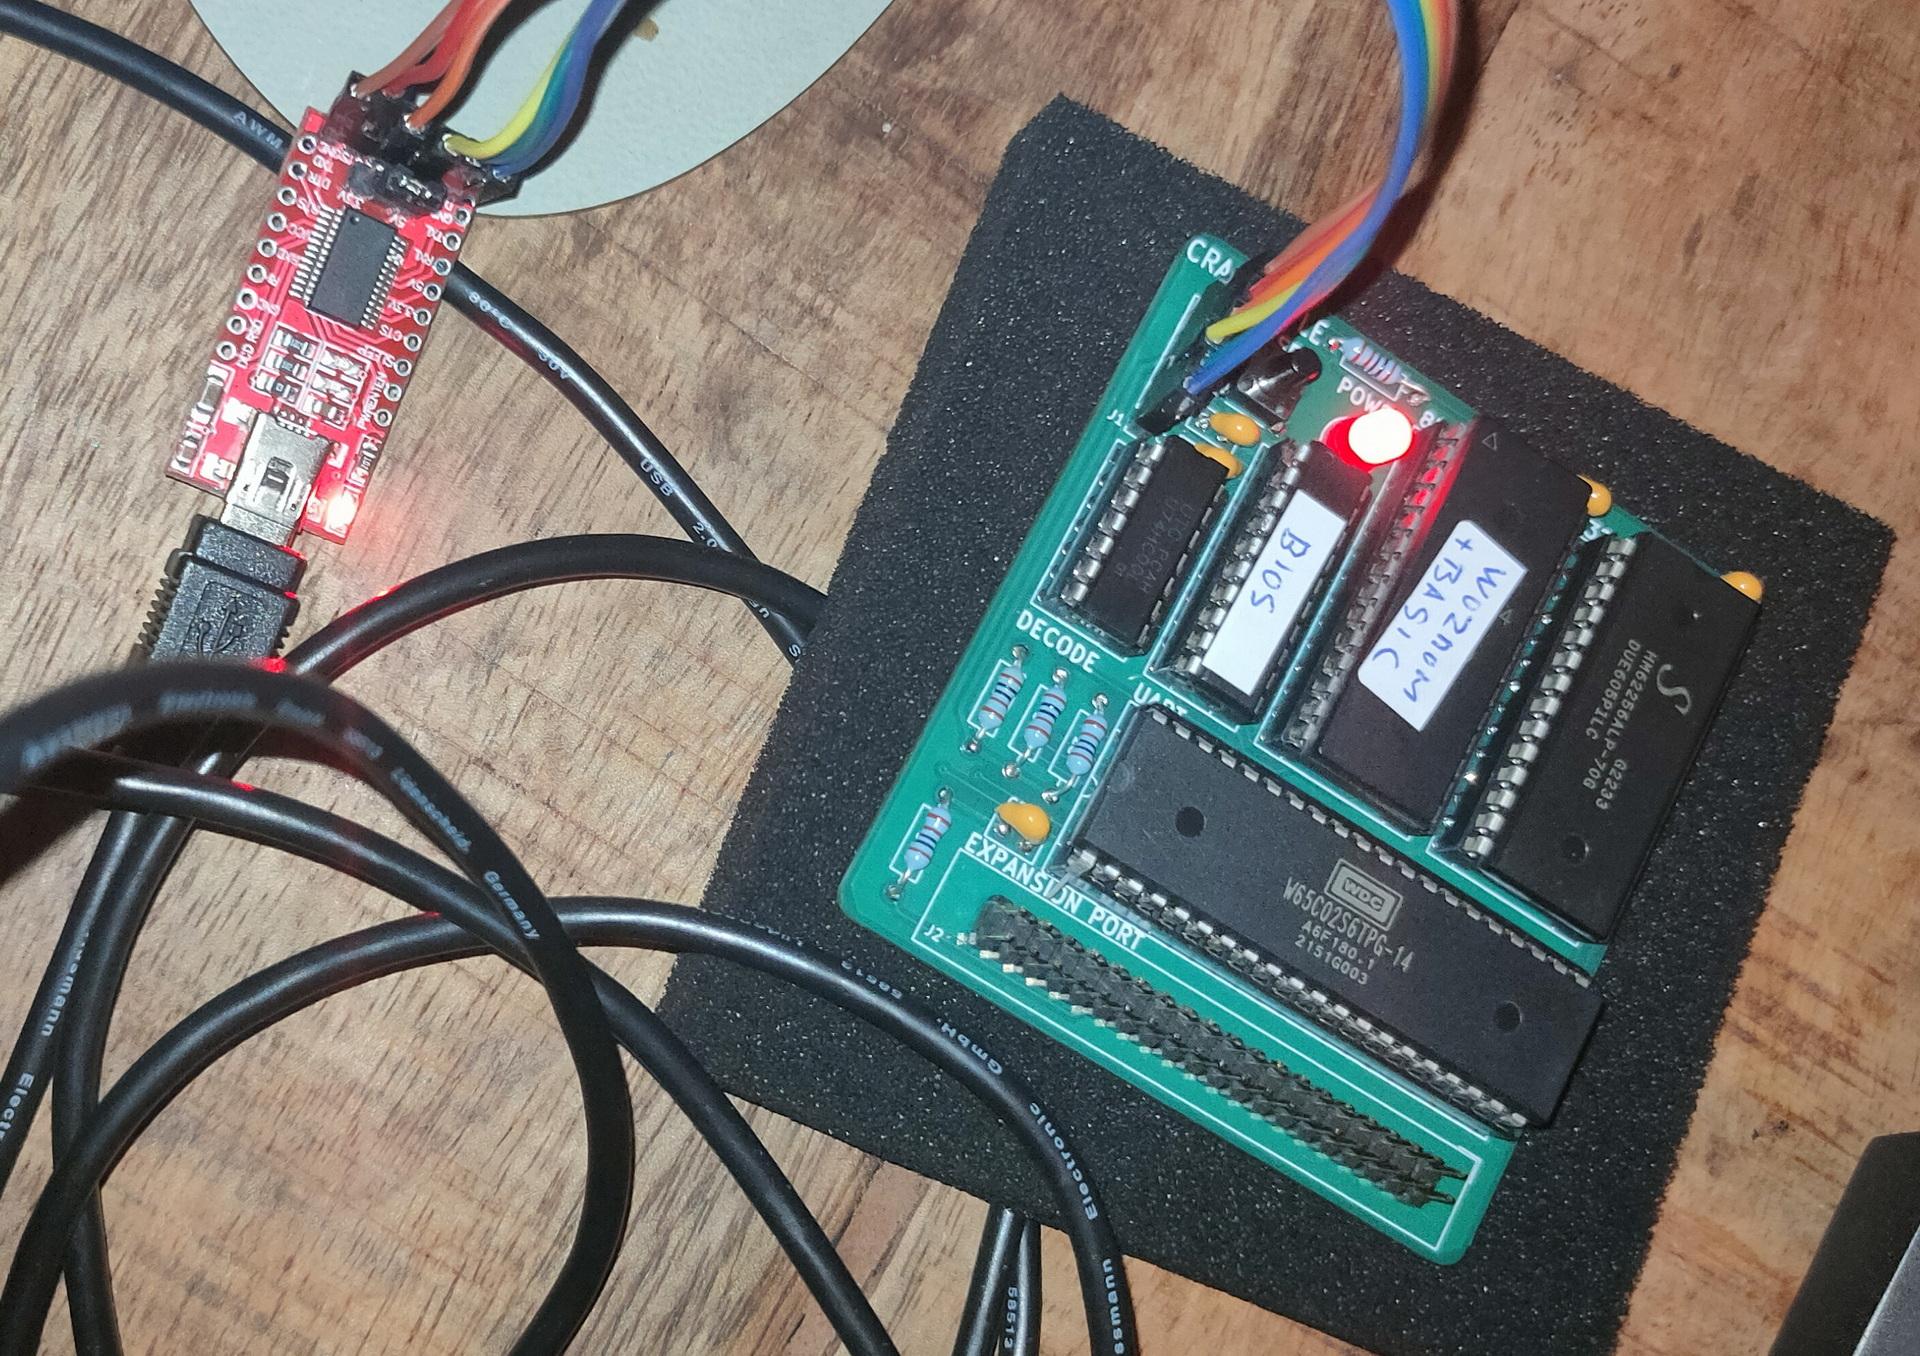
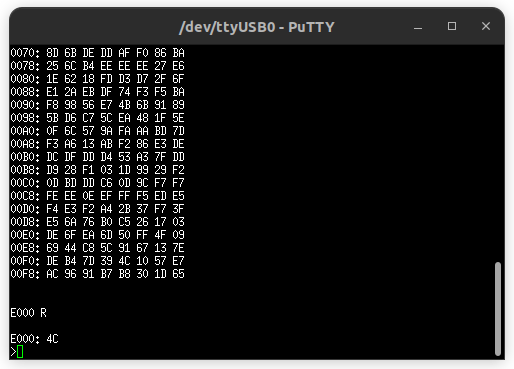
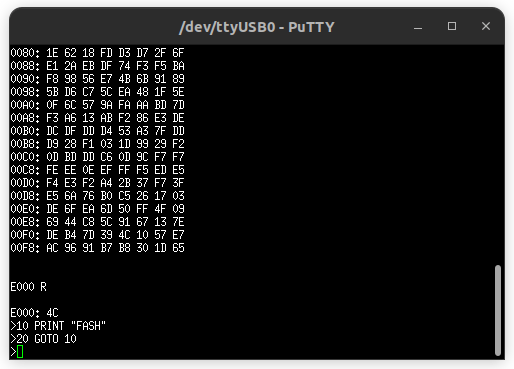
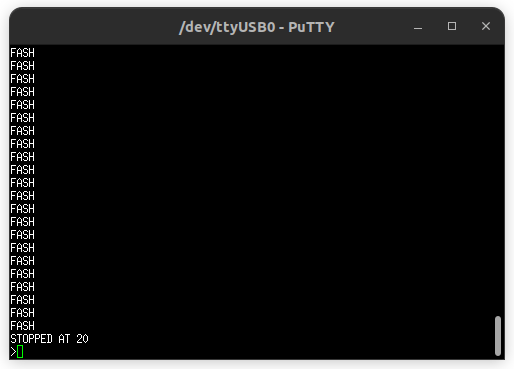
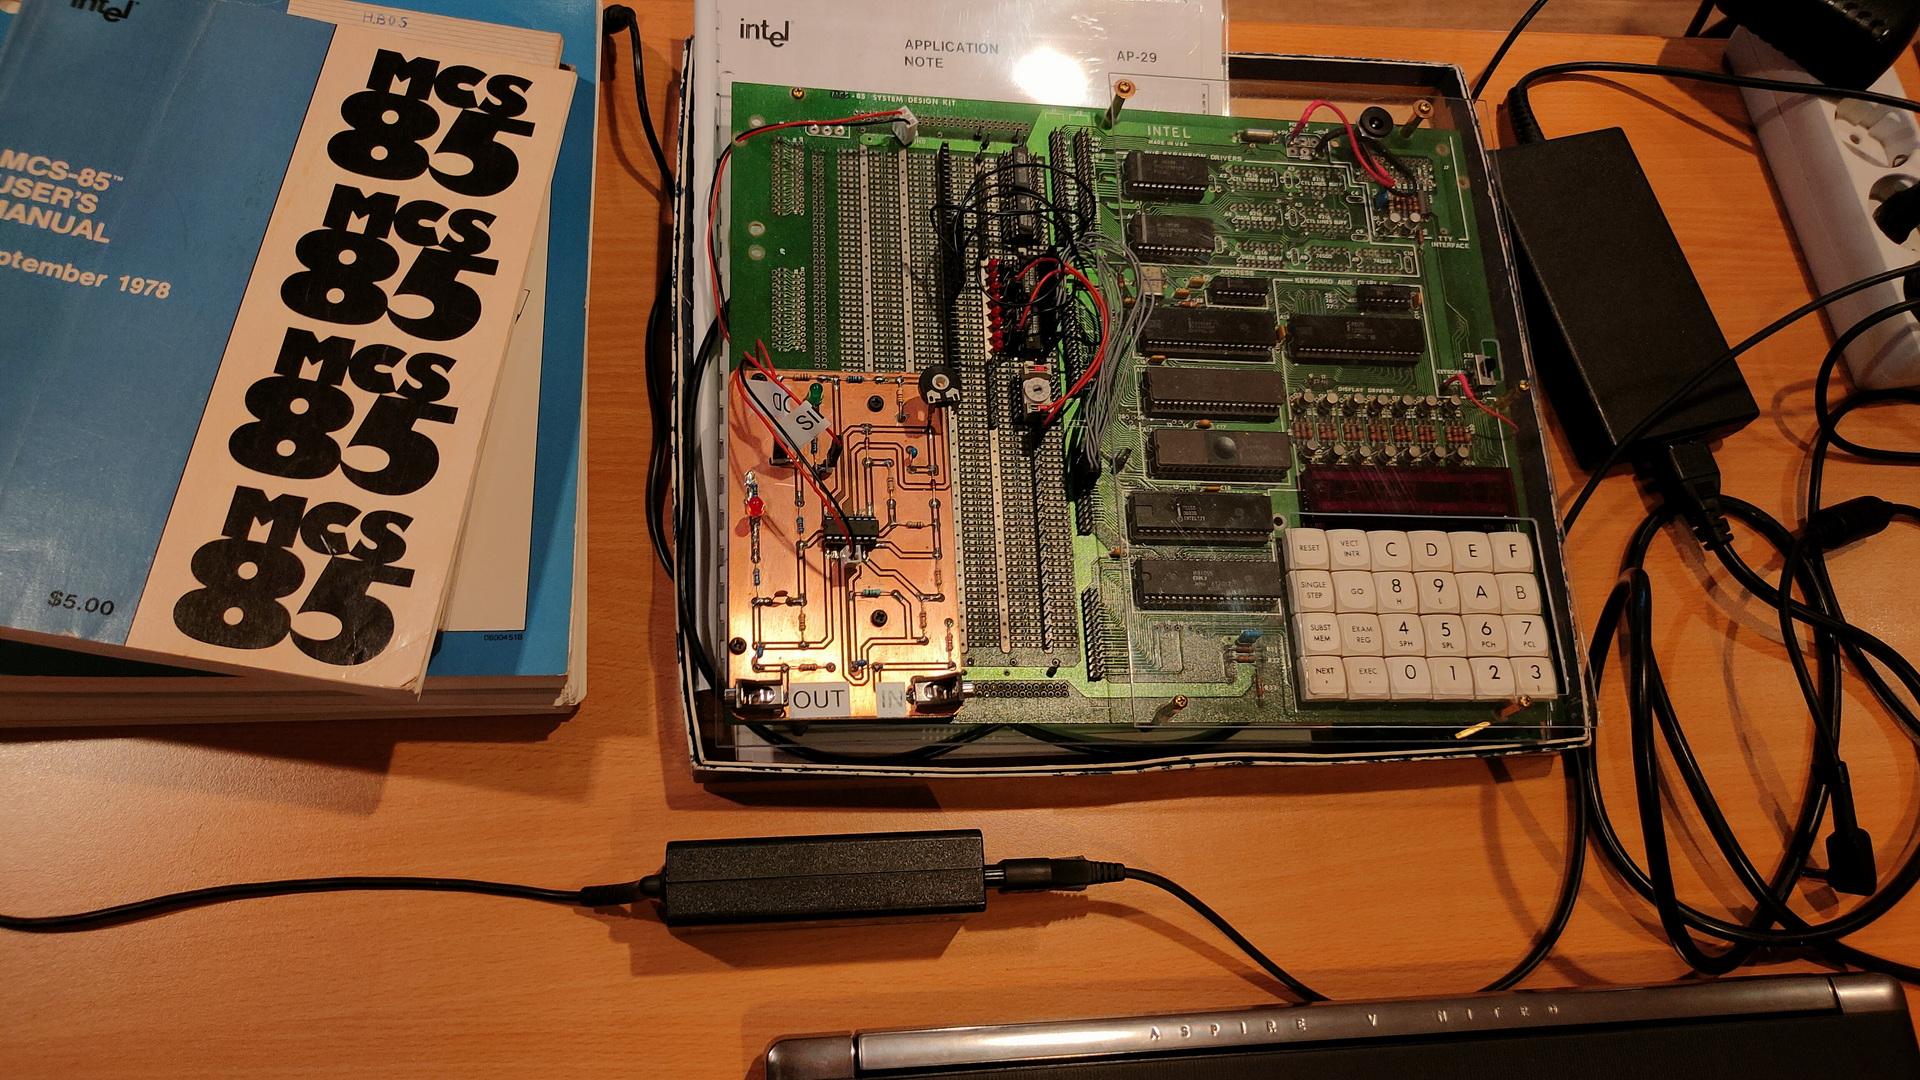
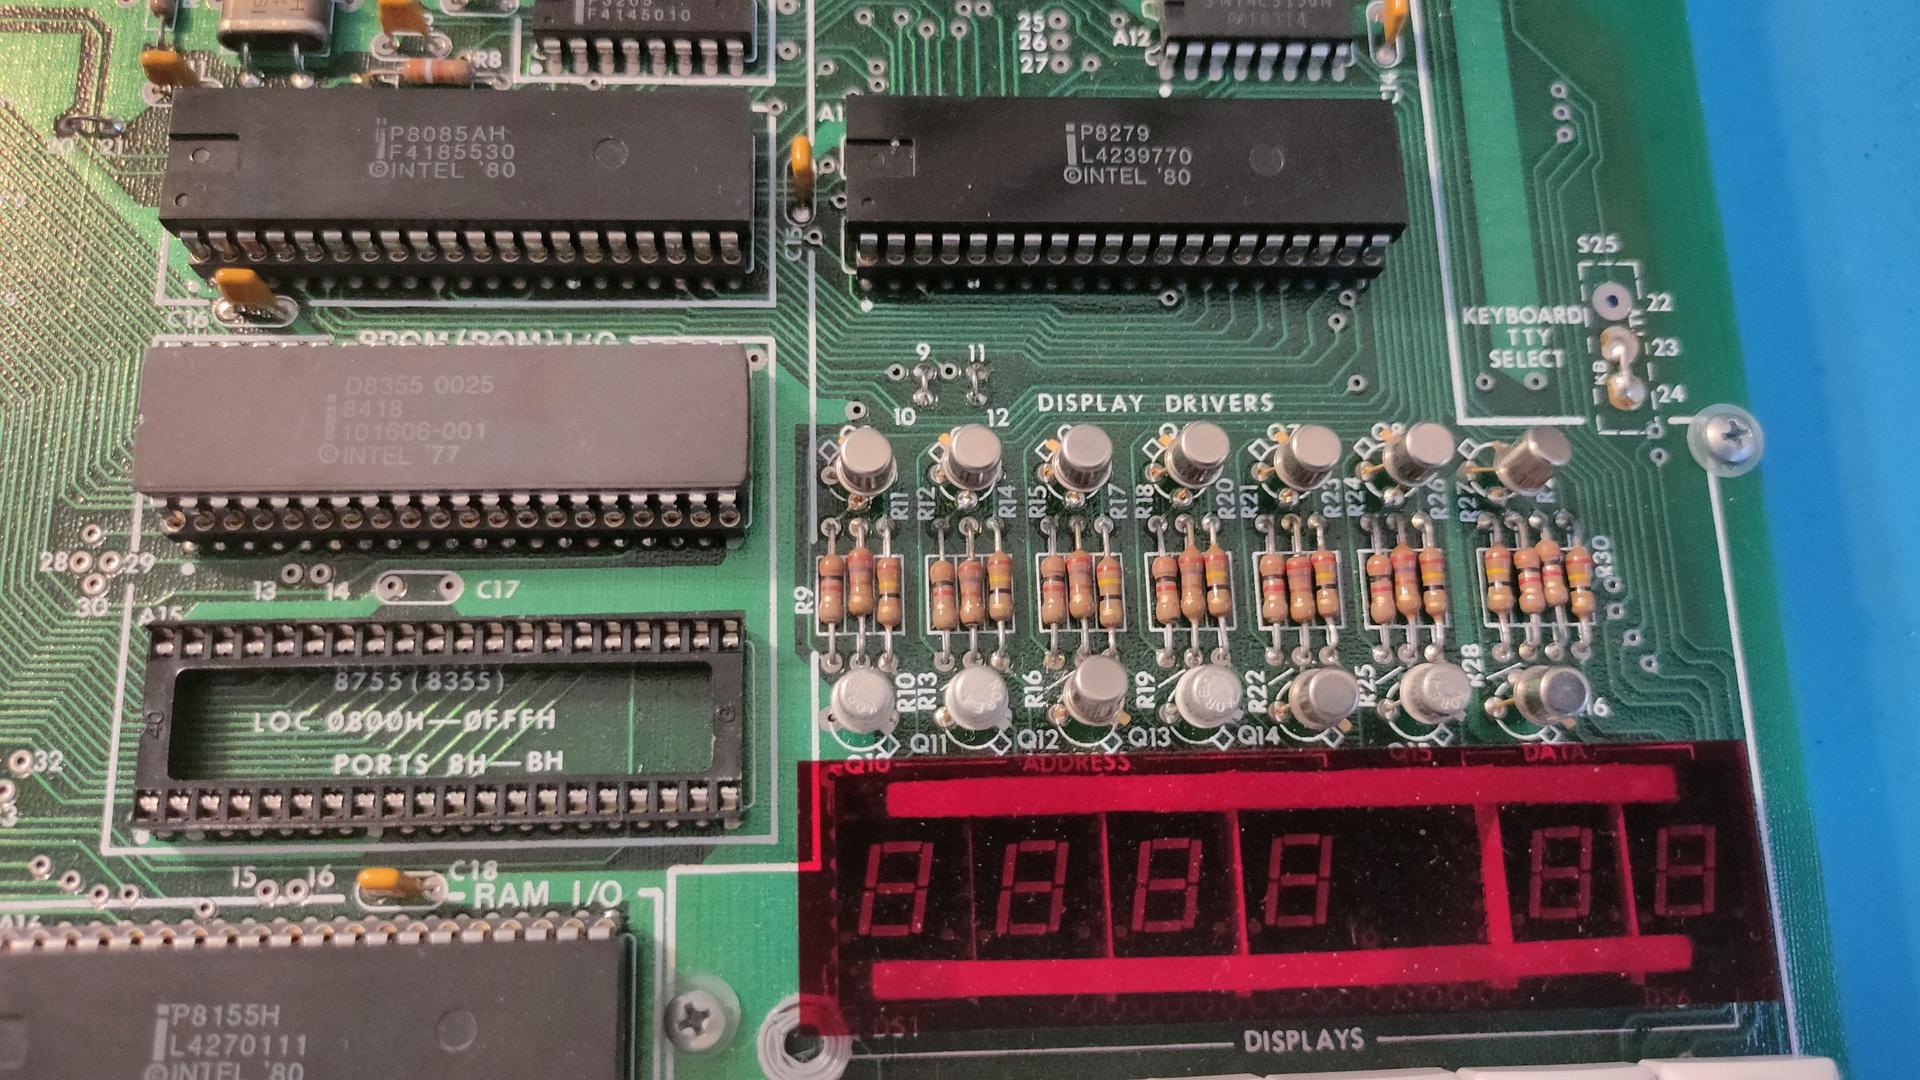
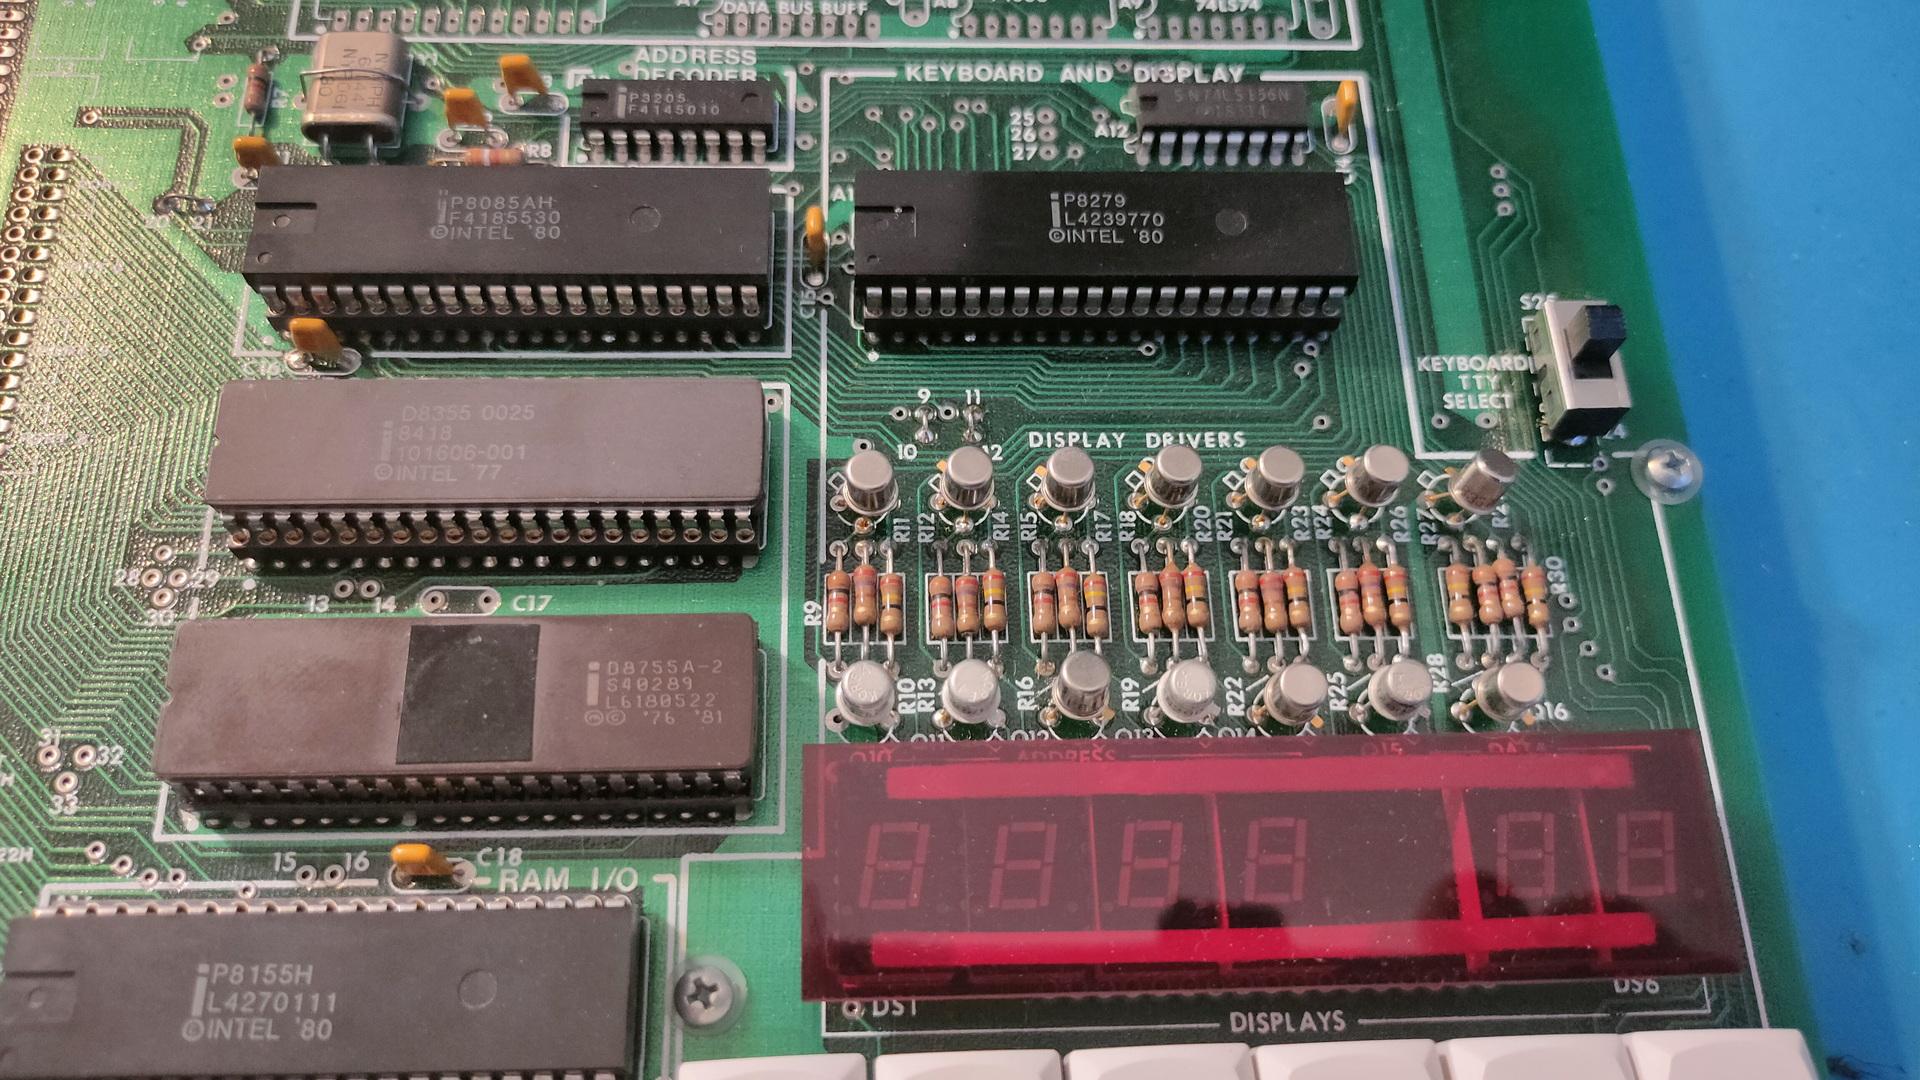
It has an EPROM with Wozmon and Basic for now. I have to redo the address decoder, but I like the simple serial interface by Geoffrey. (I hate the PIC18F15Q41, made by Microchip, but still the best minimal option .. for now)
Probably the last time i’ve used a pic was in 1998
I’ve posted in the past something about pl/m. Today i got this running again in a dosbox.
The PL/M programming language (an acronym of Programming Language for Microcomputers) is a high-level language conceived and developed by Gary Kildall in 1973 for Intel’s microprocessors.
PLM86 PROGRAM.PLM
LINK86 PROGRAM.OBJ, PLM\DOSLIBS.LIB, PLM\UTILS.LIB TO %1.LNK INITCODE
LINK PROGRAM.LNK;;;
Tic Tac Toe in PLM
bke:do;
/*DOEL:                                              */
/*Dit programma is boter kaas en eieren voor twee    */
/*spelers, er wordt gecontroleerd of iemand gewonnen */
/*heeft. (Je speelt niet tegen de computer)          */
/*UPDATE:12/2/90,15/2/90,18/2/90  RELDATE:19/2/90    */
/*PROGRAMMER:H.M.Aanstoot                            */
/*UPDATE 5/3/90 1:13:23                              */
/*De volgende 4 regels zorgen ervoor dat de compiler */
/*de PLM  DOS,UTIL routines die op disk staan        */
/*meestuurt naar de linker                           */
/* bla bla 2de versie met STRINGS!! eindelijk gelukt */

$include(plm\doslibs.inc)
$include(plm\doslibs.dcl)
$include(plm\utils.dcl)
dcl naam(3)           pointer;
dcl plaats(9)         word;
dcl teken(2)          pointer;
dcl aanzet            word;
dcl loop              word;
dcl a                 word;
dcl winnaar           word;
dcl nummer            word;
dcl item              word;
dcl error_status      word;

spelerzet:procedure;
call dsso(naam(aanzet));
call dsso(@(', geef een getal: $'));
invoer:
nummer=dsin;
nummer=nummer-48;
if nummer<1 or nummer>9 then goto invoer;
if plaats(nummer)<>0 then goto invoer;
call dso(nummer+48);
plaats(nummer)=aanzet;
end spelerzet;

update:procedure;
item=1;
call dsso(@(cr,lf,'+-----+-----+-----+',cr,lf,eos));
call dsso(@('|     |     |     |',cr,lf,eos));
call dso(124);call zet;call dso(124);call zet;call dso(124);call zet;
 call dsso(@(124,cr,lf,eos));
call dsso(@('|     |     |     |',cr,lf,eos));
call dsso(@('+-----+-----+-----+',cr,lf,eos));
call dsso(@('|     |     |     |',cr,lf,eos));
call dso(124);call zet;call dso(124);call zet;call dso(124);call zet;
 call dsso(@(124,cr,lf,eos));
call dsso(@('|     |     |     |',cr,lf,eos));
call dsso(@('+-----+-----+-----+',cr,lf,eos));
call dsso(@('|     |     |     |',cr,lf,eos));
call dso(124);call zet;call dso(124);call zet;call dso(124);call zet;
 call dsso(@(124,cr,lf,eos));
call dsso(@('|     |     |     |',cr,lf,eos));
call dsso(@('+-----+-----+-----+',cr,lf,eos));

  call dsso(@('    1   2   3',cr,lf,eos));
  call dsso(@('    4   5   6',cr,lf,eos));
  call dsso(@('    7   8   9',cr,lf,eos));
end update;


zet:procedure;
if plaats(item)=0 then call dsso(@('     $'));
if plaats(item)=1 then call dsso(@('  X  $'));
if plaats(item)=2 then call dsso(@('  O  $'));
item=item+1;
end zet;

check:procedure;
   do a=1 to 2;
   if plaats(1)=a and plaats(2)=a and plaats(3)=a then winnaar=a;
   if plaats(4)=a and plaats(5)=a and plaats(6)=a then winnaar=a;
   if plaats(7)=a and plaats(8)=a and plaats(9)=a then winnaar=a;

   if plaats(1)=a and plaats(4)=a and plaats(7)=a then winnaar=a;
   if plaats(2)=a and plaats(5)=a and plaats(8)=a then winnaar=a;
   if plaats(3)=a and plaats(6)=a and plaats(9)=a then winnaar=a;

   if plaats(1)=a and plaats(5)=a and plaats(9)=a then winnaar=a;
   if plaats(3)=a and plaats(5)=a and plaats(7)=a then winnaar=a;
   end;
end check;


hoofdprogramma:
winnaar=3;
naam(1)=@('Speler 1$');
naam(2)=@('Speler 2$');
naam(3)=@('Niemand$');
do a=1 to 9; plaats(a)=0; end;
teken(1)=@('kruisje$');
teken(2)=@('rondje$');
aanzet=1;

    do loop=1 to 9;
    call update;
    call check;
    if winnaar<>3 then goto gewonnen;
    call spelerzet;
    aanzet=3-aanzet;
    end;

call update;
gewonnen:
call dsso(naam(winnaar));
call dsso(@(' heeft gewonnen',cr,lf,eos));
if winnaar=3 then call dsso(@('Helaas, pindakaas!$'));
			 else call dsso(@('Gefeliciteerd ermee!$'));

call dexit(error_status);
end;
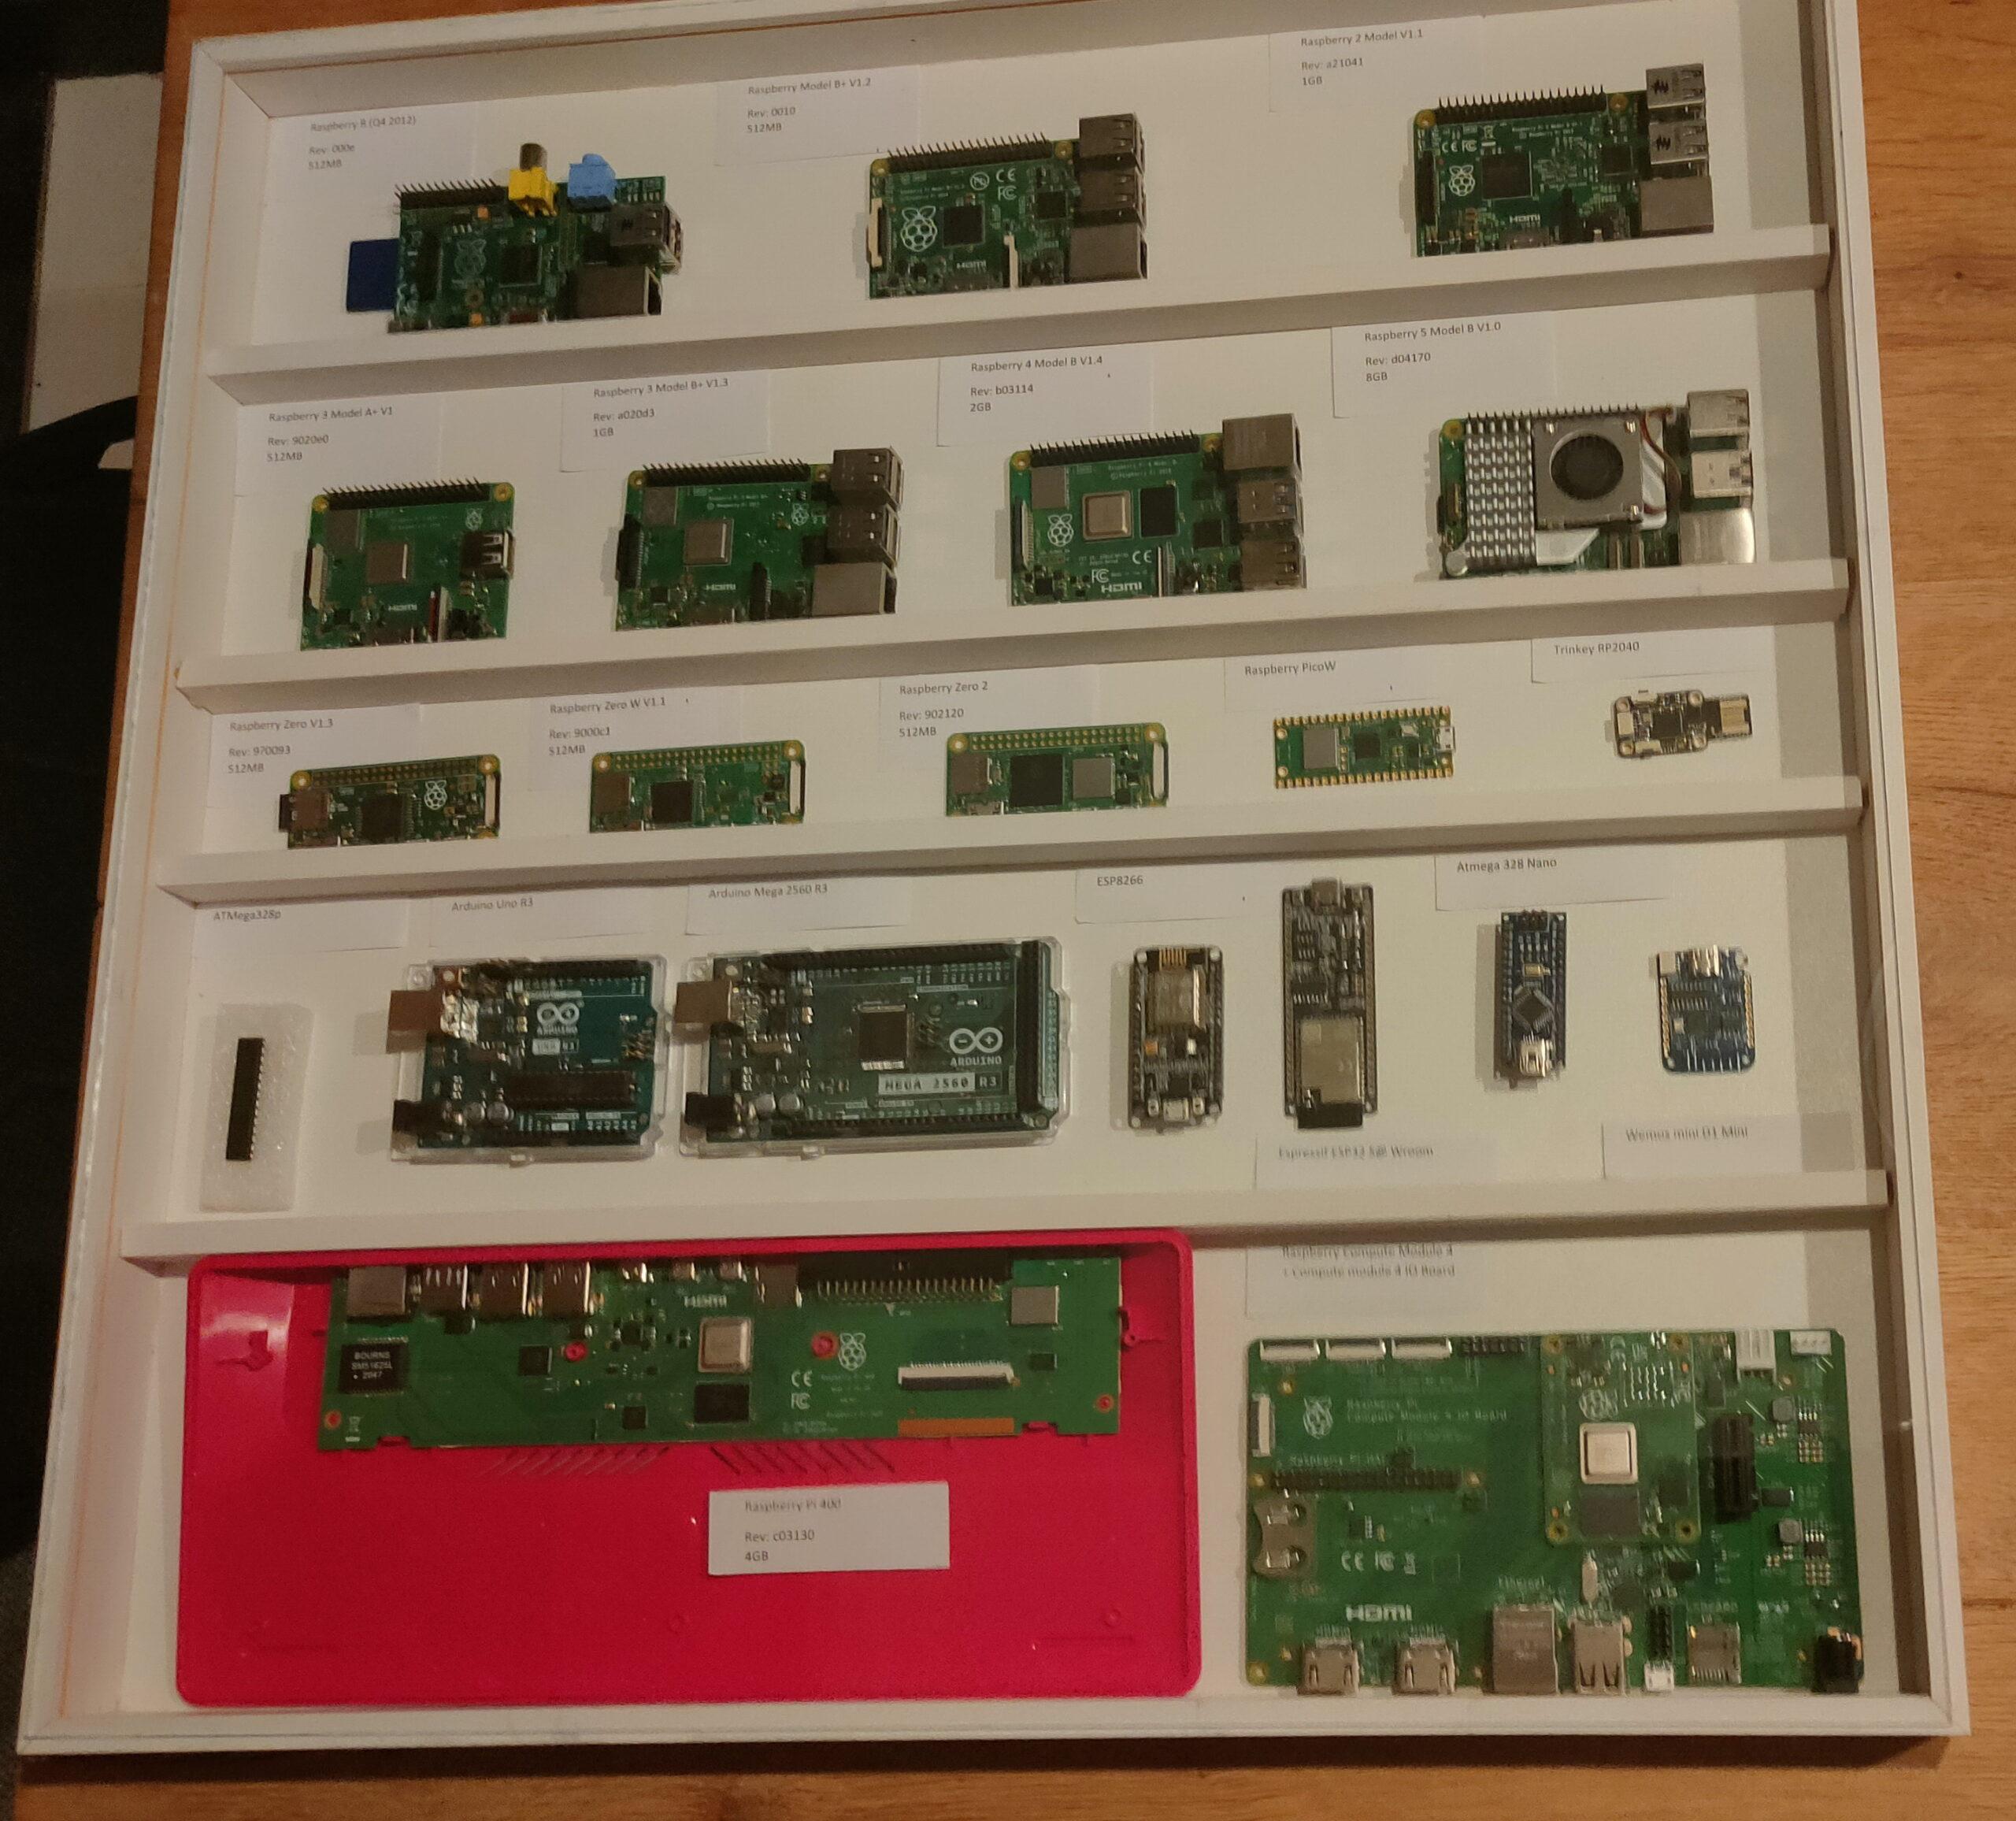
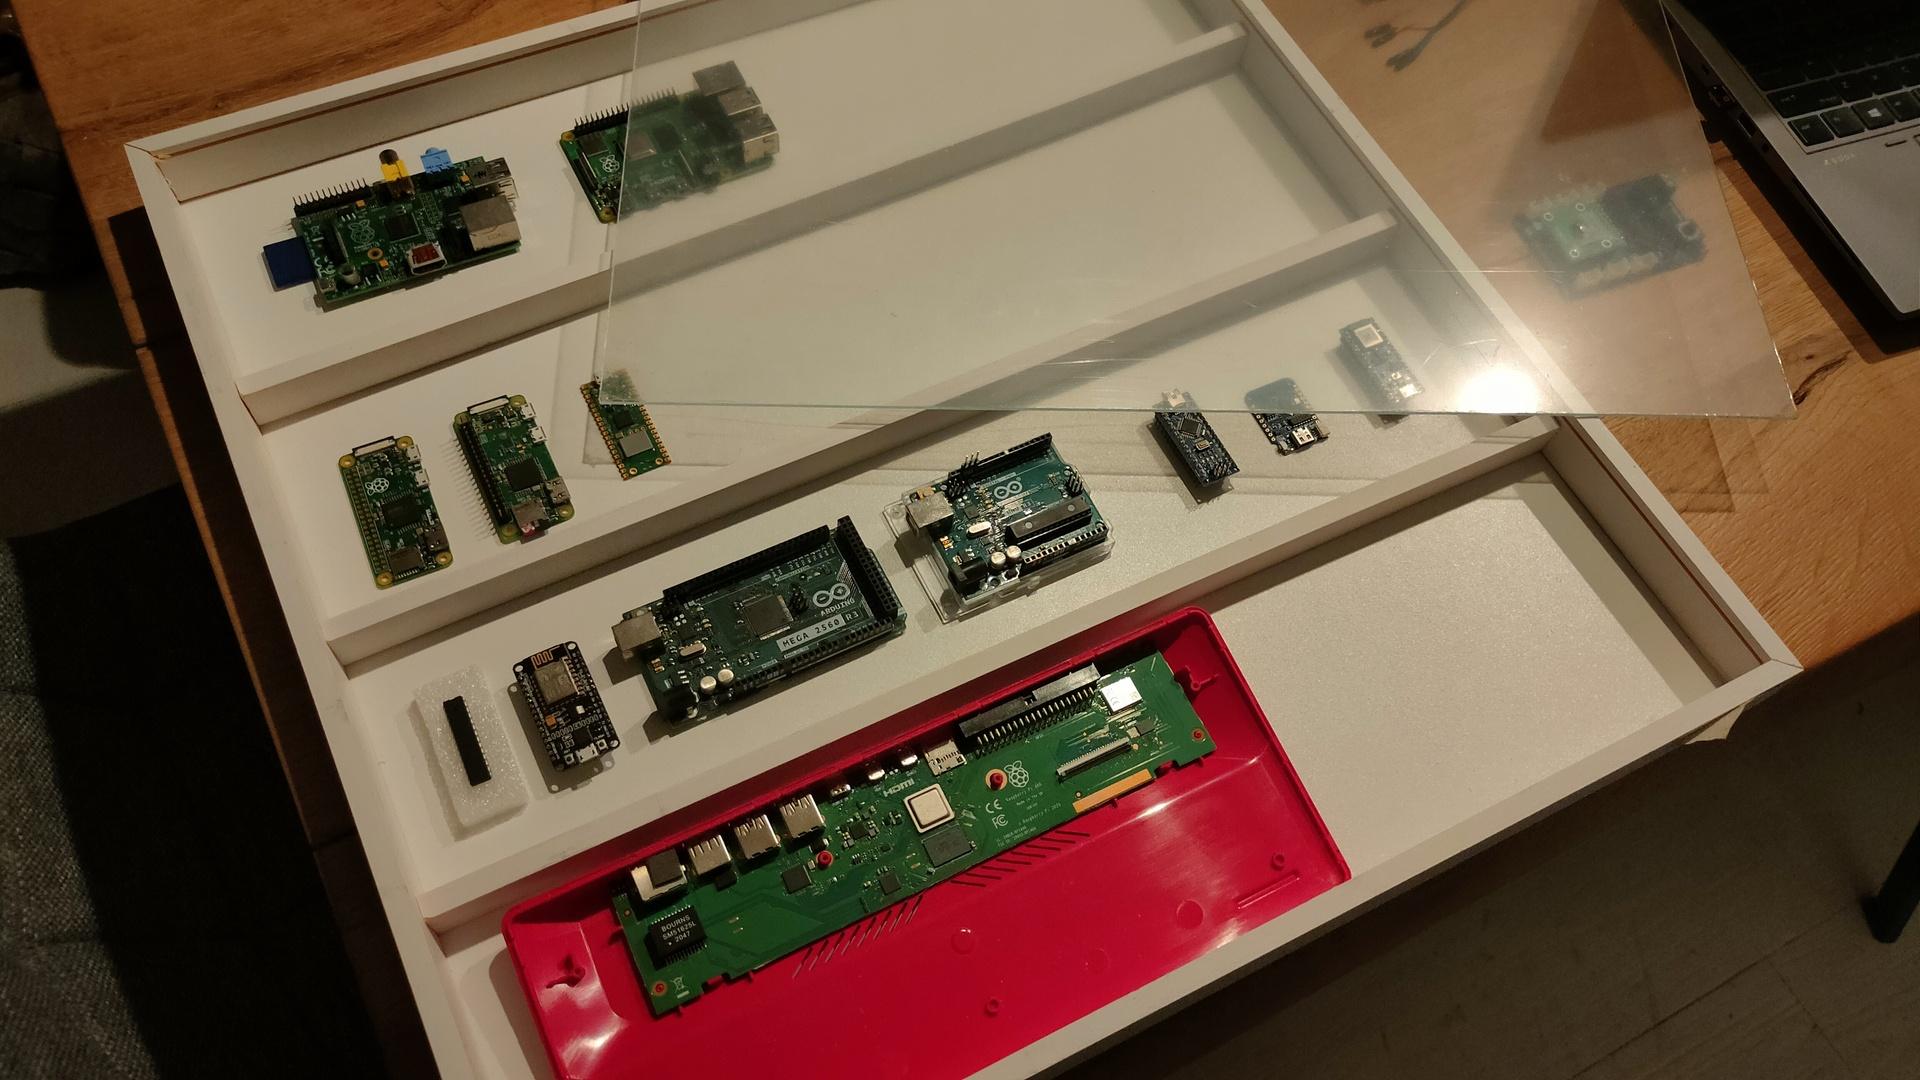
I started a little case for a collection of Raspberry devices.
Over the years, many Raspberries were designed and made. It all started in 2012 I want to have a case with all RP’s i’ve used.
There are many iterations of the RPi, I’m missing a lot now. If you want to help me, send me old/broken raspberries to get the collection complete!
This is the case at the moment
Case with some Raspberries and Arduino’s I found lying around, I’m not going to dismantle projects. Only the RPi 1A, 4B, Zero, Zero W, Pico and RPi 400 are displayed. Plastic sheet as protective layer still on there, should be clear as glass.
The case isn’t glued together yet. I’m not sure how and what to include.
Horizontal wooden bars to place the devices on?
Include a history of Arduino’s for now?
Put little notes in the case with information? Like my SDK-85 case?
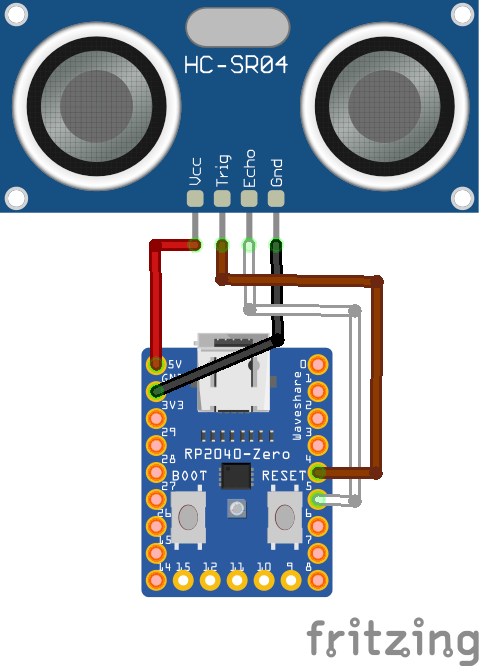
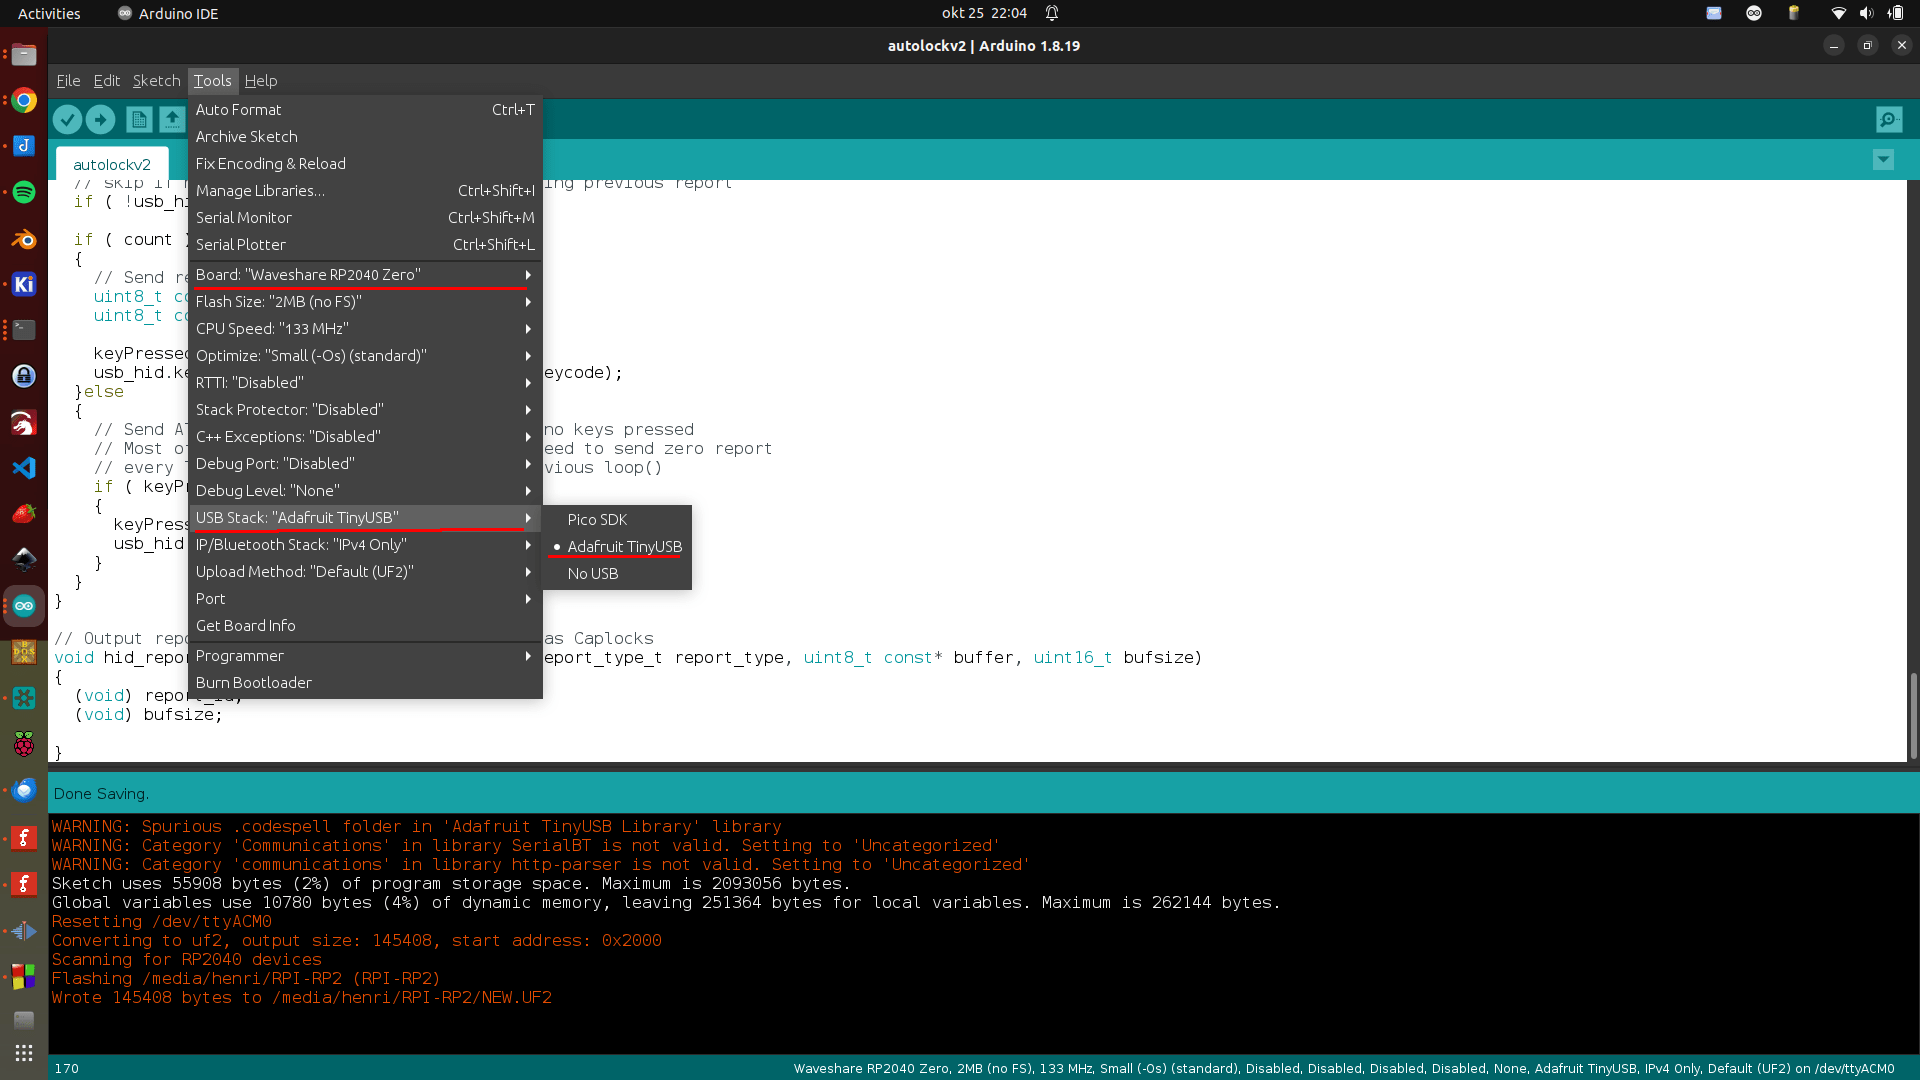
Point the sensor at yourself when behind your computer. When you leave your computer for some seconds, it wil automatically lock your screen. (Windows-L keypress) The RP2040 is configured as HID so it emulates a keyboard. Just connect via an usb-cable to your machine
#include "Adafruit_TinyUSB.h"
// defines pins numbers
const int trigPin = D4;
const int echoPin = D5;
// defines variables
long duration;
int distance;
int maxcounter;
uint8_t const desc_hid_report[] =
{
  TUD_HID_REPORT_DESC_KEYBOARD()
};

// D0-D3 NOT USED AT THE MOMENT, I'VE GOT IDEAS FOR EXTRA FUNCTIONALLITY!

// USB HID object. For ESP32 these values cannot be changed after this declaration
// desc report, desc len, protocol, interval, use out endpoint
Adafruit_USBD_HID usb_hid(desc_hid_report, sizeof(desc_hid_report), HID_ITF_PROTOCOL_KEYBOARD, 2, false);

//------------- Input Pins -------------//
// Array of pins and its keycode.
  uint8_t pins[] = { D0, D1, D2, D3 };


// number of pins
uint8_t pincount = sizeof(pins)/sizeof(pins[0]);

// For keycode definition check out https://github.com/hathach/tinyusb/blob/master/src/class/hid/hid.h
uint8_t hidcode[] = { HID_KEY_0, HID_KEY_1, HID_KEY_2, HID_KEY_3 , HID_KEY_4, HID_KEY_5 };

#if defined(ARDUINO_SAMD_CIRCUITPLAYGROUND_EXPRESS) || defined(ARDUINO_NRF52840_CIRCUITPLAY) || defined(ARDUINO_FUNHOUSE_ESP32S2)
  bool activeState = true;
#else
  bool activeState = false;
#endif

void setup()
{
  // Setting pins for Ultrasonic Sensor HC-SR04
  pinMode(trigPin, OUTPUT); // Sets the trigPin as an Output
  pinMode(echoPin, INPUT); // Sets the echoPin as an Input

#if defined(ARDUINO_ARCH_MBED) && defined(ARDUINO_ARCH_RP2040)
  // Manual begin() is required on core without built-in support for TinyUSB such as mbed rp2040
  TinyUSB_Device_Init(0);
#endif

  // Set up output report (on control endpoint) for Capslock indicator
  // Not used .. yet
  usb_hid.setReportCallback(NULL, hid_report_callback);

  usb_hid.begin();

  // overwrite input pin with PIN_BUTTONx
  // NOT USED
#ifdef PIN_BUTTON1
  pins[0] = PIN_BUTTON1;
#endif

#ifdef PIN_BUTTON2
  pins[1] = PIN_BUTTON2;
#endif

#ifdef PIN_BUTTON3
  pins[2] = PIN_BUTTON3;
#endif

#ifdef PIN_BUTTON4
  pins[3] = PIN_BUTTON4;
#endif

  // Set up pin as input
  for (uint8_t i=0; i<pincount; i++)
  {
    pinMode(pins[i], activeState ? INPUT_PULLDOWN : INPUT_PULLUP);
  }

  // wait until device mounted
  while( !TinyUSBDevice.mounted() ) delay(1);

maxcounter =0;
}

void loop()
{

  // Clears the trigPin
  digitalWrite(trigPin, LOW);
  delayMicroseconds(2);
  // Sets the trigPin on HIGH state for 10 micro seconds
  digitalWrite(trigPin, HIGH);
  delayMicroseconds(10);
  digitalWrite(trigPin, LOW);
  // Reads the echoPin, returns the sound wave travel time in microseconds
  duration = pulseIn(echoPin, HIGH);
  // Calculating the distance
  distance = duration * 0.034 / 2;
  // Prints the distance on the Serial Monitor - DEBUG
  //Serial.print("Distance: ");
  //Serial.println(distance);

  // Below will wait for more than 100 measurements with a distance of 100
  // Then it will send a WINDOWS-L (lock) keyboard combination
  if (distance > 100)
  {
    maxcounter +=1;
  }
  else
  {
    maxcounter = 0;
  }
  if (maxcounter > 100 && maxcounter < 150)
  {
    maxcounter = 200;
       // Send report if there is key pressed
    uint8_t const report_id = 0;


    uint8_t  modifier = KEYBOARD_MODIFIER_LEFTGUI;
          uint8_t keycode[6] = { 0 };
      keycode[0] = HID_KEY_L;


    usb_hid.keyboardReport(report_id, modifier, keycode);
    delay(10);
    // Un-press keys :)
    usb_hid.keyboardRelease(0);

  }


  // poll gpio once each 2 ms
  delay(20);

  // used to avoid send multiple consecutive zero report for keyboard
  static bool keyPressedPreviously = false;

  uint8_t count=0;
  uint8_t keycode[6] = { 0 };

  // scan normal key and send report
  for(uint8_t i=0; i < pincount; i++)
  {
    if ( activeState == digitalRead(pins[i]) )
    {
      // if pin is active (low), add its hid code to key report
      keycode[count++] = hidcode[i];

      // 6 is max keycode per report
      if (count == 6) break;
    }
  }

  if ( TinyUSBDevice.suspended() && count )
  {
    // Wake up host if we are in suspend mode
    // and REMOTE_WAKEUP feature is enabled by host
    TinyUSBDevice.remoteWakeup();
  }

  // skip if hid is not ready e.g still transferring previous report
  if ( !usb_hid.ready() ) return;

  if ( count )
  {
    // Send report if there is key pressed
    uint8_t const report_id = 0;
    uint8_t const modifier = 0;

    keyPressedPreviously = true;
    usb_hid.keyboardReport(report_id, modifier, keycode);
  }else
  {
    // Send All-zero report to indicate there is no keys pressed
    // Most of the time, it is, though we don't need to send zero report
    // every loop(), only a key is pressed in previous loop()
    if ( keyPressedPreviously )
    {
      keyPressedPreviously = false;
      usb_hid.keyboardRelease(0);
    }
  }
}

// Output report callback for LED indicator such as Caplocks
void hid_report_callback(uint8_t report_id, hid_report_type_t report_type, uint8_t const* buffer, uint16_t bufsize)
{
  (void) report_id;
  (void) bufsize;

}
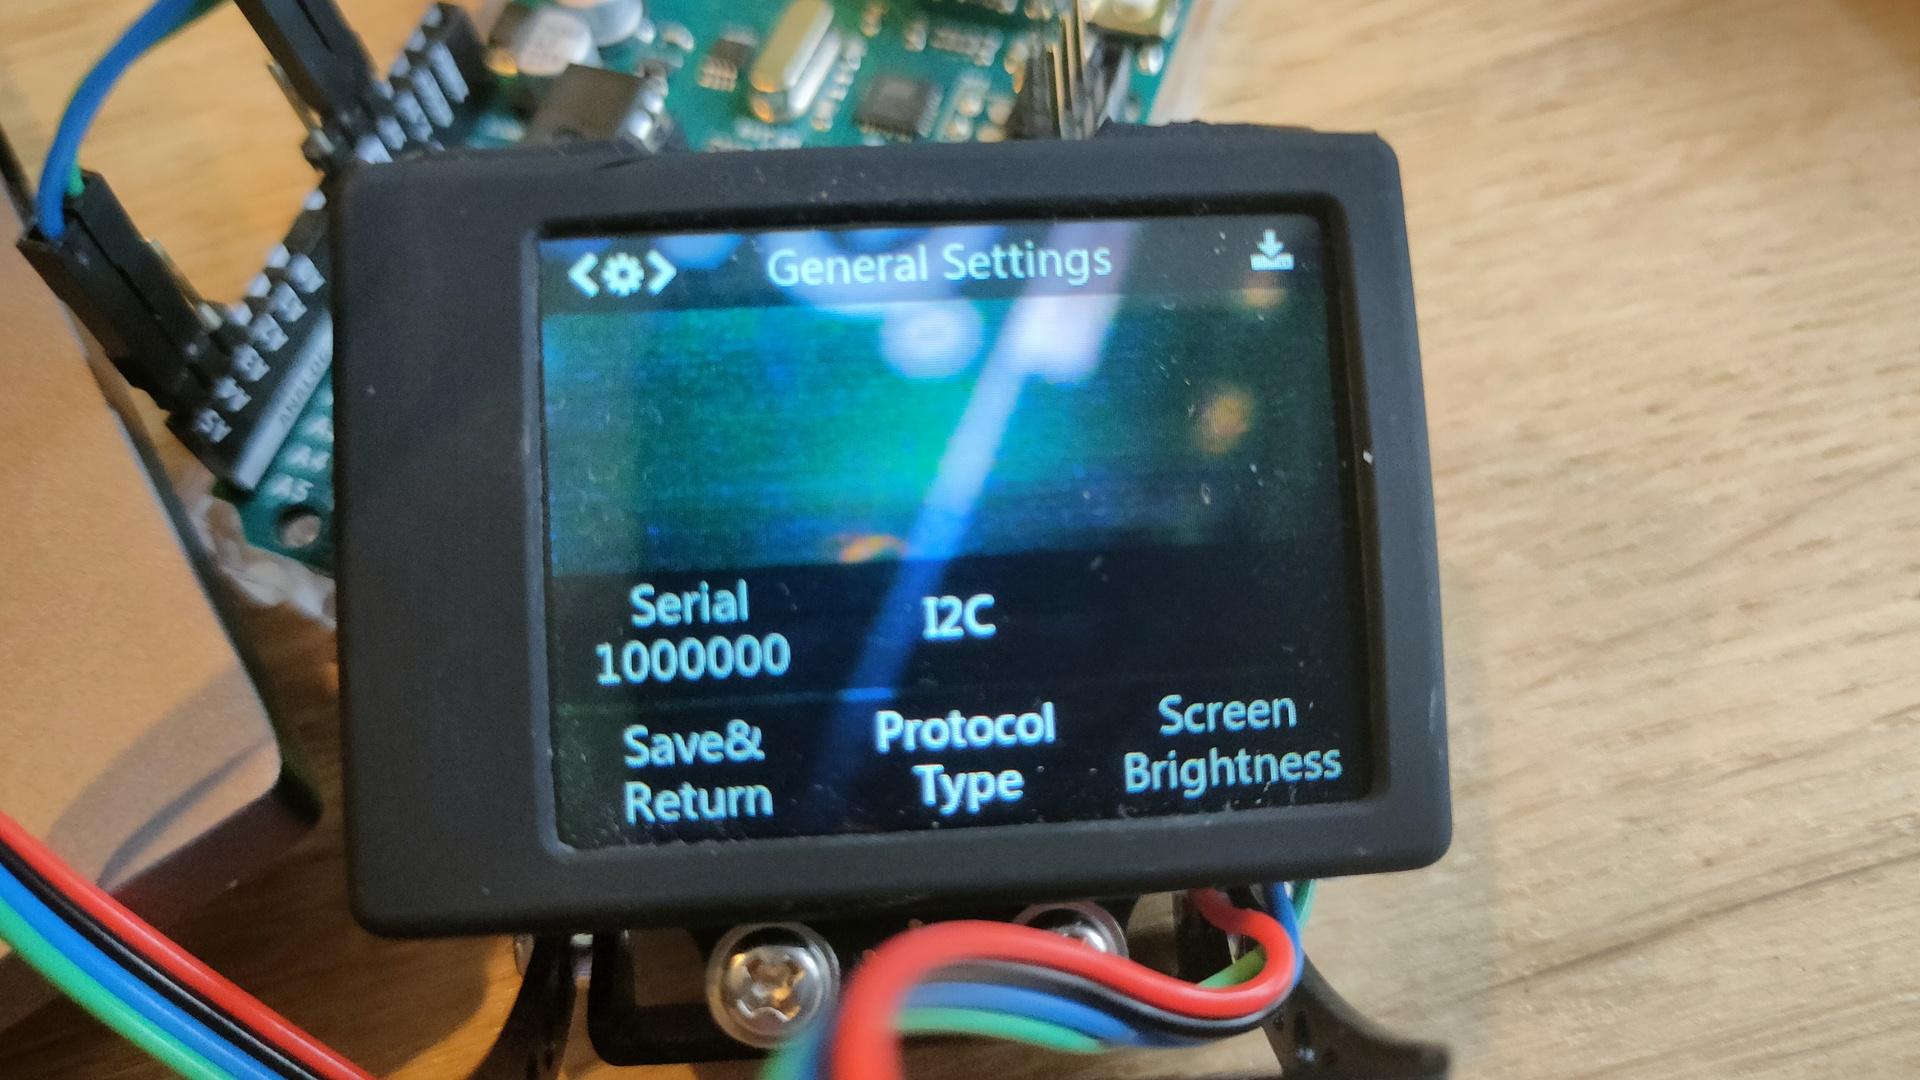
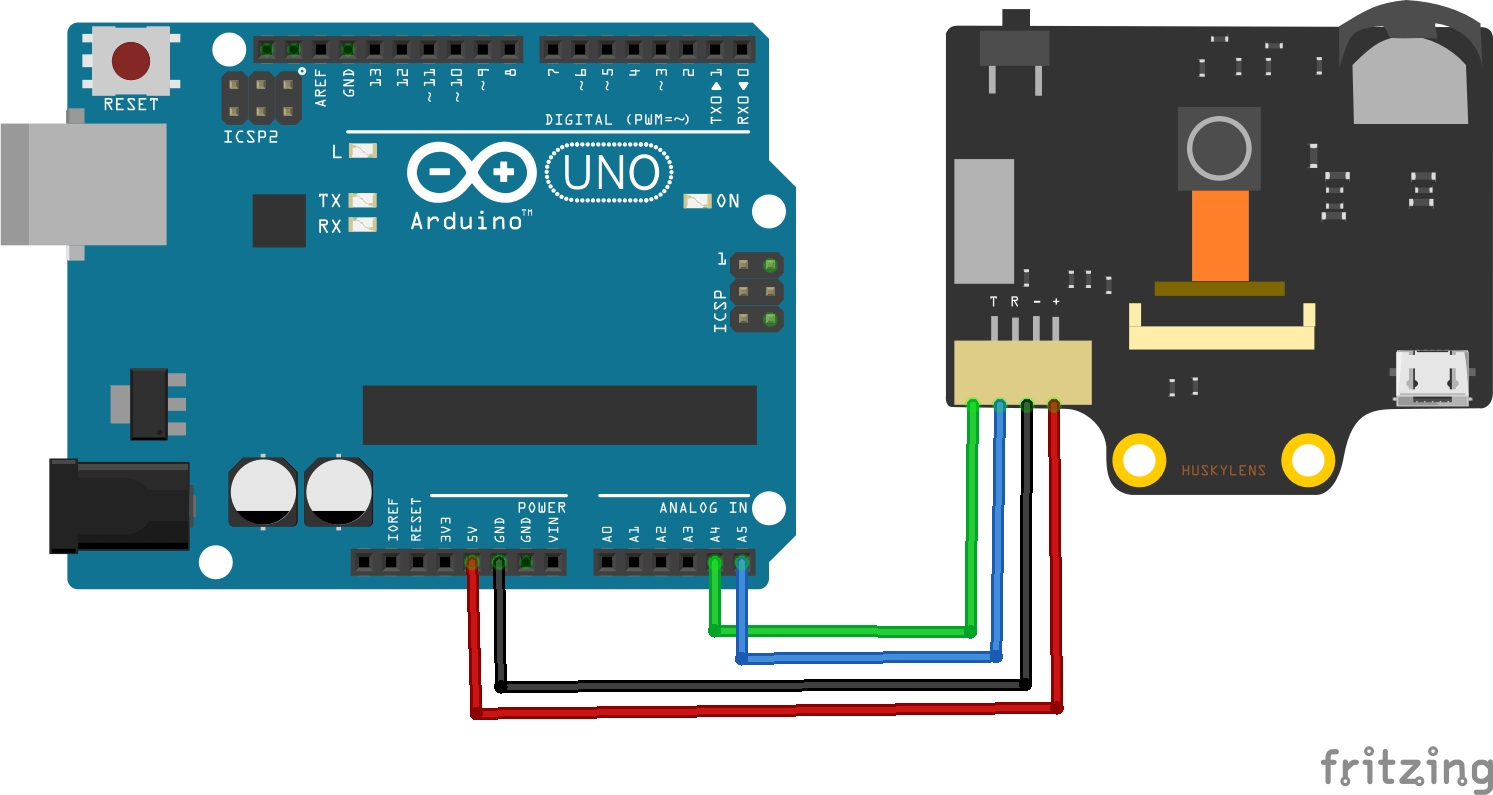
The HuskyLens is an easy-to-use AI machine vision sensor. It is equipped with multiple functions such as:
Face recognition
Object tracking
Object recognition
Line trace
Color recognition
Tag recognition (QR code).
Via the UART / I2C port you can among others: boards connect:
Arduino
micro:bit
Raspberry Pi
Steps to take: Press Face detection, when a cross in a square is displayed, press the button on your HuskyLens
Set your husky protocol to I2C in the settings.
Minimal Code needed
/***************************************************
 HUSKYLENS An Easy-to-use AI Machine Vision Sensor
 <https://www.dfrobot.com/product-1922.html>
****************************************************/

#include "HUSKYLENS.h"

HUSKYLENS huskylens;
//HUSKYLENS green line >> SDA; blue line >> SCL
int ID0 = 0; //not learned results. Grey result on HUSKYLENS screen
int ID1 = 1; //first learned results. colored result on HUSKYLENS screen
int ID2 = 2; //second learned results. colored result on HUSKYLENS screen
// and so on.....

int arjprevious = 0;
void printResult(HUSKYLENSResult result);
void setup() {
    Serial.begin(115200);
    Wire.begin();
    while (!huskylens.begin(Wire))
    {
        Serial.println(F("Begin failed!"));
        Serial.println(F("1.Please recheck the \"Protocol Type\" in HUSKYLENS (General Settings>>Protocol Type>>I2C)"));
        Serial.println(F("2.Please recheck the connection."));
        delay(100);
    }

     huskylens.writeAlgorithm(ALGORITHM_FACE_RECOGNITION);
}

void loop() {
   if (huskylens.requestLearned())          //request blocks and arrows tangged ID != 0 from HUSKYLENS
   if (huskylens.requestBlocksLearned())    //request blocks tangged ID != ID0 from HUSKYLENS

    {
        for (int i = 0; i < huskylens.countArrows(ID0); i++)
        {
            HUSKYLENSResult result = huskylens.getArrow(ID0, i);
        }
        int arj = huskylens.count(ID1);
        if ( arj != arjprevious )
        {
        if ( arj == 1 )
            {
            Serial.println("Learned face detected");
            }
            else
            {
            Serial.println("Learned face not detected");
            }
            arjprevious = arj;
        }
    }
    else
    {
        Serial.println("Fail to request objects from Huskylens!");
    }
}
Learned face detected ID1
Learned face not detected
Learned face detected ID1
Learned face not detected
Learned face detected ID1
Learned face not detected
"If something is worth doing, it's worth overdoing."