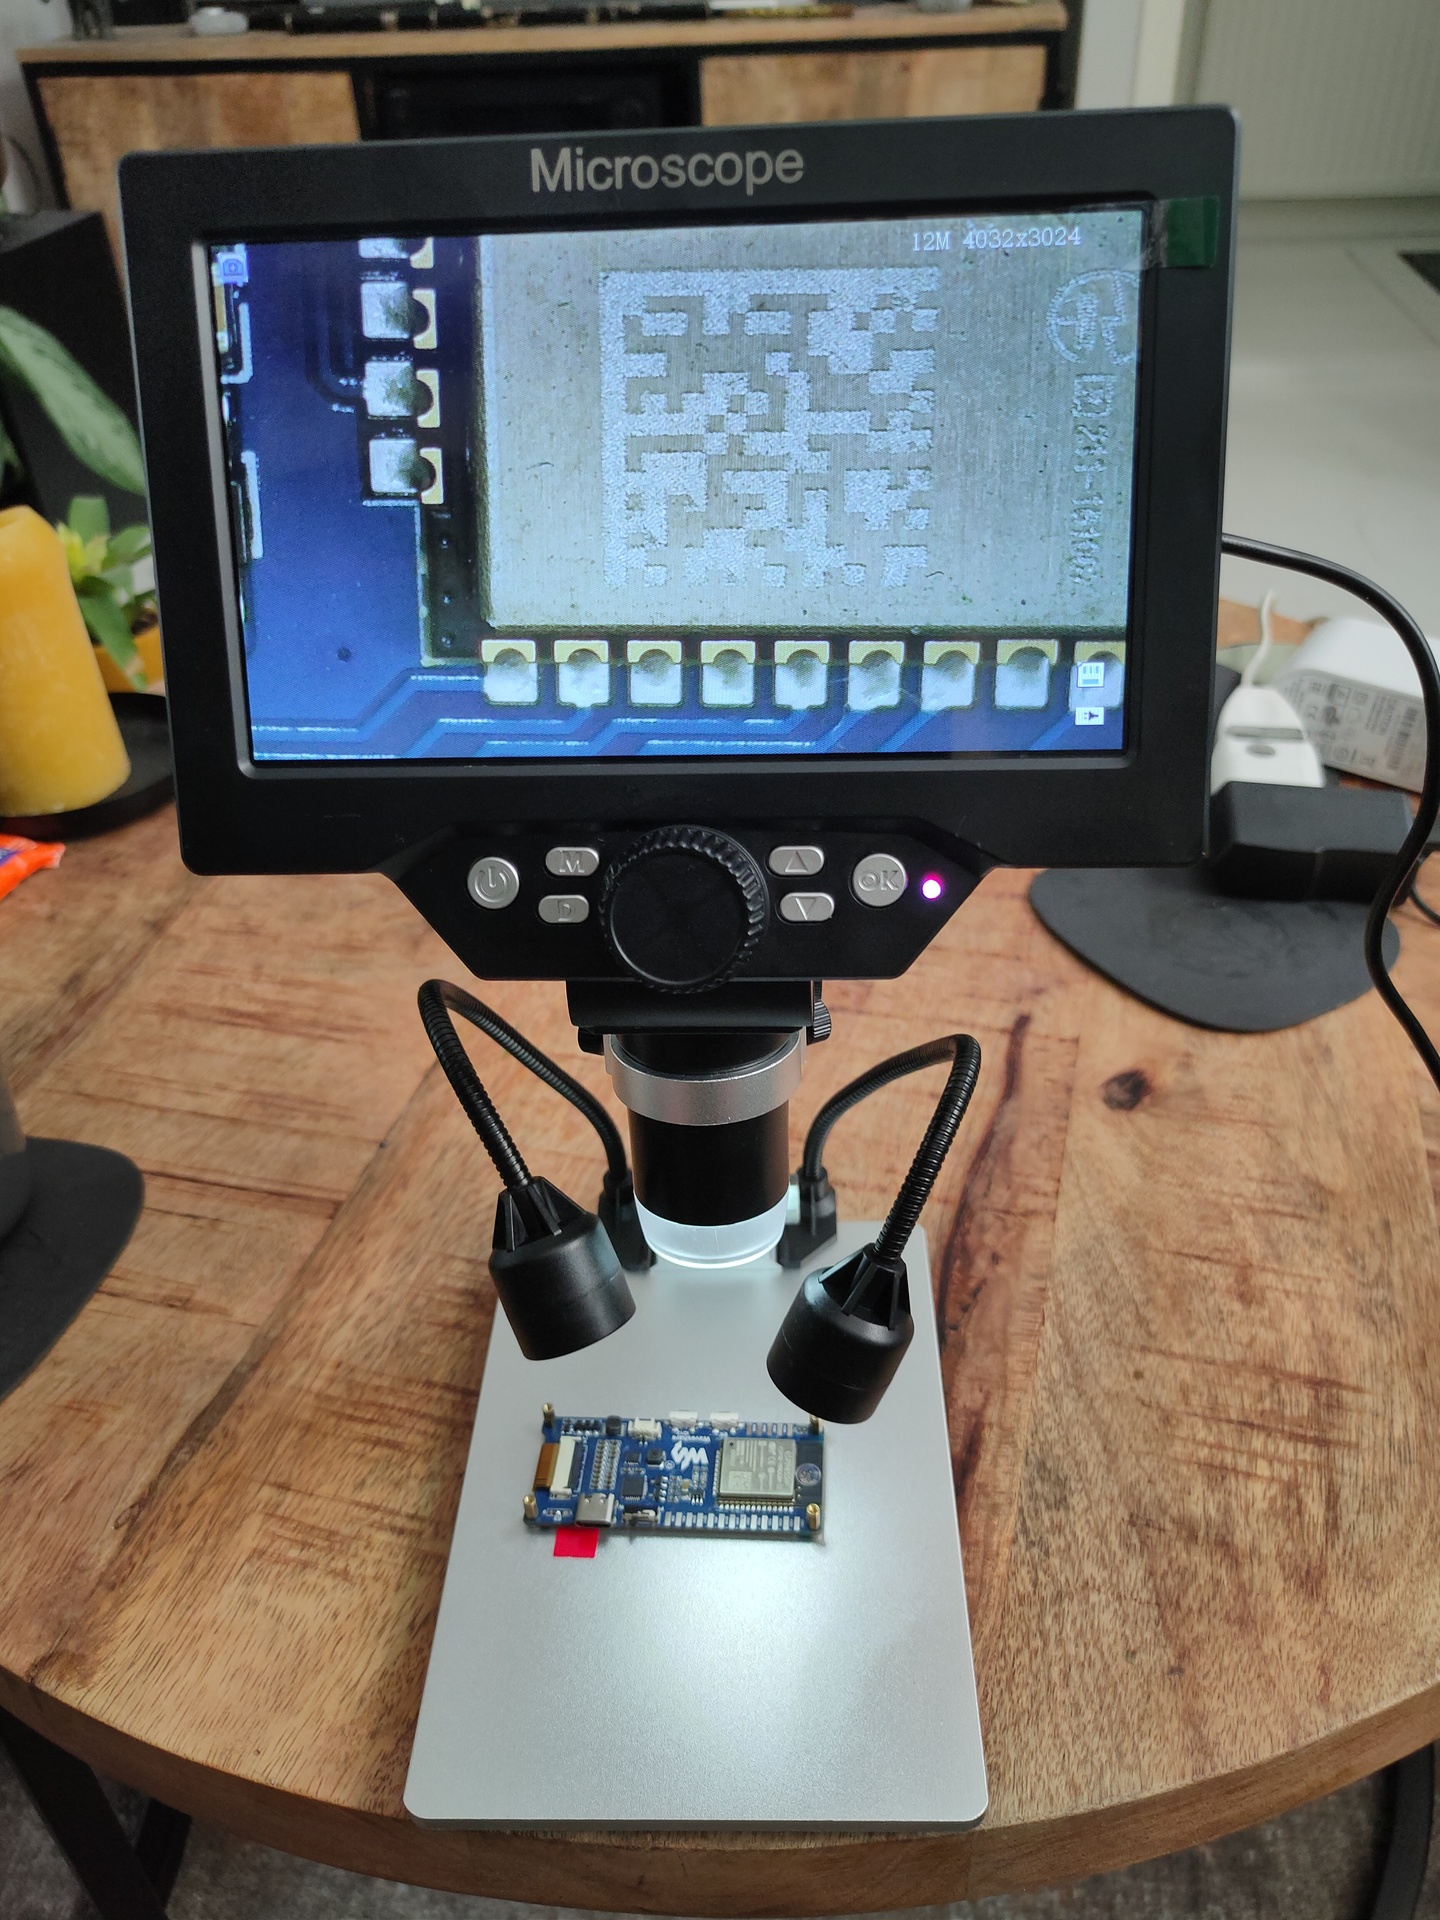
We are all getting older and electronics smaller. It’s hard to see if your soldering blobs are okay! Those blobs can reflect the light in a way that it’s not visible anymore to check them.
So i took Bigreds advice, and bought a G1200 Microscope. It’s a cheap but helpfull little gadget.
1-1200 times zoom
7inch screen (720p)
SDcard
Lipo battery
Recording on micro sdcard in 12 mega pixels pictures and 1080P Video. (even got a timer)
Focus button, and extra lights (There is a light source in de camera head, which can be adjusted by a knob)
When connecting to your pc, you get 3 options
PC Camera ( … so you can record using your pc with for example OBS)
Mass Storage, to read the SDCARD
Rec_mode ?!? – No idea yet
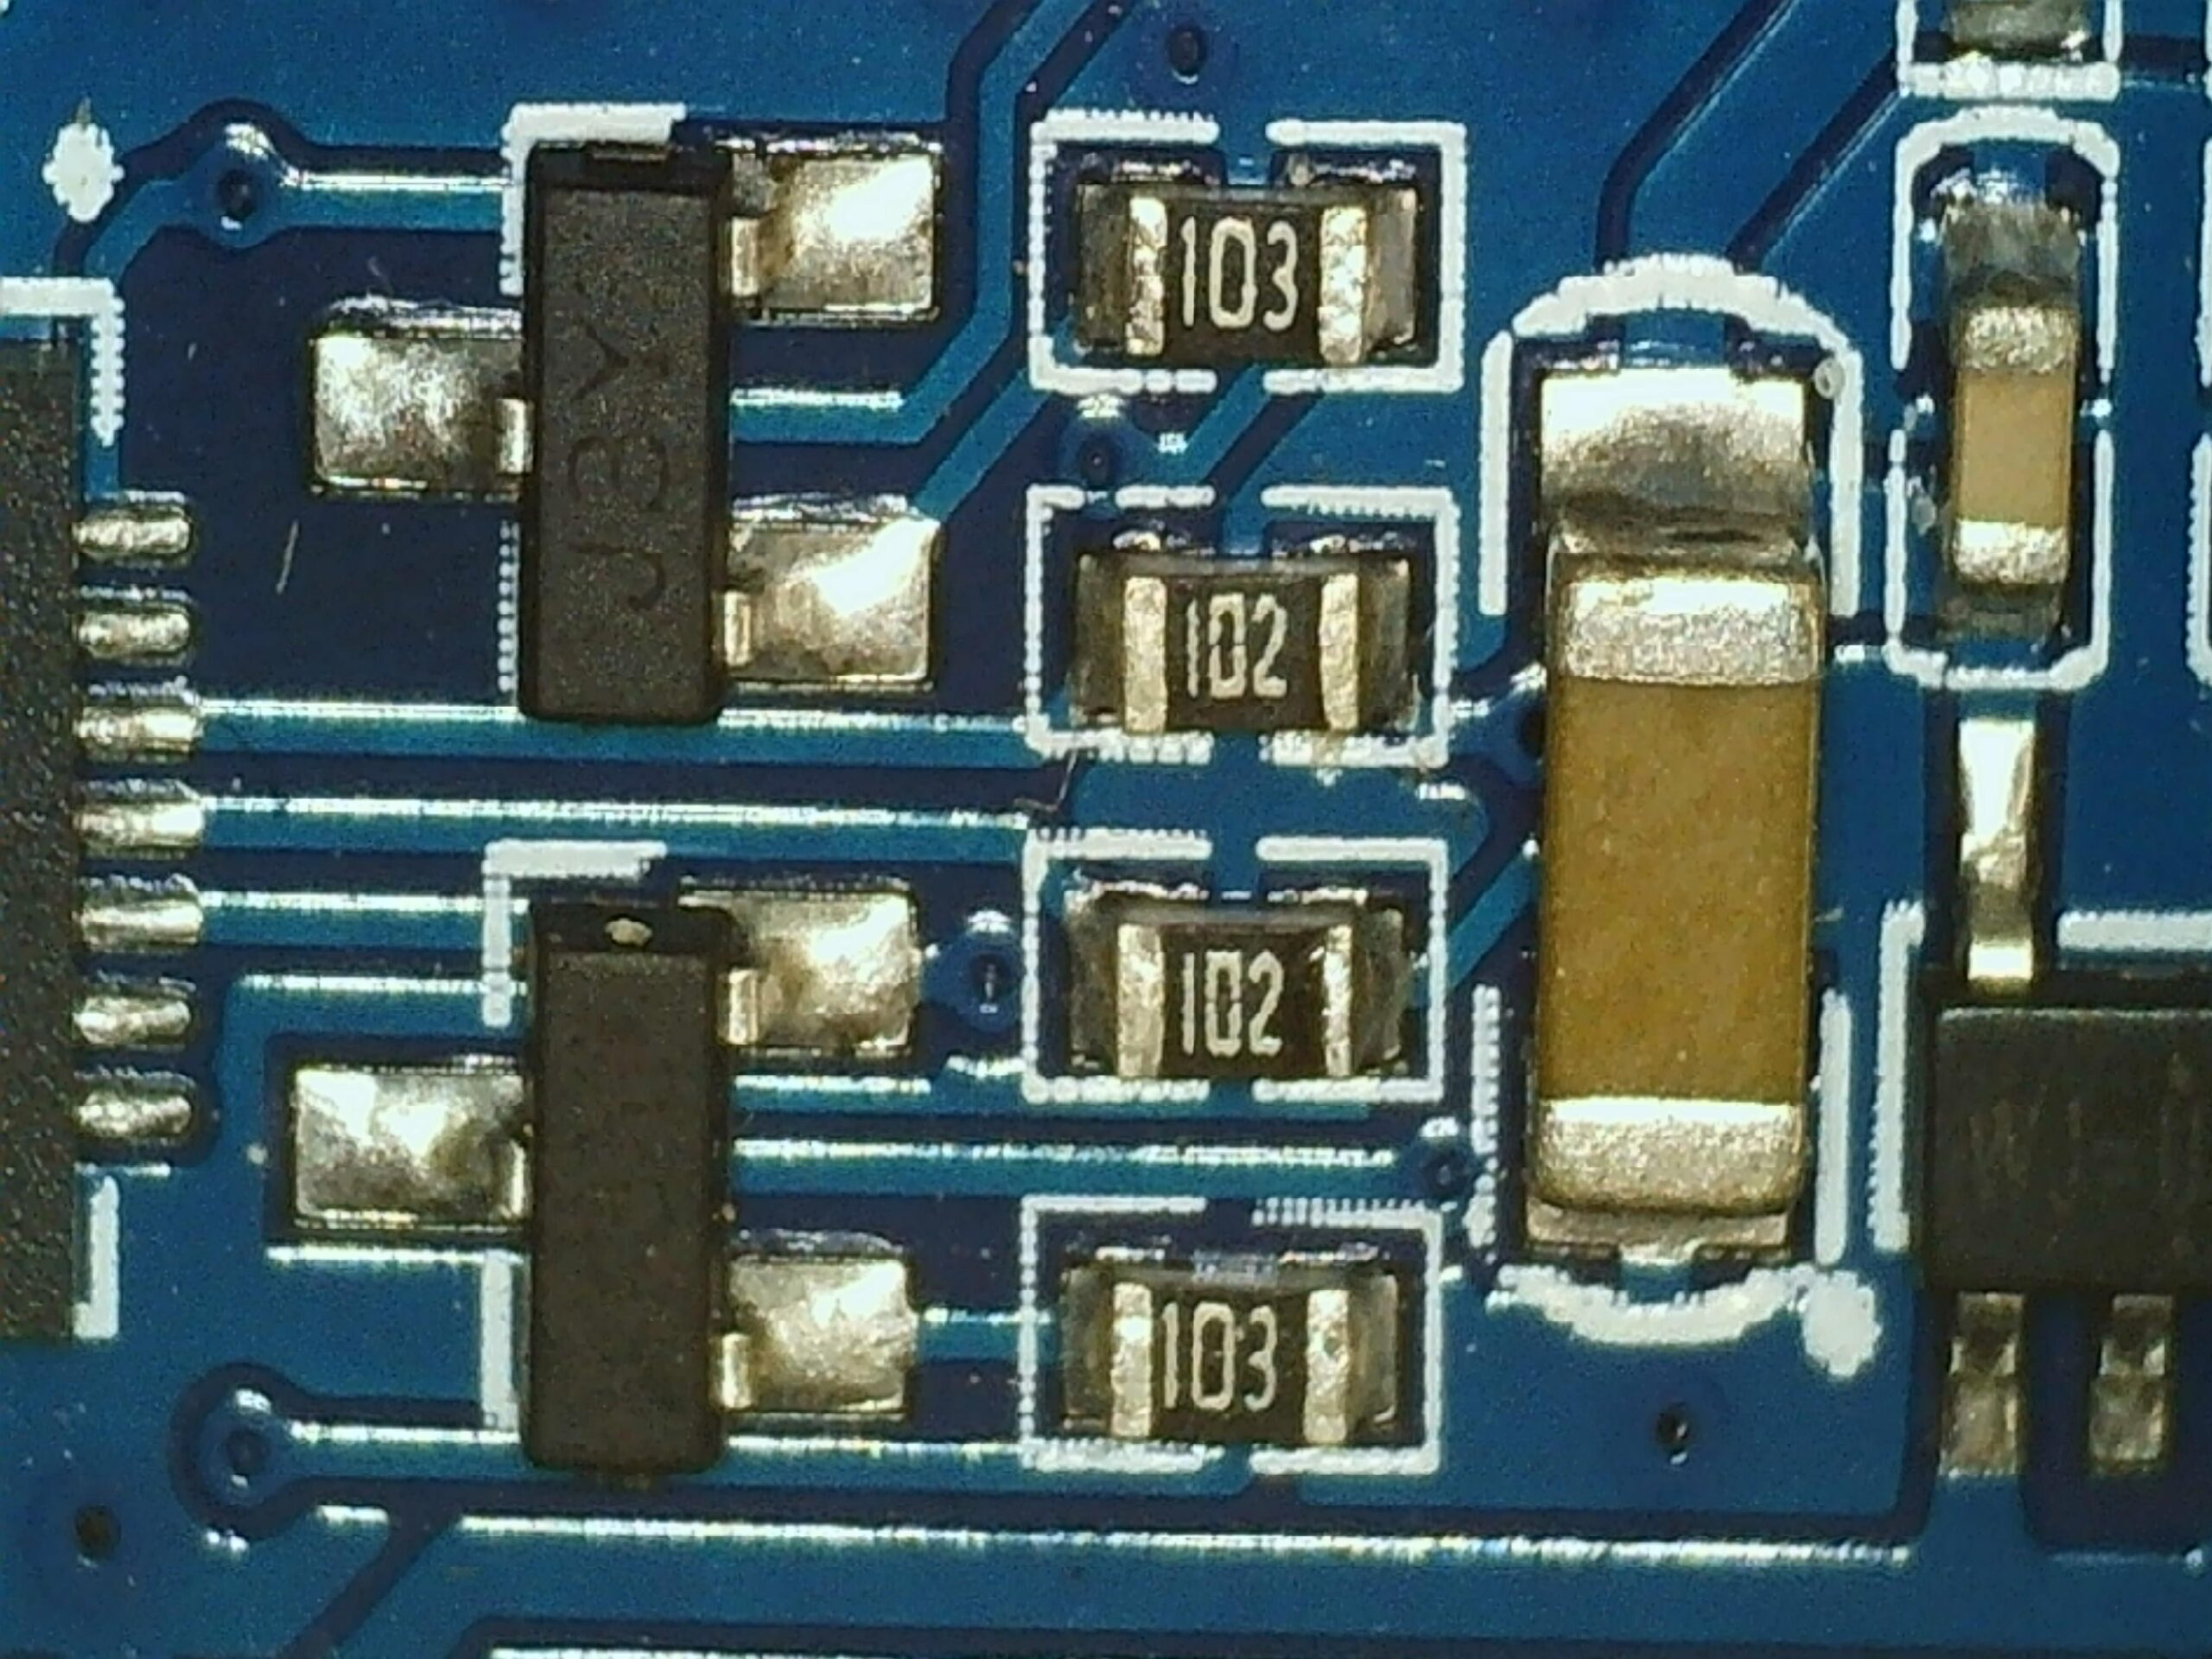
Below some examples:
Picture example
Video example
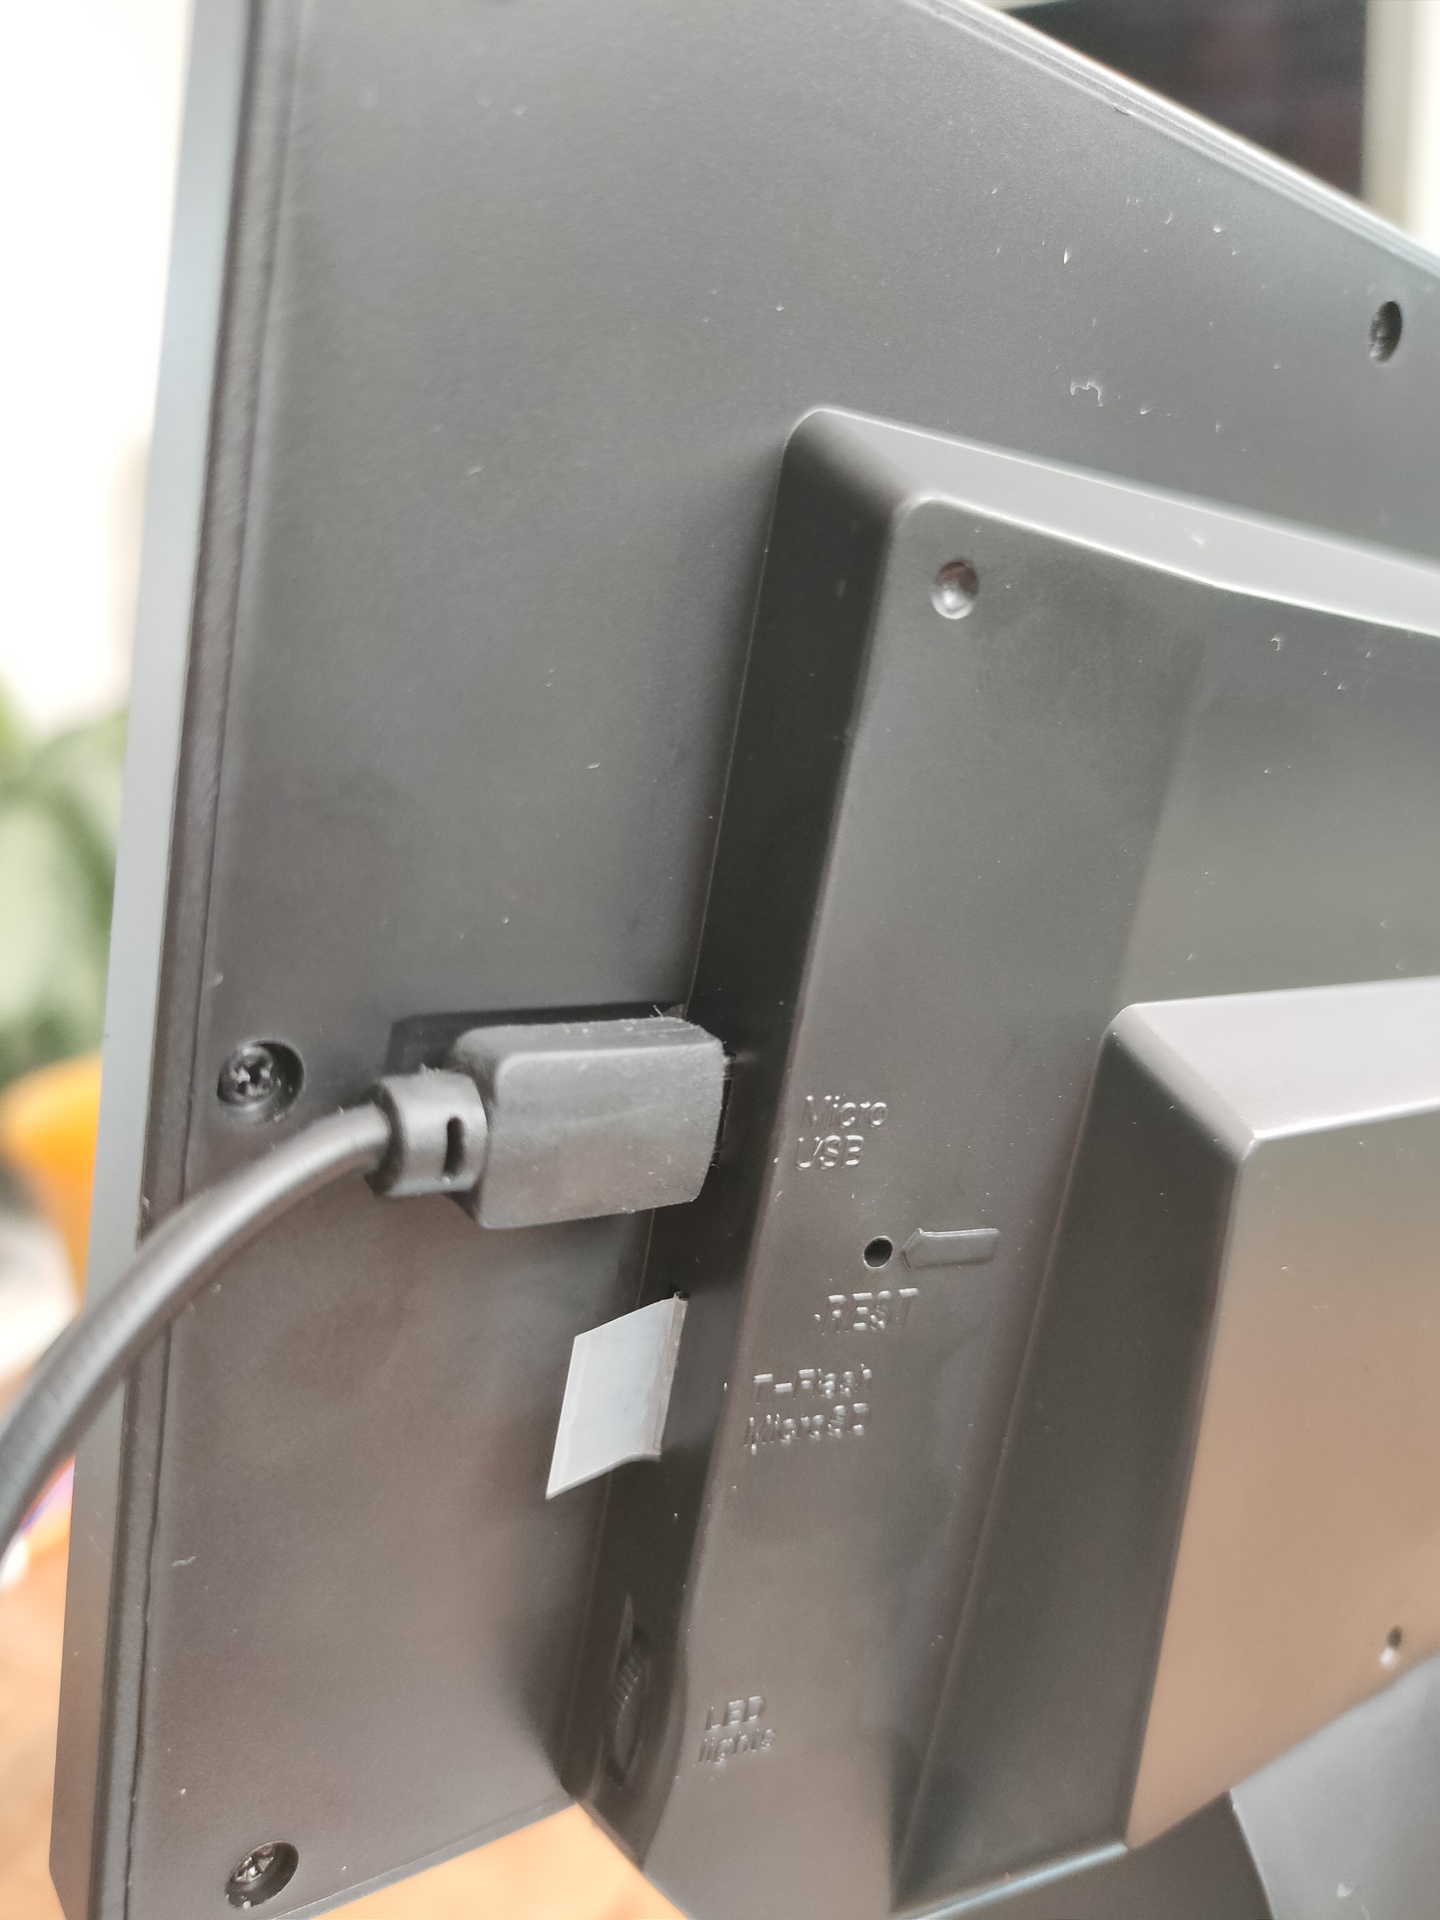
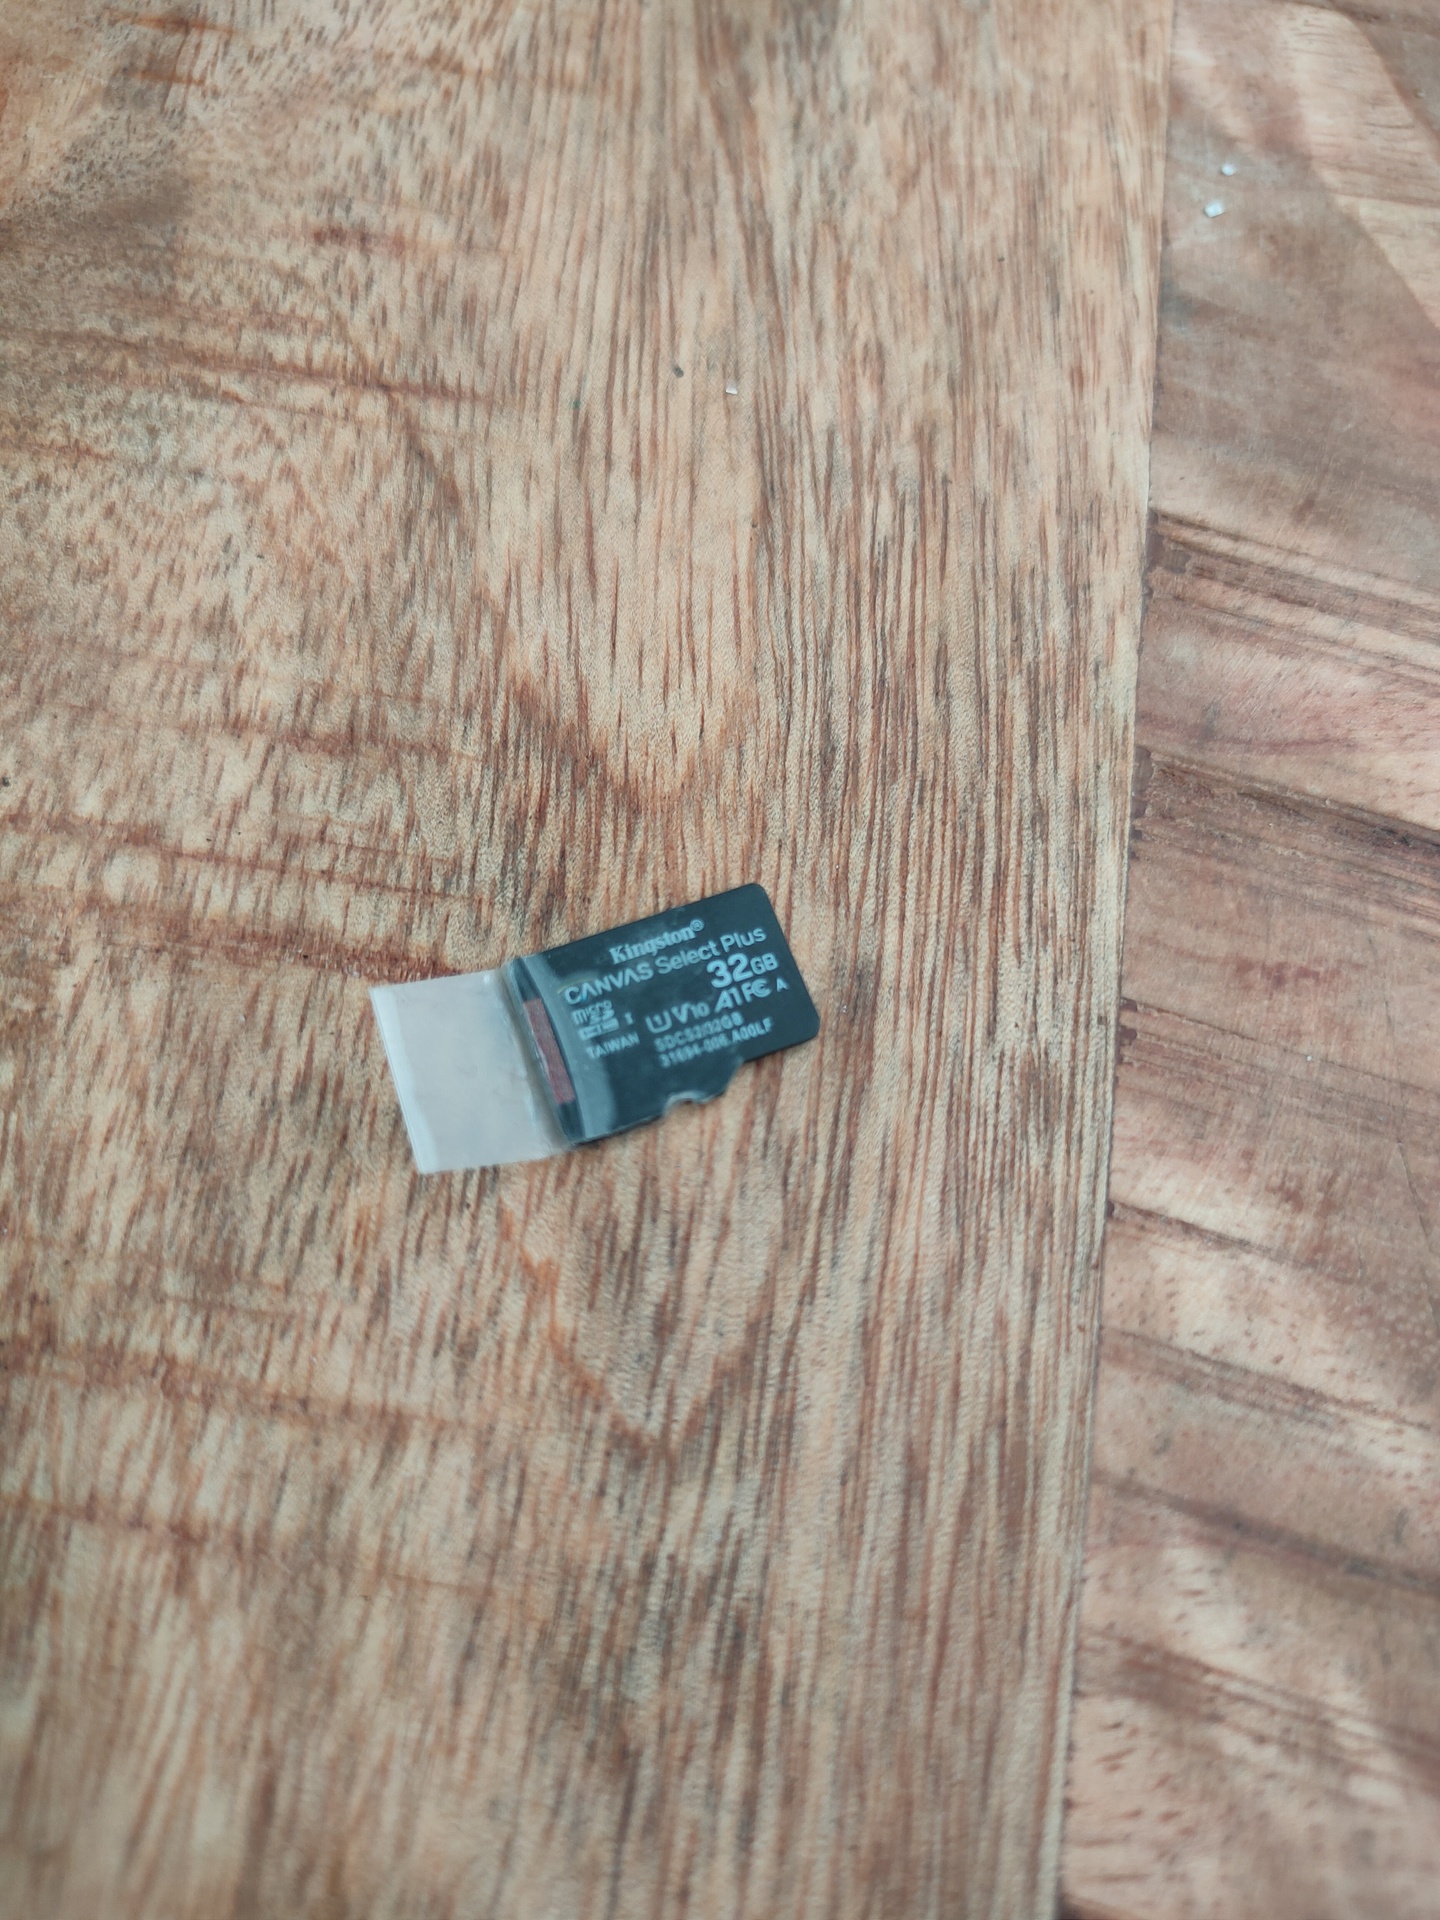
SDCard Access:
Access to the sdcard is a little hard. Connecting via Mass Storage is a solution. But i’ve put a little piece of tape to get the card in or out of the slot.
You can view the recordings on the Microscope itself. So i was wondering, can it play any other movie files?
I placed different MOV files on the sdcard, but the microscope skipped the ones i places on the sdcard myself.
I started to look at the metadata, and saw a Codec ID “qt 2016.04.21 (qt )”
 mediainfo VID_001.MOV
General
Complete name                            : VID_001.MOV
Format                                   : MPEG-4
Format profile                           : QuickTime
Codec ID                                 : qt   2016.04.21 (qt  )
File size                                : 551 MiB
Duration                                 : 12s 0ms
Overall bit rate                         : 385 Mbps
Encoded date                             : UTC 1904-01-01 00:00:00
Tagged date                              : UTC 1904-01-01 00:00:00

Video
ID                                       : 1
Format                                   : AVC
Format/Info                              : Advanced Video Codec
Format profile                           : Main@L4.1
Format settings, CABAC                   : Yes
Format settings, ReFrames                : 1 frame
Codec ID                                 : avc1
Codec ID/Info                            : Advanced Video Coding
Duration                                 : 12s 0ms
Source duration                          : 12s 360ms
Bit rate                                 : 14.5 Mbps
Width                                    : 1 920 pixels
Height                                   : 1 080 pixels
Display aspect ratio                     : 16:9
Frame rate mode                          : Constant
Frame rate                               : 25.000 fps
Color space                              : YUV
Chroma subsampling                       : 4:2:0
Bit depth                                : 8 bits
Scan type                                : Progressive
Bits/(Pixel*Frame)                       : 0.280
Stream size                              : 20.8 MiB (4%)
Source stream size                       : 21.3 MiB (4%)
Language                                 : 33
Encoded date                             : UTC 1904-01-01 00:00:00
Tagged date                              : UTC 1904-01-01 00:00:00
mdhd_Duration                            : 12000

Audio
ID                                       : 2
Format                                   : PCM
Format settings, Endianness              : Little
Format settings, Sign                    : Signed
Codec ID                                 : sowt
Duration                                 : 12s 0ms
Source duration                          : 12s 288ms
Bit rate mode                            : Constant
Bit rate                                 : 128 Kbps
Channel(s)                               : 1 channel
Channel positions                        : Front: C
Sampling rate                            : 8 000 Hz
Bit depth                                : 16 bits
Stream size                              : 188 KiB (0%)
Source stream size                       : 192 KiB (0%)
Language                                 : 33
Default                                  : Yes
Alternate group                          : 1
Encoded date                             : UTC 1904-01-01 00:00:00
Tagged date                              : UTC 1904-01-01 00:00:00
Tried to change this with ffmpeg, but it would not change the way i want.
ffmpeg -i VID_002.MOV -c copy -map 0 -brand 'qt   2016.04.21 (qt  )' VID_007.MOV

mediainfo VID_007.MOV
General
Complete name                            : VID_007.MOV
Format                                   : MPEG-4
Format profile                           : QuickTime
Codec ID                                 : qt   0000.02 (qt  )  <--------------- nope
Header of the movie clip maybe i have to look into this … later
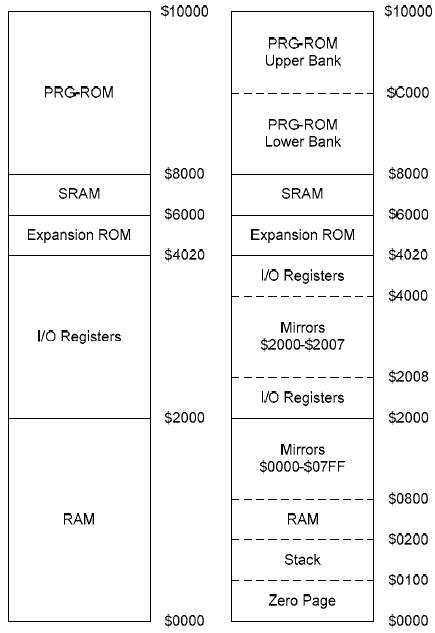
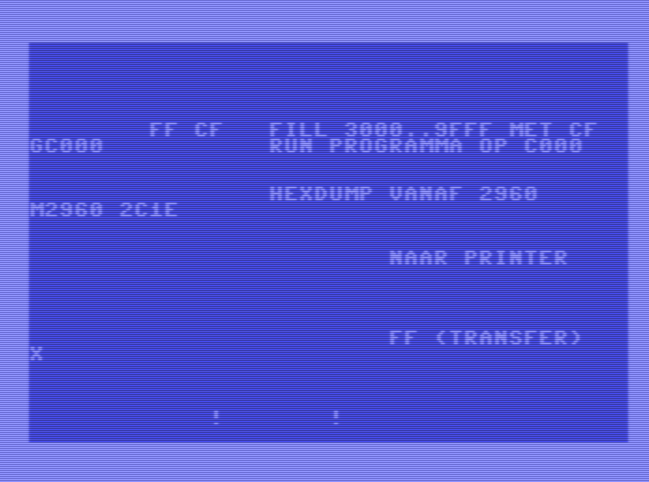
Started to write a program to generate a memory map like this
It will be a python script which generates a ascii table.
| a15 | a14 | a13 | a12 | a11 | a10 | a09 | a08 | a07 | a06 | a05 | a04 | a03 | a02 | a01 | a00 |
|  1  |  a  |  a  |  a  |  a  |  a  |  a  |  a  |  a  |  a  |  a  |  a  |  a  |  a  |  a  |  a  | ROM
|  0  |  0  |  a  |  a  |  a  |  a  |  a  |  a  |  a  |  a  |  a  |  a  |  a  |  a  |  a  |  a  | RAM
|  0  |  1  |  1  |  x  |  x  |  x  |  x  |  x  |  x  |  x  |  x  |  x  |  a  |  a  |  a  |  a  | VIA
|  0  |  0  |  0  |  0  |  0  |  0  |  0  |  1  |  a  |  a  |  a  |  a  |  a  |  a  |  a  |  a  | PS
Above example shows:
Rom – $8000 and up
Ram – $0000 till $3FFF
Via chip – $6xxx-$7xxxx 16 addresses repeating in this block. This will be the interesting/hard part
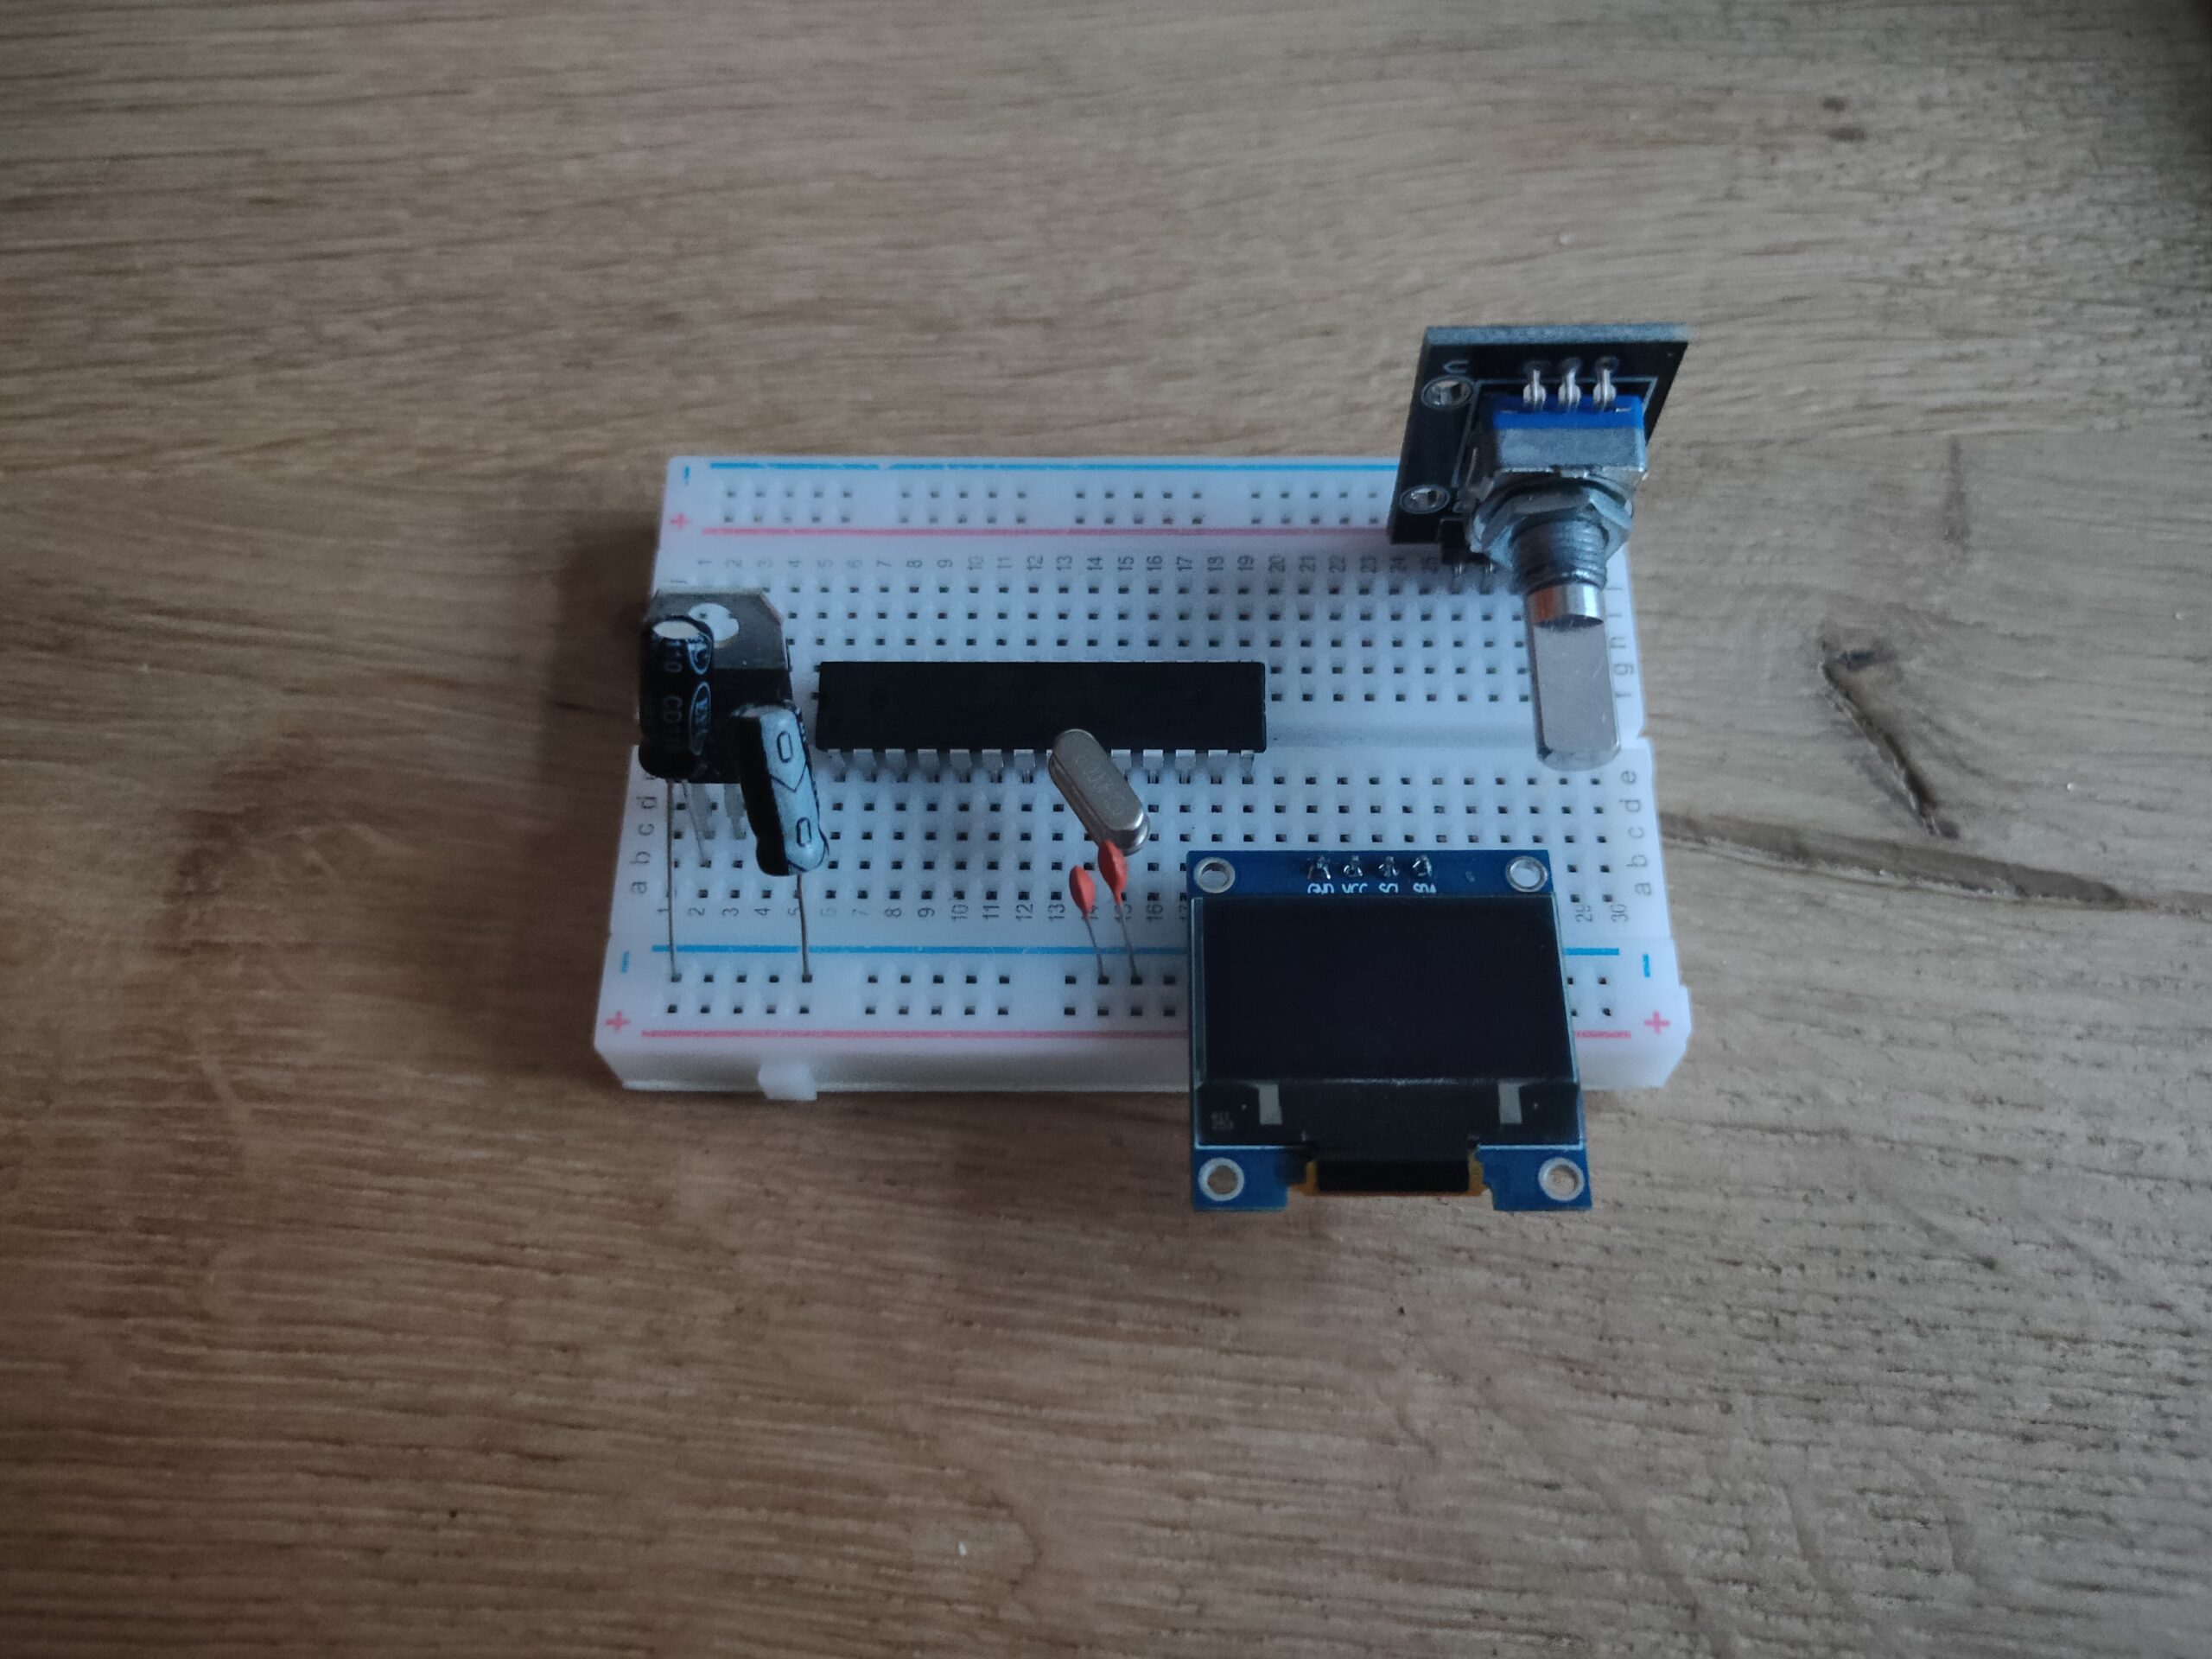
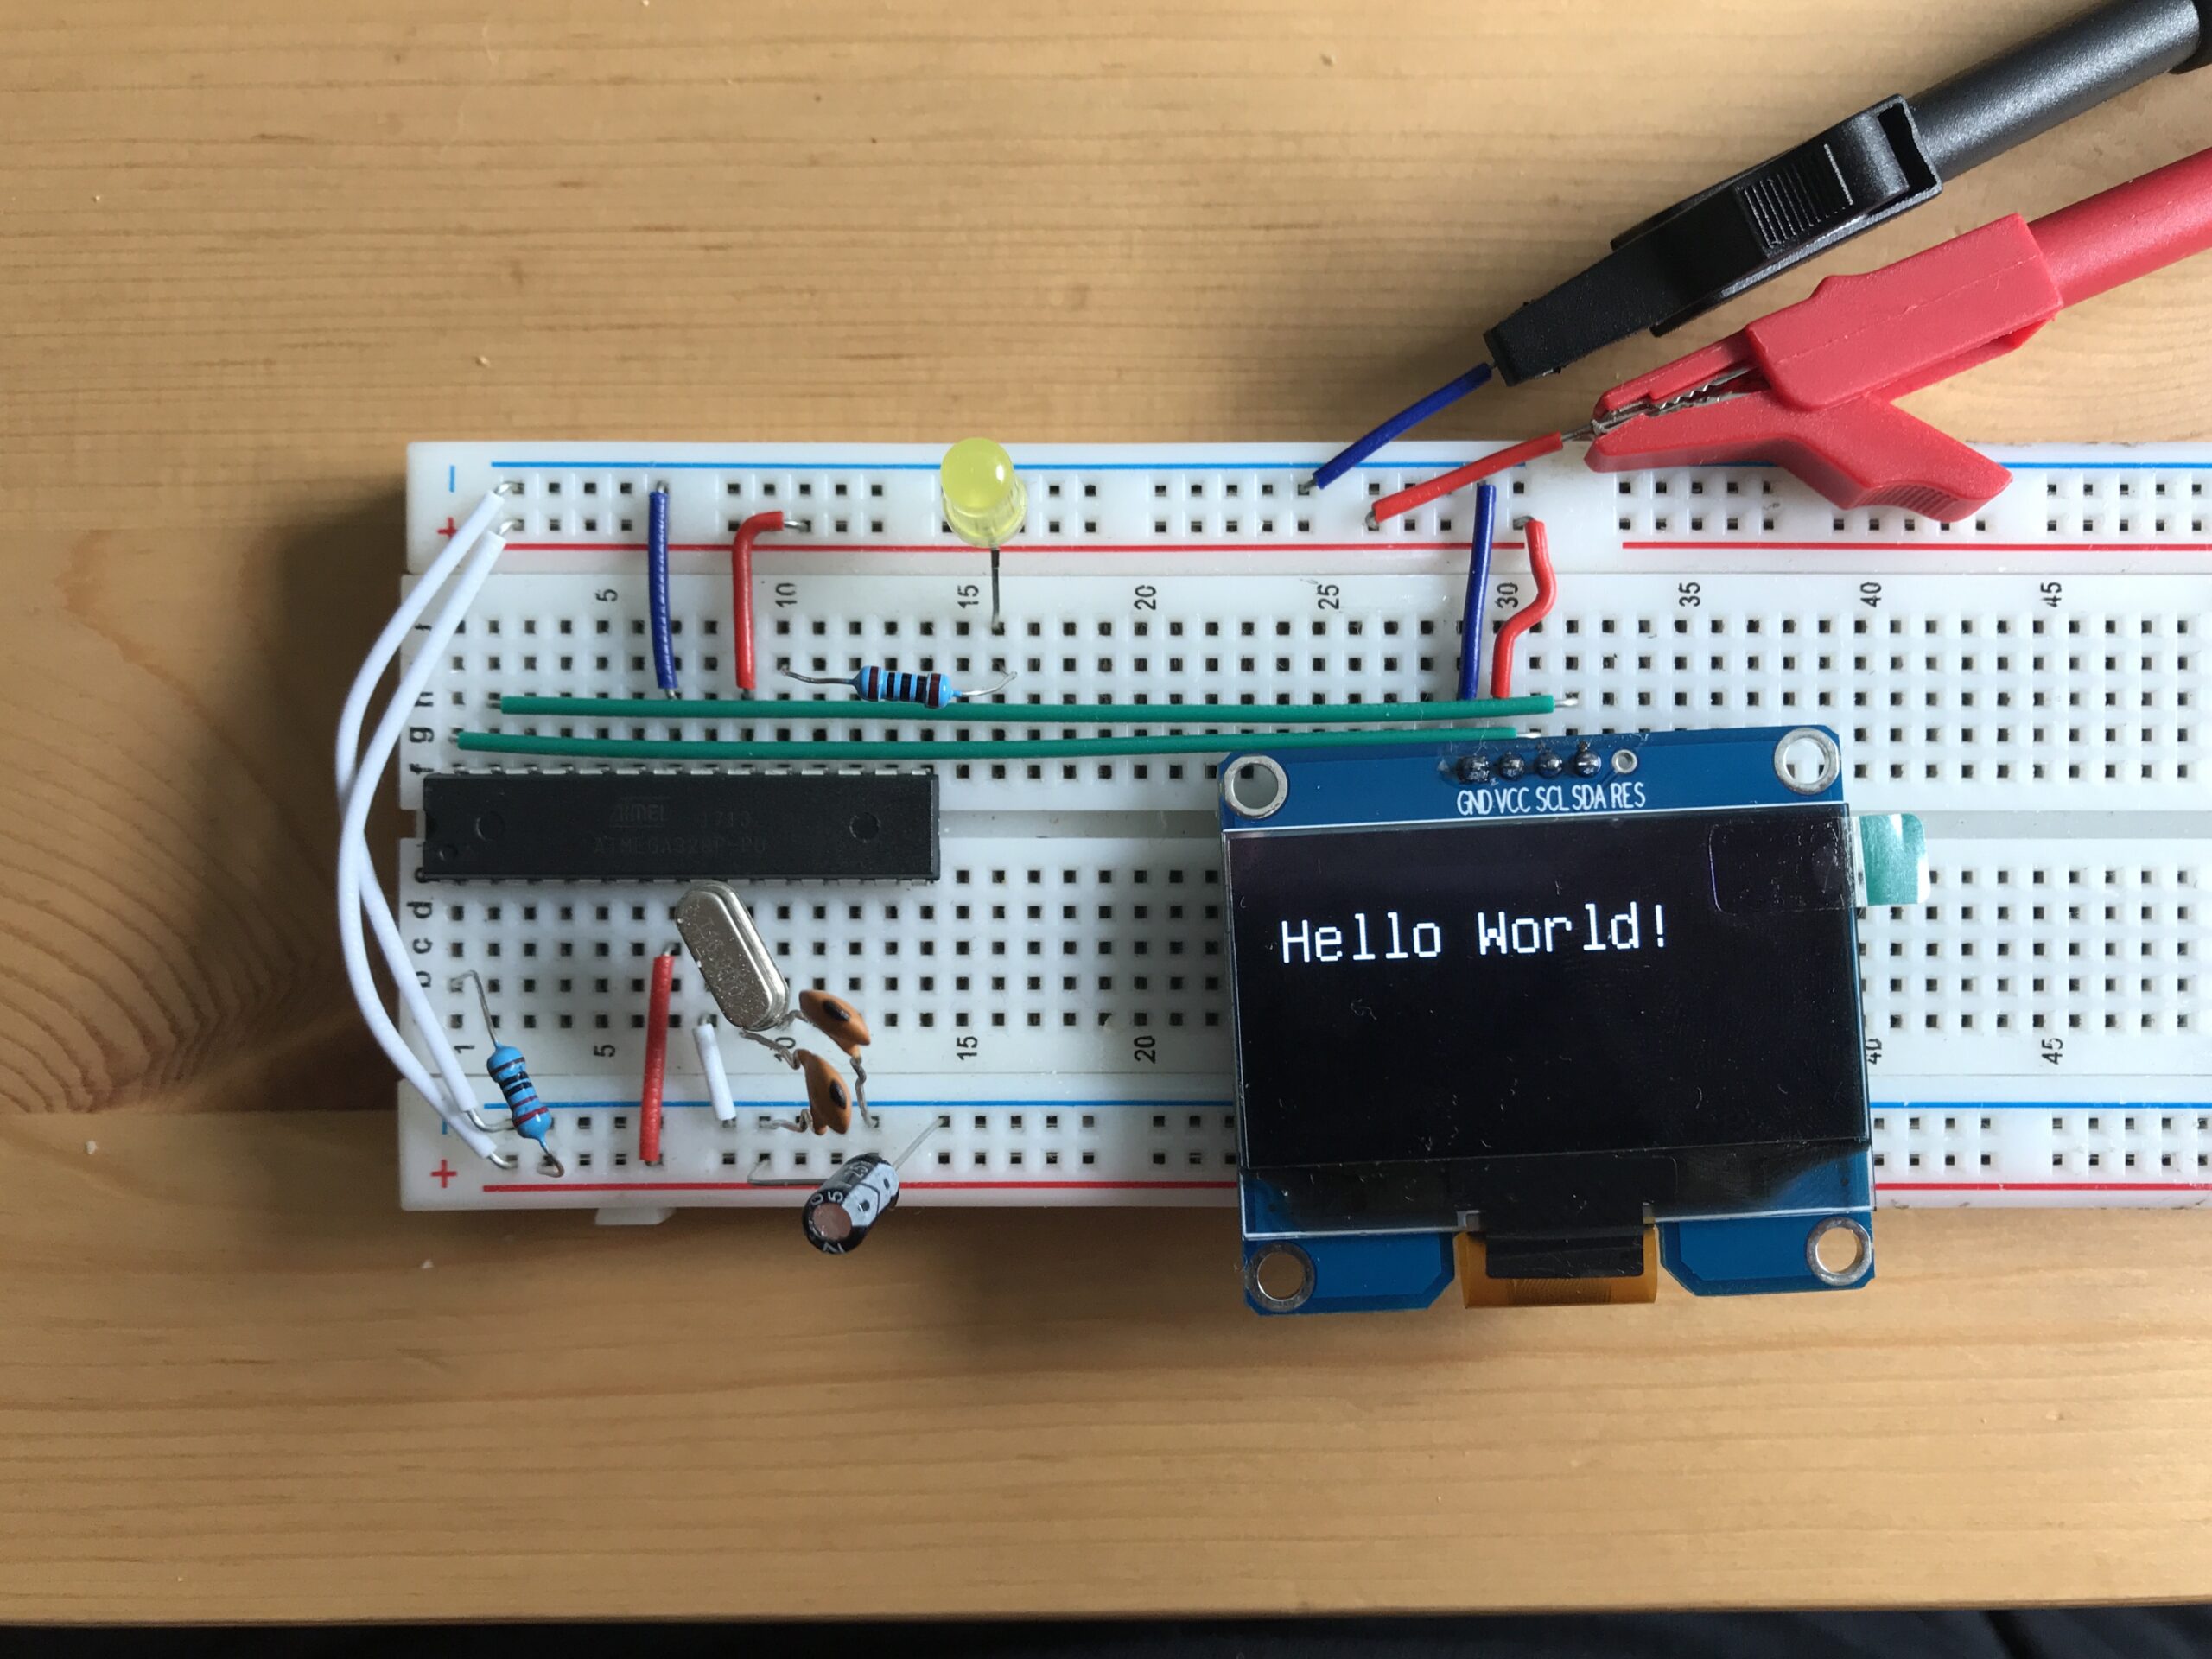
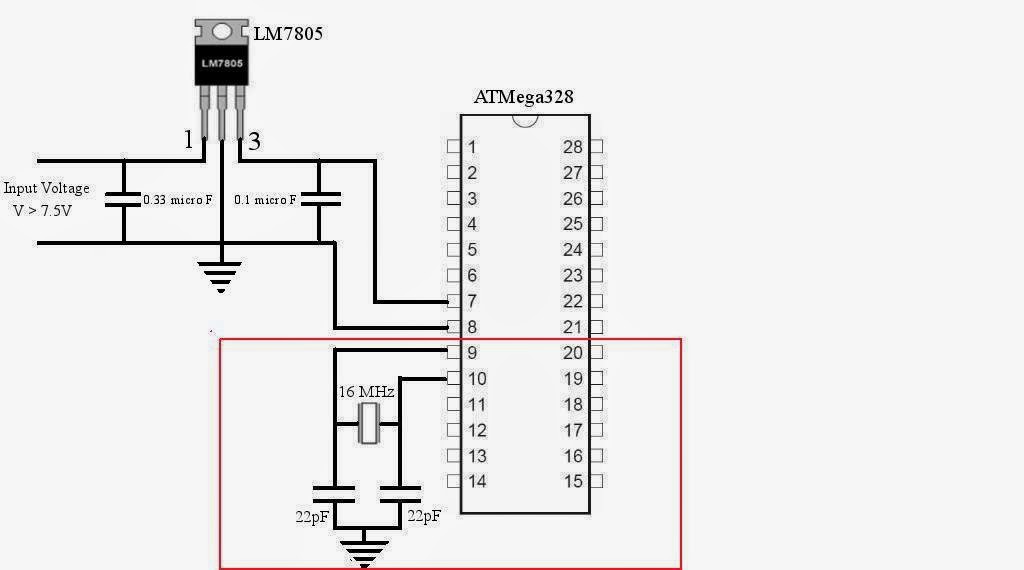
I want to make a new clock module using a bare ATmega328 running on a 16mhz crystal. This to provide a clock for my 6502 computer.
Using a display and a rotary encoder I want to create a clock module which generates a 50/50 duty cycle clock 1Hz – 1 MHz.
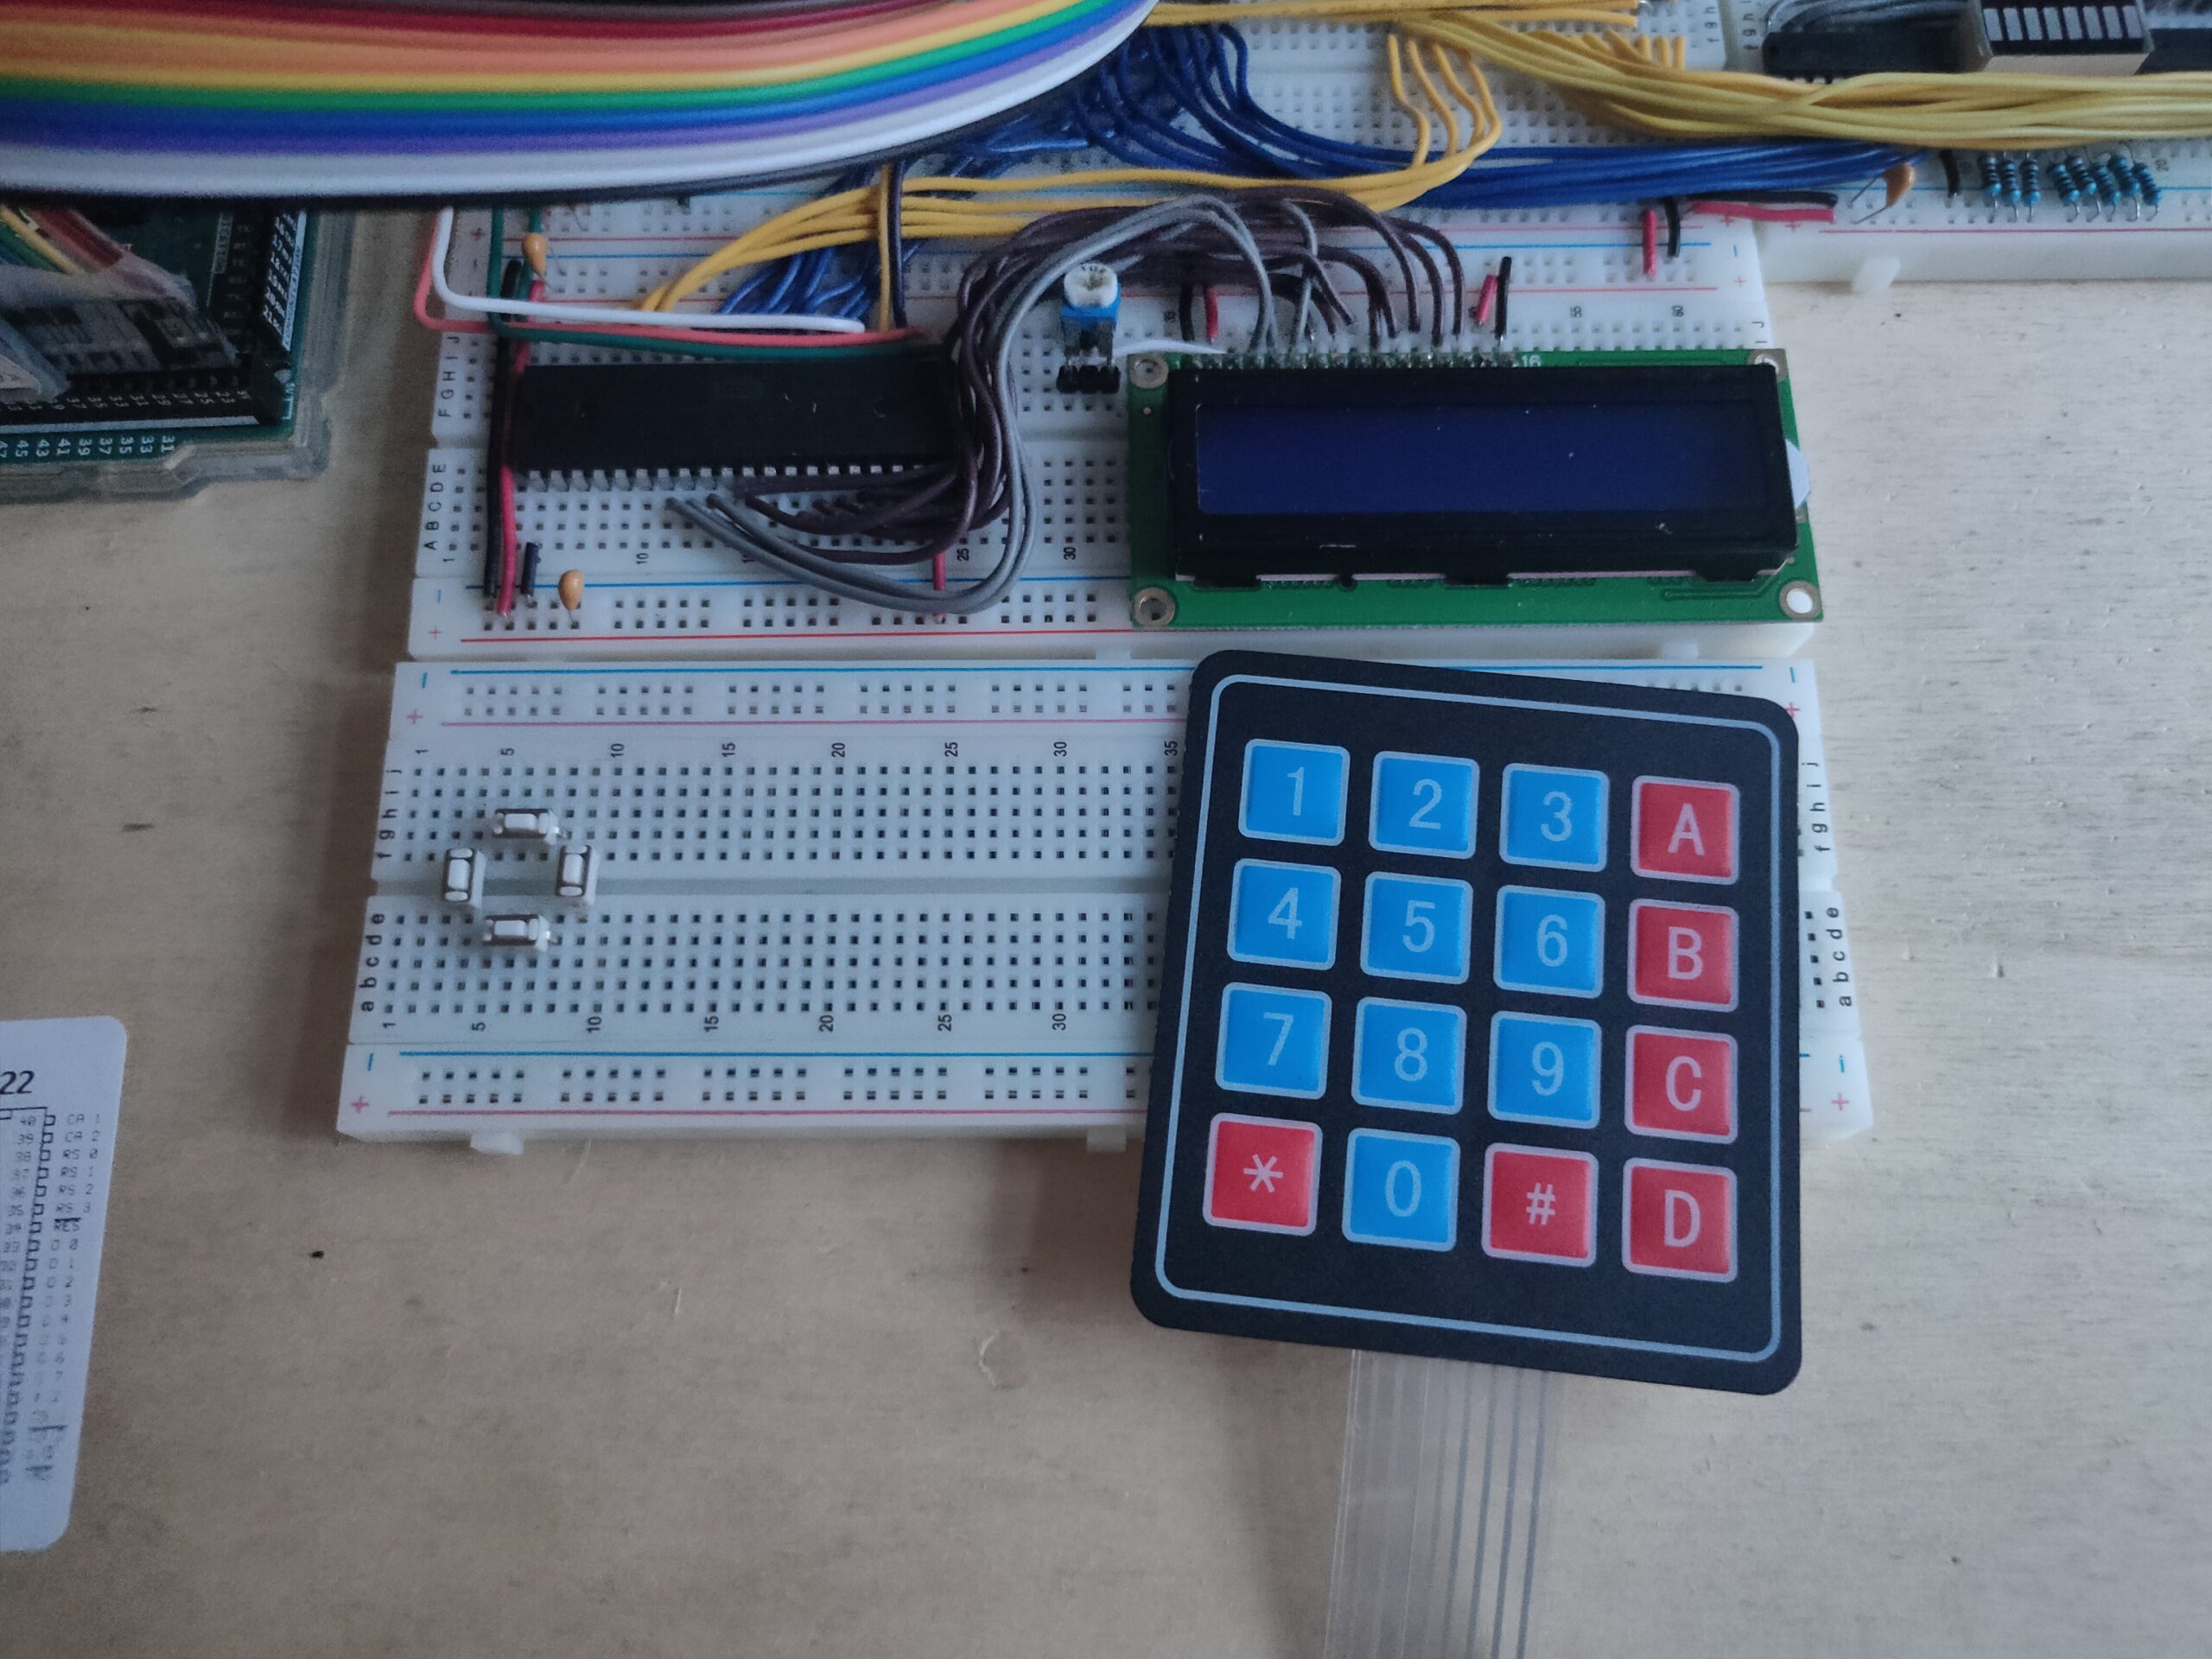
Input module for my 6502 will be 5 buttons. (For now) that’s what’s left on the VIA on port A. (Rest is used by the display). The display i’m going to place directly on the bus. But I already ordered a second VIA. Matrix keyboard will be next. Then I will use the buttons in the picture for shift/alternate buttons. Because I’ll need about 25 keys. (See other posts) . I’ll probably end up making that one myself.
I found examples like this, rest i have to think of myself
python mch2022-tools/webusb_fat_dir.py /flash/apps/python/easy
for f in easy.mp3 easy.png icon.png __init__.py ; do python  mch2022-tools/webusb_fat_push.py $f /flash/apps/python/easy/$f ; done
Micropython code __init__.py
mport display
import mch22
from audio import play
import buttons
from time import sleep
from machine import Pin
from neopixel import NeoPixel

powerPin = Pin(19, Pin.OUT)
dataPin = Pin(5, Pin.OUT)
np = NeoPixel(dataPin, 5)
powerPin.on()


def on_home_btn(pressed):
  if pressed:
    mch22.exit_python()


display.drawPng(0,0,"/apps/python/easy/easy.png")
display.flush()


# Led setup
#   2   3
#      1
#     0     4

np[0] = (23,5,15)
np[1] = (3,15,22)
np[2] = (25,24,1)
np[3] = (25,24,1)
np[4] = (23,4,15)
np.write()


buttons.attach(buttons.BTN_HOME, on_home_btn)
# playing with volume 0 to wakeup sound device, else it is going to clip
play('/apps/python/easy/easy.mp3', volume=0)
sleep(7)
while True:
    play('/apps/python/easy/easy.mp3', volume=100)
    sleep(30)
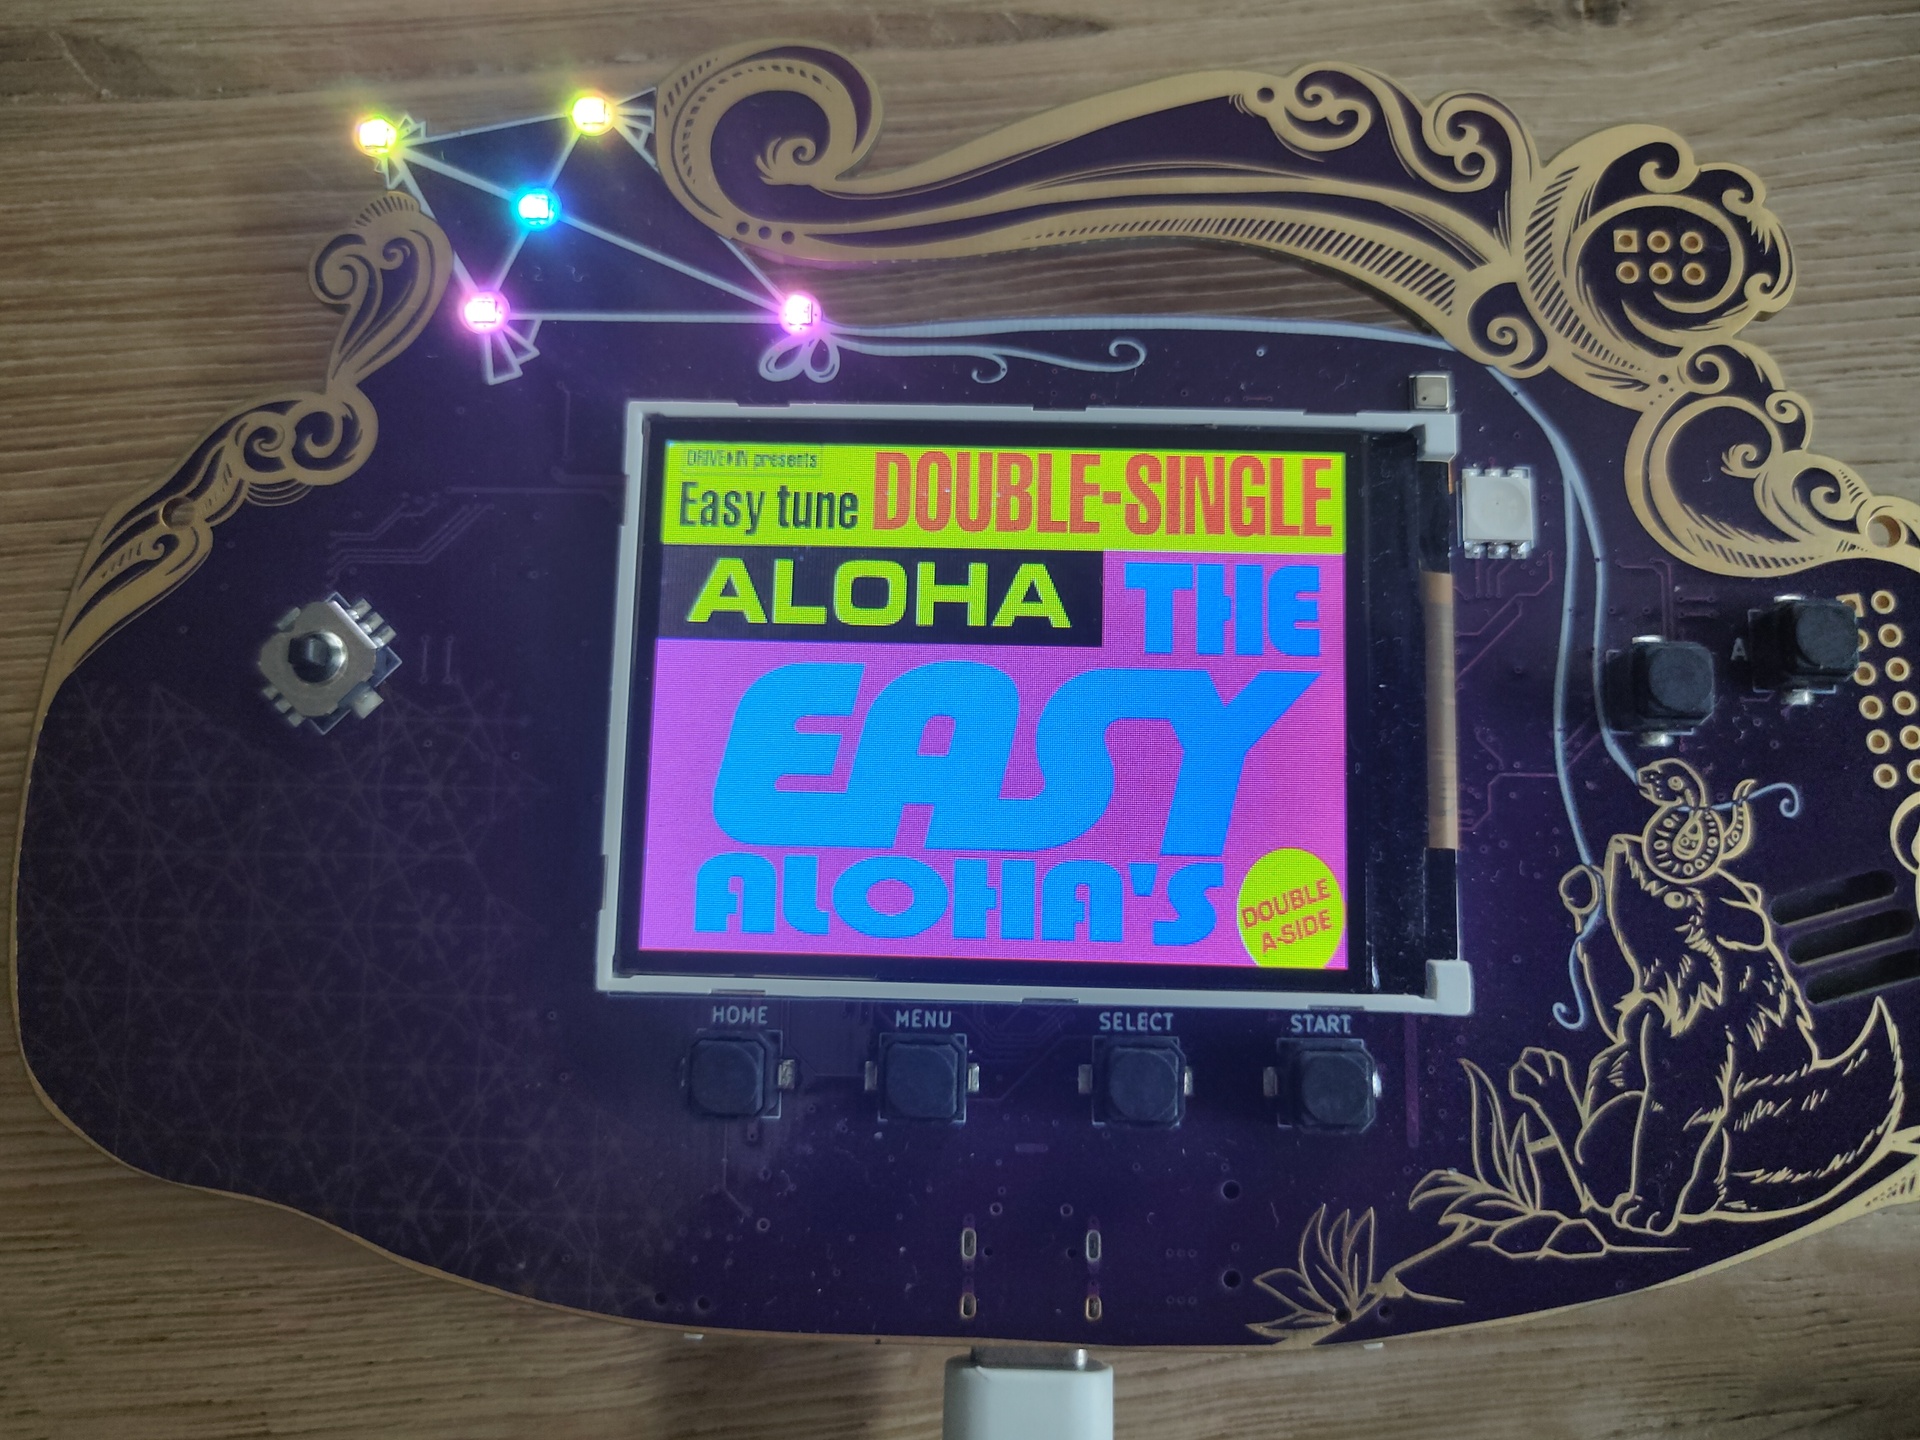
App with iconLed in aloha colors and aloha sound clip every 30s
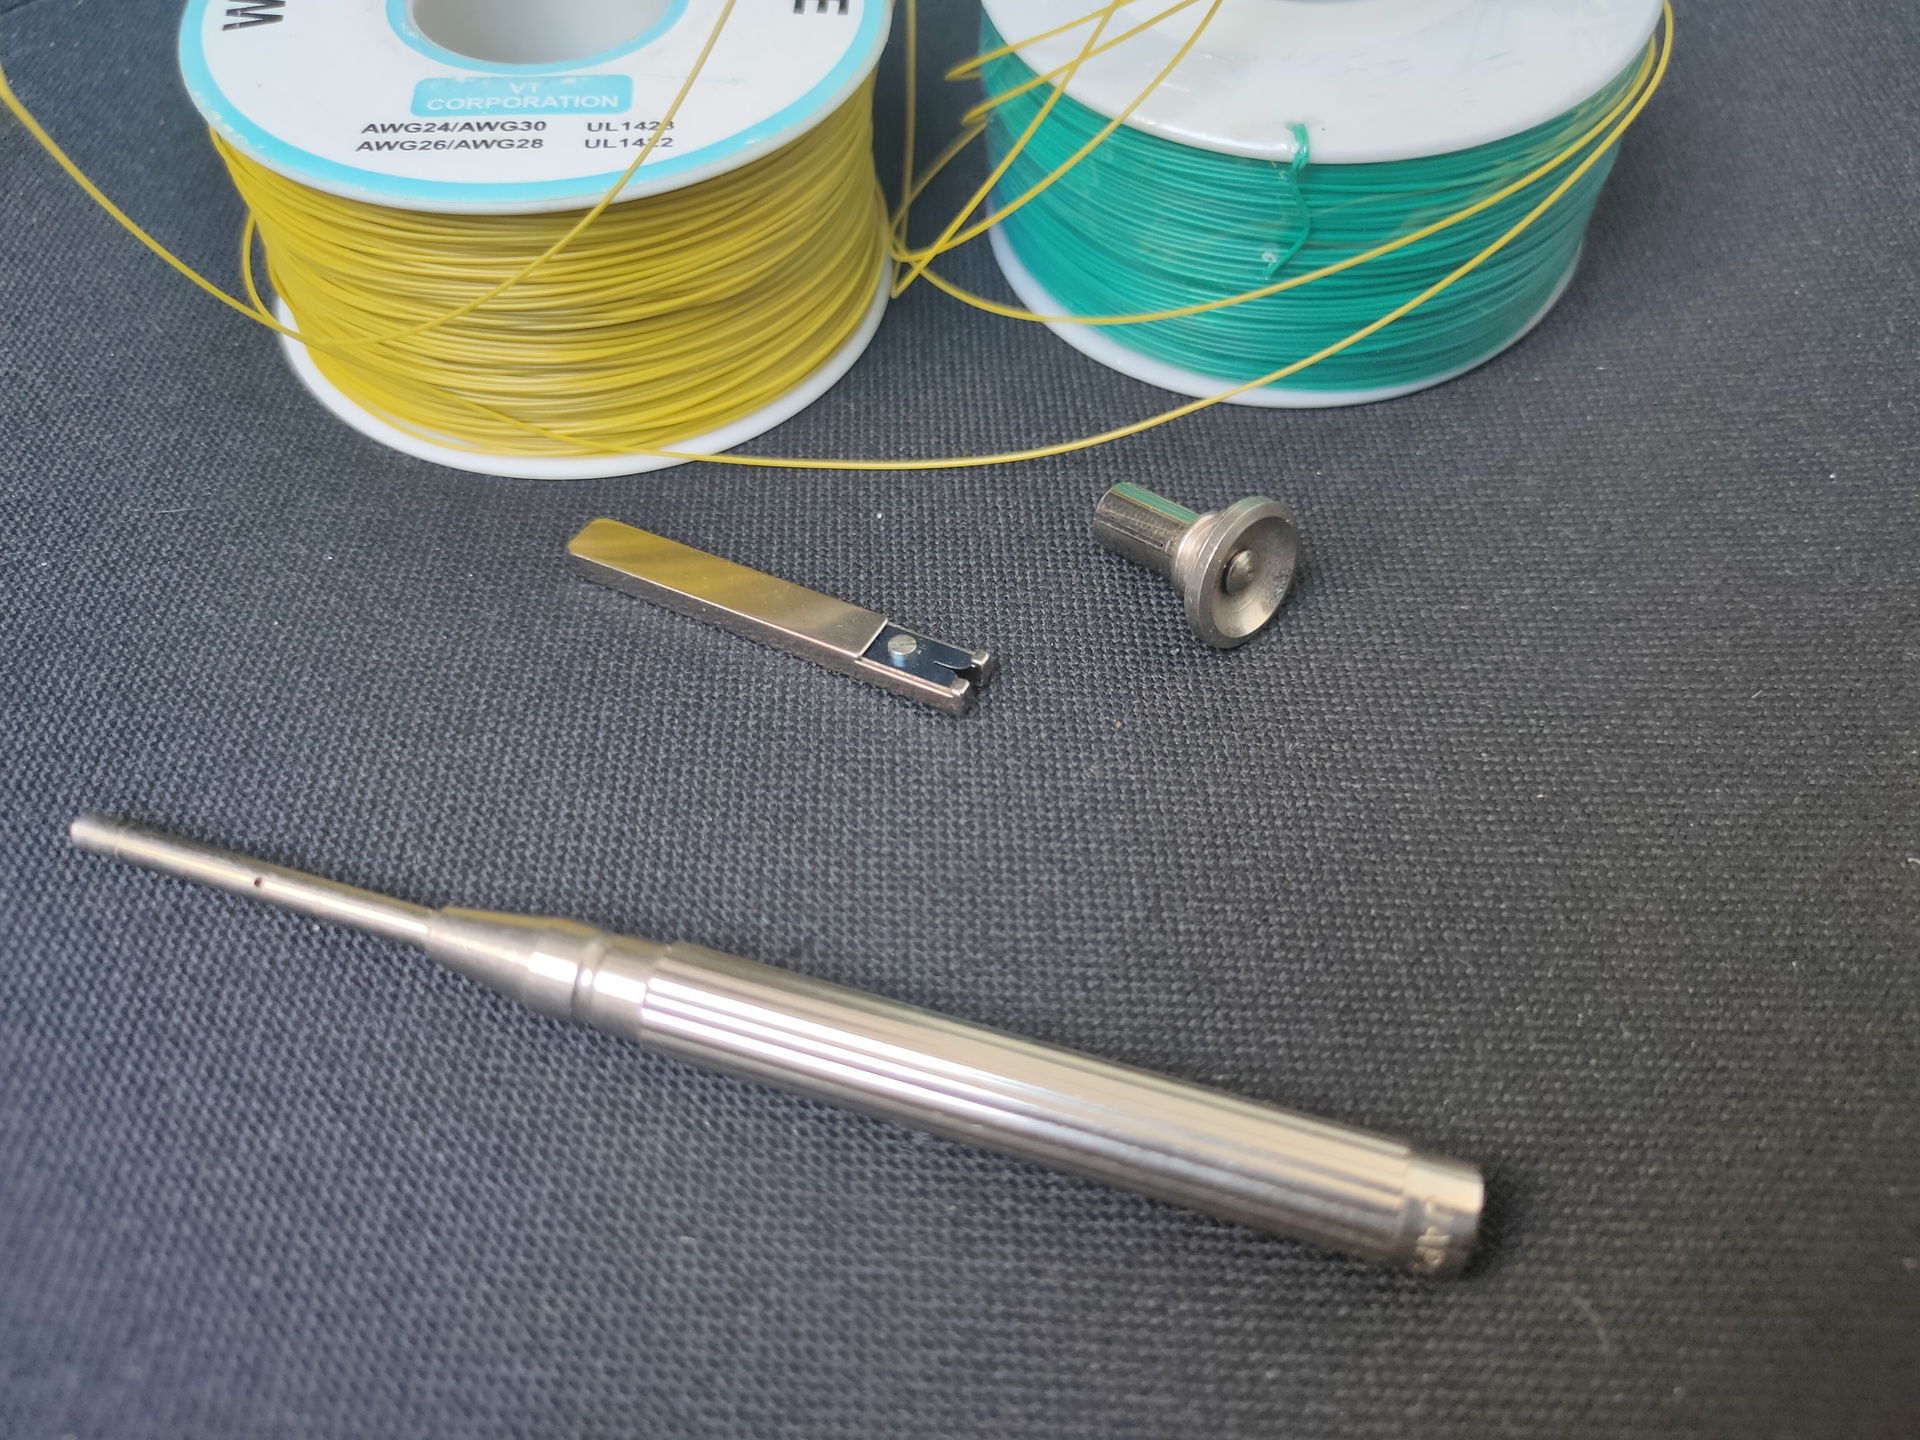
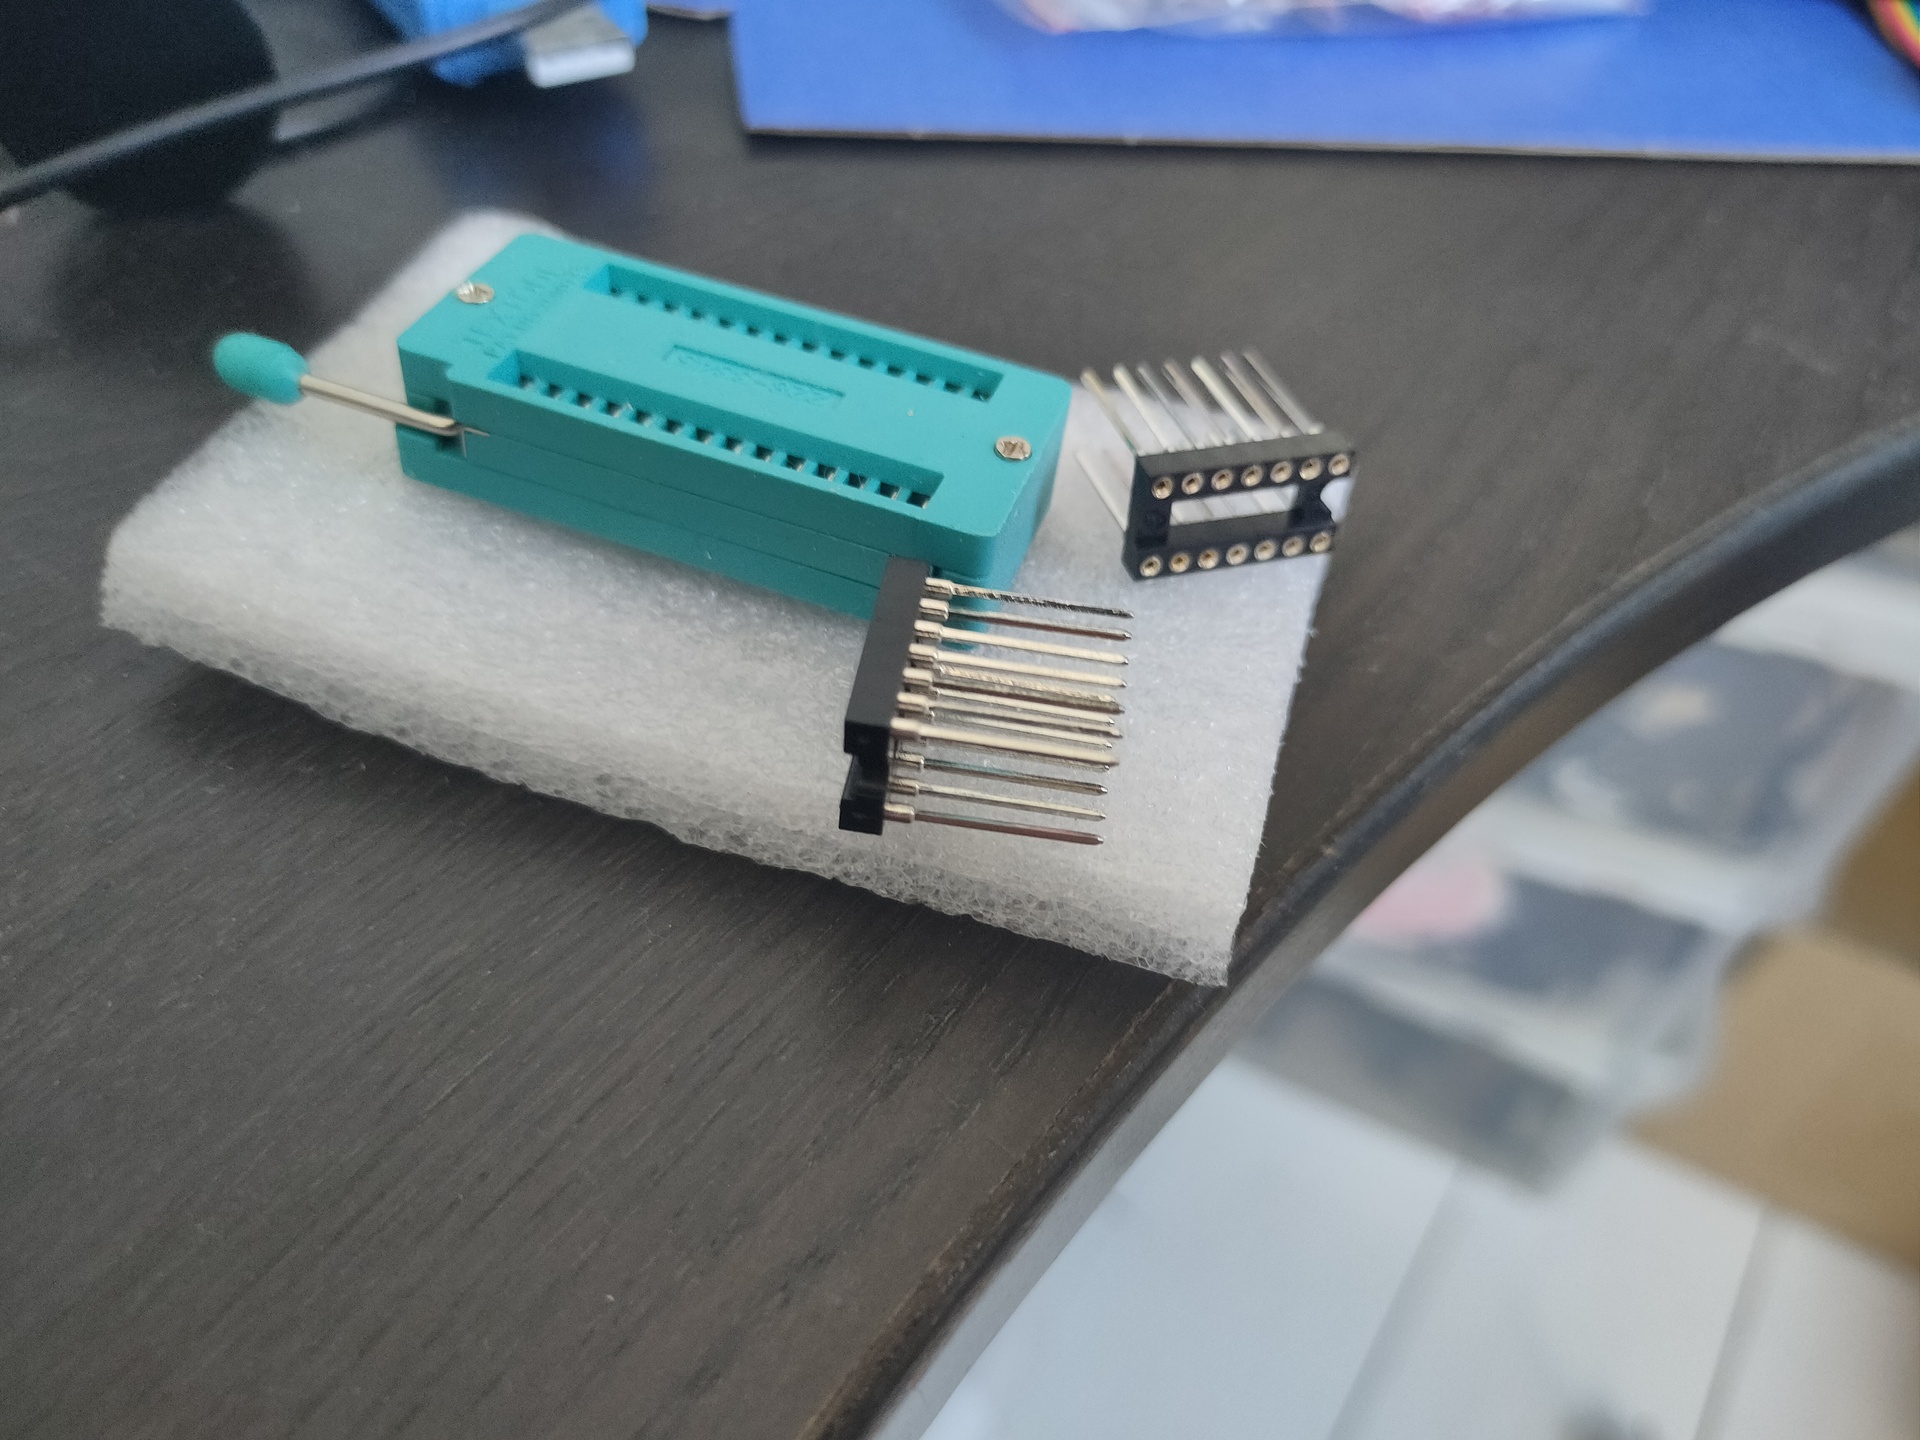
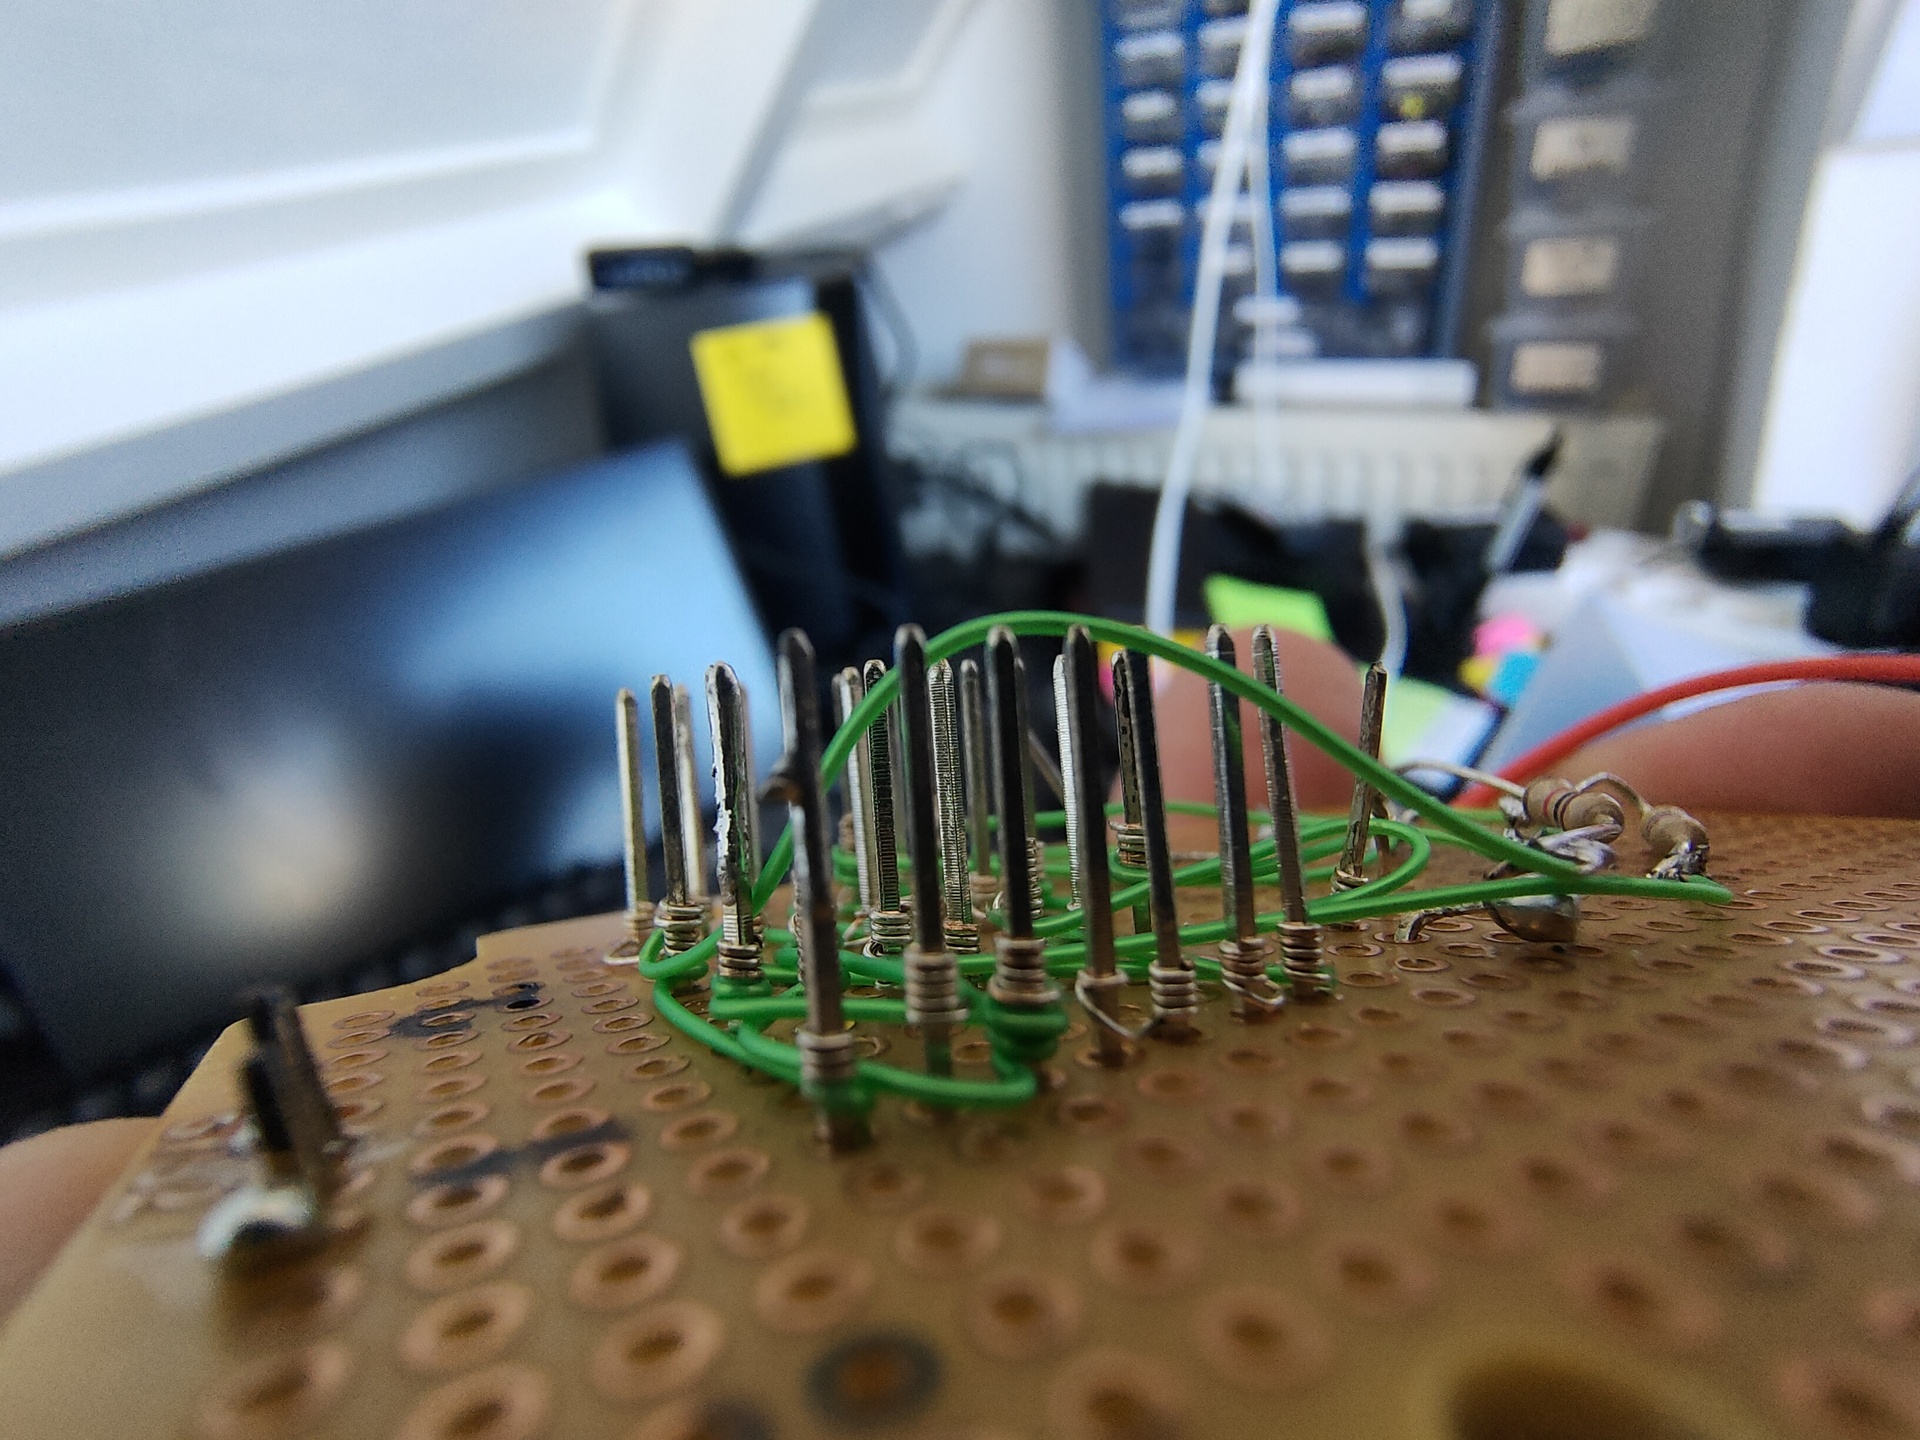
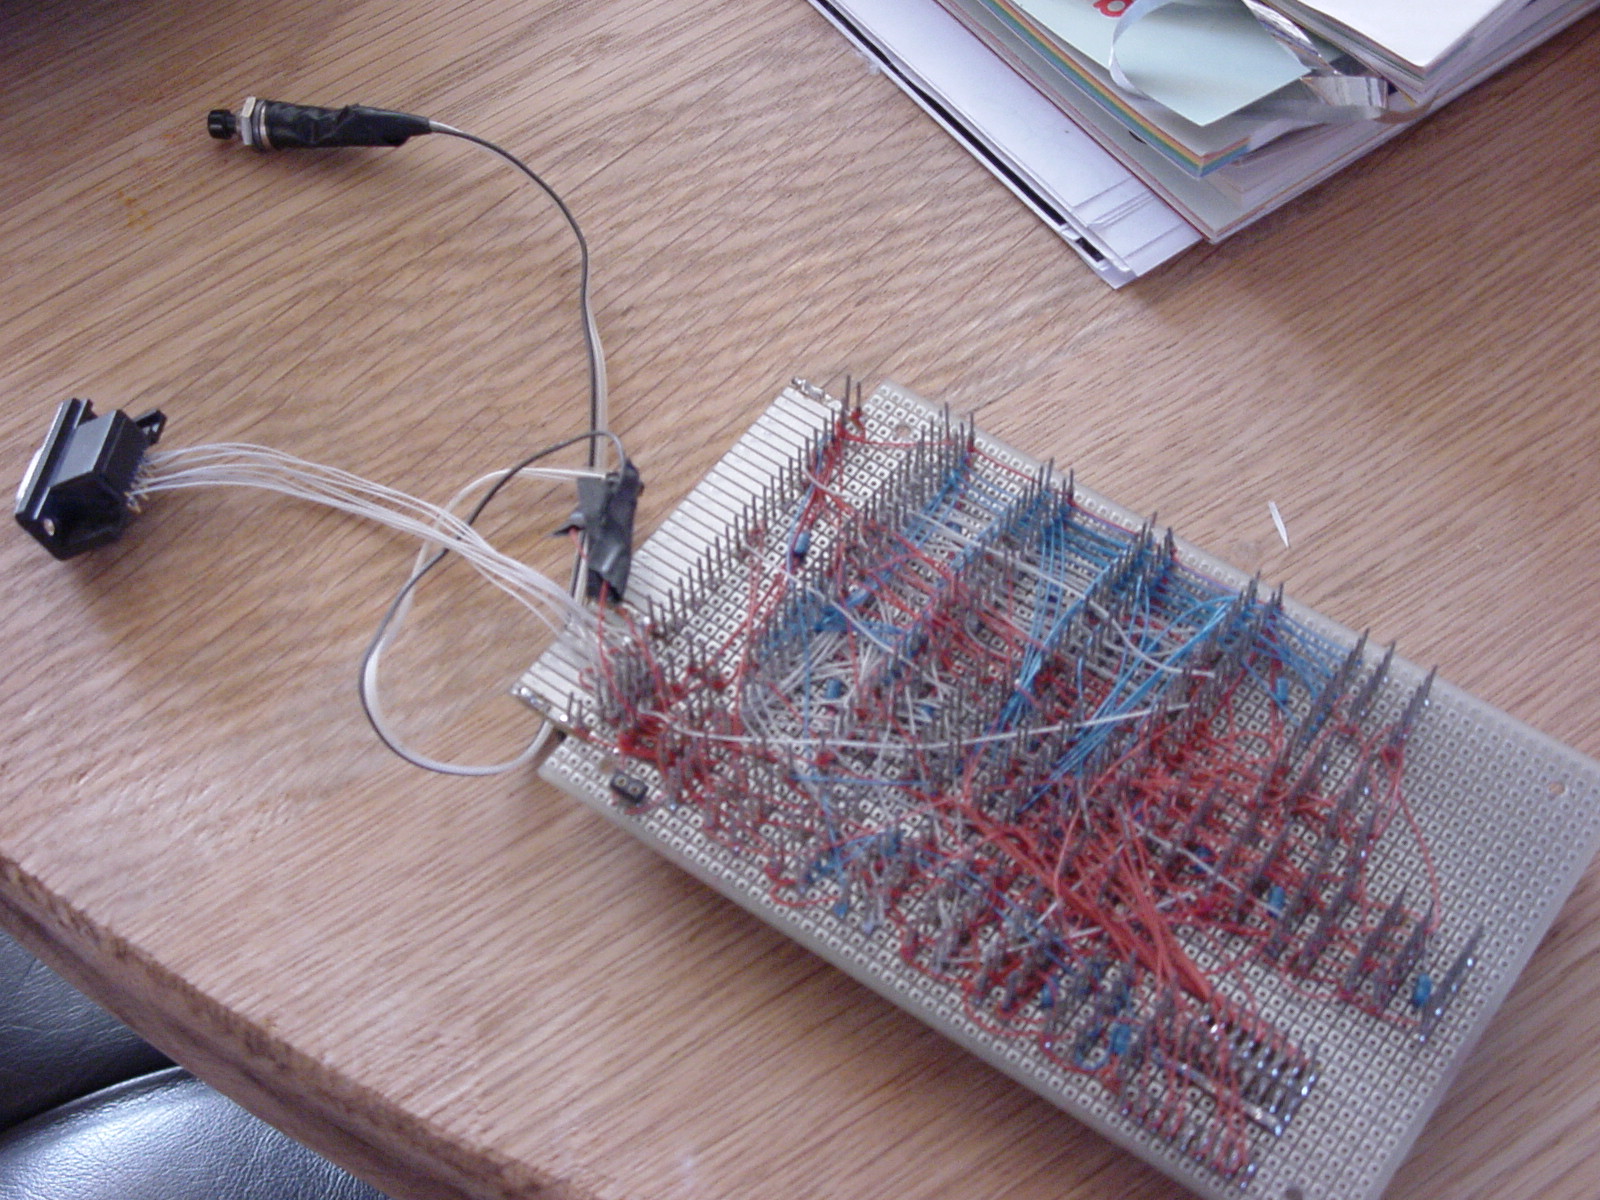
{funny story] In 2019 i wanted to make a simple probe, which could detect 0 or 1 or a pulse. I wanted to make this on a little print using wirewrap wires and IC sockets. (I still have the tool which i used in the 90s.) When going to a well-known electronics shop in Den Hague. A great shop to get all kinds of oldskool electronics. But i’m getting ahead of the story. This shop has a lot of components for all kinds of electronics. New and what it looked like de-soldered component from boards or bought from old going-out-of-business shops or factories. Stuff you needed for 60s equipment. Well i was at the counter, asking a old guy. “Do you have wire-wrap wire” He said: ” No that’s old skool” …. {/funny story]
Latest wirewrap only a few years agoFrontToolsIn front the wirewrap sockets, I even had ZIF sockets (at the back) with long pins for wirewrapping.Ugly back from print
The wirewrap tool has a cable stripper. After stripping you would put a short part in the tool, place the tool over a IC pin and turning would wrap the wire on the pins. You could stack multiple connections on one pin. Removing could be done by turning the tool counterclockwise. Sometimes you had to remove the one closest to the print, replacing all wires. (Or cut the wrong/not needed wire and leave it in place … )
I’m thinking of moving my breadboard 6502 to a wirewrapped version. All my old boards are gone .. before i got a digital camera .. 🙁
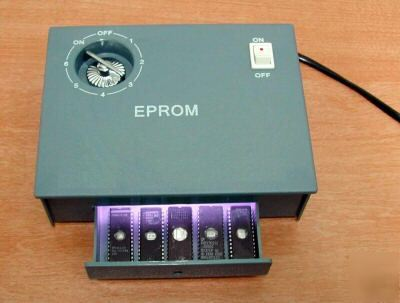
Flashing ROMs .. (eeproms). It used to be a pain in the *$$. Burning took a looong time. But clearing one with UV took .. 20 minutes or so. Using one of these:
Altered clock module
Changed button press
Dipswitches for more speed control (red .. upper left)
Changed Rom/Ram
Changed addressing
Added RAM
ZIF Socket for ROM
VIC 6522
Fixed clock
Added buttons for interrupt
Display
Display works now
To test: Create Address logic to access display without VIA Can work, but not at high speed clock. Stays behind VIA
To buy: st7920 lcd 128×64
Generic improvements
Rewired most parts, using color codes (Blue data, Yellow Address and so on)
Added leds on data and address bus using ULN2803 darlington arrays
100nF Decoupling capacitors on the power rails
To do’s or ‘have to look into’s’
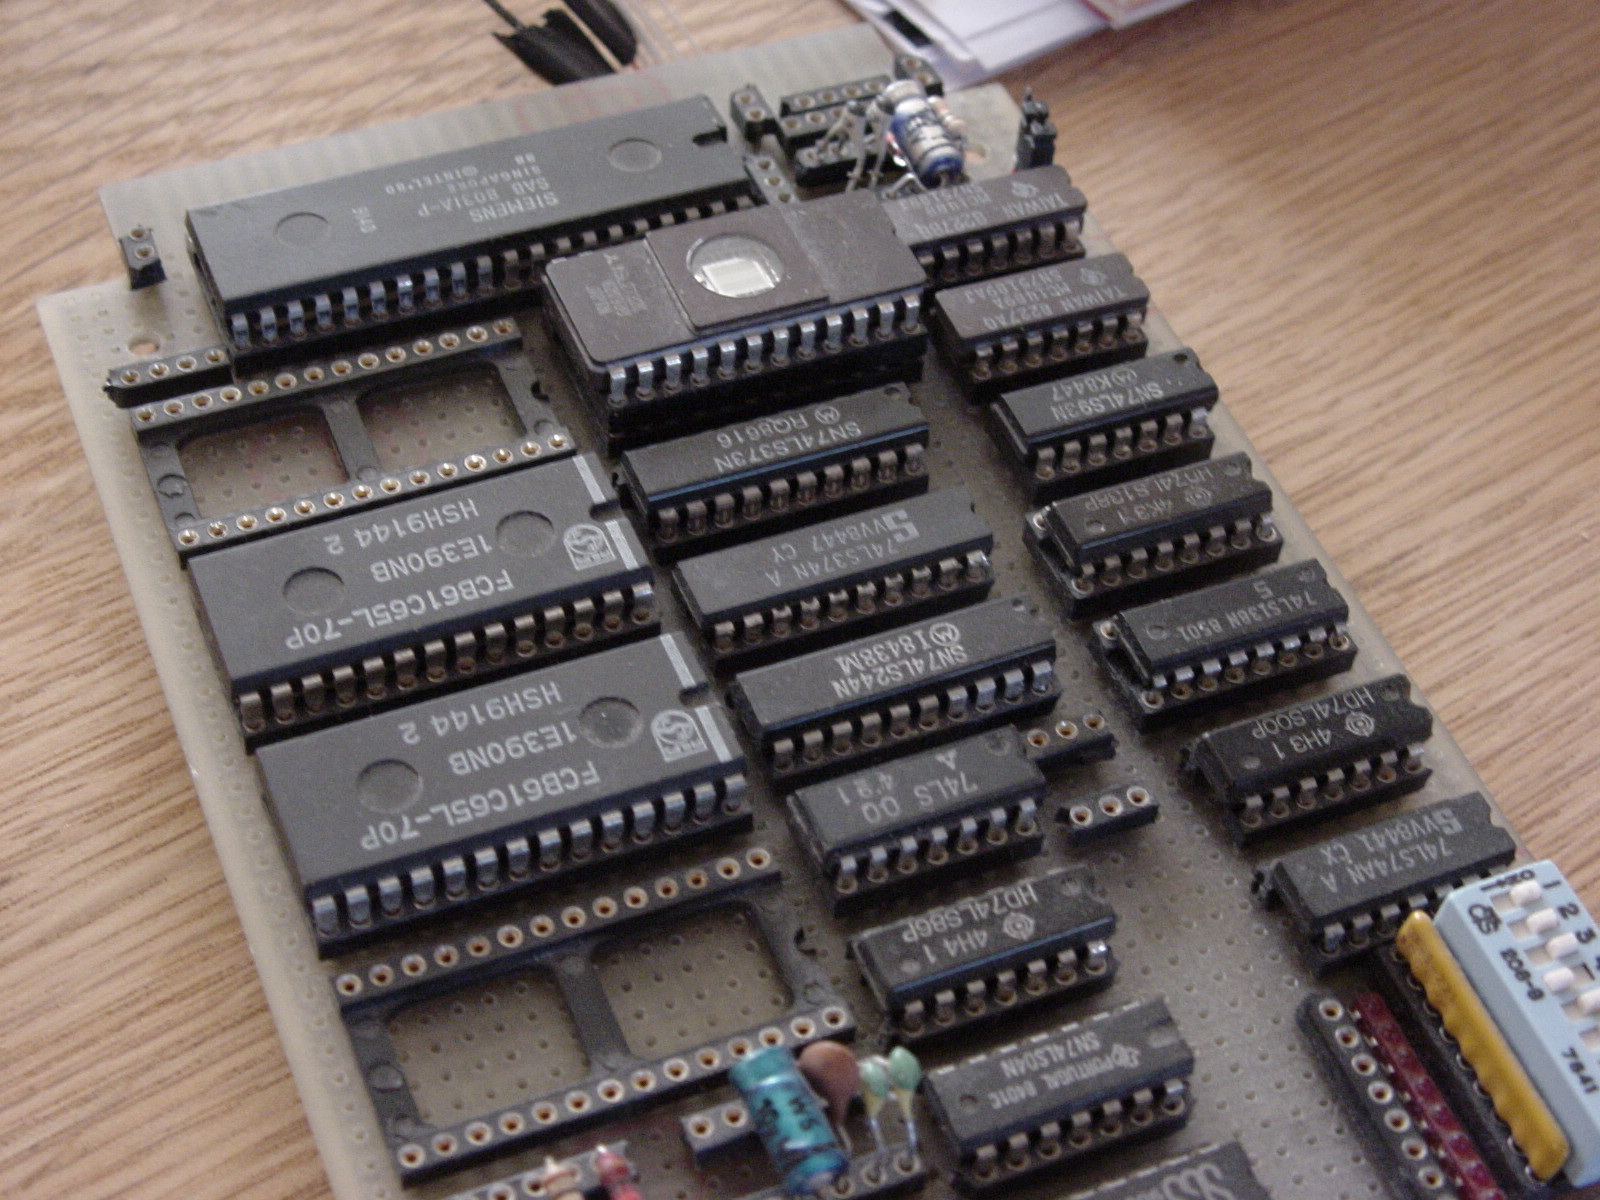
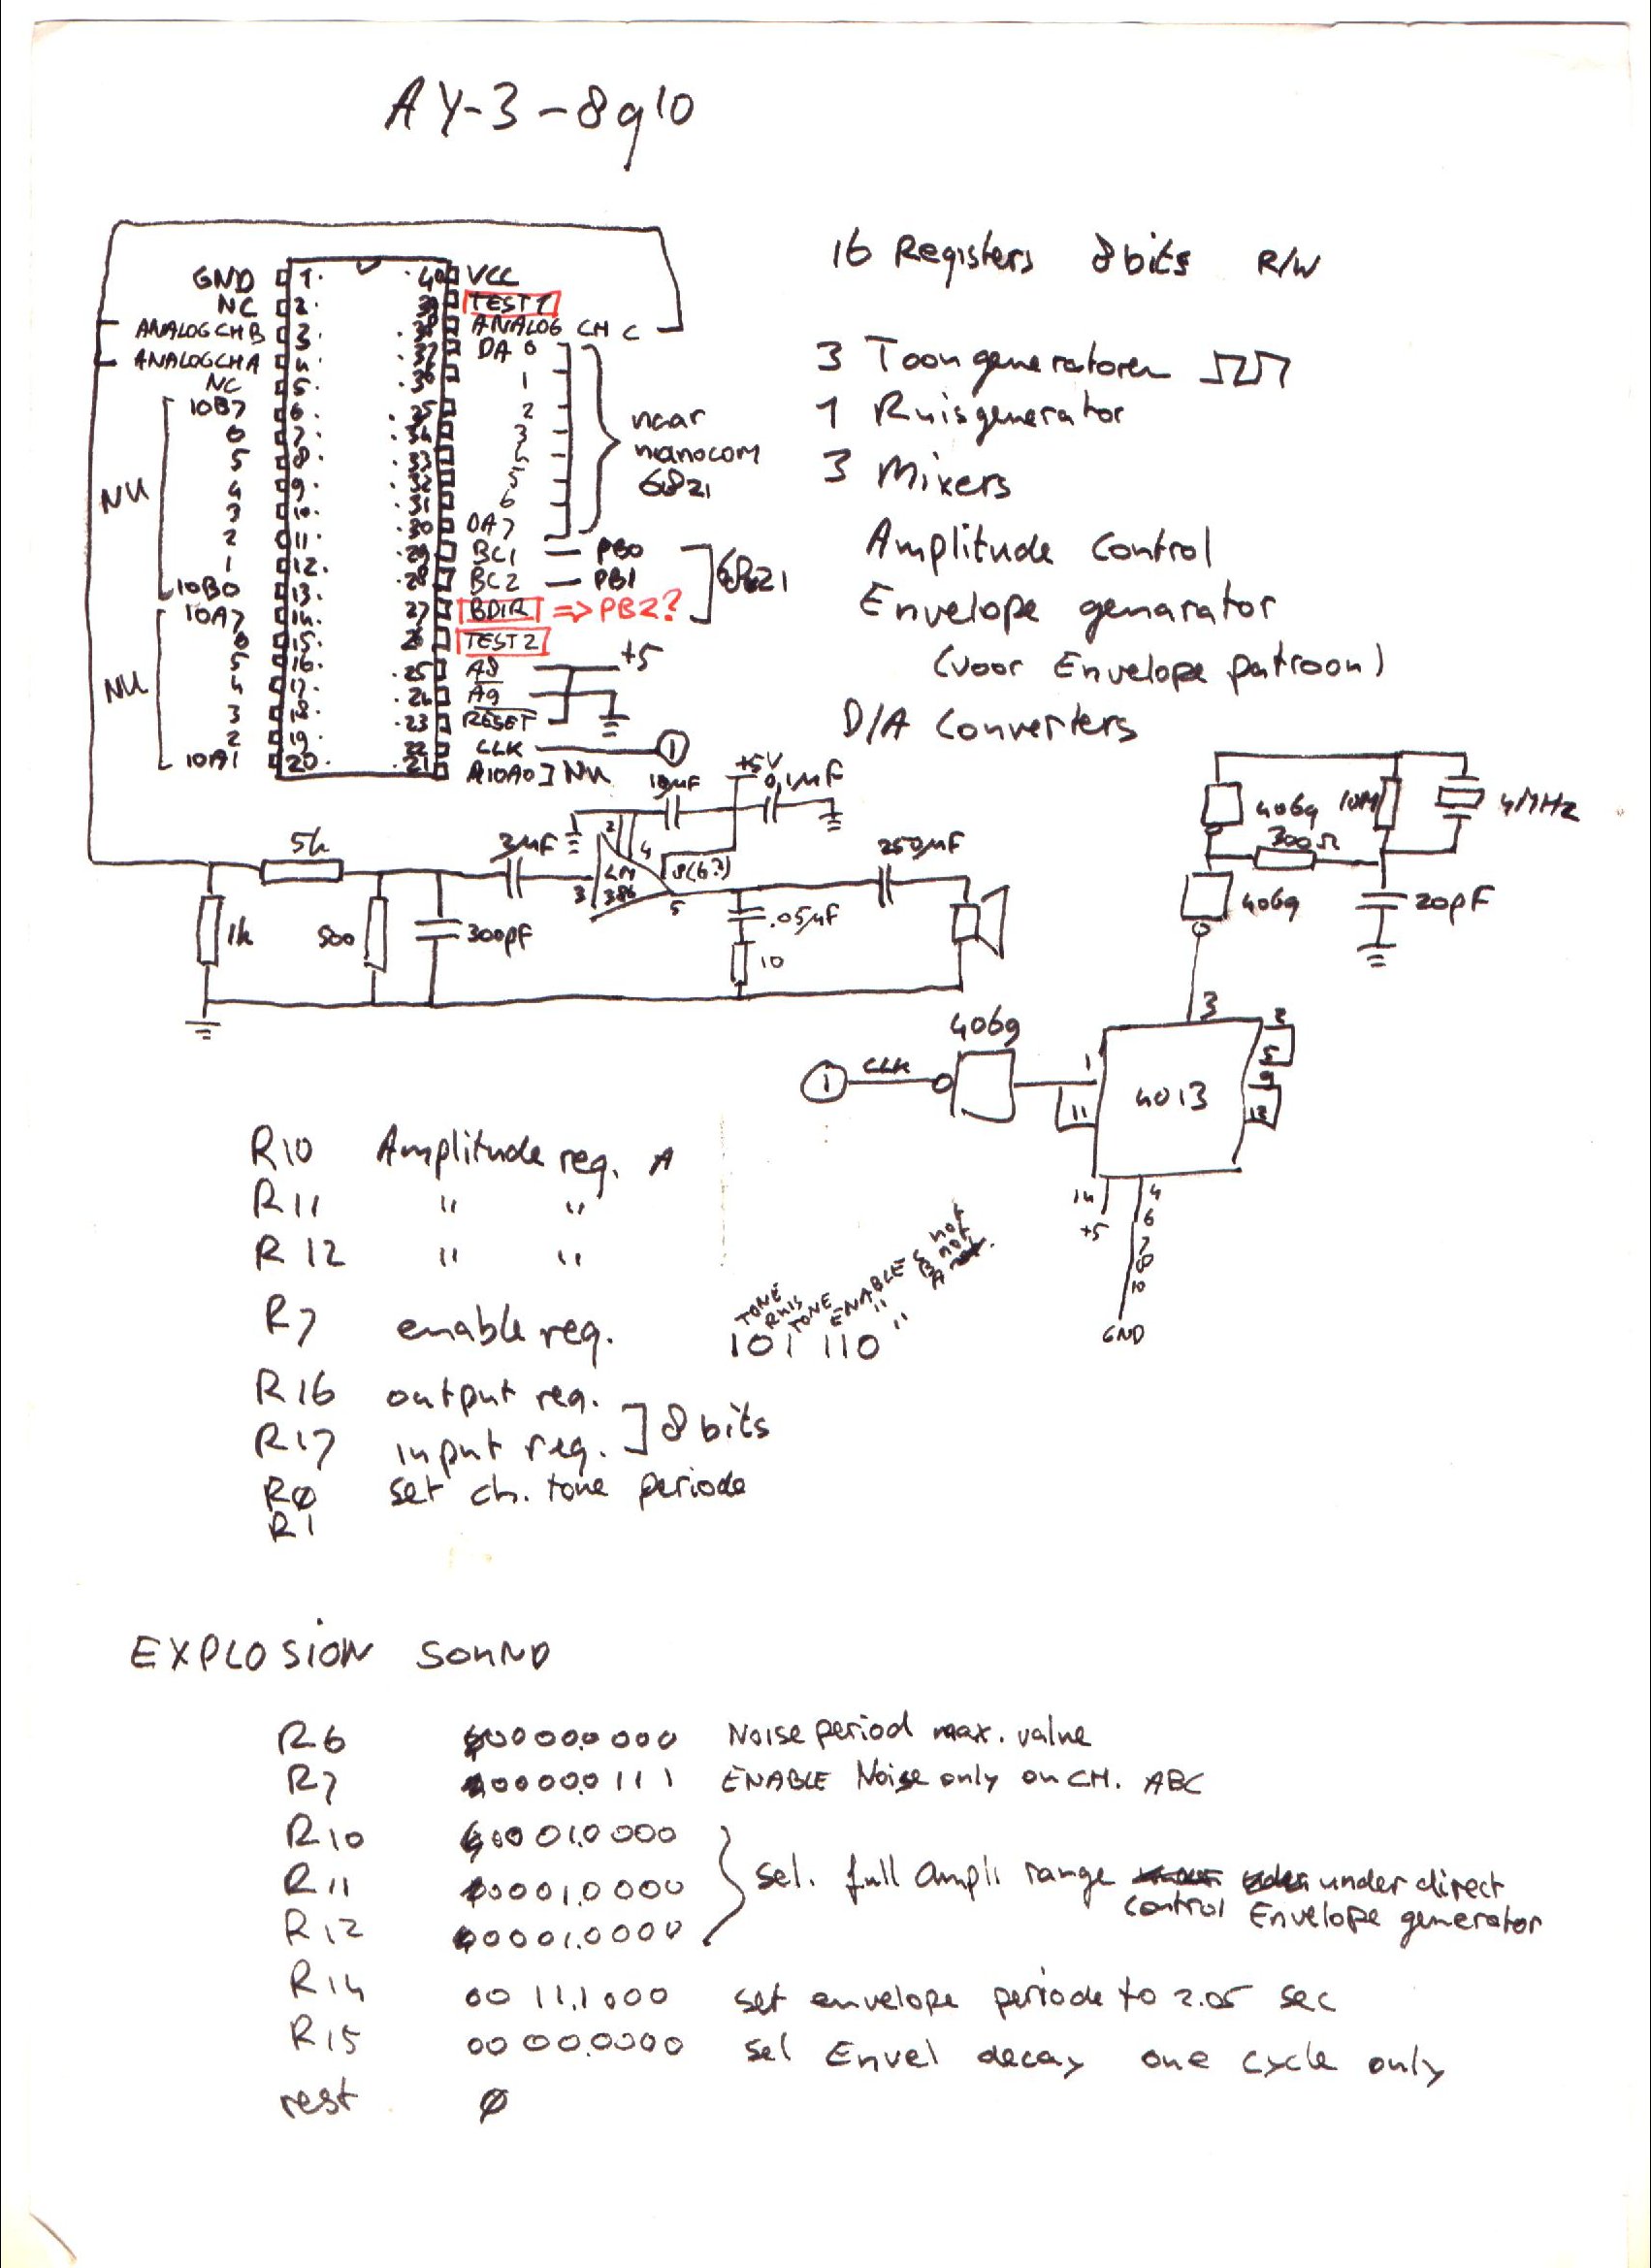
For sound i planned to use a General Instrument AY-3-8910, it is somewhere in my Lab, i know it is. I saved this chip and a SID for my Amiga addon soundcard. Where are my plans for the simple v1 setup? (FOUND IT)
I have to start writing rom functions for display usage. Like JSR $ff00 – Clear screen subroutine .. etc
I’m scraping information from websites, to get started on my clock controller. ATmega328 with ssd1306 display and rotary encoder/dip switches
Notes about the movie: Left side is Arduino IDE monitor reading Addressbus and Databus. (I’m going to try to rewrite this to realtime disassemble) Resetting system. Stepping CPU with manual clock pulses. Start vector being read at $FFFC/$FFFD. Program being run from $8000. Set clock on automatic ( ~ about 150 Hz ) Last opcodes you see a JMP loop 4C 2F 80, that is JMP $802F Display enlarged on video, was not visible on movie i took on mobile. (Wrong angle?)
Breadboard overview
Clock module
Reset module + Crystal
CPU + nmi/int buttons
RAM and ROM
Address decode + Bus divide
Addres/Data bus leds
6522 VIA + Display
2nd via + Buttons
?
(sound board)
TIL: 6502 can run without ram only rom,expect when using JSR … which uses a program stack in RAM
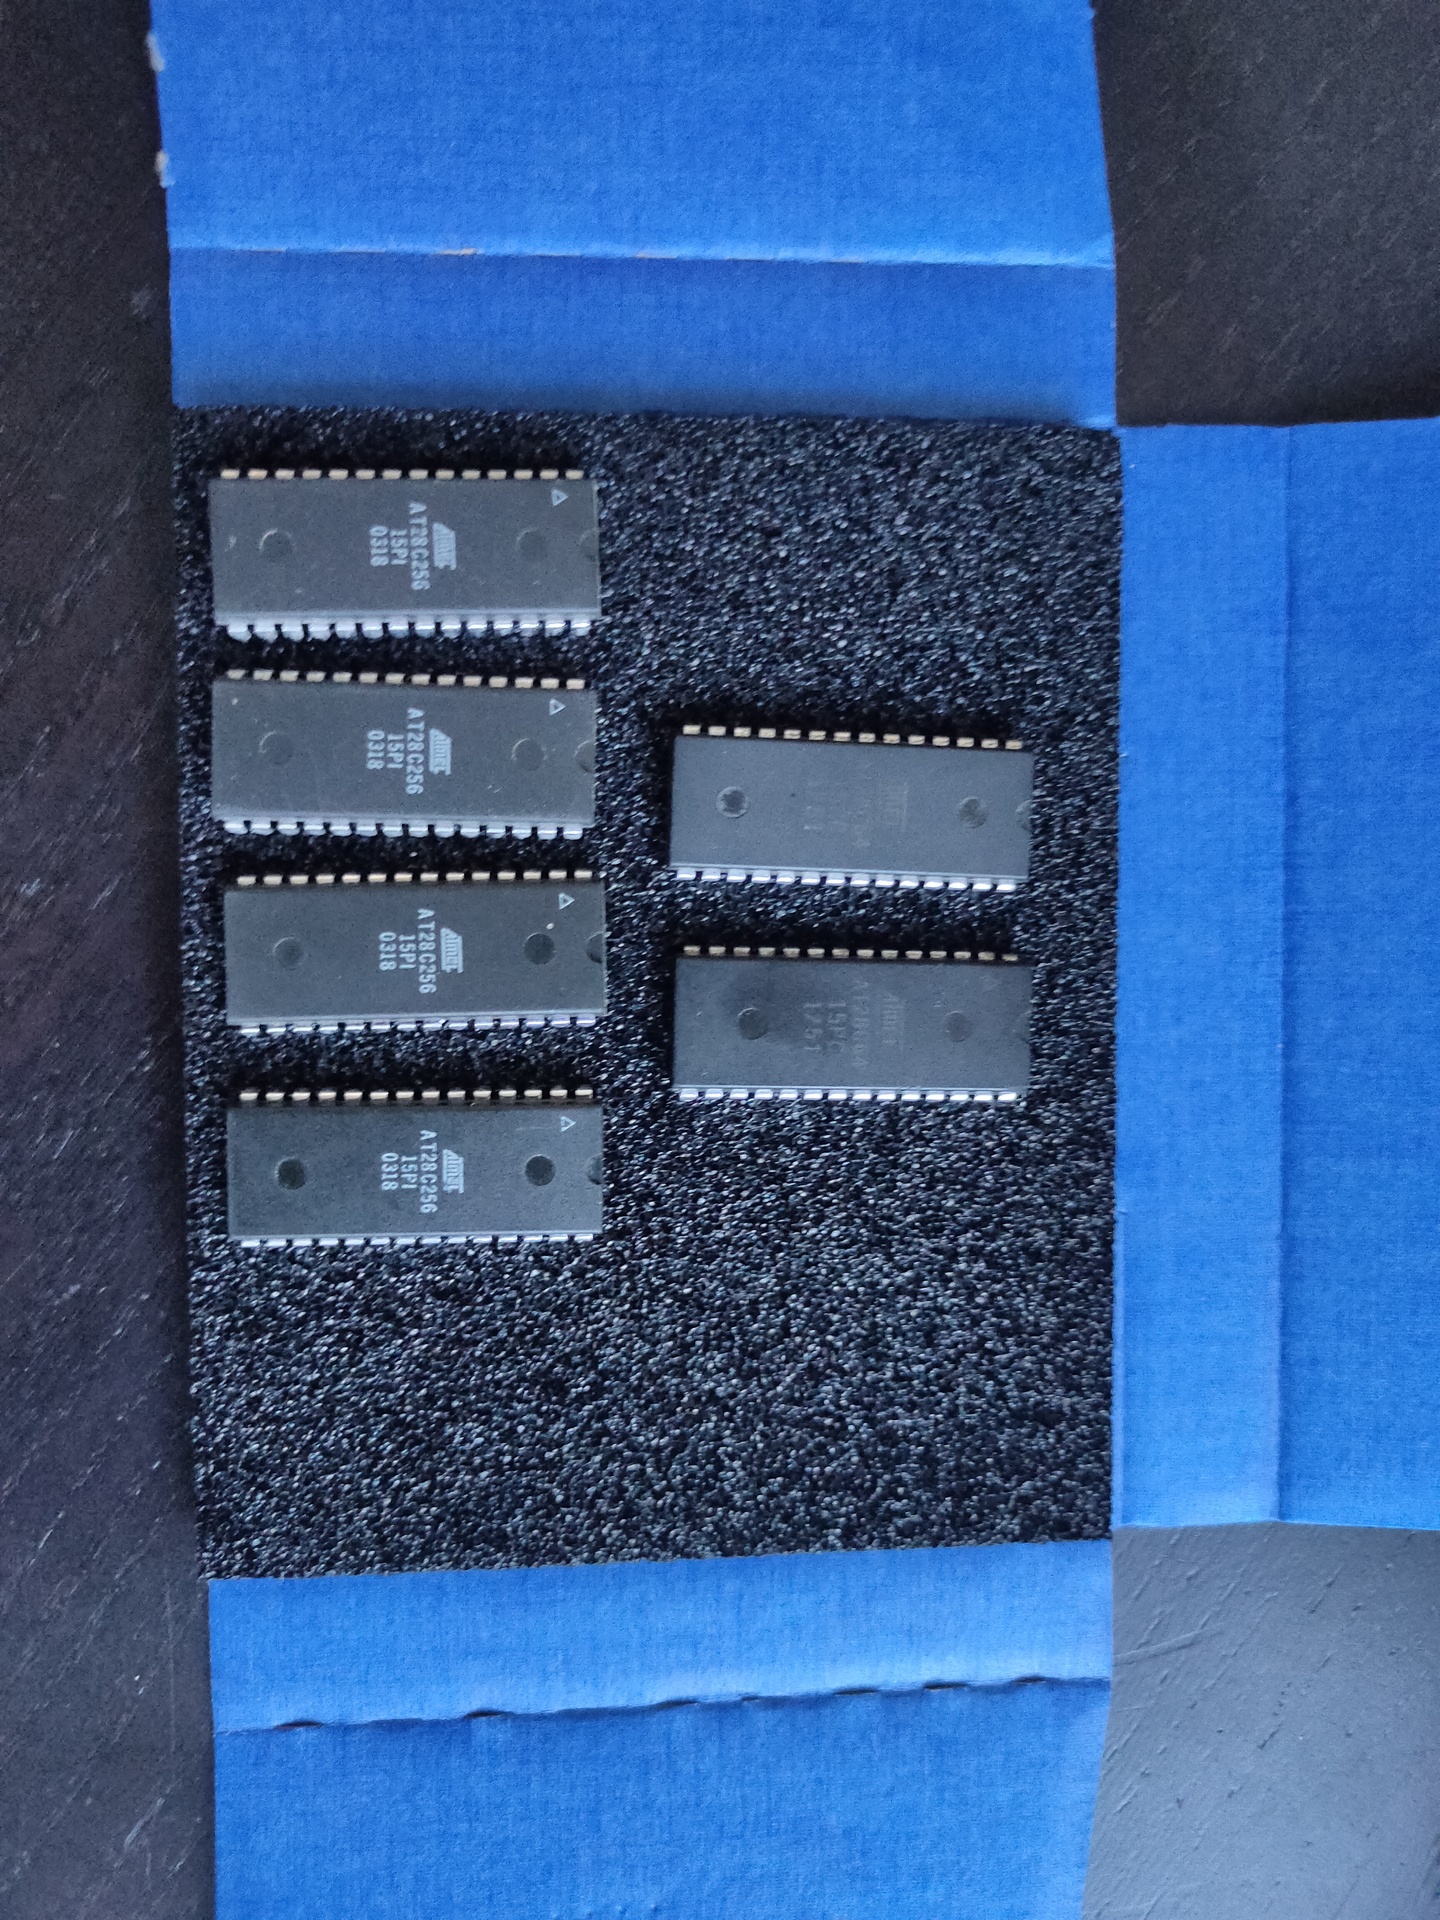
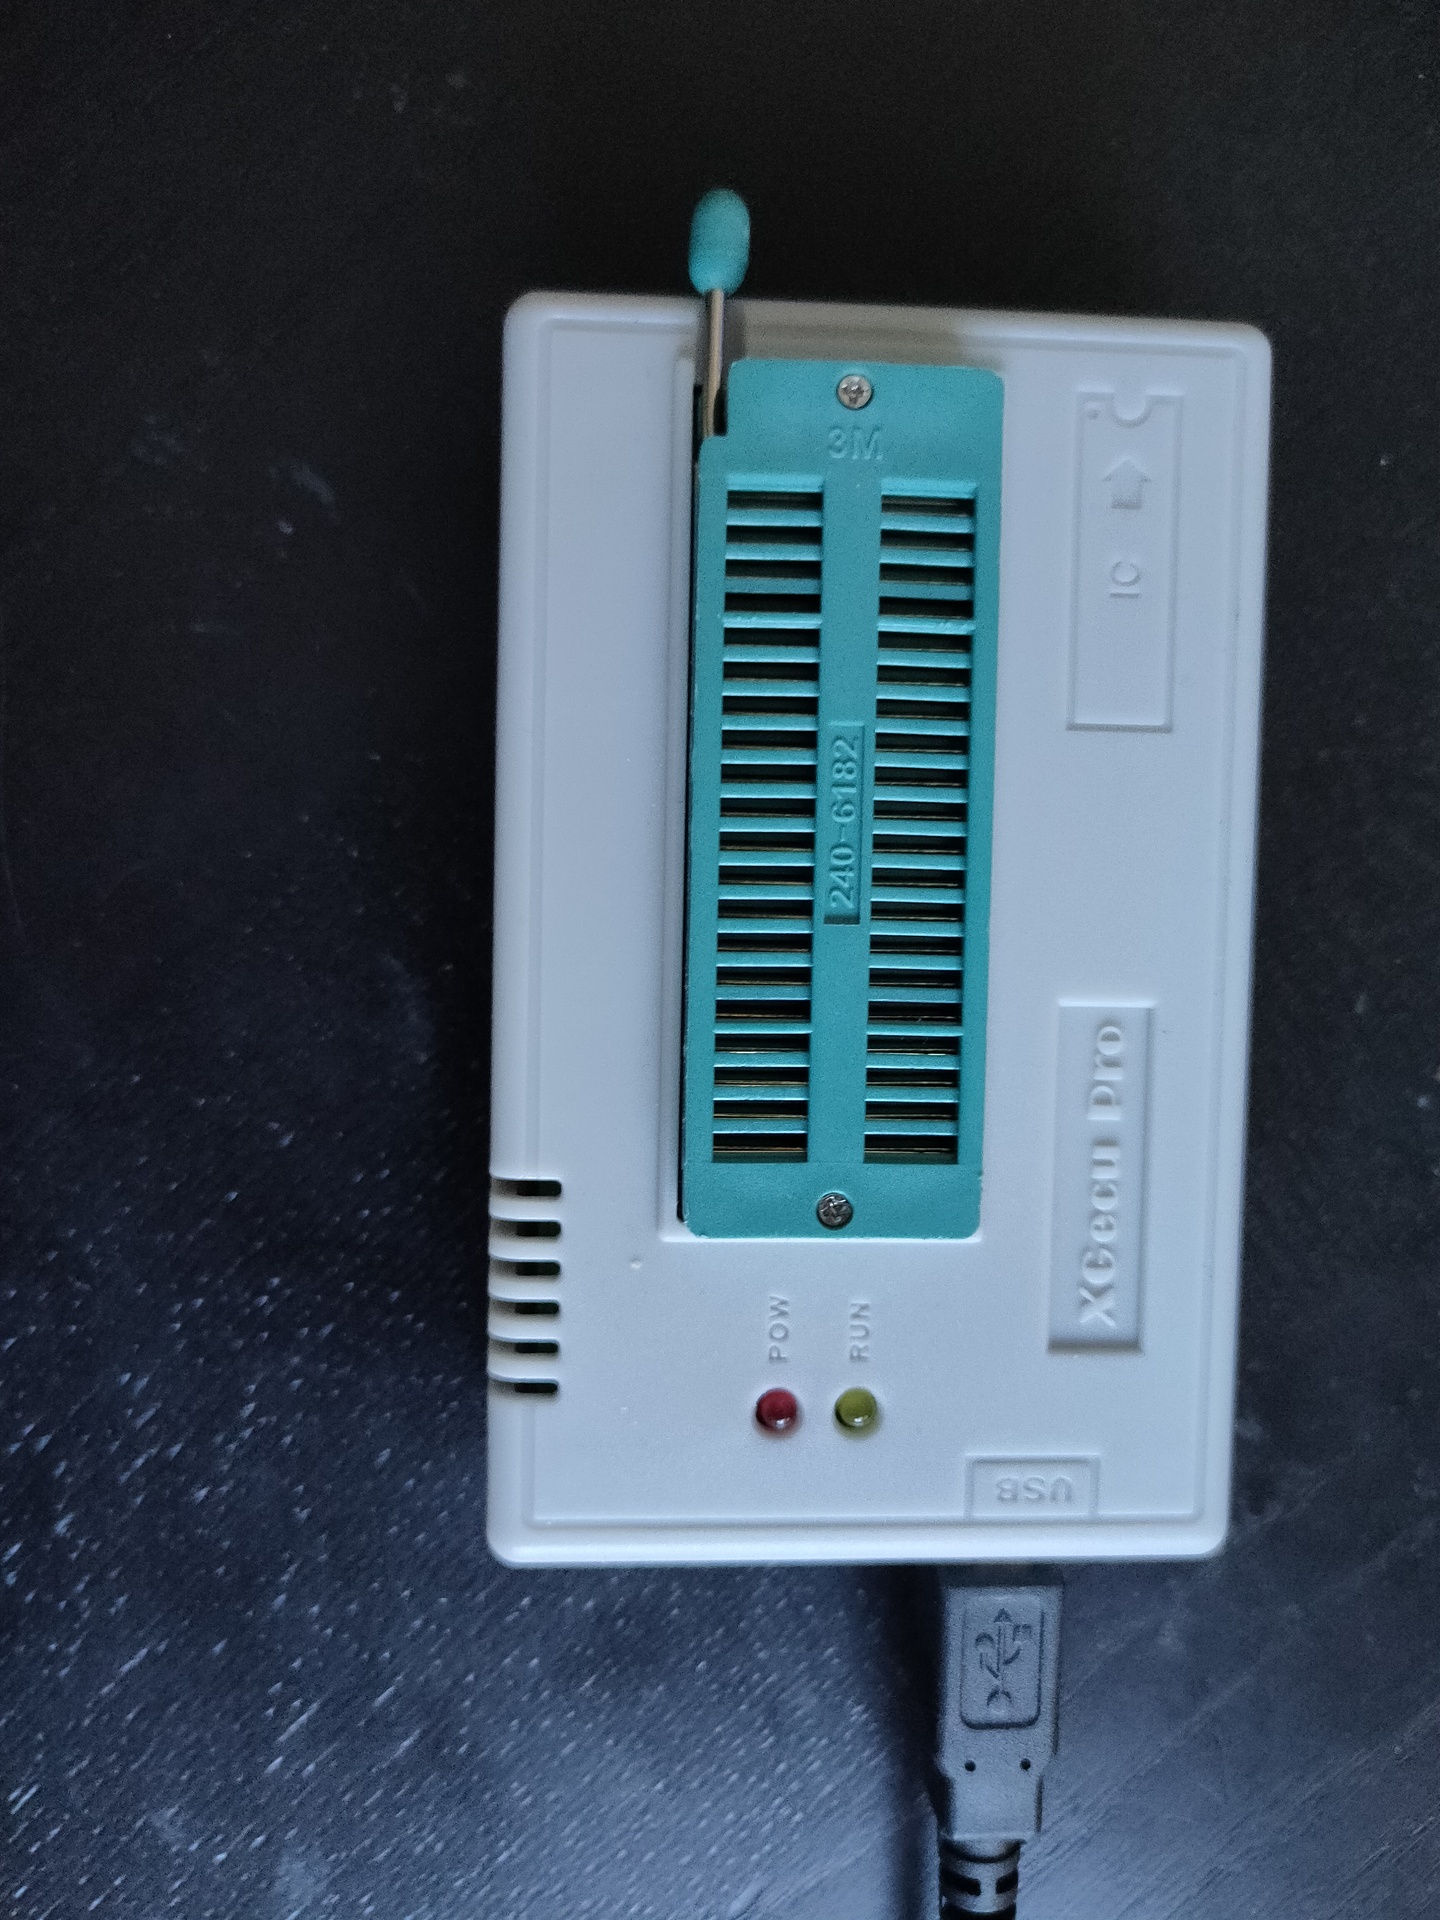
Cartridge printEeproms 8k and 32k (also for 6502 project)Eeprom programmer
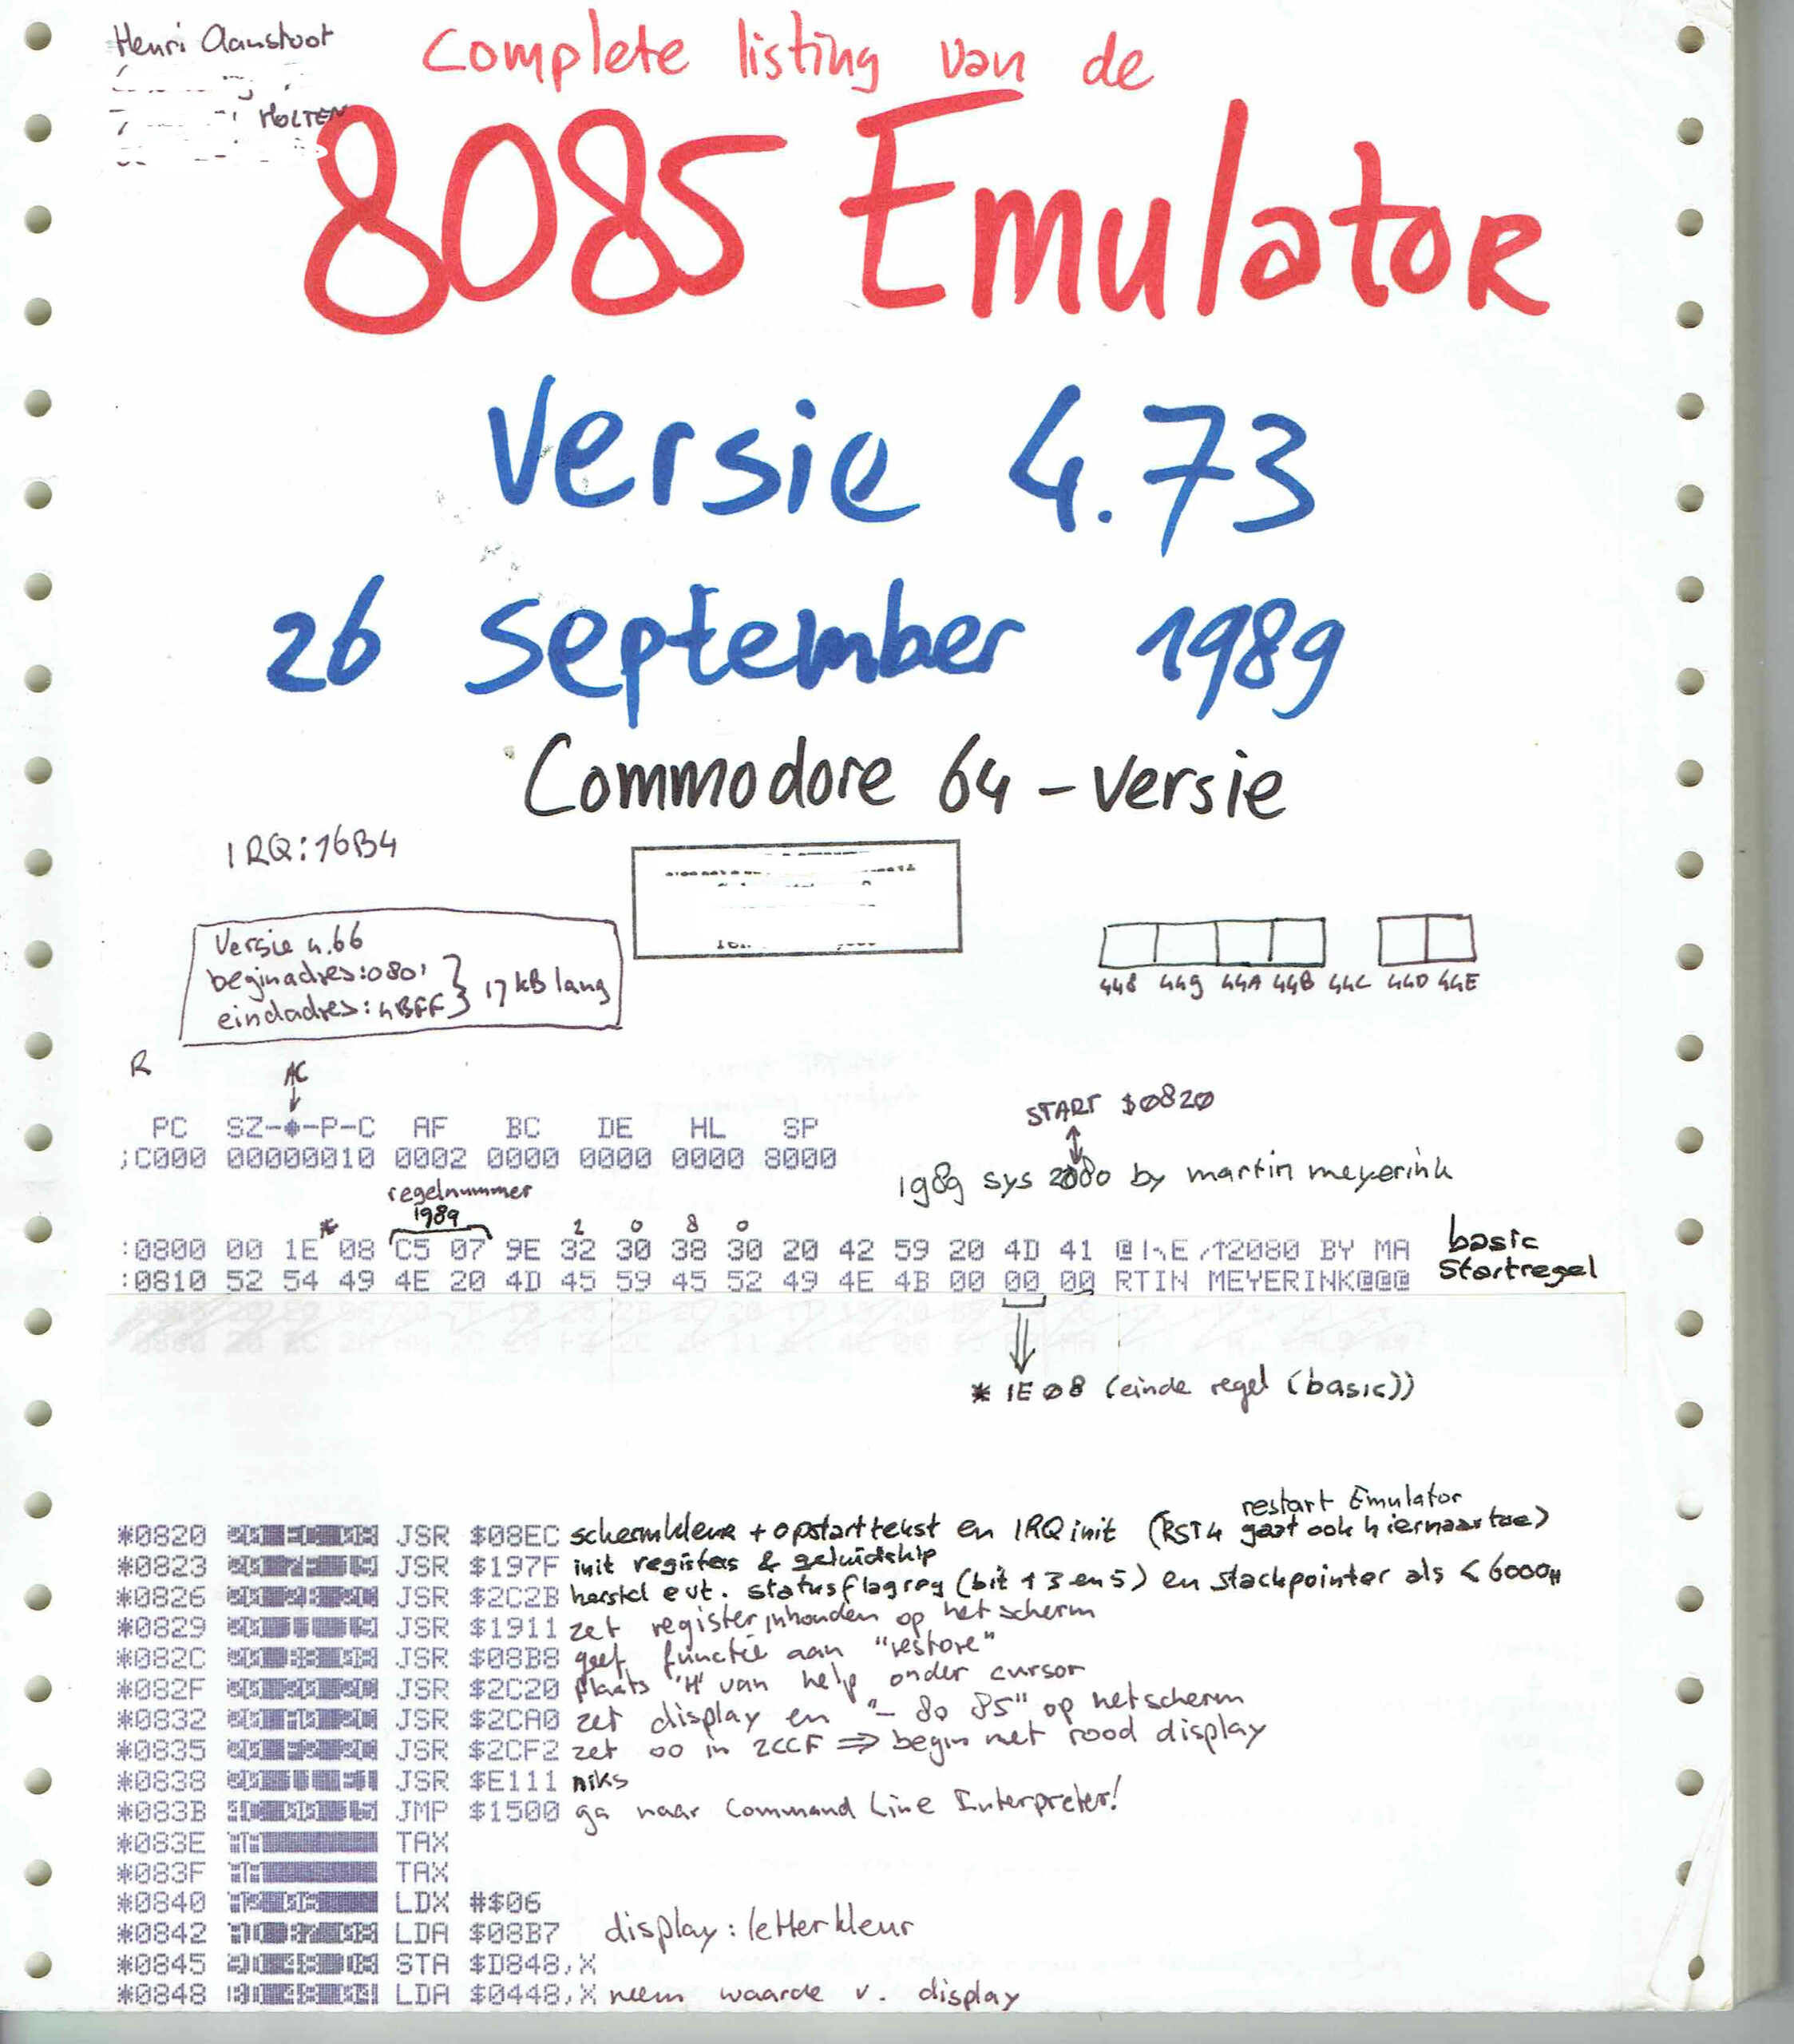
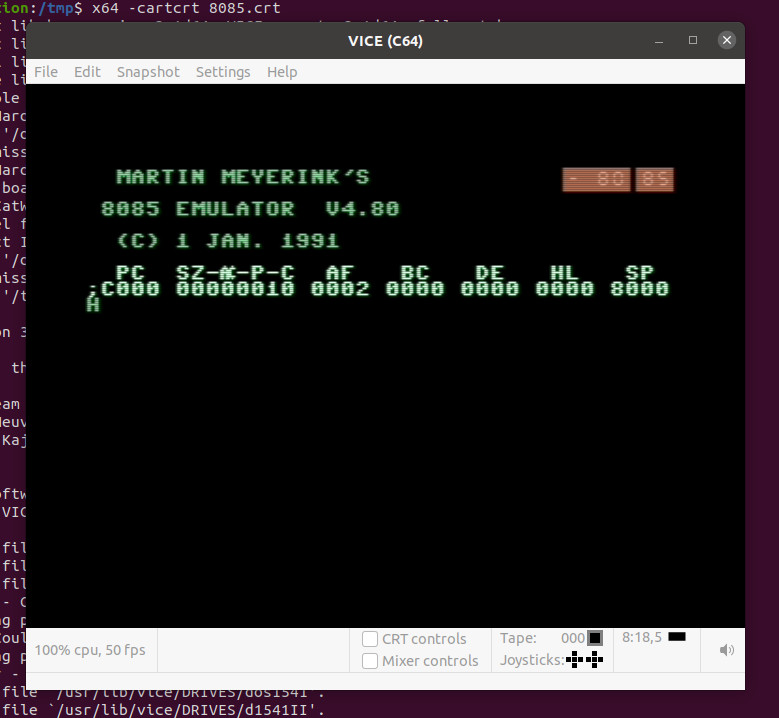
I’ve got the tools and Bigred made me enthusiastic again. My goal is to make a C64 Cartridge from a PRG. And Not any program, it is the 8085 Emulator from Sepp.
Serveral problems i have to ‘fix’
The program is 17K, Cartridges can only be 16K. So i have to use 2x 8K and compress the data. This means it have to be uncompressed at start time. ( I was thinking of using exomiser for this )
Program starts normally at $0820 and probably is not optimised to run anywhere else. So a starting routine has to copy the program from cartridge memory to the correct location
Luckily i have the source! How cool is that
For version 4.73 it states : Starting at $0820 .. but my hexdump is off by one??!?
00000020 00 20 ec starts with 00 at $0020 .. and not 20 ?!?!
Tools used until now:
Vice – C64 Emulator x64 -cartcrt 8085.crt
c1541 – Linux disk tool for C64 images. Used this to extract the 8085emulator PRG
prg2crt.py – a convertor from PRG to a cartrid file which can be used by Vice python2 prg2crt.py 8085.prg 8085.crt
minipro – eeprom programming tool for Linux minipro -p AT28C64 -w /tmp/test.bin
cartconv (tool from vice to convert crt <-> bin) cartconv -t normal -i test.bin -n ‘my cart’ -o test.crt
xa – Cross assembler 65xx/R65C02/65816
ACME – the ACME Crossassembler for Multiple Environments
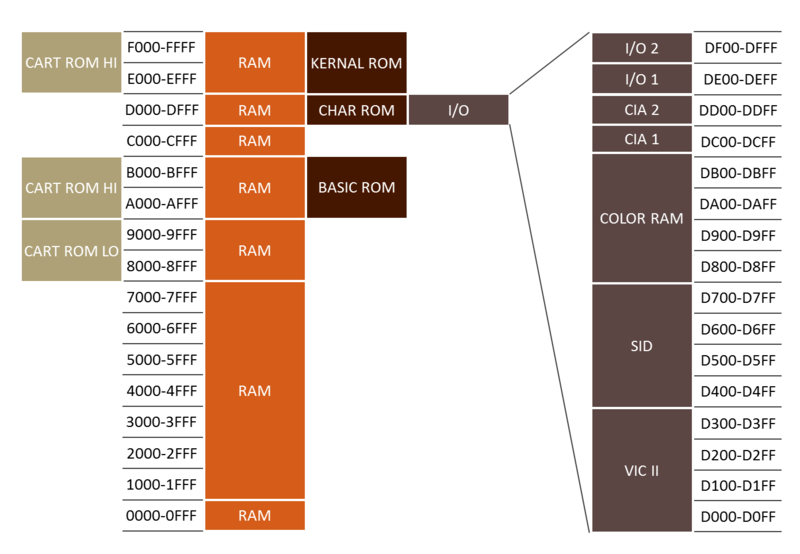
Memory Map C64 – source c64-wiki.com
Card Low starts at $8000, so that’s the place where those roms are going to be. To place on this address:
Copy routine : from ($8000 + this copy routine) to $0820 When to decompress?? jmp routine to $0820
A cartridge file >16K and with his emulation headers seems to work??!
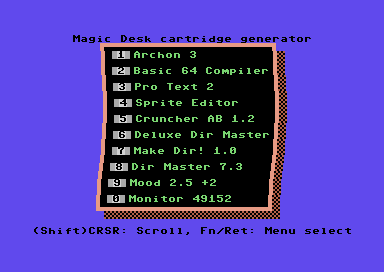
Also nice: Magic Desk Cartridge Generator V3.0
UPDATE: 20220811
exomizer sfx 0x0820 8085.prg -o data.exo # Compress and start at 0x0820
xa frame.asm -o frame.bin # Add code and write binary
x64 --cart16 frame.bin # Test cartridge with Vice
frame.asm
;----------------------------------------------------------
; example usage
; xa frame.asm -o frame.bin
; cartconv -t normal -i frame.bin -n 'my cart' -o frame.crt
; x64 -cartcrt frame.crt
;----------------------------------------------------------

;no load-adress for bin-file, so no header here

*=$8000
.word launcher ;cold start
.word launcher ;warm start
.byte $c3	;c
.byte $c2	;b
.byte $cd	;m
.byte $38	;8
.byte $30	;0

launcher
  stx $d016
  jsr $fda3	;prepare irq
  jsr $fd50	;init memory
  jsr $fd15	;init i/o
  jsr $ff5b	;init video
                ;make sure this sets up everything you need,
                ;the calls above are probably sufficient
  ldx #$fb
  txs

;set up starting code outside of cartridge-area
move_starter
  ldx #(starter_end-starter_start)
loop1
  lda starter_start,x
  sta $100,x
  dex
  bpl loop1
  jmp $100
;---------------------------------
starter_start
  ldx #$40 ;64 pages = 256 * 64 = 16384 Bytes
  ldy #0
loop
src
  lda exomized_data,y
dst
  sta $801,y
  iny
  bne loop
  inc src+2-starter_start+$100
  inc dst+2-starter_start+$100
  dex
  bpl loop

;make sure settings for $01 and IRQ etc are correct for your code
;remember THIS table from AAY64:

;       Bit+-------------+-----------+------------+
;       210| $8000-$BFFF |$D000-$DFFF|$E000-$FFFF |
;  +---+---+-------------+-----------+------------+
;  | 7 |111| Cart.+Basic |    I/O    | Kernal ROM |
;  +---+---+-------------+-----------+------------+
;  | 6 |110|     RAM     |    I/O    | Kernal ROM |
;  +---+---+-------------+-----------+------------+
;  | 5 |101|     RAM     |    I/O    |    RAM     |
;  +---+---+-------------+-----------+------------+
;  | 4 |100|     RAM     |    RAM    |    RAM     |
;  +---+---+-------------+-----------+------------+
;  | 3 |011| Cart.+Basic | Char. ROM | Kernal ROM |
;  +---+---+-------------+-----------+------------+
;  | 2 |010|     RAM     | Char. ROM | Kernal ROM |
;  +---+---+-------------+-----------+------------+
;  | 1 |001|     RAM     | Char. ROM |    RAM     |
;  +---+---+-------------+-----------+------------+
;  | 0 |000|     RAM     |    RAM    |    RAM     |
;  +---+---+-------------+-----------+------------+

  lda #$35 ;cart is always on instead of BASIC unless it can be switched off via software
  sta $01
  jmp $80d ;for exomizer, i.e.

starter_end
;----------------------------------
exomized_data
.bin 2,0,"data.exo"
;syntax for exomizer 2.0.1:
;exomizer sfx sys game.prg -o data.exo
main_file_end
;fill up full $4000 bytes for bin file ($c000-$8000=$4000)
.dsb ($c000-main_file_end),0
Exomiser info
 Reading "8085.prg", loading from $0801 to $4CE9.
 Crunching from $0801 to $4CE9.
Phase 1: Instrumenting file
-----------------------------
 Length of indata: 17640 bytes.
 [building.directed.acyclic.graph.building.directed.acyclic.graph.]
 Instrumenting file, done.

Phase 2: Calculating encoding
-----------------------------
 pass 1: optimizing ..
 [finding.shortest.path.finding.shortest.path.finding.shortest.pat]
  size 80273.0 bits ~10035 bytes
 pass 2: optimizing ..
 [finding.shortest.path.finding.shortest.path.finding.shortest.pat]
  size 80039.0 bits ~10005 bytes
 pass 3: optimizing ..
 Calculating encoding, done.

Phase 3: Generating output file
------------------------------
 Encoding: 1101112133423160,1122,2010223445667788,032144406789BBCD
 Length of crunched data: 10034 bytes.
 Crunched data reduced 7606 bytes (43.12%)
 Target is self-decrunching C64 executable,
 jmp address $0820.
 Writing "data.exo" as prg, saving from $0801 to $304C.
Memory layout:   |Start |End   |
 Crunched data   | $07E7| $2F18|
 Decrunched data | $0801| $4CE9|
 Decrunch table  | $0334| $03D0|
 Decruncher      | $00FD| $01C0| and $9F,$A7,$AE,$AF
 Decrunch effect writes to $DBE7.
Decruncher:  |Enter |During|Exit  |
 RAM config  |   $37|   $37|   $37|
 IRQ enabled |     1|     1|     1|
UPDATE:20230126
; CODE COPY FROM http://www.lemon64.com/forum/viewtopic.php?t=60786&sid=2559442c8b963d7aac27cb13b493f372
; Thanks for posting: Richard of TND
; this is for a 16KB cart, using ACME!!

      !to "mycart.crt",cart16crt

scr = $0400

DecrunchADDR = 2061 ;SYS 2061   (HEX $080D)

      *=$8000
      !word launcher
      !word launcher
      !byte $c3,$c2,$cd,$38,$30 ;CBM 80


launcher
   sei
   stx $d016
   jsr $fda3 ;prepare irq
   jsr $fd50 ;input memory
   jsr $fd15 ;initialise i/o
   jsr $ff5b ;initialise video memory

;For a more professional boot up. Make
;the border and screen black. AFTER
;the video memory, etc has finished.

   lda #$00
   sta $d020
   sta $d021
   cli

;Switch off the screen.

   lda $d011
   and #%11101111
   sta $d011

;Move transfer code over to the screen
;memory.

   ldx #$00
tloop   lda transfer,x
   sta scr,x
   inx
   bne tloop
   jmp scr

transfer
   ldx #$00
tr1      lda linkedgame,x         ;Move from linked address
  sta $0801,x                        ;Direct to BASIC start address
   inx
   bne tr1
   inc scr+4
   inc scr+7
   lda scr+4
   bne transfer
   jsr $e453 ;load basic vectors
   jsr $e3bf ;init basic ram

   ldx #$fb
   txs

   ;Execute the game, by jumping to the
   ;de-cruncher's start address.
   ;jmp $0820
   jmp DecrunchADDR


;Link crunched game as a PRG file to memory after
;the cartridge build code.

linkedgame
   !bin "8085sys.prg",,2

FileSize = *
!if FileSize >$c000 {
!error "FILE SIZE IS TOO BIG TO FIT 16KB CARTRIDGE"
} else {

   *=$c000
}
Exomizer:
exomizer sfx sys  8085.prg -o 8085sys.prg
 Reading "8085.prg", loading from $0801 to $4CE9.
 Crunching from $0801 to $4CE9.
Phase 1: Instrumenting file
-----------------------------
 Length of indata: 17640 bytes.
 [building.directed.acyclic.graph.building.directed.acyclic.graph.]
 Instrumenting file, done.

Phase 2: Calculating encoding
-----------------------------
 pass 1: optimizing ..
 [finding.shortest.path.finding.shortest.path.finding.shortest.pat]
  size 80273.0 bits ~10035 bytes
 pass 2: optimizing ..
 [finding.shortest.path.finding.shortest.path.finding.shortest.pat]
  size 80039.0 bits ~10005 bytes
 pass 3: optimizing ..
 Calculating encoding, done.

Phase 3: Generating output file
------------------------------
 Encoding: 1101112133423160,1122,2010223445667788,032144406789BBCD
 Length of crunched data: 10034 bytes.
 Crunched data reduced 7606 bytes (43.12%)
 Target is self-decrunching C64 executable,
 jmp address $0820.
 Writing "8085sys.prg" as prg, saving from $0801 to $304C.
Memory layout:   |Start |End   |
 Crunched data   | $07E7| $2F18|
 Decrunched data | $0801| $4CE9|
 Decrunch table  | $0334| $03D0|
 Decruncher      | $00FD| $01C0| and $9F,$A7,$AE,$AF
 Decrunch effect writes to $DBE7.
Decruncher:  |Enter |During|Exit  |
 RAM config  |   $37|   $37|   $37|
 IRQ enabled |     1|     1|     1|
exomizer sfx $\0801 8085.prg -o 8085out.prg
 Reading "8085.prg", loading from $0801 to $4CE9.
 Crunching from $0801 to $4CE9.
Phase 1: Instrumenting file
-----------------------------
 Length of indata: 17640 bytes.
 [building.directed.acyclic.graph.building.directed.acyclic.graph.]
 Instrumenting file, done.

Phase 2: Calculating encoding
-----------------------------
 pass 1: optimizing ..
 [finding.shortest.path.finding.shortest.path.finding.shortest.pat]
  size 80273.0 bits ~10035 bytes
 pass 2: optimizing ..
 [finding.shortest.path.finding.shortest.path.finding.shortest.pat]
  size 80039.0 bits ~10005 bytes
 pass 3: optimizing ..
 Calculating encoding, done.

Phase 3: Generating output file
------------------------------
 Encoding: 1101112133423160,1122,2010223445667788,032144406789BBCD
 Length of crunched data: 10034 bytes.
 Crunched data reduced 7606 bytes (43.12%)
 Target is self-decrunching C64 executable,
 jmp address $0801.
 Writing "8085out.prg" as prg, saving from $0801 to $304C.
Memory layout:   |Start |End   |
 Crunched data   | $07E7| $2F18|
 Decrunched data | $0801| $4CE9|
 Decrunch table  | $0334| $03D0|
 Decruncher      | $00FD| $01C0| and $9F,$A7,$AE,$AF
 Decrunch effect writes to $DBE7.
Decruncher:  |Enter |During|Exit  |
 RAM config  |   $37|   $37|   $37|
 IRQ enabled |     1|     1|     1|
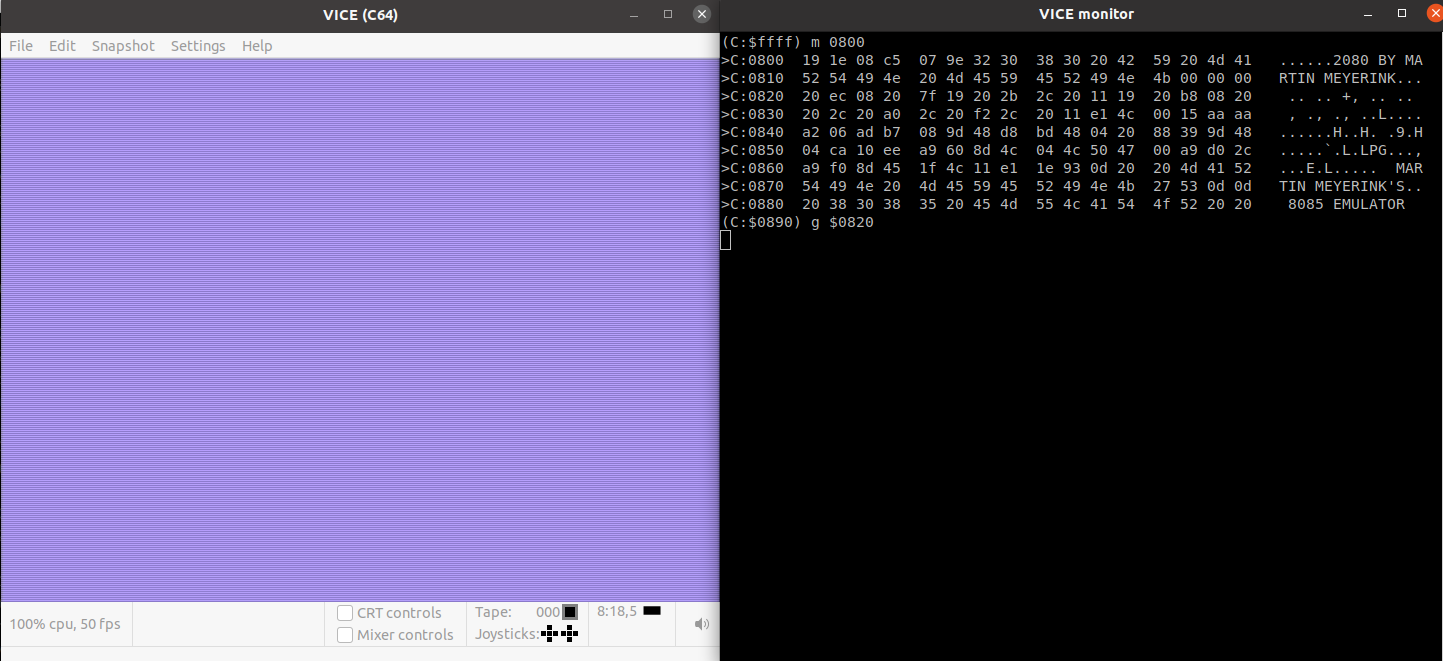
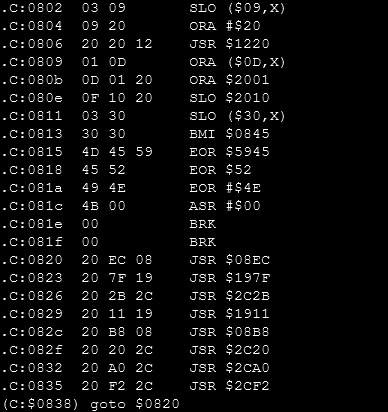
This looks okay: (monitor in vice)
Attaching crt in vice
Maybe one of these problems:
1) you CAN NOT use BASIC routines when a cart is inserted (without weird tricks, i.e.
storing BASIC routines on cart etc)

2) you need to be careful about $01 as you may map in ROM at $8000 without expecting it.

Please refer to this if in doubt:
http://unusedino.de/ec64/technical/aay/c64/memcfg.html

[3] You should also be careful about the usage of KERNAL routines as some of them
sweep across BASIC-code as well!
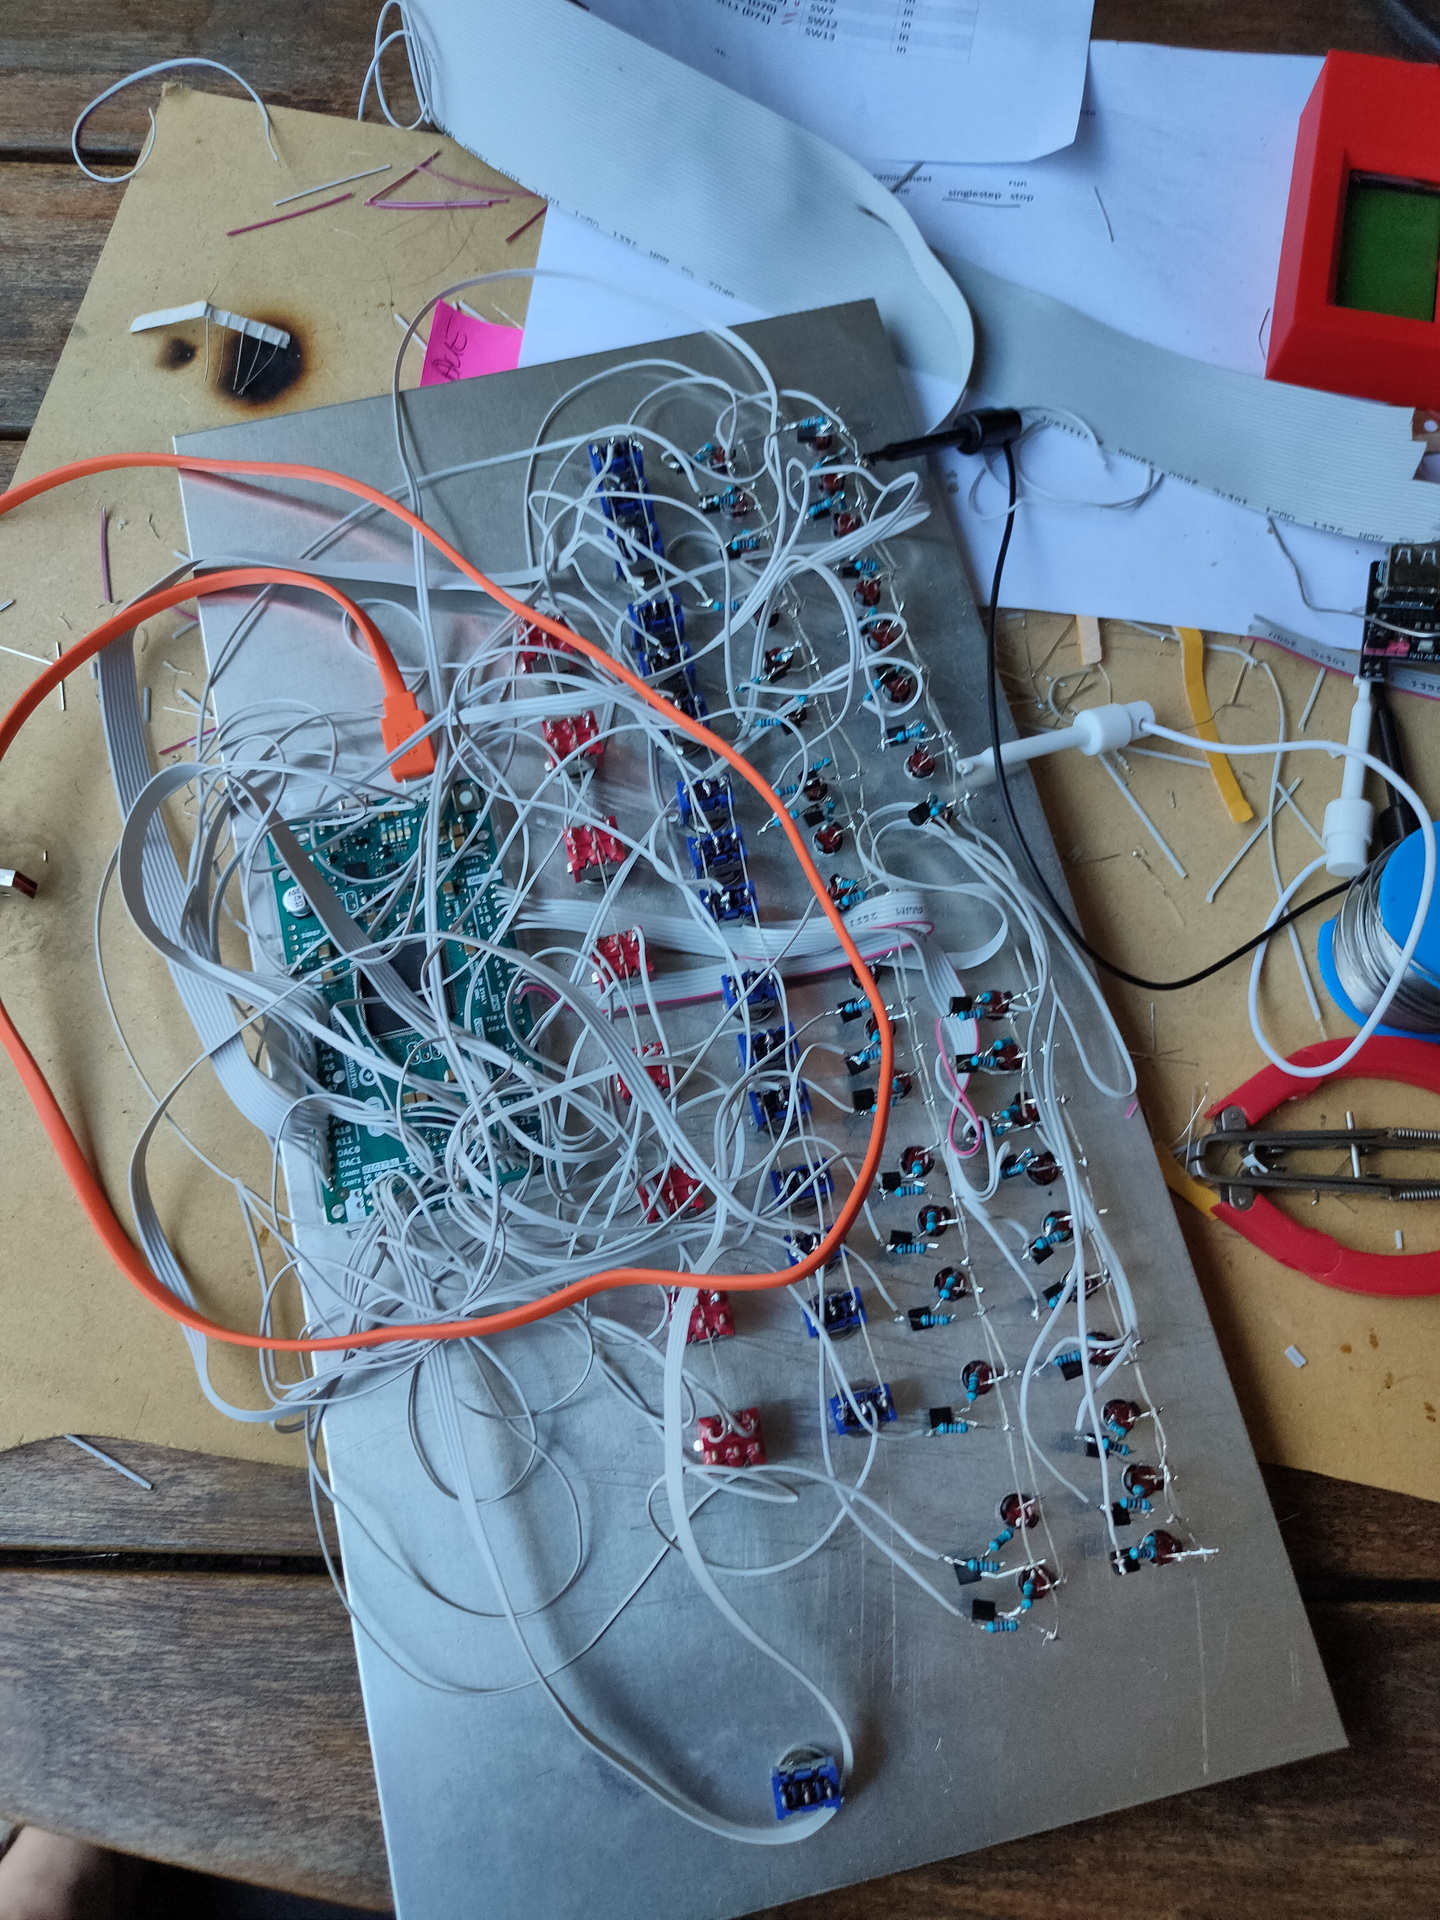
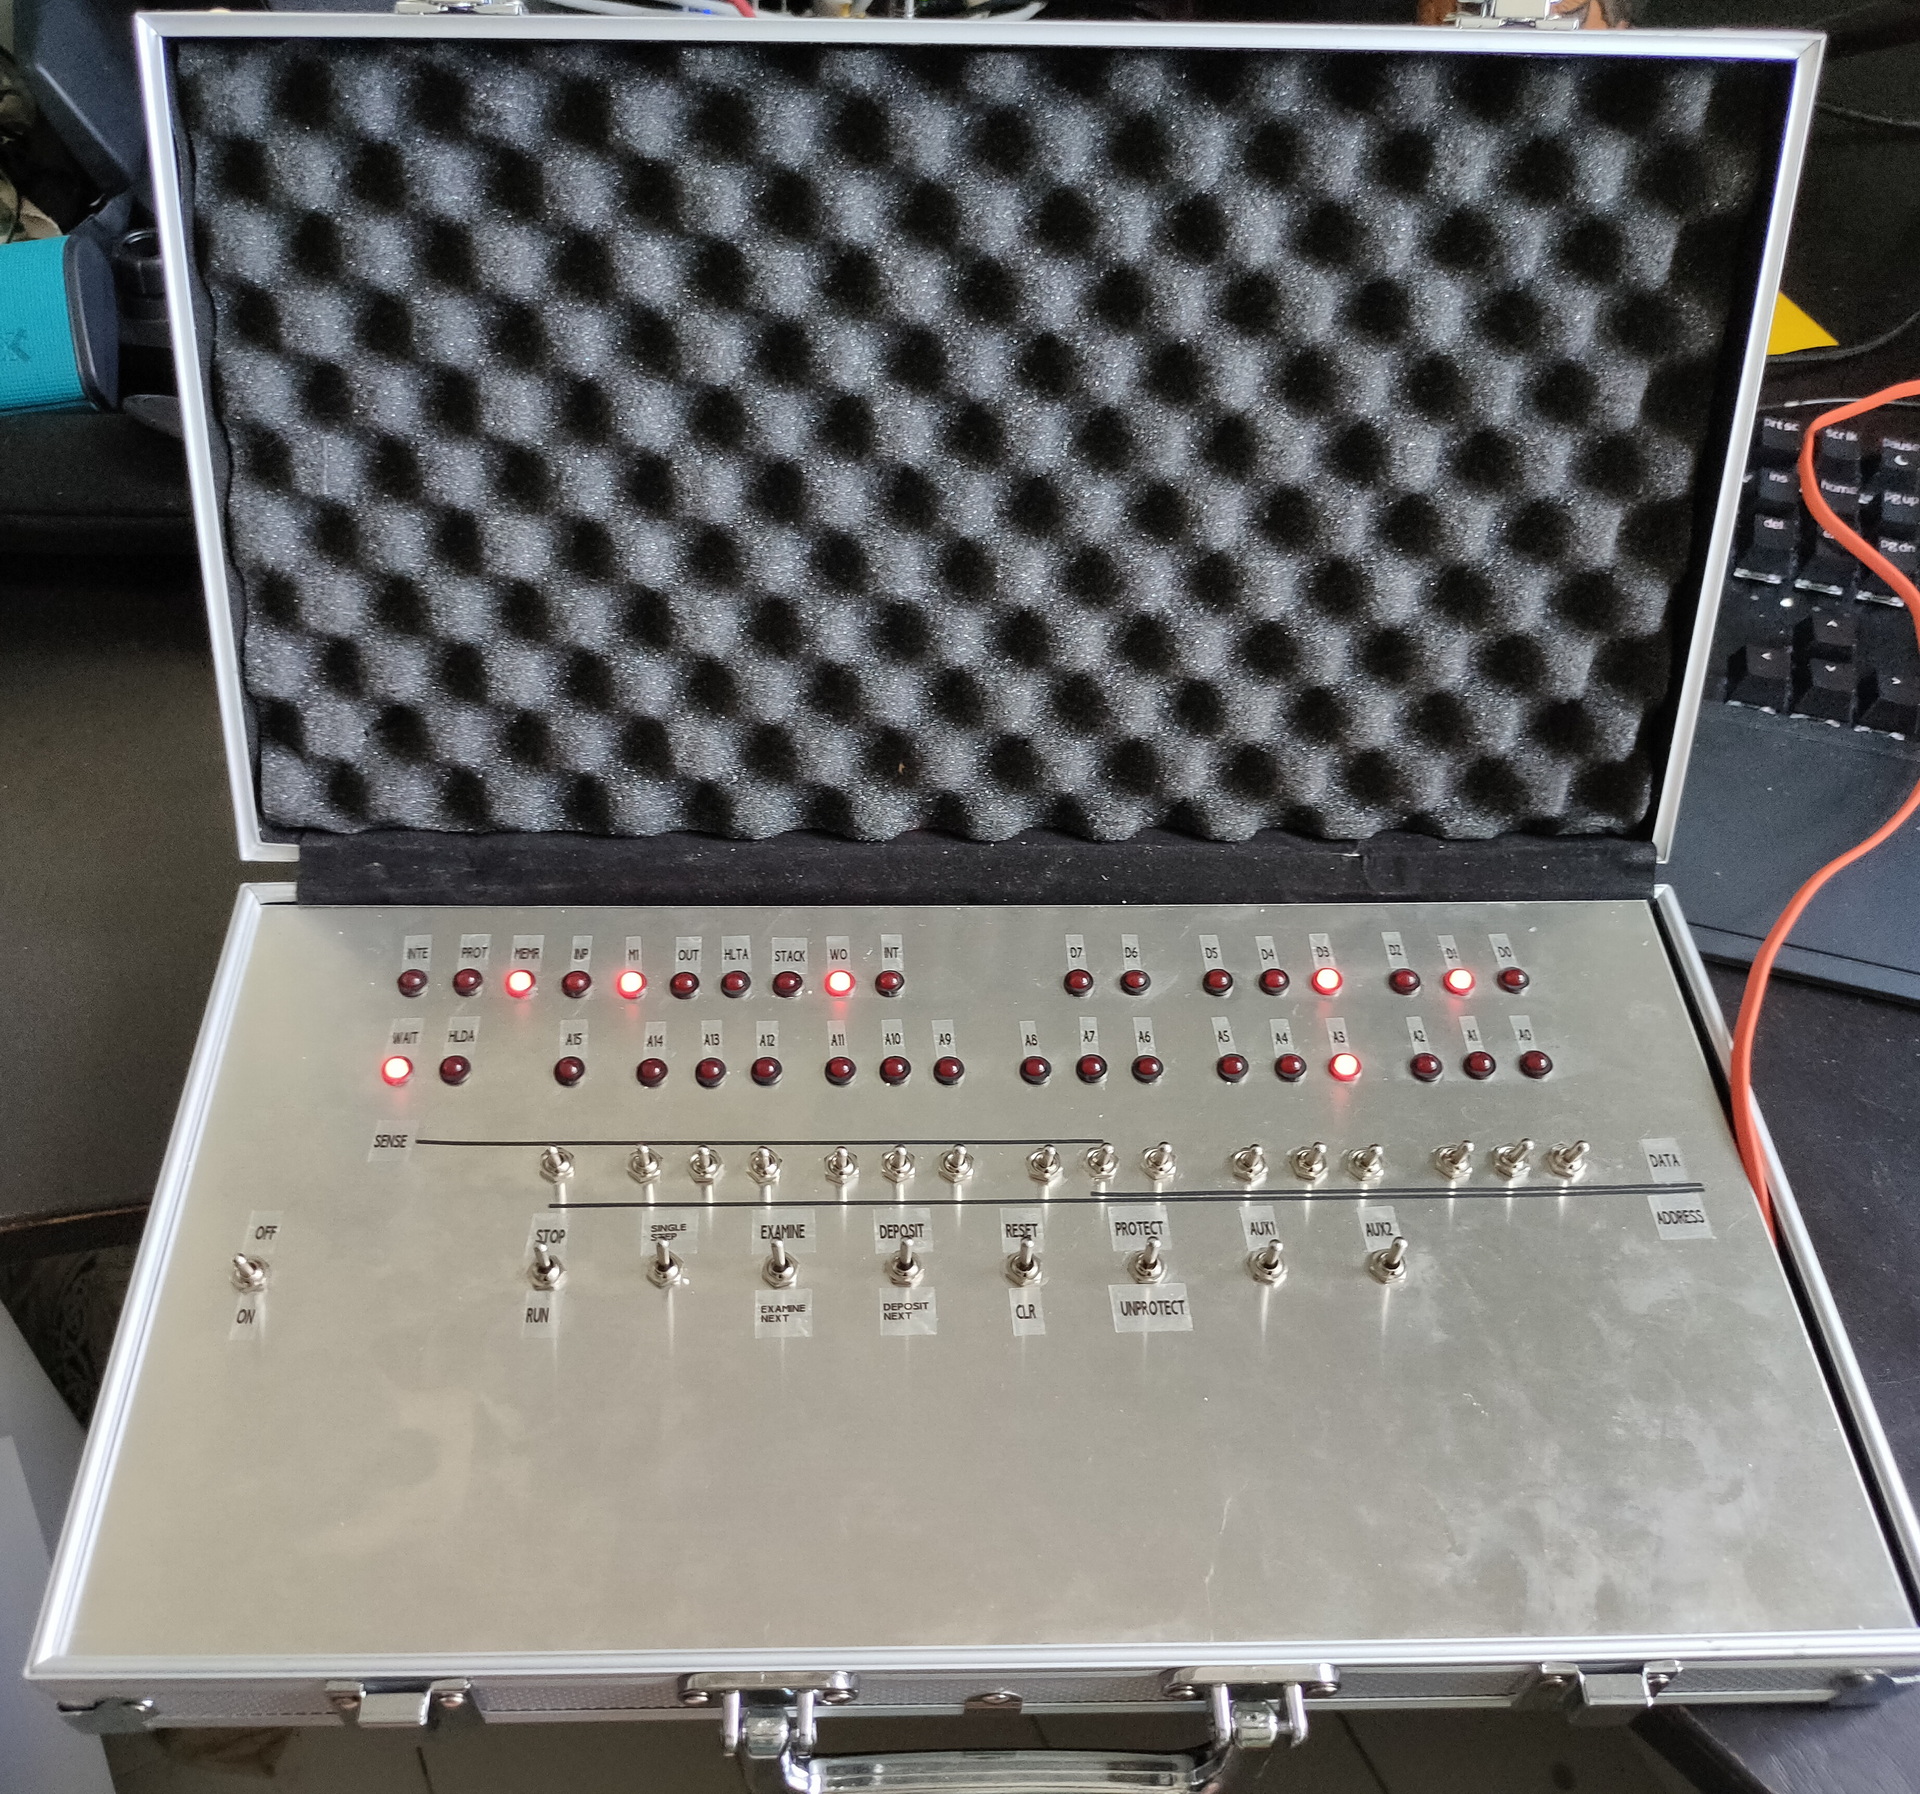
After a whole day soldering yesterday, ending up with a wire mess. Which didn’t work at the end…
Starting measuring some things, and create some test sketches (led blinky tests) I found out that the main problem was not having the red switches connected to GND. Blue switches where upside down, this was a easy fix. Because these are ON-ON switches, and where already connected to a common line. Then a mixup between D0 and D6 (wires crossed) And it is working! Made some lines and lettering on the frontplate after some playing around.
Sorting my fileserver i found a lot of Bash/Linux scripts maybe useful.
Some are tool usage only, maybe I’ll remove this page. But this being my own log/notebook, who knows
Port knocker .. opens port 22 when you send a tcp packet to port 1600 first. Note: when portscanning it wil close again when accessing 1601 or 1599. Note2: NOT active on my server .. duh!
(Open with a browser or telnet/netcat)
iptables -A INPUT -m state --state ESTABLISHED,RELATED -j ACCEPT
iptables -A INPUT -m state --state NEW -m tcp -p tcp --dport 22 -m recent --rcheck --name SSH -j ACCEPT
iptables -A INPUT -m state --state NEW -m tcp -p tcp --dport 1599 -m recent --name SSH --remove -j DROP
iptables -A INPUT -m state --state NEW -m tcp -p tcp --dport 1600 -m recent --name SSH --set -j DROP
iptables -A INPUT -m state --state NEW -m tcp -p tcp --dport 1601 -m recent --name SSH --remove -j DROP
iptables -A INPUT -m tcp -p tcp --dport 22 -j DROP
Dump and share your log, you get a short link to share
Start in screen
Start screen in "detached" mode. This creates a new session but doesn't attach to it. This is useful for system startup scripts.

/usr/bin/screen -d -m -S backup /usr/local/bin/backup.sh
screen -r backup
Screensize
ctrl-a :fix # Screensize fix
Memory leak check
pmap <pid> | tail -1
Memory leak .. pmap opslaan en vergelijken met een pmap later.
Listen to remote microphone local playback
ssh -C monitor@remoteserver arecord -f dat | aplay -f dat
Root login to named account
ssh-copy-id root@remote-server (one time only)

then:

ssh root@remoteserver

Lookup named account

cat /var/log/secure | grep publickey | cut -f6 -d: | while read ; do ssh-keygen -lf ~/.ssh/authorized_keys | grep $REPLY ;done
2048 SHA256:l85g/NvPnEy85UVfJ5LJw3NvPnEy85UVfJ5LJw3NvPnEy85UVfJ5LJw3 haanstoot@minka (RSA)
log into ovirt engine and postgres
psql -d engine -U postgres -c 'select vm_names,disk_profile_name,storage_id,disk_id,image_guid,disk_alias from public.all_disks;'
Gluster heal info
gluster volume info | egrep "Volume Name|Type"  | grep -B1 Replicate | grep "Volume Name" | cut -c14- | while read ;do gluster volume heal $REPLY info > /tmp/$REPLY.out ; done
ls /tmp/*out  | while read ;do cat $REPLY | grep entries | grep -v "Number of entries: 0" >/dev/null && echo $REPLY ;done | while read heal ; do cat $heal ;done | tac |sed -e '/Number of entries: 0/I,+1 d' | tac | uniq
Some work tips i’ve posted
VI
Vim comments
toevoegen
ga op de eerste regel van de te commenten regel staan
ctrl-v (visual)
naar beneden tot eind regel (met cursor of pagedown)
ctrl-i
#
esc (kan even duren)
verwijderen
ga op de eerste regel van de te uncommenten regel staan
ctrl-v (visual)
naar beneden tot eind regel (met cursor of pagedown)
x
esc
Als user config geedit en geen schrijfrechten?
:!bash
chmod 666 bestand
:wq
chmod bestand naar wat hij was
Input / verwerk door bash vanuit vi
:0,5 !sort # eerste 5 regels door sort heen halen

:r !date # datum in je tekst document
Vim tabs / multiple files
vi /etc/hosts /etc/services
:n
:prev
VIM7 tabs
vim -p /etc/hosts /etc/profile
:tabe /etc/services
:tabn
:tabp
Key mappen
:map <F7> :tabp <CR>
:map <F8> :tabn <CR>
zet deze in je $HOME/.vimrc ... zonder de eerste ":"
Vi redirect
:r date               # datum in text
:1,5!sort -n          # sorteren van eerste 5 regels met een extern commando (kan ook met shift v een visual gedeelte selecteren)
:0,$!cut -f1 -d:      # alleen field 1 van text overhouden (delimiter :)
Vi inspringen bij loop code
selecteer met shift-v de regels die moeten inspringen.
daarna > of < gebruiken om te tabben
Speciale charakters met vi bekijken
:set list
een tab zier er dan uit als ^I
Bash
sudo vergeten in commando
service apache restart
sudo !!
Bash truck vorige commando
doet vorig commando met aangepast keyword
systemctl status ovirt-ha-broker.service
^status^start
{} expand
directory's archief30_tmp t/m archief35_tmp recursive directories chmod 2775 zetten
find achief{30..35}_tmp -type d -exec chmod 2775 {} \;

of

mkdir tmp{1..3}
echo pr{ut,utser}s
1 regel uit een script starten zonder copy-paste (bijvoorbeeld in een remote-console sessie)
grep ipa command uit cobber.ks en voor deze uit
( /usr/sbin/ipa-client-install --domain=mgtdomain --enable-dns-updates -w password --realm=domain --server=server.domain --hostname=hypervisor.domain --unattended --force-ntpd )
cat cobbler.ks | grep ipa | bash
Bash karakters omdraaien
Linkerhand rechterhand coordinatie probleem smile
upadte
ga op de d staan en druk ctrl-t
Bash laatste woord vorige regel
ls -latrd /var/data/extra/backup
chmod 775 <ESC(punt)>
Ssh forward bij een running sessie
[haanstoot@xxx202 ~]$
~C (tilde C)
-L8080:localhost:80 (redirect localhost port 80 naar eigen machine poort 8080
-D9999 (Dynamic socks forward, zie andere post in deze wiki)
CTRL-C werkt niet?
ctrl\
SSH .ssh/config
KeepAlive yes <---------- dont die on me
ServerAliveInterval 60 <---------- dont die on me
Host *.domain <-- voor alle hosts in radlan fast login en geen vraag over key
   StrictHostKeyChecking no
   UserKnownHostsFile=/dev/null

host *.domain <-- domain is altijd mijn user
        user haanstoot
        GSSAPIAuthentication no <-- speedup

host pruts*.domain
        user pi
Parallel tasks
4 parallel jobs
find jpg -type f -name \*.jpg -print0 | xargs -0 -n1 -P4 ./convert.sh
clusterssh truck
clusterssh alle svgs <--- naar alle svgs
sudo su -
cd /bricks/*/store <--- cd naar deze als bestaat
cd /rhgs/brick0*/store <-- cd naar deze als bestaat (nu sta je in atelier directories als deze bestaat als root in de svgs)
pwd | grep store || logout <--- geen atelier dir waar je staat? dan logout
id | grep haanstoot && logout <-- net logout? dus eigen user ... dan logout
eindresultaat ... als root in atelier volumes op svgs waar ze bestaan
Start in screen
/usr/bin/screen -d -m -S backup /usr/local/bin/backup.sh
screen -r backup
Start screen in "detached" mode. This creates a new session but doesn't attach to it. This is useful for system startup scripts.
Sudo vergeten
systemctl restart httpd (wil niet als user)
sudo !!
(doet "sudo systemctl restart httpd")
Reuse arguments

Bijvoorbeeld:
# touch file1 file2 file3 file4
# chmod 777 !*

Voert uit: chmod 777 file1 file2 file3 file4
5 meeste disk gebruikers human readable
du -hsx * | sort -rh | head -5
rm groot bestand duurt lang
: > /mappen2/archieven/test.img
Check memory bankjes
sudo dmidecode| grep  -i -B1 "Form Factor" (B1 betekend BEFORE 1 regel meenemen, A is AFTER)

        Size: 8192 MB
        Form Factor: DIMM
--
        Size: 8192 MB
        Form Factor: DIMM
--
        Size: No Module Installed
        Form Factor: DIMM
--
Set time and restart NTP service
sudo service ntpd stop && sudo ntpdate ntp1.domain && sudo ntpdate ntp2.domain && sudo service ntpd start
Aliases en terminal kleuren
In een terminal f*ckedup colors?
komt door de alias
alias ls='ls --color'
deze even uitzetten / niet gebruiken?
\ls
Werkt voor alle aliassen
Snelle delete
Niet onderstaande gebruiken voor grote dirs
rm -rf /path/bla
Maar
mkdir /tmp/leeg ; rsync -a --delete /tmp/leeg /path/bla
Bash best practices
BashBestPractices
Script log replay
script --timing=/tmp/time.txt /tmp/script.log
scriptreplay -t /tmp/time.txt /tmp/script.log
There are toooo many cool sniplets .. only adding when i’m bored.
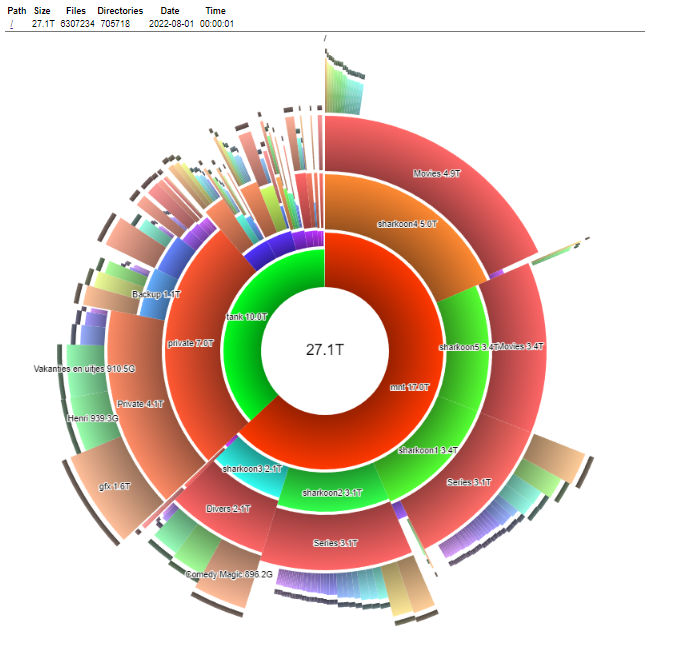
Loads of stuff on my main fileserver. (Graph is a great tool called DUC) https://duc.zevv.nl/
Besides a search engine, i have a file finder. Due to the massive amount of data, i like to find things by other means than knowing the directory structure.
I can find files by filename, but also by contents.
I’ll talk about find by contents first.
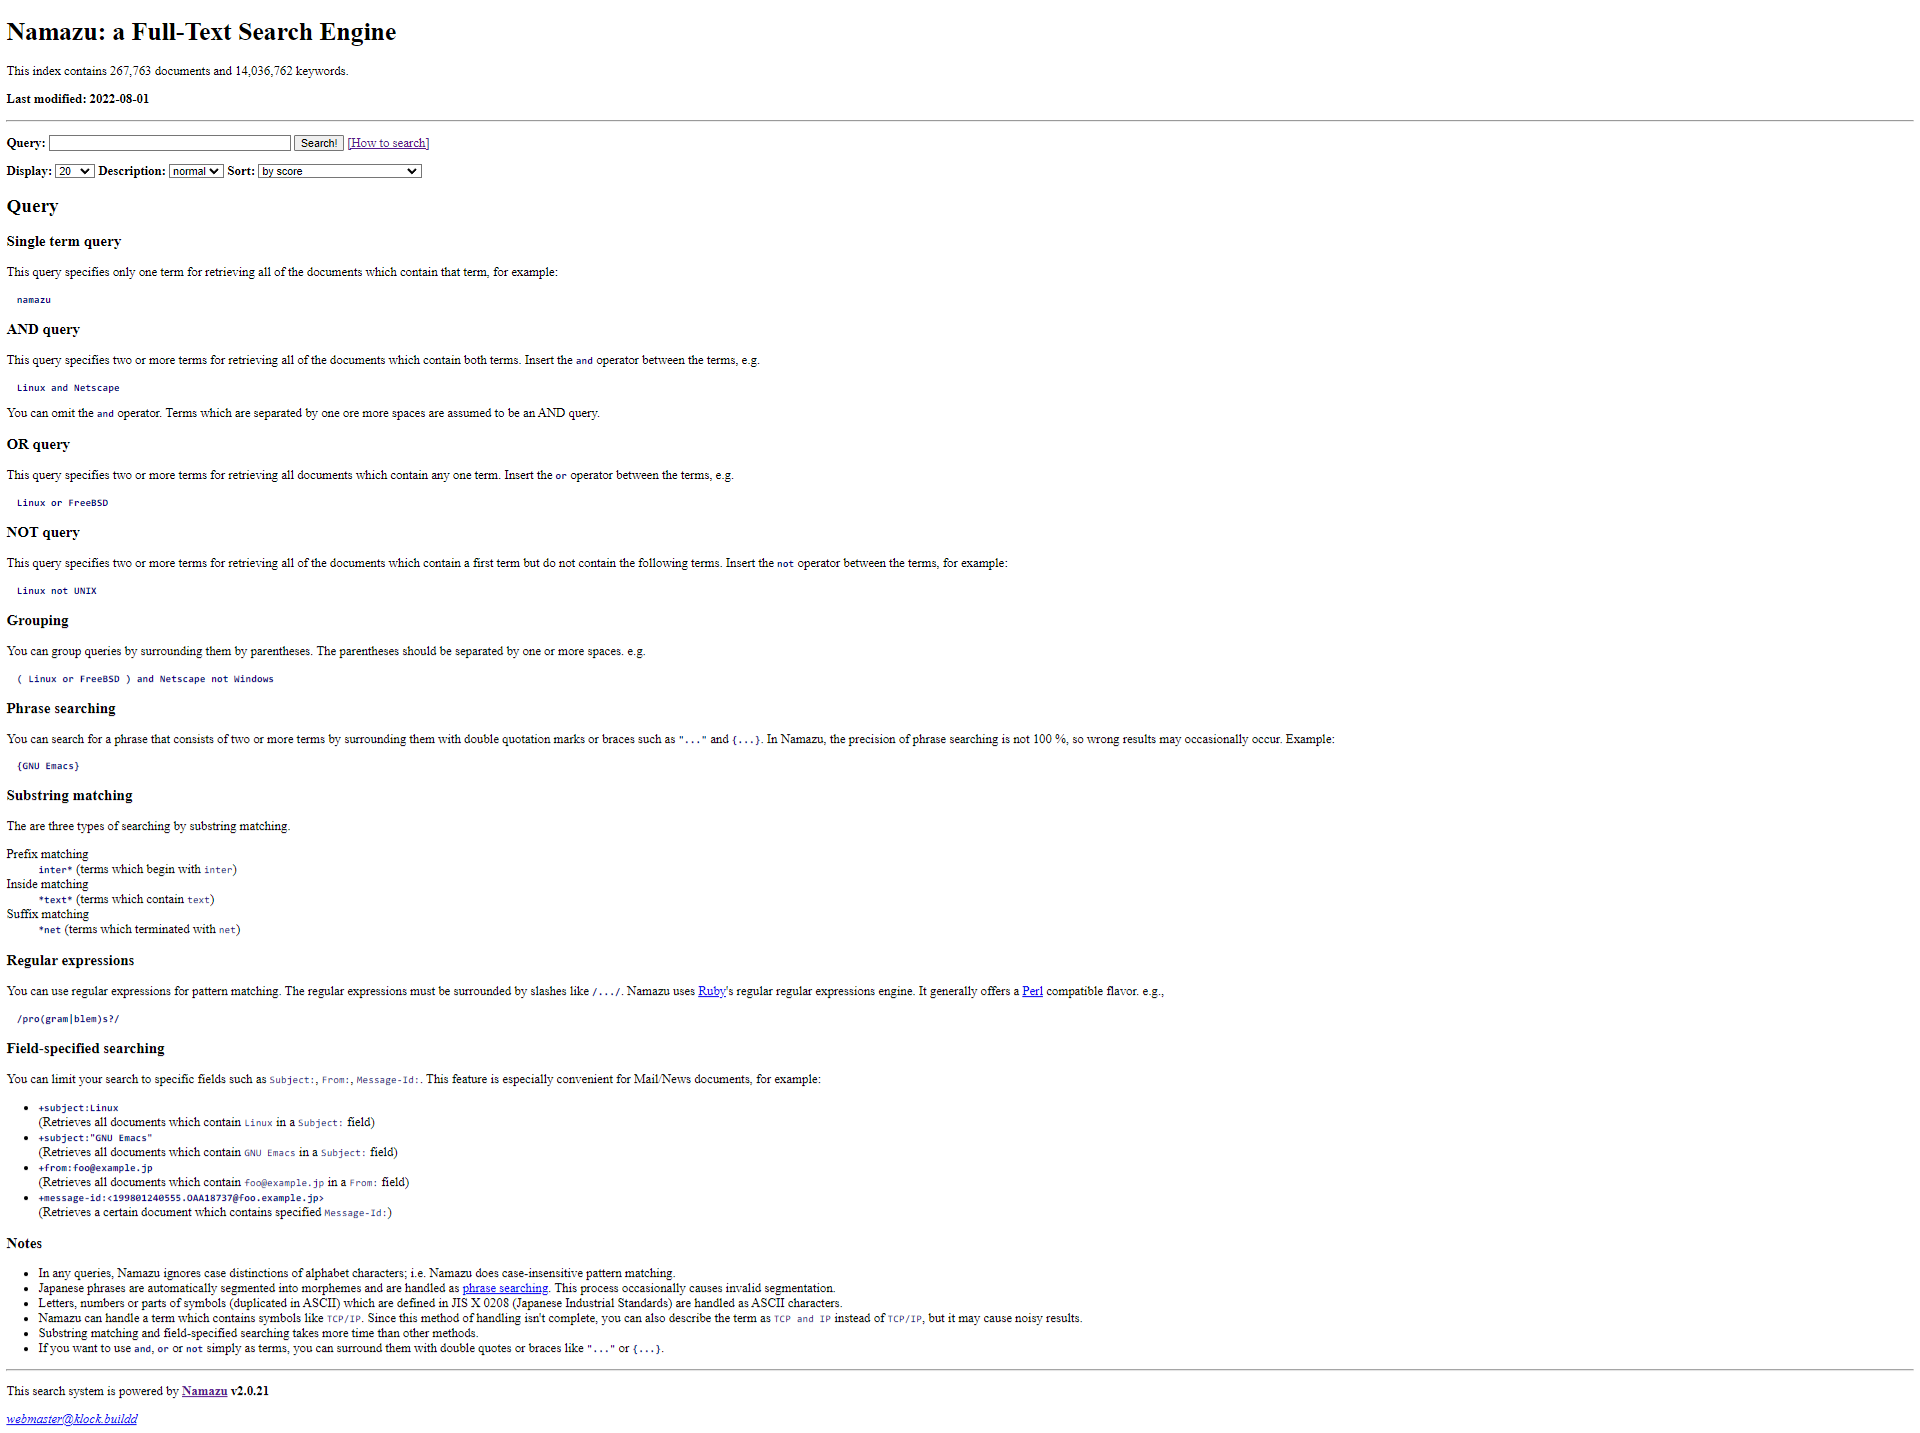
I’ve got loads of documents in Pdf, HTML, txt, doc, sheets , wordperfect etcetera. Those documents i can find using a tool named Namazu. This is quite a old tool, but i’m using it for a long time and it still works great. I didn’t find a better replacement yet. (But i’ve been looking into : elasticsearch, Solr, Lucene)
http://www.namazu.org/ is easy to install, but if you want the tool to scrape different kinds of documents you have to add some additional software.
My multipurpose printer can scan pages in pdf. Those are only embedded jpg’s in a pdf container. I will talk about how i handle these later.
My current start page : This index contains 267,763 documents and 14,036,762 keywords.
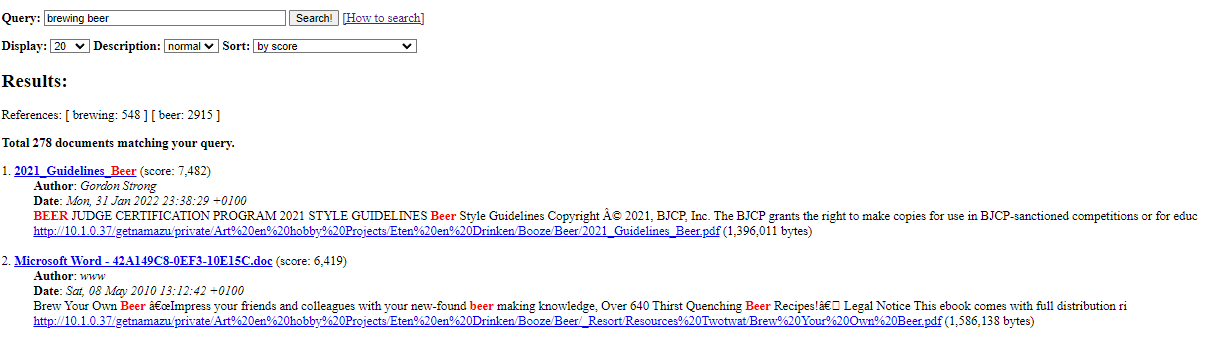
Search example of namazu
Some things to consider when implementing namazu:
tweak the file types to scrape, it makes no sense to scrape binaries
you can set a parameter in the config for search only, this disables downloading the found link in the results!
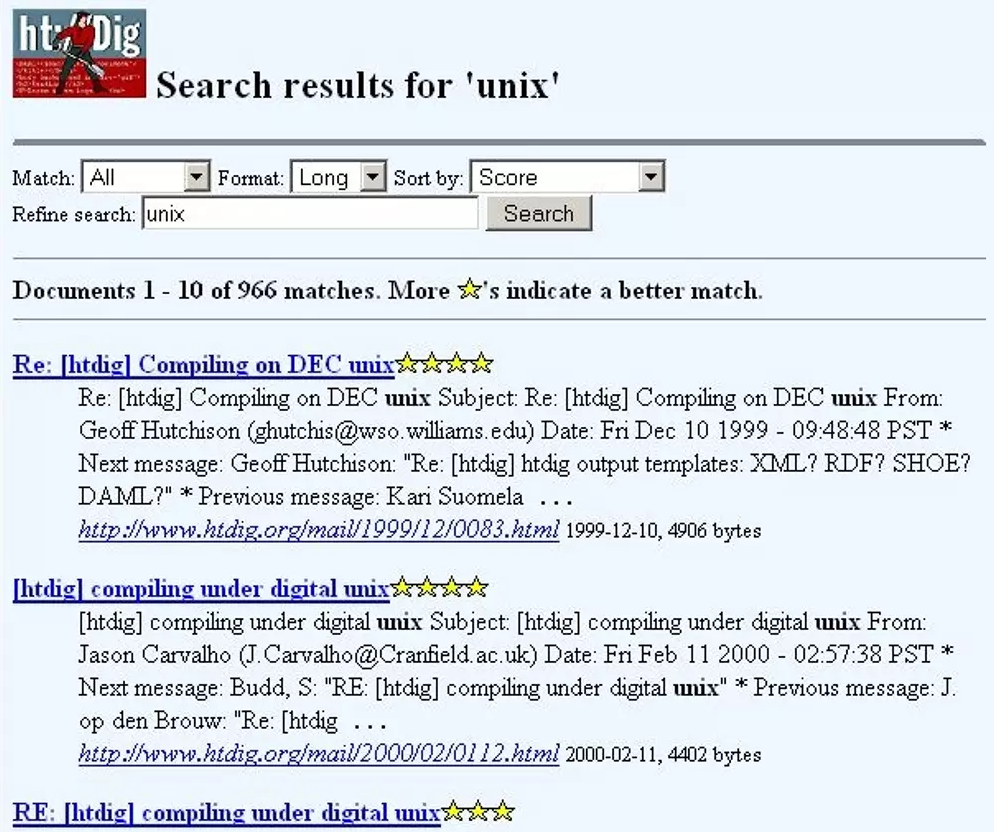
Before Namazu i used HtDig.
Screenshot htdig
HtDIg also can scrape remote websites, Namazu can’t.
Preparing PDF for indexing:
I’ve written some scripts to make PDFs containing scanned text scrape-able. ( https://gitlab.com/fash/inotify-scanner-parser ) What it does:
My scanner puts a scanned pdf on my fileserver in a certain directory
Inotify detects a written file
it will copy the file, run OCR on it (tesseract) and writes a txt file (scapeable)
After that the text will be embedded (overlay) on the PDF, so now it becomes searchable/scrapeable
When certain keywords are found, it will sort documents in subdirs
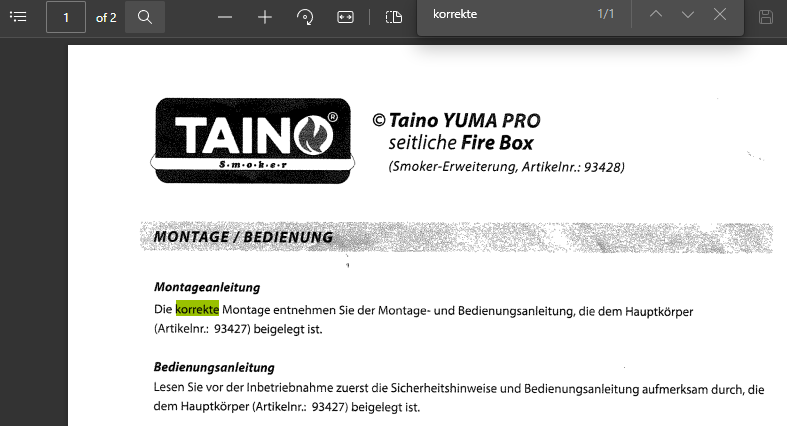
Example from a scanned jpg, i can find OCR words! (note .. the overlay is exact on the found words)
Finding files by name:
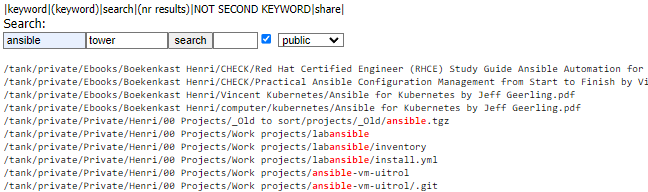
For finding files a made a little webpage like this:
It is a simple webpage grabbing through a list of files. It takes the first keyword and does a grep, it takes a second keyword to match also. I can select different file databases to search. (This case is private) Between search and private i can give the number of entries to print. So i can do Search “ansible” NOT “tower” 50 entries from the public fileset