Use inspect in your webbrowser and change password into input.
Just search in the form part.
(No you can’t copy paste the ******* field. But you can when you changed this to input)
Hint: Some browsers will highlight the part you are hovering over.
Use inspect in your webbrowser and change password into input.
Just search in the form part.
(No you can’t copy paste the ******* field. But you can when you changed this to input)
Hint: Some browsers will highlight the part you are hovering over.

See inline comments:
# Add vlan bridge
/interface bridge
add name=bridge_vlan5

# add security profile for wifi
/interface wireless security-profiles
set [ find default=yes ] supplicant-identity=MikroTik
add authentication-types=wpa2-psk eap-methods="" mode=dynamic-keys name=iot supplicant-identity=""

# add virtual wifi to 2.4G and 5G APs
/interface wireless
set [ find default-name=wlan2 ] band=2ghz-g/n country=netherlands disabled=no distance=indoors frequency=auto installation=indoor mode=ap-bridge security-profile=xxxxxxxxxxx ssid=MYSSID station-roaming=enabled wireless-protocol=802.11 wps-mode=\
    disabled
set [ find default-name=wlan1 ] band=5ghz-a/n/ac channel-width=20/40mhz-Ce country=netherlands disabled=no distance=indoors frequency=auto installation=indoor mode=ap-bridge name=wlan5 security-profile=xxxxxxxxxxxxx skip-dfs-channels=all ssid=\
    MYSSID station-roaming=enabled wireless-protocol=802.11 wps-mode=disabled
add disabled=no keepalive-frames=disabled mac-address=4A:8F:5A:48:A4:69 master-interface=wlan2 multicast-buffering=disabled name=wlan_iot2 security-profile=iot ssid=IOT vlan-id=5 vlan-mode=use-tag wds-cost-range=0 wds-default-cost=0 \
    wps-mode=disabled
add disabled=no keepalive-frames=disabled mac-address=4A:8F:5A:80:CE:1D master-interface=wlan5 multicast-buffering=disabled name=wlan_iot5 security-profile=iot ssid=IOT vlan-id=5 vlan-mode=use-tag wds-cost-range=0 wds-default-cost=0 \
    wps-mode=disabled

# Add vlans to virtual Wifi
/interface vlan
add interface=wlan_iot2 name=vlan5_iot-2 vlan-id=5
add interface=wlan_iot5 name=vlan5_iot-5 vlan-id=5

# add ip range for dhcp
/ip pool
add name=dhcp_pool5_iot ranges=10.5.0.2-10.5.0.200

# add dhcp server with above range
/ip dhcp-server
add address-pool=dhcp_pool5_iot interface=bridge_vlan5 name=dhcpiot

# add vlans and interfaces to vlan  bridge
/interface bridge port
add bridge=bridge interface=wlan_iot2
add bridge=bridge interface=wlan_iot5
add bridge=bridge_vlan5 interface=vlan5_iot-5
add bridge=bridge_vlan5 interface=vlan5_iot-2

# add vlan to existing bridge (Not really needed) is for inter vlan traffic
/interface bridge vlan
add bridge=bridge_vlan5 vlan-ids=5

# add interfaces to LAN list (firewall needs this)
/interface list member
add interface=vlan5_iot-2 list=LAN
add interface=bridge_vlan5 list=LAN
add interface=vlan5_iot-5 list=LAN

# Add gateway/dhcpserver ip address
/ip address
add address=10.5.0.254/24 comment="IOT (vlan5)" interface=bridge_vlan5 network=10.5.0.0

# dhcp server network
/ip dhcp-server network
add address=10.5.0.0/24 dns-server=1.1.1.1 gateway=10.5.0.254 netmask=24

# generic NAT rule
/ip firewall nat
add action=masquerade chain=srcnat comment="defconf: masquerade" ipsec-policy=out,none out-interface-list=WAN
When plugging an ethernet cable in port one, the alarm will sound.
And a mqtt message is being send
In the script is a little sound effect loop, maybe I’m going to write a ABC musicnotation / BagpipeMusicWriter to beep commands.
Script
:do {
	:local broker "NR"
        :local topic "crs109/ether1/alarm"
        :local int1 ether1;
	:foreach a in=[/interface find name=$int1] do={
		:local status [/interface get $a running];
		:if ($status=true) do={
                     :for t1 from=1 to=8 step=1 do={
                     :for t2 from=600 to=750 step=8 do={
                     :beep frequency=$t2 length=11ms;
                     :delay 11ms;
                     }
                     }
                /iot mqtt publish broker=$broker topic=$topic message="{\"ether1\":\"connected\"}"
                }
	}
}
Schedule
/system scheduler
add interval=5s name=schedule1 on-event=script1 policy=\
    ftp,reboot,read,write,policy,test,password,sniff,sensitive,romon \
    start-date=may/14/2023 start-time=23:25:36
I’ve made a arpscanner in the past
https://www.henriaanstoot.nl/2019/10/15/arpscanner/
But i’m going to migrate the server this is running on.
So I played with ssh commands using ssh connections with a ssh-key, also using Ansible is possible.
ssh user@mikrotik /interface wireless registration-table print
But I didn’t like the continuous logins with automated logins.
So below solution is what i’ve implemented for now.
I’ve installed the IOT extra package from Mikrotik, now I can send MQTT messages from my Wifi enabled Mikrotiks to my Mosquitto broker.
(Download extra package zip, extract iot-7.x-arm.npk, upload this to your mikrotik files folder, and reboot)
The script I’m running on my Mikrotik, sends the active wifi connections with the comments. ( When a comment is set in the Access List, then it’s a know connection )
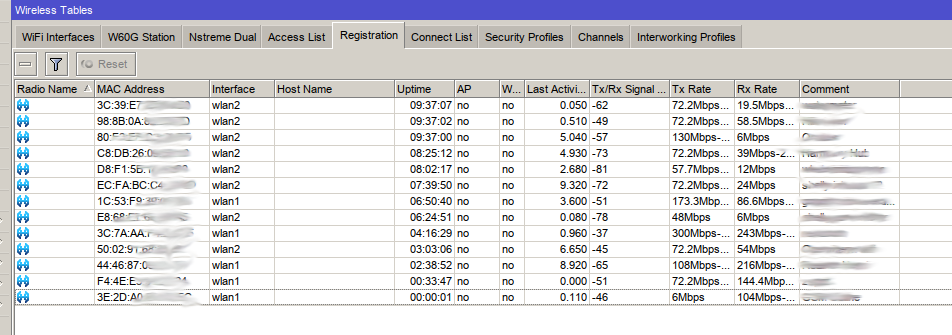
[admin@RB40111] /iot/mqtt> export
# may/15/2023 21:45:12 by RouterOS 7.9
# software id = xxxx-xxxx
#
# model = RB4011iGS+5HacQ2HnD
# serial number = xxxxxxxxxxxxxxxxx
/iot mqtt brokers
add address=10.1.x.y client-id=rb4011 name=NR
I made the following script on my MT named mqtt
:local broker "NR"

# MQTT topic where the message should be published
:local topic "rb4011/mac"

:foreach i in=[/interface wireless registration-table print proplist=mac-address as-value] do={
:local message "$i"

/iot mqtt publish broker=$broker topic=$topic message=$message
}
A schedule is needed to run this script every 15 minutes
[admin@RB40111] /system/scheduler> export
# may/15/2023 21:48:14 by RouterOS 7.9
# software id = xxxx-xxx
#
# model = RB4011iGS+5HacQ2HnD
# serial number = xxxxxxxxxxx
/system scheduler
add interval=15m name=mqtt on-event=mqtt policy=\
    ftp,reboot,read,write,policy,test,password,sniff,sensitive,romon \
    start-date=may/15/2023 start-time=13:30:54
Now all wifi connections will be send to topic rb4011/mac.
# Example
.id=*6a;comment=Mobile Henri wlan2;mac-address=44:46:87:xx:xx:xx
Using NodeRed I can make filters and notifications

Below function: get Mac and Comment from payload, if the comment is empty then it is a unknown connection … so send me a warning using Pushover.
// filter function
var output = msg.payload.split(";");

var comment = (output[1].split("="));
var mac = (output[2].split("="));

msg.payload={};
msg.payload = mac[1];
if (comment[1] == "") {
return msg;
}

// is xx:xx:xx:xx:xx:xx online? example
var output = msg.payload.split(";");

var comment = (output[1].split("="));
var mac = (output[2].split("="));

msg.payload={};
msg.payload = mac[1];
if (mac[1] == "xx:xx:xx:xx:xx:xx") {
return msg;
}
Now i’m getting a notification when an unknown wifi connection is made on my Access Point.
( I going to implement the Access List from MT at a later point. No access when not in the Access List)
3D printed a case for my fluxengine.
Last week I got my 1.2MB 5.25″ drive.
And tested it with the fluxengine.
Now i can read old 5.25″ disks again. And convert these to disk images.
Amiga/Atari ST/C64 (single side) and my old MSDos disks.
(That’s what I’m using, the fluxengine can read many more)
Why single side C64? you ask?
Those are flippy disks, that means they are single sided and you flip the disk in the drive to read the other side.
Why can’t the fluxengine read those?
Note: The 1541 Drive for the commodore’s is a complete 6502 computer with 2x 6522 VIA and ram/rom chips! (2016-15 2K x 8 bit Static RAM / 27128 16kb x 8)
see: https://www.henriaanstoot.nl/tag/6502/
And this amazing trick:
https://www.youtube.com/watch?v=zprSxCMlECA
Maybe i’m going to modify my 5.25 drive with another index sensor.
So i downloaded a diskdrive case from thingiverse, which can hold 2 drives. 3.5″and 5.25″.
https://www.thingiverse.com/thing:3089895
I started printing the bottom, no problem there. But because of the large size of bottom and top. (Both about a day of printing) I had to change the filament.
But I didn’t have a good look at what I took!
Below is what you get when printing PLA and switch to PETG!
Temperatures for PLA:
Tool: 200 and bed 50
Temperatures for PETG:
Tool: 240 and bed 70
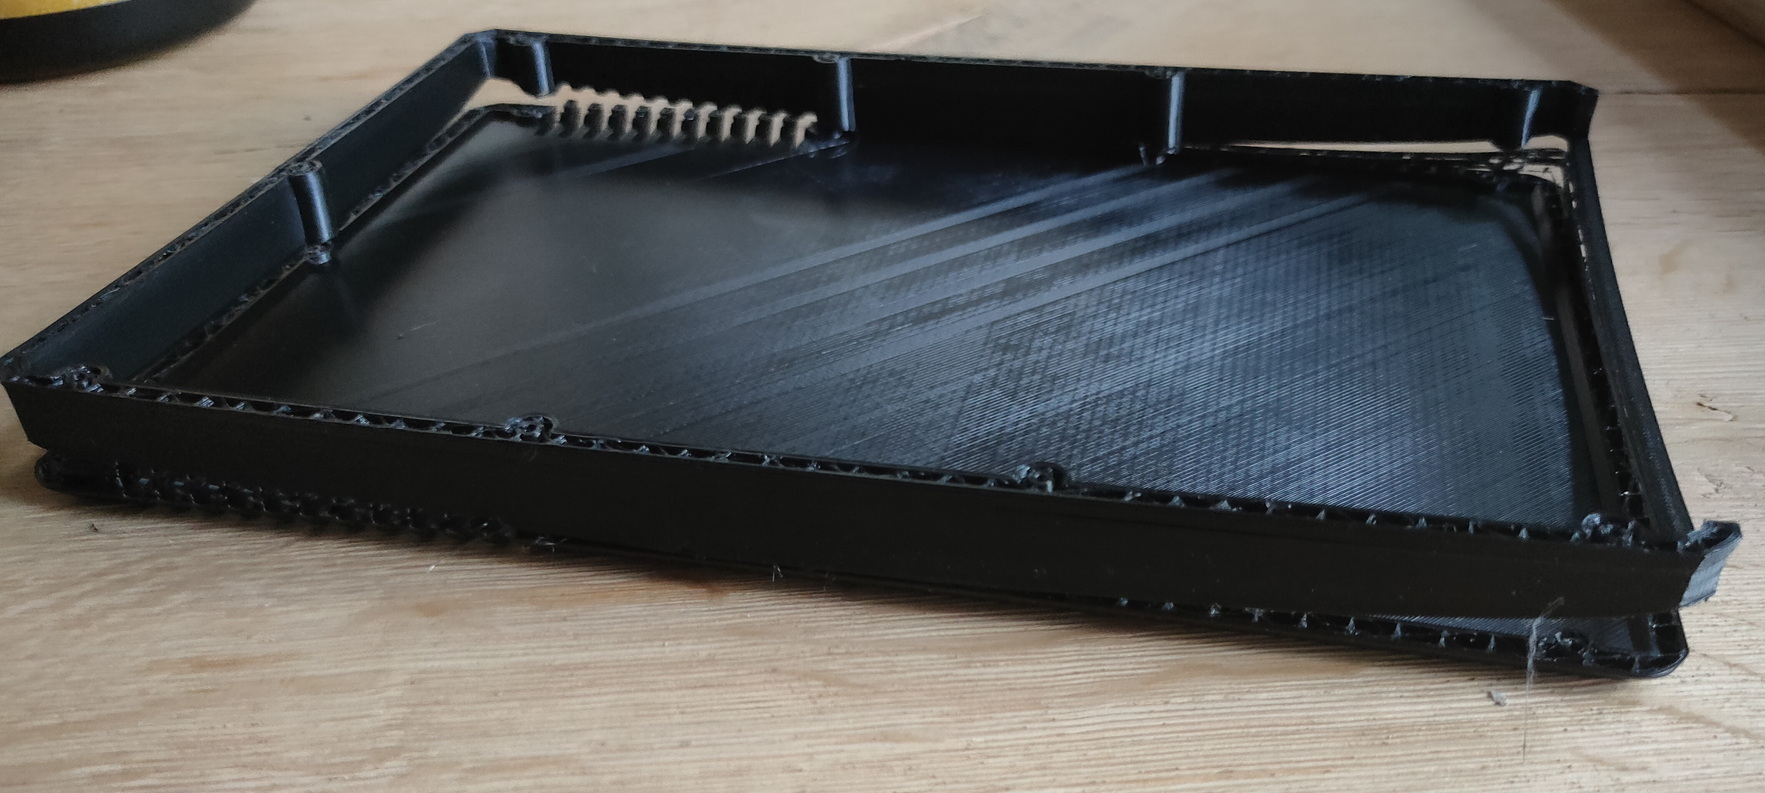
So 12 hours printing and I had to start again.
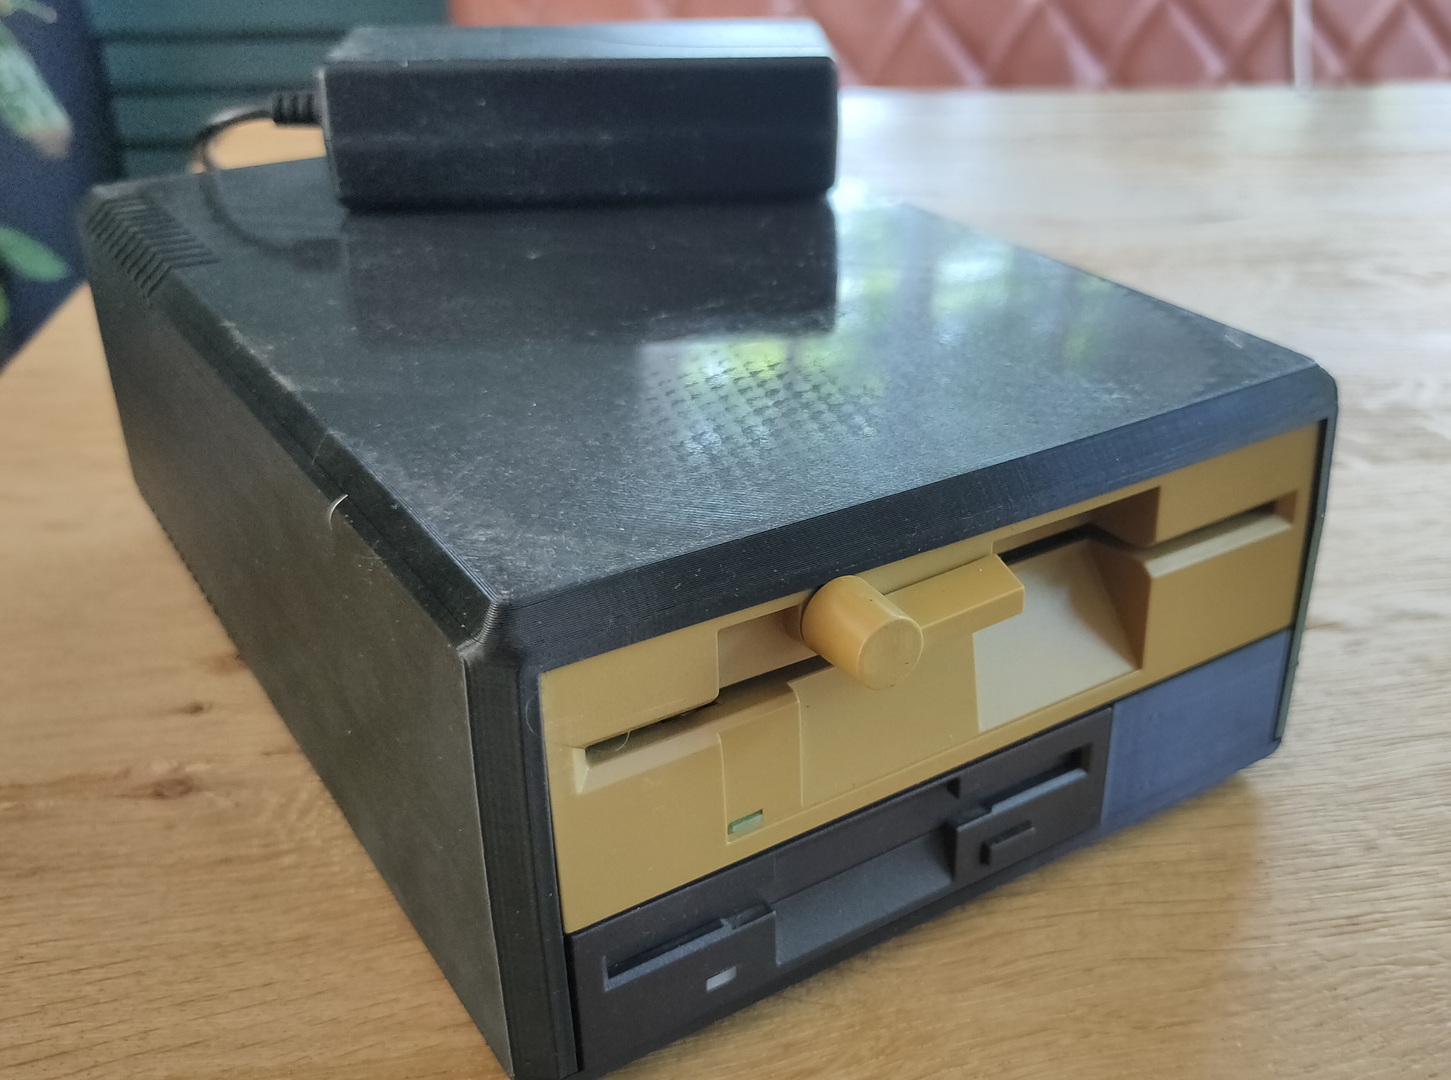
I could not remove the knob, else I would have removed the beige front and spray painted this black.
My work document for my Mikrotiks
(Also for my friend Vincent, with a similar setup.)
I’m going to collect information on this page for below changes.
WIFI
Zerotier
IOT
Move all clients to own vlan
New or better VLAN setup
Info
YT : https://www.youtube.com/watch?v=Hqu8JlieSq4
UPDATE FROM: https://www.henriaanstoot.nl/2023/05/08/wss-websocket-to-mqtt-updating-website/
Mqtt controlled
for f in 1 2 3 4 5 6 7 0 ; do mosquitto_pub -h mqttserver -t web/mapviewer -m $f ;sleep 2 ;doneBelow can be used in yesterdays script.
And can be called as image source.
<img src="draw.php?direction=0">
CODE
<?php

function imagelinethick($image, $x1, $y1, $x2, $y2, $color, $thick = 3)
{
    /* this way it works well only for orthogonal lines
    imagesetthickness($image, $thick);
    return imageline($image, $x1, $y1, $x2, $y2, $color);
    */
    if ($thick == 1) {
        return imageline($image, $x1, $y1, $x2, $y2, $color);
    }
    $t = $thick / 2 - 0.5;
    if ($x1 == $x2 || $y1 == $y2) {
        return imagefilledrectangle($image, round(min($x1, $x2) - $t), round(min($y1, $y2) - $t), round(max($x1, $x2) + $t), round(max($y1, $y2) + $t), $color);
    }
    $k = ($y2 - $y1) / ($x2 - $x1); //y = kx + q
    $a = $t / sqrt(1 + pow($k, 2));
    $points = array(
        round($x1 - (1+$k)*$a), round($y1 + (1-$k)*$a),
        round($x1 - (1-$k)*$a), round($y1 - (1+$k)*$a),
        round($x2 + (1+$k)*$a), round($y2 - (1-$k)*$a),
        round($x2 + (1-$k)*$a), round($y2 + (1+$k)*$a),
    );
    imagefilledpolygon($image, $points, 4, $color);
    return imagepolygon($image, $points, 4, $color);
}
header("Content-Type: image/png");
$im = imagecreate(640, 640);
$background_color = imagecolorallocate($im, 0, 0, 0);
$text_color = imagecolorallocate($im, 255, 255, 255);
$text_color1 = imagecolorallocate($im, 128, 128, 128);

$max=640;
$depth1=80;
$depth2=160;
$depth3=190;
$depthcolor1 = imagecolorallocate($im, 255, 255, 255);
$depthcolor2 = imagecolorallocate($im, 128, 128, 128);
$depthcolor3 = imagecolorallocate($im, 32, 32, 32);

$direction = $_GET["direction"];


// draw always
imagelinethick($im,0,0,$depth1,$depth1,$depthcolor1);
imagelinethick($im,$max,0,$max-$depth1,$depth1,$depthcolor1);
imagelinethick($im,0,$max,$depth1,$max-$depth1,$depthcolor1);
imagelinethick($im,$max,$max,$max-$depth1,$max-$depth1,$depthcolor1);

if ( $direction == "1" ) {
imagelinethick($im,$max-$depth1,$depth1,$max-$depth2,$depth2,$depthcolor2);
imagelinethick($im,$max-$depth1,$max-$depth1,$max-$depth2,$max-$depth2,$depthcolor2);
imagelinethick($im,$max-$depth2,$depth2,$max-$depth2,$max-$depth2,$depthcolor2);
imagelinethick($im,$depth1,$max-$depth2,$max-$depth2,$max-$depth2,$depthcolor2);
imagelinethick($im,$depth1,$depth2,$max-$depth2,$depth2,$depthcolor2);
// front
imagelinethick($im,$depth1,$depth1,$depth1,$max-$depth1,$depthcolor1);
}

if ( $direction == "4" ) {
imagelinethick($im,$depth1,$max-$depth1,$depth2,$max-$depth2,$depthcolor2);
imagelinethick($im,$depth1,$depth1,$depth2,$depth2,$depthcolor2);
imagelinethick($im,$depth2,$depth2,$depth2,$max-$depth2,$depthcolor2);
imagelinethick($im,$depth2,$max-$depth2,$max-$depth1,$max-$depth2,$depthcolor2);
imagelinethick($im,$depth2,$depth2,$max-$depth1,$depth2,$depthcolor2);
// front
imagelinethick($im,$max-$depth1,$depth1,$max-$depth1,$max-$depth1,$depthcolor1);
}

if ( $direction == "5" ) {
imagelinethick($im,$depth1,$depth2,$max-$depth1,$depth2,$depthcolor2);
imagelinethick($im,$depth1,$max-$depth2,$max-$depth1,$max-$depth2,$depthcolor2);
// front
imagelinethick($im,$depth1,$depth1,$depth1,$max-$depth1,$depthcolor1);
imagelinethick($im,$max-$depth1,$depth1,$max-$depth1,$max-$depth1,$depthcolor1);
}

if ( $direction == "2" ) {
imagelinethick($im,$depth1,$depth1,$depth2,$depth2,$depthcolor2);
imagelinethick($im,$max-$depth1,$depth1,$max-$depth2,$depth2,$depthcolor2);
imagelinethick($im,$max-$depth1,$max-$depth1,$max-$depth2,$max-$depth2,$depthcolor2);
imagelinethick($im,$depth1,$max-$depth1,$depth2,$max-$depth2,$depthcolor2);
imagelinethick($im,$depth2,$depth2,$depth3,$depth3,$depthcolor3);
imagelinethick($im,$max-$depth2,$depth2,$max-$depth3,$depth3,$depthcolor3);
imagelinethick($im,$depth2,$max-$depth2,$depth3,$max-$depth3,$depthcolor3);
imagelinethick($im,$max-$depth2,$max-$depth2,$max-$depth3,$max-$depth3,$depthcolor3);
}

if ( $direction == "3" ) {
imagelinethick($im,$max-$depth1,$depth1,$max-$depth2,$depth2,$depthcolor2);
imagelinethick($im,$max-$depth1,$max-$depth1,$max-$depth2,$max-$depth2,$depthcolor2);
imagelinethick($im,$depth2,$depth2,$depth1,$depth2,$depthcolor2);
imagelinethick($im,$depth2,$max-$depth2,$depth1,$max-$depth2,$depthcolor2);
imagelinethick($im,$depth2,$depth2,$depth2,$max-$depth2,$depthcolor2);

//depth3
imagelinethick($im,$depth2,$depth2,$depth3,$depth3,$depthcolor3);
imagelinethick($im,$max-$depth2,$depth2,$max-$depth3,$depth3,$depthcolor3);
imagelinethick($im,$depth2,$max-$depth2,$depth3,$max-$depth3,$depthcolor3);
imagelinethick($im,$max-$depth2,$max-$depth2,$max-$depth3,$max-$depth3,$depthcolor3);
//front
imagelinethick($im,$depth1,$depth1,$depth1,$max-$depth1,$depthcolor1);
}

if ( $direction == "6" ) {
imagelinethick($im,$depth1,$depth1,$depth2,$depth2,$depthcolor2);
imagelinethick($im,$depth1,$max-$depth1,$depth2,$max-$depth2,$depthcolor2);
imagelinethick($im,$max-$depth1,$depth2,$max-$depth2,$depth2,$depthcolor2);
imagelinethick($im,$max-$depth1,$max-$depth2,$max-$depth2,$max-$depth2,$depthcolor2);
imagelinethick($im,$max-$depth2,$max-$depth2,$max-$depth2,$depth2,$depthcolor2);

//depth3
imagelinethick($im,$depth2,$depth2,$depth3,$depth3,$depthcolor3);
imagelinethick($im,$max-$depth2,$depth2,$max-$depth3,$depth3,$depthcolor3);
imagelinethick($im,$depth2,$max-$depth2,$depth3,$max-$depth3,$depthcolor3);
imagelinethick($im,$max-$depth2,$max-$depth2,$max-$depth3,$max-$depth3,$depthcolor3);
//front
imagelinethick($im,$max-$depth1,$depth1,$max-$depth1,$max-$depth1,$depthcolor1);
}

if ( $direction == "7" ) {
imagelinethick($im,$depth1,$depth2,$depth2,$depth2,$depthcolor2);
imagelinethick($im,$depth1,$max-$depth2,$depth2,$max-$depth2,$depthcolor2);
imagelinethick($im,$depth2,$max-$depth2,$depth2,$depth2,$depthcolor2);
imagelinethick($im,$max-$depth1,$depth2,$max-$depth2,$depth2,$depthcolor2);
imagelinethick($im,$max-$depth1,$max-$depth2,$max-$depth2,$max-$depth2,$depthcolor2);
imagelinethick($im,$max-$depth2,$max-$depth2,$max-$depth2,$depth2,$depthcolor2);
//depth3
imagelinethick($im,$depth2,$depth2,$depth3,$depth3,$depthcolor3);
imagelinethick($im,$max-$depth2,$depth2,$max-$depth3,$depth3,$depthcolor3);
imagelinethick($im,$depth2,$max-$depth2,$depth3,$max-$depth3,$depthcolor3);
imagelinethick($im,$max-$depth2,$max-$depth2,$max-$depth3,$max-$depth3,$depthcolor3);
//front
imagelinethick($im,$max-$depth1,$depth1,$max-$depth1,$max-$depth1,$depthcolor1);
imagelinethick($im,$depth1,$depth1,$depth1,$max-$depth1,$depthcolor1);
}

if ( $direction == "0" ) {
imagelinethick($im,$depth1,$depth1,$max-$depth1,$depth1,$depthcolor1);
imagelinethick($im,$max-$depth1,$depth1,$max-$depth1,$max-$depth1,$depthcolor1);
imagelinethick($im,$max-$depth1,$max-$depth1,$depth1,$max-$depth1,$depthcolor1);
imagelinethick($im,$depth1,$max-$depth1,$depth1,$depth1,$depthcolor1);
}

imagepng($im);
imagedestroy($im);
?>
Using a mqtt server with websockets and a website with the Eclipse Paho JavaScript Client
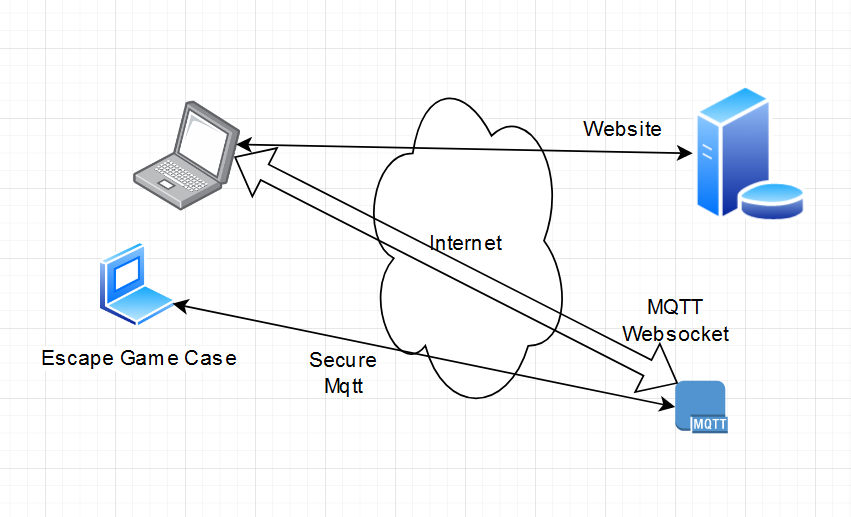
Above video: Joystick sends movement through the internet to my mqtt server, laptop is fetching a webpage from one of my webservers.
A piece of javascript connects via websockets to the mqtt server and realtime changes the displayed image.
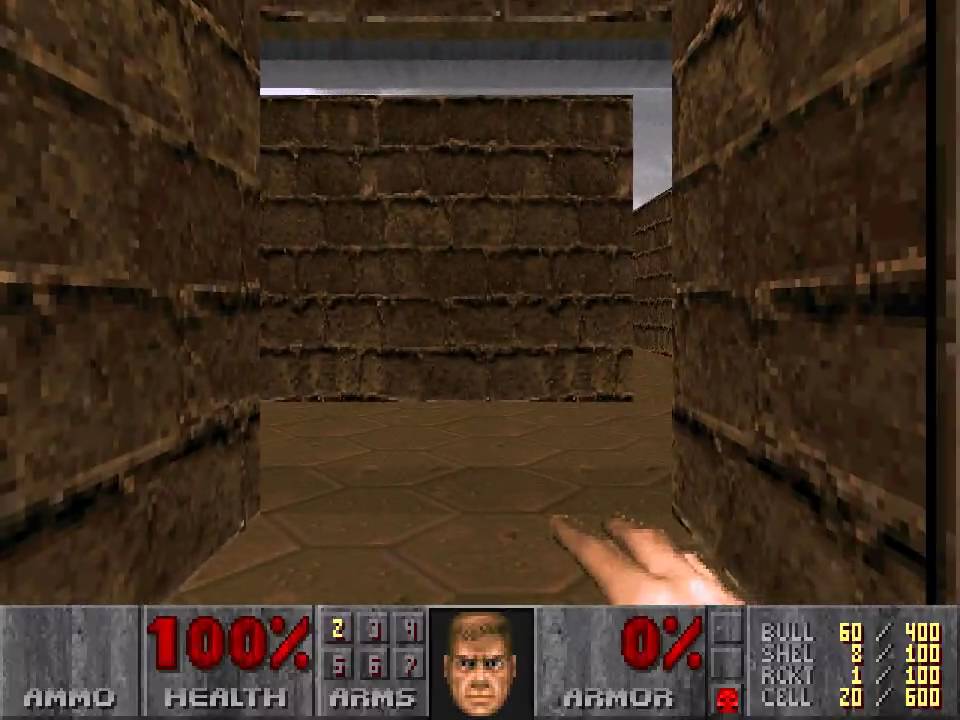
I intend to display maps and views into a maze you can walk through. like: (shamelessly stolen image from the internet)
I already have written another piece of code which generates a maze, and tells you using samples which way to go.

CODE
<?xml version="1.0" encoding="UTF-8" standalone="no"?>
<!DOCTYPE html PUBLIC "-//W3C//DTD XHTML 1.0 Transitional//EN" "http://www.w3.org/TR/xhtml1/DTD/xhtml1-transitional.dtd">
<html xmlns="http://www.w3.org/1999/xhtml">
  <head>
    <title></title>
<meta name="viewport" content="width=device-width,height=device-height,initial-scale=1.0"/>
    <script src="https://cdnjs.cloudflare.com/ajax/libs/paho-mqtt/1.0.1/mqttws31.js" type="text/javascript"></script>
     <script type = "text/javascript"
         src = "https://ajax.googleapis.com/ajax/libs/jquery/2.1.3/jquery.min.js"></script>
    <script type = "text/javascript">
    var connected_flag=0
    var mqtt;
    var reconnectTimeout = 2000;
    var host="MQTTSERVER";
    var port=8084;
var sub_topic="web/#";
    function onConnectionLost(){
    connected_flag=0;
			    document.getElementById("status").innerHTML = "Connection to HQ Lost";

    }
    function onFailure(message) {
        console.log("Failed");
        setTimeout(MQTTconnect, reconnectTimeout);
        }
    function onMessageArrived(r_message){
        var topic=r_message.destinationName;
			    document.getElementById("status").innerHTML = "";

        if(topic=="web/mapviewer")
        {
			    $(".deze").attr("src","tiles/" + r_message.payloadString + ".png");
        }
        }
    function onConnected(recon,url){
    console.log(" in onConnected " +reconn);
    }
    function onConnect() {
      // Once a connection has been made, make a subscription and send a message.
    connected_flag=1
			    document.getElementById("status").innerHTML = "Connection made to HQ";

    mqtt.subscribe(sub_topic);
      }

    function MQTTconnect() {

    console.log("connecting to "+ host +" "+ port);
    var x=Math.floor(Math.random() * 10000);
    var cname="controlform-"+x;
    //var cname="escape1";
    mqtt = new Paho.MQTT.Client(host,port,cname);
    var options = {
	useSSL:true,
        timeout: 3,
        onSuccess: onConnect,
        onFailure: onFailure,

     };

        mqtt.onConnectionLost = onConnectionLost;
        mqtt.onMessageArrived = onMessageArrived;

    mqtt.connect(options);
    return false;


    }
    function sub_topics(){
        document.getElementById("messages").innerHTML ="";
        if (connected_flag==0){
        out_msg="<b>Not Connected so can't subscribe</b>"
        console.log(out_msg);
        document.getElementById("messages").innerHTML = out_msg;
        return false;
        }
    var stopic= document.forms["subs"]["Stopic"].value;
    console.log("Subscribing to topic ="+stopic);
    mqtt.subscribe(stopic);
    return false;
    }
    function send_message(msg,topic){
        if (connected_flag==0){
        out_msg="<b>Not Connected so can't send</b>"
        console.log(out_msg);
        document.getElementById("messages").innerHTML = out_msg;
        return false;
        }
        var value=msg.value;
        console.log("value= "+value);
        console.log("topic= "+topic);
        message = new Paho.MQTT.Message(value);
        message.destinationName = "web/"+topic;

        mqtt.send(message);
        return false;
    }


    </script>
<style>
@media only screen and (max-width: 600px) {
  div {
  max-width: 320px;
  }

  img {
  max-width: 320px;
  }
}
div.imageview {
  color: white;
  background: gray;
  padding: 15px;
  position: absolute;
  top: 50%;
  left: 50%;
  -ms-transform: translateX(-50%) translateY(-50%);
  -webkit-transform: translate(-50%,-50%);
  transform: translate(-50%,-50%);
}
</style>

  </head>
  <body onload="MQTTconnect()">


	  <div class=imageview>
<img class="deze" src="tiles/00.png">
<div id="status">Connection Status: Not Connected</div>

	  </div>
  </body>
</html>
While working on a harmony for Irmgard and me in Musescore, i tought it would be nice to have it also in another notation.
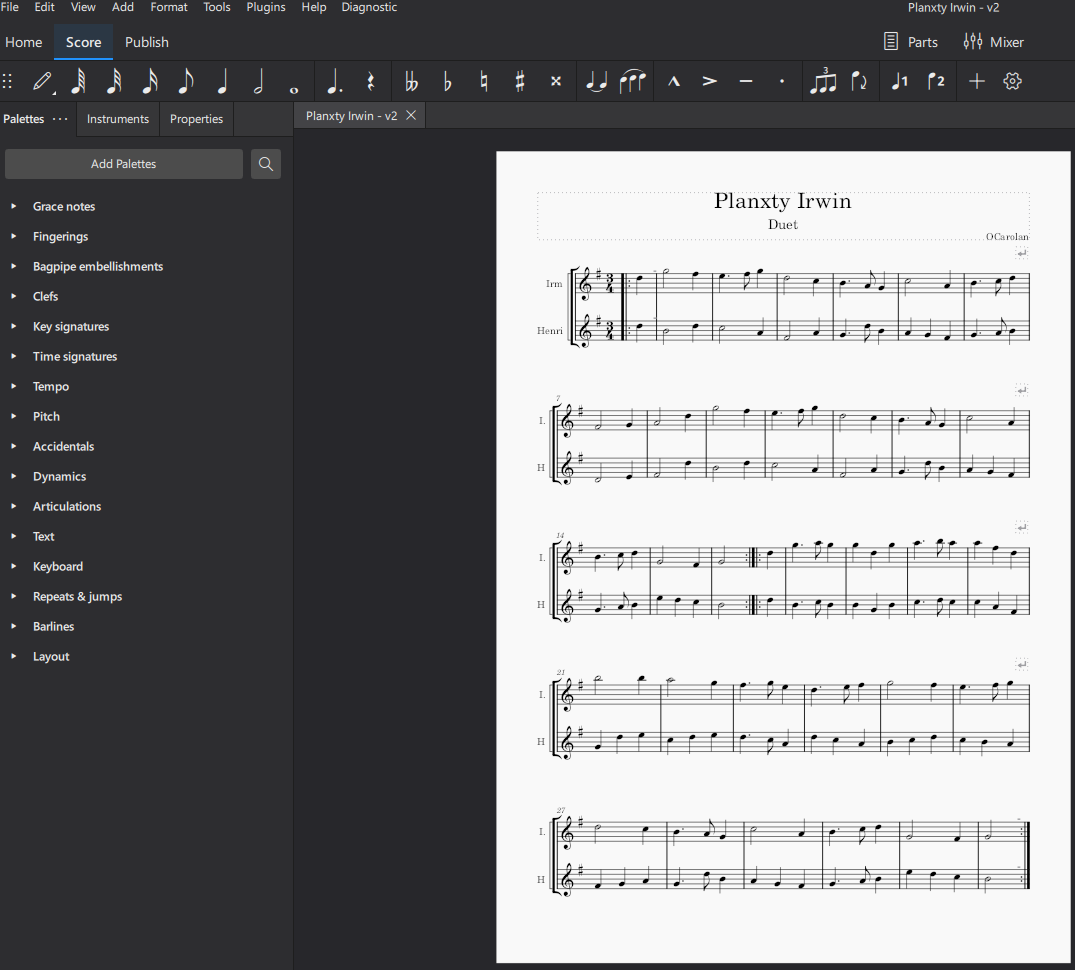
Above a Musescore screenshot.
When using below button assignment, we can easily rewrite above into another notation.
Write musescore as MusicML/mxl Music xml.
Install xml2abc from https://wim.vree.org/svgParse/xml2abc.html
python xml2abc.py INPUTFILE.mxl output.abc
My abc file
X:1
T:Planxty Irwin
C:OCarolan
L:1/4
M:3/4
I:
K:G
V:1 treble nm="Henri" snm="H"
V:1
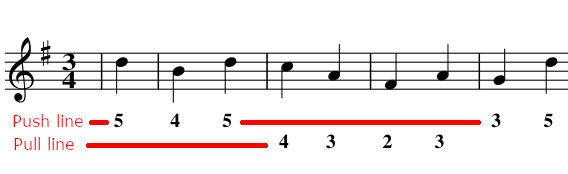
|: d | B2 d | c2 A | F2 A | G3/2 d/ B | A G F | G3/2 A/ B | D2 E | F2 d | B2 d | c2 A | F2 A |
G3/2 d/ B | A G F | G3/2 A/ B | e d c | B2 d | B3/2 c/ B | B G B | c3/2 d/ c | c A F | G d e |
c d e | d3/2 c/ A | d c A | B c d | c B A | F G A | G3/2 d/ B | A G F | G3/2 A/ B | e d c | B2 :|
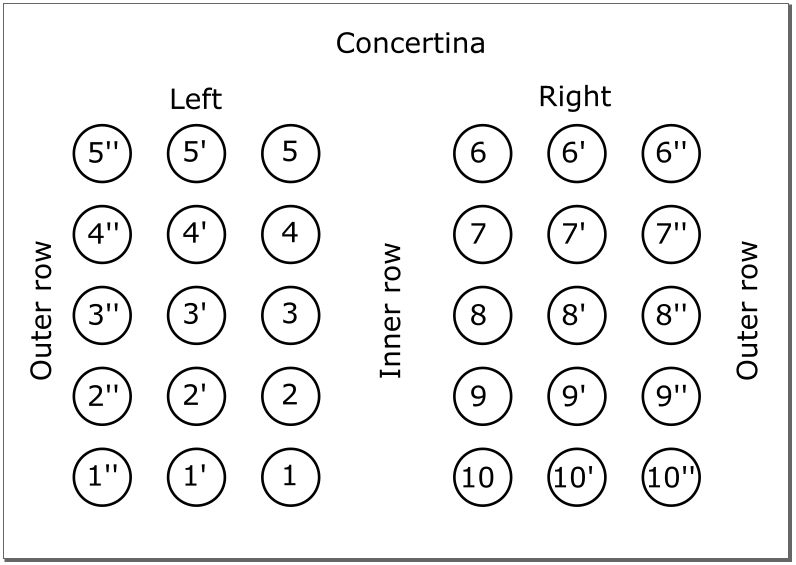
Using below bash script you can convert this to PDF WITH concertina notations.
WARNING: I didn't include all keys (yet).
NOTE: Easy to adjust to other notations.
#!/bin/bash
if [ $# -lt 2 ]; then
    print "script orgname convertname"
    exit 1
fi
: > parced
org=$1
abc=$2
cat $1 | awk '/^\|/ {exit} {print}' > header
cat $1 | grep "|" | tr -d '[0-9]:/'> parse
(
cat parse | while read ; do
echo $REPLY
echo -n "w: "

for word in $(echo $REPLY) ; do

	if [ "$word" == "|" ] ; then echo -n " | "
	elif [ "$word" == "D" ] ; then echo -n " 2 ";
	elif [ "$word" == "G" ] ; then echo -n " 3 ";
	elif [ "$word" == "B" ] ; then echo -n " 4 ";
	elif [ "$word" == "d" ] ; then echo -n " 5 ";
	elif [ "$word" == "g" ] ; then echo -n " 6 ";
	elif [ "$word" == "b" ] ; then echo -n " 7 ";
	else echo -n " * "
	fi
done
echo ""

echo -n "w: "

for word in $(echo $REPLY) ; do

	if [ "$word" == "|" ] ; then echo -n " | "
	elif [ "$word" == "F" ] ; then echo -n " 2 ";
	elif [ "$word" == "A" ] ; then echo -n " 3 ";
	elif [ "$word" == "c" ] ; then echo -n " 4 ";
	elif [ "$word" == "e" ] ; then echo -n " 5 ";
	elif [ "$word" == "f" ] ; then echo -n " 6 ";
	elif [ "$word" == "a" ] ; then echo -n " 7 ";
	elif [ "$word" == "E" ] ; then echo -n " 4' ";  # <============ example 2nd row
	else echo -n " * "
	fi
done
echo ""

done
) >> parced
cat header parced > $abc
abcm2ps -x -O - "$abc" | ps2pdf  -sPAPERSIZE=a4 - "$(echo  $abc | cut -f2 -d/ | sed 's/abc/pdf/g')"
Example output (Harmony part)
Follow up on yesterday’s post
Using a html page with javascript, I made a proof of concept displaying realtime information from the sensor.
The sensor is active using a Home Assistant integration.
https://www.henriaanstoot.nl/2022/11/07/home-assistant-nodered-update/
But using the Node-red integration, i take the payload and write this to a mqtt topic
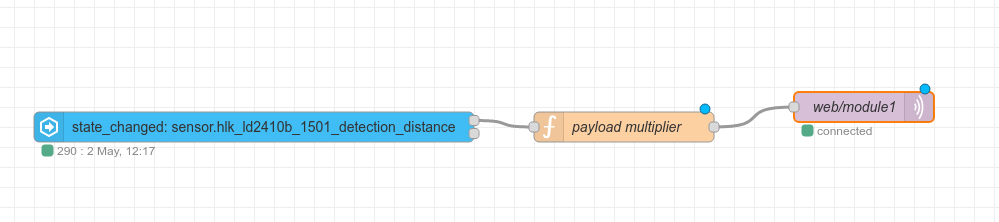
The HTML page below reads the topic using the websocket configured in mosquitto and draws the distance using canvas
cat /etc/mosquitto/conf.d/websockets.conf
listener 9001
protocol websockets
allow_anonymous true
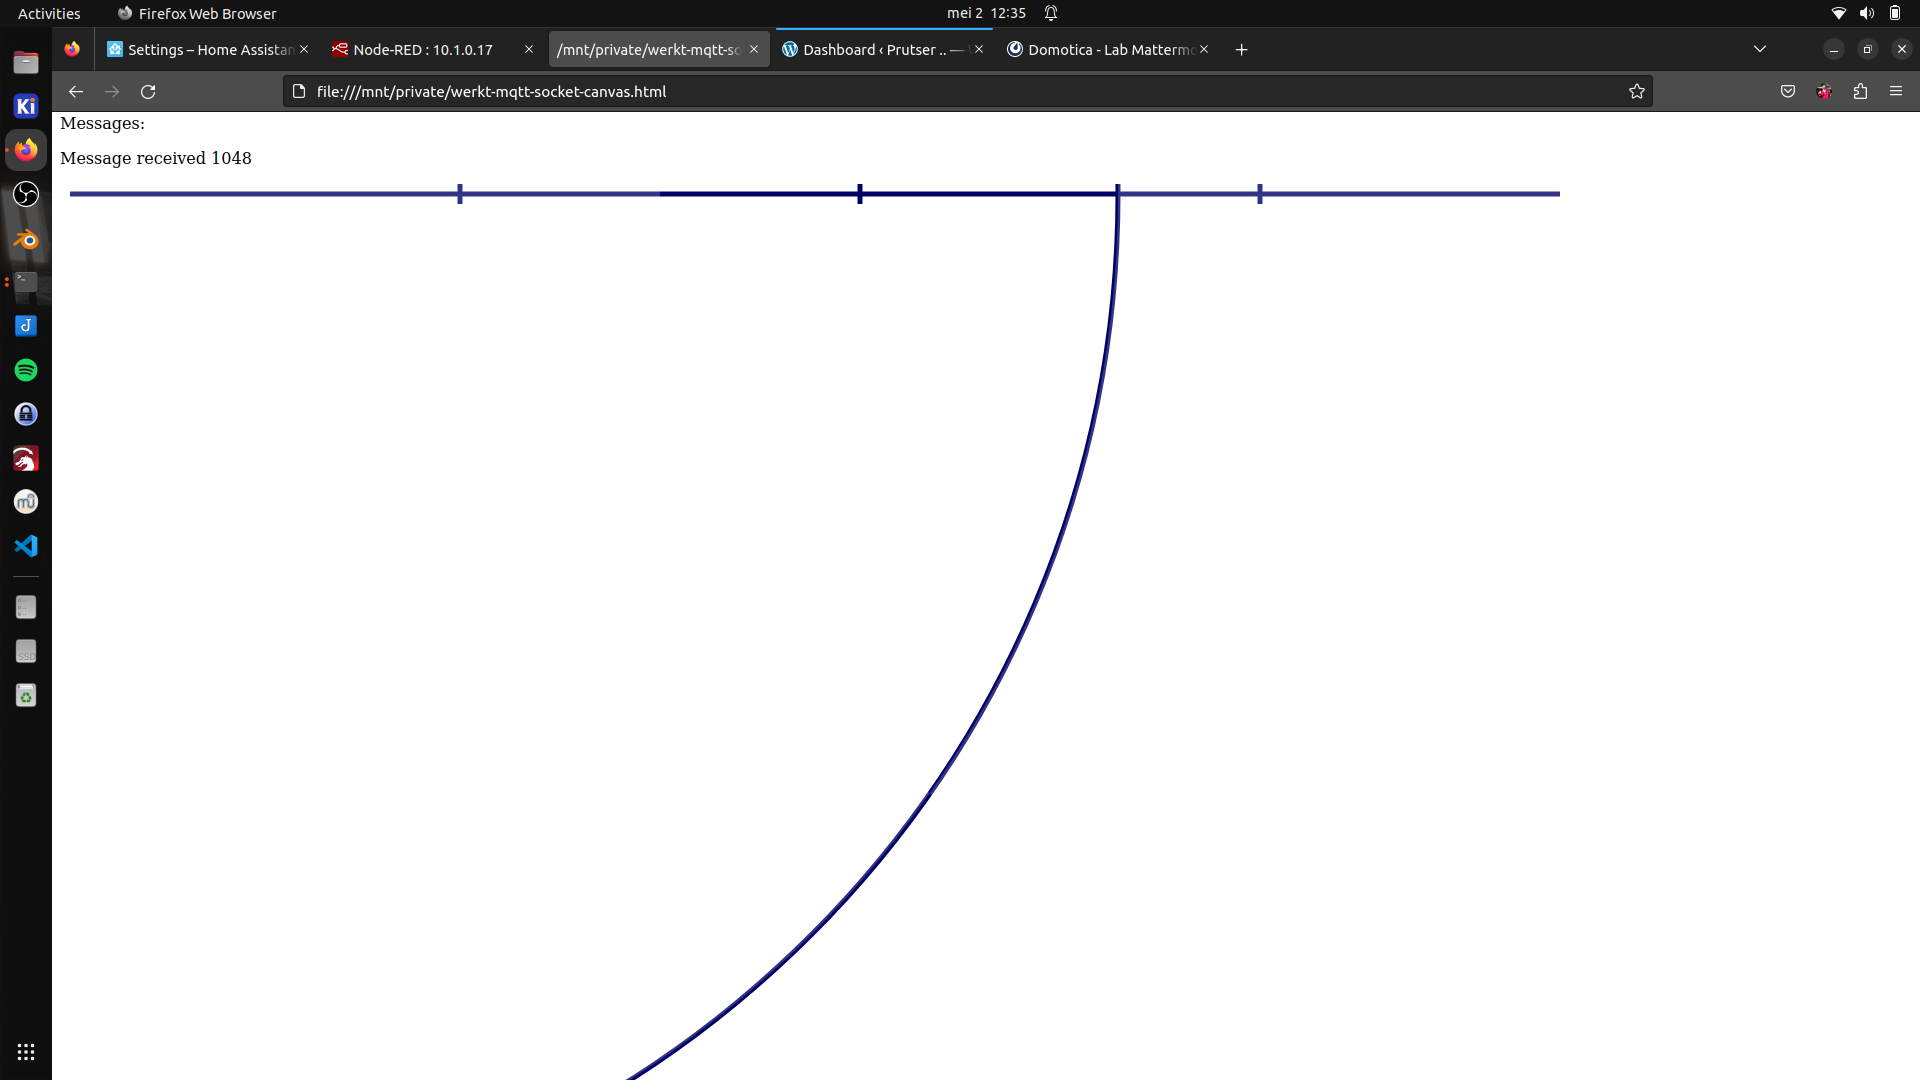
Distance drawn using canvas. Little dividers on top are meters
HTML PAGE with javascript
<?xml version="1.0" encoding="UTF-8" standalone="no"?>
<!DOCTYPE html PUBLIC "-//W3C//DTD XHTML 1.0 Transitional//EN" "http://www.w3.org/TR/xhtml1/DTD/xhtml1-transitional.dtd">
<html xmlns="http://www.w3.org/1999/xhtml">
  <head>
    <title></title>
    <meta name="viewport" content="width=device-width, initial-scale=1.0">
	<script src="https://cdnjs.cloudflare.com/ajax/libs/paho-mqtt/1.0.1/mqttws31.js" type="text/javascript"></script>
 	<script type = "text/javascript"
         src = "https://ajax.googleapis.com/ajax/libs/jquery/2.1.3/jquery.min.js"></script>
    <script type = "text/javascript">
	var connected_flag=0
	var mqtt;
    var reconnectTimeout = 2000;
	var host="MQTTSERVER";
	var port=9001;
var sub_topic="web/#";
	function onConnectionLost(){
	console.log("connection lost");
	document.getElementById("status").innerHTML = "Connection Lost";
	document.getElementById("messages").innerHTML ="Connection Lost";
	connected_flag=0;
	}
	function onFailure(message) {
		console.log("Failed");
		document.getElementById("messages").innerHTML = "Connection Failed- Retrying";
        setTimeout(MQTTconnect, reconnectTimeout);
        }
	function onMessageArrived(r_message){
		out_msg="Message received "+r_message.payloadString+"<br>";
		//out_msg=out_msg+"Message received Topic "+r_message.destinationName;
		//console.log("Message received ",r_message.payloadString);
		console.log(out_msg);
		document.getElementById("messages").innerHTML =out_msg;
		var topic=r_message.destinationName;
		if(topic=="web/module1")
		{
		document.getElementById("module1").innerHTML =r_message.payloadString;
		}
		if(topic=="web/module2")
		{
		document.getElementById("module2").innerHTML =r_message.payloadString;

		var canvas = document.getElementById('canvas');
var context = canvas.getContext('2d');
var centerX = 10;
context.clearRect(0, 0, 1800, 1000);
var centerY = 10;
var radius = r_message.payloadString;

let circle = new Path2D();  //
circle.arc(centerX, centerY, radius, 0, 2 * Math.PI, false);

//context.fillStyle = 'white';

context.fillStyle = "rgba(255, 255, 255, 0.2)";
context.fill(circle); //

context.lineWidth = 5;
context.strokeStyle = '#000066';
context.stroke(circle);  //

// top line
context.beginPath();
context.moveTo(10, 10);
context.lineTo(1500, 10);
context.stroke();

// 3x dividers
context.beginPath();
context.moveTo(400, 0);
context.lineTo(400, 20);
context.stroke();

context.beginPath();
context.moveTo(800, 0);
context.lineTo(800, 20);
context.stroke();

context.beginPath();
context.moveTo(1200, 0);
context.lineTo(1200, 20);
context.stroke();

		}
		}
	function onConnected(recon,url){
	console.log(" in onConnected " +reconn);
	}
	function onConnect() {
	  // Once a connection has been made, make a subscription and send a message.
	document.getElementById("messages").innerHTML ="Connected to "+host +"on port "+port;
	connected_flag=1
	document.getElementById("status").innerHTML = "Connected";
	console.log("on Connect "+connected_flag);
	mqtt.subscribe(sub_topic);
	  }

    function MQTTconnect() {

	console.log("connecting to "+ host +" "+ port);
	var x=Math.floor(Math.random() * 10000);
	var cname="controlform-"+x;
	mqtt = new Paho.MQTT.Client(host,port,cname);
	//document.write("connecting to "+ host);
	var options = {
        timeout: 3,
		onSuccess: onConnect,
		onFailure: onFailure,

     };

        mqtt.onConnectionLost = onConnectionLost;
        mqtt.onMessageArrived = onMessageArrived;
		//mqtt.onConnected = onConnected;

	mqtt.connect(options);
	return false;


	}
	function sub_topics(){
		document.getElementById("messages").innerHTML ="";
		if (connected_flag==0){
		out_msg="<b>Not Connected so can't subscribe</b>"
		console.log(out_msg);
		document.getElementById("messages").innerHTML = out_msg;
		return false;
		}
	var stopic= document.forms["subs"]["Stopic"].value;
	console.log("Subscribing to topic ="+stopic);
	mqtt.subscribe(stopic);
	return false;
	}
	function send_message(msg,topic){
		if (connected_flag==0){
		out_msg="<b>Not Connected so can't send</b>"
		console.log(out_msg);
		document.getElementById("messages").innerHTML = out_msg;
		return false;
		}
		var value=msg.value;
		console.log("value= "+value);
		console.log("topic= "+topic);
		message = new Paho.MQTT.Message(value);
		message.destinationName = "web/"+topic;

		mqtt.send(message);
		return false;
	}


    </script>

  </head>
  <body onload="MQTTconnect()">


 <table>
<tr><td>Sensor1:<td><td  id="module1"><td><td >
<tr><td>Sensor2:</td><td  id="module2"><td></tr>

</table>
<div id="status">Connection Status: Not Connected</div>
</div>
<br>

Messages:<p id="messages"></p>
     <canvas id="canvas" width="1600" height="1000"></canvas>
  </body>
</html>