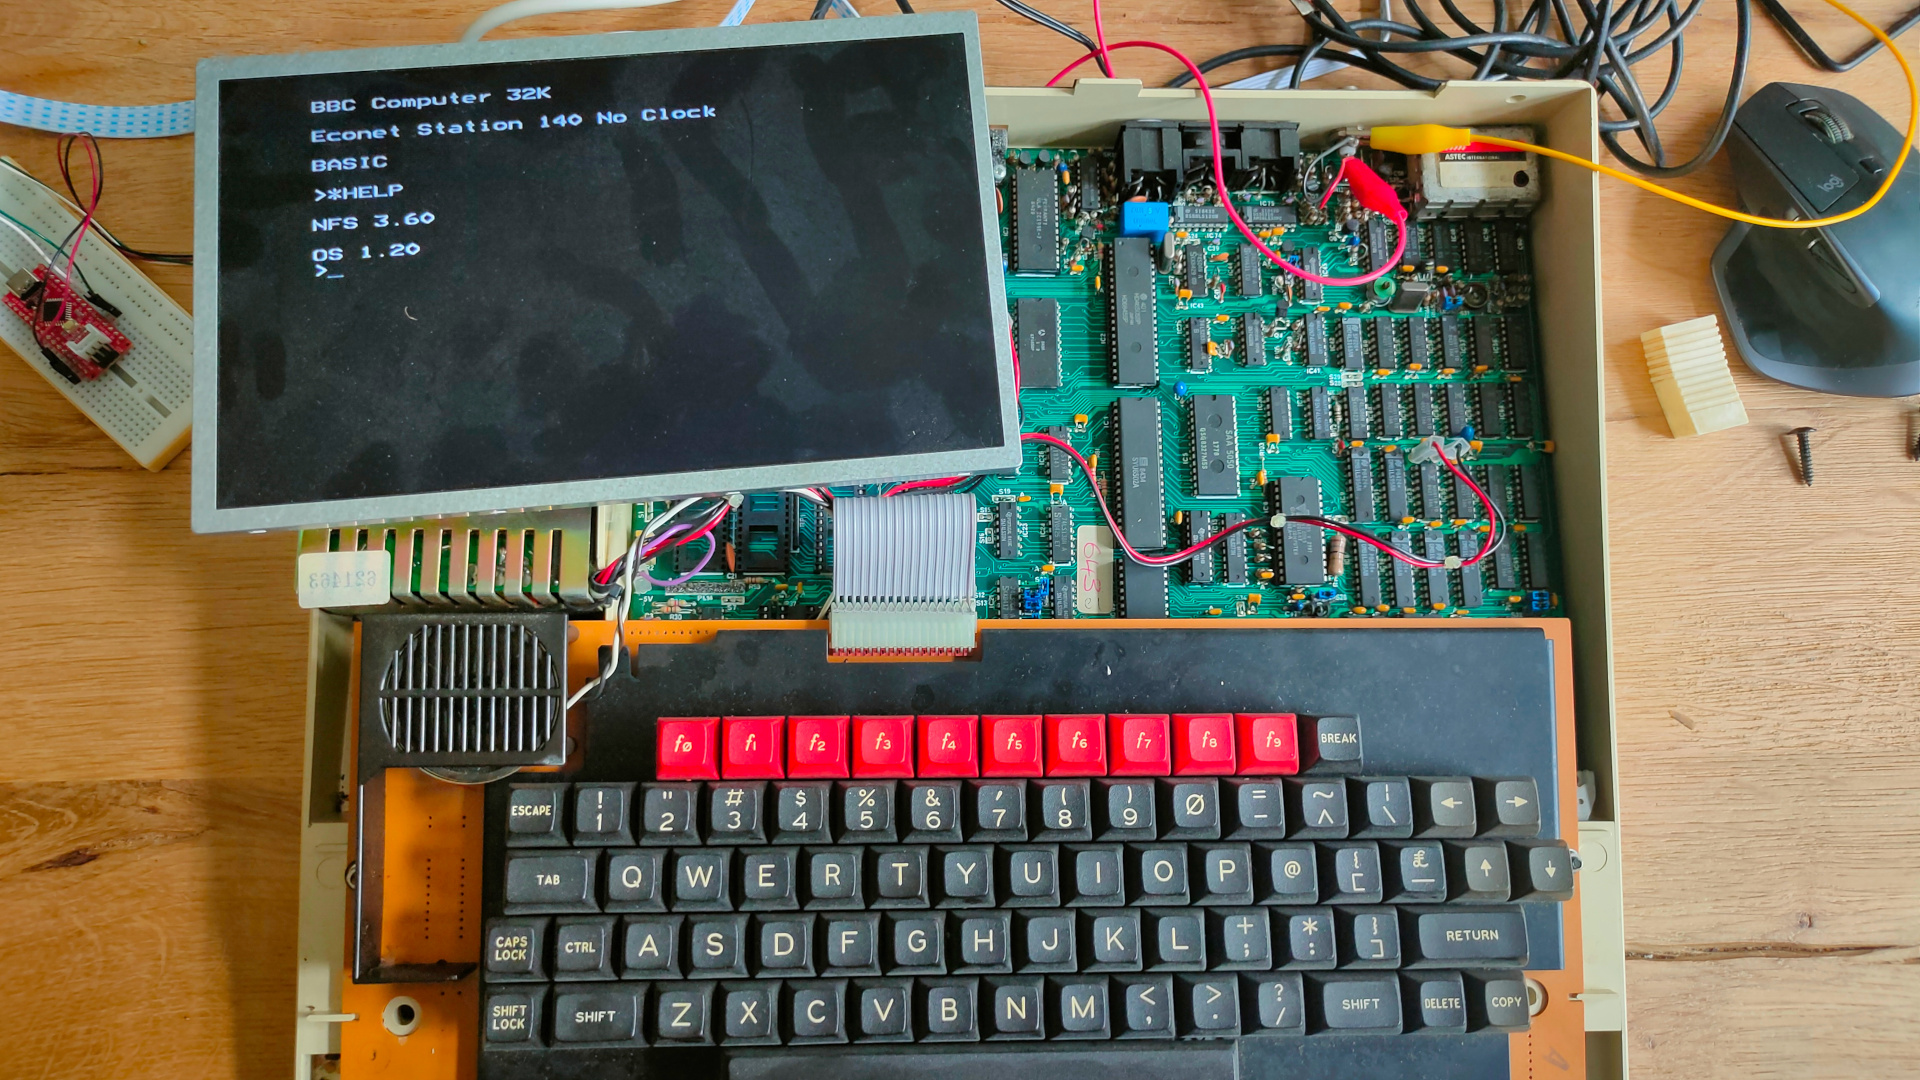
My BBC Acorn model B is working again. The original monitor is still dead.
Time to play with some machine code and ROMs.
My machine has a NFS rom installed. (NetFS)
Econet was Acorn Computers’s low-cost local area network system, intended for use by schools and small businesses. It was widely used in those areas, and was supported by a large number of different computer and server systems produced both by Acorn and by other companies.
I found a ROM online called Gremlin. It is a 16K rom file. But at the moment I only got some 28C64 (8k) or 28C256 (32k) eeproms.
32k it is. But de beeb having address line A14 floating high, I need to flash the upper 16k of the 32k ROM.
Ben posted a youtube about Wozmon running on his 6502.
In 1976, Steve Wozniac wrote what’s commonly known simply as Wozmon.
Wozmon is a machine-code monitor program written by Wozniak for the Apple 1. In Only 256 bytes ! Being pure 6502 code easily adaptable. A monitor program allows you to view/edit and run machine code using simple commands.
I’ve got a different setup as Ben’s computer. But changing the necessary, and it will run on my 6502.
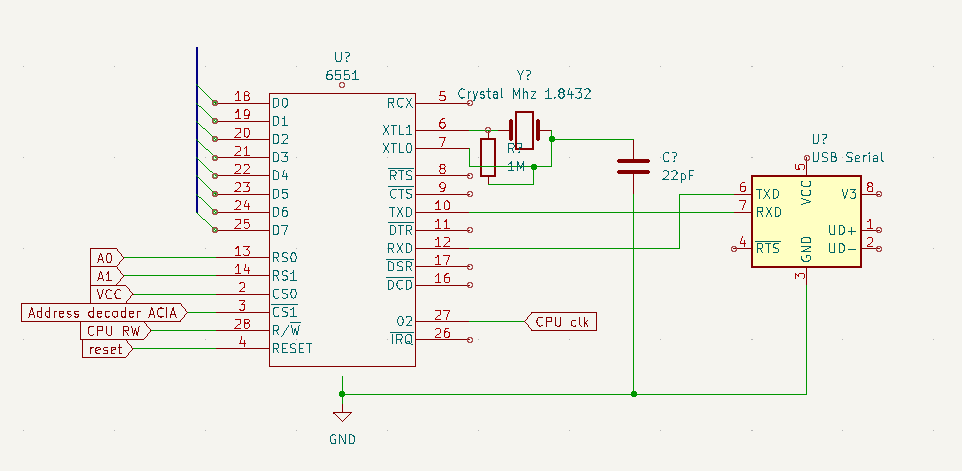
I’m not using rs232 voltage levels (-7 till -25 and +7 till +25 volts). I’m using a usb serial uart standard 5v leveling stick …
For address decoder see other post
Simplified schematic of my UART/ACIA
Compiling the Wosmon gave me an error, DEC is not a valid opcode for a bare 6502 .. but we have a 65c02. Solution: Add -c02 extra opcodes
error 1 in line 187 of "wozmon.s": illegal operand types
>                DEC                    ; Decrement A.

# fix .. add -c02
vasm6502_oldstyle -c02 -Fbin -dotdir wozmon.s
Below Apple I Manual with the sourcecode for Wozmon
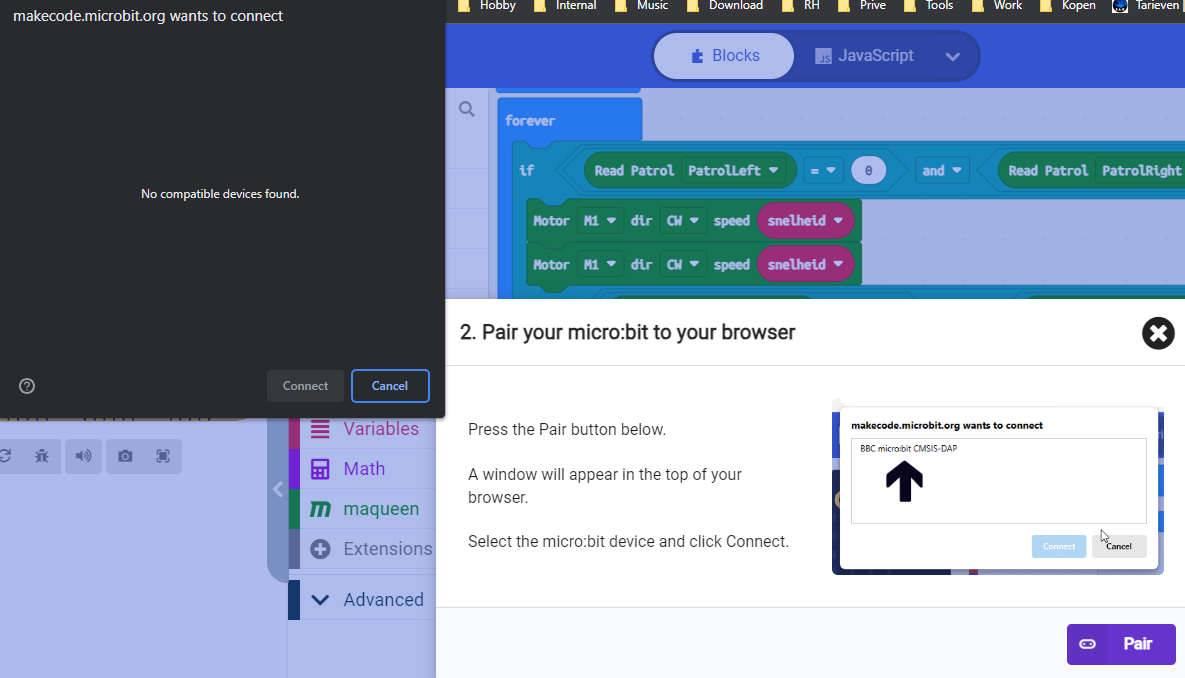
Uploading didn’t work Solution: Using chrome it had access to the usb port to upload, firefox didn’t work
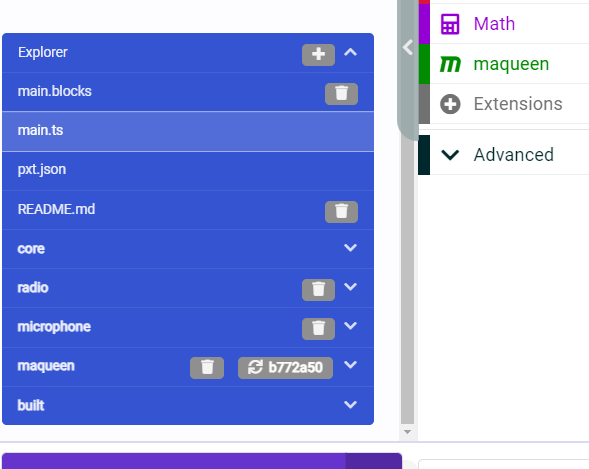
The program didn’t compile, faulty or zero size hex file. Solution: Wrong Maqueen library was in the examples (After changing, needed version update also, see below)
Not everything is in Dutch (I like English, but this is for the boy), maqueen V2 needed a lot of translation. (So we joined https://crowdin.com/project/makecode/nl to help translating the libraries)
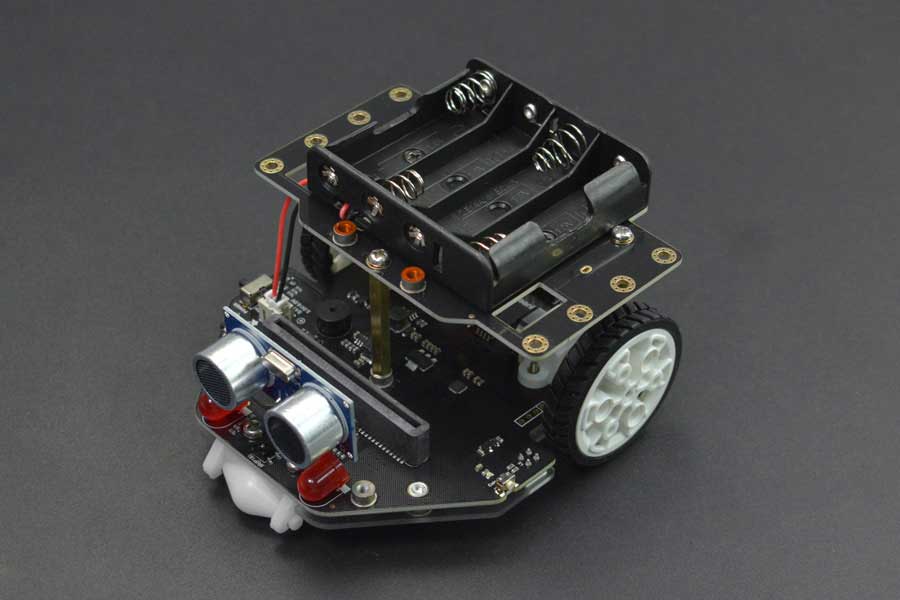
Apparently my AI camera can be connected to this robot!
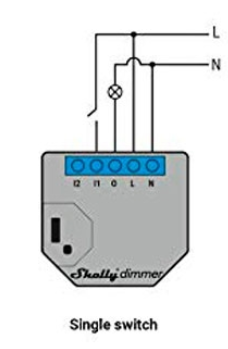
Our bedroom has a shelly dimmer, this one is connected with a wall switch and is being controlled by Domoticz, Home Assistant and NodeRed.
I had to fix some stuff, so this was a perfect time to jot down some notes.
I’ve wired it up like this: (I’ve got a Line wire in my ceiling socket, so i placed the module there instead of the wall socket)
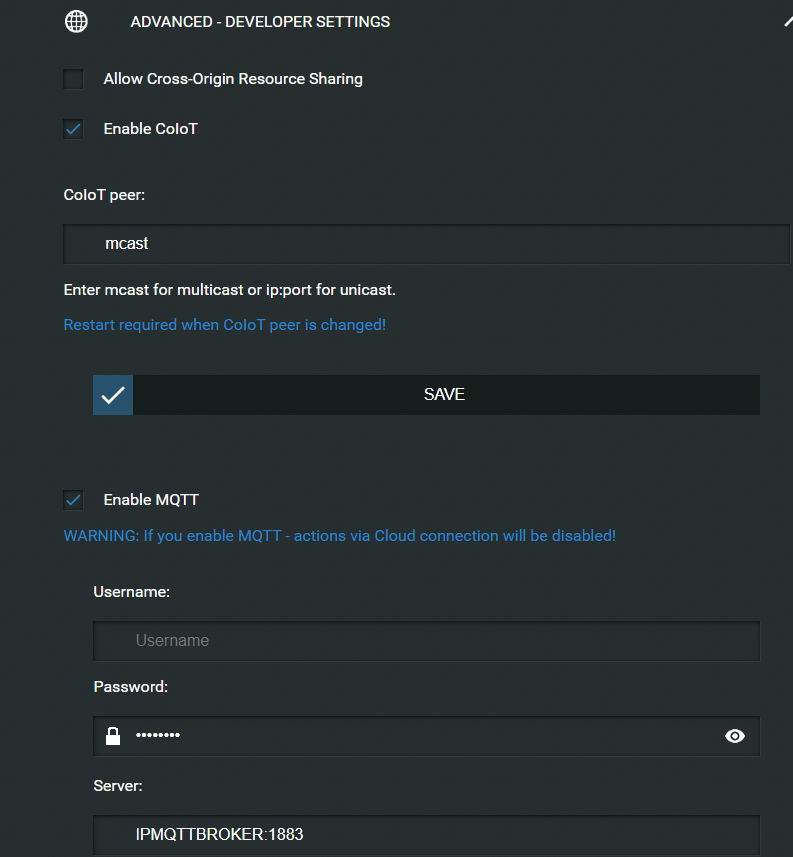
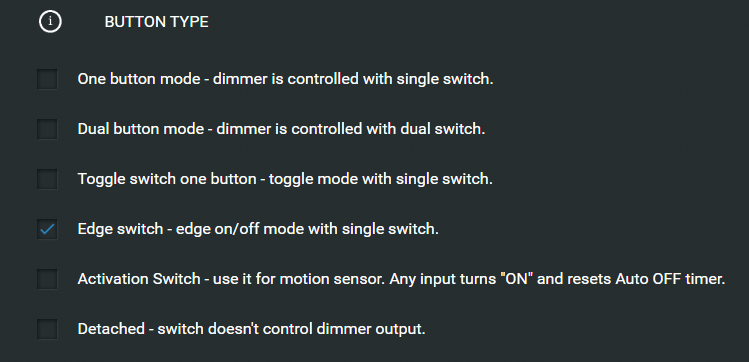
Configure the Shelly as mentioned in the manual. After that do the following: Advance > Developer settings : (Enable CoIot if you want a easy auto detect for Home Assistant) Enable MQTT (This will DISABLE cloud ! ) Server: the ip number of your Mqtt Broker
Next I did was:
Now the wall switch will change/toggle what the current state is. (If the light is off, and you switch it on using Mqtt, you probably needed to hit the switch two times to turn it off again. Not so with this setting.)
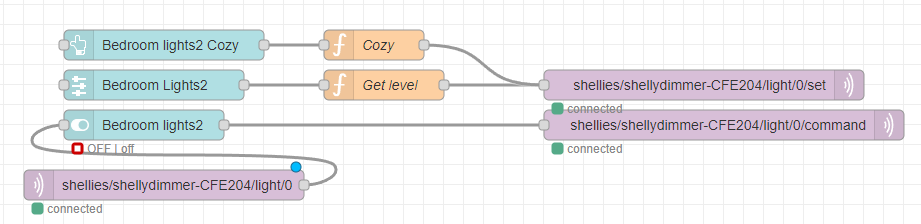
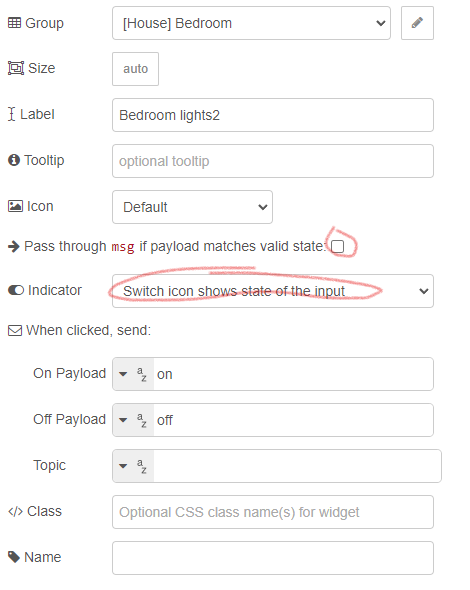
My Nodered Flow ( Not using the Shelly palette nodes in this example)
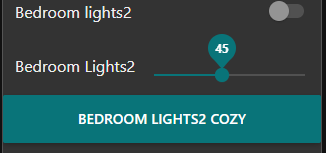
The Mqtt IN node sets the state of the switch when you use the wall switch! Cozy turns light on at a specific level. The slider send an off command when 0% selected, else an on command and the sliders value.
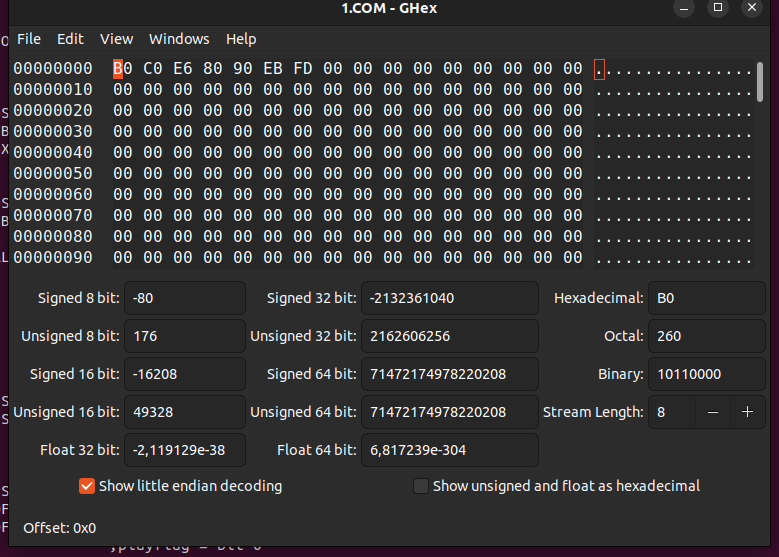
I wrote a little python script which checks the checksum of a Bios.
In a previous post i used hexedit to play around changing a Bios dump.
Below posted python script calculates the checkum using the following:
Add all bytes in the file and do a modulo 256 on this number. The output should be 0.
My previous edit gave me a output of C2, so I changed an unused byte FF into (FF-C2) 3D. No more checksum errors when booting!
Next to do, get a Bios like Glabios or PcXtBios to start my own code from a secondary Eeprom.
import sys

# Bios sum modulo should be 0
# edit  last or unused byte to fix
# python bios-checksum-test.py MYROM.edit.checksum
# 0

f = open(sys.argv[1],'rb')
m = f.read()
print  '%x' % ( ( sum(ord(c) for c in m) & 0xFFFFFFFF ) % 256 )
Python3
import sys

# Bios sum modulo should be 0
# edit  last or unused byte to fix
# python bios-checksum-test.py MYROM.edit.checksum
# 0

f = open(sys.argv[1],'rb')
m = f.read()
checksum =  ( ( sum((c) for c in m) & 0xFFFFFFFF ) % 256 )
print(checksum, 'in hex =', hex(checksum))
The board seems to be a X Golden Board, except for the missing logo on the motherboard.
Downloaded pcxtbios and compiled the eproms native in linux. So i don´t have to use dosbox any more. https://github.com/virtualxt/pcxtbios
cd pcxtbios
edit make_linux.sh if needed
./make_linux.sh

and you should end up with
eproms/27512/basicfc.rom
eproms/27512/basicf8.rom
eproms/27512/basicf6.rom
eproms/27512/pcxtbios.rom
eproms/27512/basicfa.rom
eproms/27128/basicfc.rom
eproms/27128/basicf8.rom
eproms/27128/basicf6.rom
eproms/27128/pcxtbios.rom
eproms/27128/basicfa.rom
eproms/27256/basicfc.rom
eproms/27256/basicf8.rom
eproms/27256/basicf6.rom
eproms/27256/pcxtbios.rom
eproms/27256/basicfa.rom
eproms/ibmxt/u18.rom
eproms/ibmxt/u19.rom
eproms/2764/basicfc.rom
eproms/2764/basicf8.rom
eproms/2764/basicf6.rom
eproms/2764/pcxtbios.rom
eproms/2764/basicfa.rom
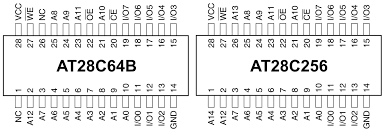
I didn’t have enough 28C64, but the 28C256 has the same pinout. It just lacks A14 and A13
So I flashed the compiled ROMs for basic to different Eeproms
PCem (short for PC Emulator) is an IBM PC emulator for Windows and Linux that specializes in running old operating systems and software that are designed for IBM PC compatibles. Originally developed as an IBM PC XT emulator, it later added support for other IBM PC compatible computers as well.
The big difference with PCem and Dosbox is the fact that you can configure many systems from 8088 to pentium, soundcards and graphic cards (like hercules, CGA, EGA VGA and alike) You won’t start in MS-DOS, you can boot from a virtual floppy, just what i needed!
Update : Typing boot disk.img in dosbox works
I’ve installed PCem using:
cd pcem/
sudo apt-get install libsdl2-dev
sudo apt-get install libopenal-dev
tar xzvf ../PCemV17Linux.tar.gz
./configure
make clean
make
# first start (complains about roms, but creates ~/.pcem/...
./pcem
cd ~/.pcem/roms
# git clone roms
git clone https://github.com/BaRRaKudaRain/PCem-ROMs.git
mv PCem-ROMs/* ./
rm -rf PCem-ROMs
Below a simple example, booting a floppy with a custom made bootsector. I’m still searching for our bootblock demo, which uses VGA graphics and a music loader using Soundblaster. We made this around the 90’s, and i have never seen a demo then booting a demo without dos. Scrollers, music, starfields etc.
NOTE: Dos calls can’t be used, that’s not loaded. So NO int 21h software functions!
Running a bootblock program, there is NO ms-dos being loaded.
The disk image I created using my real original 5.25″ floppy, and converted this with my Fluxengine.
One of the other bootblock thingy’s I made, An amiga guru meditation error. (below a old capture) When a corrupted disk or faulty software was booted using a amiga you often could see an error like this, now you could have it on you PC!
Original screen capture of a Guru Meditation. You can see, mine is a little different, because of the font spacing and color.
PCem info
Systems / motherboards emulated :
8088

    AMI XT clone
    Atari PC3
    Compaq Portable Plus
    DTK Clone XT
    (c)Anonymous Generic Turbo XT BIOS
    IBM PC
    IBM PCjr
    IBM XT
    Juko XT clone
    NCR PC4i
    Phoenix XT clone
    Schneider Euro PC
    Tandy 1000
    Tandy 1000HX
    Thomson TO16 PC
    Toshiba T1000
    VTech Laser Turbo XT
    Zenith Data SupersPort
    Xi8088

8086

    Amstrad PC1512
    Amstrad PC1640
    Amstrad PC2086
    Amstrad PC3086
    Amstrad PC5086
    Amstrad PPC512/640
    Compaq Deskpro
    Olivetti M24
    Sinclair PC200/Amstrad PC20
    Tandy 1000SL/2
    Toshiba T1200
    VTech Laser XT3

286

    AMI 286 clone
    Award 286 clone
    Bull Micral 45
    Commodore PC30-III
    Compaq Portable II
    Dell System 200
    Epson PC AX
    Epson PC AX2e
    GW-286CT GEAR
    IBM AT
    IBM PS/1 Model 2011
    IBM PS/2 Model 30-286
    IBM PS/2 Model 50
    IBM XT Model 286
    Samsung SPC-4200P
    Samsung SPC-4216P
    Toshiba T3100e
    Tulip AT Compact

386SX

    Acermate 386SX/25N
    AMI 386SX clone
    Amstrad MegaPC
    DTK 386SX clone
    Epson PC AX3
    IBM PS/1 Model 2121
    IBM PS/2 Model 55SX
    KMX-C-02
    Packard Bell Legend 300SX
    Samsung SPC-6033P

386DX

    AMI 386DX clone
    Compaq Deskpro 386
    IBM PS/2 Model 70 (type 3)
    IBM PS/2 Model 80
    MR 386DX clone
    Samsung SPC-6000A

486

    AMI 486 clone
    AMI WinBIOS 486 clone
    Award SiS 496/497
    Elonex PC-425X
    IBM PS/2 Model 70 (type 4)
    Packard Bell PB410A

Socket 4/5/7 (Pentium)

    ASUS P/I-P55TVP4
    ASUS P/I-P55T2P4
    Award 430VX PCI
    Epox P55-VA
    Intel Advanced/EV (Endeavor)
    Intel Advanced/ZP (Zappa)
    Intel Premiere/PCI (Batman's Revenge)
    Packard Bell PB520R (Robin LC)
    Packard Bell PB570 (Hillary)

Super Socket 7 (K6-2/III)

    FIC VA-503+

Socket 8 (Pentium Pro)

    Intel VS440FX

Slot 1 (Pentium II)

    Gigabyte GA-686BX

Graphics cards emulated :

    3DFX Voodoo Graphics
    3DFX Voodoo 2
    ATI Graphics Pro Turbo (Mach64 GX)
    ATI Video Xpression (Mach64 VT2)
    ATI VGA Edge-16 (ATI-18800)
    ATI VGA Charger (ATI-28800)
    CGA
    Cirrus Logic CL-GD5429
    Cirrus Logic CL-GD5430
    Cirrus Logic CL-GD5434
    Compaq CGA
    Diamond Stealth 32 (Tseng ET4000/w32p)
    Diamond Stealth 3D 2000 (S3 ViRGE/325)
    Hercules
    Hercules InColor
    IBM EGA
    IBM VGA
    MDA
    MDSI Genius
    Number Nine 9FX (S3 Trio64)
    OAK OTI-037
    OAK OTI-067
    Olivetti GO481 (Paradise PVGA1A)
    Paradise Bahamas 64 (S3 Vision864)
    Phoenix S3 Trio32
    Phoenix S3 Trio64
    Plantronics ColorPlus
    S3 ViRGE/DX
    Sigma Color 400
    Trident TVGA8900D
    Trident TGUI9400CXi
    Trident TGUI9440
    Trigem Korean VGA (Tseng ET4000AX)
    Tseng ET4000AX
    Wsye 700

Sound cards emulated :

    AdLib
    AdLib Gold
    Ensoniq AudioPCI
    GameBlaster
    Gravis UltraSound
    Sound Blaster v1.0
    Sound Blaster v1.5
    Sound Blaster MCV
    Sound Blaster v2.0
    Sound Blaster Pro v1
    Sound Blaster Pro v2
    Sound Blaster Pro MCV
    Sound Blaster 16
    Sound Blaster AWE32
    Sound Blaster PCI128
    Windows Sound System
"If something is worth doing, it's worth overdoing."